


Spring基础
IOC: inverse of control,控制反转
package com.RoboTerh;

import com.RoboTerh.service.BookService;
import org.springframework.context.ApplicationContext;
import org.springframework.context.support.ClassPathXmlApplicationContext;

public class AppTest {
    public static void main(String[] args) {
        //获取ioc容器
        ApplicationContext ctx = new ClassPathXmlApplicationContext("ApplicationContext.xml");
        //获取bean对象
        BookService bookService = (BookService) ctx.getBean("bookService");
        //调用方法
        bookService.save();
    }
}
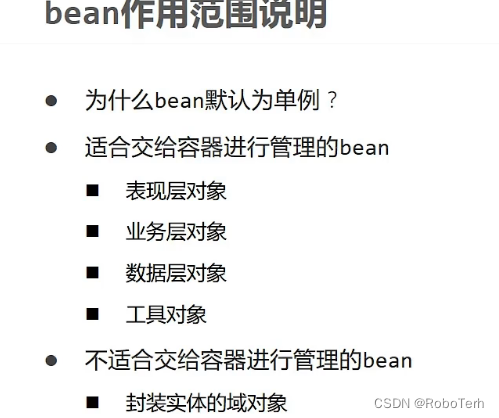
Bean:默认为单例模式,可以在ApplicationContext.xml中配置bean是使用scope调整
Bean
作用范围
实例化
- 默认使用类的无参构造方法
- 使用静态工厂实例化,(
<bean/>中的factory-method指定方法名) - 使用实例工厂实例化
- 使用
FactoryBean接口实例化 (实用)
生命周期
//app.java
        //获取ioc容器
        ClassPathXmlApplicationContext ctx = new ClassPathXmlApplicationContext("ApplicationContext.xml");
        //获取bean对象
        BookService bookService = (BookService) ctx.getBean("bookService");
        //调用方法
        bookService.save();
        //关闭ioc容器
        ctx.close();

//BookService.java
    //初始化方法
    public void init() {
        System.out.println("init ........");
    }
    //销毁方法
    public void destory() {
        System.out.println("destory.....");
    }

//applicationcontext.xml
    <bean id="bookService" class="com.RoboTerh.service.impl.BookServiceImpl" init-method="init" destroy-method="destory">
        <property name="bookDao" ref="bookDao"/>
    </bean>
同样可以使用ctx.registerShutdownHook();关闭ioc容器
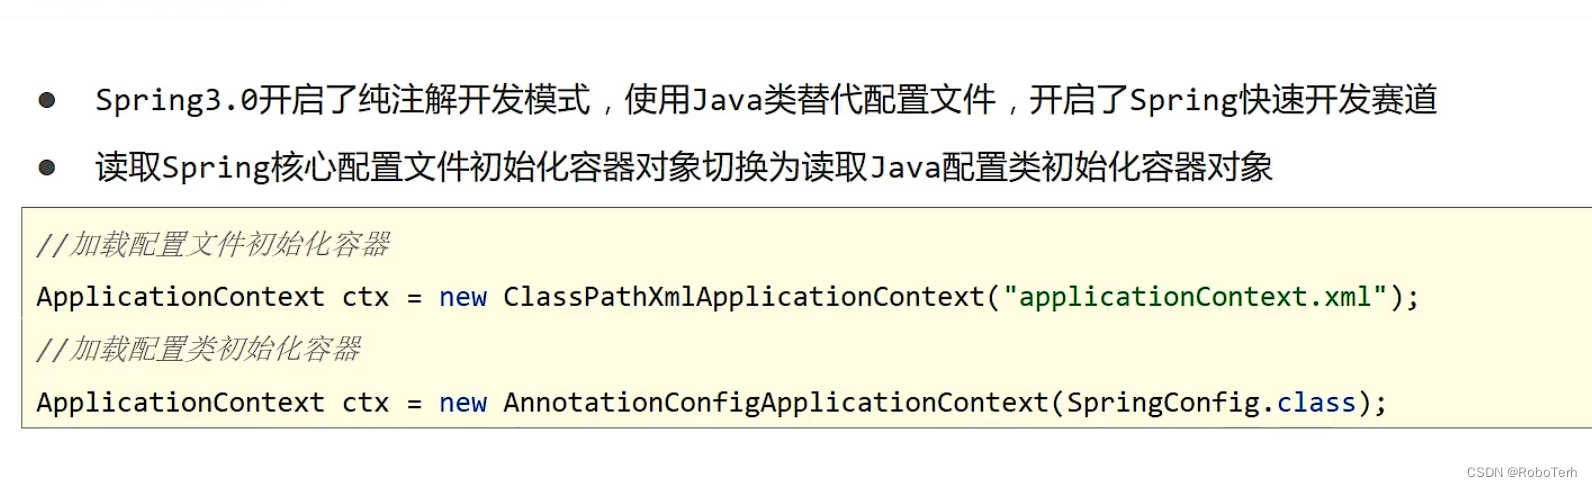
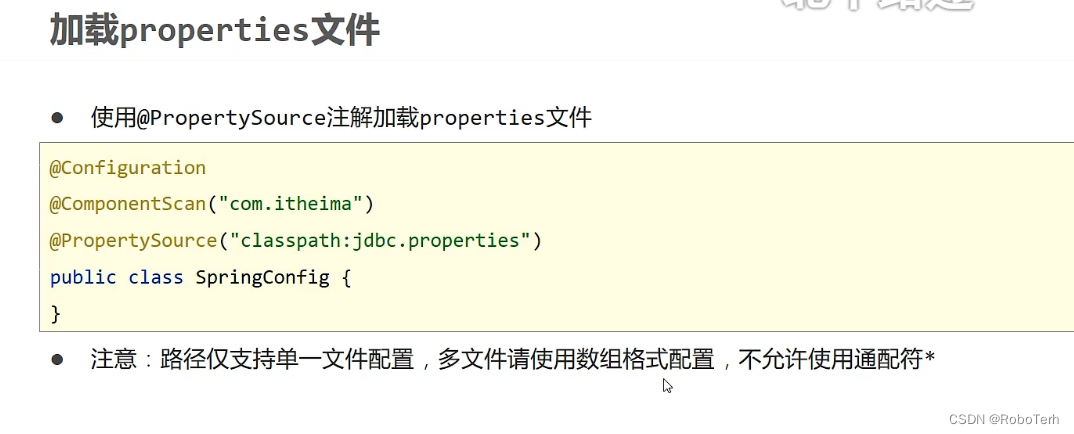
加载配置文件
properties


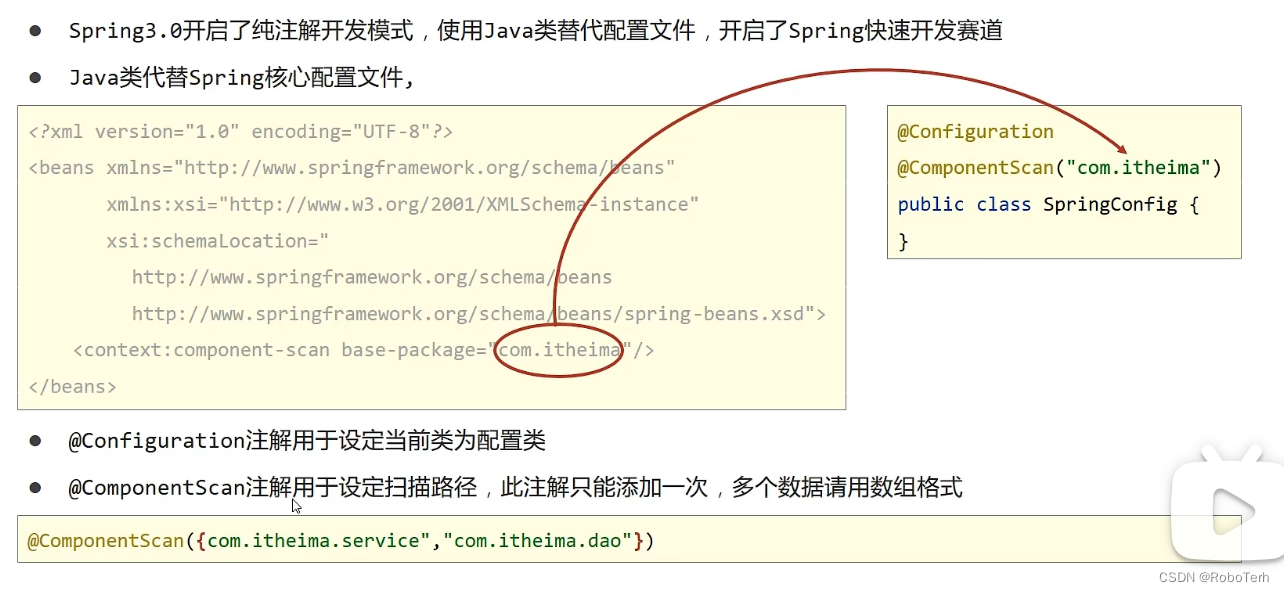
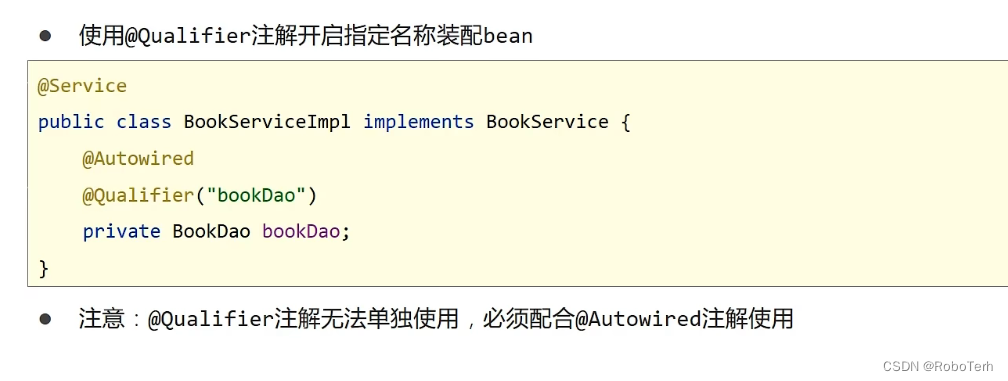
注解开发
@Scope: 定义bean作用范围
@PostConstruct @PreDestory注解初始化和销毁的调用函数
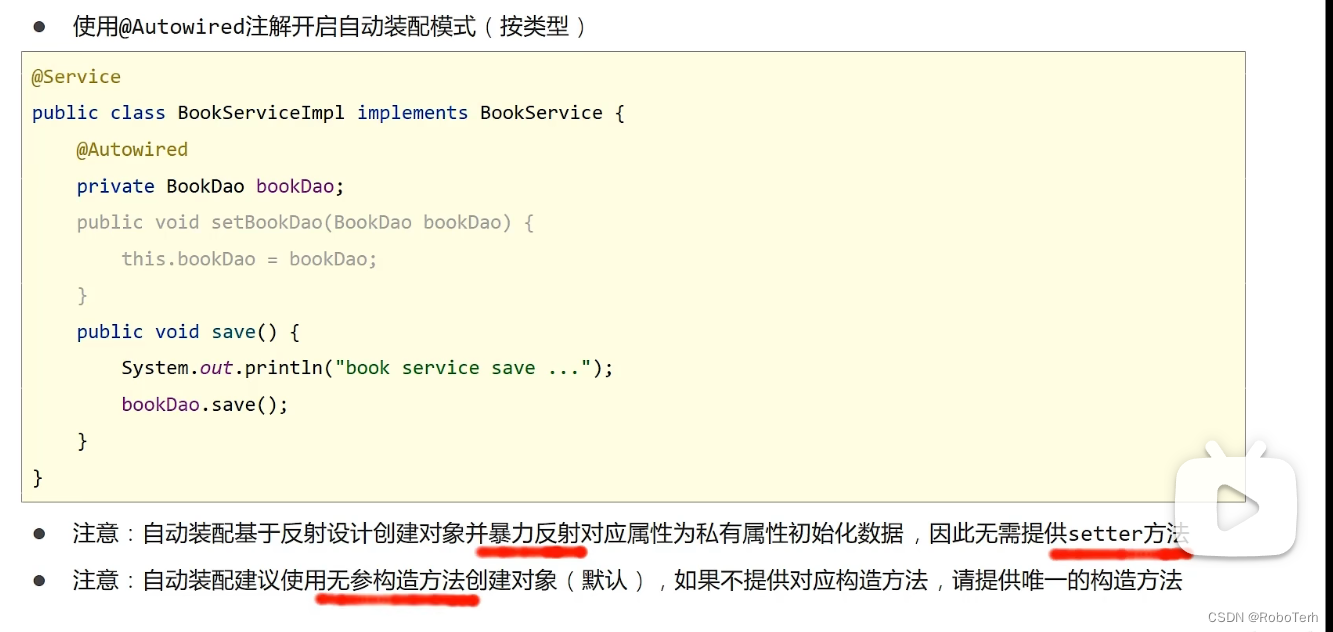
依赖注入
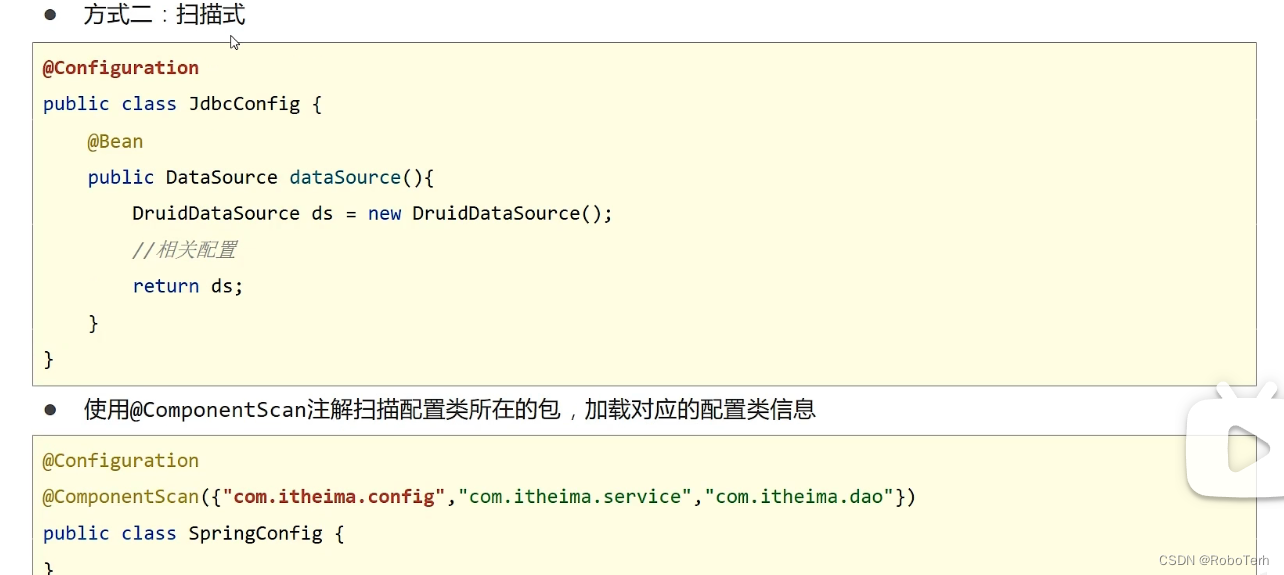
第三方bean管理
- 导入式

- 扫描式
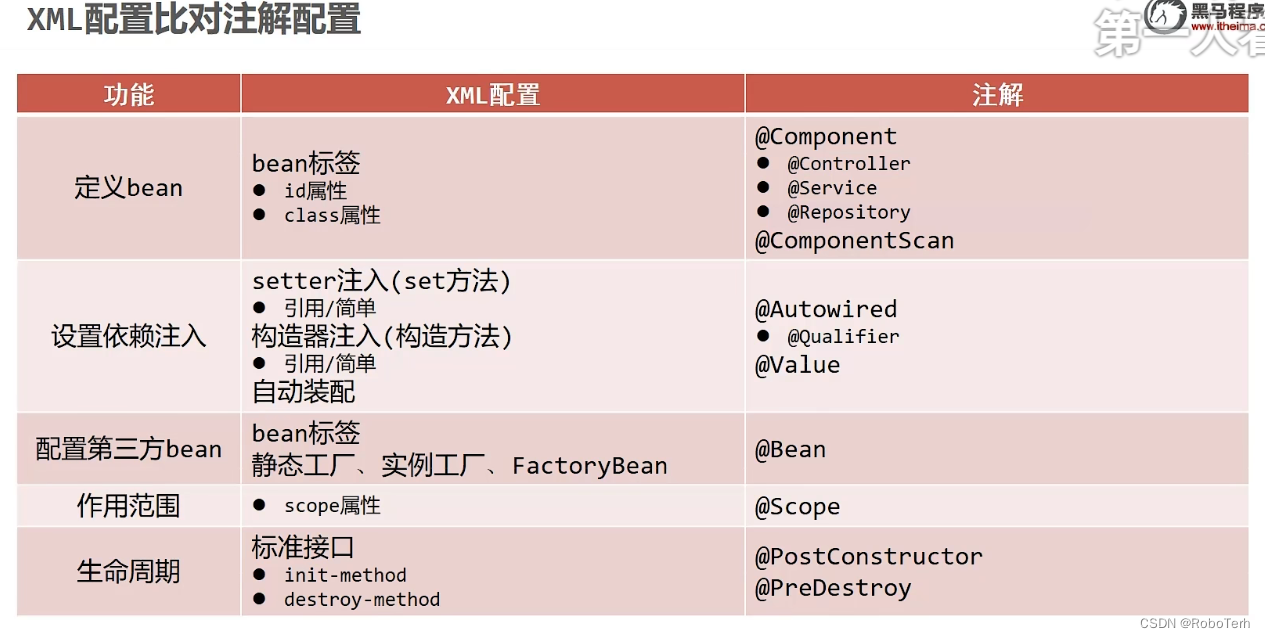
xml和注解的比较
整合Mybatis

package com.RoboTerh.config;

import org.mybatis.spring.SqlSessionFactoryBean;
import org.mybatis.spring.mapper.MapperScannerConfigurer;
import org.springframework.context.annotation.Bean;

import javax.sql.DataSource;

public class MybatisConfig {

    @Bean
    public SqlSessionFactoryBean sqlSessionFactory(DataSource dataSource) {
        SqlSessionFactoryBean ssfb = new SqlSessionFactoryBean();
        ssfb.setTypeAliasesPackage("com.RoboTerh.pojo");
        ssfb.setDataSource(dataSource);
        return ssfb;
    }

    @Bean
    public MapperScannerConfigurer mapperScannerConfigurer() {
        MapperScannerConfigurer msc = new MapperScannerConfigurer();
        msc.setBasePackage("com.RoboTerh.dao");
        return msc;
    }
}
package com.RoboTerh.config;

import com.alibaba.druid.pool.DruidDataSource;
import org.springframework.beans.factory.annotation.Configurable;
import org.springframework.context.annotation.Bean;
import org.springframework.context.annotation.ComponentScan;
import org.springframework.context.annotation.Import;
import org.springframework.context.annotation.PropertySource;

import javax.sql.DataSource;

@Configurable
@PropertySource("classpath:jdbc.properties")
@ComponentScan("com.RoboTerh")
@Import({JdbcConfig.class, MybatisConfig.class})
public class SpringConfig {
}
AOP
环境
导包
需要导入spring-aop.jar但是spring-context.jar已经自带了这个jar包了
<!-- 导入aspectjweaver.jar -->
        <!--AOP依赖包-->
        <dependency>
            <groupId>org.aspectj</groupId>
            <artifactId>aspectjweaver</artifactId>
            <version>1.9.7</version>
        </dependency>
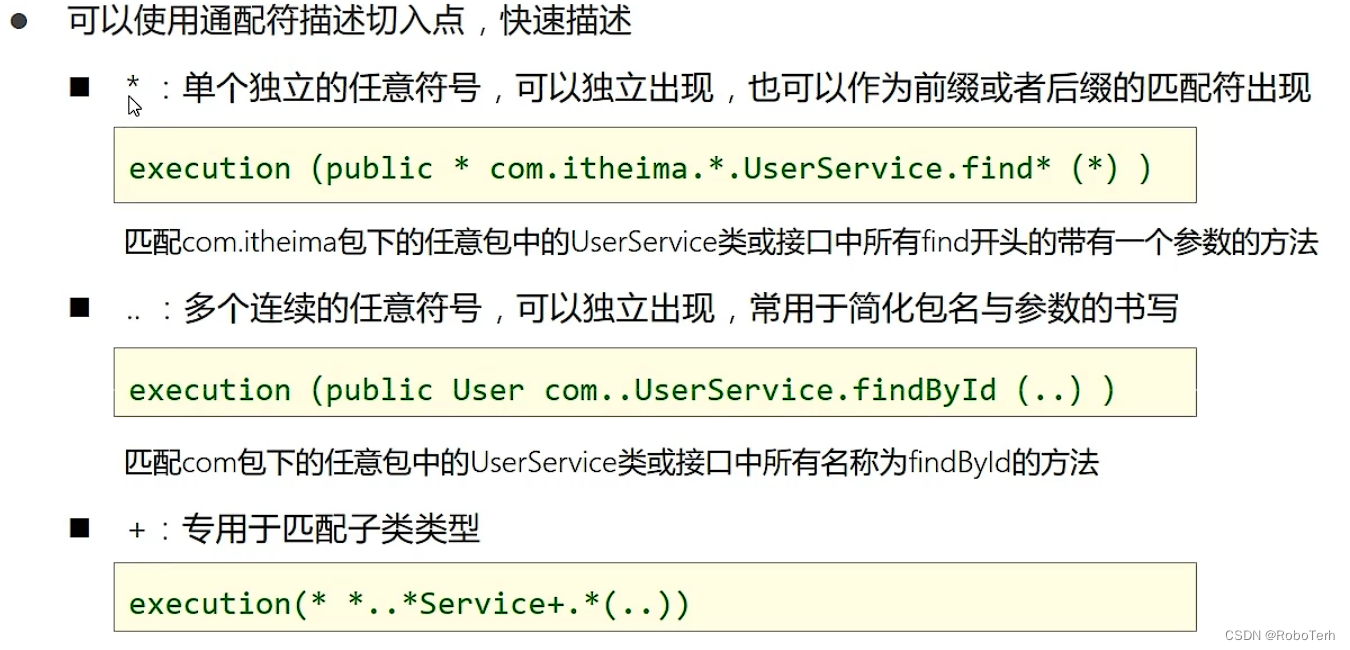
切入点表达式
AOP通知
通知类型

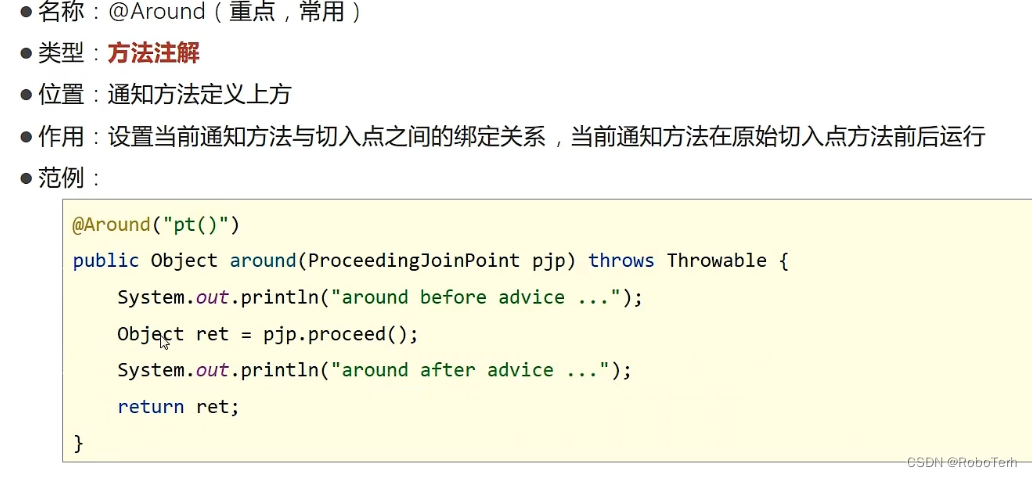
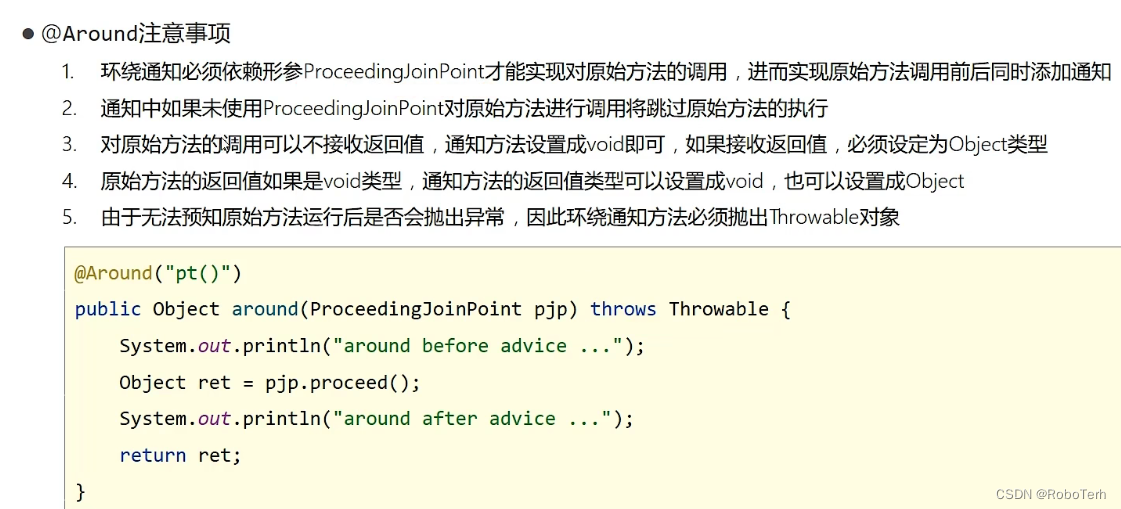
环绕通知的写法和注意事项
通过通知获取数据
- 参数
- 返回值
- 异常
SpringMVC
简单示例
导入依赖
        <dependency>
            <groupId>javax.servlet</groupId>
            <artifactId>javax.servlet-api</artifactId>
            <version>3.1.0</version>
            <scope>provided</scope>
        </dependency>
        <dependency>
            <groupId>org.springframework</groupId>
            <artifactId>spring-webmvc</artifactId>
            <version>3.2.12.RELEASE</version>
        </dependency>
之后在config包下创建SpringMvcConfig.java作为SpringMVC的配置
package com.RoboTerh.config;

import org.springframework.context.annotation.ComponentScan;
import org.springframework.context.annotation.Configuration;

// 创建springMVC的配置类,加载springmvc的bean类
@Configuration
@ComponentScan("com.RoboTerh.controller")
public class SpringMvcConfig {
}
创建ServletContainersInitConfig加载配置
package com.RoboTerh.config;

import org.springframework.web.context.WebApplicationContext;
import org.springframework.web.context.support.AnnotationConfigWebApplicationContext;
import org.springframework.web.servlet.support.AbstractDispatcherServletInitializer;

// 定义Servlet容器在启动时加载SpringMVC的配置
public class ServletContainersInitConfig extends AbstractDispatcherServletInitializer {
    // 加载SpringMVC配置
    @Override
    protected WebApplicationContext createServletApplicationContext() {
        AnnotationConfigWebApplicationContext ctx = new AnnotationConfigWebApplicationContext();
        ctx.register(SpringMvcConfig.class);
        return ctx;
    }

    // 归属SpringMVC处理的请求
    @Override
    protected String[] getServletMappings() {
        return new String[]{"/"};
    }

    // 加载Spring容器配置
    @Override
    protected WebApplicationContext createRootApplicationContext() {
        return null;
    }
}
或者使用更简单的
public class ServletContainersInitConfig extends AbstractAnnotationConfigDispatcherServletInitializer {

    @Override
    protected Class<?>[] getRootConfigClasses() {
        return new Class[0];
    }

    @Override
    protected Class<?>[] getServletConfigClasses() {
        return new Class[]{SpringMvcConfig.class};
    }

    @Override
    protected String[] getServletMappings() {
        return new String[]{"/"};
    }
之后再controller包下创建控制器
package com.RoboTerh.controller;

import org.springframework.stereotype.Controller;
import org.springframework.web.bind.annotation.RequestMapping;
import org.springframework.web.bind.annotation.ResponseBody;

// 定义Controller
@Controller
public class UserController {

    // 设置访问路径
    @RequestMapping("/save")
    @ResponseBody
    public String save() {
        System.out.println("user save .......");
        return "{'module': 'springmvc'}";
    }
}
提升
POST/GET传参
- 如果形参和请求参数相同
直接在@ResponseBody方法中传入参数就行处理 - 如果不同可以使用
public String save(@RequestParam("cmd") String cmd) {
- 可以直接创建一个
User实体类,如果形参是User对象,框架直接会封装数据 - 支持String[]数组的封装
- 如果使用
List<String> list作为形参,就需要在前面加上@RequestParam修饰,不然会自己把他当作一个实体类进行setter方法的调用 - 可以直接传送
xxxx/xx/xx格式的日期时间 - 如果是
xxxx-xx-xx格式的,需要
@DateTimeFormat(pattern="yyyy-MM-dd") Date data
乱码的处理
在ServletContainersInitConfig重写getServletFilters方法
    @Override
    protected Filter[] getServletFilters() {
        CharacterEncodingFilter filter = new CharacterEncodingFilter();
        filter.setEncoding("UTF-8");
        return new Filter[]{filter};
    }
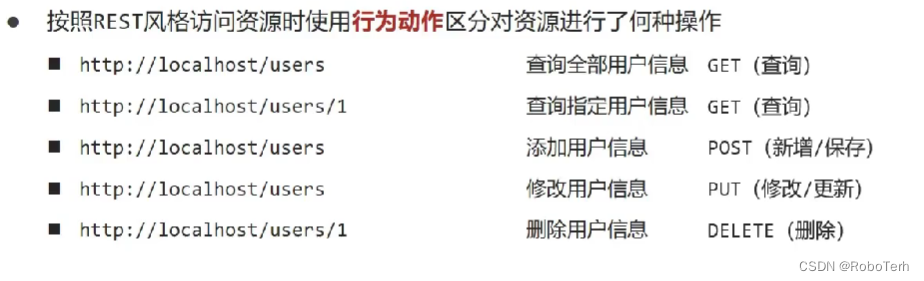
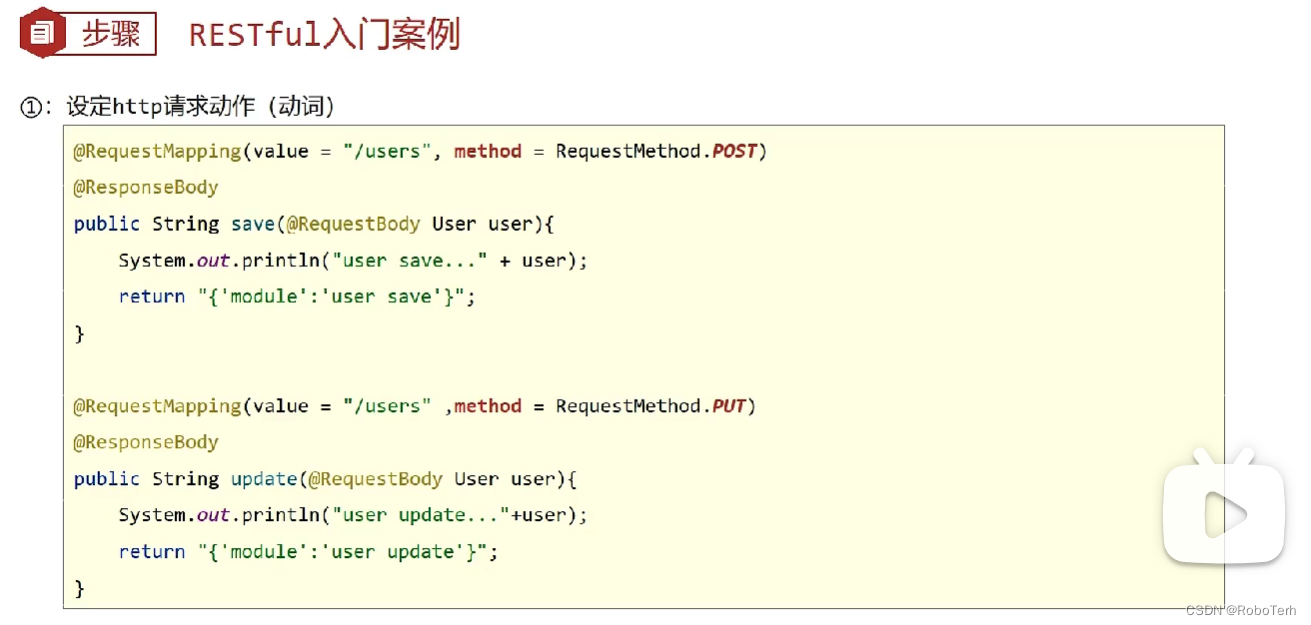
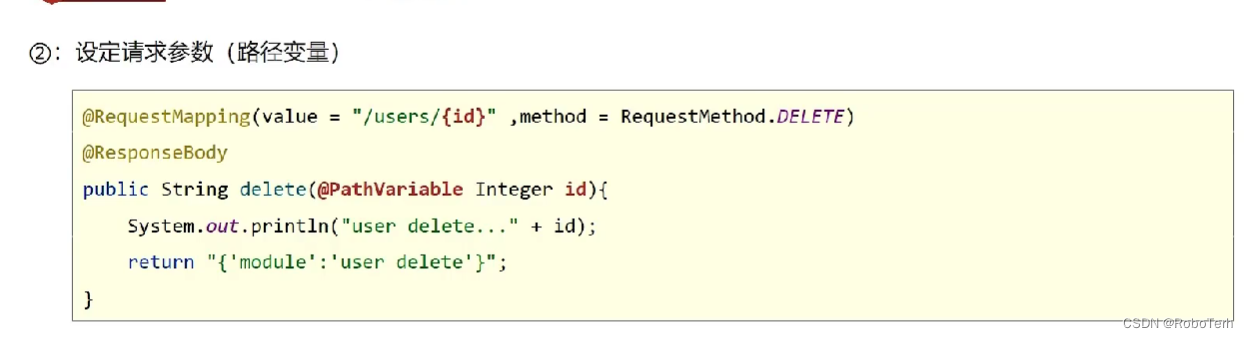
REST风格
简单示例
异常处理
使用AOP思想进行异常的处理
一般在表现层进行异常处理controller包下
@RestControllerAdvice
public class ProjectExceptionAdvice {
    @ExceptionHandler(Exception.class)
    public Result doException(Exception e) {
        return new Result(444, null, "出现了异常");
    }
}

拦截器
区别

示例
在controller包下 建立interceptor.ProjectInterceptor类,来实现HandlerInterceptor接口
@Component
public class ProjectInterceptor implements HandlerInterceptor {
    @Override
    public boolean preHandle(HttpServletRequest request, HttpServletResponse response, Object handler) throws Exception {
        System.out.println("preHandle ...");
        return true;
    }

    @Override
    public void postHandle(HttpServletRequest request, HttpServletResponse response, Object handler, ModelAndView modelAndView) throws Exception {
        System.out.println("postHandle ...");
    }

    @Override
    public void afterCompletion(HttpServletRequest request, HttpServletResponse response, Object handler, Exception ex) throws Exception {
        System.out.println("afterHandler...");
    }
}
preHandler中如果返回false就不会进行下一步
之后创建配置类(需要扫描配置)
package com.RoboTerh.config;

import com.RoboTerh.controller.interceptor.ProjectInterceptor;
import org.springframework.beans.factory.annotation.Autowired;
import org.springframework.context.annotation.Configuration;
import org.springframework.web.servlet.config.annotation.InterceptorRegistry;
import org.springframework.web.servlet.config.annotation.ResourceHandlerRegistry;
import org.springframework.web.servlet.config.annotation.WebMvcConfigurationSupport;

// 排除不需要处理的资源访问
@Configuration
public class SpringMvcSupport extends WebMvcConfigurationSupport {

    @Autowired
    private ProjectInterceptor projectInterceptor;

    @Override
    protected void addResourceHandlers(ResourceHandlerRegistry registry) {
        registry.addResourceHandler("/pages/**").addResourceLocations("/pages/");
        registry.addResourceHandler("/css/**").addResourceLocations("/css/");
        registry.addResourceHandler("/js/**").addResourceLocations("/js/");
        registry.addResourceHandler("/plugins/**").addResourceLocations("/plugins/");
    }

    @Override
    protected void addInterceptors(InterceptorRegistry registry) {
        registry.addInterceptor(projectInterceptor).addPathPatterns("/user", "/user/*");
    }
}
或者不需要扫描config包下的组件,可以直接在SpringMvcConfig中实现WebMvcConfigurer接口,重写资源访问或者拦截器的方法
package com.RoboTerh.config;

import org.springframework.context.annotation.ComponentScan;
import org.springframework.context.annotation.Configuration;
import org.springframework.web.servlet.config.annotation.EnableWebMvc;
import org.springframework.web.servlet.config.annotation.InterceptorRegistry;
import org.springframework.web.servlet.config.annotation.WebMvcConfigurer;

@Configuration
@ComponentScan({"com.RoboTerh.controller", "com.RoboTerh.config"})
@EnableWebMvc
public class SpringMvcConfig implements WebMvcConfigurer {
    @Override
    public void addInterceptors(InterceptorRegistry registry) {
        registry
    }
}
参数解释

    @Override
    public boolean preHandle(HttpServletRequest request, HttpServletResponse response, Object handler) throws Exception {
        System.out.println("Content-Type: " + request.getContentType());
        //将handler强转为HandlerMethod
        HandlerMethod handlerMethod = (HandlerMethod) handler;
//        System.out.println(handler.getClass());
        Object bean = handlerMethod.getBean();
        System.out.println(bean);
        System.out.println("preHandle ...");
        return true;
    }
postHandle中的ModelAndView可以做跳转afterCompletion中的Exception可以做异常处理
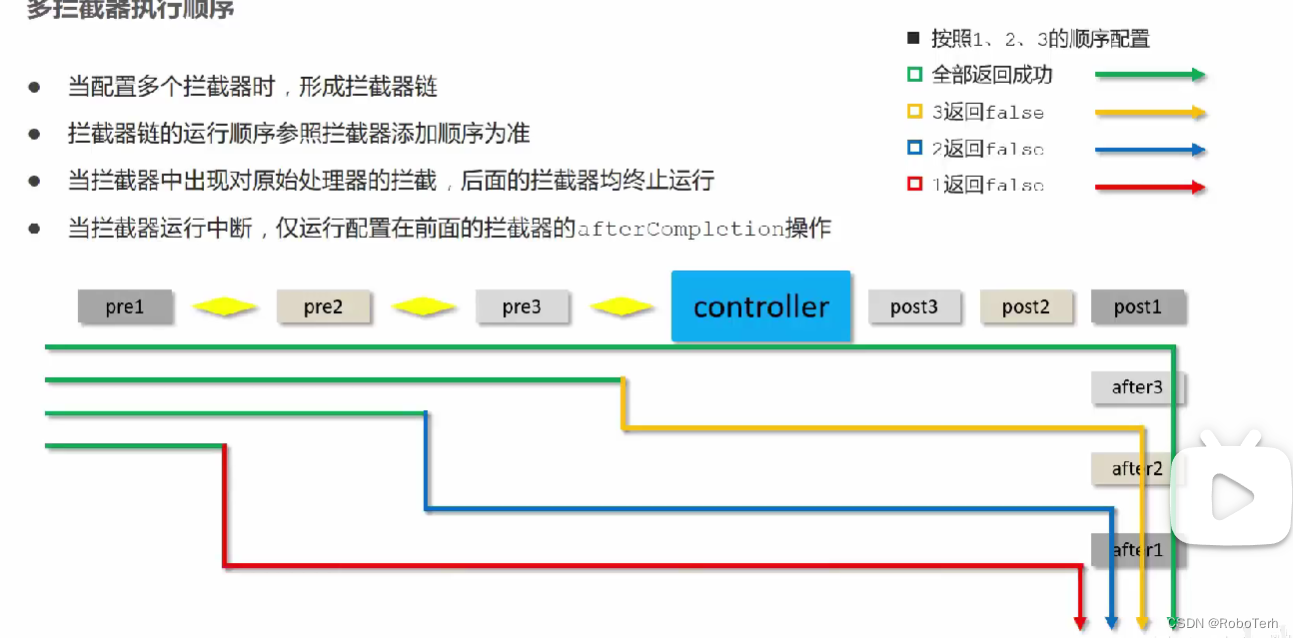
多拦截器
配置
创建另一个拦截器类ProjectInterceptor1, 之后再配置中添加拦截器
    @Override
    protected void addInterceptors(InterceptorRegistry registry) {
        registry.addInterceptor(projectInterceptor).addPathPatterns("/user", "/user/*");
        registry.addInterceptor(projectInterceptor1).addPathPatterns("/user", "/user/*");
    }
拦截顺序


 447
447


 被折叠的 条评论
为什么被折叠?
被折叠的 条评论
为什么被折叠?
 到【灌水乐园】发言


