


在Spring中,事务有两种实现方式:
- 编程式事务管理: 编程式事务管理使用TransactionTemplate可实现更细粒度的事务控制。
- 申明式事务管理: 基于Spring AOP实现。其本质是对方法前后进行拦截,然后在目标方法开始之前创建或者加入一个事务,在执行完目标方法之后根据执行情况提交或者回滚事务。
申明式事务管理不需要入侵代码,通过@Transactional就可以进行事务操作,更快捷而且简单(尤其是配合spring boot自动配置),且大部分业务都可以满足,推荐使用。其实不管是编程式事务还是申明式事务,最终调用的底层核心代码是一致的。在进入主题之前,我们最好是对 Spring AOP的织入及调用过程、以及 Spring的事务传播基本知识 需要有一点的了解。直接进入正题

编程式事务 TransactionTemplate :
对于编程式事务来说,其核心是 execute 方法
TransactionTemplate transactionTemplate = new TransactionTemplate();
transactionTemplate.execute(new TransactionCallback<Object>() {
  @Override
  public Object doInTransaction(TransactionStatus status) {
    return null;
  }
});
先来看一下其类图:

看到了两个接口 TransactionOperations, InitializingBean。其中后者就不多介绍了,对于前者,定义了一个执行方法,并且在TransactionTemplate进行了实现:
public interface TransactionOperations {

    /**
     * Execute the action specified by the given callback object within a transaction.
     * <p>Allows for returning a result object created within the transaction, that is,
     * a domain object or a collection of domain objects. A RuntimeException thrown
     * by the callback is treated as a fatal exception that enforces a rollback.
     * Such an exception gets propagated to the caller of the template.
     * @param action the callback object that specifies the transactional action
     * @return a result object returned by the callback, or {@code null} if none
     * @throws TransactionException in case of initialization, rollback, or system errors
     * @throws RuntimeException if thrown by the TransactionCallback
     */
    @Nullable
    <T> T execute(TransactionCallback<T> action) throws TransactionException;
}
接下去看这两个接口在 TransactionTemplate 中的实现:
@Override
public void afterPropertiesSet() {
  //仅仅做了以下判断,校验事务管理器是否为空
  if (this.transactionManager == null) {
    throw new IllegalArgumentException("Property 'transactionManager' is required");
  }
}

//这里面的操作很清晰
@Override
@Nullable
public <T> T execute(TransactionCallback<T> action) throws TransactionException {
        Assert.state(this.transactionManager != null, "No PlatformTransactionManager set");
     // 判断类型
        if (this.transactionManager instanceof CallbackPreferringPlatformTransactionManager) {
            return ((CallbackPreferringPlatformTransactionManager) this.transactionManager).execute(this, action);
        }
        else {//开启一个事务
            TransactionStatus status = this.transactionManager.getTransaction(this);
            T result;
            try {//调用我们的业务实现逻辑
                result = action.doInTransaction(status);
            }
            catch (RuntimeException | Error ex) {
                // Transactional code threw application exception -> rollback
                // 异常就回滚事务

                rollbackOnException(status, ex);
                throw ex;
            }
            catch (Throwable ex) {
                // Transactional code threw unexpected exception -> rollback
         // 异常就回滚事务
                rollbackOnException(status, ex);
                throw new UndeclaredThrowableException(ex, "TransactionCallback threw undeclared checked exception");
            }
            // 提交事务
            this.transactionManager.commit(status);
            return result;
        }
}
具体对应的实现在声明式事务分析到这些操作的源码的时候会进一步分析,都是调用 PlatformTransactionManager相对应的方法。
声明式事务 @Transactional:
在springboot中我们要开启事务需要在主启动类上引入 @EnableTransactionManagement 注解。然后对需要的方法上打上@Transactional,在实际开发中我们很少在类上直接声明 @Transactional,在类上注解即代表该类所有的 piblic 的方法都需要开启事务。还有一个知识点是Springboot中的事务拓展了 @EnableAutoConfiguration 来实现自动装配,所以在spring-boot-autoconfigure包里面可以看到会导入两个类
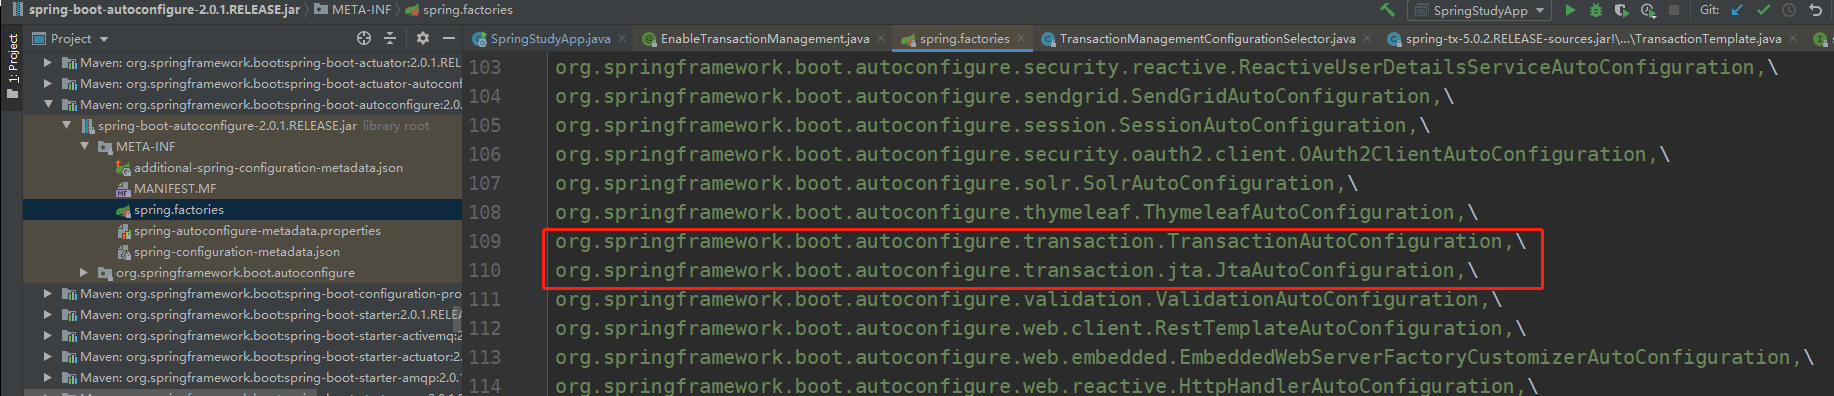
重点来看 org.springframework.boot.autoconfigure.transaction.TransactionAutoConfiguration:
@Configuration
@ConditionalOnClass(PlatformTransactionManager.class)//类路径下包含PlatformTransactionManager这个类时这个自动配置生效
@AutoConfigureAfter({ JtaAutoConfiguration.class, HibernateJpaAutoConfiguration.class,
        DataSourceTransactionManagerAutoConfiguration.class,
        Neo4jDataAutoConfiguration.class })//在这几个类注入后在开始载入
@EnableConfigurationProperties(TransactionProperties.class)
public class TransactionAutoConfiguration {

    @Bean
    @ConditionalOnMissingBean
    public TransactionManagerCustomizers platformTransactionManagerCustomizers(
            ObjectProvider<List<PlatformTransactionManagerCustomizer<?>>> customizers) {
        return new TransactionManagerCustomizers(customizers.getIfAvailable());
    }
    //事务模板配置类
    @Configuration
    @ConditionalOnSingleCandidate(PlatformTransactionManager.class)
    public static class TransactionTemplateConfiguration {

        private final PlatformTransactionManager transactionManager;

        public TransactionTemplateConfiguration(
                PlatformTransactionManager transactionManager) {
            this.transactionManager = transactionManager;
        }

        @Bean
        @ConditionalOnMissingBean//如果没有定义TransactionTemplate bean生成一个
        public TransactionTemplate transactionTemplate() {
            return new TransactionTemplate(this.transactionManager);
        }
    }

    @Configuration
    @ConditionalOnBean(PlatformTransactionManager.class)
    //Configuration支持2种代理方式
  @ConditionalOnMissingBean(AbstractTransactionManagementConfiguration.class)
    public static class EnableTransactionManagementConfiguration {
        //即proxyTargetClass = false表示是JDK动态代理支持的是:面向接口代理。
        @Configuration
        @EnableTransactionManagement(proxyTargetClass = false)
        @ConditionalOnProperty(prefix = "spring.aop", name = "proxy-target-class", havingValue = "false", matchIfMissing = false)
        public static class JdkDynamicAutoProxyConfiguration {
       //即spring.aop.proxy-target-class=false时生效,且没有这个配置不生效。
        }

        //即proxyTargetClass = true标识Cglib代理支持的是子类继承代理。
        @Configuration
        @EnableTransactionManagement(proxyTargetClass = true)
        @ConditionalOnProperty(prefix = "spring.aop", name = "proxy-target-class", havingValue = "true", matchIfMissing = true)
        public static class CglibAutoProxyConfiguration {
          //即spring.aop.proxy-target-class=true时生效,且没有这个配置默认生效。默认没有配置默认为 true,走的Cglib代理。说明@Transactional注解支持直接加在类上。
        }
    }
}
紧接着我们就需要来看看 @EnableTransactionManagement 这个注解了,也正是我们在启动类上打上的注解:
@Target(ElementType.TYPE)
@Retention(RetentionPolicy.RUNTIME)
@Documented
@Import(TransactionManagementConfigurationSelector.class)
public @interface EnableTransactionManagement {

    boolean proxyTargetClass() default false;

    AdviceMode mode() default AdviceMode.PROXY;

    int order() default Ordered.LOWEST_PRECEDENCE;

}
引入了 TransactionManagementConfigurationSelector.class
public class TransactionManagementConfigurationSelector extends AdviceModeImportSelector<EnableTransactionManagement> {

    @Override
    protected String[] selectImports(AdviceMode adviceMode) {
        switch (adviceMode) {
            case PROXY: // 默认走这里,因为上面哪个注解中默认就是 PROXY
                return new String[] {AutoProxyRegistrar.class.getName(), ProxyTransactionManagementConfiguration.class.getName()};
            case ASPECTJ:
                return new String[] {TransactionManagementConfigUtils.TRANSACTION_ASPECT_CONFIGURATION_CLASS_NAME};
            default:
                return null;
        }
    }

}
在该类中引入了 AutoProxyRegistrar.class, ProxyTransactionManagementConfiguration.class 两个类
- AutoProxyRegistrar:向容器注入一个 key 为 org.springframework.aop.config.internalAutoProxyCreator ,value 为 InfrastructureAdvisorAutoProxyCreator.class 的 bean定义。
- ProxyTransactionManagementConfiguration:代理事务配置类,定义事务拦截器相关类。
注入的这个过程就不详细介绍了,很常规的操作。然后先来看 InfrastructureAdvisorAutoProxyCreator:
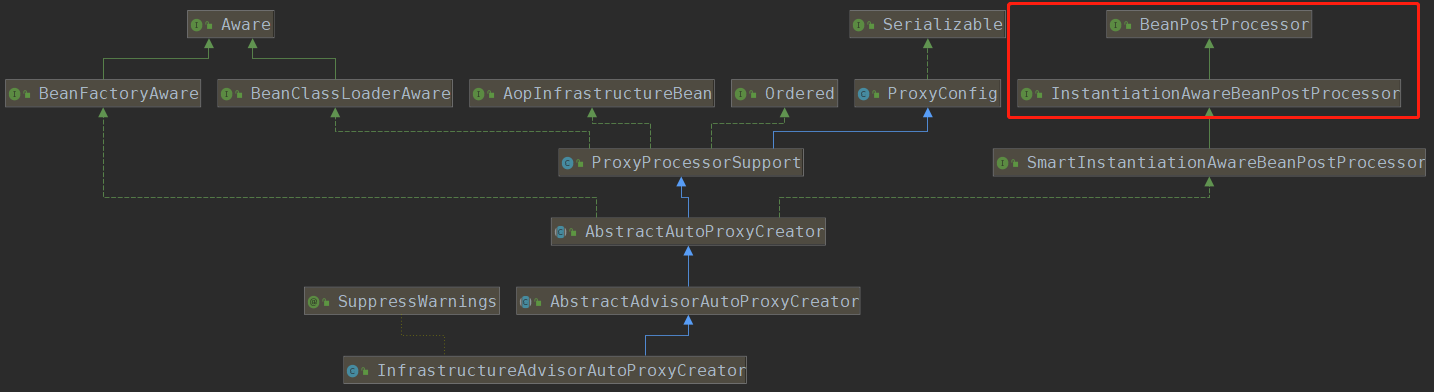
重点关注右上角的那两个类:
- BeanPostProcessor:定义了2个方法,作用于类初始化的前后处理逻辑。
- InstantiationAwareBeanPostProcessor:定义了3个方法,作用于实例化的前后处理逻辑。
该4个前后处理器的方法实现在 AbstractAutoProxyCreator 中进行了实现:
//实例化前置处理器
@Override
public Object postProcessBeforeInstantiation(Class<?> beanClass, String beanName) throws BeansException {
        Object cacheKey = getCacheKey(beanClass, beanName);

        if (!StringUtils.hasLength(beanName) || !this.targetSourcedBeans.contains(beanName)) {
            if (this.advisedBeans.containsKey(cacheKey)) {
                return null;
            }//是否是这四类实现:Advice、Pointcut、Advisor、AopInfrastructureBean
            if (isInfrastructureClass(beanClass) || shouldSkip(beanClass, beanName)) {
                //标记是否需要增强实现,供后面postProcessAfterInitialization实例化后使用。
                this.advisedBeans.put(cacheKey, Boolean.FALSE);
                return null;
            }
        }
        //如果我们有一个自定义的TargetSource,在这里创建代理。很显然目前来说没有定义
        // Create proxy here if we have a custom TargetSource.
        // Suppresses unnecessary default instantiation of the target bean:
        // The TargetSource will handle target instances in a custom fashion.
        TargetSource targetSource = getCustomTargetSource(beanClass, beanName);
        if (targetSource != null) {
            if (StringUtils.hasLength(beanName)) {
                this.targetSourcedBeans.add(beanName);
            }
            Object[] specificInterceptors = getAdvicesAndAdvisorsForBean(beanClass, beanName, targetSource);
            Object proxy = createProxy(beanClass, beanName, specificInterceptors, targetSource);
            this.proxyTypes.put(cacheKey, proxy.getClass());
            return proxy;
        }

        return null;
}
//实例化后置处理器
@Override
public boolean postProcessAfterInstantiation(Object bean, String beanName) {
  return true;
}
// 初始化前置处理器
@Override
public Object postProcessBeforeInitialization(Object bean, String beanName) {
        return bean;
}

/**初始化后置处理器,就是在AOP中提到的
* Create a proxy with the configured interceptors if the bean is
* identified as one to proxy by the subclass.
* @see #getAdvicesAndAdvisorsForBean
*/
@Override
public Object postProcessAfterInitialization(@Nullable Object bean, String beanName) throws BeansException {
        if (bean != null) {
            Object cacheKey = getCacheKey(bean.getClass(), beanName);
            if (!this.earlyProxyReferences.contains(cacheKey)) {
                return wrapIfNecessary(bean, beanName, cacheKey);
            }
        }
        return bean;
}
然后再初始化后置处理方法中的 wrapIfNecessary(增强织入):
protected Object wrapIfNecessary(Object bean, String beanName, Object cacheKey) {
       // 如果是用户自定义获取实例,不需要增强处理,直接返回
        if (beanName != null && this.targetSourcedBeans.contains(beanName)) {
            return bean;
        }// 查询map缓存,标记过false,不需要增强直接返回
        if (Boolean.FALSE.equals(this.advisedBeans.get(cacheKey))) {
            return bean;
        }// 判断一遍springAOP基础构建类,标记过false,不需要增强直接返回
        if (isInfrastructureClass(bean.getClass()) || shouldSkip(bean.getClass(), beanName)) {
            this.advisedBeans.put(cacheKey, Boolean.FALSE);
            return bean;
        }

        // 获取增强List<Advisor> advisors 这里就会获取到一个 TransationIntercepter的advisors
        Object[] specificInterceptors = getAdvicesAndAdvisorsForBean(bean.getClass(), beanName, null);
       // 如果存在增强
        if (specificInterceptors != DO_NOT_PROXY) {
            this.advisedBeans.put(cacheKey, Boolean.TRUE);// 标记增强为TRUE,表示需要增强实现
          // 生成增强代理类
            Object proxy = createProxy(
                    bean.getClass(), beanName, specificInterceptors, new SingletonTargetSource(bean));
            this.proxyTypes.put(cacheKey, proxy.getClass());
            return proxy;
        }
     // 如果不存在增强,标记false,作为缓存,再次进入提高效率,第16行利用缓存先校验
        this.advisedBeans.put(cacheKey, Boolean.FALSE);
        return bean;
    }
![]()
然后进入创建代理类,与AOP中探讨的 JDK动态代理不一样的地方如下:
- 这里默认会走 CGLib 动态代理。
- 这里形成的调用链会走 getCallbacks 所获取到的 拦截器链。
- 会调用 DynamicAdvisedInterceptor 的intercept 方法创建CglibMethodInvocation 进入 process方法
ProxyTransactionManagementConfiguration:
先来看一下其源码中都定义了什么:
@Configuration
public class ProxyTransactionManagementConfiguration extends AbstractTransactionManagementConfiguration {
    // 这个bean会在后置处理器织入AOP的时候被扫描到
    @Bean(name = TransactionManagementConfigUtils.TRANSACTION_ADVISOR_BEAN_NAME)
    @Role(BeanDefinition.ROLE_INFRASTRUCTURE)//定义事务增强
    public BeanFactoryTransactionAttributeSourceAdvisor transactionAdvisor() {
        BeanFactoryTransactionAttributeSourceAdvisor advisor = new BeanFactoryTransactionAttributeSourceAdvisor();
        advisor.setTransactionAttributeSource(transactionAttributeSource());
        advisor.setAdvice(transactionInterceptor());
        if (this.enableTx != null) {
            advisor.setOrder(this.enableTx.<Integer>getNumber("order"));
        }
        return advisor;
    }
    // 基于注解的事务资源信息
    @Bean
    @Role(BeanDefinition.ROLE_INFRASTRUCTURE)
    public TransactionAttributeSource transactionAttributeSource() {
        return new AnnotationTransactionAttributeSource();
    }
    // 定义事务拦截器
    @Bean
    @Role(BeanDefinition.ROLE_INFRASTRUCTURE)
    public TransactionInterceptor transactionInterceptor() {
        TransactionInterceptor interceptor = new TransactionInterceptor();
        interceptor.setTransactionAttributeSource(transactionAttributeSource());
        if (this.txManager != null) {
            interceptor.setTransactionManager(this.txManager);
        }
        return interceptor;
    }
}
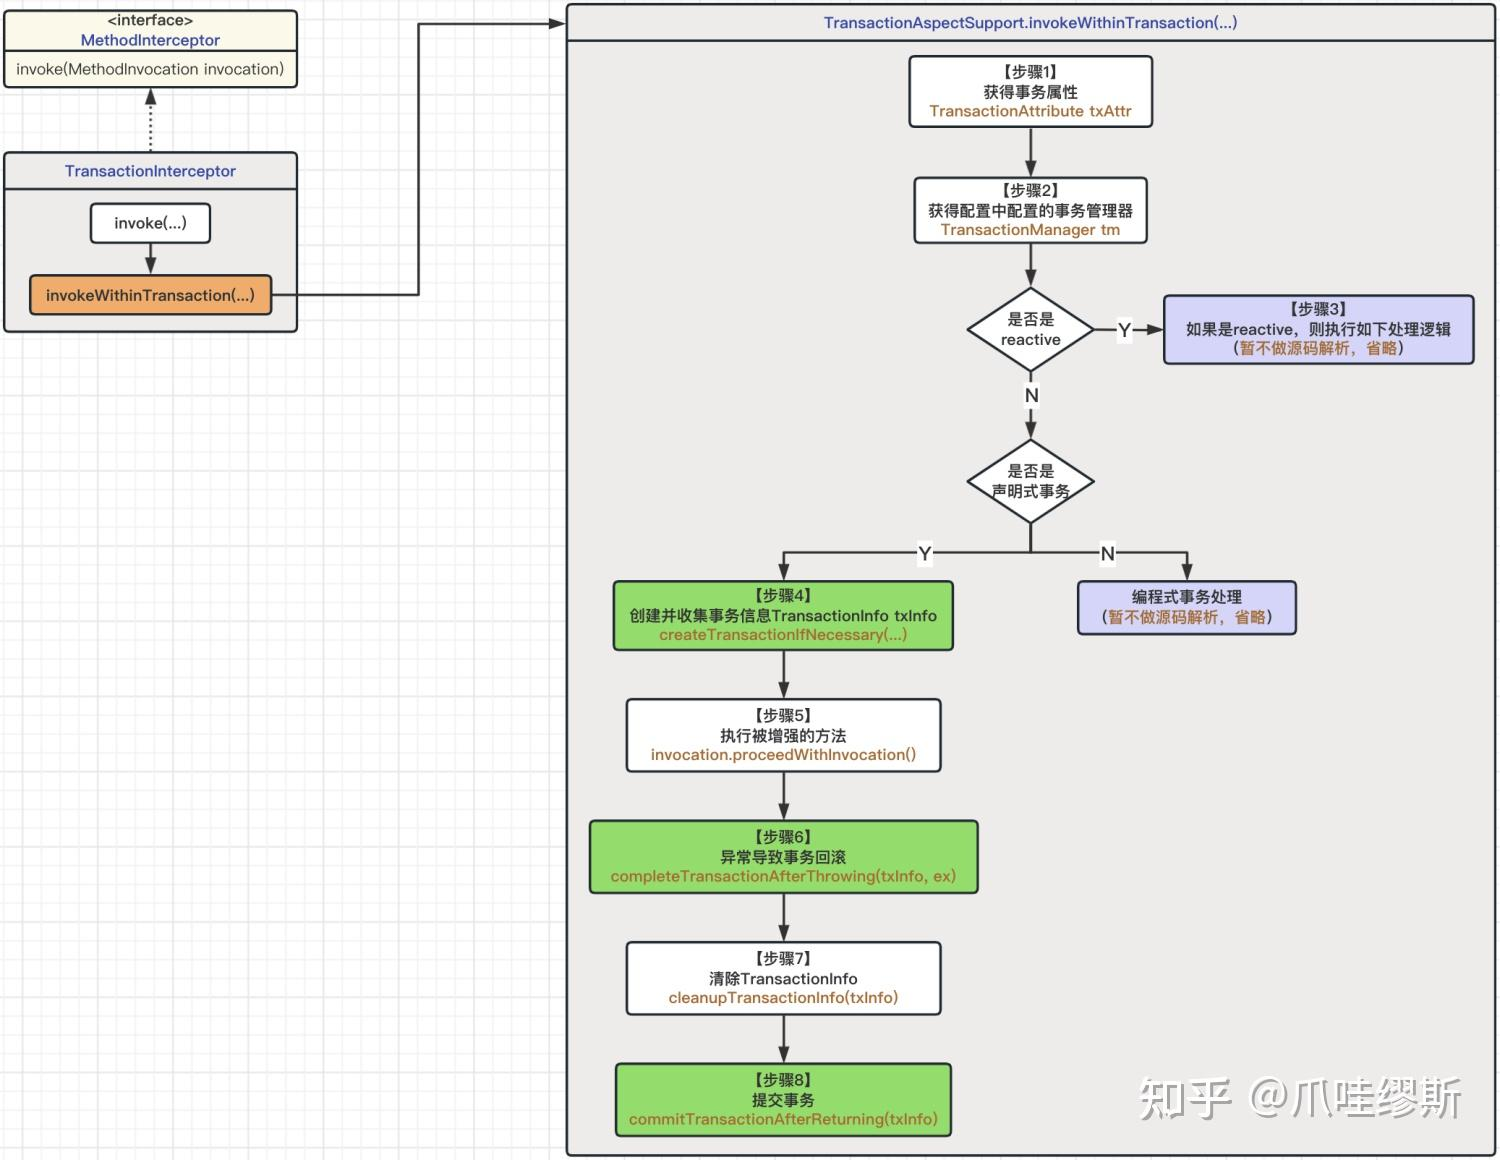
TransactionInterceptor 事务处理流程:
TransactionInterceptor使用通用的spring事务基础架构实现“声明式事务”,继承自TransactionAspectSupport类(该类包含与Spring的底层事务API的集成),实现了MethodInterceptor接口。spring类图如下:
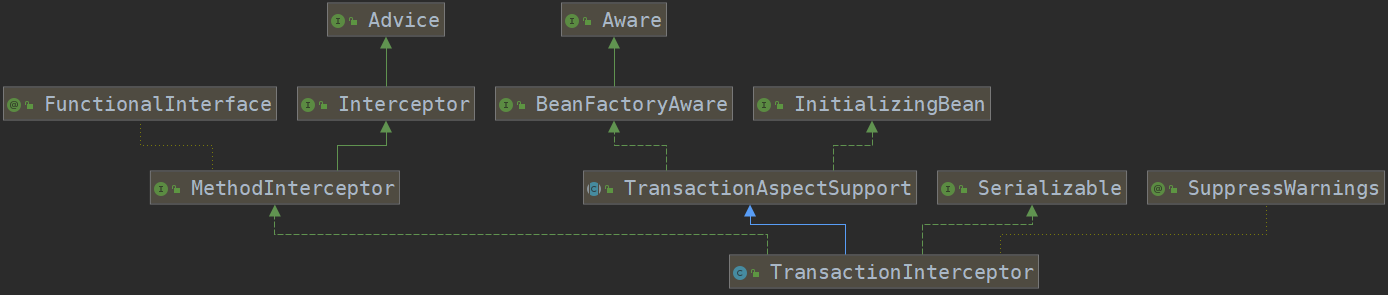
事务拦截器的拦截功能就是依靠实现了MethodInterceptor接口,这个是spring的方法拦截器,并在invoke方法中调用了父类TransactionAspectSupport的invokeWithinTransaction()方法,源码如下(全体注意!关键的地方来了):
public Object invoke(final MethodInvocation invocation) throws Throwable {
   // Work out the target class: may be {@code null}.
   // The TransactionAttributeSource should be passed the target class
   // as well as the method, which may be from an interface.
   Class<?> targetClass = (invocation.getThis() != null ? AopUtils.getTargetClass(invocation.getThis()) : null);

   // Adapt to TransactionAspectSupport's invokeWithinTransaction...
   return invokeWithinTransaction(invocation.getMethod(), targetClass, invocation::proceed);
}
protected Object invokeWithinTransaction(Method method, @Nullable Class<?> targetClass,
            final InvocationCallback invocation) throws Throwable {
        // 这里指的 non-transaction 是指编程式事务
        // If the transaction attribute is null, the method is non-transactional.
        TransactionAttributeSource tas = getTransactionAttributeSource();
        final TransactionAttribute txAttr = (tas != null ? tas.getTransactionAttribute(method, targetClass) : null);
        final PlatformTransactionManager tm = determineTransactionManager(txAttr);
        final String joinpointIdentification = methodIdentification(method, targetClass, txAttr);
        //声明式事务:事务属性为空、或者事务管理器非这个类型
        if (txAttr == null || !(tm instanceof CallbackPreferringPlatformTransactionManager)) {
            // Standard transaction demarcation with getTransaction and commit/rollback calls.
            // 如果需要创建事务

            TransactionInfo txInfo = createTransactionIfNecessary(tm, txAttr, joinpointIdentification);
            Object retVal = null;
            try {
                // This is an around advice: Invoke the next interceptor in the chain.
                // This will normally result in a target object being invoked.
                //方法执行、环绕增强、可自定义

                retVal = invocation.proceedWithInvocation();
            }
            catch (Throwable ex) {
                // target invocation exception
                // 事务异常,提交/回滚

                completeTransactionAfterThrowing(txInfo, ex);
                throw ex;
            }
            finally {
                // 清除事务信息、重置为老的事务
                cleanupTransactionInfo(txInfo);
            }
            // 提交事务
            commitTransactionAfterReturning(txInfo);
            return retVal;
        }
        // 很明显是编程式事务
        else {
            final ThrowableHolder throwableHolder = new ThrowableHolder();

            // It's a CallbackPreferringPlatformTransactionManager: pass a TransactionCallback in.
            try {
                Object result = ((CallbackPreferringPlatformTransactionManager) tm).execute(txAttr, status -> {
                    // 准备事务信息
                    TransactionInfo txInfo = prepareTransactionInfo(tm, txAttr, joinpointIdentification, status);
                    try {//环绕增强
                        return invocation.proceedWithInvocation();
                    }
                    catch (Throwable ex) {
                        // 回滚
                        if (txAttr.rollbackOn(ex)) {
                            // A RuntimeException: will lead to a rollback.
                            if (ex instanceof RuntimeException) {
                                throw (RuntimeException) ex;
                            }
                            else {
                                throw new ThrowableHolderException(ex);
                            }
                        }
                        else {
                            // A normal return value: will lead to a commit.
                            throwableHolder.throwable = ex;
                            return null;
                        }
                    }
                    finally {//清除事务
                        cleanupTransactionInfo(txInfo);
                    }
                });

                // Check result state: It might indicate a Throwable to rethrow.
                if (throwableHolder.throwable != null) {
                    throw throwableHolder.throwable;
                }
                return result;
            }
      // ......
        }
    }
其中 invocation::proceed 是lamda表达式,对应的是:
new InvocationCallback() {
    public Object proceedWithInvocation() throws Throwable {
        return invocation.proceed();
}
createTransactionIfNecessary 创建事务:
protected TransactionInfo createTransactionIfNecessary(@Nullable PlatformTransactionManager tm,
            @Nullable TransactionAttribute txAttr, final String joinpointIdentification) {

        // If no name specified, apply method identification as transaction name.
     // ....省略代码
        TransactionStatus status = null;
        if (txAttr != null) {
            if (tm != null) {
                // 根据事务属性获得status
                status = tm.getTransaction(txAttr);
            }
            else {
                if (logger.isDebugEnabled()) {
                    logger.debug("Skipping transactional joinpoint [" + joinpointIdentification +
                            "] because no transaction manager has been configured");
                }
            }
        }
        return prepareTransactionInfo(tm, txAttr, joinpointIdentification, status);
}
//通过事务管理器 PlatformTransactionManager 的 getTransaction开启事务
public final TransactionStatus getTransaction(@Nullable TransactionDefinition definition) throws TransactionException {
     // .....省略代码
      try {
         boolean newSynchronization = (getTransactionSynchronization() != SYNCHRONIZATION_NEVER);
         DefaultTransactionStatus status = newTransactionStatus(
               definition, transaction, true, newSynchronization, debugEnabled, suspendedResources);
         doBegin(transaction, definition); // 开启事务 connection.setAutoCommit(false)
         prepareSynchronization(status, definition);
         return status;
      }
     // .....省略代码
}
//构造TransactionInfo 对象绑定当前线程
protected TransactionInfo prepareTransactionInfo(@Nullable PlatformTransactionManager tm,
      @Nullable TransactionAttribute txAttr, String joinpointIdentification,
      @Nullable TransactionStatus status) {

   TransactionInfo txInfo = new TransactionInfo(tm, txAttr, joinpointIdentification);
   // .....省略代码
   txInfo.bindToThread();
   return txInfo;
}
invocation.proceed()回调业务方法,这个 invication 也就是刚刚获取代理的时候生成了一个回调方法集合。其中有个 DynamicAdvisedInterceptor 拦截器。最终会走到他的 intercept 方法:
public Object intercept(Object proxy, Method method, Object[] args, MethodProxy methodProxy) throws Throwable {
            Object oldProxy = null;
            boolean setProxyContext = false;
            Object target = null;
            TargetSource targetSource = this.advised.getTargetSource();
            try {
                if (this.advised.exposeProxy) {
                    // Make invocation available if necessary.
                    oldProxy = AopContext.setCurrentProxy(proxy);
                    setProxyContext = true;
                }
                // Get as late as possible to minimize the time we "own" the target, in case it comes from a pool...
                target = targetSource.getTarget();
                Class<?> targetClass = (target != null ? target.getClass() : null);
                //获取 advice组成chain
                List<Object> chain = this.advised.getInterceptorsAndDynamicInterceptionAdvice(method, targetClass);
                Object retVal;
                // Check whether we only have one InvokerInterceptor: that is,
                // no real advice, but just reflective invocation of the target.
                if (chain.isEmpty() && Modifier.isPublic(method.getModifiers())) {
                    // We can skip creating a MethodInvocation: just invoke the target directly.
                    // Note that the final invoker must be an InvokerInterceptor, so we know
                    // it does nothing but a reflective operation on the target, and no hot
                    // swapping or fancy proxying.
                    Object[] argsToUse = AopProxyUtils.adaptArgumentsIfNecessary(method, args);
                    retVal = methodProxy.invoke(target, argsToUse);
                }
                else {
                    // We need to create a method invocation...
                    retVal = new CglibMethodInvocation(proxy, target, method, args, targetClass, chain, methodProxy).proceed();
                }
                retVal = processReturnType(proxy, target, method, retVal);
                return retVal;
            }
            finally {
                if (target != null && !targetSource.isStatic()) {
                    targetSource.releaseTarget(target);
                }
                if (setProxyContext) {
                    // Restore old proxy.
                    AopContext.setCurrentProxy(oldProxy);
                }
            }
        }
大家可以看到这里构造了 CglibMethodInvocation 这么个对象,并且调用了他的 process 方法。我们先来看一下他的类图:
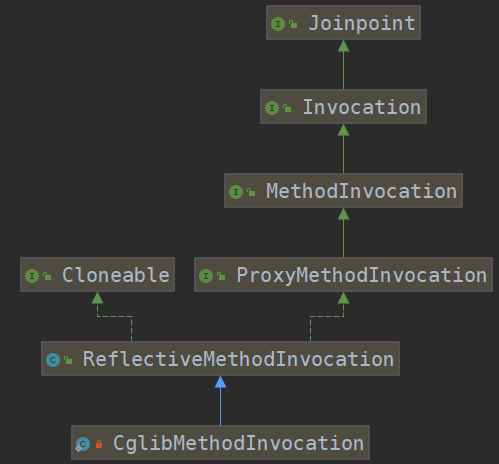
原来他是 ReflectiveMethodInvocation 的子类。ReflectiveMethodInvocation正式JDK动态代理中所生成的 MethodInvocation。进入他的 proceed()。这个代码对于看过AOP源码的朋友来说可以说是很熟悉了。根据组装的拦截器链进行链式处理。最后循环回来等链处理完了,反射调用原来的方法。
@Override
    public Object proceed() throws Throwable {
        //    启动时索引为-1,唤醒连接点,后续递增
        if (this.currentInterceptorIndex == this.interceptorsAndDynamicMethodMatchers.size() - 1) {
            return invokeJoinpoint(); // 这里回调真正的业务逻辑
        }

        Object interceptorOrInterceptionAdvice =
                this.interceptorsAndDynamicMethodMatchers.get(++this.currentInterceptorIndex);
        if (interceptorOrInterceptionAdvice instanceof InterceptorAndDynamicMethodMatcher) {
            // 这里进行动态方法匹配校验,静态的方法匹配早已经校验过了(MethodMatcher接口有两种典型:动态/静态校验)
            InterceptorAndDynamicMethodMatcher dm =
                    (InterceptorAndDynamicMethodMatcher) interceptorOrInterceptionAdvice;
            if (dm.methodMatcher.matches(this.method, this.targetClass, this.arguments)) {
                return dm.interceptor.invoke(this);
            }
            else {
                // 动态匹配失败,跳过当前拦截,进入下一个(拦截器链)
                return proceed();
            }
        }
        else {
            // 它是一个拦截器,所以我们只调用它:在构造这个对象之前,切入点将被静态地计算。
            return ((MethodInterceptor) interceptorOrInterceptionAdvice).invoke(this);
        }
    }
朋友们可以调试一下代码,这里的走的 ((MethodInterceptor) interceptorOrInterceptionAdvice).invoke(this)逻辑, 在我们这个场景下走的就是 TransactionInterceptor 的 invoke方法的入口。这里需要理解的是第一次进入 process() 走else调用了TransactionInterceptor 的 invoke方法,然后invocation.proceedWithInvocation() 进入process方法的时候调用链已经走完了,那么这个时候就直接走真正的业务逻辑 invokeJoinpoint()。这就是spring事务的基本织入及调用过程。
PlatformTransactionManager 事务管理器:
无论在声明式事务、编程式事务中,最后都会走事务管理器的PlatformTransactionManager接口的3个方法:
public interface PlatformTransactionManager {

    TransactionStatus getTransaction(@Nullable TransactionDefinition definition) throws TransactionException;

    void commit(TransactionStatus status) throws TransactionException;

    void rollback(TransactionStatus status) throws TransactionException;

}
我们先来看一下常见的实现类图:

如上图所示,PlatformTransactionManager顶级接口定义了最核心的事务管理方法,下面一层是AbstractPlatformTransactionManager抽象类,实现了PlatformTransactionManager接口的方法并定义了一些抽象方法,供子类拓展。最后下面一层是2个经典事务管理器:
- DataSourceTransactionmanager,即JDBC单数据库事务管理器,基于Connection实现,也是我们这次讨论的重点。
- JtaTransactionManager,即多数据库事务管理器(又叫做分布式事务管理器),其实现了JTA规范,使用XA协议进行两阶段提交。
我们这里只看基于DataSourceTransactionmanager源码。
getTransaction 事务获取:
@Override
    public final TransactionStatus getTransaction(TransactionDefinition definition) throws TransactionException {
        Object transaction = doGetTransaction();

        // Cache debug flag to avoid repeated checks.
        boolean debugEnabled = logger.isDebugEnabled();

        if (definition == null) {
            // Use defaults if no transaction definition given.
            definition = new DefaultTransactionDefinition();
        }
      // 如果当前已经存在事务
        if (isExistingTransaction(transaction)) {
            // 根据不同传播机制不同处理、就不走下面了
            return handleExistingTransaction(definition, transaction, debugEnabled);
        }

        // 超时不能小于默认值
        if (definition.getTimeout() < TransactionDefinition.TIMEOUT_DEFAULT) {
            throw new InvalidTimeoutException("Invalid transaction timeout", definition.getTimeout());
        }

        // 当前不存在事务,传播机制=MANDATORY(支持当前事务,没事务可以让他支持),抛出异常
        if (definition.getPropagationBehavior() == TransactionDefinition.PROPAGATION_MANDATORY) {
            throw new IllegalTransactionStateException(
                    "No existing transaction found for transaction marked with propagation 'mandatory'");
        }// 当前不存在事务,传播机制为 REQUIRED/REQUIRED_NEW/NESTED,这三种情况,需要新开启事务,且加上事务同步
        else if (definition.getPropagationBehavior() == TransactionDefinition.PROPAGATION_REQUIRED ||
                definition.getPropagationBehavior() == TransactionDefinition.PROPAGATION_REQUIRES_NEW ||
                definition.getPropagationBehavior() == TransactionDefinition.PROPAGATION_NESTED) {
            SuspendedResourcesHolder suspendedResources = suspend(null);
            if (debugEnabled) {
                logger.debug("Creating new transaction with name [" + definition.getName() + "]: " + definition);
            }
            try {// 是否需要新开启同步// 开启// 开启
                boolean newSynchronization = (getTransactionSynchronization() != SYNCHRONIZATION_NEVER);
                DefaultTransactionStatus status = newTransactionStatus(
                        definition, transaction, true, newSynchronization, debugEnabled, suspendedResources);
                doBegin(transaction, definition);// 开启新事务
                prepareSynchronization(status, definition);//预备同步
                return status;
            }
            catch (RuntimeException ex) {
                resume(null, suspendedResources);
                throw ex;
            }
            catch (Error err) {
                resume(null, suspendedResources);
                throw err;
            }
        }
        else {
            // 当前不存在事务当前不存在事务,且传播机制=PROPAGATION_SUPPORTS/PROPAGATION_NOT_SUPPORTED/PROPAGATION_NEVER,
            // 这三种情况,创建“空”事务:没有实际事务,但可能是同步。
            // 警告:定义了隔离级别,但并没有真实的事务初始化,隔离级别被忽略有隔离级别但是并没有定义实际的事务初始化,有隔离级别但是并没有定义实际的事务初始化,
            if (definition.getIsolationLevel() != TransactionDefinition.ISOLATION_DEFAULT && logger.isWarnEnabled()) {
                logger.warn("Custom isolation level specified but no actual transaction initiated; " +
                        "isolation level will effectively be ignored: " + definition);
            }
            boolean newSynchronization = (getTransactionSynchronization() == SYNCHRONIZATION_ALWAYS);
            return prepareTransactionStatus(definition, null, true, newSynchronization, debugEnabled, null);
        }
    }
这里的代码我们终于遇到了Spring的事务传播属性相关的东西,这里分成了两种情况:
- isExistingTransaction 判断是否已经存在事务,若存在进入handleExistingTransaction()根据不同传播机制不同处理(嵌套事务)
- isExistingTransaction 返回false,不存在已有事务,根据事务传播属性进行分类处理
先来看嵌套事务:
private TransactionStatus handleExistingTransaction(
            TransactionDefinition definition, Object transaction, boolean debugEnabled)
            throws TransactionException {
     // 1.NERVER(不支持当前事务;如果当前事务存在,抛出异常)报错
        if (definition.getPropagationBehavior() == TransactionDefinition.PROPAGATION_NEVER) {
            throw new IllegalTransactionStateException(
                    "Existing transaction found for transaction marked with propagation 'never'");
        }
      // 2.NOT_SUPPORTED(不支持当前事务,现有同步将被挂起)挂起当前事务
        if (definition.getPropagationBehavior() == TransactionDefinition.PROPAGATION_NOT_SUPPORTED) {
            if (debugEnabled) {
                logger.debug("Suspending current transaction");
            }
            Object suspendedResources = suspend(transaction);
            boolean newSynchronization = (getTransactionSynchronization() == SYNCHRONIZATION_ALWAYS);
            return prepareTransactionStatus(
                    definition, null, false, newSynchronization, debugEnabled, suspendedResources);
        }
      // 3.REQUIRES_NEW挂起当前事务,创建新事务
        if (definition.getPropagationBehavior() == TransactionDefinition.PROPAGATION_REQUIRES_NEW) {
            if (debugEnabled) {
                logger.debug("Suspending current transaction, creating new transaction with name [" +
                        definition.getName() + "]");
            }// 挂起当前事务
            SuspendedResourcesHolder suspendedResources = suspend(transaction);
            try {// 创建新事务
                boolean newSynchronization = (getTransactionSynchronization() != SYNCHRONIZATION_NEVER);
                DefaultTransactionStatus status = newTransactionStatus(
                        definition, transaction, true, newSynchronization, debugEnabled, suspendedResources);
                doBegin(transaction, definition);
                prepareSynchronization(status, definition);
                return status;
            }
            catch (RuntimeException beginEx) {
                resumeAfterBeginException(transaction, suspendedResources, beginEx);
                throw beginEx;
            }
            catch (Error beginErr) {
                resumeAfterBeginException(transaction, suspendedResources, beginErr);
                throw beginErr;
            }
        }
     // 4.NESTED嵌套事务
        if (definition.getPropagationBehavior() == TransactionDefinition.PROPAGATION_NESTED) {
            if (!isNestedTransactionAllowed()) {
                throw new NestedTransactionNotSupportedException(
                        "Transaction manager does not allow nested transactions by default - " +
                        "specify 'nestedTransactionAllowed' property with value 'true'");
            }
            if (debugEnabled) {
                logger.debug("Creating nested transaction with name [" + definition.getName() + "]");
            }// 是否支持保存点:非JTA事务走这个分支。AbstractPlatformTransactionManager默认是true,JtaTransactionManager复写了该方法false,DataSourceTransactionmanager没有复写,还是true,
            if (useSavepointForNestedTransaction()) {
                // Usually uses JDBC 3.0 savepoints. Never activates Spring synchronization.
                DefaultTransactionStatus status =
                        prepareTransactionStatus(definition, transaction, false, false, debugEnabled, null);
                status.createAndHoldSavepoint();// 创建保存点
                return status;
            }
            else {
                // JTA事务走这个分支,创建新事务
                boolean newSynchronization = (getTransactionSynchronization() != SYNCHRONIZATION_NEVER);
                DefaultTransactionStatus status = newTransactionStatus(
                        definition, transaction, true, newSynchronization, debugEnabled, null);
                doBegin(transaction, definition);
                prepareSynchronization(status, definition);
                return status;
            }
        }
       // .....省略部分代码  // 到这里PROPAGATION_SUPPORTS 或 PROPAGATION_REQUIRED或PROPAGATION_MANDATORY,存在事务加入事务即可,prepareTransactionStatus第三个参数就是是否需要新事务。false代表不需要新事物
        boolean newSynchronization = (getTransactionSynchronization() != SYNCHRONIZATION_NEVER);
        return prepareTransactionStatus(definition, transaction, false, newSynchronization, debugEnabled, null);
    }
上面的代码段已经反映出了嵌套事务的规则,不过其中又两个比较重要的方法:
- doBegin(transaction, definition) 开启一个新事务。
- suspend(transaction) 挂起当前事务
suspend(transaction):先来看挂起事务,其中先解除绑定当前事务各种属性:名称、只读、隔离级别、是否是真实的事务:
protected final SuspendedResourcesHolder suspend(Object transaction) throws TransactionException {
        if (TransactionSynchronizationManager.isSynchronizationActive()) {// 1.当前存在同步,
            List<TransactionSynchronization> suspendedSynchronizations = doSuspendSynchronization();
            try {
                Object suspendedResources = null;
                if (transaction != null) {// 事务不为空,挂起事务
                    suspendedResources = doSuspend(transaction);
                }// 解除绑定当前事务各种属性:名称、只读、隔离级别、是否是真实的事务.
                String name = TransactionSynchronizationManager.getCurrentTransactionName();
                TransactionSynchronizationManager.setCurrentTransactionName(null);
                boolean readOnly = TransactionSynchronizationManager.isCurrentTransactionReadOnly();
                TransactionSynchronizationManager.setCurrentTransactionReadOnly(false);
                Integer isolationLevel = TransactionSynchronizationManager.getCurrentTransactionIsolationLevel();
                TransactionSynchronizationManager.setCurrentTransactionIsolationLevel(null);
                boolean wasActive = TransactionSynchronizationManager.isActualTransactionActive();
                TransactionSynchronizationManager.setActualTransactionActive(false);
                return new SuspendedResourcesHolder(
                        suspendedResources, suspendedSynchronizations, name, readOnly, isolationLevel, wasActive);
            }
    // ..... 省略代码
}
然后调用 doSuspend(transaction) ,这个方法由具体的实现类去复写,这里就是DataSourceTransactionManager:
@Override
protected Object doSuspend(Object transaction) {
        DataSourceTransactionObject txObject = (DataSourceTransactionObject) transaction;
        txObject.setConnectionHolder(null);//把当前事务的connectionHolder数据库连接持有者清空。
      // 当前线程解绑datasource.其实就是ThreadLocal移除对应变量private static final ThreadLocal<Map<Object, Object>> resources = new NamedThreadLocal<>("Transactional resources");
        return TransactionSynchronizationManager.unbindResource(obtainDataSource());
}
上述代码中就涉及到一个很重要的事务同步管理器 :TransactionSynchronizationManager ,该类中维护了事务中本地变量:
public abstract class TransactionSynchronizationManager {

    private static final Log logger = LogFactory.getLog(TransactionSynchronizationManager.class);
    // 事务资源:map<k,v> 两种数据对。1.会话工厂和会话k=SqlsessionFactory v=SqlSessionHolder 2.数据源和连接k=DataSource v=ConnectionHolder,就是上面提到的map
    private static final ThreadLocal<Map<Object, Object>> resources =
            new NamedThreadLocal<Map<Object, Object>>("Transactional resources");
    // 事务同步
    private static final ThreadLocal<Set<TransactionSynchronization>> synchronizations =
            new NamedThreadLocal<Set<TransactionSynchronization>>("Transaction synchronizations");
  // 当前事务名称
    private static final ThreadLocal<String> currentTransactionName =
            new NamedThreadLocal<String>("Current transaction name");
  // 当前事务的只读属性
    private static final ThreadLocal<Boolean> currentTransactionReadOnly =
            new NamedThreadLocal<Boolean>("Current transaction read-only status");
  // 当前事务的隔离级别
    private static final ThreadLocal<Integer> currentTransactionIsolationLevel =
            new NamedThreadLocal<Integer>("Current transaction isolation level");
  // 是否存在事务
    private static final ThreadLocal<Boolean> actualTransactionActive =
            new NamedThreadLocal<Boolean>("Actual transaction active");
    // ....省略代码
}
doBegin(transaction, definition) :
@Override
protected void doBegin(Object transaction, TransactionDefinition definition) {
        DataSourceTransactionObject txObject = (DataSourceTransactionObject) transaction;
        Connection con = null;

        try {// 如果事务还没有connection或者connection在事务同步状态,重置新的connectionHolder
            if (!txObject.hasConnectionHolder() ||
                    txObject.getConnectionHolder().isSynchronizedWithTransaction()) {
                Connection newCon = this.dataSource.getConnection();
                if (logger.isDebugEnabled()) {
                    logger.debug("Acquired Connection [" + newCon + "] for JDBC transaction");
                }// 重置新的connectionHolder
                txObject.setConnectionHolder(new ConnectionHolder(newCon), true);
            }
       //设置新的连接为事务同步中
            txObject.getConnectionHolder().setSynchronizedWithTransaction(true);
            con = txObject.getConnectionHolder().getConnection();
         //conn设置事务隔离级别,只读
            Integer previousIsolationLevel = DataSourceUtils.prepareConnectionForTransaction(con, definition);
            txObject.setPreviousIsolationLevel(previousIsolationLevel);//DataSourceTransactionObject设置事务隔离级别

            // 如果是自动提交切换到手动提交
            // so we don't want to do it unnecessarily (for example if we've explicitly
            // configured the connection pool to set it already).
            if (con.getAutoCommit()) {
                txObject.setMustRestoreAutoCommit(true);
                if (logger.isDebugEnabled()) {
                    logger.debug("Switching JDBC Connection [" + con + "] to manual commit");
                }
                con.setAutoCommit(false);
            }
       // 如果只读,执行sql设置事务只读
            prepareTransactionalConnection(con, definition);
            txObject.getConnectionHolder().setTransactionActive(true);// 设置connection持有者的事务开启状态

            int timeout = determineTimeout(definition);
            if (timeout != TransactionDefinition.TIMEOUT_DEFAULT) {
                txObject.getConnectionHolder().setTimeoutInSeconds(timeout);// 设置超时秒数
            }

            // 绑定connection持有者到当前线程
            if (txObject.isNewConnectionHolder()) {
                TransactionSynchronizationManager.bindResource(getDataSource(), txObject.getConnectionHolder());
            }
        }
      //....省略代码
}
开启新事务的 doBegin() 中最重要的操作:
- DataSourceTransactionObject“数据源事务对象”,设置ConnectionHolder,再给ConnectionHolder设置各种属性:自动提交、超时、事务开启、隔离级别。
- 给当前线程绑定一个线程本地变量,key=DataSource数据源 v=ConnectionHolder数据库连接。
commit 提交事务:
public final void commit(TransactionStatus status) throws TransactionException {
        if (status.isCompleted()) {//事务已经完成,抛出异常
            throw new IllegalTransactionStateException(
                    "Transaction is already completed - do not call commit or rollback more than once per transaction");
        }

        DefaultTransactionStatus defStatus = (DefaultTransactionStatus) status;
        if (defStatus.isLocalRollbackOnly()) {//事务状态标记为回滚
            if (defStatus.isDebug()) {
                logger.debug("Transactional code has requested rollback");
            }//执行回滚
            processRollback(defStatus, false);
            return;
        }

        if (!shouldCommitOnGlobalRollbackOnly() && defStatus.isGlobalRollbackOnly()) {
            if (defStatus.isDebug()) {
                logger.debug("Global transaction is marked as rollback-only but transactional code requested commit");
            }//回滚
            processRollback(defStatus, true);
            return;
        }
        // 处理提交
        processCommit(defStatus);
}
经过一系列判断进入主要的方法 processCommit:
private void processCommit(DefaultTransactionStatus status) throws TransactionException {
        try {
            boolean beforeCompletionInvoked = false;
            try {//3个前置操作
                prepareForCommit(status);
                triggerBeforeCommit(status);
                triggerBeforeCompletion(status);
                beforeCompletionInvoked = true;//3个前置操作已调用
                boolean globalRollbackOnly = false;//新事务 或 全局回滚失败
                if (status.isNewTransaction() || isFailEarlyOnGlobalRollbackOnly()) {
                    globalRollbackOnly = status.isGlobalRollbackOnly();
                }//1.有保存点,即嵌套事务
                if (status.hasSavepoint()) {
                    if (status.isDebug()) {
                        logger.debug("Releasing transaction savepoint");
                    }//释放保存点
                    status.releaseHeldSavepoint();
                }//2.新事务
                else if (status.isNewTransaction()) {
                    if (status.isDebug()) {
                        logger.debug("Initiating transaction commit");
                    }//调用事务处理器提交事务
                    doCommit(status);
                }
                // 3.非新事务,且全局回滚失败,但是提交时没有得到异常,抛出异常
                if (globalRollbackOnly) {
                    throw new UnexpectedRollbackException(
                            "Transaction silently rolled back because it has been marked as rollback-only");
                }
            }
            catch (UnexpectedRollbackException ex) {
                // 触发完成后事务同步,状态为回滚
                triggerAfterCompletion(status, TransactionSynchronization.STATUS_ROLLED_BACK);
                throw ex;
            }// 事务异常
            catch (TransactionException ex) {
                // 提交失败回滚
                if (isRollbackOnCommitFailure()) {
                    doRollbackOnCommitException(status, ex);
                }// 触发完成后回调,事务同步状态为未知
                else {
                    triggerAfterCompletion(status, TransactionSynchronization.STATUS_UNKNOWN);
                }
                throw ex;
            }// 运行时异常
            catch (RuntimeException ex) {
            // 如果3个前置步骤未完成,调用前置的最后一步操作
                if (!beforeCompletionInvoked) {
                    triggerBeforeCompletion(status);
                }// 提交异常回滚
                doRollbackOnCommitException(status, ex);
                throw ex;
            }// 其它异常
            catch (Error err) {
            // 如果3个前置步骤未完成,调用前置的最后一步操作
                if (!beforeCompletionInvoked) {
                    triggerBeforeCompletion(status);
                }// 提交异常回滚
                doRollbackOnCommitException(status, err);
                throw err;
            }

            // Trigger afterCommit callbacks, with an exception thrown there
            // propagated to callers but the transaction still considered as committed.
            try {
                triggerAfterCommit(status);
            }
            finally {
                triggerAfterCompletion(status, TransactionSynchronization.STATUS_COMMITTED);
            }

        }
        finally {
            cleanupAfterCompletion(status);
        }
    }
细节部分就不去扣了,这里最终调用 doCommit(status) 提交事务:
@Override
protected void doCommit(DefaultTransactionStatus status) {
        DataSourceTransactionObject txObject = (DataSourceTransactionObject) status.getTransaction();
        Connection con = txObject.getConnectionHolder().getConnection();
        if (status.isDebug()) {
            logger.debug("Committing JDBC transaction on Connection [" + con + "]");
        }
        try {//提交事务
            con.commit();
        }
        catch (SQLException ex) {
            throw new TransactionSystemException("Could not commit JDBC transaction", ex);
        }
}
提交流程中涉及到的SqlSessionSynchronization是SqlSessionUtils的一个内部类,继承自TransactionSynchronizationAdapter抽象类,实现了事务同步接口TransactionSynchronization。看一下接口定义
public interface TransactionSynchronization extends Flushable {

    /** 正确提交时的完成状态 */
    int STATUS_COMMITTED = 0;

    /** 正确回滚情况下的完成状态 */
    int STATUS_ROLLED_BACK = 1;

    /** 启发式混合完成或系统错误情况下的完成状态 */
    int STATUS_UNKNOWN = 2;

    /**挂起事务,解绑资源*/
    default void suspend() {
    }
    /**唤醒事务,重新绑定资源*/
    default void resume() {
    }

    /**将底层会话刷新到数据存储(如果适用)*/
    @Override
    default void flush() {
    }

    /**事务提交前的操作*/
    default void beforeCommit(boolean readOnly) {
    }

    /**事务提交完成前的操作*/
    default void beforeCompletion() {
    }

    /**事务提交后的额操作*/
    default void afterCommit() {
    }

    /**事务提交完成后后的操作*/
    default void afterCompletion(int status) {
    }
}
rollback 回滚事务:
public final void rollback(TransactionStatus status) throws TransactionException {
        if (status.isCompleted()) { // 事务状态是完成,抛出异常
            throw new IllegalTransactionStateException(
                    "Transaction is already completed - do not call commit or rollback more than once per transaction");
        }

        DefaultTransactionStatus defStatus = (DefaultTransactionStatus) status;
        processRollback(defStatus, false);//回滚
}
processRollback 回滚:
private void processRollback(DefaultTransactionStatus status) {
        try {
            try {// 解绑当前线程绑定的会话工厂,并关闭会话
                triggerBeforeCompletion(status);
                if (status.hasSavepoint()) {// 1.如果有保存点,即嵌套式事务
                    if (status.isDebug()) {
                        logger.debug("Rolling back transaction to savepoint");
                    }//回滚到保存点
                    status.rollbackToHeldSavepoint();
                }//2.如果就是一个简单事务
                else if (status.isNewTransaction()) {
                    if (status.isDebug()) {
                        logger.debug("Initiating transaction rollback");
                    }//回滚核心方法
                    doRollback(status);
                }//3.当前存在事务且没有保存点,即加入当前事务的
                else if (status.hasTransaction()) {//如果已经标记为回滚 或 当加入事务失败时全局回滚(默认true)
                    if (status.isLocalRollbackOnly() || isGlobalRollbackOnParticipationFailure()) {
                        if (status.isDebug()) {//debug时会打印:加入事务失败-标记已存在事务为回滚
                            logger.debug("Participating transaction failed - marking existing transaction as rollback-only");
                        }//设置当前connectionHolder:当加入一个已存在事务时回滚
                        doSetRollbackOnly(status);
                    }
                    else {
                        if (status.isDebug()) {
                            logger.debug("Participating transaction failed - letting transaction originator decide on rollback");
                        }
                    }
                }
                else {
                    logger.debug("Should roll back transaction but cannot - no transaction available");
                }
            }
            catch (RuntimeException ex) {//关闭会话,重置SqlSessionHolder属性
                triggerAfterCompletion(status, TransactionSynchronization.STATUS_UNKNOWN);
                throw ex;
            }
            catch (Error err) {
                triggerAfterCompletion(status, TransactionSynchronization.STATUS_UNKNOWN);
                throw err;
            }
            triggerAfterCompletion(status, TransactionSynchronization.STATUS_ROLLED_BACK);
        }
        finally {//解绑当前线程
            cleanupAfterCompletion(status);
        }
    }
调用回滚核心方法doRollback(status):
protected void doRollback(DefaultTransactionStatus status) {
        DataSourceTransactionObject txObject = (DataSourceTransactionObject) status.getTransaction();
        Connection con = txObject.getConnectionHolder().getConnection();
        if (status.isDebug()) {
            logger.debug("Rolling back JDBC transaction on Connection [" + con + "]");
        }
        try {//回滚
            con.rollback();
        }
        catch (SQLException ex) {
            throw new TransactionSystemException("Could not roll back JDBC transaction", ex);
        }
}
整个流程深度还是比较深的,需要我们慢慢去琢磨。慢慢积累吧!

可参考:Spring事务注解@Transactional的流程和源码分析_spring @transactional源码分析-CSDN博客
在使用事务的时候需要添加@EnableTransactionManagement注解来开启事务,Spring事务底层是通过AOP来实现的,所以启用事务后,同样会向容器中注入一个代理对象创建器,AOP使用的是AnnotationAwareAspectJAutoProxyCreator,事务使用的是InfrastructureAdvisorAutoProxyCreator。实际上,真正起事务作用的是最底层的DatasourceTransactionManager、hibernateTransactionManager等
-
Advice通知:定义在切点上需要执行什么样的操作;
-
PointCut切点:定义在哪些方法上使用通知;
-
Advisor:Advice和Pointcut加起来组成了Advisor,可以看做是对切面的封装;
在使用AOP时,一般会创建一个切面,里面包含了切点和通知,事务既然基于AOP实现,所以也会有对应的通知和切点。
事务Advisor
开启事务时,还会向Spring容器中注册一个BeanFactoryTransactionAttributeSourceAdvisor,从名字上可以看出它是一个Advisor,它重点有以下几个类型的成员变量:
-
Advice(通知):传入的实际类型为TransactionInterceptor,它是事务拦截器,实现了Advice接口,这个拦截器就相当于AOP中的通知,在执行目标方法前会进行拦截,进行事务处理;
-
TransactionAttributeSourcePointcut(切点):它实现了Pointcut和MethodMatcher接口,是一个切点,目标方法是否需要被事务代理就是通过它判断的;
-
TransactionAttributeSource:传入的实际类型为AnnotationTransactionAttributeSource,用于解析事务属性相关配置信息;
Advisor由Advice和Pointcut组成,现在Advice和Pointcut都已经知道了,接下来就去看看是如何判断当前Bean是否需要进行事务代理的。
事务底层是通过AOP实现的,所以它的处理逻辑与AOP类似,启动时会注册一个后置处理器,在postProcessAfterInitialization方法中判断是否需要进行代理,逻辑与AOP一致,会获取所有的Advisor,判断是否有匹配当前Bean的Advisor,Spring会自动为事务注册Advisor(BeanFactoryTransactionAttributeSourceAdvisor),匹配的处理逻辑在TransactionAttributeSourcePointcut切点中实现,是否匹配的判断条件如下:
- 判断当前Bean的Class是否匹配,具体是通过ClassFilter(TransactionAttributeSourceClassFilter)的matches方法实现的,注意这里并不是判断当前Bean所在类上面是否有事务注解,这个条件主要是为了排除一些Spring认为不需要进行事务代理的类,比如某个Bean的类路径以java.开头,而我们编写的类一般不会是以java开头的,所以这个Bean就会跳过代理,对于我们编写的Bean,一般不会被这个条件过滤掉,会进行下一个条件判断;
TransactionAttributeSourceClassFilter是TransactionAttributeSourcePointcut的内部类,里面有matches方法的实现。
-
判断当前Bean中的方法是否与事务切点匹配,具体是通过MethodMatcher(TransactionAttributeSourcePointcut)的matches方法实现,这里会获取当前Bean的所有方法,一个个与事务切点进行匹配,匹配规则如下:
(1)从方法中获取事务注解相关的设置;
(2)从方法所在类中获取事务注解相关设置;
(3)如果方法所在的类实现了接口,还会从接口上面解析是否有事务注解相关的配置;如果我们使用了@Transactional注解对方法或者类进行了配置,就会在这一步解析到相关内容。
如果通过以上方式中的任意一种获取到了事务相关设置,就会认为当前Bean需要进行事务代理,为其创建代理对象,实现与AOP一致,会为其创建一个AOP代理对象,只不过在执行目标方法时,Spring会通过已经设定好的事务切面进行拦截,也就是BeanFactoryTransactionAttributeSourceAdvisor中的TransactionInterceptor对进行方法拦截,而在AOP中一般是我们自己编写切面。
事务拦截
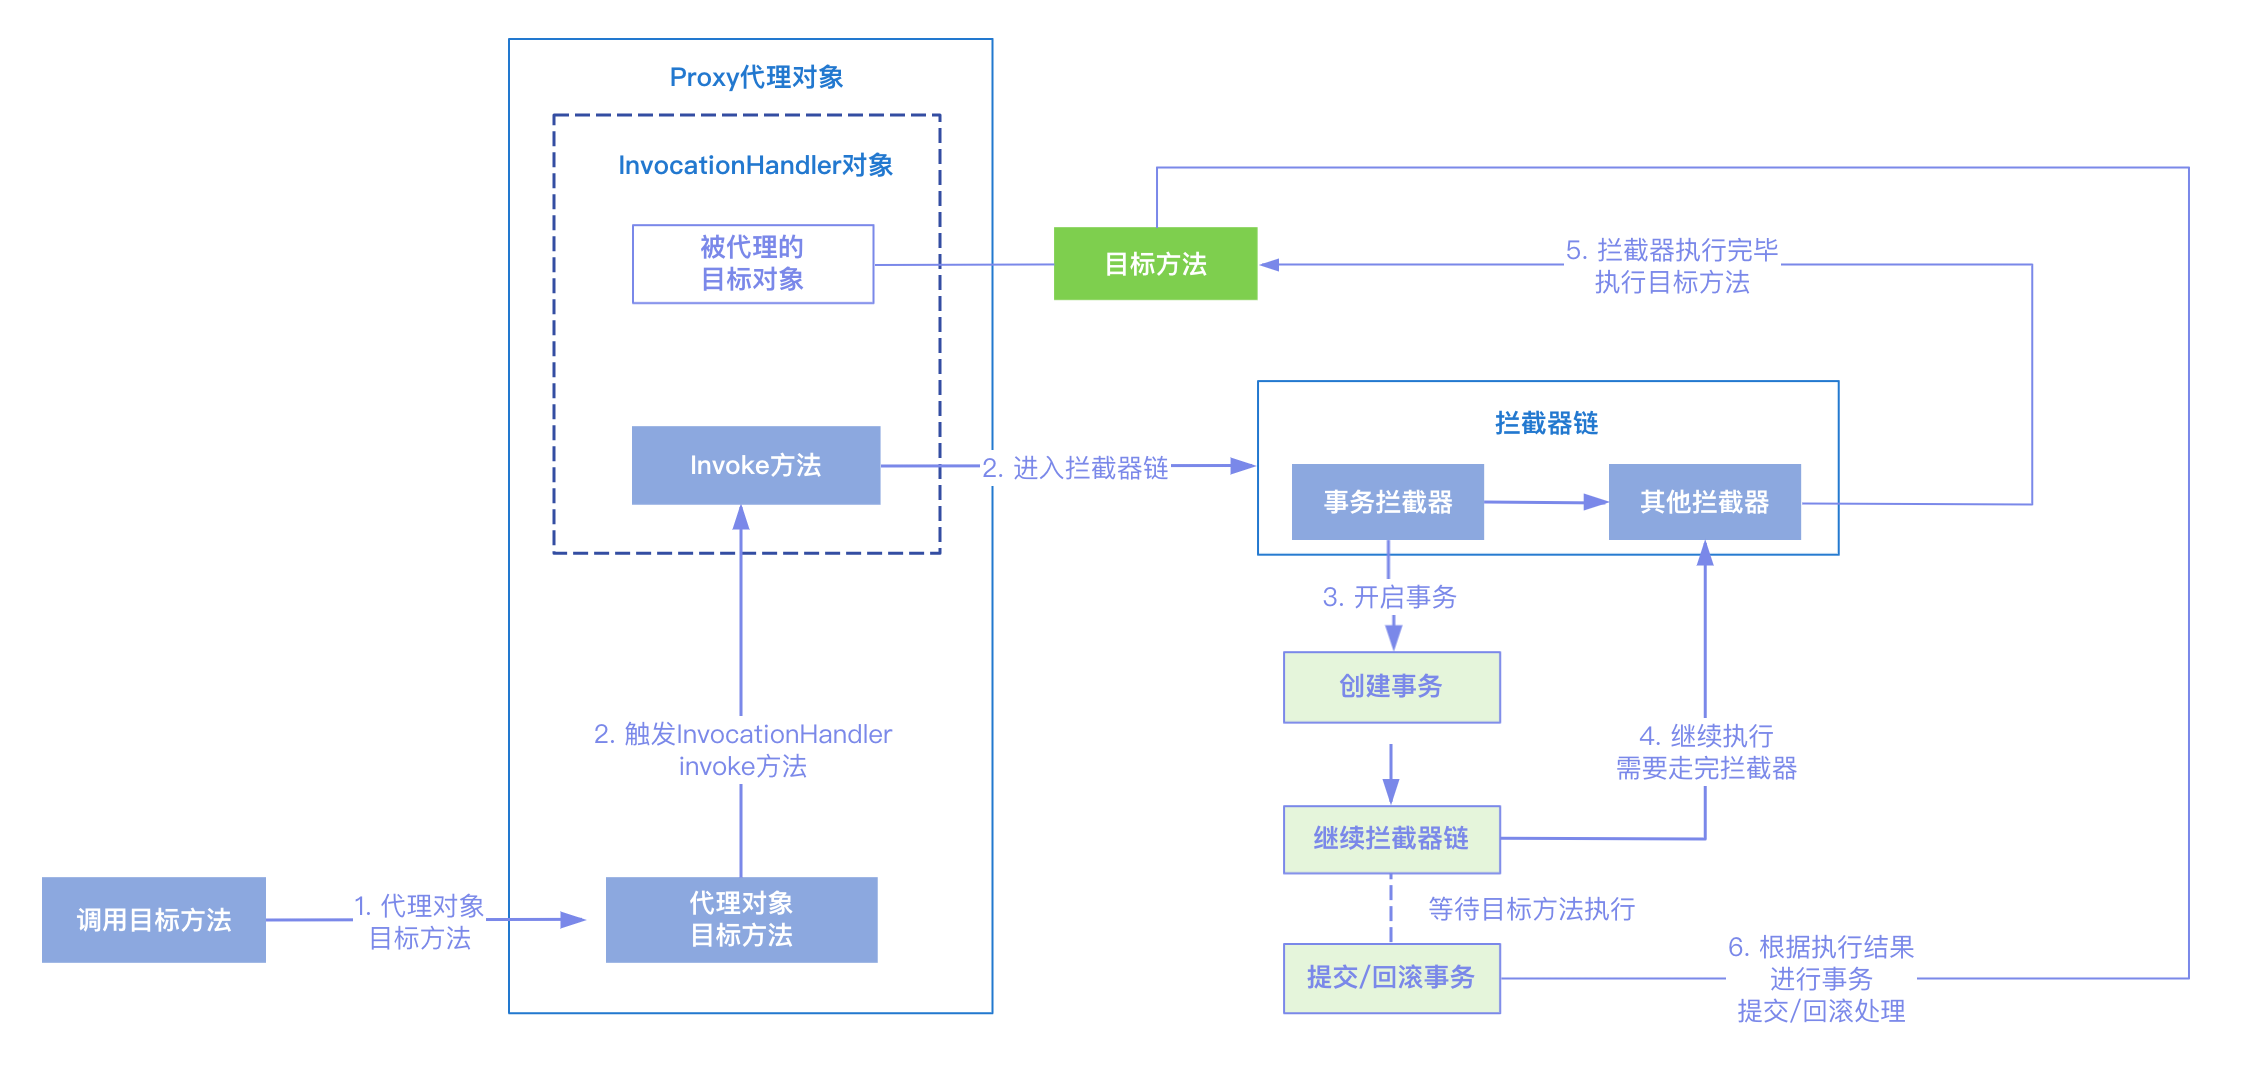
上面我们知道对于需要进行事务拦截的Bean,会为其创建代理对象,在执行目标方法的时候,会进入事务拦截器的处理逻辑,主要步骤如下:
- 获取事务管理器;
- 创建事务;
- 这里主要是向后执行拦截器链,待所有的拦截器都执行完毕之后,执行目标方法;
- 捕捉异常,如果出现异常进行回滚;
- 提交事务;
事务的创建
事务的创建分为两部分:
一、 获取事务
(1)首先获取事务对象,它是一个抽象方法,数据源的不同具体的实现类也不同;
以DataSourceTransactionManager为例,它主要是创建了一个数据源事务对象(DataSourceTransactionObject),然后根据数据源信息源获取当前线程绑定的ConnectionHolder对象(如果有的话会获取到否则获取为空),ConnectionHolder中存有数据库连接及事务的活跃状态,之后会将这个ConnectionHolder设置到数据源事务对象中,将数据源事务对象返回;
(2)根据上一步获取到的事务对象,判断当前线程是否存在事务,如果存在事务需要根据事务传播行为进行不同的处理;
是否存在事务的判断方式是通过当前线程是否持有数据库连接(数据源事务对象中的ConnectionHolder不为空)并且事务处于活跃状态。
- 如果事务传播行为设是PROPAGATION_NEVER,表示不能存在事务,当前存在事务会抛出异常;
- 如果事务的传播行为是PROPAGATION_NOT_SUPPORTED,表示以不使用事务的方式执行,如果当前存在事务,则挂起当前的事务,执行完当前逻辑后(不使用事务)再恢复挂起的事务;
- 如果事务的传播行为是PROPAGATION_REQUIRES_NEW,表示每次执行都新建事务,如果当前存在事务需要挂起当前事务,创建一个自己的事务执行之后再恢复挂起的事务;
- 如果事务的传播行为是PROPAGATION_NESTED,表示嵌套事务,判断是否使用保存点,如果是则使用嵌套事务,否则开启一个新事务;
- 其他情况使用当前的事务;
(3)如果当前线程不存在事务:
-
如果事务的传播行为是PROPAGATION_MANDATORY,它要求必须存在事务,当前不存在事务,会抛出异常;
-
如果传播行为是PROPAGATION_REQUIRED、PROPAGATION_REQUIRES_NEW或者PROPAGATION_NESTED,新建事务;
-
其他情况创建一个空事务;
新建事务说明之前不存在事务,ConnectionHolder为空,此时会从数据库连接池中获取一个连接,设置到ConnectionHolder中,并将当前线程对应这个ConnectionHolder与数据源绑定(底层ThreadLocal实现),上面第(1)步中可以看到会通过数据源获取当前线程的ConnectionHolder,数据就是在这里添加的,之后就可以通过这个判断当前线程是否已经存在事务。
二、 预处理事务
主要是进行事务相关信息的封装以及事务和线程的绑定。
事务回滚
当执行过程中出现异常时,会进行事务回滚,回滚的处理逻辑如下:
- 判断事务是否设置了保存点,如果设置了将事务回滚到保存点;
- 如果是一个独立的新事务,直接回滚即可;
- 如果既没有设置保存点,也不是一个新事务,说明可能处于嵌套事务中,此时只设置回滚状态rollbackOnly为true,当它的外围事务进行提交时,如果发现回滚状态为true,外围事务则不提交;
资源清理
在事务提交/回滚之后,需要根据情况清理相关的资源以及恢复被挂起的事务,主要有以下操作:
- 清除当前线程绑定的事务相关信息;
- 清除当前线程对应的ConnectionHolder与数据源的绑定关系及ConnectionHolder自身的清理;
- 如果挂起的事务不为空,恢复挂起的事务;
事务和锁


有时,在高并发场景下,我们项目里会同时使用事务和锁,锁就是为了保证在同一时刻,代码块只有一个线程可以执行,事务就是为了控制业务数据的逻辑正确,从而保证数据库数据的一致性。
有些时候,使用了事务,就会导致锁失效。原因在于,如果你得数据库使用的是mysql,mysql的隔离级别默认为可重复读,说白了,就是多个线程都走这段代码块时,每个线程的数据互不影响,在同一个线程内多次读取都是同一个值。
举个例子:假如这段代码块中有两个操作,一个操作是读取竞价表中最高价字段的值,另一个操作是更新竞价表的最高价字段的值,则在这段代码块中获取的最高价的值都是当前线程的值,而不受其他线程更新最高价的影响。这就是可重复读的隔离级别,这个隔离级别也是很高了。
如果这段代码块加了锁,和事务,如果代码块是这样的:
@Transactional(rollbackFor = Exception.class)
    @Override
    public void entryTransAction(int newMoney,String threadName){
        RLock bidLock = redissonClient.getLock("bidLock");
        try{
            bidLock.lock();
            //执行业务代码-查询最高价
            Integer maxMoney =  this.queryMax();

            if (newMoney <= maxMoney){
                log.warn("出价低于最高价,无法出价");
                return;
            }
            //根据最高价更新数据库
            this.updateMoney(newMoney,threadName);

        }catch (Exception e){
            e.printStackTrace();
            throw new RuntimeException("cuowu");
        }finally {
            bidLock.unlock();
        }
    }
上面的代码块中锁放到了事务的内部,锁内部执行了查询最大值的操作,然后更新最大值,如果不加锁就会出现多个线程同时进入到这个代码块中,同时处理最大值,从而导致最大值不正确。加了锁后,同一时刻只有一个线程执行查询和更新操作,当前线程释放锁之后才能允许下一个线程进入执行。
而如果将事务放到了锁的外面时,只有等事务提交后当前线程的执行数据库的操作才会更新,而此时恰好在当前线程释放锁之后、事务提交之前有其他线程执行 Integer maxMoney = this.queryMax();这个代码时,就会出现读到的数据不正确,从而导致锁失效。
所以为了解决这种情况,保证锁生效,我们一定要将锁放到事务的外面,也就是这样写:
@Override
    public void userBidTest1(int newMoney,String threadName) throws Exception{

                //获取锁对象
        RLock lock = redissonClient.getLock(lockKey);
            //尝试获取一个锁,如果获取成功,向队列中添加出价信息,如果获取失败,抛出异常
        if(lock.tryLock(2,3,TimeUnit.SECONDS)){
            try{

                //调用另一个方法,从队列中取出出价的信息,并更新数据库
               TestBidZsServiceImpl o = (TestBidZsServiceImpl) AopContext.currentProxy();
                o.entryTransAction(newMoney,threadName);
            }catch (Exception e){
                e.printStackTrace();
            }finally{
                //释放锁
                lock.unlock();
            }
        }else{
            //获取锁失败,抛出异常
            throw new RuntimeException("获取锁失败");
        }

    }


    @Transactional(rollbackFor = Exception.class)
    @Override
    public void entryTransAction(int newMoney,String threadName){

        try{

            //执行业务代码-查询最高价
            Integer maxMoney =  this.queryMax();
            if (maxMoney ==null){
                //根据最高价更新数据库
                this.updateMoney(newMoney,threadName);
//                int b = 1/ 0;
                return;
            }

            if (newMoney <= maxMoney){
                log.warn("出价低于最高价,无法出价");
                return;
            }
            //根据最高价更新数据库
            this.updateMoney(newMoney,threadName);
//            int a =  1/0;

        }catch (Exception e){
            e.printStackTrace();
            throw new RuntimeException("cuowu");
        }finally {

        }
    }
上面的代码中将有事务的方法包了一层,锁放在了外面,这样就能保证多个线程只有有一个线程执行当前代码块了。


 192
192

 被折叠的 条评论
为什么被折叠?
被折叠的 条评论
为什么被折叠?
 到【灌水乐园】发言


