


概述:
popupWindow可以用来实现弹出框效果,弹出框的布局可以任意指定,这个弹出框是悬浮在当前activity之上的。
使用方式:
1.为popupWindow填充一个布局;
2.new出popupWindow实例;
3.调用showAsDropDown或者showAtLocation方法显示弹出框.
示例:
1.popupWindow的布局:
<?xml version="1.0" encoding="utf-8"?>
<LinearLayout xmlns:android="http://schemas.android.com/apk/res/android"
    android:layout_height="match_parent"
    android:layout_width="match_parent"
    android:background="#00ff00"
    android:orientation="vertical" >

    <TextView
        android:id="@+od/tv"
        android:layout_width="match_parent"
        android:layout_height="wrap_content"
        android:gravity="center_horizontal"
        android:textSize="25sp"
        android:text="立 即 更 新"
        />
    <ImageView
        android:layout_width="match_parent"
        android:layout_height="1dp"
        android:background="#000"
        />
    <RelativeLayout
        android:layout_width="match_parent"
        android:layout_height="wrap_content"
        android:gravity="center_horizontal"
        >
        <Button
            android:id="@+id/but_neg"
            android:layout_width="wrap_content"
            android:layout_height="wrap_content"
            android:text="取消"
            />
        <Button
            android:id="@+id/but_pos"
            android:layout_width="wrap_content"
            android:layout_height="wrap_content"
            android:text="确定"
            android:layout_marginLeft="20dp"
            android:layout_toRightOf="@id/but_neg"
            />
    </RelativeLayout>
</LinearLayout>
2.activity:
activity的布局很简单,只有一个button,用于显示popupWindow,就不贴了。
package com.example.popupwindowdemo;
import android.app.Activity;
import android.graphics.drawable.BitmapDrawable;
import android.os.Bundle;
import android.view.Gravity;
import android.view.View;
import android.view.View.OnClickListener;
import android.widget.Button;
import android.widget.LinearLayout.LayoutParams;
import android.widget.PopupWindow;
import android.widget.Toast;
public class MainActivity extends Activity implements OnClickListener
{
    private PopupWindow pw = null;
    private Button but_pos = null;
    private Button but_neg = null;

    private Button but_show = null;

    private int screenWidth = 0;
    @Override
    protected void onCreate(Bundle savedInstanceState)
    {
        super.onCreate(savedInstanceState);
        setContentView(R.layout.activity_main);
        screenWidth = getWindowManager().getDefaultDisplay().getWidth();
        but_show = (Button) findViewById(R.id.but_show);
        but_show.setOnClickListener(this);
    }

    public void initPopupWindow()
    {
        View view = getLayoutInflater().inflate(R.layout.layout_popup_window,null);
        but_pos = (Button) view.findViewById(R.id.but_pos);
        but_neg = (Button) view.findViewById(R.id.but_neg);
        but_neg.setOnClickListener(this);
        but_pos.setOnClickListener(this);

        pw = new PopupWindow(view, LayoutParams.WRAP_CONTENT, LayoutParams.WRAP_CONTENT,true);
        pw.setWidth(screenWidth*3/4);
        pw.setBackgroundDrawable(new BitmapDrawable());
    }
    @Override
    public void onClick(View v)
    {
        switch (v.getId())
        {
        case R.id.but_neg:
            Toast.makeText(this,"取消", 0).show();
            pw.dismiss();
            break;
        case R.id.but_pos:
            Toast.makeText(this,"开始下载", 0).show();
            pw.dismiss();
            break;
        case R.id.but_show:
            initPopupWindow();
            //显示在指定位置
            pw.showAtLocation(findViewById(R.id.root),Gravity.CENTER,0,0);
            //默认显示在指定的view左下,可以指定偏移量,这里让其显示在中间
//            pw.showAsDropDown(but_show,(screenWidth-pw.getWidth())/2,0);
            break;
        }
    }
}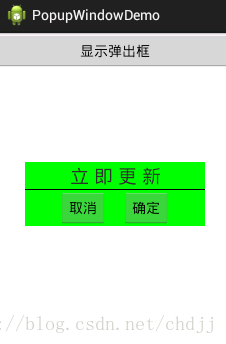
当我们点击按钮后,将会弹出上面定义的弹出框,另外如果我们希望给其
增加动画,我们可以调用
setAnimationStyle方法。
添加自定义动画
比如我们希望给这个弹出框增加淡入淡出的效果。
首先我们先定义好动画:
in.xml
<?xml version="1.0" encoding="utf-8"?>
<set xmlns:android="http://schemas.android.com/apk/res/android">
  <alpha
      android:fromAlpha="0"
      android:toAlpha="1"
      android:duration="2000"
      />
</set><?xml version="1.0" encoding="utf-8"?>
<set xmlns:android="http://schemas.android.com/apk/res/android">
<alpha android:fromAlpha="1"
android:toAlpha="0"
android:duration="1000"
/>
</set><style name="popup_window_style">
<item name="android:windowEnterAnimation">@anim/in</item>
<item name="android:windowExitAnimation">@anim/out</item>
</style>pw.setAnimationStyle(R.style.popup_window_style);
现在弹出框就有了淡入淡出的效果了.
注意:
当我们触摸弹出框外侧或者点击back键时,弹出框会自动消失,这符合我们的使用常识。但是当我们去掉下面这一句后,将会发现弹出框不能被dismiss掉。
pw.setBackgroundDrawable(new BitmapDrawable());
这是为什么呢?我们跟踪源码看看。
从showAtLocation方法开始:
public void showAtLocation(IBinder token, int gravity, int x, int y) {
        if (isShowing() || mContentView == null) {
            return;
        }
        unregisterForScrollChanged();
        mIsShowing = true;
        mIsDropdown = false;
        WindowManager.LayoutParams p = createPopupLayout(token);
        p.windowAnimations = computeAnimationResource();

        preparePopup(p);
        if (gravity == Gravity.NO_GRAVITY) {
            gravity = Gravity.TOP | Gravity.START;
        }
        p.gravity = gravity;
        p.x = x;
        p.y = y;
        if (mHeightMode < 0) p.height = mLastHeight = mHeightMode;
        if (mWidthMode < 0) p.width = mLastWidth = mWidthMode;
        invokePopup(p);
}private void preparePopup(WindowManager.LayoutParams p) {
if (mContentView == null || mContext == null || mWindowManager == null) {
throw new IllegalStateException("You must specify a valid content view by "
+ "calling setContentView() before attempting to show the popup.");
}
if (mBackground != null) {
final ViewGroup.LayoutParams layoutParams = mContentView.getLayoutParams();
int height = ViewGroup.LayoutParams.MATCH_PARENT;
if (layoutParams != null &&
layoutParams.height == ViewGroup.LayoutParams.WRAP_CONTENT) {
height = ViewGroup.LayoutParams.WRAP_CONTENT;
}
// when a background is available, we embed the content view
// within another view that owns the background drawable
PopupViewContainer popupViewContainer = new PopupViewContainer(mContext);
PopupViewContainer.LayoutParams listParams = new PopupViewContainer.LayoutParams(
ViewGroup.LayoutParams.MATCH_PARENT, height
);
popupViewContainer.setBackgroundDrawable(mBackground);
popupViewContainer.addView(mContentView, listParams);
mPopupView = popupViewContainer;
} else {
mPopupView = mContentView;
}
mPopupViewInitialLayoutDirectionInherited =
(mPopupView.getRawLayoutDirection() == View.LAYOUT_DIRECTION_INHERIT);
mPopupWidth = p.width;
mPopupHeight = p.height;
}
可以看到如果mBackground 为空则将mContentView赋给popupView,否则在mContentView外侧包装一个popupViewContainer。mContentView即弹出框上显示的view,那么这个popupViewContainer是啥?
经查找,发现它是PopupWindow的一个内部类:
private class PopupViewContainer extends FrameLayout
观察这个类,
我们发现这个类重写了onTouchEvent,dispatchTouchEvent,dispatchKeyEvent等方法。
比如说这个
onTouchEvent就定义了当我们点击popupWindow外就会自动dismiss掉弹出框:
public boolean onTouchEvent(MotionEvent event) {
            final int x = (int) event.getX();
            final int y = (int) event.getY();

            if ((event.getAction() == MotionEvent.ACTION_DOWN)
                    && ((x < 0) || (x >= getWidth()) || (y < 0) || (y >= getHeight()))) {
                dismiss();
                return true;
            } else if (event.getAction() == MotionEvent.ACTION_OUTSIDE) {
                dismiss();
                return true;
            } else {
                return super.onTouchEvent(event);
            }
        }


 309
309

 被折叠的 条评论
为什么被折叠?
被折叠的 条评论
为什么被折叠?
 到【灌水乐园】发言


