


愿所有人都摆脱冷气,只是向上走,不必听自暴自弃者流的话
一、前言
(1)弹窗选择说明:
按目前来说,我们处理弹窗的时候,Google官方提供了两种选择给我们,分别是PopupWindow和Dialog。今天我们的主角是PopupWindow,Dialog的讲解会在后续的文章中推出。
(2)PopupWindow位置异常说明:
开始正式讲解PopupWindow之前,我想事先说明关于PopupWindow位置异常的一些事情,以帮助大家在解决实际开发中,一些异常事情的问题解惑。
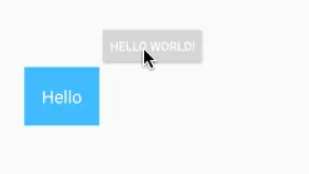
- PopupWindow 中的 showAsDropDown(View anchor) 用于在指定锚点View下方显示 PopupWindow
在Android 7.0 (api<=23) 前,此方法的效果没有问题,但是在Android7.x系统之上会出现意外的兼容问题:
情况描述:
情况一:高度 “MATCH_PARENT”
- 条件:指定的 PopupWindow 的高度为 MATCH_PARENT
- 调用: 调用showAsDropDown(View anchor) 时,在 7.0 之前,会在锚点 anchor 下边缘到屏幕底部之间显示 PopupWindow
- 其他调用:在 7.0、7.1 系统上的 PopupWindow 会占据整个屏幕(除状态栏之外)
(SDK >= 24时,PopupWindow高度为 match_parent 时,会占据整个屏幕,需要重新设置。)
情况二:高度“WRAP_CONTENT”
如果指定 PopupWindow 的高度为 WRAP_CONTENT, 调用 showAsDropDown(View anchor) 时,便不会出现兼容性的问题。
情况三:高度 “自定义height”
如果指定 PopupWindow 的高度为自定义的值height,调用 showAsDropDown(View anchor)时, 如果 height > 锚点 anchor 下边缘与屏幕底部的距离, 则还是会出现7.0、7.1上显示异常的问题
解决方案:
if(Build.VERSION.SDK_INT < 24){
Log.e("sdk","小于24")
//mDivider : 你指定的View变量
popupWindow.showAsDropDown(mDivider,1,1)
}else{
//SDK >= 24时,PopupWindow 高度为 match_parent 时,会占据整个屏幕,需要重新设置。
int[] location = new int[2];
mDivider.getLocationOnScreen(location);
int offsetY = location[1] + mDivider.getHeight();
int screenHeight = DensityUtil.getScreenHeight(getActivity());
// 重新设置PopupWindow 的高度
popupWindow.setHeight(screenHeight - offsetY);
popupWindow.showAtLocation(mDivider,Gracity.NOGRAVITY,0,offsetY);
}
二、基本使用
- 新建类继承PopupWindow,创建PopupWindow的样式布局
public class DemoPopupWindow extends PopupWindow {

    public DemoPopupWindow(Context context) {
        super(context);
        setHeight(ViewGroup.LayoutParams.WRAP_CONTENT);
        setWidth(ViewGroup.LayoutParams.WRAP_CONTENT);
        setOutsideTouchable(true);
        setFocusable(true);
        setBackgroundDrawable(new ColorDrawable(Color.TRANSPARENT));
        //加载的PopupWindow 的样式布局
        View contentView = LayoutInflater.from(context).inflate(R.layout.popup_test,
              null, false);
        setContentView(contentView);
    }
}
- 基本使用
DemoPopupWindow mDemoWindow = new DemoPopupWindow(this);
//根据指定View定位
PopupWindowCompat.showAsDropDown(mDemoWindow,mButtom,0,0,Gravity.START);
//或者使用showAsDropDown
mDemoWindow .showAsDropDown(...);
//又或者使用showAtLocation根据屏幕来定位
mDemoWindow .showAtLocation(...);
基于View下方,左偏移 或者 右偏移
Gravity.LEFT(Gravity.START):相对于View左对齐;
Gravity.RIGHT(Gravity.END):相对于View靠右显示。
Gravity.CENTER:在showAsDropDown()中是跟 Gravity.LEFT一样,在showAtLocation()中Gravity.CENTER才有效果
- 弹出位置
解决方法:showAsDropDown()中的另外两个参数:xoff、yoff
一、准备工作:
弹框前,需要得到PopupWindow的大小(也就是PopupWindow中contentView的大小)
- 由于contentView还未绘制,这时候的width、height都是0
- 需要通过measure测量出contentView的大小,才能进行计算
    @SuppressWarnings("ResourceType")
    private static int makeDropDownMeasureSpec(int measureSpec) {
        int mode;
        if (measureSpec == ViewGroup.LayoutParams.WRAP_CONTENT) {
            mode = View.MeasureSpec.UNSPECIFIED;
        } else {
            mode = View.MeasureSpec.EXACTLY;
        }
        return View.MeasureSpec.makeMeasureSpec(View.MeasureSpec.getSize(measureSpec), mode);
    }
二、测量contentView的大小
DemoPopupWindow mDemoWindow = new DemoPopupWindow (this);
//获取PopupWindow的样式视图
View contentView = mDemoWindow .getContentView();
//需要先测量,PopupWindow还未弹出时,宽高为0
contentView.measure(makeDropDownMeasureSpec(window.getWidth()),
      makeDropDownMeasureSpec(window.getHeight()));
三、弹窗
测量好PopupWindow大小后,就可以在任意位置弹窗了
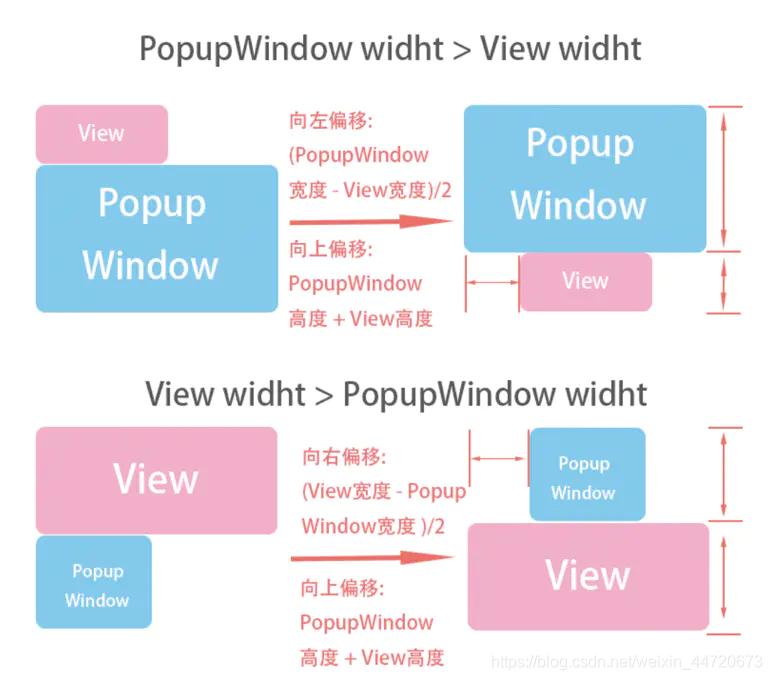
弹框的位置无非就是根据PopupWindow以及指定View的大小,计算水平、竖直方向偏移。
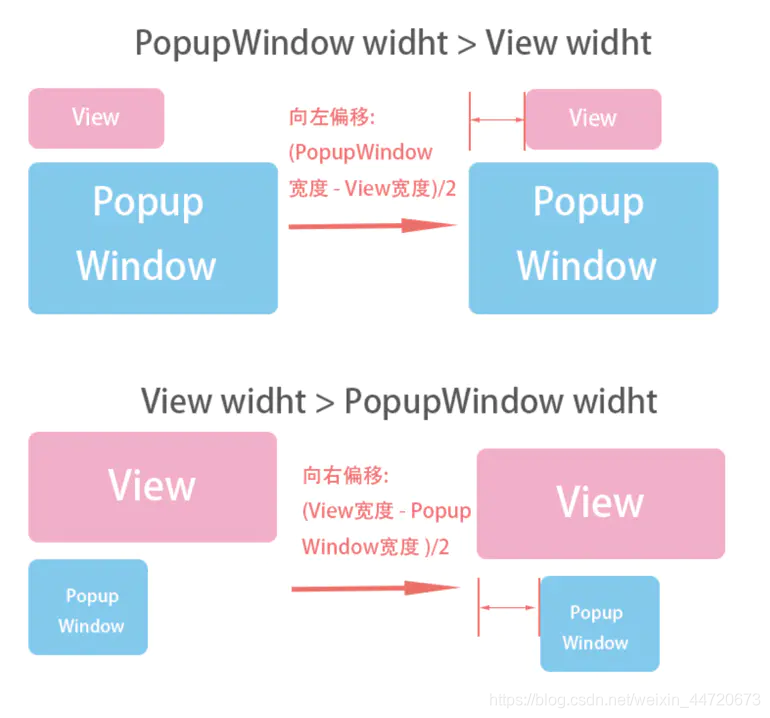
(1)计算偏移: 水平:居左;竖直:居下
//代码例子:
int offsetX = -mDemoWindow.getContentView().getMeasuredWidth();
int offsetY = 0;
PopupWindowCompat.showAsDropDown(mDemoWindow, mButton, offsetX, offsetY, Gravity.START);
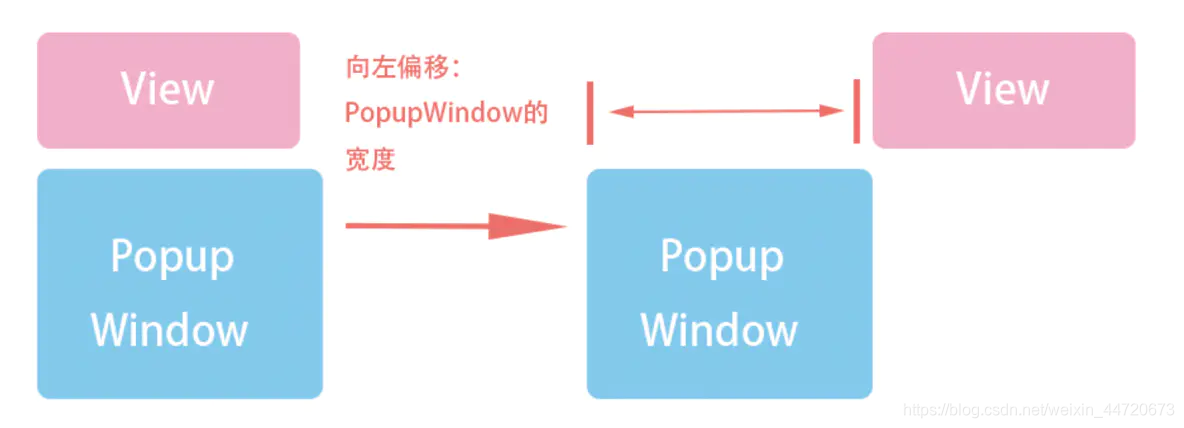
(2)计算偏移: 水平:居中;竖直:居下
//代码例子:
offsetX = Math.abs(mDemoWindow.getContentView().getMeasuredWidth()-mButton.getWidth()) / 2;
offsetY = 0;
PopupWindowCompat.showAsDropDown(mDemoWindow, mButton, offsetX, offsetY, Gravity.START);
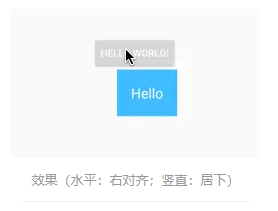
(3)计算偏移:水平:右对齐;竖直:居下

//代码例子:
offsetX = mButton.getWidth() - mDemoWindow.getContentView().getMeasuredWidth();
offsetY = 0;
PopupWindowCompat.showAsDropDown(mDemoWindow, mButton, offsetX, offsetY, Gravity.START);
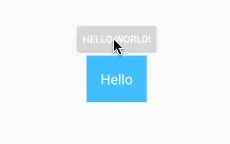
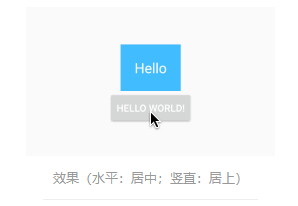
(4)计算偏移:水平:居中;竖直:居上
//代码例子
offsetX = Math.abs(mDemoWindow.getContentView().getMeasuredWidth()-mButton.getWidth()) / 2;
offsetY = -(mDemoWindow.getContentView().getMeasuredHeight()+mButton.getHeight());
PopupWindowCompat.showAsDropDown(mDemoWindow, mButton, offsetX, offsetY, Gravity.START);
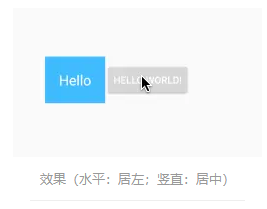
(5)计算偏移:水平:居左;竖直:居中
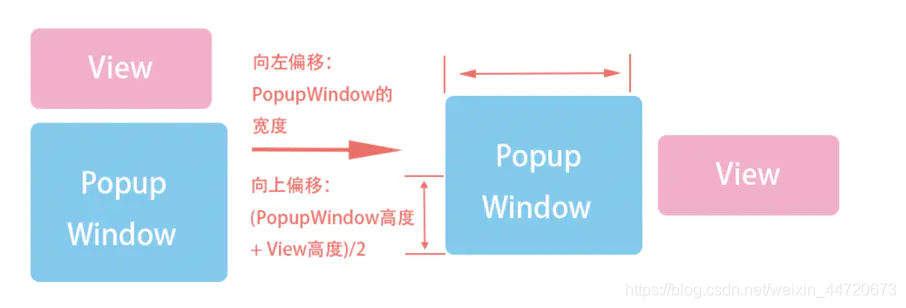
//代码例子
offsetX = -mDemoWindow.getContentView().getMeasuredWidth();
offsetY = -(mDemoWindow.getContentView().getMeasuredHeight() + mButton.getHeight()) / 2;
PopupWindowCompat.showAsDropDown(mDemoWindow, mButton, offsetX, offsetY, Gravity.START);
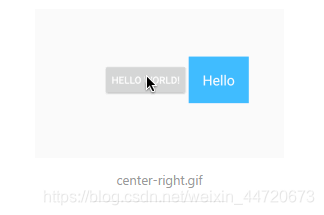
(6)计算偏移:水平:居右;竖直:居中
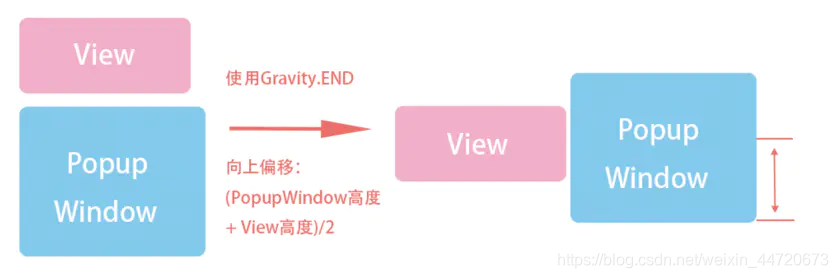
//代码例子
offsetX = 0;
offsetY = -(mDemoWindow.getContentView().getMeasuredHeight() + mButton.getHeight()) / 2;
PopupWindowCompat.showAsDropDown(mDemoWindow, mButton, offsetX, offsetY, Gravity.END);
四、背景变暗
通过改变Window的透明度来实现背景变暗是常用的一种做法。
在PopupWindow中,先写个修改Window透明度的方法(注意,这边的mContext必须是Activity)
    /**
     * 控制窗口背景的不透明度
     */
    private void setWindowBackgroundAlpha(float alpha) {
        if (mContext == null) return;
        if (mContext instanceof Activity) {
            Window window = ((Activity) mContext).getWindow();
            WindowManager.LayoutParams layoutParams = window.getAttributes();
            layoutParams.alpha = alpha;
            window.setAttributes(layoutParams);
        }
    }
然后定义透明度:
private float mAlpha = 1f; //背景灰度 0-1 1表示全透明
最后在PopupWindow show的时候调用以下方法
    /**
     * 窗口显示,窗口背景透明度渐变动画
     */
    private void showBackgroundAnimator() {
        if (mAlpha >= 1f) return;
        ValueAnimator animator = ValueAnimator.ofFloat(1.0f, mAlpha);
        animator.addUpdateListener(new ValueAnimator.AnimatorUpdateListener() {

            @Override
            public void onAnimationUpdate(ValueAnimator animation) {
                float alpha = (float) animation.getAnimatedValue();
                setWindowBackgroundAlpha(alpha);
            }
        });
        animator.setDuration(360);
        animator.start();
    }
通过动画来改变Window达到渐变的效果
五、推荐开源库
- RelativePopupWindow:代码简洁,支持各种位置的弹框。还能超出屏幕
使用方式:
popup.showOnAnchor(anchor, VerticalPosition.ABOVE, HorizontalPosition.CENTER, false);
- EasyPopup:一个功能比较全的库,支持背景变暗,背景不可点击(6.0以上通用)等,而且可以链式调用。
- 缺点:背景变暗效果只支持 4.2 以上的版本。
private EasyPopup mCirclePop;
circlePop = new EasyPopup(this)
        .setContentView(R.layout.layout_circle_comment)
        .setAnimationStyle(R.style.CirclePopAnim)
    //是否允许点击PopupWindow之外的地方消失
        .setFocusAndOutsideEnable(true)
        .createPopup();
//显示
circlePop.showAtAnchorView(view, VerticalGravity.CENTER, HorizontalGravity.LEFT, 0, 0);
如果最小版本大于等于18的话,直接用- EasyPopup就可以了
六、兼容工具类
介于EasyPopup只适配4.2 以上的版本,而如果项目要适配到4.1。结合上面的提到的两个库,以及背景变暗的方案。改造一下,以下是思路:
 SmartPopupWindow popupWindow= SmartPopupWindow.Builder
     .build(Activity.this, view)
     .setAlpha(0.4f)                   //背景灰度     默认全透明
     .setOutsideTouchDismiss(false)    //点击外部消失  默认true(消失)
     .createPopupWindow();             //创建PopupWindow
 popupWindow.showAtAnchorView(view, VerticalPosition.ABOVE, HorizontalPosition.CENTER);
水平方向参数HorizontalPosition:LEFT 、 RIGHT 、 ALIGN_LEFT 、 ALIGN_RIGHT、 CENTER
竖直方向参数VerticalPosition :ABOVE 、 BELOW、 ALIGN_TOP 、 ALIGN_BOTTOM、 CENTER
项目地址 SmartPopupWindow
七、参考
1、RelativePopupWindow
2、EasyPopup
3、Android弹窗_PopupWindow详解 (挺详细的)
4、在任意位置弹出PopupWindow


 1万+
1万+

 被折叠的 条评论
为什么被折叠?
被折叠的 条评论
为什么被折叠?
 到【灌水乐园】发言


