


所谓桌面小控件,就是能之间显示在Android系统桌面的小程序。
桌面小控件的实现是基于Broadcast的形式实现的,因此,每一个桌面小控件都对应于一个BroadcastReceiver类。Android系统提供了一个AppWidgetProvider类(它就是BroadcastReceiver的子类),这个类很关键,你在写桌面小控件时只需继承这个类就行。继承了AppWidgetProvider类之后,你可以根据自己的需要覆盖它的不同的生命周期的方法,来达到自己的目的。AppWidgetProvider类的主要提供如下不同生命周期的方法:
- void onUpdate(Context context, AppWidgetManager appWidgetManager,int[] appWidgetIds) { }
- // 这个方法字面意思是负责更新桌面小控件,但貌似只有在小控件被用户放到桌面上时被调用了一次,读者可以自己通过输出Log来测试
- // 实现桌面控件是通常都会考虑重写该方法
- void onDeleted(Context context, int[] appWidgetIds)
- // 在小控件被删除时调用该方法
void onUpdate(Context context, AppWidgetManager appWidgetManager,int[] appWidgetIds) { }
// 这个方法字面意思是负责更新桌面小控件,但貌似只有在小控件被用户放到桌面上时被调用了一次,读者可以自己通过输出Log来测试
// 实现桌面控件是通常都会考虑重写该方法

void onDeleted(Context context, int[] appWidgetIds)
// 在小控件被删除时调用该方法下面上代码,有不足之处请指教:
DesktopClock.java,这个类继承了上面说的AppWidgetProvider类(记住它是继承自BroadcastReceiver类):
- package org.ls;
- import android.appwidget.AppWidgetManager;
- import android.appwidget.AppWidgetProvider;
- import android.content.Context;
- import android.content.Intent;
- import android.util.Log;
- import android.widget.RemoteViews;
- public class DesktopClock extends AppWidgetProvider {
- @Override
- public void onUpdate(Context context, AppWidgetManager appWidgetManager,
- int[] appWidgetIds) {
- Log.e("appwidget", "--update--");
- // 创建RemoteViews对象
- RemoteViews views = new RemoteViews(context.getPackageName(),
- R.layout.main);
- views.setImageViewResource(R.id.double_dot,
- R.drawable.blue_modern_middle);
- // 将刷新UI的service的必要的数据设置好(此处没有使用Bundle传递数据)
- UpdateUIService.appWidgetManager = appWidgetManager;
- UpdateUIService.context = context;
- UpdateUIService.remoteViews = views;
- // 启动刷新UI的Service
- Intent intent = new Intent(context, UpdateUIService.class);
- context.startService(intent);
- }
- // 在小控件被删除时调用该方法停止Service
- @Override
- public void onDeleted(Context context, int[] appWidgetIds) {
- super.onDeleted(context, appWidgetIds);
- Log.e("appwidget", "--deleted--");
- Intent intent = new Intent(context, UpdateUIService.class);
- context.stopService(intent);
- }
- }
package org.ls;

import android.appwidget.AppWidgetManager;
import android.appwidget.AppWidgetProvider;
import android.content.Context;
import android.content.Intent;
import android.util.Log;
import android.widget.RemoteViews;

public class DesktopClock extends AppWidgetProvider {

	@Override
	public void onUpdate(Context context, AppWidgetManager appWidgetManager,
			int[] appWidgetIds) {

		Log.e("appwidget", "--update--");
		// 创建RemoteViews对象
		RemoteViews views = new RemoteViews(context.getPackageName(),
				R.layout.main);
		views.setImageViewResource(R.id.double_dot,
				R.drawable.blue_modern_middle);
		// 将刷新UI的service的必要的数据设置好(此处没有使用Bundle传递数据)
		UpdateUIService.appWidgetManager = appWidgetManager;
		UpdateUIService.context = context;
		UpdateUIService.remoteViews = views;
		// 启动刷新UI的Service
		Intent intent = new Intent(context, UpdateUIService.class);
		context.startService(intent);
	}

	// 在小控件被删除时调用该方法停止Service
	@Override
	public void onDeleted(Context context, int[] appWidgetIds) {
		super.onDeleted(context, appWidgetIds);
		Log.e("appwidget", "--deleted--");
		Intent intent = new Intent(context, UpdateUIService.class);
		context.stopService(intent);
	}
}
还有一点要注意的是,读者可能会有这样的疑问,不是说AppWidgetProvider本身就是一个BroadcastReceiver吗,为什么不让它直接监听系统的时间变化的广播呢?注意,虽然AppWidgetProvider本身就是一个BroadcastReceiver,但是它是一个“分化”了的BroadcastReceiver,不能再监听其它的系统广播了。一般的BroadcastReceiver是这样的:每次系统的Broadcast事件发生后,系统就会创建对应的BroadcastReceiver的实例,并自动触发它的onReceive( )方法,onReceive( )执行完后,BroadcastReceiver的实例就会被销毁。但是这个“分化”了的BroadcastReceiver——AppWidgetProvider显然做不到这样,也即系统尝试再创建它的实例时会发生异常,因此不能用它之间监听系统的Broadcast了。
那我为什么不在AppWidgetProvider里面新动态注册一个BroadcastReceiver,而是要新开一个Service呢?笔者也曾经尝试过这样做,但是当调用registerReceiver( )方法时编译通不过,此外,如果不在AppWidgetProvider里面新开一个Service,AppWidgetProvider并不是会一直在后台运行的,执行完onUpdate方法后就会退出执行,因此最好的方法就是在onUpdate里面新开一个Service。
- package org.ls;
- import java.text.SimpleDateFormat;
- import java.util.Date;
- import android.app.Service;
- import android.appwidget.AppWidgetManager;
- import android.content.BroadcastReceiver;
- import android.content.ComponentName;
- import android.content.Context;
- import android.content.Intent;
- import android.content.IntentFilter;
- import android.os.IBinder;
- import android.util.Log;
- import android.widget.RemoteViews;
- public class UpdateUIService extends Service {
- private SimpleDateFormat df = new SimpleDateFormat("HHmmss");
- public static Context context;
- public static AppWidgetManager appWidgetManager;
- public static RemoteViews remoteViews;
- // 数字图片的ID
- private int[] numberIcon = new int[] { R.drawable.blue_modern_zero,
- R.drawable.blue_modern_one, R.drawable.blue_modern_two,
- R.drawable.blue_modern_three, R.drawable.blue_modern_four,
- R.drawable.blue_modern_five, R.drawable.blue_modern_six,
- R.drawable.blue_modern_seven, R.drawable.blue_modern_eight,
- R.drawable.blue_modern_nine };
- // 用于显示数字的ImageView的ID
- private int[] numberView = new int[] { R.id.hour01, R.id.hour02,
- R.id.minute01, R.id.minute02 };
- // 覆盖基类的抽象方法
- @Override
- public IBinder onBind(Intent intent) {
- return null;
- }
- // 在本服务创建时将监听系统时间的BroadcastReceiver注册
- @Override
- public void onCreate() {
- super.onCreate();
- Log.e("service", "--service created--");
- IntentFilter intentFilter = new IntentFilter();
- intentFilter.addAction(Intent.ACTION_TIME_TICK); // 时间的流逝
- intentFilter.addAction(Intent.ACTION_TIME_CHANGED); // 时间被改变,人为设置时间
- registerReceiver(boroadcastReceiver, intentFilter);
- }
- @Override
- public int onStartCommand(Intent intent, int flags, int startId) {
- Log.e("service", "--service started--");
- updateUI(); // 开始服务前先刷新一次UI
- return START_STICKY;
- }
- // 在服务停止时解注册BroadcastReceiver
- @Override
- public void onDestroy() {
- super.onDestroy();
- unregisterReceiver(boroadcastReceiver);
- }
- // 用于监听系统时间变化Intent.ACTION_TIME_TICK的BroadcastReceiver,此BroadcastReceiver须为动态注册
- private BroadcastReceiver boroadcastReceiver = new BroadcastReceiver() {
- @Override
- public void onReceive(Context acontext, Intent intent) {
- // Log.e("time received", "--receive--");
- updateUI();
- }
- };
- // 根据当前时间设置小部件相应的数字图片
- private void updateUI() {
- String timeString = df.format(new Date());
- int num;
- for (int i = 0; i < numberView.length; i++) {
- num = timeString.charAt(i) - 48;
- remoteViews.setImageViewResource(numberView[i], numberIcon[num]);
- }
- // 将AppWidgetProvider的子类包装成ComponentName对象
- ComponentName componentName = new ComponentName(context,
- DesktopClock.class);
- // 调用AppWidgetManager将remoteViews添加到ComponentName中
- appWidgetManager.updateAppWidget(componentName, remoteViews);
- }
- }
package org.ls;

import java.text.SimpleDateFormat;
import java.util.Date;

import android.app.Service;
import android.appwidget.AppWidgetManager;
import android.content.BroadcastReceiver;
import android.content.ComponentName;
import android.content.Context;
import android.content.Intent;
import android.content.IntentFilter;
import android.os.IBinder;
import android.util.Log;
import android.widget.RemoteViews;

public class UpdateUIService extends Service {

	private SimpleDateFormat df = new SimpleDateFormat("HHmmss");

	public static Context context;
	public static AppWidgetManager appWidgetManager;
	public static RemoteViews remoteViews;
	// 数字图片的ID
	private int[] numberIcon = new int[] { R.drawable.blue_modern_zero,
			R.drawable.blue_modern_one, R.drawable.blue_modern_two,
			R.drawable.blue_modern_three, R.drawable.blue_modern_four,
			R.drawable.blue_modern_five, R.drawable.blue_modern_six,
			R.drawable.blue_modern_seven, R.drawable.blue_modern_eight,
			R.drawable.blue_modern_nine };
	// 用于显示数字的ImageView的ID
	private int[] numberView = new int[] { R.id.hour01, R.id.hour02,
			R.id.minute01, R.id.minute02 };

	// 覆盖基类的抽象方法
	@Override
	public IBinder onBind(Intent intent) {
		return null;
	}

	// 在本服务创建时将监听系统时间的BroadcastReceiver注册
	@Override
	public void onCreate() {
		super.onCreate();
		Log.e("service", "--service created--");
		IntentFilter intentFilter = new IntentFilter();
		intentFilter.addAction(Intent.ACTION_TIME_TICK); // 时间的流逝
		intentFilter.addAction(Intent.ACTION_TIME_CHANGED); // 时间被改变,人为设置时间
		registerReceiver(boroadcastReceiver, intentFilter);
	}

	@Override
	public int onStartCommand(Intent intent, int flags, int startId) {
		Log.e("service", "--service started--");
		updateUI(); // 开始服务前先刷新一次UI
		return START_STICKY;
	}

	// 在服务停止时解注册BroadcastReceiver
	@Override
	public void onDestroy() {
		super.onDestroy();
		unregisterReceiver(boroadcastReceiver);
	}

	// 用于监听系统时间变化Intent.ACTION_TIME_TICK的BroadcastReceiver,此BroadcastReceiver须为动态注册
	private BroadcastReceiver boroadcastReceiver = new BroadcastReceiver() {
		@Override
		public void onReceive(Context acontext, Intent intent) {
//			Log.e("time received", "--receive--");
			updateUI();
		}
	};

	// 根据当前时间设置小部件相应的数字图片
	private void updateUI() {
		String timeString = df.format(new Date());
		int num;
		for (int i = 0; i < numberView.length; i++) {
			num = timeString.charAt(i) - 48;
			remoteViews.setImageViewResource(numberView[i], numberIcon[num]);
		}
		// 将AppWidgetProvider的子类包装成ComponentName对象
		ComponentName componentName = new ComponentName(context,
				DesktopClock.class);
		// 调用AppWidgetManager将remoteViews添加到ComponentName中
		appWidgetManager.updateAppWidget(componentName, remoteViews);
	}
}
下面是一些xml文件:
布局文件main.xml:
- <?xml version="1.0" encoding="utf-8"?>
- <LinearLayout xmlns:android="http://schemas.android.com/apk/res/android"
- android:layout_width="fill_parent"
- android:layout_height="fill_parent"
- android:orientation="horizontal" >
- <ImageView
- android:id="@+id/hour01"
- android:layout_weight="1"
- android:layout_width="wrap_content"
- android:layout_height="wrap_content" />
- <ImageView
- android:id="@+id/hour02"
- android:layout_weight="1"
- android:layout_width="wrap_content"
- android:layout_height="wrap_content" />
- <ImageView
- android:id="@+id/double_dot"
- android:layout_width="wrap_content"
- android:layout_height="wrap_content" />
- <ImageView
- android:id="@+id/minute01"
- android:layout_weight="1"
- android:layout_width="wrap_content"
- android:layout_height="wrap_content" />
- <ImageView
- android:id="@+id/minute02"
- android:layout_weight="1"
- android:layout_width="wrap_content"
- android:layout_height="wrap_content" />
- </LinearLayout>
<?xml version="1.0" encoding="utf-8"?>
<LinearLayout xmlns:android="http://schemas.android.com/apk/res/android"
    android:layout_width="fill_parent"
    android:layout_height="fill_parent"
    android:orientation="horizontal" >

   <ImageView
	android:id="@+id/hour01"
	android:layout_weight="1"
	android:layout_width="wrap_content"
	android:layout_height="wrap_content" />

   <ImageView
	android:id="@+id/hour02"
	android:layout_weight="1"
	android:layout_width="wrap_content"
	android:layout_height="wrap_content" />

   <ImageView
	android:id="@+id/double_dot"
	android:layout_width="wrap_content"
	android:layout_height="wrap_content" />

   <ImageView
	android:id="@+id/minute01"
	android:layout_weight="1"
	android:layout_width="wrap_content"
	android:layout_height="wrap_content" />

   <ImageView
	android:id="@+id/minute02"
	android:layout_weight="1"
	android:layout_width="wrap_content"
	android:layout_height="wrap_content" />

</LinearLayout>AndroidManifest.xml:
- <?xml version="1.0" encoding="utf-8"?>
- <manifest xmlns:android="http://schemas.android.com/apk/res/android"
- package="org.ls"
- android:versionCode="1"
- android:versionName="1.0" >
- <uses-sdk android:minSdkVersion="10" />
- <application
- android:icon="@drawable/ic_launcher"
- android:label="@string/app_name" >
- <receiver android:name=".DesktopClock"
- android:label="@string/app_name">
- <intent-filter>
- <action android:name="android.appwidget.action.APPWIDGET_UPDATE" />
- <category android:name="android.intent.category.DEFAULT" />
- </intent-filter>
- <meta-data android:name="android.appwidget.provider"
- android:resource="@xml/appwidget_provider" />
- </receiver>
- <service android:name=".UpdateUIService" >
- </service>
- </application>
- </manifest>
<?xml version="1.0" encoding="utf-8"?>
<manifest xmlns:android="http://schemas.android.com/apk/res/android"
    package="org.ls"
    android:versionCode="1"
    android:versionName="1.0" >

    <uses-sdk android:minSdkVersion="10" />

    <application
        android:icon="@drawable/ic_launcher"
        android:label="@string/app_name" >

        <receiver android:name=".DesktopClock"
			android:label="@string/app_name">

			<intent-filter>
				<action android:name="android.appwidget.action.APPWIDGET_UPDATE" />
				<category android:name="android.intent.category.DEFAULT" />
			</intent-filter>

			<meta-data android:name="android.appwidget.provider"
				android:resource="@xml/appwidget_provider" />

		</receiver>

        <service android:name=".UpdateUIService" >

        </service>

    </application>

</manifest>
用于配置时钟小控件属性的appwidget_provider.xml(在 AndroidManifest.xml中被引用):
- <?xml version="1.0" encoding="utf-8"?>
- <appwidget-provider
- xmlns:android="http://schemas.android.com/apk/res/android"
- android:minWidth="270px"
- android:minHeight="103px"
- android:updatePeriodMillis="1000"
- android:initialLayout="@layout/main">
- </appwidget-provider>
<?xml version="1.0" encoding="utf-8"?>
<appwidget-provider
	xmlns:android="http://schemas.android.com/apk/res/android"
	android:minWidth="270px"
	android:minHeight="103px"
	android:updatePeriodMillis="1000"
	android:initialLayout="@layout/main">
</appwidget-provider>
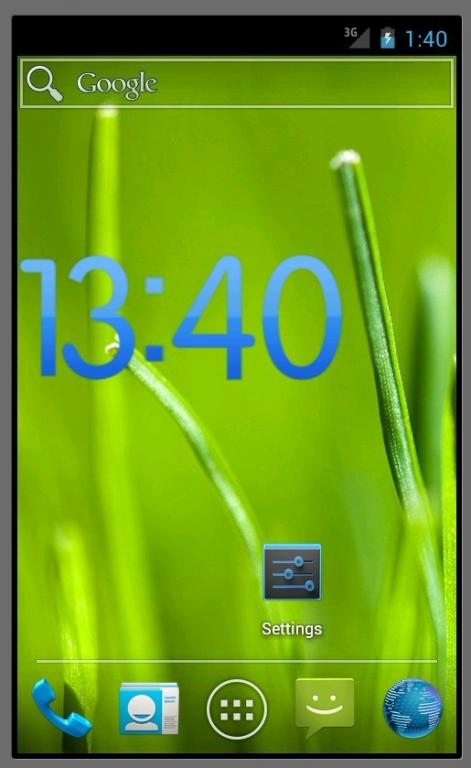
效果图:同步更新时间,完全与系统时间同步:
欢迎讨论。


 620
620

 被折叠的 条评论
为什么被折叠?
被折叠的 条评论
为什么被折叠?
 到【灌水乐园】发言


