


一.samba服务简介
作用:smb = Server Message Block Sum
cifs = Common Internet File System Miscrosoft
windows系统共享文件时用到的协议smb,smb是由miscrosoft+sun
二.samba基本信息
服务启动脚本: smb.service
主配置目录: /etc/samba
主配置文件: /etc/smb.conf
安全上下文: samba_share_t
端口: 139、445
安装包:samba 、samba-common
三.samba的安装与启用
samba的安装:
dnf install samba samba-common samba-client -y
samba服务启动:
systemctl enable --now smb
samba服务启用:
firewall-cmd --permanent --add-service=samba
firewall-cmd --reload

1.samba用户的建立
samba用户必须是已经存在的用户
samba用户的建立
smbpasswd -a westos ##添加用户
pdbedit -L ##查看用户列表
pdbedit -x westos ##删除用户


2.samba用户访问家目录
当selinux开启时: setsebool -P samba_enable_home_dirs on
windows下:
\\172.25.254.110 ##访问
net use ##查看访问记录
net use * /del ##删除访问记录
在linux下:
smbclient -L //172.25.254.110/westos -U westos

3.samba服务共享目录
mkdir /westos ##建立共享目录
cd /etc/samba/
ls
getenforce
mv smb.conf smb.conf.bak
cp smb.conf.example smb.conf
vim smb.conf
[westosshare] ##共享名称
comment = westos dir ##共享说明
path = /westos
semanage fcontext -a -t samba_share_t '/westos(/.*)?' ##更改安全上下文
restorecon -RvvF /westos/
ls -Zd /westos/
touch /westos/westosfile{1..10}
ls -Z /westos

测试
smbclient //172.25.254.110/westosshare -U westos

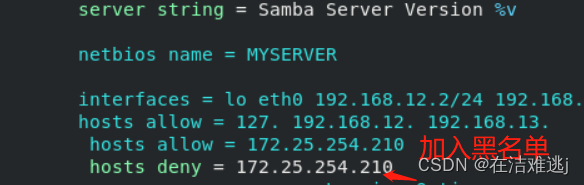
4.samba的访问控制
hosts allow 172.25.254.210 172.25.254.110 ##当写到单独共享时只对此共享生效
hosts deny ##当写到【GLOBAL】时对samba整体生效
vim smb.conf
hosts allow = 172.25.254.210
systemctl restart smb.service
mount -o username=lee,password=lee //172.25.254.110/westosshare /mnt/
mount -o username=lee,password=lee //172.25.254.110/westosshare /mnt/


5.samba的常用配置参数
writable = yes ##可写
write list = westos ##指定用户可写
write list = +westos ##指定组可写
write list = @westos
valid users = lee ##指定访问用户
valid users = +lee|@lee ##指定访问组
browseable = yes|no ##是否隐藏共享
map to guest = bad user ##写到全局设定中
guest ok = yes ##允许匿名用户访问
admin users = lee ##指定此共享的超级用户身份


6.samba的多用户挂载
在客户端如果用普通的挂载方式,没有用过用户验证的人也可以访问samba服务
dnf install cifs-utils -y ##下载安装
umount /mnt
vim .smbauth
chmod 600 .smbauth
mount -o credentials=/root/.smbauth //172.25.254.110/westosshare /mnt/
mount -o credentials=/root/.smbauth,multiuser,sec=ntlmssp //172.25.254.110/westosshare /mnt/
#credentials=/root/.smbauth 指定认证文件
#sec=ntlmssp 指定认证类型
#multiuser 支持多用户


四.NFS<Net File System>
1.nfs基本信息
nfs-utils ##安装包
nfs-server ##服务脚本
/etc/exports ##共享配置文件
2.nfs的启用
dnf install nfs-utils -y ##下载安装
systemctl enable --now nfs-server ##开启nfs服务
showmount -e 172.25.254.110
firewall-cmd --permanent --add-service=nfs
firewall-cmd --permanent --add-service=rpc-bind
firewall-cmd --permanent --add-service=mountd
firewall-cmd --reload
3.nfs配置
mkdir /westosnfs
chmod 777 /westosnfs/
vim /etc/exports ##此文件更改后生效exportfs -rv
共享目录 共享给谁(共享参数)
/westosnfs *(rw)
exportfs -rv

4.nfs配置参数
anonuid=1000,anongid=1000 ##指定用户身份
sync ##更改生成后同步数据到服务器
async ##时时同步数据到服务器
rw ##读写
ro ##只读
no_root_squash ##root用户挂载不转换身份


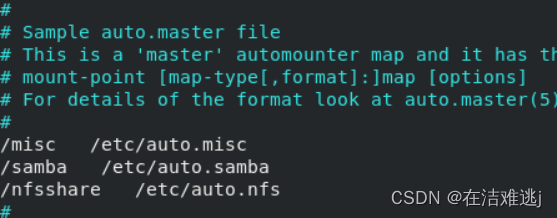
5.nfs+autofs
vim /etc/auto.nfs
五.iscsi
dnf install targetcli -y
fdisk -l
dd if=/dev/zero of=/dev/vdb bs=1M count=10
fdisk /dev/vdb ##建立分区/dev/sdb1 分区大小为2G
targetcli
/> ls
/> backstores/block create westos:storzge1 /dev/sdb1
/> /iscsi create iqn.2011-11.org.westos:storzge1
/> /iscsi/iqn.2011-11.org.westos:storzge1/tpg1/luns create /backstores/block/westos:storzge1
/> /iscsi/iqn.2011-11.org.westos:storzge1/tpg1/acls create iqn.2011-11.org.westos:westoskey1
/> ls
/> exit
vim /etc/target/saveconfig.json ##查看端口
firewall-cmd --permanent --add-port=3260/tcp
success
firewall-cmd --reload
success
firewall-cmd --list-all
fdisk -l
fdisk /dev/sda ##给/dev/sda分区
mkfs.xfs /dev/sda1
mount /dev/sda1 /mnt/ ##挂载到/mnt
df


 1694
1694


 被折叠的 条评论
为什么被折叠?
被折叠的 条评论
为什么被折叠?
 到【灌水乐园】发言


