


最近项目中需要实现对ListBox呈现内容的外观进行动态的修改,实现方式是通过修改DataTemplate里面控件的Style,具体实现如下:
Xaml文件:
<Window x:Class="StrStyle.MainWindow"
        xmlns="http://schemas.microsoft.com/winfx/2006/xaml/presentation"
        xmlns:x="http://schemas.microsoft.com/winfx/2006/xaml"
        xmlns:d="http://schemas.microsoft.com/expression/blend/2008"
        xmlns:mc="http://schemas.openxmlformats.org/markup-compatibility/2006"
        xmlns:local="clr-namespace:StrStyle"
        mc:Ignorable="d"
        Title="MainWindow" Height="350" Width="525">
    <Window.Resources>
        <Style x:Key="itemBorder" TargetType="Border">
            <Setter Property="Background" Value="Aqua"/>
        </Style>
        <DataTemplate x:Key="ItemTempalte">
            <Border  Style="{DynamicResource itemBorder}" Height="40" Width="100"  BorderThickness="2">
                <TextBlock Text="{Binding}"/>
            </Border>
        </DataTemplate>
    </Window.Resources>
    <Grid>
        <Grid.RowDefinitions>
            <RowDefinition/>
            <RowDefinition/>
        </Grid.RowDefinitions>
        <ListBox x:Name="showList" ItemsSource="{Binding Items}" ItemTemplate="{StaticResource ItemTempalte}"></ListBox>
        <Grid Grid.Row="1">
            <Grid.RowDefinitions>
                <RowDefinition Height="Auto"/>
                <RowDefinition/>
            </Grid.RowDefinitions>
            <Button Height="40" Content="Apply" Click="Button_Click"/>
            <local:WpfPropertyGrid Grid.Row="1" x:Name="property"/>
        </Grid>
    </Grid>
</Window>
里面用到的WpfPropertyGrid是使用的[http://blog.csdn.net/wushang923/article/details/7352460]里面给出的代码。
CS文件如下:
namespace StrStyle
{
    /// <summary>
    /// MainWindow.xaml 的交互逻辑
    /// </summary>
    public partial class MainWindow : Window
    {
        public MainWindow()
        {
            InitializeComponent();
            for (int index = 0; index < 100; index++)
            {
                Items.Add(index);
            }
            property.SelectedObject = Template;

            DataContext = this;
        }
        ItemBorder Template = new ItemBorder();

        public List<int> Items { get; set; } = new List<int>();

        private void Button_Click(object sender, RoutedEventArgs e)
        {
            string TemplateStr = GetStyleStr(Template);
            var ss = XamlReader.Parse(TemplateStr); //将字符串转成对应的对象
            this.Resources["itemBorder"] = ss;//替换原来资源中的Style
        }

        string xmlns = " xmlns=\"http://schemas.microsoft.com/winfx/2006/xaml/presentation\" ";
        //生成对应类型的Style的字符串
        string GetStyleStr(object _obj)
        {
            Type type = _obj.GetType();
            string propertyStr = "";
            foreach (var item in type.GetProperties())
            {
                propertyStr += string.Format("<Setter Property=\"{0}\" Value=\"{1}\"/>\n",item.Name,item.GetValue(_obj,null));
            }

            string typeName = type.Name;
            switch(type.Name)
            {
                case "ItemBorder":
                    typeName = "Border";
                    break;
            }
            string typeStr = string.Format("TargetType=\"{0}\"", typeName);
            string str = "<Style  " + typeStr + xmlns +  "  >\n" +
                propertyStr + "</Style >";
            return str;
        }

        //定义一个对应的结构  保证属性名相同
        public class ItemBorder
        {
            public int Height { get; set; } = 40;
            public Color BorderBrush { get; set; } = Colors.Red;
            public Color Background { get; set; } = Colors.Blue;
        }
    }
}
这里使用的方式是先生成对应Style的字符串,再将字符串转换成对象替换原来资源中对应的资源
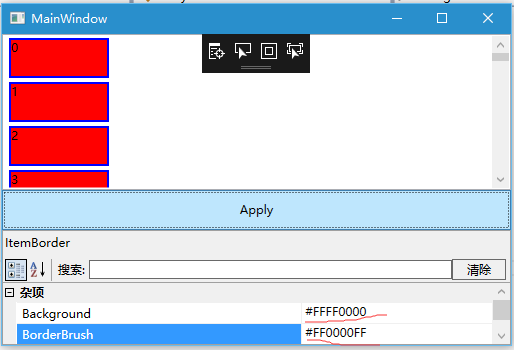
具体效果如图:
图1

图2


 1539
1539


 被折叠的 条评论
为什么被折叠?
被折叠的 条评论
为什么被折叠?
 到【灌水乐园】发言


