


Part1:
From a developer's perspective, one of the more significant changes in iOS 7, and OS X Mavericks for that matter, is the introduction of NSURLSession. Even thoughNSURLSession may seem daunting at first glance, it's important that you understand what it is, how it relates to NSURLConnection, and what the differences are. In this series, I will take you through the fundamentals of NSURLSession so you can take advantage of this new technology in your own applications.
从开发者的角度,对于iOS7和OS X Mavericks最显著的变化就是引入了 NSURLSession 。虽然乍一看,NSURLSession 有点令人生畏,但重要的是要了解它是什么,它和 NSURLConnection 有什么关系和差异。在本系列 Networking with NSURLSession 教程中,我将会带你了解 NSURLSession 有关的基本内容,你也可以在你的应用程序中使用这种新技术的优势。
Why Replace NSURLConnection?
The first question you may be asking yourself is why Apple found it necessary to introduce NSURLSession while we are perfectly happy with NSURLConnection. The real question is whether you are happy with NSURLConnection. Do you remember that time you were cursing and throwing things at NSURLConnection? Most Cocoa developers have been in that place, which is why Apple decided to go back to the drawing board and create a more elegant solution, better suited for the modern web.
你可能会问这样一个问题:为什么正当我们愉快的使用 NSURLConnection的时候,有必要引入 NSURLSession 吗?然而,问题恰恰就在于,你是否真的使用 NSURLConnection 很愉快?莫非你忘了你曾经咒骂吐槽 NSURLConnection 了,没错,大多数 Cocoa 开发者曾有这样的经历,所以Apple才决定重新设计一种更优雅的解决方案以适应于现代网络开发。
Even though NSURLSession and NSURLConnection have a lot in common in terms of how they work, at a fundamental level, they are quite different. Apple created NSURLSessionto resemble the general concepts of NSURLConnection, but you will learn in the course of this series that NSURLSession is modern, easier to use, and built with mobile in mind.
尽管 NSURLSession 和 NSURLConnection 的运行有很多共同点,但是在最基础的层面上,它们还是有着很大的不同。Apple 引入类似于 NSURLConnection 概念的 NSURLSession ,你将会在本系列 Networking with NSURLSession 教程的这篇文章中了解到 NSURLSession 是现代的,更易于使用的,而且是附有为移动应用设计的初衷。
What is NSURLSession?
Before I discuss the differences between NSURLSession and NSURLConnection, it's a good idea to first take a closer look at what NSURLSession is. Despite its name,NSURLSession isn't just another class you can use in an iOS or OS X application.NSURLSession is first and foremost a technology just like NSURLConnection is.
在讨论 NSURLSession 和 NSURLConnection 的不同之处之前,不妨先仔细了解一下 NSURLSession 是什么。对于 NSURLSession ,它仅仅是可以在 iOS 和 OS X应用程序中使用的一个类,其就像 NSURLConnection 一样是一种用于网络开发的技术。
Sessions are Containers
NSURLSession and NSURLConnection both provide an API for interacting with various protocols, such as HTTP and HTTPS. The session object, an instance of theNSURLSession class, is what manages this interaction. It is a highly configurable container with an elegant API that allows for fine-grained control. It offers features that are absent in NSURLConnection. What's more, with NSURLSession, you can accomplish tasks that are simply not possible with NSURLConnection, such as implementing private browsing.
NSURLSession 和 NSURLConnection 都提供了与各种协议,诸如 HTTP 和 HTTPS ,进行交互的API。会话对象,NSURLSession 类对象,就是用于管理这种交互过程。它是一个高度可配置的容器,通过使用其提供的APPI,可进行细粒度的管理控制。它提供了在 NSURLConnection 中的所有特性,此外,它还可以实现 NSURLConnection 不能完成的任务,例如实现私密浏览。
Tasks
The basic unit of work when working with NSURLSession is the task, an instance ofNSURLSessionTask. There are three types of tasks, data tasks, upload tasks, anddownload tasks.
使用 NSURLSession 最基本单元就是任务(task),这个是 NSURLSessionTask 的实例。有三种类型的任务:data task,upload task 和 download task。
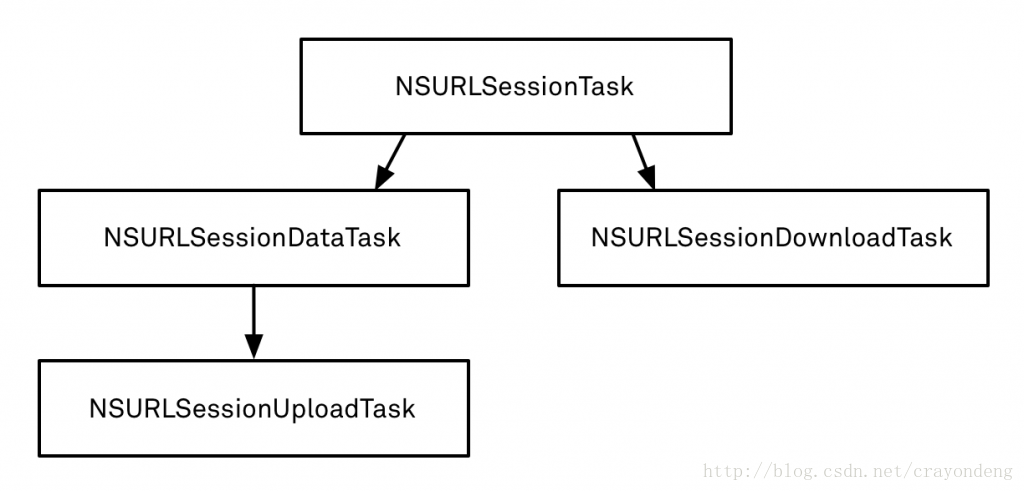
- You'll most often use data tasks, which are instances of
NSURLSessionDataTask. Data tasks are used for requesting data from a server, such as JSON data. The principal difference with upload and download tasks is that they return data directly to your application instead of going through the file system. The data is only stored in memory.
- As the name implies, upload tasks are used to upload data to a remote destination. The
NSURLSessionUploadTaskis a subclass ofNSURLSessionDataTaskand behaves in a similar fashion. One of the key differences with a regular data task is that upload tasks can be used in a session created with a background session configuration.
- Download tasks, instances of
NSURLSessionDownloadTask, inherit directly fromNSURLSessionTask. The most significant difference with data tasks is that a download task writes its response directly to a temporary file. This is quite different from a regular data task that stores the response in memory. It is possible to cancel a download task and resume it at a later point.
As you can imagine, asynchronicity is a key concept in NSURLSession. TheNSURLSession API returns data by invoking a completion handler or through the session's delegate. The API of NSURLSession was designed with flexibility in mind as you'll notice a bit later in this tutorial.
正如你所想的,异步性是NSURLSession的关键概念。使用 NSURLSession 的 API 返回数据可以通过调用完成处理程序块或者通过会话的委托。NSURLSession 的 API 在设计的时候充分考虑了灵活性,关于这一点,你将会在本教程的后面体会到。
Meet the Family
As I mentioned earlier, NSURLSession is both a technology and a class that you'll be working with. The NSURLSession API houses a number of classes, but NSURLSession is the key component sending requests and receiving responses. The configuration of the session object, however, is handled by an instance of the NSURLSessionConfigurationclass. The NSURLSessionTask class and its three concrete subclasses are the workers and are always used in conjunction with a session as it is the session that creates the task objects.
正如我之前提到的,NSURLSession 即是指一种新的网络开发技术,同时也是一个类。NSURLSession 的 API 包括若干个类,但是 NSURLSession 是关键的部件用于发送请求和接收响应,而会话对象的配置是由 NSURLSessionConfiguration 实例进行处理。NSURLSessionTask 和其三个具体的子类总是和会话对象关联在一起,因为会话对象创建了任务对象。
Delegation
Both NSURLSession and NSURLConnection rely heavily on the delegation pattern. TheNSURLSessionDelegate protocol declares a handful of delegate methods for handling events at the session-level. In addition, the NSURLSessionTask class and subclasses each declare a delegate protocol for handling task-level events.
NSURLSession 和 NSURLConnection 都采用了委托代理模式。NSURLSessionDelegate 委托协议声明了少量的委托方法用于处理会话事件。除此之外,NSURLSessionTask 和其子类都各自有一个委托协议用于处理任务事件。
Old Friends
The NSURLSession API builds on top of classes that you're already familiar with, such asNSURL, NSURLRequest, and NSURLResponse.
NSURLSession 的 API 的使用涉及到你曾熟悉的类,例如:NSURL,NSURLRequest 和 NSURLResponse。
What are the differences?
How does NSURLSession differ from NSURLConnection? This is an important question, because NSURLConnection is not being deprecated by Apple. You can still useNSURLConnection in your projects. Why should you use NSURLSession?
那么 NSURLSession 和 NSURLConnection 有什么不同呢?这是一个关键的问题,因为 NSURLConnection 还未被 Apple 弃用。你仍可以是项目中使用 NSURLConnection。那何时使用 NSURLSession 呢?
The first thing to understand is that the NSURLSession instance is the object that manages the request and response. This is similar to how NSURLConnection works, but the key difference is that the configuration of the request is handled by the session object, which is a long lived object. This is done through the NSURLSessionConfigurationclass. Not only does it provide the NSURLSession API fine-grained configuration through the NSURLSessionConfiguration class, it encourages the separation of data (request body) from metadata. The NSURLSessionDownloadTask illustrates this well by directly writing the response to the file system.
首先要了解到,NSURLSession 实例对象是管理请求和响应的,这和 NSURLConnection 相似,但区别是管理请求配置的是一个长寿命对象,由 NSURLSessionConfiguration 类对象完成。通过 NSURLSessionConfiguration 类不仅提供了细粒度配置的 API 管理 NSURLSession 会话对象,而且将数据(请求主体)从元数据(metadata)中分离开来。NSURLSessionDownloadTask 通过直接将响应数据写入文件系统就很好的说明了这一点。
Authentication is easier and handled more elegantly by NSURLSession. TheNSURLSession API handles authentication on a connection basis instead of on a request basis, like NSURLConnection does. The NSURLSession API also makes it more convenient to provide HTTP options and each session can have a separate storage container depending on how you configure the session.
通过 NSURLSession 可以更容易的实现身份认证。NSURLSession 的 API 处理身份认证是在连接的基础上进行而非在请求的基础上进行,和 NSURLConnection 的处理方式是一样的。NSURLSession 的 API 提供了方便的 HTTP 协议处理选项,而且每一个会话可以根据你是如何配置会话而有一个单独的存储容器。
In the introduction, I told you that NSURLSession provides a modern interface, which integrates gracefully with iOS 7. One example of this integration is NSURLSession's out-of-process uploads and downloads. NSURLSession is optimized to preserve battery life, supports pausing, canceling, and resuming of tasks as well as UIKit's multitasking API. What is not to love about NSURLSession?
在引言中,我告诉你 NSURLSession 提供了一个现代化的接口,它与iOS 7优雅的集成整合。这种集成整合体现的一个例子是 NSURLSession 的上传下载是在进程外进行。 NSURLSession 也进行了优化以保持电池的使用寿命,提供暂停,取消和恢复任务,还支持 UIKit 的多线程处理的 API 。还有什么理由不爱 NSURLSession 呢?
Getting Your Feet Wet
Step 1: Project Setup
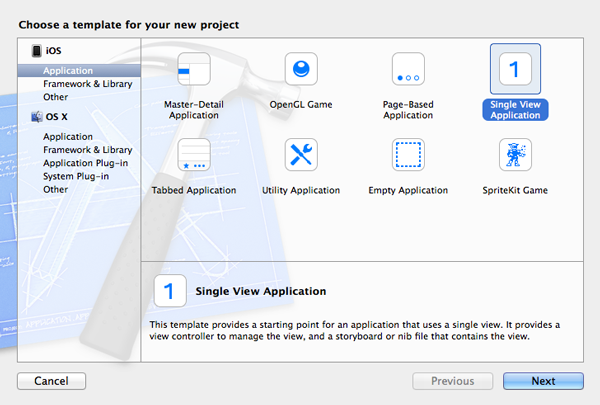
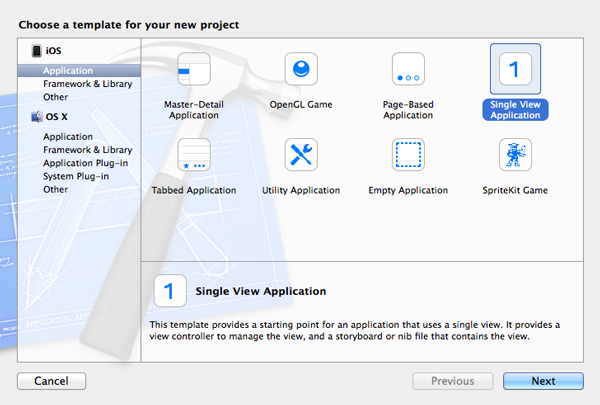
A new API is best learned by practice so it's time to fire up Xcode and get our feet wet. Launch Xcode 5, create a new project by selecting New > Project... from the Filemenu, and select the Single View Application template from the list of iOS application templates.
实践出真知。在 Xcode 5 中创建一个单视图项目。
Give your project a name, tell Xcode where you'd like to save it, and hit Create. There's no need to put the project under source control.

Step 2: Create a Session Object
When working with NSURLSession, it is important to understand that the session object, an instance of NSURLSession, is the star player. It handles the requests and responses, configures the requests, manages session storage and state, etc. Creating a session can be done several ways. The quickest way to get started is to use NSURLSession'ssharedSession class method as shown below.
在使用 NSURLSession 的时候,重点是理解会话对象(它可是主角),NSURLSession 的实例。它处理请求和响应,配置请求,管理会话的存储和状态,等等。创建会话对象有多种方式,最快的是使用 NSURLSession 的 sharedSession 类方法。
- - (void)viewDidLoad {
- [super viewDidLoad];
- NSURLSession *session = [NSURLSession sharedSession];
- }
Create a session object in the view controller's viewDidLoad method as shown above. The session object we created is fine for our example, but you probably want a bit more flexibility in most cases. The session object we just created uses the globalNSURLCache, NSHTTPCookieStorage, and NSURLCredentialStorage. This means that it works pretty similar to a default implementation of NSURLConnection.
在视图控制器的 viewDidLoad 方法创建了 session 会话对象,这个会话对象已经适合我们例子的需要了,但是在大多数情况下可能需要多一点的灵活性。刚刚我们创建的 session 对象使用全局的 NSURLCache,NSHTTPCookieStorage 和 NSURLCredentialStorage。这样 session 的工作状态就和 NSURLConnection 的默认实现类似。
Step 3: Create a Data Task
To put the session object to use, let's query the iTunes Store Search API and search for software made by Apple. The iTunes Store Search API is easy to use and requires no authentication, which makes it ideal for our example.
为了测试 session 对象的使用,我们使用 Apple 提供的数据查询接口: iTunes Store Search API ,这个开发接口易于使用且不需要身份验证,适合本例子。
To query the search API, we need to send a request tohttps://itunes.apple.com/search and pass a few parameters. As we saw earlier, when using the NSURLSession API, a request is represented by a task. To query the search API, all we need is a data task, an instance of the NSURLSessionDataTask class. Take a look at the updated viewDidLoad implementation shown below.
我们发送请求并传递一些请求参数。正如我们之前所见,一个任务代表一个请求。使用查询接口请求数据,我们需要一个 Data task,NSURLSessionDataTask 的实例。修改 viewDidLoad 方法如下:
- - (void)viewDidLoad {
- [super viewDidLoad];
- NSURLSession *session = [NSURLSession sharedSession];
- NSURLSessionDataTask *dataTask = [session dataTaskWithURL:[NSURL URLWithString:@"https://itunes.apple.com/search?term=apple&media=software"]completionHandler:^(NSData *data,NSURLResponse *response,NSError *error) {
- NSDictionary *json = [NSJSONSerialization JSONObjectWithData:data options:0 error:nil];
- NSLog(@"%@", json);
- }];
- }
There are a number of methods available to create a task, but the key concept to understand is that the session object does the actual creation and configuration of the task. In this example, we invoke dataTaskWithURL:completionHandler: and pass it an instance of NSURL as well as a completion handler. The completion handler accepts three arguments, the raw data of the response (NSData), the response object(NSURLResponse), and an error object (NSError). If the request is successful, the error object is nil. Because we know the request returns a JSON response, we create a Foundation object from the data object that we've received and log the output to the console.
有许多方法来创建一个任务,但是关键概念的理解是 session 对象创建且配置了任务。在这个例子中,我们调用 dataTaskWithURL:completionHandler: 方法,并传递 NSURL 对象和一个完成程序代码块作为参数。完成程序代码块有三个参数:请求响应的原始数据(NSData),响应对象(NSURLResponse)和一个错误对象(NSError)。如果请求成功,错误对象就为 nil。因为我们知道请求返回的是JSON数据作为响应,我们用 data 对象接收响应,并在终端中输出。
It is important to understand that the error object passed to the completion handler is only populated, not nil, if the request failed or encountered an error. In other words, if the request returned a 404 response, the request did succeed as far as the sessions is concerned. The error object will then be nil. This is an important concept to grasp when working with NSURLSession and NSURLConnection for that matter.
对于 error 对象,如果请求失败或者遇到一个错误,那么传递给完成处理代码块的 error 对象(不是nil)就很重要了。换言之,如果请求得到一个 404 的响应,那么请求将会直到会话连接成功才得到响应。当然 error 对象也有可能是 nil。所以在使用 NSURLSession 和 NSURLConnection 的时候 error 对象是一个很重要把握的概念。
Build the project and run the application in the iOS Simulator or on a physical device, and inspect Xcode's Console. Nothing is printed to the console. What went wrong? As I mentioned earlier, the NSURLSession API supports pausing, canceling, and resuming of tasks or requests. This behavior is similar to that of NSOperation and it may remind you of the AFNetworking library. A task has a state property that indicates whether the task is running (NSURLSessionTaskStateRunning), suspended(NSURLSessionTaskStateSuspended), canceling (NSURLSessionTaskStateCanceling), or completed (NSURLSessionTaskStateCompleted). When a session object creates a task, the task starts its life in the suspended state. To start the task, we need to tell it toresume by calling resume on the task. Update the viewDidLoad method as shown below, run the application one more time, and inspect the output in the console. Mission accomplished.
编译运行程序在模拟器或者真机,然后观察 Xcode 的终端,会发现没有东西输出。是否出错了呢?正如我之前所说,NSURLSession 的 API 支持暂停,取消和恢复请求任务。这个和 NSOperation 很相似。任务有一个 state 状态属性指示一个任务是否正在运行 (NSURLSessionTaskStateRunning),是否停止(NSURLSessionTaskStateSuspended),是否取消(NSURLSessionTaskStateCanceling)或者是否完成(NSURLSessionTaskStateCompleted)。当一个会话对象创建了一个任务,这个任务初始时是处于停止状态。为了启动任务,我们需要调用 resume 方法去启动任务执行。修改 viewDidLoad 方法如下,重新运行,观察终端中的输出。
- - (void)viewDidLoad {
- [super viewDidLoad];
- NSURLSession *session = [NSURLSession sharedSession];
- NSURLSessionDataTask *dataTask = [session dataTaskWithURL:[NSURL URLWithString:@"https://itunes.apple.com/search?term=apple&media=software"]completionHandler:^(NSData *data,NSURLResponse *response,NSError *error) {
- NSDictionary *json = [NSJSONSerialization JSONObjectWithData:data options:0 error:nil];
- NSLog(@"%@", json);
- }];
- [dataTask resume];
- }
Downloading a Remote Resource
In the previous example, we made use of a completion handler to process the response we received from the request. It's also possible to achieve the same result by implementing the task delegate protocol(s). Let's see what it takes to download an image by leveraging NSURLSession and the NSURLSessionDownloadTask.
在前一个例子中,我们使用完成程序代码块去处理请求接收到的响应。也可以通过委托协议来实现相同过程。让我们看看借助 NSURLSession 和 NSURLSessionDownloadTask 完成下载图像。
Step 1: Create the User Interface
Open MTViewController.h and create two outlets as shown below. We'll use the first outlet, an instance of UIImageView, to display the downloaded image to the user. The second outlet, an instance of UIProgressView, will show the progress of the download task.
打开 MTViewController.h 然后创建如下的两个 outlet 。我们使用第一个 outlet,UIImageView 的实例,去显示下载的图像;第二个 outlet ,UIProgressView 的实例,去显示下载任务的进度。
- #import <UIKit/UIKit.h>
- @interface MTViewController: UIViewController
- @property(weak,nonatomic)IBOutlet UIImageView *imageView;
- @property(weak,nonatomic)IBOutlet UIProgressView *progressView;
- @end
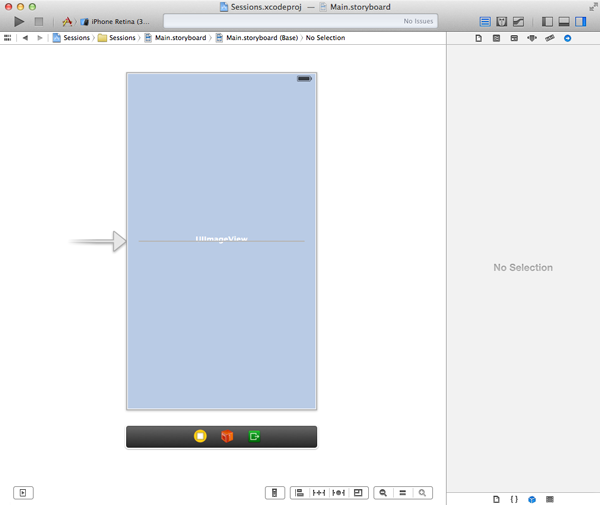
Open the project's main storyboard (Main.storyboard), drag a UIImageView instance to the view controller's view, and connect the view controller's outlet that we just created in the view controller's header file. Repeat this process for the progress view.
打开项目的 storyboard,拖动 UIImageView 到视图中,然后和视图控制器中的 outlet 进行连接对应。重复这个过程完成添加进度条。
译者注:由于添加进度条之后,其默认值为0.5(打开 Xcode 右侧栏 Attributes inspector,其中 Progress 值默认为 0.5),那么由于下载一开始是从 0 开始,那么应该修改设置其为 0。或者使用代码,在 viewDidLoad 方法中 增加如下代码进行设置:
- [self.progressView setProgress:0];
Step 2: Create a Download Task
In this example, we won't make use of the sharedSession class method, because we need to configure the session object that we'll use to make the request. Update the implementation of viewDidLoad as shown below.
在这个例子中,我们不使用 sharedSession 类方法创建会话对象,因为需要根据请求对会话对象进行配置。在viewDidLoad 方法中:
- - (void)viewDidLoad {
- [super viewDidLoad];
- NSURLSessionConfiguration *sessionConfiguration = [NSURLSessionConfiguration defaultSessionConfiguration];
- NSURLSession *session = [NSURLSession sessionWithConfiguration:sessionConfiguration delegate:self delegateQueue:nil];
- NSURLSessionDownloadTask *downloadTask = [session downloadTaskWithURL:[NSURL URLWithString:@"http://cdn.tutsplus.com/mobile/uploads/2013/12/sample.jpg"]];
- [downloadTask resume];
- }
译者注:由于代码中的图片链接地址有可能打不开(测试时,出现过),所以读者需要先将链接地址到浏览器中测试能否打开,若不能,则随便替换一个图片链接地址。译者就是无法打开该链接的图片,所以替换为这个链接:http://iphone.images.paojiao.cn//iphone/paper/201111/4/97108898/paojiao_08a86f17_280x420.jpg
To prevent any compiler warning from popping up, make sure to conform theMTViewController class to the NSURLSessionDelegate and NSURLSessionDownloadDelegateprotocols as shown below.
为了避免出现编译错误,确保 MTViewController 类遵循NSURLSessionDelegate 和 NSURLSessionDownloadDelegate 协议。
- #import "MTViewController.h"
- @interface MTViewController() <NSURLSessionDelegate, NSURLSessionDownloadDelegate>
- @end
In viewDidLoad, we create an instance of the NSURLSessionConfiguration class by invoking the defaultSessionConfiguration class method. As stated in the documentation, by using the default session configuration the session will behave much like an instance of NSURLConnection in its default configuration, which is fine for our example.
在 viewDidLoad 方法中,我们通过调用 defaultSessionConfiguration 类方法创建 NSURLSessionConfiguration 类的实例。使用默认的会话配置将会使会话的行为和 NSURLConnection 实例的默认配置类似。
In this example, we create a NSURLSession instance by invoking thesessionWithConfiguration:delegate:delegateQueue: class method and pass thesessionConfiguration object we created a moment ago. We set the view controller as the session delegate and pass nil as the third argument. You can ignore the third argument for now. The main difference with the previous example is that we set thesession's delegate to the view controller.
在这个例子中,我们创建创建 NSURLSession 实例是通过调用sessionWithConfiguration:delegate:delegateQueue: 类方法,然后传入 sessionConfiguration 对象作为参数进行创建。我们设置视图控制器为会话的委托对象,然后传递 nil 给第三个参数。你可以暂时忽略第三个参数的含义。这和之前例子最主要的不同是我们设置 session 的委托对象为视图控制器。
To download the image, we need to create a download task. We do this by callingdownloadTaskWithURL: on the session object, passing an instance of NSURL, and callingresume on the download task. We could have made use of a completion handler like we did earlier, but I want to show you the possibilities of using a delegate instead.
为了下载图像,我们要创建一个 Download 任务。我们在 session 会话对象上调用 downloadTaskWithURL: 方法,传入一个 NSURL 实例,在调用 resume 方法去开始下载任务。我们这里可以使用完成程序代码块处理接收请求响应,但是我这里想要使用委托方法进行实现。
Step 3: Implement the Delegate Protocol
To make all this work, we need to implement the three delegate methods of theNSURLSessionDownloadDelegate protocol,URLSession:downloadTask:didFinishDownloadingToURL:,
URLSession:downloadTask:didResumeAtOffset:expectedTotalBytes:, andURLSession:downloadTask:downloadTask didWriteData:totalBytesWritten:totalBytesExpectedToWrite:. The implementation of each method is quite easy. It's important to note that we need update the user interface on the main thread using GCD (Grand Central Dispatch). By passing nil as the third argument of sessionWithConfiguration:delegate:delegateQueue:, the operating system created a background queue for us. This is fine, but it also means that we need to be aware that the delegate methods are invoked on a background thread instead of the main thread. Build the project and run the application to see the result of our hard work.
为了完成下载过程,我们需要实现 NSURLSessionDownloadDelegate 委托协议的如下三个方法:URLSession:downloadTask:didFinishDownloadingToURL: ,URLSession:downloadTask:didResumeAtOffset:expectedTotalBytes: 和didWriteData:totalBytesWritten:totalBytesExpectedToWrite: 。每一个委托方法的实现都比较简单。重点需要注意的是要使用 GCD(Grand Central Dispatch) 在主线程中更新用户界面(UI)。由于在sessionWithConfiguration:delegate:delegateQueue: 方法中传入 nil 作为其第三个参数,操作系统自动为我们创建一个后台队列。在本例中是适用的,同时我们也要意识到这些委托方法是在后台线程中进行调用执行的,而非在主程序中。编译运行项目程序,观察结果。
- - (void)URLSession:(NSURLSession*)session downloadTask:(NSURLSessionDownloadTask*)downloadTask didFinishDownloadingToURL:(NSURL*)location {
- NSData *data = [NSData dataWithContentsOfURL:location];
- dispatch_async(dispatch_get_main_queue(), ^{
- [self.progressView setHidden:YES];
- [self.imageView setImage:[UIImage imageWithData:data]];
- });
- }
- - (void)URLSession:(NSURLSession*)session downloadTask:(NSURLSessionDownloadTask*)downloadTask didResumeAtOffset:(int64_t)fileOffset expectedTotalBytes:(int64_t)expectedTotalBytes {
- }
- - (void)URLSession:(NSURLSession*)session downloadTask:(NSURLSessionDownloadTask*)downloadTask didWriteData:(int64_t)bytesWritten totalBytesWritten:(int64_t)totalBytesWritten totalBytesExpectedToWrite:(int64_t)totalBytesExpectedToWrite {
- float progress = (double)totalBytesWritten / (double)totalBytesExpectedToWrite;
- dispatch_async(dispatch_get_main_queue(), ^{
- [self.progressView setProgress:progress];
- });
- }
译者注:运行项目其结果:进度条显示图像下载进度(从0开始),下载完毕,进度条隐藏,图像显示。
Conclusion
With these two examples, you should have a basic understanding of the fundamentals of the NSURLSession API, how it compares to NSURLConnection, and what its advantages are. In the next part of this series, we will look at more advanced features ofNSURLSession.
有了这两个例子,你应该对 NSURLSession 的基础知识,它和 NSURLConnection 的比较,它的优势有了一定的了解。在下一篇教程中,我们将深入了解 NSURLSession 的其它先进特性
Part2:
In the previous tutorial, I introduced you to NSURLSession. I talked about the advantages it has over NSURLConnection and how to use NSURLSession for simple tasks, such as fetching data from a web service and downloading an image from the web. In this tutorial, we'll take a closer look at the configuration options of NSURLSession and how to cancel and resume a download task. We've got a lot of ground to cover so let's get started.
在前一篇教程文章中,我介绍了NSURLSession。谈及了 NSURLSession 优于 NSURLConnection 的特性,并且提供了简单的例子展示了如何使用 NSURLSession:从网上获取数据和下载图像。在这篇教程中,我们将深入了解 NSURLSession 的配置选项,如何取消和恢复下载任务。开始吧!
Session Configuration
As we saw in the previous tutorial, a session, an instance of NSURLSession, is a configurable container for putting network requests into. The configuration of the session is handled by an instance of NSURLSessionConfiguration.
正如在前文中所说,会话对象,NSURLSession 的实例,如同一个可配置的容器,用于装在网络请求。而会话对象的配置是由 NSURLSessionConfiguration 对象管理。
A session configuration object is nothing more than a dictionary of properties that defines how the session it is tied to behaves. A session has one session configuration object that dictates cookie, security, and cache policies, the maximum number of connections to a host, resource and network timeouts, etc. This is a significant improvement over NSURLConnection, which relied on a global configuration object with much less flexibility.
一个会话管理对象无非就是一个属性字典,其中定义了会话中绑定的行为。一个会话对象对应一个会话管理对象,其决定了cookie,安全和高速缓存策略,最大主机连接数,资源管理,网络超时,等等。相比于 NSURLConnection 依赖于一个全局的配置对象,缺乏灵活性而言,NSURLSession 有很大的改进了。
Mutability
Once a session is created and configured by a NSURLSessionConfiguration instance, the session's configuration cannot be modified. If you need to modify a session's configuration, you have to create a new session. Keep in mind that it is possible to copy a session's configuration and modify it, but the changes have no effect on the session from which the configuration was copied.
一旦会话对象创建,并且由 NSURLSessionConfiguration 对象进行配置后,这个会话配置对象就不能被修改了。如果你想要修改会话配置对象,那么你必须重新创建一个新的会话。请记住,可以复制会话配置对象,然后修改会话配置对象,但是修改对会话没有影响。
Default Configuration:默认配置
The NSURLSessionConfiguration class provides three factory constructors for instantiating standard configurations, defaultSessionConfiguration,ephemeralSessionConfiguration, and backgroundSessionConfiguration. The first method returns a copy of the default session configuration object, which results in a session that behaves similarly to an NSURLConnection object in its standard configuration. Altering a session configuration obtained through the defaultSessionConfigurationfactory method doesn't change the default session configuration which it's a copy of.
NSURLSessionConfiguration 类提供了三个工厂方法创建标准的配置实例对象:defaultSessionConfiguration,ephemeralSessionConfiguration, and backgroundSessionConfiguration。第一个方法返回一个默认会话配置对象的副本,由此对应的会话行为和 NSURLConnection 对象的标准配置的对应行为相似。对通过 defaultSessionConfiguration 工厂方法获得的默认会话配置对象进行修改并不会有效。
Ephemeral Configuration:临时配置
A session configuration object created by invoking the ephemeralSessionConfigurationfactory method ensures that the resulting session uses no persistent storage for cookies, caches, or credentials. In other words, cookies, caches, and credentials are kept in memory. Ephemeral sessions are therefore ideal if you need to implement private browsing, something that simply wasn't possible before the introduction ofNSURLSession.
通过 ephemeralSessionConfiguration 工厂方法创建的会话配置对象确保所产生的会话不使用持久化存储的cookie,缓存或者证书;换言之,cookie,缓存或者证书都是保存在内存中的。因此,临时会话对象非常适合实现私密浏览,这些在引入 NSURLSession 之前是不可能实现的。
Background Configuration:后台配置
The backgroundSessionConfiguration: factory method creates a session configuration object that enables out-of-process uploads and downloads. The upload and download tasks are managed by a background daemon and continue to run even if the application is suspended or crashes. We'll talk more about background sessions later in this series.
backgroundSessionConfiguration: 工厂方法创建的会话配置对象,使得上传下载数据可以在进程之外进行。上传下载数据的任务由一个后台守护教程管理,并且在应用程序挂起或者奔溃的时候,仍在后台运行。我们将在本系列后面详细介绍背景会话。
Session Configuration
As we saw in the previous tutorial, creating a session configuration object is simple. In the example shown below, I used the defaultSessionConfiguration factory method to create a NSURLSessionConfiguration instance. Configuring a session configuration object is as simple as modifying its properties as shown in the example. We can then use the session configuration object to instantiate a session object. The session object serves as a factory for data, upload, and download tasks, with each task corresponding to a single request. In the example below, we query the iTunes Search API as we did in the previous tutorial.
正如前篇教程所见,创建一个会话配置对象是简单的。在下面的例子中,我使用了 defaultSessionConfiguration 工厂方法创建 NSURLSessionConfiguration 对象。配置会话配置对象是简单的,如在下面例子中通过修改属性值即可。然后,我们通过会话配置对象实例化会话对象,会话对象作为数据请求,上传和下载任务的工厂,每一个任务都对应一个请求。在下面的例子中,我们使用上篇教程用过的查询接口。
- // Create Session Configuration
- NSURLSessionConfiguration *sessionConfiguration = [NSURLSessionConfiguration defaultSessionConfiguration];
- // Configure Session Configuration
- [sessionConfiguration setAllowsCellularAccess:YES];
- [sessionConfiguration setHTTPAdditionalHeaders:@{@"Accept": @"application/json"}];
- // Create Session
- NSURLSession *session = [NSURLSession sessionWithConfiguration:sessionConfiguration];
- // Send Request
- NSURL *url = [NSURL URLWithString:@"https://itunes.apple.com/search?term=apple&media=software"];
- [[session dataTaskWithURL:url completionHandler:^(NSData *data, NSURLResponse *response, NSError *error) {
- NSLog(@"%@", [NSJSONSerialization JSONObjectWithData:data options:0 error:nil]);
- }] resume];
The example also illustrates how easy it is to add custom headers by setting theHTTPAdditionalHeaders property of the session configuration object. The beauty of theNSURLSession API is that every request that passes through the session is configured by the session's configuration object. Adding authentication headers to a set of requests, for example, becomes easy as pie.
这个例子说明了通过设置会话配置对象的 HTTPAdditionalHeaders 属性来自定义请求头部是容易的。NSURLSession 的 API 的美妙之处在于每一个请求都是通过会话配置对象对会话进行配置。例如,为一组请求添加身份验证的头部就变得容易了。
Canceling and Resuming Downloads
In the previous tutorial, I showed you how to download an image using the NSURLSessionAPI. However, network connections are unreliable and it happens all too often that a download fails due to a flaky network connection. Fortunately, resuming a download isn't difficult with the NSURLSession API. In the next example, I'll show you how to cancel and resume the download of an image.
在前一篇教程中,我展示了通过 NSURLSession 的 API 去下载图像。然而网络连接是不可靠的,经常会发生由于网络连接错误而导致的下载失败。幸运的是,通过 NSURLSession 的 API 恢复下载并不困难。在下一个例子中,我将会展示如何取消和恢复图像的下载。
Before we take a closer look at resuming a download task, it is important to understand the difference between canceling and suspending a download task. It is possible to suspend a download task and resume it at a later time. Canceling a download task, however, stops the task and it isn't possible to resume it at a later time. There is one alternative, though. It is possible to cancel a download task by callingcancelByProducingResumeData: on it. It accepts a completion handler that accepts one parameter, an NSData object that is used to resume the download at a later time by invoking downloadTaskWithResumeData: ordownloadTaskWithResumeData:completionHandler: on a session object. The NSData object contains the necessary information to resume the download task where it left off.
在开始了解恢复下载任务之前,先了解取消和暂停下载任务的区别是非常重要的。暂停下载任务,之后再恢复下载是可以的。但是取消下载任务,相当于停止了任务,这样就不可能在之后再恢复下载。然而,有一个替代的方案。通过调用cancelByProducingResumeData: 取消一个下载任务,它的完成处理程序块接收一个 NSData 对象参数,通过调用downloadTaskWithResumeData 方法并传入这个参数或者在会话对象上调用downloadTaskWithResumeData:completionHandler: 方法就可以恢复下载任务。其中 NSData 对象包含了恢复下载任务必要的信息。
Step 1: Outlets and Actions
Open the project we created in the previous tutorial or download it here. We start by adding two buttons to the user interface, one to cancel the download and one to resume the download. In the view controller's header file, create an outlet and an action for each button as shown below.
打开上一篇教程中的项目。我们在界面上添加两个按键,一个用于取消下载,一个用于恢复下载。在视图控制器的头文件中,为每个按键创建一个outlet和一个action,如下:
- #import <UIKit/UIKit.h>
-
- @interface MTViewController : UIViewController
-
- @property(weak,nonatomic)IBOutlet UIButton *cancelButton;
- @property(weak,nonatomic)IBOutlet UIButton *resumeButton;
- @property(weak,nonatomic)IBOutlet UIImageView *imageView;
- @property(weak,nonatomic)IBOutlet UIProgressView *progressView;
-
- - (IBAction)cancel:(id)sender;
- - (IBAction)resume:(id)sender;
-
- @end
- #import <UIKit/UIKit.h>
- @interface MTViewController : UIViewController
- @property(weak,nonatomic)IBOutlet UIButton *cancelButton;
- @property(weak,nonatomic)IBOutlet UIButton *resumeButton;
- @property(weak,nonatomic)IBOutlet UIImageView *imageView;
- @property(weak,nonatomic)IBOutlet UIProgressView *progressView;
- - (IBAction)cancel:(id)sender;
- - (IBAction)resume:(id)sender;
- @end
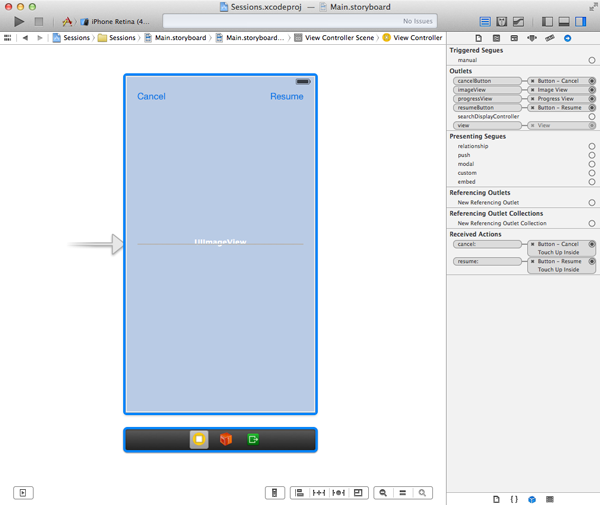
Step 2: User Interface
Open the project's main storyboard and add two buttons to the view controller's view. Position the buttons as shown in the screenshot below and connect each button with its corresponding outlet and action.
打开项目的storyboard,添加两个按键到视图中,同时连接到对应的outlet和action。
Step 3: Refactoring
We'll need to do some refactoring to make everything work correctly. OpenMTViewController.m and declare one instance variable and two properties. The instance variable, session, will keep a reference to the session we'll use for downloading the image.
我们需要进行一些代码重构使得一切正常运行。打开 MTViewController.m 文件,声明一个实例变量和两个属性。实例变量 session 用于下载图像。
- #import "MTViewController.h"
- @interfaceMTViewController () <NSURLSessionDelegate, NSURLSessionDownloadDelegate> {
- NSURLSession *_session;
- }
- @property(strong, nonatomic)NSURLSessionDownloadTask *downloadTask;
- @property(strong, nonatomic)NSData *resumeData;
- @end
We also need to refactor the viewDidLoad method, but first I'd like to implement a getter method for the session. Its implementation is pretty straightforward as you can see below. We create a session configuration object using the defaultSessionConfigurationfactory method and instantiate the session object with it. The view controller serves as the session's delegate.
我们还需要对 viewDidLoad 方法进行重构,但首先我为 session 实例变量实现 getter 方法,它的实现是简单的,如下所示。我们通过 defaultSessionConfiguration 工厂方法创建一个会话配置对象,然后实例化 session 对象。这个视图控制器作为会话的委托代理。
- - (NSURLSession*)session {
- if(!_session) {
- // Create Session Configuration
- NSURLSessionConfiguration *sessionConfiguration = [NSURLSessionConfiguration defaultSessionConfiguration];
- // Create Session
- _session = [NSURLSession sessionWithConfiguration:sessionConfiguration delegate:self delegateQueue:nil];
- }
- return _session;
- }
With the session accessor implemented, the viewDidLoad method becomes much simpler. We create a download task, as we did in the previous tutorial, and store a reference to the task in downloadTask. We then tell the download task to resume.
由于 session getter方法的实现,viewDidLoad 方法就变得简单了。我们创建一个下载任务,如上篇教程那样。然后通知下载任务 resume (此时即是开始下载任务)。
- - (void)viewDidLoad {
- [super viewDidLoad];
- // Create Download Task
- self.downloadTask= [self.session downloadTaskWithURL:[NSURL URLWithString:@"http://cdn.tutsplus.com/mobile/uploads/2014/01/5a3f1-sample.jpg"]];
- // Resume Download Task
- [self.downloadTask resume];
- }
译者注:如前篇教程中提到的,注意要现在浏览器中先测试该图像链接是否有效,若无效,则替换一个图像下载链接地址。可供替换链接:http://iphone.images.paojiao.cn//iphone/paper/201111/4/97108898/paojiao_08a86f17_280x420.jpg
Step 4: Canceling the Download
The cancel: action contains the logic for canceling the download task we just created. If downloadTask is not nil, we call cancelByProducingResumeData: on the task. This method accepts one parameter, a completion block. The completion block also takes one parameter, an instance of NSData. If resumeData is not nil, we store a reference to the data object in view controller's resumeData property.
cancel 方法中包含的处理逻辑就是取消之前创建的下载任务。如果 downloadTask (下载任务)非空,我们对下载任务调用 cancelByProducingResumeData: 方法,这个方法接收一个参数,完成处理程序块,这个程序块有一个 NSData 参数 resumeData,如果 resumeData 非空,我们就保存这个对象到视图控制器的 resumeData 属性中。
If a download is not resumable, the completion block's resumeData parameter is nil. Not every download is resumable so it's important to check if resumeData is a validNSData object.
如果一个下载任务是不可恢复的,那么完成处理程序块的 resumeData 参数就是 nil。并非所有的下载任务都是可恢复的,所以有必要检查 resumeData 是否是一个有效的 NSData 对象。
- - (IBAction)cancel:(id)sender {
- if(!self.downloadTask) return;
-
- // Hide Cancel Button
- [self.cancelButton setHidden:YES];
-
- [self.downloadTask cancelByProducingResumeData:^(NSData *resumeData) {
- if(!resumeData) return;
- [self setResumeData:resumeData];
- [self setDownloadTask:nil];
- }];
- }
- - (IBAction)cancel:(id)sender {
- if(!self.downloadTask) return;
- // Hide Cancel Button
- [self.cancelButton setHidden:YES];
- [self.downloadTask cancelByProducingResumeData:^(NSData *resumeData) {
- if(!resumeData) return;
- [self setResumeData:resumeData];
- [self setDownloadTask:nil];
- }];
- }
Step 5: Resuming the Download
Resuming the download task after it was canceled is easy. In the resume: action, we check if the view controller's resumeData property is set. If resumeData is a valid NSDataobject, we tell the session object to create a new download task and pass it theNSData object. This is all the session object needs to recreate the download task that we canceled in the cancel: action. We then tell the download task to resume and setresumeData to nil.
取消下载任务之后,恢复下载任务就变得简单了。在 resume action 方法中,我们先检查视图控制器的 resumeData 属性是否已置值。如果 resumeData 是一个有效的 DSData 对象,我们通知 session 会话对象创建一个新的下载任务,通过传递这个 NSData 对象。这个 NSData 包含了所有 session 需要重新创建下载任务的信息。然后通知下载任务开始,并置 resumeData 为 nil。
- - (IBAction)resume:(id)sender {
- if(!self.resumeData) return;
- // Hide Resume Button
- [self.resumeButton setHidden:YES];
- // Create Download Task
- self.downloadTask= [self.session downloadTaskWithResumeData:self.resumeData];
- // Resume Download Task
- [self.downloadTask resume];
- // Cleanup
- [self setResumeData:nil];
- }
Build the project and run the application in the iOS Simulator or on a physical device. The download should start automatically. Tap the cancel button to cancel the download and tap the resume button to resume the download.
编译项目程序,并在模拟器或者真机上运行。下载任务是自动开始的,点击 cancel 取消按键可以取消下载,点击 resume 恢复按键可以恢复下载。
Step 6: Finishing Touches
There are a number of details we need to take care of. First of all, the buttons shouldn't always be visible. We'll use key value observing to show and hide the buttons when necessary. In viewDidLoad, hide the buttons and add the view controller as an observer of itself for the resumeData and downloadTask key paths.
这里我们还需要关注一些细节处理。首先按键不应该总是可见的。我们使用 KVO 去处理显示和隐藏按键。在 viewDidLoad 方法中,设置隐藏两个按键,并且设置视图控制器为其本身的观察者,key path 为 “resumeData” 和 “downloadTask”。
- - (void)viewDidLoad {
- [super viewDidLoad];
- // Add Observer
- [self addObserver:self forKeyPath:@"resumeData" options:NSKeyValueObservingOptionNew context:NULL];
- [self addObserver:self forKeyPath:@"downloadTask" options:NSKeyValueObservingOptionNew context:NULL];
- // Setup User Interface
- [self.cancelButton setHidden:YES];
- [self.resumeButton setHidden:YES];
- // Create Download Task
- self.downloadTask= [self.session downloadTaskWithURL:[NSURLURLWithString:@"http://cdn.tutsplus.com/mobile/uploads/2014/01/5a3f1-sample.jpg"]];
- // Resume Download Task
- [self.downloadTask resume];
- }
In observeValueForKeyPath:ofObject:change:context:, we hide the cancel button ifresumeData is nil and we hide the resume button if downloadTask is nil. Build the project and run the application one more time to see the result. This is better. Right?
在 方法中,如果 resumeData 为nil,则隐藏取消按键;如果 downloadTask 为 nil,则隐藏恢复按键。编译项目并再次运行,看看效果,是否就好多了。
- - (void)observeValueForKeyPath:(NSString*)keyPath ofObject:(id)object change:(NSDictionary*)change context:(void*)context {
- if([keyPath isEqualToString:@"resumeData"]) {
- dispatch_async(dispatch_get_main_queue(), ^{
- [self.resumeButton setHidden:(self.resumeData==nil)];
- });
- }else if([keyPath isEqualToString:@"downloadTask"]) {
- dispatch_async(dispatch_get_main_queue(), ^{
- [self.cancelButton setHidden:(self.downloadTask==nil)];
- });
- }
- }
observeValueForKeyPath:ofObject:change:context: is called on the main thread. It is therefore important to update the user interface in a GCD (Grand Central Dispatch) block that is invoked on the main queue.
Step 7: Invalidating the Session
There is one key aspect of NSURLSession that I haven't talked about yet, session invalidation. The session keeps a strong reference to its delegate, which means that the delegate isn't released as long as the session is active. To break this reference cycle, the session needs to be invalidated. When a session is invalidated, active tasks are canceled or finished, and the delegate is sent aURLSession:didBecomeInvalidWithError: message and the session releases its delegate.
NSURLSession 还有一个重要的内容没有提及,就是会话失效。会话对象会对其委托保持一个强引用,这就意味着只要会话处于活动状态,委托就不会被释放。为了打破这种循环引用,会话就需要被置为无效。当一个会话失效,例如活动的任务取消或者完成,委托就被发送一个URLSession:didBecomeInvalidWithError: 消息,会话就释放了委托。
There are several places that we can invalidate the session. Since the view controller downloads only one image, the session can be invalidated when the download finishes. Take a look at the updated implementation ofURLSession:downloadTask:didFinishDownloadingToURL:. The cancel button is also hidden when the download finishes.
有几个地方我们可以使会话失效。由于视图控制器只下载一个图像,该会话可以在下载完成的时候失效。实现URLSession:downloadTask:didFinishDownloadingToURL: 方法如下。取消按键也会在下载完成的时候被隐藏。
- - (void)URLSession:(NSURLSession*)session downloadTask:(NSURLSessionDownloadTask*)downloadTask didFinishDownloadingToURL:(NSURL*)location {
- NSData *data = [NSData dataWithContentsOfURL:location];
- dispatch_async(dispatch_get_main_queue(), ^{
- [self.cancelButton setHidden:YES];
- [self.progressView setHidden:YES];
- [self.imageView setImage:[UIImageimageWithData:data]];
- });
- // Invalidate Session
- [session finishTasksAndInvalidate];
- }
Conclusion
The example project we created in this tutorial is a simplified implementation of how to cancel and resume downloads. In your applications, it may be necessary to write theresumeData object to disk for later use and it may be possible that several download tasks are running at the same time. Even though this adds complexity, the basic principles remain the same. Be sure to prevent memory leaks by always invalidating a session that you no longer need.
在本教程中创建的示例项目是实现如何取消和恢复下载任务。在你的应用中,可能又比要将 resumeData 对象写入磁盘供以后使用,或者多个下载任务同时运行它也是有可能的。尽管这些增加了复杂性,但其基本的原理是相同的。注意防止内存泄露,如果不再需要的话,要使会话对象失效。
Part3:
In the previous tutorials, we explored the fundamentals of the NSURLSession API. There is one other feature of the NSURLSession API that we haven't look into yet, that is, out-of-process uploads and downloads. In the next two tutorials, I will show you how to create a very simple podcast client that enables background downloads.
在前面的教程中,我们已经探索了 NSURLSession API 的基础部分。关于 NSURLSession API 还有一个特性没有被提及,就是在进程之外进行上传和下载。在接下来的两篇教程中,我将会向你展示如何创建一个简单的播客客户端,其支持后台下载。
译者注:关于 podcast 播客:点击打开链接
Introduction
The podcast client that we're about to create isn't really going to be that functional. It will allow the user to query the iTunes Search API for a list of podcasts, select a podcast, and download episodes. Since we are focusing on the NSURLSession API, we won't go into playing the episodes the application downloads.
我们将要创建的播客客户端,其实并没有完全实现其功能。这将允许用户通过 iTunes 的查询接口,得到一系列的播客列表,选择一个播客,然后进行下载。由于我们关注的是 NSURLSession 的 API,所以我们不会对下载的内容进行播放。
The project, however, will teach you how to use data tasks and download tasks in a real world application. The podcast client will also enable background downloads for which we'll leverage NSURLSession's out-of-process API. We have quite a few things to do so let's not waste time and get started.
这个项目示例将会教你如何使用Data task 和 Download task,并真的在应用中下载数据。利用 NSURLSession 的 out-of-process API ,播客客户端也支持后台下载任务。我们有不少的事情要做,所以不浪费时间了介绍了,开始吧!
1. Project Setup
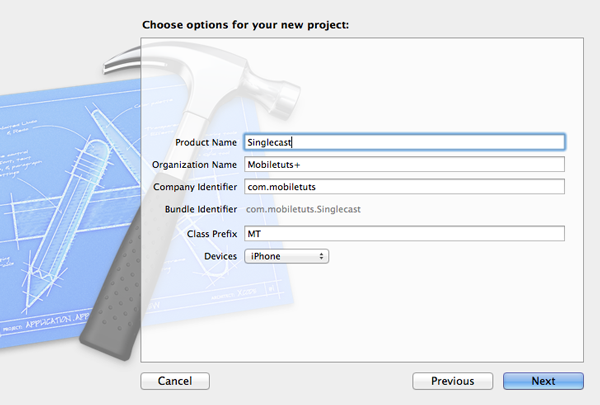
Fire up Xcode 5, select New > Project... from the File menu, and choose the Single View Application template from the list of iOS application templates. Name the application Singlecast, set the Device Family to iPhone, and tell Xcode where you'd like to save the project. Hit Create to create the project.
在Xcode中创建一个单视图项目,命名为 Singlecast。
2. Update Storyboard
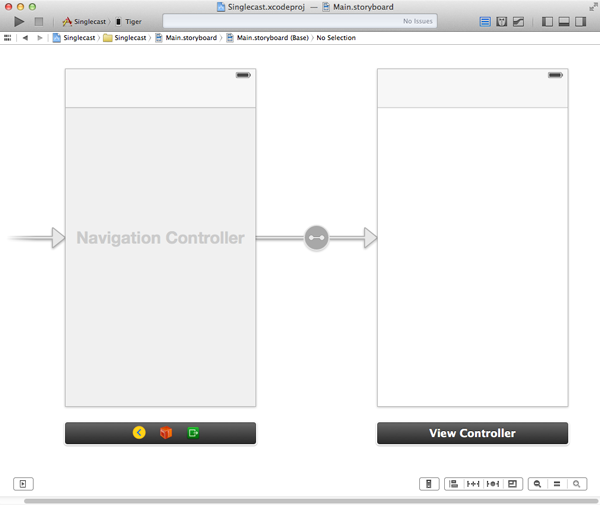
The first thing we need to do is edit the project's main storyboard. OpenMain.storyboard, select the storyboard's only view controller, and choose Embed In > Navigation Controller from the Editor menu. The reason for embedding the view controller in a navigation controller will become clear later in this tutorial.
首先需要做的是编辑storyboard。打开storyboard,选中唯一的视图,然后在 Editor 菜单中,选择 Embed In > Navigation Controller。为什么要嵌入一个导航控制器后面就知道了,不解释。
3. Search View Controller
Step 1: Create Class Files
As I mentioned in the introduction, to keep things simple, the user will only be able to subscribe to one podcast. Let's start by creating the search view controller. Select New > File... from the File menu and choose Objective-C class from the options on the right. Name the class MTSearchViewController and make it a subclass of UIViewController. Leave the check box labeled With XIB for user interface unchecked. Tell Xcode where you want to save the class files and hit Create.
如我在引言中所说,为了变得简单,用户只能订阅一个播客。让我们开始创建一个搜索视图控制器。创建一个Objective-C 类,名为 MTSearchViewController,继承自 UIViewController。注意不要勾选下面的两个选项,如下图:

Step 2: Update Class Interface
Before we create the user interface, open the view controller's header file and update the class's interface as shown below. We specify that the MTSearchViewController class conforms to the UITableViewDataSource, UITableViewDelegate, and UISearchBarDelegateprotocols, we declare two outlets, searchBar and tableView as well as an action,cancel, to dismiss the search view controller.
在编辑UI之前,先打开视图控制器的头文件,指定 MTSearchViewController 类遵循UITableViewDataSource, UITableViewDelegate, 和 UISearchBarDelegate 三个协议,然后创建两个 outlet :searchBar 和 tableView,还有一个 cancel action,用于关闭 search view controller。
- #import <UIKit/UIKit.h>
- @interface MTSearchViewController: UIViewController<UITableViewDataSource,UITableViewDelegate, UISearchBarDelegate>
- @property(weak,nonatomic)IBOutlet UISearchBar *searchBar;
- @property(weak,nonatomic)IBOutlet UITableView *tableView;
- - (IBAction)cancel:(id)sender;
- @end
Step 3: Create User Interface
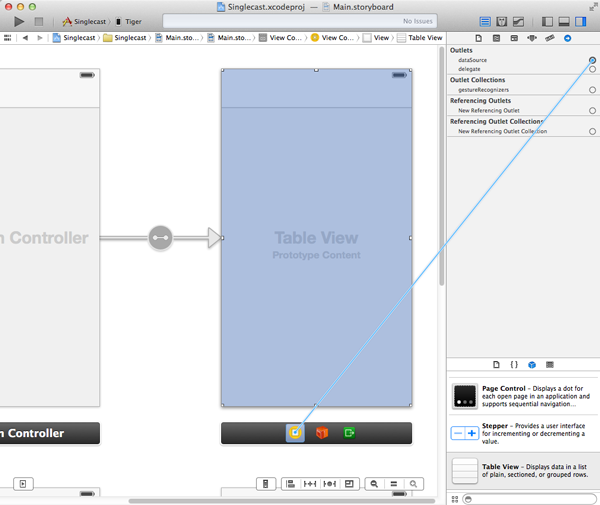
Revisit the project's main storyboard and drag a new view controller from the Object Library on the right. Select the new view controller, open the Identity Inspector on the right, and set the view controller's class to MTSearchViewController. With the new view controller still selected, open the Editor menu and choose Embed In > Navigation Controller. Drag a table view to the view controller's view and connect the table view'sdataSource and delegate outlets with the search view controller.
重新打开 storyboard,添加一个新的view controller,选中这个新添加的view controller,在Xcode右侧打开 Identity Inspector,设置 view controller的类为 MTSearchViewController。保持这个view controller的选中状态,打开Editor菜单,选择 Embed In > Navigation Controller。。拖动一个 table view 到这个新的 view controller 的 view 中,连接这个table view 的 dataSource 和 delegate。
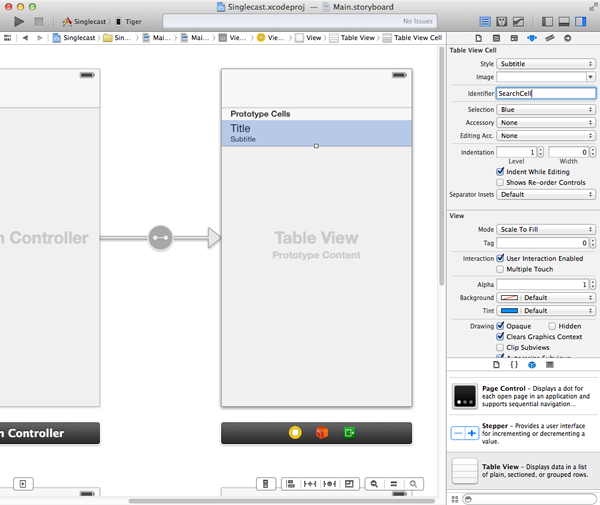
With the table view still selected, open the Attributes Inspector, and set the number of prototype cells to 1. Select the prototype cell and set its style property to Subtitle and its identifier to SearchCell.
选中table view,打开 Attributes Inspector, 选择 Table View ,设置 the number of prototype cells to 1. 然后选中 cell 并设置其 style property 为 Subtitle,其 identifier 为 SearchCell.
Drag a search bar from the Object Library and add it to the table view's header view. Select the search bar and connect its delegate outlet with the view controller.
从 Object Library 中拖动一个 search bar 到table view的头部。选中 search bar,连接其到view controller 的delegate outlet。
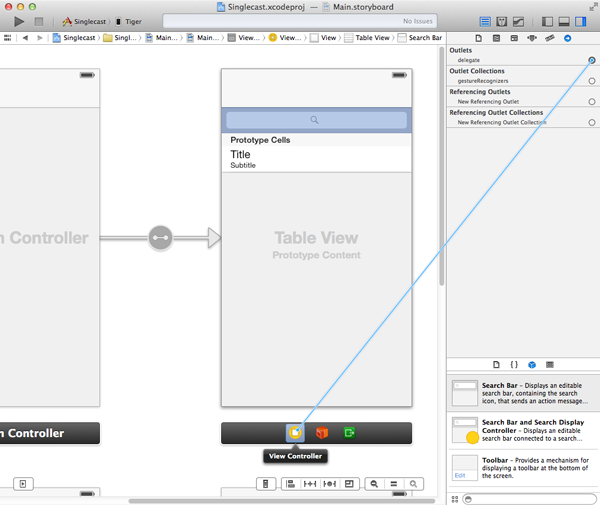
Select the view controller and connect its searchBar and tableView outlets with the search bar and table view respectively. There are a few other things that we need to do before we're done with the storyboard.
分别将 searchBar 和 tableView 的 outlet 和 view controller 中的控件连接起来。在结束storyboard的编辑之前还有一些事情要处理。
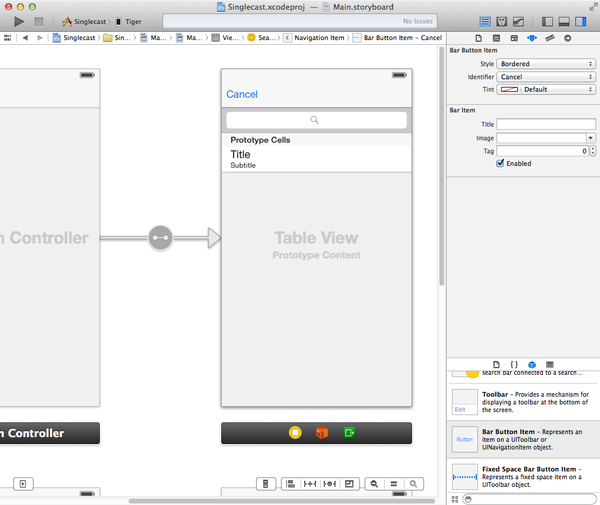
Open the Object Library and drag a bar button item to the navigation bar. Select the bar button item, connect it with the cancel: action we declared in the search view controller's interface, and change its Identifier in the Attributes Inspector to Cancel.
打开 Object Library ,拖动一个 bar button 添加到导航栏,然后将这bar button 连接到 cancel action,同时在 Attributes Inspector 中修改其 Identifier 为 Cancel。
Drag a bar button item to the navigation bar of the view controller (not the search view controller) and change its Identifier in the Attributes Inspector to Add. Control drag from the bar button item to the search view controller's navigation controller and select modal from the menu that pops up. This creates a segue from the view controller to the search view controller's navigation controller.
拖动一个bar button添加到另一个view controller(不是search view controller),在 Attributes Inspector 中置其Identifier 为Add。按住 control 按键的同时拖动 这个 bar button 连接到 search view controller,在弹出的菜单中选择 modal。这样就在这个view controller 和 search view controller 的navigation 之间建立了一个 segue。

Step 4: Table View Implementation
Before we implement the UITableViewDataSource and UITableViewDelegate protocols in the MTSearchViewController class, we need to declare a property that stores the search results we'll get back from the iTunes Search API. Name the property podcasts as shown below. We also declare a static string that will serve as a cell reuse identifier. It corresponds to the identifier we set on the prototype cell a few moments ago.
在 MTSearchViewController 实现 UITableViewDataSource 和 UITableViewDelegate 协议之前,我们需要声明一个属性用以保存从 iTunes Search 接口查询返回的结果。这个属性命名为 podcasts。同时声明一个静态字符串常量作为 cell 表单元的复用标识符,这和之前我们设置 cell 的 identity 是一致的
- #import "MTSearchViewController.h"
- @interface MTSearchViewController()
- @property(strong,nonatomic)NSMutableArray *podcasts;
- @end
- static NSString *SearchCell = @"SearchCell";
The implementation of numberOfSectionsInTableView: is as easy as it gets. We return 1if self.podcasts is not nil and 0 if it is. The implementation oftableView:numberOfRowsInSection: is pretty similar as you can see below. IntableView:cellForRowAtIndexPath:, we ask the table view for a cell by passing the cell reuse identifier, which we declared earlier, and indexPath. We fetch the corresponding item from the podcasts data source and update the table view cell. BothtableView:canEditRowAtIndexPath: and tableView:canMoveRowAtIndexPath: return NO.
接着,分别对委托方法 numberOfSectionsInTableView: ,tableView:numberOfRowsInSection: ,tableView:cellForRowAtIndexPath:,tableView:canEditRowAtIndexPath: ,tableView:canMoveRowAtIndexPath: 进行实现。
- - (NSInteger)numberOfSectionsInTableView:(UITableView*)tableView {
- return self.podcasts?1:0;
- }
- - (NSInteger)tableView:(UITableView*)tableView numberOfRowsInSection:(NSInteger)section {
- return self.podcasts?self.podcasts.count:0;
- }
- - (UITableViewCell*)tableView:(UITableView*)tableView cellForRowAtIndexPath:(NSIndexPath*)indexPath {
- UITableViewCell *cell = [tableView dequeueReusableCellWithIdentifier:SearchCell forIndexPath:indexPath];
- // Fetch Podcast
- NSDictionary *podcast = [self.podcasts objectAtIndex:indexPath.row];
- // Configure Table View Cell
- [cell.textLabel setText:[podcast objectForKey:@"collectionName"]];
- [cell.detailTextLabel setText:[podcast objectForKey:@"artistName"]];
- return cell;
- }
- - (BOOL)tableView:(UITableView*)tableView canEditRowAtIndexPath:(NSIndexPath*)indexPath {
- return NO;
- }
- - (BOOL)tableView:(UITableView*)tableView canMoveRowAtIndexPath:(NSIndexPath*)indexPath {
- return NO;
- }
Before running the application, implement the cancel: action in which we dismiss the search view controller.
然后再对关闭 search view controller 的 cancel action 进行实现。
- - (IBAction)cancel:(id)sender {
- [self dismissViewControllerAnimated:YES completion:nil];
- }
Build the project and run the application to make sure that the foundation is working as expected. It's time to start using the NSURLSession API to query the iTunes Search API.
编译运行项目确保一切正常运行,这时就可以开始使用 NSURLSession 的 API 进行查询了。
Step 5: Creating a Session
Let's begin by declaring two additional private properties in the MTSearchViewControllerclass, session and dataTask. The session variable is used to store a reference to theNSURLSession instance we'll be using for querying Apple's API. We also keep a reference to the data task that we will use for the request. This will enable us to cancel the data task if the user updates the search query before we've received a response from the API. If you have an eye for detail, you may have noticed that theMTSearchViewController class also conforms to the UIScrollViewDelegate protocol. The reason for this will become clear in a few minutes.
在 MTSearchViewController 类中添加两个私有属性 session ,用于查询 Apple 提供的接口; dataTask,用于数据请求(在接收到数据响应之前可以取消data task)。同时注意到 MTSearchViewController 遵循了 UIScrollViewDelegate 协议(原因不解释,后面就知道了)。
- #import "MTSearchViewController.h"
- @interface MTSearchViewController() <UIScrollViewDelegate>
- @property(strong,nonatomic)NSURLSession *session;
- @property(strong,nonatomic)NSURLSessionDataTask *dataTask;
- @property(strong,nonatomic)NSMutableArray *podcasts;
- @end
The session is created in its getter method as you can see below. Its implementation shouldn't hold any surprises if you've read the previous tutorials. We override the getter method of the session property to lazily load the session and confine the session's instantiation and configuration in its getter method. This makes for clean and elegant code.
实现如下的 session 获取方法,在前面的教程中已经见过,所以不会感到陌生。
- - (NSURLSession*)session {
- if(!_session) {
- // Initialize Session Configuration
- NSURLSessionConfiguration *sessionConfiguration = [NSURLSessionConfiguration defaultSessionConfiguration];
-
- // Configure Session Configuration
- [sessionConfiguration setHTTPAdditionalHeaders:@{@"Accept":@"application/json"}];
-
- // Initialize Session
- _session = [NSURLSession sessionWithConfiguration:sessionConfiguration];
- }
-
- return _session;
- }
- - (NSURLSession*)session {
- if(!_session) {
- // Initialize Session Configuration
- NSURLSessionConfiguration *sessionConfiguration = [NSURLSessionConfiguration defaultSessionConfiguration];
- // Configure Session Configuration
- [sessionConfiguration setHTTPAdditionalHeaders:@{@"Accept":@"application/json"}];
- // Initialize Session
- _session = [NSURLSession sessionWithConfiguration:sessionConfiguration];
- }
- return _session;
- }
Step 6: Searching
To respond to the user's input in the search bar, we implementsearchBar:textDidChange: of the UISearchBarDelegate protocol. The implementation is simple. If searchText is nil, the method returns early. If the length of searchText is less than four characters long, we reset the search by invoking resetSearch. If the query is four characters or longer, we perform a search by calling performSearch on the search view controller.
为了响应用户在搜索栏的输入,我们需要实现 UISearchBarDelegate 委托协议方法searchBar:textDidChange: 。实现的过程是简单的,如果 searchText 为 nil,则直接返回 return;如果 searchText 的长度小于4 个字符,则调用resetSearch 方法重置;如果查询输入长度大于等于 4,则调用performSearch 方法执行搜索。
- - (void)searchBar:(UISearchBar*)searchBar textDidChange:(NSString*)searchText {
- if(!searchText) return;
- if(searchText.length<=3) {
- [self resetSearch];
- }else{
- [self performSearch];
- }
- }
Before we inspect performSearch, let's take a quick look at resetSearch. All that we do in resetSearch is clearing the contents of podcasts and reloading the table view.
先看看 resetSearch 方法实现,先清除 podcasts 数组中的内容,然后刷新表视图。
- - (void)resetSearch {
- // Update Data Source
- [self.podcasts removeAllObjects];
- // Update Table View
- [self.tableView reloadData];
- }
The heavy lifting is done in performSearch. After storing the user's input in a variable named query, we check if dataTask is set. If it is set, we call cancel on it. This is important as we don't want to receive a response from an old request that may no longer be relevant to the user. This is also the reason why we have only one active data task at any one time. There is no advantage in sending multiple requests to the API.
繁重的工作是如何实现 performSearch 方法。先将用户的输入保存在 query 变量中,然后检查 dataTask 是否被设置,如果已经被设置,则调用 cancel 。这是因为我们不希望接收的响应是来自旧的请求,同时这也是我们每一时刻只有一个活跃的数据请求任务的原因。NSURLSession API 同时处理多个数据请求是没有优势的。
Next, we ask the session for a new data task instance by passing it an NSURL instance and a completion handler. Remember that the session is the factory that creates tasks. You should never create tasks yourself. If we get a valid data task from the session, we call resume on it as we saw in the previous tutorials.
接着,会话对象开始一个新的 data task 通过传递一个 NSURL 实例和一个完成处理程序块。记住会话对象就是创建请求任务的工厂,你不能自己创建请求任务。然后调用 resume 方法启动任务。
The logic inside the completion handler is interesting to say the least. The error object is important to us for several reasons. Not only will it tell us if something went wrong with the request, but it's also useful for determining if the data task was canceled. If we do get an error object, we check whether its error code is equal to -999. This error code indicates the data task was canceled. If we get another error code, we log the error to the console. In a real application, you'd need to improve the error handling and notify the user when an error is thrown.
完成处理程序块中的逻辑很有趣。其中 error 对象是相当重要的,它不仅告诉请求是否出错,而且对于判断请求任务是否取消也很有用。如果我们接收到一个 error 对象,而且错误代码为 -999,则说明请求任务被取消了。如果是其它的错误代码,则我们将其输出到终端。在实际的应用中,你需要提高错误的处理能力并在发送错误的时候通知用户。
If no error was passed to the completion handler, we create a dictionary from theNSData instance that was passed to the completion handler and we extract the results from it. If we have an array of results to work with, we pass it to processResults:. Did you notice we invoked processResults: in a GCD (Grand Central Dispatch) block? Why did we do that? I hope you remember, because it's a very important detail. We have no guarantee that the completion handler is invoked on the main thread. Since we need to update the table view on the main thread, we need to make sure thatprocessResults: is called on the main thread.
如果没有错误传递到完成处理程序块中,我们就将传递到完成处理程序块中的 NSData 实例创建一个 NSDictionary 对象,然后从这个字典中提取结果,如果我们获得的结果是一个数组,则传递给processResults: 方法处理。是否注意到processResults: 方法的调用是在GCD代码块中,这是一个非常重要的细节,虽然我们不能保证完成处理程序块会在主线程中调用,但由于我们需要在主线程中更新表视图,所以我们需要确保processResults: 方法一定会在主线程中调用(译者注:也即说,一旦完成处理程序块调用了,那么就一定要确保processResults: 方法被调用,以在主线程中更新表视图,而 processResults: 方法置于GCD block中处理可以做到这一点)。
- - (void)performSearch {
- NSString *query = self.searchBar.text;
- if(self.dataTask) {
- [self.dataTask cancel];
- }
- self.dataTask= [self.session dataTaskWithURL:[self urlForQuery:query]completionHandler:^(NSData *data,NSURLResponse *response,NSError *error) {
- if(error) {
- if(error.code!= -999) {
- NSLog(@"%@", error);
- }
- }else{
- NSDictionary *result = [NSJSONSerialization JSONObjectWithData:data options:0 error:nil];
- NSArray *results = [result objectForKey:@"results"];
- dispatch_async(dispatch_get_main_queue(), ^{
- if(results) {
- [self processResults:results];
- }
- });
- }
- }];
- if(self.dataTask) {
- [self.dataTask resume];
- }
- }
Before we look at the implementation of processResults:, I want to quickly show you what happens in urlForQuery:, the helper method we use in performSearch. InurlForQuery:, we replace any spaces with a + sign to ensure that the iTunes Search API is happy with what we send it. We then create an NSURL instance with it and return it.
在了解如何实现 processResults: 方法之前,先看看 urlForQuery: 方法。在该方法中,我们将所有的空格都置换成 “+”确保 iTunes Search 接口使用正确,然后创建一个NSURL实例并返回,
- - (NSURL*)urlForQuery:(NSString*)query {
- query = [query stringByReplacingOccurrencesOfString:@" " withString:@"+"];
- return [NSURL URLWithString:[NSString stringWithFormat:@"https://itunes.apple.com/search?media=podcast&entity=podcast&term=%@",query]];
- }
In processResults:, the podcasts variable is cleared, populated with the contents ofresults, and the results are displayed in the table view.
在 processResults: 方法中,清除 podcasts 变量中的内容,填入results 变量中的内容,然后更新表视图,显示结果。
- - (void)processResults:(NSArray*)results {
- if(!self.podcasts) {
- self.podcasts= [NSMutableArray array];
- }
-
- // Update Data Source
- [self.podcasts removeAllObjects];
- [self.podcasts addObjectsFromArray:results];
-
- // Update Table View
- [self.tableView reloadData];
- }
- - (void)processResults:(NSArray*)results {
- if(!self.podcasts) {
- self.podcasts= [NSMutableArray array];
- }
- // Update Data Source
- [self.podcasts removeAllObjects];
- [self.podcasts addObjectsFromArray:results];
- // Update Table View
- [self.tableView reloadData];
- }
Step 6: Selecting a Podcast
When the user taps a row in the table view to select a podcast,tableView:didSelectRowAtIndexPath: of the UITableViewDelegate protocol is invoked. Its implementation may seem odd at first so let me explain what's going on. We select the podcast that corresponds with the user's selection, store it in the application's user defaults database, and dismiss the search view controller. We don't notify anyone about this? Why we do this will become clear once we continue implementing theMTViewController class.
当用户点击表视图中的一行来选择一个播客时,UITableViewDelegate 委托协议方法tableView:didSelectRowAtIndexPath: 就会被调用。其实现过程看上去可能有点奇怪,下面稍作解释。我们将与用户选择的播客保存在用户默认的数据库中,然后关闭 search view controller。接下来继续实现MTViewController 类的时候就清楚这么处理是为什么了。
- - (void)tableView:(UITableView*)tableView didSelectRowAtIndexPath:(NSIndexPath*)indexPath {
- [tableView deselectRowAtIndexPath:indexPath animated:YES];
-
- // Fetch Podcast
- NSDictionary *podcast = [self.podcasts objectAtIndex:indexPath.row];
-
- // Update User Defatuls
- NSUserDefaults *ud = [NSUserDefaults standardUserDefaults];
- [ud setObject:podcast forKey:@"MTPodcast"];
- [ud synchronize];
-
- // Dismiss View Controller
- [self dismissViewControllerAnimated:YES completion:nil];
- }
- - (void)tableView:(UITableView*)tableView didSelectRowAtIndexPath:(NSIndexPath*)indexPath {
- [tableView deselectRowAtIndexPath:indexPath animated:YES];
- // Fetch Podcast
- NSDictionary *podcast = [self.podcasts objectAtIndex:indexPath.row];
- // Update User Defatuls
- NSUserDefaults *ud = [NSUserDefaults standardUserDefaults];
- [ud setObject:podcast forKey:@"MTPodcast"];
- [ud synchronize];
- // Dismiss View Controller
- [self dismissViewControllerAnimated:YES completion:nil];
- }
Step 7: Finishing Touches
There are two details I want to talk about before returning to the MTViewControllerclass. When the search view controller is presented to the user, it is clear that she wants to search for podcasts. It is therefore a good idea to immediately present the keyboard. We do this in viewDidAppear: as shown below.
在继续实现 MTViewController 类之前,有两个需要注意的细节。当search view controller呈现给用户的时候,显然用户此时是要进行查询播客的操作,因此此时应该立即弹出键盘,我们在viewDidAppear: 方法中:
- - (void)viewDidAppear:(BOOL)animated {
- [super viewDidAppear:animated];
- // Show Keyboard
- [self.searchBar becomeFirstResponder];
- }
The keyboard needs to hide the moment the user starts scrolling through the search results. To accomplish this, we implement scrollViewDidScroll: of theUIScrollViewDelegate protocol. This explains why MTSearchViewController conforms to the UIScrollViewDelegate protocol. Have a look at the implementation ofscrollViewDidScroll: shown below.
当用户浏览查询返回的结果的时候就应该将键盘隐藏,要实现这个功能,需要实现 UIScrollViewDelegate 委托协议的 scrollViewDidScroll: 方法。这就是为什么MTSearchViewController 类要遵循UIScrollViewDelegate 协议了。实现scrollViewDidScroll: 方法如下所示:
- - (void)scrollViewDidScroll:(UIScrollView*)scrollView {
- if([self.searchBar isFirstResponder]) {
- [self.searchBar resignFirstResponder];
- }
- }
UITableView class is a subclass of UIScrollView, which is the reason the above approach works.
4. Looping Back
As we saw earlier, we store the user's selection in the application's user defaults database. We need to update the MTViewController class to make use of the user's selection in the search view controller. In the view controller's viewDidLoad method, we load the podcast from the user defaults database and we add the view controller as an observer of the user defaults database for the key path MTPodcast so that the view controller is notified when the value for MTPodcast changes.
如前所见,我们将用户的选择保存在应用程序的用户默认数据库中,接着我们就需要在 MTViewController 中使用这个保存的用户的选择。在 viewDidLoad 方法中,我们先加载用户保存在默认数据库中选中的播客,然后将 view controller 作为用户默认数据库的观察者,其key path 为MTPodcast ,这样,当MTPodcast 的值发生变化的时候,就会通知 view controller。
- - (void)viewDidLoad {
- [super viewDidLoad];
- // Load Podcast
- [self loadPodcast];
- // Add Observer
- [[NSUserDefaults standardUserDefaults] addObserver:self forKeyPath:@"MTPodcast" options:NSKeyValueObservingOptionNew context:NULL];
- }
All we do in loadPodcast is storing the value for MTPodcast from the user defaults database in the view controller's podcast property. This value will be nil if the user defaults database doesn't contain an entry for MTPodcast. The view controller will gracefully handle this for us. Remember that, in Objective-C, you can send messages tonil without all hell breaking loose. This has its disadvantages, but it certainly has its advantages to.
在 loadPodcast 方法中,将保存在用户默认数据库中key值为 MTPodcast 的value 保存到 view controller 的podcast 属性中,如果用户默认数据库中没有包含key为podcast 的键值对,这个值可能为 nil。
- - (void)loadPodcast {
- NSUserDefaults *ud = [NSUserDefaults standardUserDefaults];
- self.podcast = [ud objectForKey:@"MTPodcast"];
- }
This also means that we need to declare a property named podcast in the view controller's implementation file.
这也就说明在 view controller 中声明了一个名为podcast 的属性:
- #import "MTViewController.h"
- @interface MTViewController ()
- @property (strong, nonatomic) NSDictionary *podcast;
- @end
Let's also take a quick look at setPodcast: and updateView.
让我们看看 setPodcast: 方法和updateView 方法的实现:
- - (void)setPodcast:(NSDictionary *)podcast {
- if (_podcast != podcast) {
- _podcast = podcast;
- // Update View
- [self updateView];
- }
- }
- - (void)updateView {
- // Update View
- self.title = [self.podcast objectForKey:@"collectionName"];
- }
When the value in the user defaults database changes for the key MTPodcast, the view controller can respond to this change inobserveValueForKeyPath:ofObject:change:context:. That's how key value observing works. All we do in this method is updating the value of the view controller's podcastproperty.
当用户默认数据库中key值为 MTPodcast 的value发送变化的时候,视图控制器可以在observeValueForKeyPath:ofObject:change:context: 方法中响应这种变化。这就是KVO。我们在这个方法中修改podcast 属性的值。
- - (void)observeValueForKeyPath:(NSString *)keyPath ofObject:(id)object change:(NSDictionary *)change context:(voidvoid *)context {
- if ([keyPath isEqualToString:@"MTPodcast"]) {
- self.podcast = [object objectForKey:@"MTPodcast"];
- }
- }
When working with key value observing, it is instrumental to be aware of memory management and retain cycles. In this case, it means that we need to remove the view controller as an observer when the view controller is deallocated.
当使用KVO的时候,要注意内存管理和避免出现 retain cycle。在这个例子中,意味着我们需要在 delloc 方法中解除这个观察者对象。
- - (void)dealloc {
- [[NSUserDefaults standardUserDefaults] removeObserver:self forKeyPath:@"MTPodcast"];
- }
5. Fetching and Parsing the Feed
Step 1: Adding Dependencies
The response we get back from the iTunes Search API includes a feedUrl attribute for each podcast. We could manually fetch the feed and parse it. However, to save some time, we'll make use of MWFeedParser, a popular library that can do this for us. You can manually download and include the library in your project, but I am going to opt for Cocoapods. I prefer Cocoapods for managing dependencies in iOS and OS X projects. You can read more about Cocoapods on its website or on Mobiletuts+.
我们从 iTunes 搜索得到的响应中,每一个播客都包含一个 feedUrl 属性。 我们可以手动提取并进行解析。不过,为了提高效率,我们可以使用 MWFeedParser 这个流行的库。你可以手动下载并添加到项目中。但是我更喜欢在iOS 和 OS X 中使用 Cocoapods ,可以在 its website 和 Mobiletuts+ 获取更详细的信息。
译者注:
CocoaPods is the dependency manager for Objective-C projects. It has thousands of libraries and can help you scale your projects elegantly.
关于使用 CocoaPods 来做包依赖管理的有关内容,可以参考如下:
OBJC依赖库管理利器cocoapods 安装及使用详细图解
https://github.com/CocoaPods/CocoaPods/wiki
Quit Xcode, navigate to the root of your Xcode project, and create a file named Podfile. Open this file in your text editor of choice and add the following three lines of code. In the first line, we specify the platform and the deployment target, which is iOS 7 in this example. The next two lines each specify a dependency of our Xcode project. The first one is the MWFeedParser library and I've also included the popular SVProgressHUD library, which will come in handy a bit later.
退出Xcode,导航定位到项目的更目录下,创建一个名为 Podfile 文件。用文本编辑器打开这个文件,添加如下的三行代码。第一行代码指定开发平台和部署目标位iOS 7.接下来的两行指定该Xcode项目的依赖库,第一个是MWFeedParser 库,还有流行的 SVProgressHUD 库。
- platform :ios, '7'
- pod 'MWFeedParser'
- pod 'SVProgressHUD'
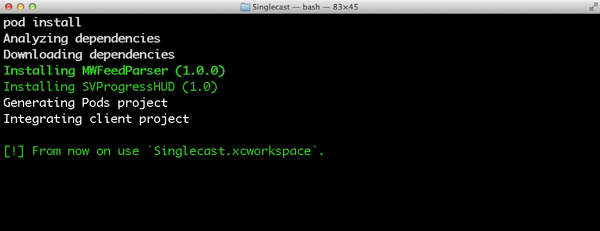
Open a Terminal window, navigate to the root of your Xcode project, and execute the command pod install. This should install the dependencies and create an Xcode workspace. When Cocoapods is finished installing the project's dependencies, it tells you to use the workspace it created for you. This is important so don't ignore this advice. In the root of your Xcode project, you will see that Cocoapods has indeed created an Xcode workspace for you. Double-click this file and you should be ready to go.
打开终端窗口,导航到 Xcode 项目的根目录下,然后执行命令 pod install 。这将会下载项目所需要的依赖库,并创建一个Xcode 的 workspace。当 完成下载项目所需的依赖库的时候,它会提示打开这个新创建的 workspace。特别要注意这个提示。在Xcode 的项目根目录下就会看到确实新增了 Xcode 项目的 workspace。双击 workspace 文件打开。
Step 2: Fetching and Parsing the Feed
Open the implementation file of the MTViewController class, add an import statement for MWFeedParser and SVProgressHUD, and declare two properties, episodes andfeedParser. We also need to make MTViewController conform to theMWFeedParserDelegate protocol.
打开 类文件,添加 MWFeedParser 和 SVProgressHUD 的 import 导入语句,声明两个属性 episodes 和feedParser 。同时让 MTViewController 遵循 MWFeedParserDelegate 协议。
- #import "MTViewController.h"
- #import "MWFeedParser.h"
- #import "SVProgressHUD.h"
- @interface MTViewController () <MWFeedParserDelegate>
- @property (strong, nonatomic) NSDictionary *podcast;
- @property (strong, nonatomic) NSMutableArray *episodes;
- @property (strong, nonatomic) MWFeedParser *feedParser;
- @end
Next, we update setPodcast: by invoking fetchAndParseFeed, a helper method in which we use the MWFeedParser class to fetch and parse the podcast's feed.
接着,在 setPodcast: 方法中调用 fetchAndParseFeed ,在这个方法中,使用 MWFeedParser类的方法获取并解析podcast's feed。
- - (void)setPodcast:(NSDictionary *)podcast {
- if (_podcast != podcast) {
- _podcast = podcast;
- // Update View
- [self updateView];
- // Fetch and Parse Feed
- [self fetchAndParseFeed];
- }
- }
In fetchAndParseFeed, we get rid of our current MWFeedParser instance if we have one and initialize a new instance with the podcast's feed URL. We set the feedParseTypeproperty to ParseTypeFull and set the view controller as the feed parser's delegate. Before we fetch the feed, we use SVProgressHUD to show a progress HUD to the user.
在 fetchAndParseFeed 方法中,为了避免使用已经存在的 MWFeedParser 类实例,根据 podcast 的 feed URL 重新创建一个新的实例对象。设置 feedParseType 属性为 ParseTypeFull ,该 view controller 为 feed 解析的委托对象。在开始获取 feed之前,使用 SVProgressHUD 显示进度。
- - (void)fetchAndParseFeed {
- if (!self.podcast) return;
- NSURL *url = [NSURL URLWithString:[self.podcast objectForKey:@"feedUrl"]];
- if (!url) return;
- if (self.feedParser) {
- [self.feedParser stopParsing];
- [self.feedParser setDelegate:nil];
- [self setFeedParser:nil];
- }
- // Clear Episodes
- if (self.episodes) {
- [self setEpisodes:nil];
- }
- // Initialize Feed Parser
- self.feedParser = [[MWFeedParser alloc] initWithFeedURL:url];
- // Configure Feed Parser
- [self.feedParser setFeedParseType:ParseTypeFull];
- [self.feedParser setDelegate:self];
- // Show Progress HUD
- [SVProgressHUD showWithMaskType:SVProgressHUDMaskTypeGradient];
- // Start Parsing
- [self.feedParser parse];
- }
We also need to implement two methods of the MWFeedParserDelegate protocol,feedParser:didParseFeedItem: and feedParserDidFinish:. InfeedParser:didParseFeedItem:, we initialize the episodes property if necessary and pass it the feed item that the feed parser hands to us.
需要实现 MWFeedParserDelegate 协议的两个方法:feedParser:didParseFeedItem: 和feedParserDidFinish: 。在 feedParser:didParseFeedItem: 方法中:
- - (void)feedParser:(MWFeedParser *)parser didParseFeedItem:(MWFeedItem *)item {
- if (!self.episodes) {
- self.episodes = [NSMutableArray array];
- }
- [self.episodes addObject:item];
- }
In feedParserDidFinish:, we dismiss the progress HUD and update the table view. Did you say table view? That's right. We need to add a table view and implement the necessary UITableViewDataSource protocol methods.
在 feedParserDidFinish: 方法中,隐藏进度显示,同时更新 table view。这样就需要在 view controller 中添加一个 table view,同时实现 UITableViewDataSource 协议中的方法。
- - (void)feedParserDidFinish:(MWFeedParser *)parser {
- // Dismiss Progress HUD
- [SVProgressHUD dismiss];
- // Update View
- [self.tableView reloadData];
- }
Step 3: Displaying the Feed
Before we update the user interface, open MTViewController.h, declare an outlet for the table view, and tell the compiler the MTViewController class conforms to theUITableViewDataSource and UITableViewDelegate protocols.
在更新UI界面之前,打开 MTViewController.h ,声明一个 table view 的 outlet,并让 MTViewController 类遵循 UITableViewDataSource 和 UITableViewDelegate 协议。
- #import <UIKit/UIKit.h>
- @interface MTViewController : UIViewController <UITableViewDataSource, UITableViewDelegate>
- @property (weak, nonatomic) IBOutlet UITableView *tableView;
- @end
Open the main storyboard one more time and add a table view to the view controller's view. Connect the table view's dataSource and delegate outlets with the view controller and connect the view controller's tableView outlet with the table view. Select the table view, open the Attributes Inspector, and set the number of prototype cells to 1. Select the prototype cell, set its style to Subtitle, and give it an identifier of EpisodeCell.
再次打开 storyboard,添加一个 table view。连接 table view 的 dataSource 和 delegate ,同时连接其到文件中的 tableView outlet。选中 table view ,打开 Attributes Inspector,设置 the number of prototype cells 为 1.同时设置其类型 style 为 Subtitle,identifier 为 EpisodeCell。

Before we implement the UITableViewDataSource protocol, declare a static string named EpisodeCell in MTViewController.m. This corresponds with the identifier we set for the prototype cell in the storyboard.
实现 UITableViewDataSource 协议之前,在 MTViewController.m 中声明一个静态字符串常量 EpisodeCell 。这和之前在 storyboard 中设置 cell 的 identifier 相同。
- static NSString *EpisodeCell = @"EpisodeCell";
Implementing the UITableViewDataSource protocol is simple as pie and very similar to how we implemented the protocol in the search view controller. The only difference is that the episodes variable contains instances of the MWFeedItem class instead ofNSDictionary instances.
实现 UITableViewDataSource 协议和之前在 search view controller 中实现该协议类似,只不过 episodes 变量包含的是 MWFeedItem 类实例,而非 MWFeedItem 实例。
- - (NSInteger)numberOfSectionsInTableView:(UITableView *)tableView {
- return self.episodes ? 1 : 0;
- }
- - (NSInteger)tableView:(UITableView *)tableView numberOfRowsInSection:(NSInteger)section {
- return self.episodes ? self.episodes.count : 0;
- }
- - (UITableViewCell *)tableView:(UITableView *)tableView cellForRowAtIndexPath:(NSIndexPath *)indexPath {
- UITableViewCell *cell = [tableView dequeueReusableCellWithIdentifier:EpisodeCell forIndexPath:indexPath];
- // Fetch Feed Item
- MWFeedItem *feedItem = [self.episodes objectAtIndex:indexPath.row];
- // Configure Table View Cell
- [cell.textLabel setText:feedItem.title];
- [cell.detailTextLabel setText:[NSString stringWithFormat:@"%@", feedItem.date]];
- return cell;
- }
- - (BOOL)tableView:(UITableView *)tableView canEditRowAtIndexPath:(NSIndexPath *)indexPath {
- return NO;
- }
- - (BOOL)tableView:(UITableView *)tableView canMoveRowAtIndexPath:(NSIndexPath *)indexPath {
- return NO;
- }
Run the application in the iOS Simulator or on a physical device and run it through its paces. You should now be able to search for podcasts, select a podcast from the list, and see its episodes.
在模拟器或真机上运行该项目程序,你应该可以 search for podcasts, select a podcast from the list, and see its episodes.
Conclusion
We've done a lot in this tutorial, but we still have quite a bit of work in front of us. In the next tutorial, we zoom in on downloading episodes from the feed and we'll discuss background or out-of-process downloads. Stay tuned.
在本篇教程中,我们做了很多,但仍有很多工作摆在我们面前。在下一篇教程中,我们深入了解下载任务,讨论有关后台下载和线程外下载的内容,敬请关注。
Part4:
In the previous tutorial, we started creating a simple podcast client to put what we've learned about NSURLSession into practice. So far, our podcast client can query the iTunes Search API, download a podcast feed, and display a list of episodes. In this tutorial, we zoom in on another interesting aspect of NSURLSession, out-of-process downloads. Let me show you how this works.
在前一篇教程中,我们创建了一个简单的播客客户端,对 NSURLSession 的所学进行了实践。目前,我们的播客客户端可以 query the iTunes Search API, download a podcast feed, 和 display a list of episodes。在这篇教程中,将探究 NSURLSession 另一个有趣的部分:out-of-process download。下面开始吧!
Introduction
In this fourth and final tutorial about NSURLSession, we'll take a closer look at out-of-process tasks, download tasks in particular. Our podcast client is already able to show a list of episodes, but it currently lacks the ability to download individual episodes. That'll be the focus of this tutorial.
在这第四篇也是最后一篇有关 NSURLSession 的教程,我们将深入了解 out-of-process task 尤其是 download task。目前播客客户端可以 show a list of episodes,但是还不能下载 individual episodes,这将是本篇教程的关注点。
Background Uploads and Downloads
Adding support for background uploads and downloads is surprisingly easy withNSURLSession. Apple refers to them as out-of-process uploads and downloads as the tasks are managed by a background daemon, not your application. Even if your application crashes during an upload or download task, the task continues in the background.
对于 NSURLSession ,是支持后台下载和上传的。Apple 将其称之 进程之外(out-of-process)的上传和下载,因为这些任务都是由后台的守护进程完成的,而非应用程序本身。即使应用程序奔溃了,上传或者下载任务都可以在后台进行执行。
Overview
I'd like to take a few moments to take a closer look at how out-of-process tasks work. It's pretty simple once you have a complete picture of the process. Enabling background uploads and downloads is nothing more than flipping a switch in your session's configuration. With a properly configured session object, you are ready to schedule upload and download tasks in the background.
先看看 out-of-process 的任务是如何工作的。一旦你对整个过程有了全面的了解,这将变得很简单。启动后台上传和下载无非就是在会话配置中进行简单的设置(如同扳开开关),通过会话配置对象中的属性设置,你就可以在后台执行上传和下载的任务。
When an upload or download is initiated, a background daemon comes into existence. The daemon takes care of the task and sends updates to the application through the delegate protocols declared in the NSURLSession API. If your application stops running for some reason, the task continues in the background as it's the daemon managing the task. The moment the task finishes, the application that created the task is notified. It reconnects with the background session that created the task and the daemon managing the task informs the session that the task finished and, in the case of a download task, hands the file over to the session. The session then invokes the appropriate delegate methods to make sure your application can take the appropriate actions, such as moving the file to a more permanent location. That's enough theory for now. Let's see what we need to do to implement out-of-process downloads in Singlecast.
当一个上传或者下载的任务启动,一个后台守护进程就存在了。通过 NSURLSession 委托协议中的 API ,守护进程关注维护这个任务,并且发送更新消息给应用程序。如果由于某些原因,应用程序停止运行,守护进程会在后台管理这个任务的继续执行。一旦任务执行结束,就会通知创建该任务的应用程序。它(应用程序)会和后台这个任务的会话重新连接;同时,后台守护进程通知会话对象,任务执行结束,如果是一个下载任务,会将下载文件提交给会话对象。会话对象接着会调用相应的委托方法,确保应用程序执行恰当的动作,例如,将文件移动到某一持久化存储位置。这些理论解释差不多就是这样了,下面看看如何在 Singlecast 项目中实现 out-of-process 的下载。
1. Subclass UITableViewCell
Step 1: Update Main Storyboard
At the moment, we are using prototype cells to populate the table view. To give us a bit more flexibility, we need to create a UITableViewCell subclass. Open the main storyboard, select the table view of the MTViewController instance and set the number of prototype cells to 0.
目前,在table view中我们使用的是原型的表单元。为了处理的灵活性,我们自定义创建 UITableViewCell 的子类。打开 storyboard,选中MTViewController 的 table view,设置其 prototype cells 数量为0.
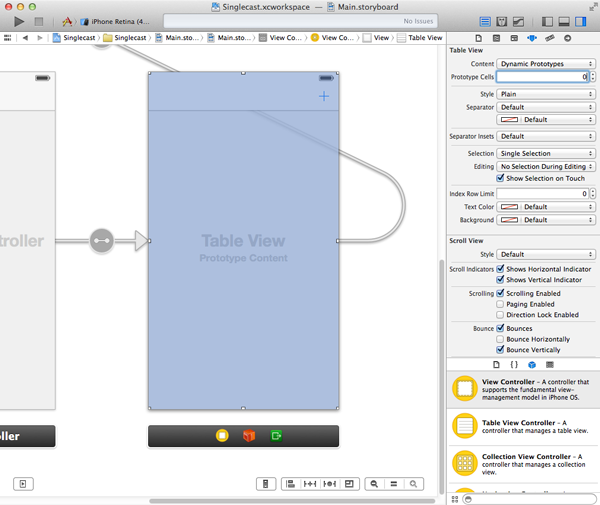
Step 2: Create Subclass
Open Xcode's File menu and choose New > File.... Create a new Objective-C class, name it MTEpisodeCell, and make sure it inherits from UITableViewCell. Tell Xcode where you'd like to store the class files and hit Create.
新建一个 Objective-C 类文件,名为 MTEpisodeCell ,继承自UITableViewCell。
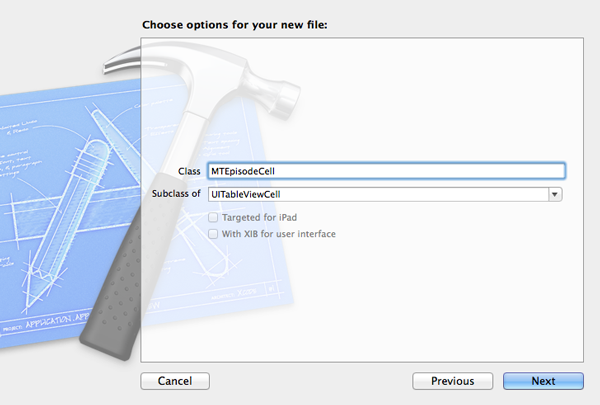
Step 3: Update Class Interface
The interface of MTEpisodeCell is simple as you can see in the code snippet below. All we do is declare a property progress of type float. We'll use this to update and display the progress of the download task that we'll use for downloading an episode.
MTEpisodeCell 类的interface 是比较简单的,代码片段如下。在其中声明了一个 float 类型的属性 progress 。这个属性将用来更新和显示下载任务的进度。
- #import <UIKit/UIKit.h>
- @interface MTEpisodeCell : UITableViewCell
- @property (assign, nonatomic) float progress;
- @end
Step 4: Implement Class
The implementation of MTEpisodeCell is a bit more involved, but it isn't complicated. Instead of using an instance of UIProgressView, we'll fill the cell's content view with a solid color to show the progress of the download task. We do this by adding a subview to the cell's content view and updating its width whenever the cell's progress property changes. Start by declaring a private property progressView of type UIView.
MTEpisodeCell 类的 implementation 是有些复杂,但不难实现。我们用纯色填充表单元视图以显示下载任务的进度,而不使用进度条 UIProgressView。在表单元中添加一个子视图更新显示 progress 属性的变化,添加一个UIView 类型的私有属性 progressView (在实现文件的 interface 中添加 property 即是私有属性)。
- #import "MTEpisodeCell.h"
- @interface MTEpisodeCell ()
- @property (strong, nonatomic) UIView *progressView;
- @end
We override the class's designated initializer as shown below. Note how we ignore thestyle argument and pass UITableViewCellStyleSubtitle to the superclass's designated initializer. This is important, because the table view will passUITableViewCellStyleDefault as the cell's style when we ask it for a new cell.
覆盖该类的指定初始化方法如下。注意到style 参数,传递UITableViewCellStyleSubtitle 给超类的初始化方法。这一点很重要,因为创建一个新的cell的时候,table view 会传递UITableViewCellStyleDefault 给cell 的类型。
In the initializer, we set the background color of the text and detail text labels to [UIColor clearColor] and create the progress view. Two details are especially important. First, we insert the progress view as a subview of the cell's content view at index 0 to make sure that it's inserted below the text labels. Second, we invoke updateView to make sure that the frame of the progress view is updated to reflect the value of progress, which is set to 0 during the cell's initialization.
在初始化方法中,设置文本(text label)和详细文本(detail text label)的背景颜色为[UIColor clearColor],并创建一个进度视图。有两个细节比较重要,首先,插入一个进度显示视图作为表单元的子视图,并置 index 为 0 使得进度显示位于 text label 之下;其次,我们调用updateView 方法确保进度显示视图及时更新反映progress 的值,在表单元初始化的时候设置progress 的值为 0.
- - (id)initWithStyle:(UITableViewCellStyle)style reuseIdentifier:(NSString *)reuseIdentifier {
- self = [super initWithStyle:UITableViewCellStyleSubtitle reuseIdentifier:reuseIdentifier];
- if (self) {
- // Helpers
- CGSize size = self.contentView.bounds.size;
- // Configure Labels
- [self.textLabel setBackgroundColor:[UIColor clearColor]];
- [self.detailTextLabel setBackgroundColor:[UIColor clearColor]];
- // Initialize Progress View
- self.progressView = [[UIView alloc] initWithFrame:CGRectMake(0.0, 0.0, size.width, size.height)];
- // Configure Progress View
- [self.progressView setAutoresizingMask:(UIViewAutoresizingFlexibleWidth | UIViewAutoresizingFlexibleWidth)];
- [self.progressView setBackgroundColor:[UIColor colorWithRed:0.678 green:0.886 blue:0.557 alpha:1.0]];
- [self.contentView insertSubview:self.progressView atIndex:0];
- // Update View
- [self updateView];
- }
- return self;
- }
Before we take a look at the implementation of updateView, we need to override the setter method of the progress property. The only change we make to the default implementation of setProgress: is invoke updateView when the _progress instance variable is updated. This ensures that the progress view is updated whenever we update the cell's progress property.
在实现 updateView 方法之前,我们需要实现 progress 属性的 setter 方法。和默认的 setProgress: 实现方法,唯一有所不同的是,当 _progress 实例变量更新时,调用 updateView 方法。这样当表单元的 属性发生更新变化时,进度显示视图可以及时更新显示。
- - (void)setProgress:(CGFloat)progress {
- if (_progress != progress) {
- _progress = progress;
- // Update View
- [self updateView];
- }
- }
In updateView, we calculate the new width of the progress view based on the value of the cell's progress property.
在 updateView 方法中,我们基于表单元的 progress 属性计算进度显示视图的宽度值。
- - (void)updateView {
- // Helpers
- CGSize size = self.contentView.bounds.size;
-
- // Update Frame Progress View
- CGRect frame = self.progressView.frame;
- frame.size.width = size.width * self.progress;
- self.progressView.frame = frame;
- }
- - (void)updateView {
- // Helpers
- CGSize size = self.contentView.bounds.size;
- // Update Frame Progress View
- CGRect frame = self.progressView.frame;
- frame.size.width = size.width * self.progress;
- self.progressView.frame = frame;
- }
Step 5: Use MTEpisodeCell
To make use of the MTEpisodeCell, we need to make a few changes in theMTViewController class. Start by adding an import statement for MTEpisodeCell.
为了在 MTViewController 类中使用MTEpisodeCell ,首先需要添加 import 语句。
- #import "MTViewController.h"
- #import "MWFeedParser.h"
- #import "SVProgressHUD.h"
- #import "MTEpisodeCell.h"
- @interface MTViewController () <MWFeedParserDelegate>
- @property (strong, nonatomic) NSDictionary *podcast;
- @property (strong, nonatomic) NSMutableArray *episodes;
- @property (strong, nonatomic) MWFeedParser *feedParser;
- @end
In the view controller's viewDidLoad method, invoke setupView, a helper method we'll implement next.
在 viewDidLoad 方法中,调用setupView 方法,这个方法接着会实现它。
- - (void)viewDidLoad {
- [super viewDidLoad];
- // Setup View
- [self setupView];
- // Load Podcast
- [self loadPodcast];
- // Add Observer
- [[NSUserDefaults standardUserDefaults] addObserver:self forKeyPath:@"MTPodcast" options:NSKeyValueObservingOptionNew context:NULL];
- }
In setupView, we invoke setupTableView, another helper method in which we tell the table view to use the MTEpisodeCell class whenever it needs a cell with a reuse identifier of EpisodeCell.
在 setupView 方法中,调用 setupTableView 方法,这个方法通知 table view 使用 MTEpisodeCell 类创建 cell ,并使用 EpisodeCell 作为 identifier。
- - (void)setupView {
- // Setup Table View
- [self setupTableView];
- }
- - (void)setupTableView {
- // Register Class for Cell Reuse
- [self.tableView registerClass:[MTEpisodeCell class] forCellReuseIdentifier:EpisodeCell];
- }
Before we build the project and run the application, we need to update our implementation of tableView:cellForRowAtIndexPath: as shown below.
在编译运行项目之前,还要更新实现 tableView:cellForRowAtIndexPath: 方法如下:
- - (UITableViewCell *)tableView:(UITableView *)tableView cellForRowAtIndexPath:(NSIndexPath *)indexPath {
- MTEpisodeCell *cell = (MTEpisodeCell *)[tableView dequeueReusableCellWithIdentifier:EpisodeCell forIndexPath:indexPath];
- // Fetch Feed Item
- MWFeedItem *feedItem = [self.episodes objectAtIndex:indexPath.row];
- // Configure Table View Cell
- [cell.textLabel setText:feedItem.title];
- [cell.detailTextLabel setText:[NSString stringWithFormat:@"%@", feedItem.date]];
- return cell;
- }
Step 6: Build and Run
Run your application in the iOS Simulator or on a test device to see the result. If nothing has changed, then you've followed the steps correctly. All that we've done so far is replacing the prototype cells with instances of MTEpisodeCell.
在模拟器或者真机上运行该程序查看结果,如果没有异常,则说明以上内容都顺利的完成了。诚然,所有的这些都只是将原型表单元替换为自定义的表单元 MTEpisodeCell 。
2. Create Background Session
To enable out-of-process downloads, we need a session that is configured to support out-of-process downloads. This is surprisingly easy to do with the NSURLSession API. There a few gotchas though.
为了实现 out-of-process 下载,我们需要一个会话对象,其配置是支持 out-of-process 下载的。对于使用 NSURLSession 的 API 这是很容易实现的,几步即可。
Step 1: Create session Property
Start by declaring a new property session of type NSURLSession in theMTViewController class and make the class conform to the NSURLSessionDelegate andNSURLSessionDownloadDelegate protocols.
在 MTViewController 中声明一个NSURLSession 属性 session ,还有使这个类遵循 NSURLSessionDelegate 和 NSURLSessionDownloadDelegate 协议。
- #import "MTViewController.h"
- #import "MWFeedParser.h"
- #import "SVProgressHUD.h"
- #import "MTEpisodeCell.h"
- @interface MTViewController () <NSURLSessionDelegate, NSURLSessionDownloadDelegate, MWFeedParserDelegate>
- @property (strong, nonatomic) NSDictionary *podcast;
- @property (strong, nonatomic) NSMutableArray *episodes;
- @property (strong, nonatomic) MWFeedParser *feedParser;
- @property (strong, nonatomic) NSURLSession *session;
- @end
In viewDidLoad, we set the session property by invoking backgroundSession on the view controller instance. This is one of the gotchas I was talking about.
在 viewDidLoad 方法中,调用 backgroundSession 方法设置 session 属性,下面将介绍这个方法:
- - (void)viewDidLoad {
- [super viewDidLoad];
- // Setup View
- [self setupView];
- // Initialize Session
- [self setSession:[self backgroundSession]];
- // Load Podcast
- [self loadPodcast];
- // Add Observer
- [[NSUserDefaults standardUserDefaults] addObserver:self forKeyPath:@"MTPodcast" options:NSKeyValueObservingOptionNew context:NULL];
- }
Let's take a look at the implementation of backgroundSession. In backgroundSession, we statically declare a session variable and use dispatch_once (Grand Central Dispatch) to instantiate the background session. Even though this isn't strictly necessary, it emphasizes the fact that we only need one background session at any time. This is a best practice that's also mentioned in the WWDC session on the NSURLSession API.
下面看看 backgroundSession 方法的实现。在 backgroundSession 方法中,声明一个静态变量 session ,使用dispatch_once (GCD)实例化这个后台会话对象。虽然这并不是绝对需要的,但是在只需要一个后台会话对象的时候是有必要的这么处理的( dispatch_once)。这也是在WWDC 中提到的最佳实践。(原话:So, I do this inside of a dispatch once here to emphasize the fact that you should only be creating a session with a given identifier once.)
In the dispatch_once block, we start by creating a NSURLSessionConfiguration object by invoking backgroundSessionConfiguration: and passing a string as an identifier. The identifier we pass uniquely identifies the background session, which is key as we'll see a bit later. We then create a session instance by invokingsessionWithConfiguration:delegate:delegateQueue: and passing the session configuration object, setting the session's delegate property, and passing nil as the third argument.
在 dispatch_once block 中,通过调用 backgroundSessionConfiguration: 方法,传递一个字符串作为 identifier(标识符) 创建一个 NSURLSessionConfiguration 对象。这个标识符是唯一的。然后通过调用 sessionWithConfiguration:delegate:delegateQueue: 方法传递会话配置对象作为参数创建一个会话对象实例,同时设置会话对象的 delegate 属性为 self ,传递 nil 给第三个参数。
- - (NSURLSession *)backgroundSession {
- static NSURLSession *session = nil;
- static dispatch_once_t onceToken;
- dispatch_once(&onceToken, ^{
- // Session Configuration
- NSURLSessionConfiguration *sessionConfiguration = [NSURLSessionConfiguration backgroundSessionConfiguration:@"com.mobiletuts.Singlecast.BackgroundSession"];
- // Initialize Session
- session = [NSURLSession sessionWithConfiguration:sessionConfiguration delegate:self delegateQueue:nil];
- });
- return session;
- }
nil
as the third argument of
sessionWithConfiguration:delegate:delegateQueue:
, the session creates a
serial operation queue
(串行操作队列)for us. This operation queue is used for performing the delegate method calls and completion handler calls.
3. Download Episode
Step 1: Create Download Task
It's time to make use of the background session we created and put the MTEpisodeCellto use. Let's start by implementing tableView:didSelectRowAtIndexPath:, a method of the UITableViewDelegate protocol. Its implementation is straightforward as you can see below. We fetch the correct MWFeedItem instance from the episodes array and pass it todownloadEpisodeWithFeedItem:.
是时候开始使用刚创建的后台会话对象和 MTEpisodeCell 类了。先实现 UITableViewDelegate 的委托方法:tableView:didSelectRowAtIndexPath: 。实现过程是简单的,从 episodes 数组中获取到对应的 MWFeedItem 实例对象,传递给downloadEpisodeWithFeedItem: 方法。
- - (void)tableView:(UITableView *)tableView didSelectRowAtIndexPath:(NSIndexPath *)indexPath {
- [tableView deselectRowAtIndexPath:indexPath animated:YES];
- // Fetch Feed Item
- MWFeedItem *feedItem = [self.episodes objectAtIndex:indexPath.row];
- // Download Episode with Feed Item
- [self downloadEpisodeWithFeedItem:feedItem];
- }
In downloadEpisodeWithFeedItem:, we extract the remote URL from the feed item by invoking urlForFeedItem:, create a download task by calling downloadTaskWithURL: on the background session, and send it a message of resume to start the download task.
在 downloadEpisodeWithFeedItem: 方法中,调用 urlForFeedItem: 方法提取出 URL ,然后后台会话对象调用 downloadTaskWithURL: 方法创建一个下载任务,调用 resume 启动下载任务。
- - (void)downloadEpisodeWithFeedItem:(MWFeedItem *)feedItem {
- // Extract URL for Feed Item
- NSURL *URL = [self urlForFeedItem:feedItem];
- if (URL) {
- // Schedule Download Task
- [[self.session downloadTaskWithURL:URL] resume];
- }
- }
As you may have guessed, urlForFeedItem: is a convenience method that we use. We'll use it a few more times in this project. We obtain a reference to the feed item'senclosures array, extract the first enclosure, and pull out the object for the url key. We create and return an NSURL instance.
正如你所猜测的那样,urlForFeedItem: 方法是一个辅助方法,我们已经在项目中多次使用到了。在该方法中,先获取到feed item的enclosures 数组,取出第一项,根据 key 值获取 value ,然后创建一个 NSURL 实例,并返回。
- - (NSURL *)urlForFeedItem:(MWFeedItem *)feedItem {
- NSURL *result = nil;
- // Extract Enclosures
- NSArray *enclosures = [feedItem enclosures];
- if (!enclosures || !enclosures.count) return result;
- NSDictionary *enclosure = [enclosures objectAtIndex:0];
- NSString *urlString = [enclosure objectForKey:@"url"];
- result = [NSURL URLWithString:urlString];
- return result;
- }
We're not done yet. Is the compiler giving you three warnings? That's not surprising as we haven't implemented the required methods of the NSURLSessionDelegate andNSURLSessionDownloadDelegate protocols yet. We also need to implement these methods if we want to show the progress of the download tasks.
是不是编译器给出三个警告吧,所以任务还没有完成。这并不奇怪,因为我们还没有实现 NSURLSessionDelegate 和 NSURLSessionDownloadDelegate 协议中的方法,所以为了显示下载任务的进度,需要实现这些方法。
Step 2: Implementing Protocol(s)
The first method we need to implement is URLSession:downloadTask:didResumeAtOffset:. This method is invoked if a download task is resumed. Because this is something we won't cover in this tutorial, we simply log a message to Xcode's console.
第一个需要实现的是 URLSession:downloadTask:didResumeAtOffset: 方法,下载任务重新启动的时候就会调用到该方法,这里只是简单的在Xcode终端中输出一个消息。
- - (void)URLSession:(NSURLSession *)session downloadTask:(NSURLSessionDownloadTask *)downloadTask didResumeAtOffset:(int64_t)fileOffset expectedTotalBytes:(int64_t)expectedTotalBytes {
- NSLog(@"%s", __PRETTY_FUNCTION__);
- }
More interesting is the implementation ofURLSession:downloadTask:didWriteData:totalBytesWritten:totalBytesExpectedToWrite:. This method is invoked every time a few bytes have been downloaded by the session. In this delegate method, we calculate the progress, fetch the correct cell, and update the cell's progress property, which in turn updates the cell's progress view. Have you spotted the dispatch_async call? There's no guarantee that the delegate method is invoked on the main thread. Since we update the user interface by setting the cell's progress, we need to update the cell's progress property on the main thread.
对于 URLSession:downloadTask:didWriteData:totalBytesWritten:totalBytesExpectedToWrite: 方法,当会话对象下载到数据时就会调用到。在这个委托方法中,先计算进度,获取到正确的表单元,更新这个表单元的进度属性,同时更新表单元的进度显示视图。注意到 dispatch_async 了吗?我们无法保证这个委托方法一定会在主线程中调用,但一旦该委托方法被调用到,那么就一定要对表单元的progress 属性在主线程中进行更新。
- - (void)URLSession:(NSURLSession *)session downloadTask:(NSURLSessionDownloadTask *)downloadTask didWriteData:(int64_t)bytesWritten totalBytesWritten:(int64_t)totalBytesWritten totalBytesExpectedToWrite:(int64_t)totalBytesExpectedToWrite {
- // Calculate Progress
- double progress = (double)totalBytesWritten / (double)totalBytesExpectedToWrite;
- // Update Table View Cell
- MTEpisodeCell *cell = [self cellForForDownloadTask:downloadTask];
- dispatch_async(dispatch_get_main_queue(), ^{
- [cell setProgress:progress];
- });
- }
The implementation of cellForForDownloadTask: is straightforward. We pull the remote URL from the download task using its originalRequest property and loop over the feed items in the episodes array until we have a match. When we've found a match, we ask the table view for the corresponding cell and return it.
cellForForDownloadTask: 方法的实现比较简单。根据 downloadTask 参数中的 originalRequest 属性提取到 URL。然后遍历 episodes 数组中的 feed item,从 table view 中找到一个匹配对应的 cell,并返回。
- - (MTEpisodeCell *)cellForForDownloadTask:(NSURLSessionDownloadTask *)downloadTask {
- // Helpers
- MTEpisodeCell *cell = nil;
- NSURL *URL = [[downloadTask originalRequest] URL];
- for (MWFeedItem *feedItem in self.episodes) {
- NSURL *feedItemURL = [self urlForFeedItem:feedItem];
- if ([URL isEqual:feedItemURL]) {
- NSUInteger index = [self.episodes indexOfObject:feedItem];
- cell = (MTEpisodeCell *)[self.tableView cellForRowAtIndexPath:[NSIndexPath indexPathForRow:index inSection:0]];
- break;
- }
- }
- return cell;
- }
The third delegate method of the NSURLSessionDownloadDelegate protocol that we need to implement is URLSession:downloadTask:didFinishDownloadingToURL:. As I mentioned in the previous tutorials, one of the advantages of the NSURLSession API is that downloads are immediately written to disk. The result is that we are passed a local URL inURLSession:downloadTask:didFinishDownloadingToURL:. However, the local URL that we receive, points to a temporary file. It is our responsibility to move the file to a more permanent location and that's exactly what we do inURLSession:downloadTask:didFinishDownloadingToURL:.
NSURLSessionDownloadDelegate 协议的第三个需要实现的是 URLSession:downloadTask:didFinishDownloadingToURL: 方法。正如我在前面教程中提到的, NSURLSession 的API 是将下载内容写入磁盘。其结果是,传递一个本地 URL 参数给URLSession:downloadTask:didFinishDownloadingToURL: 方法,然后我们接收到的 URL 参数却是指向一个临时文件。所以在该方法中我们有必要将文件移到到一个持久化保存的固定位置。
- - (void)URLSession:(NSURLSession *)session downloadTask:(NSURLSessionDownloadTask *)downloadTask didFinishDownloadingToURL:(NSURL *)location {
- // Write File to Disk
- [self moveFileWithURL:location downloadTask:downloadTask];
- }
In moveFileWithURL:downloadTask:, we extract the episode's file name from the download task and create a URL in the application's Documents directory by invokingURLForEpisodeWithName:. If the temporary file that we received from the background session points to a valid file, we move that file to its new home in the application's Documents directory.
在 moveFileWithURL:downloadTask: 方法中,我们从下载任务中提取到情节(episode)文件名,通过调用URLForEpisodeWithName: 方法创建一个该应用程序 Documents 目录路径的 URL。如果从后台会话对象中接收到的临时文件是一个有效的文件,我们将该文件移动到应用程序的 Documents 目录下。
- - (void)moveFileWithURL:(NSURL *)URL downloadTask:(NSURLSessionDownloadTask *)downloadTask {
- // Filename
- NSString *fileName = [[[downloadTask originalRequest] URL] lastPathComponent];
- // Local URL
- NSURL *localURL = [self URLForEpisodeWithName:fileName];
- NSFileManager *fm = [NSFileManager defaultManager];
- if ([fm fileExistsAtPath:[URL path]]) {
- NSError *error = nil;
- [fm moveItemAtURL:URL toURL:localURL error:&error];
- if (error) {
- NSLog(@"Unable to move temporary file to destination. %@, %@", error, error.userInfo);
- }
- }
- }
URLForEpisodeWithName: is another helper method, which invokes episodesDirectory. InURLForEpisodeWithName:, we append the name argument to the Episodes directory, which is located in the application's Documents directory.
在 URLForEpisodeWithName: 方法中,调用 episodesDirectory 方法,将 name 参数追加到情节文件目录,它位于应用程序的 Documents 目录。
- - (NSURL *)URLForEpisodeWithName:(NSString *)name {
- if (!name) return nil;
- return [self.episodesDirectory URLByAppendingPathComponent:name];
- }
In episodesDirectory, we create the URL for the Episodes directory and create the directory if it doesn't exist yet.
在 episodesDirectory 方法中,创建一个指向Episodes 目录的URL,并返回。
- - (NSURL *)episodesDirectory {
- NSURL *documents = [[[NSFileManager defaultManager] URLsForDirectory:NSDocumentDirectory inDomains:NSUserDomainMask] lastObject];
- NSURL *episodes = [documents URLByAppendingPathComponent:@"Episodes"];
-
- NSFileManager *fm = [NSFileManager defaultManager];
-
- if (![fm fileExistsAtPath:[episodes path]]) {
- NSError *error = nil;
- [fm createDirectoryAtURL:episodes withIntermediateDirectories:YES attributes:nil error:&error];
-
- if (error) {
- NSLog(@"Unable to create episodes directory. %@, %@", error, error.userInfo);
- }
- }
-
- return episodes;
- }
- - (NSURL *)episodesDirectory {
- NSURL *documents = [[[NSFileManager defaultManager] URLsForDirectory:NSDocumentDirectory inDomains:NSUserDomainMask] lastObject];
- NSURL *episodes = [documents URLByAppendingPathComponent:@"Episodes"];
- NSFileManager *fm = [NSFileManager defaultManager];
- if (![fm fileExistsAtPath:[episodes path]]) {
- NSError *error = nil;
- [fm createDirectoryAtURL:episodes withIntermediateDirectories:YES attributes:nil error:&error];
- if (error) {
- NSLog(@"Unable to create episodes directory. %@, %@", error, error.userInfo);
- }
- }
- return episodes;
- }
Step 3: Build and Run
Run the application and test the result by downloading an episode from the list of episodes. You should see the table view cell's progress view progress from left to right reflecting the progress of the download task. There are a few issues though. Have you tried scrolling through the table view? That doesn't look right. Let's fix that.
运行程序,从 episodes 列表中选择一个 episode 下载进行测试。你应该可以看到选中的表视图单元的进度显示从左往右,反映出下载任务的进度。但还有几个问题,试一下滚动表视图,这看起来好像不对吧,接下来解决它吧!
4. Create a Progress Buffer
Because the table view reuses cells as much as possible, we need to make sure that each cell properly reflects the download state of the episode that it represents. We can fix this in several ways. One approach is to use an object that keeps track of the progress of each download task, including the download tasks that have already completed.
由于table view中存在表单元的复用机制,而我们需要每一个表单元都显示各自代表的 episode 文件下载状态。有几种方式解决。一种解决方式是使用一个对象来保存每一个下载任务的进度,包括已经下载完毕的任务。
Step 1: Declare a Property
Let's start by declaring a new private property progressBuffer of typeNSMutableDictionary in the MTViewController class.
在 MTViewController 类中声明一个 NSMutableDictionary 类型的私有属性 progressBuffer 。
- #import "MTViewController.h"
- #import "MWFeedParser.h"
- #import "SVProgressHUD.h"
- #import "MTEpisodeCell.h"
- @interface MTViewController () <NSURLSessionDelegate, NSURLSessionDownloadDelegate, MWFeedParserDelegate>
- @property (strong, nonatomic) NSDictionary *podcast;
- @property (strong, nonatomic) NSMutableArray *episodes;
- @property (strong, nonatomic) MWFeedParser *feedParser;
- @property (strong, nonatomic) NSURLSession *session;
- @property (strong, nonatomic) NSMutableDictionary *progressBuffer;
- @end
Step 2: Initialize Buffer
In viewDidLoad, we initialize the progress buffer as shown below.
在 viewDidLoad 方法中,初始化 progress buffer 这个对象。
- - (void)viewDidLoad {
- [super viewDidLoad];
- // Setup View
- [self setupView];
- // Initialize Session
- [self setSession:[self backgroundSession]];
- // Initialize Progress Buffer
- [self setProgressBuffer:[NSMutableDictionary dictionary]];
- // Load Podcast
- [self loadPodcast];
- // Add Observer
- [[NSUserDefaults standardUserDefaults] addObserver:self forKeyPath:@"MTPodcast" options:NSKeyValueObservingOptionNew context:NULL];
- }
Step 3: Update Table View Cells
The key that we'll use in the dictionary is the remote URL of the corresponding feed item. With this in mind, we can update the tableView:cellForRowAtIndexPath: method as shown below. We pull the remote URL from the feed item and ask progressBuffer for the value for the key that corresponds to the remote URL. If the value isn't nil, we set the cell's progress property to that value, otherwise we set the progress property of the cell to 0.0, which hides the progress view by setting its width to 0.0.
字典中的 key 值是每一 feed item对应的下载链接地址 URL。考虑到这一点,我们就可以在 tableView:cellForRowAtIndexPath: 方法中进行如下的修改。先从 feed item 中获取到下载链接地址 URL,然后对应的从 progressBuffer 字典中获取到 value 值,也即是下载的进度。如果这个value值不是 nil,那么就将表单元 progress 属性设置为该 value 值;否则将其置为 0.0,这样进度条显示宽带为 0.0。
- - (UITableViewCell *)tableView:(UITableView *)tableView cellForRowAtIndexPath:(NSIndexPath *)indexPath {
- MTEpisodeCell *cell = (MTEpisodeCell *)[tableView dequeueReusableCellWithIdentifier:EpisodeCell forIndexPath:indexPath];
- // Fetch Feed Item
- MWFeedItem *feedItem = [self.episodes objectAtIndex:indexPath.row];
- NSURL *URL = [self urlForFeedItem:feedItem];
- // Configure Table View Cell
- [cell.textLabel setText:feedItem.title];
- [cell.detailTextLabel setText:[NSString stringWithFormat:@"%@", feedItem.date]];
- NSNumber *progress = [self.progressBuffer objectForKey:[URL absoluteString]];
- if (!progress) progress = @(0.0);
- [cell setProgress:[progress floatValue]];
- return cell;
- }
Step 4: Avoid Duplicates
We can also use the progress buffer to prevent users from downloading the same episode twice. Take a look at the updated implementation oftableView:didSelectRowAtIndexPath:. We take the same steps we took intableView:cellForRowAtIndexPath: to extract the progress value from the progress buffer. Only when the progress value is nil, we download the episode.
我们根据 progress buffer 还可以阻止用户对同一 episode 文件下载两次。更新 tableView:didSelectRowAtIndexPath: 方法如下。如 方法中那样从 progress buffer 中获取到某一表单元cell的进度的值,只有进度值为 nil,我们才需要进行下载。
- - (void)tableView:(UITableView *)tableView didSelectRowAtIndexPath:(NSIndexPath *)indexPath {
- [tableView deselectRowAtIndexPath:indexPath animated:YES];
- // Fetch Feed Item
- MWFeedItem *feedItem = [self.episodes objectAtIndex:indexPath.row];
- // URL for Feed Item
- NSURL *URL = [self urlForFeedItem:feedItem];
- if (![self.progressBuffer objectForKey:[URL absoluteString]]) {
- // Download Episode with Feed Item
- [self downloadEpisodeWithFeedItem:feedItem];
- }
- }
Step 5: Update Buffer
The progress buffer only works in its current implementation if we keep it up to date. This means that we need to update theURLSession:downloadTask:didWriteData:totalBytesWritten:totalBytesExpectedToWrite:method as well. All we do is store the new progress value in the progress buffer.
progress buffer 只有在以下方法执行的时候才进行更新,这就意味着需要对 URLSession:downloadTask:didWriteData:totalBytesWritten:totalBytesExpectedToWrite: 方法进行修改如下。我们只是将新的下载进度值保存到 progress buffer中。
- - (void)URLSession:(NSURLSession *)session downloadTask:(NSURLSessionDownloadTask *)downloadTask didWriteData:(int64_t)bytesWritten totalBytesWritten:(int64_t)totalBytesWritten totalBytesExpectedToWrite:(int64_t)totalBytesExpectedToWrite {
- // Calculate Progress
- double progress = (double)totalBytesWritten / (double)totalBytesExpectedToWrite;
- // Update Progress Buffer
- NSURL *URL = [[downloadTask originalRequest] URL];
- [self.progressBuffer setObject:@(progress) forKey:[URL absoluteString]];
- // Update Table View Cell
- MTEpisodeCell *cell = [self cellForForDownloadTask:downloadTask];
- dispatch_async(dispatch_get_main_queue(), ^{
- [cell setProgress:progress];
- });
- }
In downloadEpisodeWithFeedItem:, we set the progress value to 0.0 when the download task starts.
在 downloadEpisodeWithFeedItem: 方法中,下载任务启动的时候,设置其进度值为 0.0
- - (void)downloadEpisodeWithFeedItem:(MWFeedItem *)feedItem {
- // Extract URL for Feed Item
- NSURL *URL = [self urlForFeedItem:feedItem];
- if (URL) {
- // Schedule Download Task
- [[self.session downloadTaskWithURL:URL] resume];
- // Update Progress Buffer
- [self.progressBuffer setObject:@(0.0) forKey:[URL absoluteString]];
- }
- }
The session delegate is notified when a download task finishes. InURLSession:downloadTask:didFinishDownloadingToURL:, we set the progress value to 1.0.
当下载任务结束的时候,会通知会话的委托方法,我们在 URLSession:downloadTask:didFinishDownloadingToURL: 委托方法中设置下载任务的进度值为 1.0。
- - (void)URLSession:(NSURLSession *)session downloadTask:(NSURLSessionDownloadTask *)downloadTask didFinishDownloadingToURL:(NSURL *)location {
- // Write File to Disk
- [self moveFileWithURL:location downloadTask:downloadTask];
- // Update Progress Buffer
- NSURL *URL = [[downloadTask originalRequest] URL];
- [self.progressBuffer setObject:@(1.0) forKey:[URL absoluteString]];
- }
Step 6: Restore Buffer
At the moment, the progress buffer is only stored in memory, which means that it's cleared between application launches. We could write its contents to disk, but to keep this application simple we are going to restore or recreate the buffer by checking which episodes have already been downloaded. The feedParser:didParseFeedItem: method, part of the MWFeedParserDelegate protocol, is invoked for every item in the feed. In this method, we pull the remote URL from the feed item, create the corresponding local URL, and check if the file exists. If it does, then we set the corresponding progress value for that feed item to 1.0 to indicate that it's already been downloaded.
目前,progress buffer 对象只是保存在内存中,这就意味着应用程序退出的时候就会被清除。我们可以将其写入磁盘中持久保存,但为了保持应用程序的简洁,我们可以通过检查episodes 已经下载的进度,然后重新创建恢复 progress buffer。 MWFeedParserDelegate 协议的feedParser:didParseFeedItem: 方法,feed 中的每一个 item 都会调用这个方法。在这个方法中,从 item 中提取到下载链接remote URL ,然后得到对应的本地保存路径 local URL,检查下载文件是否存在。如果存在,则设置对应的下载进度值为 1.0 ,表明已经下载完毕了。
- - (void)feedParser:(MWFeedParser *)parser didParseFeedItem:(MWFeedItem *)item {
- if (!self.episodes) {
- self.episodes = [NSMutableArray array];
- }
- [self.episodes addObject:item];
- // Update Progress Buffer
- NSURL *URL = [self urlForFeedItem:item];
- NSURL *localURL = [self URLForEpisodeWithName:[URL lastPathComponent]];
- if ([[NSFileManager defaultManager] fileExistsAtPath:[localURL path]]) {
- [self.progressBuffer setObject:@(1.0) forKey:[URL absoluteString]];
- }
- }
Step 7: Rinse and Repeat
Run the application one more time to see if the issues with the table view are resolved. The application should now also remember which episodes have already been downloaded.
再一次运行应用程序,看看表视图有关的问题是否都解决了。现在应用程序应该知道哪些已经下载了。
5. Being a Good Citizen
It's important that our application is a good citizen by not wasting more CPU cycles or consume more battery power than needed. What does this mean for our podcast client. When a download task is started by our application and the application goes to the background, the background daemon that manages our application's download task notifies our application through the background session that the download task has finished. If necessary, the background daemon will launch our application so that it can respond to these notifications and process the downloaded file.
应该好的应用程序应该充分利用CPU的运行周期,并且不消耗更多电量。对于我们的播客客户端,启动一个下载任务,如果应用程序退到后台,那么后台的守护进程就管理这个应用程序的下载任务,而且当后台会话的下载任务完成下载,就会通知应用程序,如果有必要,后台守护进程将会启动应用程序,以便其可以处理下载的文件。
In our example, we don't need to do anything special to make sure that our application reconnects to the original background session. This is taken care of by theMTViewController instance. However, we do have to notify the operating system when our application has finished processing the download(s) by invoking a background completion handler.
在这个例子中,我们不需要对应用程序做额外特殊的处理使得应用程序和后台会话重新连接。但是,当下载完成后,我们也要通过调用完成处理程序块通知操作系统该应用程序的下载任务完成了。
When our application is woken up by the operating system to respond to the notifications of the background session, the application delegate is sent a message ofapplication:handleEventsForBackgroundURLSession:completionHandler:. In this method, we can reconnect to the background session, if necessary, and invoke the completion handler that is passed to us. By invoking the completion handler, the operating system knows that our application no longer needs to run in the background. This is important for optimizing battery life. How do we do this in practice?
当应用程序被操作系统唤醒,对后台会话通知做出响应时,应用程序会调用 application:handleEventsForBackgroundURLSession:completionHandler: 委托方法。在这个方法中,应用程序和后台会话对象重新建立连接,如果有必要,也会执行传递参数:完成处理程序块。通过调用完成处理程序块,操作系统就知道,应用程序不再需要在后台继续运行了,这对于优化电池寿命是恒友好处的。如何将这一点付诸实践呢?
Step 1: Declare a Property
We first need to declare a property on the MTAppDelegate class to keep a reference to the completion handler that we get fromapplication:handleEventsForBackgroundURLSession:completionHandler:. The property needs to be public. The reason for this will become clear in a moment.
首先需要在 MTAppDelegate 类中声明一个公有属性:完成处理程序块(completion handler),保存在application:handleEventsForBackgroundURLSession:completionHandler: 委托方法中的参数。这么做的原因后面就知道了。
- #import <UIKit/UIKit.h>
- @interface MTAppDelegate : UIResponder <UIApplicationDelegate>
- @property (strong, nonatomic) UIWindow *window;
- @property (copy, nonatomic) void (^backgroundSessionCompletionHandler)();
- @end
Step 2: Implement Callback
In application:handleEventsForBackgroundURLSession:completionHandler:, we store the completion handler in backgroundSessionCompletionHandler, which we declared a moment ago.
在 application:handleEventsForBackgroundURLSession:completionHandler: 方法中,保存backgroundSessionCompletionHandler 。
- - (void)application:(UIApplication *)application handleEventsForBackgroundURLSession:(NSString *)identifier completionHandler:(void (^)())completionHandler {
- [self setBackgroundSessionCompletionHandler:completionHandler];
- }
Step 3: Invoke Background Completion Handler
In the MTViewController class, we start by adding an import statement for theMTAppDelegate class.
在 MTViewController 类中,添加 MTAppDelegate 类的 import 语句。
- #import "MTViewController.h"
- #import "MWFeedParser.h"
- #import "MTAppDelegate.h"
- #import "SVProgressHUD.h"
- #import "MTEpisodeCell.h"
- @interface MTViewController () <NSURLSessionDelegate, NSURLSessionDownloadDelegate, MWFeedParserDelegate>
- @property (strong, nonatomic) NSDictionary *podcast;
- @property (strong, nonatomic) NSMutableArray *episodes;
- @property (strong, nonatomic) MWFeedParser *feedParser;
- @property (strong, nonatomic) NSURLSession *session;
- @property (strong, nonatomic) NSMutableDictionary *progressBuffer;
- @end
We then implement another helper method, invokeBackgroundSessionCompletionHandler, which invokes the background completion handler stored in the application delegate'sbackgroundSessionCompletionHandler property. In this method, we ask the background session for all its running tasks. If there are no tasks running, we get a reference to the application delegate's background completion handler and, if it isn't nil, we invoke it and set it to nil.
接着实现 invokeBackgroundSessionCompletionHandler 方法,这个方法会调用保存着应用程序委托的 backgroundSessionCompletionHandler 属性。在这个方法中,我们查看后台会话是否有任务在运行,如果没有且不为 nil,则将其置为 nil。
- - (void)invokeBackgroundSessionCompletionHandler {
- [self.session getTasksWithCompletionHandler:^(NSArray *dataTasks, NSArray *uploadTasks, NSArray *downloadTasks) {
- NSUInteger count = [dataTasks count] + [uploadTasks count] + [downloadTasks count];
- if (!count) {
- MTAppDelegate *applicationDelegate = (MTAppDelegate *)[[UIApplication sharedApplication] delegate];
- void (^backgroundSessionCompletionHandler)() = [applicationDelegate backgroundSessionCompletionHandler];
- if (backgroundSessionCompletionHandler) {
- [applicationDelegate setBackgroundSessionCompletionHandler:nil];
- backgroundSessionCompletionHandler();
- }
- }
- }];
- }
Wait a minute. When do we invoke invokeBackgroundSessionCompletionHandler? We do this every time a download task finishes. In other words, we invoke this method inURLSession:downloadTask:didFinishDownloadingToURL: as shown below.
那么什么时候调用 invokeBackgroundSessionCompletionHandler 方法呢?我们在每一次下载任务完成的时候进行调用。换言之,在 URLSession:downloadTask:didFinishDownloadingToURL: 方法中进行调用,如下:
- - (void)URLSession:(NSURLSession *)session downloadTask:(NSURLSessionDownloadTask *)downloadTask didFinishDownloadingToURL:(NSURL *)location {
- // Write File to Disk
- [self moveFileWithURL:location downloadTask:downloadTask];
- // Update Progress Buffer
- NSURL *URL = [[downloadTask originalRequest] URL];
- [self.progressBuffer setObject:@(1.0) forKey:[URL absoluteString]];
- // Invoke Background Completion Handler
- [self invokeBackgroundSessionCompletionHandler];
- }
6. Wrapping Up
I hope you agree that our podcast client isn't ready for the App Store just yet since one of the key features, playing podcasts, is still missing. As I mentioned in the previous tutorial, the focus of this project wasn't creating a full-featured podcast client. The goal of this project was illustrating how to leverage the NSURLSession API to search the iTunes Search API and download podcast episodes using data and out-of-process download tasks respectively. You should now have a basic understanding of theNSURLSession API as well as out-of-process tasks.
你应该同意,现在我们实现的播客客户端还不能上 App Store,因为只实现了一个功能,播放功能还没有实现。正如我在前面教程中所提到的,我们关注的重点不是实现一个完整功能的播客客户端。我们的目标是通过这个项目展示如何利用 NSURLSession 的data task 对 iTunes 的 API 进行查询;out-of-process download task 下载播客节目。现在你应该对此有一个基本的了解了吧!
Conclusion
By creating a simple podcast client, we have taken a close look at data and download tasks. We've also learned how easy it is to schedule download tasks in the background. The NSURLSession API is an important step forward for both iOS and OS X, and I encourage you to take advantage of this easy to use and flexible suite of classes. In the final installment of this series, I will take a look at AFNetworking 2.0. Why is it a milestone release? When should you use it? And how does it compare to theNSURLSession API?
通过创建一个简单的播客客户端,我们已经对数据任务和下载任务有了一定的了解。我们也了解到安排下载任务在后台执行也是简单的。NSURLSession 是 iOS 和 OS X开发重要的一个内容,我建议你根据其优势在开发中进行使用。最后,我会看看 AFNetworking 2.0 ,它是一个里程碑意义的版本,什么时候可以使用它?它和 NSURLSession API 比较有怎样?


 8954
8954

 被折叠的 条评论
为什么被折叠?
被折叠的 条评论
为什么被折叠?
 到【灌水乐园】发言


