


不要因为没有掌声而丢掉梦想。
目录
五、【实战】全局使用tree组件==>使用$store存储全局变量
(3)页面中通过this.$store.state使用全局数据
效果总览展示:


一、【基础】基础树结构
ElementUI 提供了基础的树结构,Element - The world's most popular Vue UI framework
默认效果为:(1)点击节点展开或者收起 (2)hover有默认颜色效果。结合案例给出我们的基础树结构,效果代码如下:
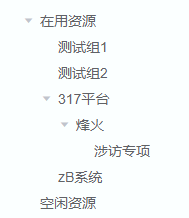
已给出整个页面的代码,包含HTML,JS,CSS.其中给出了资源数据,为接口返回数据。
<template>
  <div class="app-content">
    <div class="app-container">
      <div>
        <div style="height: 400px; padding-bottom: 10px; width: 200px">
          <!-- <div class="treeHead">
            <i class="el-icon-folder-opened"></i> 请选择资源分组
          </div> -->
          <div class="treeBox">
            <el-tree
              :data="resourceData.data"
              node-key="id"
              ref="tree"
              :props="defaultProps"
              class="tree"
              style="width: 100%"
            >
            </el-tree>
          </div>
        </div>
      </div>
    </div>
  </div>
</template>

<script>
export default {
  name: "resourceTree",
  data() {
    return {
      defaultProps: {
        children: "children",
        label: "name",
        value: "id",
      },
      resourceData: {
        code: 200,
        message: "SUCCESS",
        data: [
          {
            id: "c21d02ec204c3d9f9591a45a67f58195",
            name: "在用资源",
            parentId: "",
            children: [
              {
                id: "5cbf0e4bf6c455f2b90f26dccc7f2c7c",
                name: "测试组1",
                parentId: "c21d02ec204c3d9f9591a45a67f58195",
                children: [],
              },
              {
                id: "88f69770e9d94e32d81ea49eb2bf05e8",
                name: "测试组2",
                parentId: "c21d02ec204c3d9f9591a45a67f58195",
                children: [],
              },
              {
                id: "294c01cd26f41cb54dd75c0098335b5b",
                name: "317平台",
                parentId: "c21d02ec204c3d9f9591a45a67f58195",
                children: [
                  {
                    id: "936fba4555abad9872803d90a5304fdc",
                    name: "烽火",
                    parentId: "294c01cd26f41cb54dd75c0098335b5b",
                    children: [
                      {
                        id: "4a5d79d291fc74e495d6ee7129fa213e",
                        name: "涉访专项",
                        parentId: "936fba4555abad9872803d90a5304fdc",
                        children: [],
                      },
                    ],
                  },
                ],
              },
              {
                id: "cb6cd8a969c41698e00f7c6a9ad36d38",
                name: "zB系统",
                parentId: "c21d02ec204c3d9f9591a45a67f58195",
                children: [],
              },
            ],
          },
          {
            id: "eaced9ffb820418cbe98691c781c6baa",
            name: "空闲资源",
            parentId: "",
            children: [],
          },
        ],
        success: true,
      },
    };
  },
  created() {},
  methods: {},
};
</script>

<style lang="scss" rel="stylesheet/scss"  scoped>
</style>
二、优化tree前端样式
step1.【基础】添加箭头

效果说明: (1)包含子节点的需要添加箭头;没有子节点的不需要箭头(2)未展开状态为:右箭头;(3)展开状态为:下箭头;(4)箭头有旋转效果;
//----------1.添加箭头效果-----------
// 没有展开且有子节点
.el-tree ::v-deep .el-icon-caret-right:before {
  background: url("~@/assets/images/tree/arrow-right1.png") no-repeat 0 0;
  content: "";
  display: inline-block;
  width: 12px;
  height: 12px;
  margin-left: 3px;
  background-size: 8px 12px;
}
// 已经展开且有子节点
.el-tree
  ::v-deep
  .el-tree-node__expand-icon.expanded.el-icon-caret-right:before {
  background: url("~@/assets/images/tree/arrow-right1.png") no-repeat 0 0;
  content: "";
  display: inline-block;
  width: 12px;
  height: 12px;
  background-size: 8px 12px;
}
// 没有子节点
.el-tree ::v-deep.el-tree-node__expand-icon.is-leaf::before {
  background: none;
}
step2.【进阶】添加分级图标
说明:(暂且最多五层)五层每一层对应不同的图标。

(存在一个小问题:同级目录含有子目录和未含有子目录没有对其(由于箭头区分))
//---------------2.添加前置图标---------
// 添加图标
.el-tree ::v-deep .el-tree-node__content .el-tree-node__label {
  color: black;
  padding-left: 22px;
  background: url("../../../src/assets/images/tree/icon11.png") no-repeat 0 3px;
  background-size: 13px 13px;
}
.el-tree ::v-deep .el-tree-node__children .el-tree-node__label {
  padding-left: 22px;
  background: url("../../../src/assets/images/tree/icon21.png") no-repeat 0 3px;
  background-size: 13px 13px;
}
.el-tree
  ::v-deep
  .el-tree-node__children
  .el-tree-node__children
  .el-tree-node__label {
  padding-left: 22px;
  background: url("../../../src/assets/images/tree/icon31.png") no-repeat 0 3px;
  background-size: 13px 13px;
}
.el-tree
  ::v-deep
  .el-tree-node__children
  .el-tree-node__children
  .el-tree-node__children
  .el-tree-node__label {
  padding-left: 22px;
  background: url("../../../src/assets/images/tree/icon41.png") no-repeat 0 3px;
  background-size: 13px 13px;
}
.el-tree
  ::v-deep
  .el-tree-node__children
  .el-tree-node__children
  .el-tree-node__children
  .el-tree-node__children
  .el-tree-node__label {
  padding-left: 22px;
  background: url("../../../src/assets/images/tree/icon51.png") no-repeat 0 3px;
  background-size: 13px 13px;
}

//----------1.添加箭头效果-----------
// 没有展开且有子节点
.el-tree ::v-deep .el-icon-caret-right:before {
  background: url("~@/assets/images/tree/arrow-right1.png") no-repeat 0 0;
  content: "";
  display: inline-block;
  width: 12px;
  height: 12px;
  margin-left: 3px;
  background-size: 8px 12px;
}
// 已经展开且有子节点
.el-tree
  ::v-deep
  .el-tree-node__expand-icon.expanded.el-icon-caret-right:before {
  background: url("~@/assets/images/tree/arrow-right1.png") no-repeat 0 0;
  content: "";
  display: inline-block;
  width: 12px;
  height: 12px;
  background-size: 8px 12px;
}
// 没有子节点
.el-tree ::v-deep.el-tree-node__expand-icon.is-leaf::before {
  background: none;
}
step3.【基础】添加颜色样式
效果说明:(1)添加头部效果 (2)添加tree背景颜色 (3)修改hover颜色和选中节点颜色
// -------------3.添加颜色效果-----------
// 资源树-头部标签样式
.treeHead {
  text-align: center;
  // color: #fff;
  font-size: 14px;
  padding: 10px;
  align-items: center;
  border: 1px solid #8db2f3;
  background-color: #8db2f3;
}
// 添加tree背景颜色
.tree {
  color: #fff;
  border: 1px solid #9ec4f0;
  background-color: #9ec4f0;
}
.treeBox {
  width: 100%;
  margin: 0 auto;
  overflow: auto;
  height: 360px;
  // overflow-x: auto;
  // overflow-y: auto;
}
.el-tree {
  min-width: 100%;
  display: inline-block !important;
  color: #fff;
}
// hover节点时的背景颜色
::v-deep .el-tree-node__content:hover {
  background-color: #fff;
}
::v-deep .el-tree-node__content:is-active {
  // background-color: rgb(99, 201, 145);
}
// 节点选中的背景颜色
::v-deep .el-tree-node:focus > .el-tree-node__content {
  background-color: #fff;
}


//----------1.添加箭头效果-----------
// 没有展开且有子节点
.el-tree ::v-deep .el-icon-caret-right:before {
  background: url("~@/assets/images/tree/arrow-right1.png") no-repeat 0 0;
  content: "";
  display: inline-block;
  width: 12px;
  height: 12px;
  margin-left: 3px;
  background-size: 8px 12px;
}
// 已经展开且有子节点
.el-tree
  ::v-deep
  .el-tree-node__expand-icon.expanded.el-icon-caret-right:before {
  background: url("~@/assets/images/tree/arrow-right1.png") no-repeat 0 0;
  content: "";
  display: inline-block;
  width: 12px;
  height: 12px;
  background-size: 8px 12px;
}
// 没有子节点
.el-tree ::v-deep.el-tree-node__expand-icon.is-leaf::before {
  background: none;
}

//---------------2.添加前置图标---------
// 添加图标
.el-tree ::v-deep .el-tree-node__content .el-tree-node__label {
  color: black;
  padding-left: 22px;
  background: url("../../../src/assets/images/tree/icon11.png") no-repeat 0 3px;
  background-size: 13px 13px;
}
.el-tree ::v-deep .el-tree-node__children .el-tree-node__label {
  padding-left: 22px;
  background: url("../../../src/assets/images/tree/icon21.png") no-repeat 0 3px;
  background-size: 13px 13px;
}
.el-tree
  ::v-deep
  .el-tree-node__children
  .el-tree-node__children
  .el-tree-node__label {
  padding-left: 22px;
  background: url("../../../src/assets/images/tree/icon31.png") no-repeat 0 3px;
  background-size: 13px 13px;
}
.el-tree
  ::v-deep
  .el-tree-node__children
  .el-tree-node__children
  .el-tree-node__children
  .el-tree-node__label {
  padding-left: 22px;
  background: url("../../../src/assets/images/tree/icon41.png") no-repeat 0 3px;
  background-size: 13px 13px;
}
.el-tree
  ::v-deep
  .el-tree-node__children
  .el-tree-node__children
  .el-tree-node__children
  .el-tree-node__children
  .el-tree-node__label {
  padding-left: 22px;
  background: url("../../../src/assets/images/tree/icon51.png") no-repeat 0 3px;
  background-size: 13px 13px;
}
step4.【进阶】添加引导线

效果说明:添加一个目录线,如图
// 资源树-头部标签样式
.treeHead {
  text-align: center;
  // color: #fff;
  font-size: 14px;
  padding: 10px;
  align-items: center;
  border: 1px solid #8db2f3;
  background-color: #8db2f3;
}
// -------------4.添加引导线-----------
.treeBox {
  width: 100%;
}
.treeBox ::v-deep .el-tree > .el-tree-node:after {
  border-top: none;
}
.tree ::v-deep .el-tree-node {
  position: relative;
}
// 节点左边距
.tree ::v-deep .el-tree-node__children {
  padding-left: 15px;
}
.tree ::v-deep .el-tree-node :last-child:before {
  height: 38px;
}
.tree ::v-deep .el-tree > .el-tree-node:before {
  border-left: none;
}
.treeBox ::v-deep .el-tree > .el-tree-node:after {
  border-top: none;
}
// 添加
.tree ::v-deep .el-tree-node:before {
  content: "";
  left: -4px;
  position: absolute;
  right: auto;
  border-width: 1px;
}

.tree ::v-deep .el-tree-node:after {
  content: "";
  left: -4px;
  position: absolute;
  right: auto;
  border-width: 1px;
}

.tree ::v-deep .el-tree-node:before {
  border-left: 1px dashed #ffffff;
  bottom: 0px;
  height: 100%;
  top: -26px;
  width: 1px;
}

.tree ::v-deep .el-tree-node:after {
  border-top: 1px dashed #ffffff;
  height: 20px;
  top: 12px;
  width: 12px;
}
// 解决节点偏移量大问题
.tree ::v-deep .el-tree-node__content {
  padding-left: 2px !important;
}

//----------1.添加箭头效果-----------
// 没有展开且有子节点
.el-tree ::v-deep .el-icon-caret-right:before {
  background: url("~@/assets/images/tree/arrow-right1.png") no-repeat 0 0;
  content: "";
  display: inline-block;
  width: 12px;
  height: 12px;
  margin-left: 3px;
  background-size: 8px 12px;
}
// 已经展开且有子节点
.el-tree
  ::v-deep
  .el-tree-node__expand-icon.expanded.el-icon-caret-right:before {
  background: url("~@/assets/images/tree/arrow-right1.png") no-repeat 0 0;
  content: "";
  display: inline-block;
  width: 12px;
  height: 12px;
  background-size: 8px 12px;
}
// 没有子节点
.el-tree ::v-deep.el-tree-node__expand-icon.is-leaf::before {
  background: none;
}

//---------------2.添加前置图标---------
// 添加图标
.el-tree ::v-deep .el-tree-node__content .el-tree-node__label {
  color: black;
  padding-left: 22px;
  background: url("../../../src/assets/images/tree/icon11.png") no-repeat 0 3px;
  background-size: 13px 13px;
}
.el-tree ::v-deep .el-tree-node__children .el-tree-node__label {
  padding-left: 22px;
  background: url("../../../src/assets/images/tree/icon21.png") no-repeat 0 3px;
  background-size: 13px 13px;
}
.el-tree
  ::v-deep
  .el-tree-node__children
  .el-tree-node__children
  .el-tree-node__label {
  padding-left: 22px;
  background: url("../../../src/assets/images/tree/icon31.png") no-repeat 0 3px;
  background-size: 13px 13px;
}
.el-tree
  ::v-deep
  .el-tree-node__children
  .el-tree-node__children
  .el-tree-node__children
  .el-tree-node__label {
  padding-left: 22px;
  background: url("../../../src/assets/images/tree/icon41.png") no-repeat 0 3px;
  background-size: 13px 13px;
}
.el-tree
  ::v-deep
  .el-tree-node__children
  .el-tree-node__children
  .el-tree-node__children
  .el-tree-node__children
  .el-tree-node__label {
  padding-left: 22px;
  background: url("../../../src/assets/images/tree/icon51.png") no-repeat 0 3px;
  background-size: 13px 13px;
}

// -------------3.添加颜色效果-----------
// 资源树-头部标签样式
.treeHead {
  text-align: center;
  // color: #fff;
  font-size: 14px;
  padding: 10px;
  align-items: center;
  border: 1px solid #8db2f3;
  background-color: #8db2f3;
}
// 添加tree背景颜色
.tree {
  color: #fff;
  border: 1px solid #9ec4f0;
  background-color: #9ec4f0;
}
.treeBox {
  width: 100%;
  margin: 0 auto;
  overflow: auto;
  height: 360px;
  // overflow-x: auto;
  // overflow-y: auto;
}
.el-tree {
  min-width: 100%;
  display: inline-block !important;
  color: #fff;
}
// hover节点时的背景颜色
::v-deep .el-tree-node__content:hover {
  background-color: #fff;
}
::v-deep .el-tree-node__content:is-active {
  // background-color: rgb(99, 201, 145);
}
// 节点选中的背景颜色
::v-deep .el-tree-node:focus > .el-tree-node__content {
  background-color: #fff;
}
三、【基础】修改tree配置效果
default-expand-all 默认展开全部节点
:expand-on-click-node="false" 点选节点不做”展开“”收起“操作
node-key="id" 每个树节点用来作为唯一标识的属性,整棵树应该是唯一的
:indent="0" 相邻级节点间的水平缩进,单位为像素

<el-tree
              :data="resourceData.data"
              node-key="id"
              ref="tree"
              default-expand-all
              :expand-on-click-node="false"
              :props="defaultProps"
              :indent="0"
              class="tree"
              style="width: 100%"
            >
</el-tree>
附:全部Tree组件代码
<template>
  <div
    v-if="this.$store.state.treeShow"
    style="height: 400px; padding-bottom: 10px"
  >
    <div class="treeHead" @click="reset()">
      <i class="el-icon-folder-opened"></i> 请选择资源分组
    </div>
    <div class="treeBox">
      <el-tree
        :data="this.$store.state.treeData"
        node-key="id"
        :indent="0"
        ref="tree"
        default-expand-all
        :expand-on-click-node="false"
        :props="defaultProps"
        class="tree"
        style="width: 100%"
        @node-click="handle"
      >
      </el-tree>
    </div>
  </div>
</template>
<script>
import { getResourceGroupTree } from "@/api/zypz/zyfz";
export default {
  data() {
    return {
      selectKey: "",
      // treeData: [],
      defaultProps: {
        children: "children",
        label: "name",
        value: "id",
      },
    };
  },
  created() {
    // 获取资源分组树结构
    this.getGroupTree();
  },
  methods: {
    getGroupTree() {
      getResourceGroupTree().then((response) => {
        var res = response.data;
        this.$store.commit("getTree", res);
        // this.treeData = response.data;
        // this.treeData[this.treeData.length - 1].disabled = true;
      });
    },
    handle(node) {
      // let isleaf = this.$refs.tree.setCheckedKeys();
      // console.log(isleaf,"ddddddd")
      let selectKey = "";
      let parent = [];
      if (node.children.length > 0) {
        this.$store.commit("getLeaf", "");
      } else {
        console.log("叶");
        selectKey = this.$refs.tree.getCurrentKey();
        parent = this.getParent(this.$refs.tree.data, selectKey);
        this.$store.commit("getLeaf", parent);
      }
      selectKey = this.$refs.tree.getCurrentKey();
      parent = this.getParent(this.$refs.tree.data, selectKey);
      // this.$store.commit("getLeaf", parent);
      this.$store.commit("getNode", parent);
      this.$store.commit("getNodeKey", selectKey);
    },
    // 获取选中节点的所有上父节点函数
    getParent(array, key) {
      let result = [];
      let toToo = true;
      const catchData = (array, key) => {
        array.forEach((item) => {
          if (!toToo) return;
          result.push(String(item["name"]));
          if (item["id"] === key) {
            toToo = false;
          } else if (item["children"]) {
            catchData(item["children"], key);
          } else {
            result.pop();
          }
        });
        toToo && result.pop();
      };
      catchData(array, key);
      console.log(result, "result");
      return result;
    },
    // 制空选中的资源分组
    reset() {
      let selectKey = "";
      let parent = [];
      // this.$store.commit("getLeaf", parent);
      this.$store.commit("getNode", parent);
      this.$store.commit("getNodeKey", selectKey);
    },
  },
};
</script>
<style lang="scss" scoped>
/**
**箭头
**/
// 没有展开且有子节点
.el-tree ::v-deep .el-icon-caret-right:before {
  background: url("~@/assets/tree/arrow-right1.png") no-repeat 0 0;
  content: "";
  display: inline-block;
  width: 12px;
  height: 12px;
  margin-left: 3px;
  background-size: 8px 12px;
}
// 已经展开且有子节点
.el-tree
  ::v-deep
  .el-tree-node__expand-icon.expanded.el-icon-caret-right:before {
  background: url("~@/assets/tree/arrow-right1.png") no-repeat 0 0;
  content: "";
  display: inline-block;
  width: 12px;
  height: 12px;
  background-size: 8px 12px;
}
// 没有子节点
.el-tree ::v-deep.el-tree-node__expand-icon.is-leaf::before {
  background: none;
}
// 添加引导线
.treeBox {
  width: 100%;
}
.treeBox ::v-deep .el-tree > .el-tree-node:after {
  border-top: none;
}
.tree ::v-deep .el-tree-node {
  position: relative;
}

.tree ::v-deep .el-tree-node__children {
  padding-left: 15px;
}

.tree ::v-deep .el-tree-node :last-child:before {
  height: 38px;
}

.tree ::v-deep .el-tree > .el-tree-node:before {
  border-left: none;
}

.treeBox ::v-deep .el-tree > .el-tree-node:after {
  border-top: none;
}

.tree ::v-deep .el-tree-node:before {
  content: "";
  left: -4px;
  position: absolute;
  right: auto;
  border-width: 1px;
}

.tree ::v-deep .el-tree-node:after {
  content: "";
  left: -4px;
  position: absolute;
  right: auto;
  border-width: 1px;
}

.tree ::v-deep .el-tree-node:before {
  border-left: 1px dashed #ffffff;
  bottom: 0px;
  height: 100%;
  top: -26px;
  width: 1px;
}

.tree ::v-deep .el-tree-node:after {
  border-top: 1px dashed #ffffff;
  height: 20px;
  top: 12px;
  width: 12px;
}

// 添加图标
.el-tree ::v-deep .el-tree-node__content .el-tree-node__label {
  color: black;
  padding-left: 22px;
  background: url("../../../src/assets/tree/icon11.png") no-repeat 0 3px;
  background-size: 13px 13px;
}
.el-tree ::v-deep .el-tree-node__children .el-tree-node__label {
  padding-left: 22px;
  background: url("../../../src/assets/tree/icon21.png") no-repeat 0 3px;
  background-size: 13px 13px;
}
.el-tree
  ::v-deep
  .el-tree-node__children
  .el-tree-node__children
  .el-tree-node__label {
  padding-left: 22px;
  background: url("../../../src/assets/tree/icon31.png") no-repeat 0 3px;
  background-size: 13px 13px;
}
.el-tree
  ::v-deep
  .el-tree-node__children
  .el-tree-node__children
  .el-tree-node__children
  .el-tree-node__label {
  padding-left: 22px;
  background: url("../../../src/assets/tree/icon41.png") no-repeat 0 3px;
  background-size: 13px 13px;
}
.el-tree
  ::v-deep
  .el-tree-node__children
  .el-tree-node__children
  .el-tree-node__children
  .el-tree-node__children
  .el-tree-node__label {
  padding-left: 22px;
  background: url("../../../src/assets/tree/icon51.png") no-repeat 0 3px;
  background-size: 13px 13px;
}
.tree {
  color: #fff;
  border: 1px solid #3a90f2;
  background-color: #3a90f2;
}
.treeBox {
  width: 100%;
  margin: 0 auto;
  overflow: auto;
  height: 360px;
  // overflow-x: auto;
  // overflow-y: auto;
}
.el-tree {
  min-width: 100%;
  display: inline-block !important;
}
::v-deep .el-tree-node__content:hover {
  // background-color: #2181f5;
}
::v-deep .el-tree-node__content:is-active {
  // background-color: #2181f5;
}
::v-deep .el-tree-node:focus > .el-tree-node__content {
  // background-color: #2181f5;
}
::-webkit-scrollbar {
  width: 5px;
  height: 5px;
}
::-webkit-scrollbar-thumb {
  background-color: #409eff;
  border-radius: 5px;
}
::-webkit-scrollbar-corner {
  background-color: inherit;
}
.treeHead {
  text-align: center;
  color: #fff;
  font-size: 14px;
  padding: 10px;
  align-items: center;
  border: 1px solid #196eff;
  background-color: #196eff;
}
// 修改点击>小图标展开收起区域往下问题
// ::v-deep .tree[data-v-96a3565e] .el-tree-node:after {
//   height: 0px !important;
//   top: 0px !important;
//   width: 0px !important;
// }
</style>
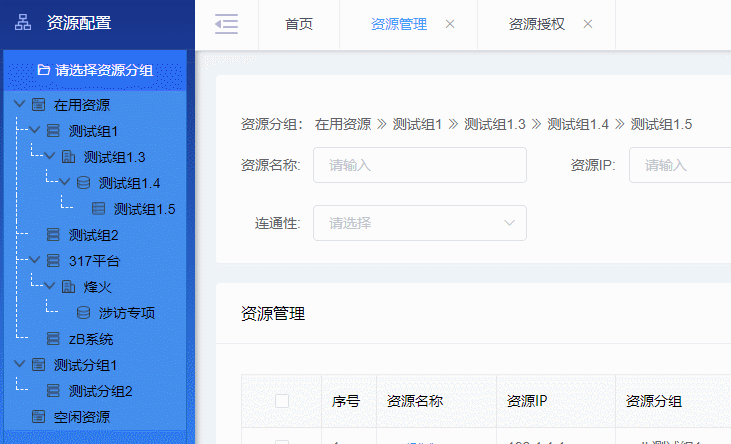
四、【实战】添加节点点击函数==> 点击展示全部节点信息
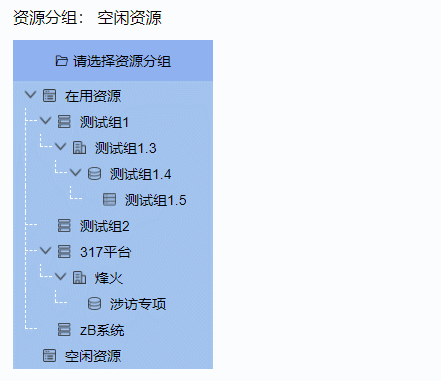
@node-click="handle"功能说明:(1)点击节点,获取选中节点(node);
(2)获取选中节点的父节点 ==> 进而获取选中节点的所有父节点(用于展示全部选择路径)
// 使用到的函数
node-click 节点被点击时的回调.共三个参数,依次为:传递给
data属性的数组中该节点所对应的对象、节点对应的 Node、节点组件本身。getCurrentKey() 获取当前被选中节点的 key,必须设置 node-key 属性,若没有节点被选中则返回 null
1.node-click说明(原理 可跳过)
节点被点击时的回调.共三个参数,依次为:传递给 data 属性的数组中该节点所对应的对象、节点对应的 Node、节点组件本身。
handle(node) {
      console.log("this is node:", node);
    },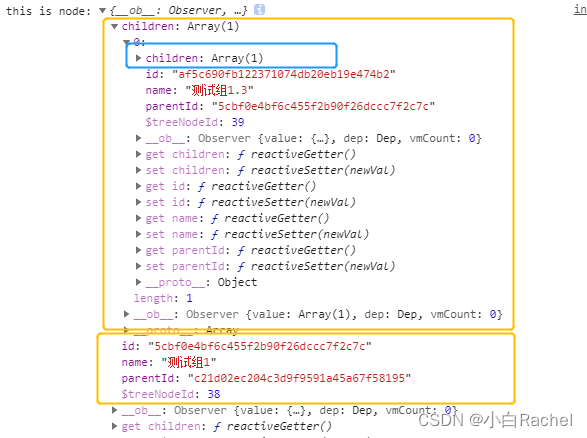
我们可以通过点击函数node-click,在函数中使用node,获取到当前选中节点的全部信息(包含id,name,parentId,以及他全部children信息)
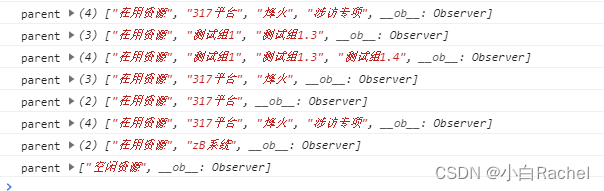
2.getParent获取选中节点所有父节点(递归实现)
// 获取选中节点的所有上父节点函数
    getParent(array, key) {
      let result = [];
      let toToo = true;
      const catchData = (array, key) => {
        array.forEach((item) => {
          if (!toToo) return;
          result.push(String(item["name"]));
          if (item["id"] === key) {
            toToo = false;
          } else if (item["children"]) {
            catchData(item["children"], key);
          } else {
            result.pop();
          }
        });
        toToo && result.pop();
      };
      catchData(array, key);
      console.log(result, "result");
      return result;
    },
返回的parent数组如下
3.判断展示全部节点信息
前端通过判断treeGroup的长度来控制显示。
在handel函数中调用获取全部父节点信息的函数
<div style="height: 50px; background: #fff">
        <el-col :span="24">
          <p>
            资源分组:
            {{ this.treeGroup[0] }}
            <i
              class="el-icon-d-arrow-right"
              v-if="this.treeGroup.length > 1"
            ></i>
            {{ this.treeGroup[1] }}
            <i
              class="el-icon-d-arrow-right"
              v-if="this.treeGroup.length > 2"
            ></i>
            {{ this.treeGroup[2] }}
            <i
              class="el-icon-d-arrow-right"
              v-if="this.treeGroup.length > 3"
            ></i>
            {{ this.treeGroup[3] }}
            <i
              class="el-icon-d-arrow-right"
              v-if="this.treeGroup.length > 4"
            ></i>
            {{ this.treeGroup[4] }}
          </p>
        </el-col>
      </div>
handle(node) {
// console.log("this is node:", node);
let selectKey = "";
let parent = [];
selectKey = this.$refs.tree.getCurrentKey(); //当前选中节点id
parent = this.getParent(this.$refs.tree.data, selectKey);
this.treeGroup = parent;
// console.log("parent", parent);
selectKey = this.$refs.tree.getCurrentKey();
parent = this.getParent(this.$refs.tree.data, selectKey);
},五、【实战】全局使用tree组件==>使用$store存储全局变量
前情提要:由于多个页面都需要使用到资源树组件进行辅助查询,甲方要求把这个资源树放在全局的导航路由sidebar中.对于需要Tree组件时显示,不需要的时候隐藏。

功能点:(1)Tree组件放在Sidebar组件中
(2)使用vue
1.Vuex的使用
在vue的项目里父子组件间可以用props 或者 $emit 等方式 进行数据传递,而如果项目稍微大一点的话有很多平行组件,这个时候在这些组件间传递数据,使用这些方法会比较麻烦,在本案例中,Tree资源树组件和页面没有父子组件之间的关系,而且需要多处使用到,因此我们可以vuex来解决这个问题。
参考链接: https://www.jb51.net/article/191612.htm
2. store全局参数和函数
接下来的主要代码在store/index.js中
treeData getTree() 用于存储资源树数据
treeShow treeVis() 用于控制资源树的显示与隐藏
treeGroup getNode() 上一节提到过的,用于存储选中节点的全部父节点信息数组
treeGroupKey getNodeKey() 用于存储当前选中节点的groupid
leaf getLeaf() 用于存储选中节点
import Vue from "vue";
import Vuex from "vuex";
import app from "./modules/app";
import user from "./modules/user";
import tagsView from "./modules/tagsView";
import permission from "./modules/permission";
import settings from "./modules/settings";
import getters from "./getters";

Vue.use(Vuex);

const store = new Vuex.Store({
  modules: {
    app,
    user,
    tagsView,
    permission,
    settings,
  },
  state: {
    treeData: [],
    // 控制左侧树的显示
    treeShow: false,
    // 选中节点的上级节点
    treeGroup: [],
    // 选中节点的groupid
    treeGroupKey: "",
    // 叶节点
    leaf:[],
  },
  getters,
  mutations: {
    // 控制左侧树的显示
    treeVis() {
      this.state.treeShow = true;
    },
    // 获取选中的上级节点
    getNode(state, parent) {
      state.treeGroup = parent;
    },
    // 获取选中节点的groupid
    getNodeKey(state, key) {
      state.treeGroupKey = key;
    },
    getLeaf(state,parent){
      state.leaf = parent
    },
    getTree(state, data) {
      state.treeData = data;
    },
  },
});

export default store;
3.如何在页面中使用
(1)sidebar中引用Tree组件

(2)this.$store.commit存储数据
step 1: 在Tree组件中,使用 this.$store.commit("getTree", res);存储整个树结构数据到全局的treeData中。(这里展示调接口获取的数据存储)
// created() {
    // 获取资源分组树结构
    // this.getGroupTree();
// },
getGroupTree() {
      getResourceGroupTree().then((response) => {
        var res = response.data;
        this.$store.commit("getTree", res);    // treeData
      });
    },
step 2: 在handel节点点击函数中,存储节点信息。
使用this.$store.commit("getNode", parent); 将选中节点的全部父节点信息通过getNode存储到全局的treeGroup中;
使用this.$store.commit("getNodeKey", selectKey);将选中节点的key值通过getNodeKey存储到treeGroupKey中
handle(node) {
      let selectKey = "";
      let parent = [];
      if (node.children.length > 0) {
        this.$store.commit("getLeaf", "");
      } else {
        console.log("叶");
        selectKey = this.$refs.tree.getCurrentKey();
        parent = this.getParent(this.$refs.tree.data, selectKey);
        this.$store.commit("getLeaf", parent);
      }
      selectKey = this.$refs.tree.getCurrentKey();
      parent = this.getParent(this.$refs.tree.data, selectKey);
      this.$store.commit("getNode", parent);
      this.$store.commit("getNodeKey", selectKey);
    },
(3)页面中通过this.$store.state使用全局数据
step 1: 使用this.$store.state.treeShow = true;展示全局资源树组件
created() {
    this.getResourceList();
    this.$store.state.treeShow = true;
  },
destroyed() {
    this.$store.state.treeShow = false;
  },
step 2: 在页面通过this.$store.state.treeGroup展示选中资源树信息
 <el-col :span="24"
            ><p>
              资源分组:
              {{ this.$store.state.treeGroup[0] }}
              <i
                class="el-icon-d-arrow-right"
                v-if="this.$store.state.treeGroup.length > 1"
              ></i>
              {{ this.$store.state.treeGroup[1] }}
              <i
                class="el-icon-d-arrow-right"
                v-if="this.$store.state.treeGroup.length > 2"
              ></i>
              {{ this.$store.state.treeGroup[2] }}
              <i
                class="el-icon-d-arrow-right"
                v-if="this.$store.state.treeGroup.length > 3"
              ></i>
              {{ this.$store.state.treeGroup[3] }}
              <i
                class="el-icon-d-arrow-right"
                v-if="this.$store.state.treeGroup.length > 4"
              ></i>
              {{ this.$store.state.treeGroup[4] }}
            </p></el-col
          >
step 2: 结合查询函数查询信息
// 获取资源列表信息
    getResourceList() {
      console.log(this.$store.state.treeGroupKey);
      const params = {
        ...this.queryParams,
        groupId: this.$store.state.treeGroupKey,  // 资源树选中资源的groupid
      };
      getResource(params).then((response) => {
        this.resourceData = response.data.list;
        this.total = response.data.totalCount;
      });
},源码下载:el-tree==>添加分级图标==>添加引导线样式==>点击节点展示全部父节点信息==>使用$store封装全局组件-Javascript文档类资源-CSDN下载


 929
929


 被折叠的 条评论
为什么被折叠?
被折叠的 条评论
为什么被折叠?
 到【灌水乐园】发言


