


https://www.sitepoint.com/caching-a-mongodb-database-with-redis/
Today, performance is one of the most important metrics you need to evaluate when developing a web service. Keeping customers engaged is critical to any company, especially startups, and for this reason it is extremely important to improve the performances and reduce page load times.
When running a web server that interacts with a database, its operations may become a bottleneck. MongoDB is no exception here, and as your MongoDB database scales up, things can really slow down. This issue can even get worse if the database server is detached from the web server. In such systems, the communication with the database can cause a big overhead.
Luckily, you can use a method called caching to speed things up. In this tutorial we’ll introduce this method and see how you can use it to enhance the performance of your Node.js web service.
Background
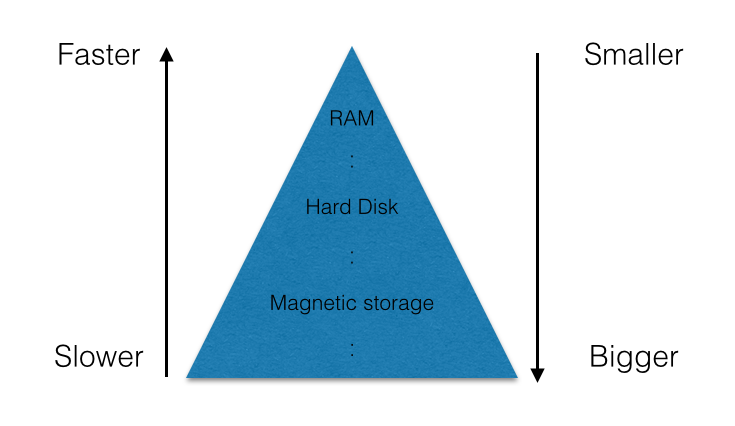
Caching is a strategy aimed at tackling the main storage problem, which means: the bigger the storage is, the slower will be, and vice versa. In a computer, you have the hard drive which is big but also relatively slow. You then have the RAM which is faster but smaller in its storage capabilities, and lastly the CPU registers which are very fast but tiny. The following chart showcases the memory problem:
A cache is a component that stores recently accessed data in a faster storage system. Each time a request for that data is made, it can (with some probability) be pulled from the faster memory. The underlying assumption behind caching is that data which have been recently read, have a higher chance of being read again. Thus they should be stored in a faster memory so that even the next read will be quicker.
To gain a better understanding of this concept, think about a group of people sitting in a library. The library itself represents a huge storage system, but it’s hard to find some books there. In our imagination, the library is a big and slow storage mechanism. Suppose that these people, whenever they find a book, read it but don’t return it since they rather prefer to keep it on their desks. They have this behavior because they are sure they’ll need it again soon, and it makes sense to keep that book on the table where it is more accessible. In this example, the library is the main storage system, while the table is our cache.
In this tutorial, we’ll build a web service that we’ll call “fastLibrary”. Here we’ll implement the concept of caching for a virtual library. MongoDB will be the main storage system, and we’ll build the cache usingRedis. Our web server will work with Express.js. If you are unfamiliar with any of these technologies, I recommend you to deepen these topics before starting the tutorial. For our purpose, I suggest you to give a reading to these articles published on SitePoint:
You can find all the code for this tutorial in this GitHub repository.
The Basic System
As first step, we’ll build a basic web server that stores data in MongoDB. For this demonstration, we’ll name it “fastLibrary”. The server will have two basic operations:
- POST
/book: This endpoint will receive the title, the author, and the content of the book, and create a book entry in the database. - GET
/book/:title: This endpoint will get a title and return its content. We assume that titles uniquely identify books (thus, there won’t be two books with the same title). A better alternative would be, of course, to use an ID. However, to keep things simple, we’ll simply use the title.
This is a simple library system, but we’ll add more advanced abilities later.
Now, let’s create the directory where the application will live:
mkdir fastLibrary
cd fastLibrary
This tutorial assumes you have Node.js and npm installed. If you need to learn how to install them, you can take a look at this resource.
The first step is to enter the following command and answer the questions in order to create the initial structure of your new project:
npm initThen, we have to install Express and the MongoDB driver and save them as dependencies:
npm install express --save
npm install mongodb --save
Now, it’s time to create the main file called index.js. It’s the file where we’ll do most of our work. Start off by creating a simple app, connecting it to MongoDB and listening on port 8000:
var express = require('express'),
    MongoClient = require('mongodb').MongoClient,
    app = express(),
    mongoUrl = 'mongodb://localhost:27017/textmonkey';

MongoClient.connect(mongoUrl, function (err, db) {
    if (err) throw 'Error connecting to database - ' + err;

    app.listen(8000, function () {
        console.log('Listening on port 8000');
    });
});
Make sure you have MongoDB installed on your machine. You can use the following command to start it:
mongod --dbpath=/data --port 27017 Once done, we’ll implement a function that will make possible to save text for a certain key in the database. The function will simply take a key and some text and save it in the database. We are wrapping the MongoDB functions so we can add the caching logic later. All the database functions will reside as a separate module in a file called access.js:
module.exports.saveBook = function (db, title, author, text, callback) {
    db.collection('text').save({
        title: title,
        author: author,
        text: text
    }, callback);
};
Similarly, we’ll implement the findText function:
module.exports.findBookByTitle = function (db, title, callback) {
    db.collection('text').findOne({
        title: title
    }, function (err, doc) {
        if (err || !doc) callback(null);
        else callback(doc.text);
    });
};
At this point, we can put all the code into the actual endpoints:
var express = require('express'),
    MongoClient = require('mongodb').MongoClient,
    app = express(),
    mongoUrl = 'mongodb://localhost:27017/textmonkey';

var access = require('./access.js');

MongoClient.connect(mongoUrl, function (err, db) {
    if (err) throw 'Error connecting to database - ' + err;

    app.post('/book', function (req, res) {
        if (!req.body.title || !req.body.author) res.status(400).send("Please send a title and an author for the book");
        else if (!req.body.text) res.status(400).send("Please send some text for the book");
        else {
            access.saveBook(db, req.body.title, req.body.author, req.body.text, function (err) {
                if (err) res.status(500).send("Server error");
                else res.status(201).send("Saved");
            });
        }
    });

    app.get('/book/:title', function (req, res) {
        if (!req.param('title')) res.status(400).send("Please send a proper title");
        else {
            access.findBookByTitle(db, req.param('title'), function (book) {
                if (!text) res.status(500).send("Server error");
                else res.status(200).send(book);
            });
        }
    });

    app.listen(8000, function () {
        console.log('Listening on port 8000');
    });
});
Adding the Cache
So far we’ve created a basic library web service, but it’s not astonishingly fast at all. In this section, we’ll try to optimize the findBookByTitle() function by caching the results.
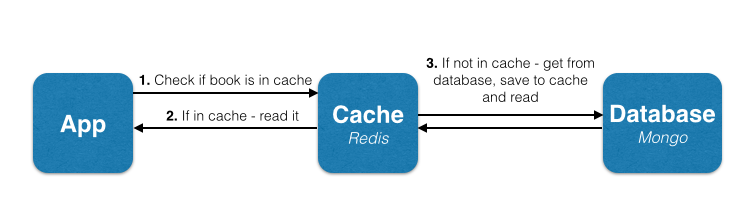
To get a better idea of how we’ll achieve this goal, let’s go back to the our example of the people sitting in a traditional library. Let’s say they want to find the book with a certain title. First of all, they’ll look around the table to see if they already brought it there. If they have, that’s great! They just had a cache hit, that is finding an item in the cache. If they haven’t found it, they had a cache miss , meaning they didn’t find the item in the cache. In the case of a missing item, they’ll have to look for the book in the library. When they find it, they’ll keep it on their table or insert it into the cache.
In our tutorial, we’ll follow exactly the same algorithm for the findBookByTitle() function. When asked for a book with a certain title, we’ll look for it in the cache. If not found, we’ll look for it in the main storage, that is our MongoDB database.
No changes are going to take place in the saveBook() function as it has no effect over the cache. We need to change the findBookByTitle(), which will have the following flow:
First of all, we must install the Node.js Redis client. This can be done via npm:
npm install redis --saveIf you need to install Redis, you can learn how to do here. Once done, run Redis locally on your machine:
redis-server Now, on the top of the index.js file, require and initialize the Redis client:
var redisClient = require('redis').createClient;
var redis = redisClient(6379, 'localhost');
Let’s now write the function access.findBookByTitleCached() which will be an enhanced version of what we’ve built earlier. The function will follow the exact logic we just introduced. We’ll store each book’s data in the Redis database, and as we’re querying books by their titles, we’ll use each book’s title as the key to its data.
module.exports.findBookByTitleCached = function (db, redis, title, callback) {
    redis.get(title, function (err, reply) {
        if (err) callback(null);
        else if (reply) //Book exists in cache
        callback(JSON.parse(reply));
        else {
            //Book doesn't exist in cache - we need to query the main database
            db.collection('text').findOne({
                title: title
            }, function (err, doc) {
                if (err || !doc) callback(null);
                else {\\Book found in database, save to cache and
                    return to client
                    redis.set(title, JSON.stringify(doc), function () {
                        callback(doc);
                    });
                }
            });
        }
    });
};
We also have to update the endpoint to summon the appropriate function:
app.get('/book/:title', function (req, res) {
    if (!req.param('title')) res.status(400).send("Please send a proper title");
    else {
        access.findBookByTitleCached(db, redis, req.param('title'), function (book) {
            if (!text) res.status(500).send("Server error");
            else res.status(200).send(book);
        });
    }
});
Caching Policy
We’ve created a basic system that works with Redis to cache all the query results from the database. However, we must admit that it’s not a smart system. It just saves each result to the Redis cache and keeps it there. In this way, the cache will slowly overload the computer’s RAM until it fills up.
Due to this memory limitation, we must delete some of the items in the cache and only keep few of them. Ideally, we would want to keep those with the highest chances of getting read again only. To select the items we want to delete, we have to establish a sort of caching policy. Deleting random items would probably be a valid policy, but it obviously won’t be very effective. We’ll use one of the most popular policies: the LRU (Least Recently Used). This policy deletes the cache items that were (as the name implies) the least recently used.
Luckily for us, Redis has an LRU mechanism implemented within it, so we don’t have to bother with it on the application layer. To that end, all we have to do is to configure Redis to delete items on an LRU manner. To achieve that, we’ll add two arguments to the command starting Redis. The first will limit the amount of memory it can use (in this example we chose 512 MB), while the second will tell it to use the LRU policy. The command will look like that:
redis-server --maxmemory 10mb --maxmemory-policy allkeys-lruYou can read more about memory management in Redis here.
Keeping the Cache Updated
One of the issues that caching introduces is that of keeping the cache up-to-date when data changes. For example, let’s create the endpoint PUT /book/:title that enables us to update the text of a certain book. For that, we shall implement the function access.updateBookByTitle(title).
The natural thing to do would be to simply update the record in the main database containing that book. But what if the item is in the cache? In that case, the next time we read it, we’ll get a cache hit and read the item from the cache. But that item would be the not updated version of the book, which means that a user might not get the its latest version. Not all the systems can tolerate this inaccuracy. Thus, we’ll update the cache with the new, updated data.
In that case the implementation of the update function will be the following:
module.exports.access.updateBookByTitle = function (db, redis, title, newText, callback) {
    db.collection("text").findAndModify({
        title: title
    }, {
        $set: {
            text: text
        }
    }, function (err, doc) { //Update the main database
        if (err) callback(err);
        else if (!doc) callback('Missing book');
        else {
            //Save new book version to cache
            redis.set(title, JSON.stringify(doc), function (err) {
                if (err) callback(err);
                else callback(null);
            });
        }
    });
};
And we’ll add the appropriate endpoint:
app.put('/book/:title', function (req, res) {
    if (!req.param("title")) res.status(400).send("Please send the book title");
    else if (!req.param("text")) res.status(400).send("Please send the new text");
    else {
        access.updateBookByTitle(db, redis, req.param("title"), req.param("text"), function (err) {
            if (err == "Missing book") res.status(404).send("Book not found");
            else if (err) res.status(500).send("Server error");
            else res.status(200).send("Updated");
        });
    }
});
Another scenario worth noticing is the following: you have multiple separate caches for the same database. This might occur, for example, when you have one main database and multiple machines running the app. It would be great to have a cache for each machine since it might prevents a huge traffic of data back and forth to the database. In that case, a mechanism will have to be put in place to make sure that updates from one machine affect all the caches. Unfortunately, the deepening of this scenario is out of the scope of this tutorial, but we’ll probably propose some clever solutions to solve the problem I raised in one of the next articles.
Metrics
Now that we have a nice working cached app, it’s time to enjoy the fruit of our work and test the performances of our application. For this test, we have first inserted 1.000 books into the library, and then read them randomly. Now we’ll measure how fast the server response times are in the cached application versus the non-cached one. At the end of the test, these are the results. I put them in a graph:

Conclusions
In this tutorial I have shown how to speed up a web server connected to a database by caching the data it accesses to. Although this tutorial uses Redis as the cache, you can use other key-value stores for the purpose. An example of another popular database is Memcached. I chose Redis mainly because of its popularity, its detailed documentation, and ease of use.
While caching is a great performance booster, it isn’t a good fit for every application. Here are some considerations you can think about when thinking about caching:
- Do database reads really have a big impact on your performances? You should make some tests and see if that is your real problem
- Are you using many different keys for querying? In the main database, many parameters can be used to query a collection. In the cache, just one key (either one parameter or a collection of parameters) can be used for querying. Caching all the possible keys would probably be harmful. Try to think which queries are used the most and should be cached, instead.
- Does your app perform a lot of database updates? While caching speeds up reads, it also slows down writes.
- Are you trying to cache complex queries? Complex queries will be harder and less efficient to cache.
Lastly, it is worth keeping this idiom in mind:
Premature optimization is the source of all evil.
This should remind you that optimizations have their proper time and place. I hope you enjoyed this tutorial and I’ll look forward to reading your thoughts and comments.


 888
888


 被折叠的 条评论
为什么被折叠?
被折叠的 条评论
为什么被折叠?
 到【灌水乐园】发言


