


public class MainActivity extends Activity {
private Context context;private TextView tv, tv_1, tv_2, tv_3;
private PopupWindow mPopupWindow;
private RelativeLayout rl_out;
@Override
protected void onCreate(Bundle savedInstanceState) {
super.onCreate(savedInstanceState);
setContentView(R.layout.activity_main);
context = this;
initview();
}
private void initview() {
// TODO Auto-generated method stub
tv = (TextView) findViewById(R.id.tv);
rl_out= (RelativeLayout) findViewById(R.id.rl_out);
tv.setOnClickListener(new OnClickListener() {
@Override
public void onClick(View arg0) {
// TODO Auto-generated method stub
// Toast.makeText(context, "tv", 0).show();
showPopUp1();
//showPopUp2();
}
});
}
protected void showPopUp2() {
// TODO Auto-generated method stub
if (mPopupWindow != null && mPopupWindow.isShowing()) {
mPopupWindow.dismiss();
mPopupWindow = null;
rl_out.setVisibility(View.GONE);
return;
}
if (mPopupWindow == null) {
View localView = getLayoutInflater().inflate(
R.layout.pop_menu_dialog, null);
mPopupWindow = new PopupWindow(localView, 200,
LayoutParams.WRAP_CONTENT);
// LayoutParams.MATCH_PARENT, LayoutParams.WRAP_CONTENT);
mPopupWindow.setAnimationStyle(R.style.PopupWindowAnimation);
//在PopupWindow里面就加上下面代码,让键盘弹出时,不会挡住pop窗口。
mPopupWindow.setInputMethodMode(PopupWindow.INPUT_METHOD_NEEDED);
mPopupWindow.setSoftInputMode(WindowManager.LayoutParams.SOFT_INPUT_ADJUST_RESIZE);
mPopupWindow.setFocusable(true);
mPopupWindow.setOutsideTouchable(true);
mPopupWindow.setBackgroundDrawable(new BitmapDrawable());
mPopupWindow.setOnDismissListener(new OnDismissListener() {
@Override
public void onDismiss() {
// TODO Auto-generated method stub
rl_out.setVisibility(View.GONE);
}
});
tv_1 = (TextView) localView.findViewById(R.id.tv_1);
tv_2 = (TextView) localView.findViewById(R.id.tv_2);
tv_3 = (TextView) localView.findViewById(R.id.tv_3);
tv_1.setOnClickListener(new OnClickListener() {
@Override
public void onClick(View arg0) {
// TODO Auto-generated method stub
Toast.makeText(context, "登录", 0).show();
mPopupWindow.dismiss();
}
});
tv_2.setOnClickListener(new OnClickListener() {
@Override
public void onClick(View arg0) {
// TODO Auto-generated method stub
Toast.makeText(context, "注册", 0).show();
mPopupWindow.dismiss();
}
});
tv_3.setOnClickListener(new OnClickListener() {
@Override
public void onClick(View arg0) {
// TODO Auto-generated method stub
Toast.makeText(context, "取消", 0).show();
mPopupWindow.dismiss();
}
});
}
mPopupWindow.showAsDropDown(tv, 0, 0);
rl_out.setVisibility(View.VISIBLE);
}
protected void showPopUp1() {
// TODO Auto-generated method stub
if (mPopupWindow != null && mPopupWindow.isShowing()) {
mPopupWindow.dismiss();
mPopupWindow = null;
return;
}
if (mPopupWindow == null) {
View localView = getLayoutInflater().inflate(
R.layout.pop_menu_dialog, null);
mPopupWindow = new PopupWindow(localView, 200,
LayoutParams.WRAP_CONTENT);
mPopupWindow.setAnimationStyle(R.style.PopupWindowAnimation);
//在PopupWindow里面就加上下面代码,让键盘弹出时,不会挡住pop窗口。
mPopupWindow.setInputMethodMode(PopupWindow.INPUT_METHOD_NEEDED);
mPopupWindow.setSoftInputMode(WindowManager.LayoutParams.SOFT_INPUT_ADJUST_RESIZE);
mPopupWindow.setFocusable(true);
mPopupWindow.setOutsideTouchable(true);
mPopupWindow.setBackgroundDrawable(new BitmapDrawable());
mPopupWindow.setOnDismissListener(new OnDismissListener() {
@Override
public void onDismiss() {
// TODO Auto-generated method stub
backgroundAlpha(1f);
}
});
tv_1 = (TextView) localView.findViewById(R.id.tv_1);
tv_2 = (TextView) localView.findViewById(R.id.tv_2);
tv_3 = (TextView) localView.findViewById(R.id.tv_3);
tv_1.setOnClickListener(new OnClickListener() {
@Override
public void onClick(View arg0) {
// TODO Auto-generated method stub
Toast.makeText(context, "登录", 0).show();
mPopupWindow.dismiss();
}
});
tv_2.setOnClickListener(new OnClickListener() {
@Override
public void onClick(View arg0) {
// TODO Auto-generated method stub
Toast.makeText(context, "注册", 0).show();
mPopupWindow.dismiss();
}
});
tv_3.setOnClickListener(new OnClickListener() {
@Override
public void onClick(View arg0) {
// TODO Auto-generated method stub
Toast.makeText(context, "取消", 0).show();
mPopupWindow.dismiss();
}
});
}
mPopupWindow.showAsDropDown(tv, 0, 0);
//mPopupWindow.showAtLocation(rl_out, Gravity.CENTER_HORIZONTAL|Gravity.BOTTOM, 150, 50);//后面2个参数为x和y的偏移
backgroundAlpha(0.4f);
}
public void backgroundAlpha(float bgAlpha)
{
WindowManager.LayoutParams lp = getWindow().getAttributes();
lp.alpha = bgAlpha; //0.0-1.0
getWindow().setAttributes(lp);
}
}
隐藏动画:
<?xml version="1.0" encoding="utf-8"?>
<set xmlns:android="http://schemas.android.com/apk/res/android" >
<scale
android:duration="100"
android:fillAfter="false"
android:fromXScale="1.0"
android:fromYScale="1.0"
android:interpolator="@android:anim/accelerate_interpolator"
android:pivotX="50%"
android:pivotY="0%"
android:toXScale="1.0"
android:toYScale="0.0" >
</scale>
</set>
显示动画:
<?xml version="1.0" encoding="utf-8"?>
<set xmlns:android="http://schemas.android.com/apk/res/android" >
<scale
android:duration="100"
android:fillAfter="false"
android:fromXScale="1.0"
android:fromYScale="0.0"
android:interpolator="@android:anim/accelerate_decelerate_interpolator"
android:pivotX="50%"
android:pivotY="0%"
android:toXScale="1.0"
android:toYScale="1.0" >
</scale>
</set>
主界面布局文件:
<RelativeLayout xmlns:android="http://schemas.android.com/apk/res/android"
xmlns:tools="http://schemas.android.com/tools"
android:layout_width="match_parent"
android:layout_height="match_parent"
tools:context=".MainActivity" >
<RelativeLayout
android:id="@+id/rl_out"
android:layout_width="match_parent"
android:layout_height="match_parent"
android:visibility="gone"
android:background="#78000000" >
</RelativeLayout>
<TextView
android:id="@+id/tv"
android:layout_width="wrap_content"
android:layout_height="wrap_content"
android:layout_alignParentRight="true"
android:background="#0000ff"
android:clickable="true"
android:padding="10dip"
android:text="@string/hello_world"
android:textColor="#ffffff" />
<EditText
android:id="@+id/editText1"
android:layout_width="wrap_content"
android:layout_height="wrap_content"
android:layout_alignBottom="@+id/tv"
android:layout_alignParentLeft="true"
android:layout_toLeftOf="@+id/tv"
android:ems="10"
android:inputType="textPersonName" >
<requestFocus />
</EditText>
</RelativeLayout>
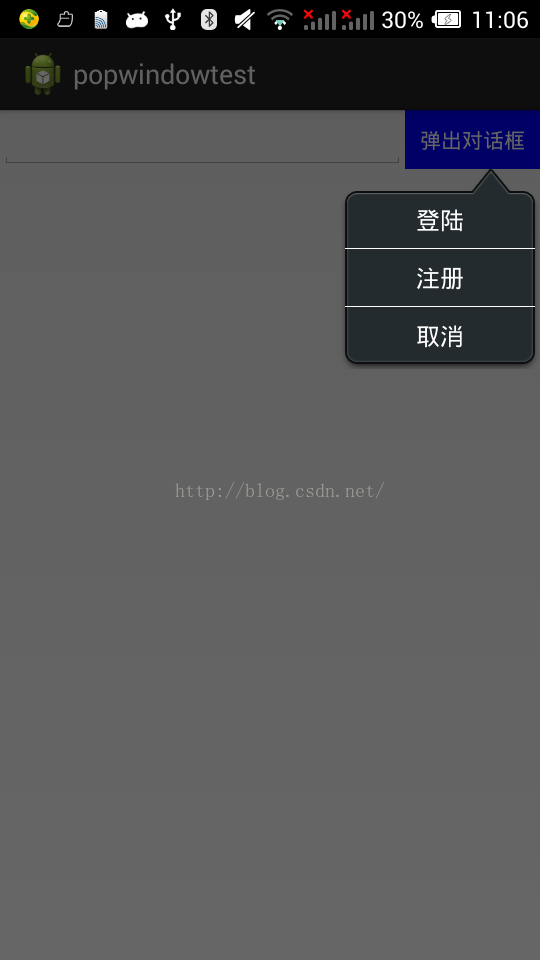
pop窗口布局文件:
<?xml version="1.0" encoding="utf-8"?>
<LinearLayout xmlns:android="http://schemas.android.com/apk/res/android"
android:layout_width="200dip"
android:layout_height="wrap_content"
android:background="@drawable/title_function_bg"
android:orientation="vertical" >
<LinearLayout
android:layout_width="match_parent"
android:layout_height="wrap_content"
android:orientation="vertical" >
<TextView
android:id="@+id/tv_1"
android:layout_width="match_parent"
android:layout_height="wrap_content"
android:gravity="center_horizontal"
android:paddingBottom="8dp"
android:paddingTop="8dp"
android:text="登陆"
android:clickable="true"
android:textColor="#ffffff"
android:textSize="16sp" />
<LinearLayout
android:layout_width="match_parent"
android:layout_height="0.5dp"
android:background="#ffffff" />
<TextView
android:id="@+id/tv_2"
android:layout_width="match_parent"
android:layout_height="wrap_content"
android:gravity="center_horizontal"
android:paddingBottom="8dp"
android:paddingTop="8dp"
android:text="注册"
android:clickable="true"
android:textColor="#ffffff"
android:textSize="16sp" />
<LinearLayout
android:layout_width="match_parent"
android:layout_height="0.5dp"
android:background="#ffffff" />
<TextView
android:id="@+id/tv_3"
android:layout_width="match_parent"
android:layout_height="wrap_content"
android:gravity="center_horizontal"
android:paddingBottom="8dp"
android:paddingTop="8dp"
android:text="取消"
android:clickable="true"
android:textColor="#ffffff"
android:textSize="16sp" />
</LinearLayout>
</LinearLayout>
<style name="PopupWindowAnimation" parent="@android:style/Animation">
<item name="android:windowEnterAnimation">@anim/popshow_anim</item>
<item name="android:windowExitAnimation">@anim/pophidden_anim</item>
</style>


 1万+
1万+


 被折叠的 条评论
为什么被折叠?
被折叠的 条评论
为什么被折叠?
 到【灌水乐园】发言


