


官方文档解释:
Future表示一个异步计算的结果。并提供一些方法检测计算是否完成,等待完成,并取回数据。只有计算完成的时候,结果可以通过get方法获取。如果没有完成,则调用get方法的时候会阻塞。
官方文档是这么写的,翻译起来有点奇怪。
直接看源码更好理解,Future是一个接口,总共就5个方法。详细解释看注释。
原理介绍和基本使用
//Future本身的意思就是未来,表示任务的执行结果。虽然在定义的时候没有结果,但是到了任务执行结束就有结果了。
public interface Future<V> {
    //取消任务
    boolean cancel(boolean mayInterruptIfRunning);
    //判断是否取消了
    boolean isCancelled();
    //判断是否完成
    boolean isDone();
    //获取任务的执行结果,如果任务没有完成,则会阻塞,知道任务完成,然后获取结果
    V get() throws InterruptedException, ExecutionException;
    //和上面的一样,如果超出给定时间,则会抛出异常
    V get(long timeout, TimeUnit unit)
        throws InterruptedException, ExecutionException, TimeoutException;
}
Future只是一个接口,他的一个最主要实现类是FutureTask。
public class FutureTask<V> implements RunnableFuture<V>
FutureTask实现了RunnableFuture,那么RunnableFuture接口又是什么呢?
RunnableFuture实际上就是结合了Runnable和Future接口。
public interface RunnableFuture<V> extends Runnable, Future<V> {
    /**
     * Sets this Future to the result of its computation
     * unless it has been cancelled.
     */
    void run();
}
下面举一个简单的例子来说明FutureTask的使用。FutureTask需要配合Thread使用,因为FutureTask本身是一个Runnable。FutureTask的get方法会等待结果完成,然后获取返回值。
public class FutureTest {
    public static void main(String[] args) {

        FutureTask<Integer> futureTask=new FutureTask<>(new Callable<Integer>() {
            @Override
            public Integer call() throws Exception {
                System.out.println("start task");
                Thread.sleep(3000);
                return 123;
            }
        });

        //FutureTask本身是一个Runnable和Thread可以完美配合
        new Thread(futureTask).start();
        System.out.println("do something in main thread");

        try {
            //等待执行结果并返回执行结果
            Integer integer = futureTask.get();
            System.out.println("result is "+integer);
        } catch (InterruptedException e) {
            throw new RuntimeException(e);
        } catch (ExecutionException e) {
            throw new RuntimeException(e);
        }

    }
}
输出:
do something in main thread
start task
result is 123
既然都使用JUC的高级类了,使用Thread类就有点low。可以配合Executors来使用。运行效果是一样的。
public class FutureTest {
    public static void main(String[] args) {

        Future<Integer> future = Executors.newCachedThreadPool().submit(new Callable<Integer>() {
            @Override
            public Integer call() throws Exception {
                System.out.println("start task");
                Thread.sleep(3000);
                return 123;
            }
        });

        System.out.println("do something in main thread");

        try {
            //等待执行结果并返回执行结果
            Integer integer = future.get();
            System.out.println("result is "+integer);
        } catch (InterruptedException e) {
            throw new RuntimeException(e);
        } catch (ExecutionException e) {
            throw new RuntimeException(e);
        }

    }
}
FutureTask的使用还是非常简单的,接下来要进行FutureTask的源码分析。
源码分析
FutureTask状态
最开始的几行是FutureTask的状态。
    //初始化任务
    private static final int NEW          = 0;
    //任务已经完成,分为正常完成和异常完成,是一个中间状态
    private static final int COMPLETING   = 1;
    //正常完成,是最终状态
    private static final int NORMAL       = 2;
    //任务已经完成,但是异常完成,是最终状态
    private static final int EXCEPTIONAL  = 3;
    //任务还没开始执行就被取消了,是最终状态
    private static final int CANCELLED    = 4;
    //任务还没开始执行就被打断(这里的中断指的是Thread的interrupt方法),是中间状态
    private static final int INTERRUPTING = 5;
    //任务还没开始执行就被打断(比如操作系统kill信号),是最终状态
    private static final int INTERRUPTED  = 6;
接下来介绍几个非常重要的成员函数:
    //任务本身
	private Callable<V> callable;
    //任务结果
    private Object outcome;
    //运行的线程
    private volatile Thread runner;
    //等待节点,是一个Treiber stack结构
    private volatile WaitNode waiters;
需要解释的就是WaitNode节点,是一个Treiber stack结构,Treiber stack是一种算法,Treiber Stack是 R. Kent Treiber在1986年的论文Systems Programming: Coping with Parallelism中首次出现。它是一种无锁并发栈,其无锁的特性是基于CAS原子操作实现的。总之就是能实现无锁并发,WaitNode本身是一个Linked List结构。
    static final class WaitNode {
        volatile Thread thread;
        volatile WaitNode next;
        WaitNode() { thread = Thread.currentThread(); }
    }
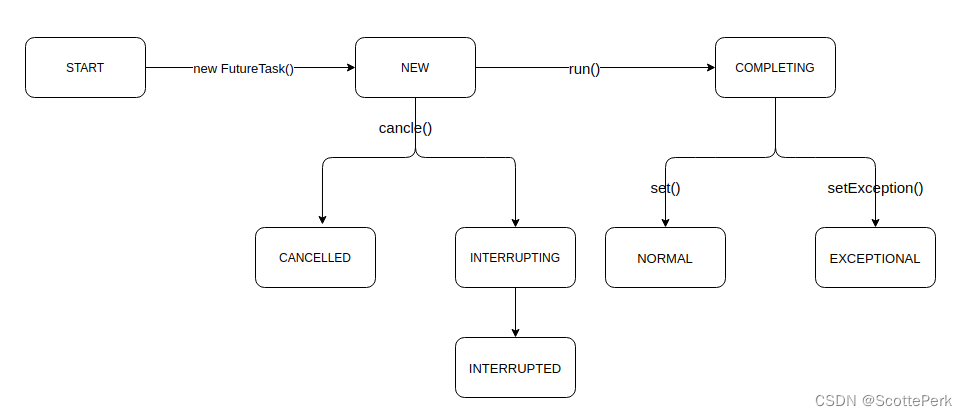
运行结构图
整个运行流程如下图所示。其中这些方法和常量都可以在源码中找到对应的代码。
构造函数
就两个构造函数,一个传Callable,一个传Runnable。但Runnable最终还是转化为Callable。
    public FutureTask(Callable<V> callable) {
        if (callable == null)
            throw new NullPointerException();
        this.callable = callable;
        this.state = NEW;       // ensure visibility of callable
    }
    public FutureTask(Runnable runnable, V result) {
        this.callable = Executors.callable(runnable, result);
        this.state = NEW;       // ensure visibility of callable
    }
Executors.callable方法返回一个RunnableAdapter,这个适配器实际上就是将Runnable转化为Callable。
   public static <T> Callable<T> callable(Runnable task, T result) {
        if (task == null)
            throw new NullPointerException();
        return new RunnableAdapter<T>(task, result);
    }
    private static final class RunnableAdapter<T> implements Callable<T> {
        private final Runnable task;
        private final T result;
        RunnableAdapter(Runnable task, T result) {
            this.task = task;
            this.result = result;
        }
        public T call() {
            task.run();
            return result;
        }
        public String toString() {
            return super.toString() + "[Wrapped task = " + task + "]";
        }
    }


 3083
3083


 被折叠的 条评论
为什么被折叠?
被折叠的 条评论
为什么被折叠?
 到【灌水乐园】发言


