


转载请注明出处:http://blog.csdn.net/bbld_/article/details/40633327
翻译自:http://developer.android.com/training/material/animations.html
用户跟你的app进行交互时,material design中的动画给予用户动作的反馈和提供视觉的一致性(感受)。Material主题提供了一些默认的按钮和activity过渡的动画效果,而在Android 5.0(API级别21)或以上的系统版本中你可以自定义这些动画,还可以创建新的动画:
l Touch feedback(触摸反馈)
l Circular Reveal(循环显示)
l Activity transitions(Activity过渡)
l Curved motion(曲线运动)
l View state changes(视图状态改变)
自定义触摸反馈
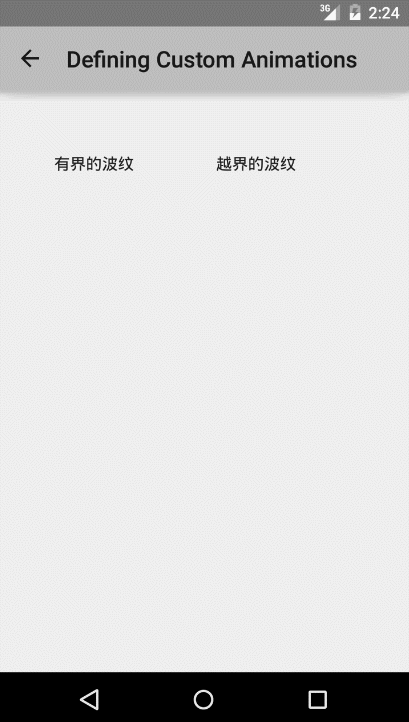
当用户与用户界面进行交互时,materialdesign中的触摸反馈在触摸点上提供了一种瞬时视觉确认。按钮的默认触摸反馈动画使用新的RippleDrawable类,它使用涟漪(波纹)效应在不同状态间转换。
在大多数情况下,你应该在你的布局XML文件中使用如下的方法去指定视图的背景:
l ?android:attr/selectableItemBackground for a bounded ripple(有界的波纹)
l ?android:attr/selectableItemBackgroundBorderless for a ripple that extends beyond the view(能越界的波纹)
注意:selectableItemBackgroundBorderless是API级别21上的新属性。
或者,你可以定义一个RippleDrawable作为波纹元素的XML资源
你可以给RippleDrawable对象指定一种颜色。要更改默认的触摸反馈颜色,使用主题的android:colorControlHighlight属性。
更多的信息,请参阅RippleDrawable类的API文档说明。
使用揭示效果
当你显示或隐藏一组UI元素时,显示动画为用户提供视觉的连续性(感受)。ViewAnimationUtils.createCircularReveal() 方法使你可以使用动画效果来显示或隐藏一个视图。
显示(揭示)以前看不见的视图:
- // previously invisible view
- View myView = findViewById(R.id.my_view);
- // get the center for the clipping circle
- int cx = (myView.getLeft() + myView.getRight()) / 2;
- int cy = (myView.getTop() + myView.getBottom()) / 2;
- // get the final radius for the clipping circle
- int finalRadius = myView.getWidth();
- // create and start the animator for this view
- // (the start radius is zero)
- Animator anim =
- ViewAnimationUtils.createCircularReveal(myView, cx, cy, 0, finalRadius);
- anim.start();
// previously invisible view
View myView = findViewById(R.id.my_view);

// get the center for the clipping circle
int cx = (myView.getLeft() + myView.getRight()) / 2;
int cy = (myView.getTop() + myView.getBottom()) / 2;

// get the final radius for the clipping circle
int finalRadius = myView.getWidth();

// create and start the animator for this view
// (the start radius is zero)
Animator anim =
    ViewAnimationUtils.createCircularReveal(myView, cx, cy, 0, finalRadius);
anim.start();
隐藏一个可见的视图:
- // previously visible view
- final View myView = findViewById(R.id.my_view);
- // get the center for the clipping circle
- int cx = (myView.getLeft() + myView.getRight()) / 2;
- int cy = (myView.getTop() + myView.getBottom()) / 2;
- // get the initial radius for the clipping circle
- int initialRadius = myView.getWidth();
- // create the animation (the final radius is zero)
- Animator anim =
- ViewAnimationUtils.createCircularReveal(myView, cx, cy, initialRadius, 0);
- // make the view invisible when the animation is done
- anim.addListener(new AnimatorListenerAdapter() {
- @Override
- public void onAnimationEnd(Animator animation) {
- super.onAnimationEnd(animation);
- myView.setVisibility(View.INVISIBLE);
- }
- });
- // start the animation
- anim.start();
// previously visible view
final View myView = findViewById(R.id.my_view);

// get the center for the clipping circle
int cx = (myView.getLeft() + myView.getRight()) / 2;
int cy = (myView.getTop() + myView.getBottom()) / 2;

// get the initial radius for the clipping circle
int initialRadius = myView.getWidth();

// create the animation (the final radius is zero)
Animator anim =
    ViewAnimationUtils.createCircularReveal(myView, cx, cy, initialRadius, 0);

// make the view invisible when the animation is done
anim.addListener(new AnimatorListenerAdapter() {
    @Override
    public void onAnimationEnd(Animator animation) {
        super.onAnimationEnd(animation);
        myView.setVisibility(View.INVISIBLE);
    }
});

// start the animation
anim.start();
自定义Activity的过渡
在materialdesign的app中Activity的过渡中,手势产生的不同状态和常见的元素之间的转换(都)提供了视觉的连接。在activities之间,你可以为进入、退出、共享元素的过渡指定自定义动画。
l 一个进入的过渡(动画)决定activity中的所有的视图怎么进入屏幕。例如,在分解(explode)进入过渡(动画)中,所有视图从屏幕外进入并且一起飞向屏幕中心。
l 一个退出的过渡(动画)决定一个activity中的所有视图怎么退出屏幕。例如,在分解(explode)退出过渡(动画)中,所有视图总是从屏幕中间退出。
l 一个共享元素过渡(动画)决定两个activities之间的过渡,怎么共享(它们)的视图。例如,如果两个activities有相同的图像且是有不同的位置和大小,那么changeImageTransform(原文的单词,改变图像变换?)共享元素的过渡转换盒平滑的缩放图像。
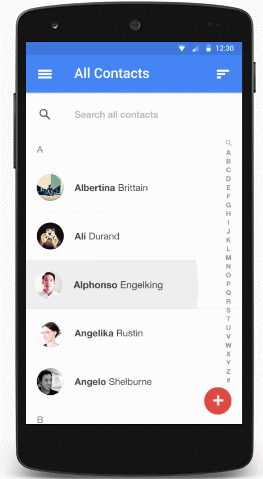 图一:共享元素的过渡。
Android 5.0(API级别21)支持这些进入和退出的过渡动画:
l explode(分解) –进或出地移动视图,从屏幕中间
l slide(滑动) -进或出地移动视图,从屏幕边缘
l fade(淡出) –通过改变屏幕上视图的不透明度达到添加或者移除视图(的效果)
任何继承了Visibility类的过渡都支持进入或退出的过渡。欲了解更多的信息,请参阅Transition类的API文档说明。
Android 5.0(API级别21)也支持这些共享元素的过渡:
l changeBounds –以动画(的效果)更改目标视图的布局界限
l changeClipBounds -以动画(的效果)更改目标视图的裁剪界限
l changeTransform -以动画(的效果)更改目标视图的缩放和旋转
l changeImageTransform -以动画(的效果)更改目标图像的缩放和大小
当你在你的app中启用activity的过渡(动画),activities的进入和退出将会显示默认的交叉渐变过渡效果。

图二:伴随一个共享元素的屏幕装换
自定义转换(动画)
第一,当你定义继承了material主题样式时,使用android:windowContentTransitions属性启用窗口的内容转换(效果)。你还可以指定进入、退出、和共享元素的转换:
- <style name="BaseAppTheme" parent="android:Theme.Material">
- <!-- 启用窗口的内容转换-->
- <item name="android:windowContentTransitions">true</item>
- <!-- 进入、退出的转换(效果) -->
- <item name="android:windowEnterTransition">@transition/explode</item>
- <item name="android:windowExitTransition">@transition/explode</item>
- <!—指定共享元素的转换(效果)-->
- <item name="android:windowSharedElementEnterTransition">
- @transition/change_image_transform</item>
- <item name="android:windowSharedElementExitTransition">
- @transition/change_image_transform</item>
- </style>
<style name="BaseAppTheme" parent="android:Theme.Material">
  <!-- 启用窗口的内容转换-->
  <item name="android:windowContentTransitions">true</item>

  <!-- 进入、退出的转换(效果) -->
  <item name="android:windowEnterTransition">@transition/explode</item>
  <item name="android:windowExitTransition">@transition/explode</item>

  <!—指定共享元素的转换(效果)-->
  <item name="android:windowSharedElementEnterTransition">
    @transition/change_image_transform</item>
  <item name="android:windowSharedElementExitTransition">
    @transition/change_image_transform</item>
</style>
在这个例子中,change_image_transform过渡的定义如下:
- <!-- res/transition/change_image_transform.xml -->
- <!-- (see also Shared Transitions below) -->
- <transitionSet xmlns:android="http://schemas.android.com/apk/res/android">
- <changeImageTransform/>
- </transitionSet>
<!-- res/transition/change_image_transform.xml -->
<!-- (see also Shared Transitions below) -->
<transitionSet xmlns:android="http://schemas.android.com/apk/res/android">
  <changeImageTransform/>
</transitionSet>
该changeImageTransform元素对应ChangeImageTransform类。更多的信息,请参阅Transition的API文档说明。
在代码中启用窗口内容的过渡,调用Window.requestFeature()方法:
- //在你的activity中(如果你没有在主题中启用转换)
- getWindow().requestFeature(Window.FEATURE_CONTENT_TRANSITIONS);
- // 设置一个退出的过渡(动画)
- getWindow().setExitTransition(new Explode());
//在你的activity中(如果你没有在主题中启用转换)
getWindow().requestFeature(Window.FEATURE_CONTENT_TRANSITIONS);
// 设置一个退出的过渡(动画)
getWindow().setExitTransition(new Explode());
要在代码中指定转换,调用这些方法with一个Transition对象:
l Window.setSharedElementEnterTransition()
l Window.setSharedElementExitTransition()
该setExitTransition()方法和setSharedElementExitTransition()方法为正在调用(开启)的activity(将要隐藏的activity)定义退出过渡(动画)。该setEnterTransition()方法和setSharedElementEnterTransition()方法为被调用(开启)的activity(将要显示的activity)定义进入过渡(动画)。
为了得到一个过渡的完整效果,你必须在转换的两个activities都启用窗口内容过渡。否则,将要显示的activity会开始退出过渡动画,但随后你会看到一个窗口的过渡(如缩放或渐变)。
要尽快地开始一个进入的过渡,在即将显示的activity中使用Window.setAllowEnterTransitionOverlap()方法。这让你有更引人注目的进入过渡动画。
使用过渡(动画)开启activity
如果你为一个activity启用了过渡动画并设置了退出过渡动画,那么过渡动画将会被激活当你启动另一个activity时:
- startActivity(intent,
- ActivityOptions.makeSceneTransitionAnimation(this).toBundle());
startActivity(intent,
             ActivityOptions.makeSceneTransitionAnimation(this).toBundle());
如果你设置了一个过渡给第二个activity,那么过渡也是在该activity开启时激活的。要禁用开启另一个activity时的过渡,可以提供一个空选项的bundle。
使用共享元素开启activity
为了使有一个共享元素的两个activities间使用过渡动画:
1. 在你的主题中启用窗口内容过渡
2. 在你的主题样式中指定共享元素的过渡
3. 定义你的过渡动画为XML资源
4. 使用android:transitionName属性给两个布局中的共享元素指定一个相同的名字
5. 使用ActivityOptions.makeSceneTransitionAnimation() 方法
- // get the element that receives the click event
- final View imgContainerView = findViewById(R.id.img_container);
- // get the common element for the transition in this activity
- final View androidRobotView = findViewById(R.id.image_small);
- // define a click listener
- imgContainerView.setOnClickListener(new View.OnClickListener() {
- @Override
- public void onClick(View view) {
- Intent intent = new Intent(this, Activity2.class);
- // create the transition animation - the images in the layouts
- // of both activities are defined with android:transitionName="robot"
- ActivityOptions options = ActivityOptions
- .makeSceneTransitionAnimation(this, androidRobotView, "robot");
- // start the new activity
- startActivity(intent, options.toBundle());
- }
- });
// get the element that receives the click event
final View imgContainerView = findViewById(R.id.img_container);

// get the common element for the transition in this activity
final View androidRobotView = findViewById(R.id.image_small);

// define a click listener
imgContainerView.setOnClickListener(new View.OnClickListener() {
    @Override
    public void onClick(View view) {
        Intent intent = new Intent(this, Activity2.class);
        // create the transition animation - the images in the layouts
        // of both activities are defined with android:transitionName="robot"
        ActivityOptions options = ActivityOptions
            .makeSceneTransitionAnimation(this, androidRobotView, "robot");
        // start the new activity
        startActivity(intent, options.toBundle());
    }
});
对于你在代码中去生成共享的动态视图,在两个activities中使用View.setTransitionName()方法去指定一个相同的元素名字。
为了扭转场景过渡动画,当你在finish掉第二个activity时,调用Activity.finishAfterTransition()方法而不是调用Activity.finish()方法。
开启有多个共享元素的activity
为了使两个activities有多个共享元素,在两个布局中使用android:transitionName属性定义共享元素(或者在两个activities中使用View.setTransitionName()方法),并像如下创建一个ActivityOptions对象:
- ActivityOptions options = ActivityOptions.makeSceneTransitionAnimation(this,
- Pair.create(view1, "agreedName1"),
- Pair.create(view2, "agreedName2"));
ActivityOptions options = ActivityOptions.makeSceneTransitionAnimation(this,
        Pair.create(view1, "agreedName1"),
        Pair.create(view2, "agreedName2"));
使用曲线运动
Material design中的动画依靠曲线,这个曲线适用于时间插值器和控件运动模式。Android5.0(API级别21)或者以上的系统版本中,你可以自定义定时的曲线和曲面运动模式的动画。
PathInterpolator类是一个基于贝塞尔曲线(Bézier curve)或路径(Path)对象上的新的插值器。这个插值器指定了一个1x1的方形运动曲线,用(0,0)点和(1,1)定位点还有控制点来作为构造方法中的参数。你还可以定义一个XML资源的路径插值器:
- <pathInterpolator xmlns:android="http://schemas.android.com/apk/res/android"
- android:controlX1="0.4"
- android:controlY1="0"
- android:controlX2="1"
- android:controlY2="1"/>
<pathInterpolator xmlns:android="http://schemas.android.com/apk/res/android"
    android:controlX1="0.4"
    android:controlY1="0"
    android:controlX2="1"
    android:controlY2="1"/>
在materialdesign规范中,系统提供了三个基本的曲线:
l @interpolator/fast_out_linear_in.xml
l @interpolator/fast_out_slow_in.xml
l @interpolator/linear_out_slow_in.xml
你可以传递一个PathInterpolator对象给Animator.setInterpolator()方法。
ObjectAnimator类有了新的构造方法,使你能够一次能同时使用两个或多个属性去绘制动画的路径。例如,下面的动画使用一个Path对象进行视图X和Y属性的动画绘制:
- ObjectAnimator mAnimator;
- mAnimator = ObjectAnimator.ofFloat(view, View.X, View.Y, path);
- ...
- mAnimator.start();
ObjectAnimator mAnimator;
mAnimator = ObjectAnimator.ofFloat(view, View.X, View.Y, path);
...
mAnimator.start();
创建视图更改的动画
StateListAnimator类可以让你定义动画集,能在view状态改变时工作。下面的实例显示了如何定义一个XML资源的StateListAnimator。
- <!-- animate the translationZ property of a view when pressed -->
- <!- view被按下时绘制translationZ 属性上的动画 ->
- <selector xmlns:android="http://schemas.android.com/apk/res/android">
- <item android:state_pressed="true">
- <set>
- <objectAnimator android:propertyName="translationZ"
- android:duration="@android:integer/config_shortAnimTime"
- android:valueTo="2dp"
- android:valueType="floatType"/>
- <!-- you could have other objectAnimator elements
- here for "x" and "y", or other properties -->
- <!- 你还可以有其它的objectAnimator元素设置给x、y或其它的元素 ->
- </set>
- </item>
- <item android:state_enabled="true"
- android:state_pressed="false"
- android:state_focused="true">
- <set>
- <objectAnimator android:propertyName="translationZ"
- android:duration="100"
- android:valueTo="0"
- android:valueType="floatType"/>
- </set>
- </item>
- </selector>
<!-- animate the translationZ property of a view when pressed -->
<!- view被按下时绘制translationZ 属性上的动画 ->
<selector xmlns:android="http://schemas.android.com/apk/res/android">
  <item android:state_pressed="true">
    <set>
      <objectAnimator android:propertyName="translationZ"
        android:duration="@android:integer/config_shortAnimTime"
        android:valueTo="2dp"
        android:valueType="floatType"/>
        <!-- you could have other objectAnimator elements
             here for "x" and "y", or other properties -->
		<!- 你还可以有其它的objectAnimator元素设置给x、y或其它的元素 ->
    </set>
  </item>
  <item android:state_enabled="true"
    android:state_pressed="false"
    android:state_focused="true">
    <set>
      <objectAnimator android:propertyName="translationZ"
        android:duration="100"
        android:valueTo="0"
        android:valueType="floatType"/>
    </set>
  </item>
</selector>
若要将自定义的视图状态改变的动画集附加到视图上,定义一个使用selector元素的XML资源文件创建的动画,像这个例子一样,并使用android:stateListAnimator属性将其分配给你的视图。在代码中给你的视图分配一个状态动画集,使用AnimationInflater.loadStateListAnimator()方法,并且通过View.setStateListAnimator()方法分配动画到你的视图上。
当你的主题继承了material主题,默认情况下按钮都有一个Z动画。为了避免在你的按钮中表现这个默认的行为,设置android:stateListAnimator属性为@null。
AnimatedStateListDrawable类让你去创建drawable资源,该资源在相关联的视图的状态更改时展示动画。一些Android5.0中的系统控件使用这些默认的动画。下面的例子显示了如何定义一个AnimatedStateListDrawable作为XML资源:
- <!-- res/drawable/myanimstatedrawable.xml -->
- <animated-selector
- xmlns:android="http://schemas.android.com/apk/res/android">
- <!-- provide a different drawable for each state-->
- <!- 为不同状态提供一个不同的drawable ->
- <item android:id="@+id/pressed" android:drawable="@drawable/drawableP"
- android:state_pressed="true"/>
- <item android:id="@+id/focused" android:drawable="@drawable/drawableF"
- android:state_focused="true"/>
- <item android:id="@id/default"
- android:drawable="@drawable/drawableD"/>
- <!-- specify a transition -->
- <!- 定义一个过渡 ->
- <transition android:fromId="@+id/default" android:toId="@+id/pressed">
- <animation-list>
- <item android:duration="15" android:drawable="@drawable/dt1"/>
- <item android:duration="15" android:drawable="@drawable/dt2"/>
- ...
- </animation-list>
- </transition>
- ...
- </animated-selector>
<!-- res/drawable/myanimstatedrawable.xml -->
<animated-selector
    xmlns:android="http://schemas.android.com/apk/res/android">

<!-- provide a different drawable for each state-->
<!- 为不同状态提供一个不同的drawable ->
    <item android:id="@+id/pressed" android:drawable="@drawable/drawableP"
        android:state_pressed="true"/>
    <item android:id="@+id/focused" android:drawable="@drawable/drawableF"
        android:state_focused="true"/>
    <item android:id="@id/default"
        android:drawable="@drawable/drawableD"/>

<!-- specify a transition -->
<!- 定义一个过渡 ->
    <transition android:fromId="@+id/default" android:toId="@+id/pressed">
        <animation-list>
            <item android:duration="15" android:drawable="@drawable/dt1"/>
            <item android:duration="15" android:drawable="@drawable/dt2"/>
            ...
        </animation-list>
    </transition>
    ...
</animated-selector>
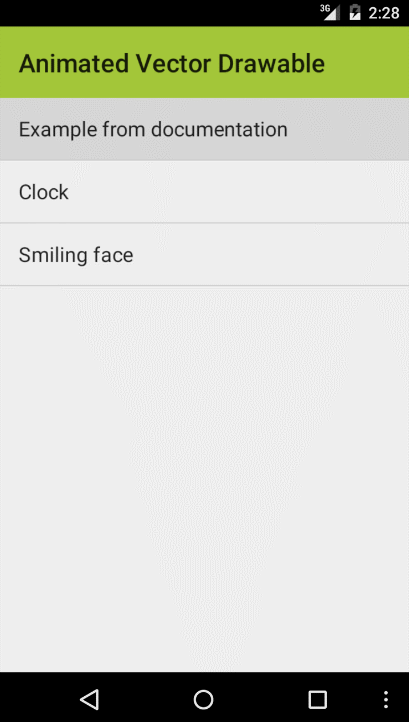
创建矢量Drawable动画
矢量drawable(Vector Drawables)具有可扩展性却不失清晰。AnimatedVectorDrawable类可以去创建一个矢量资源的动画。
你通常在三个XML文件中定义矢量资源的动画载体:
l <vector>元素的矢量资源,在res/drawable/(文件夹)
l <animated-vector>元素的矢量资源动画,在res/drawable/(文件夹)
l < objectAnimator>元素的一个或多个对象动画器,在res/anim/(文件夹)
矢量资源动画能创建<group>和<path>元素属性的动画。<group>元素定义了一组路径或子组,并且<path>元素定义了要被绘制的路径。
当你想要创建动画时去定义矢量资源,使用android:name属性分配一个唯一的名字给组和路径,这样你可以从你的动画定义中查询到它们。例如:
- <!-- res/drawable/vectordrawable.xml -->
- <vector xmlns:android="http://schemas.android.com/apk/res/android"
- android:height="64dp"
- android:width="64dp"
- android:viewportHeight="600"
- android:viewportWidth="600">
- <group
- android:name="rotationGroup"
- android:pivotX="300.0"
- android:pivotY="300.0"
- android:rotation="45.0" >
- <path
- android:name="v"
- android:fillColor="#000000"
- android:pathData="M300,70 l 0,-70 70,70 0,0 -70,70z" />
- </group>
- </vector>
<!-- res/drawable/vectordrawable.xml -->
<vector xmlns:android="http://schemas.android.com/apk/res/android"
    android:height="64dp"
    android:width="64dp"
    android:viewportHeight="600"
    android:viewportWidth="600">
    <group
        android:name="rotationGroup"
        android:pivotX="300.0"
        android:pivotY="300.0"
        android:rotation="45.0" >
        <path
            android:name="v"
            android:fillColor="#000000"
            android:pathData="M300,70 l 0,-70 70,70 0,0 -70,70z" />
    </group>
</vector>
矢量资源动画的定义指的是矢量资源中的组和路径,通过它们的名字:
- <!-- res/drawable/animvectordrawable.xml -->
- <animated-vector xmlns:android="http://schemas.android.com/apk/res/android"
- android:drawable="@drawable/vectordrawable" >
- <target
- android:name="rotationGroup"
- android:animation="@anim/rotation" />
- <target
- android:name="v"
- android:animation="@anim/path_morph" />
- </animated-vector>
<!-- res/drawable/animvectordrawable.xml -->
<animated-vector xmlns:android="http://schemas.android.com/apk/res/android"
  android:drawable="@drawable/vectordrawable" >
    <target
        android:name="rotationGroup"
        android:animation="@anim/rotation" />
    <target
        android:name="v"
        android:animation="@anim/path_morph" />
</animated-vector>
动画的定义代表ObjectAnimator或者AnimatorSet对象。这个例子中,第一个动画是旋转目标组360度:
- <!-- res/anim/rotation.xml -->
- <objectAnimator
- android:duration="6000"
- android:propertyName="rotation"
- android:valueFrom="0"
- android:valueTo="360" />
<!-- res/anim/rotation.xml -->
<objectAnimator
    android:duration="6000"
    android:propertyName="rotation"
    android:valueFrom="0"
    android:valueTo="360" />
这个例子的第二个动画(如下)改变了矢量资源的路径,从一个形状到另一个形状。两个形状必须是变形兼容:他们必须是具有相同数目的命令和相同数量的命令参数。
- <!-- res/anim/path_morph.xml -->
- <set xmlns:android="http://schemas.android.com/apk/res/android">
- <objectAnimator
- android:duration="3000"
- android:propertyName="pathData"
- android:valueFrom="M300,70 l 0,-70 70,70 0,0 -70,70z"
- android:valueTo="M300,70 l 0,-70 70,0 0,140 -70,0 z"
- android:valueType="pathType" />
- </set>
<!-- res/anim/path_morph.xml -->
<set xmlns:android="http://schemas.android.com/apk/res/android">
    <objectAnimator
        android:duration="3000"
        android:propertyName="pathData"
        android:valueFrom="M300,70 l 0,-70 70,70 0,0   -70,70z"
        android:valueTo="M300,70 l 0,-70 70,0  0,140 -70,0 z"
        android:valueType="pathType" />
</set>
更多的信息,请参阅AnimatedVectorDrawable的API文档说明。
demo示例效果:
另外github上有一个比较好的矢量drawable的示例(animated-vector-drawable),其效果:
demo源码下载地址:http://download.csdn.net/detail/bbld_/8102797
animated-vector-drawable的源码(Eclipse工程)下载地址:http://download.csdn.net/detail/bbld_/8102935


 2252
2252


 被折叠的 条评论
为什么被折叠?
被折叠的 条评论
为什么被折叠?
 到【灌水乐园】发言


