


一部分来自1. 生成圆弧顶点 | Three.js中文网 ,一部分是自己的总结
一、生成圆弧顶点
1、三维向量Vector3表示顶点坐标
用三维向量Vector3表示顶点的x、y、z坐标,作为数组元素创建一组顶点坐标
const pointsArr = [
    // 三维向量Vector3表示的坐标值
    new THREE.Vector3(0,0,0),
    new THREE.Vector3(0,100,0),
    new THREE.Vector3(0,100,100),
    new THREE.Vector3(0,0,100),
];
2、几何体方法.setFromPoints()
.setFromPoints()是几何体BufferGeometry的一个方法,通过该方法可以把数组pointsArr中坐标数据提取出来赋值给几何体。具体说就是把pointsArr里面坐标数据提取出来,赋值给geometry.attributes.position属性
// 把数组pointsArr里面的坐标数据提取出来,赋值给`geometry.attributes.position`属性
geometry.setFromPoints(pointsArr);
console.log('几何体变化',geometry.attributes.position);
3、全部代码
import * as THREE from 'three';

const group = new THREE.Group();

const pointsArr = [
    new THREE.Vector3(0,0,0),
    new THREE.Vector3(0,100,0),
    new THREE.Vector3(0,100,100),
    new THREE.Vector3(0,0,100),
]

const geometry = new THREE.BufferGeometry();
geometry.setFromPoints(pointsArr)

const material = new THREE.PointsMaterial({
    color:'red',
    size:10
})

const point = new THREE.Points(geometry,material)

group.add(point)
export default group 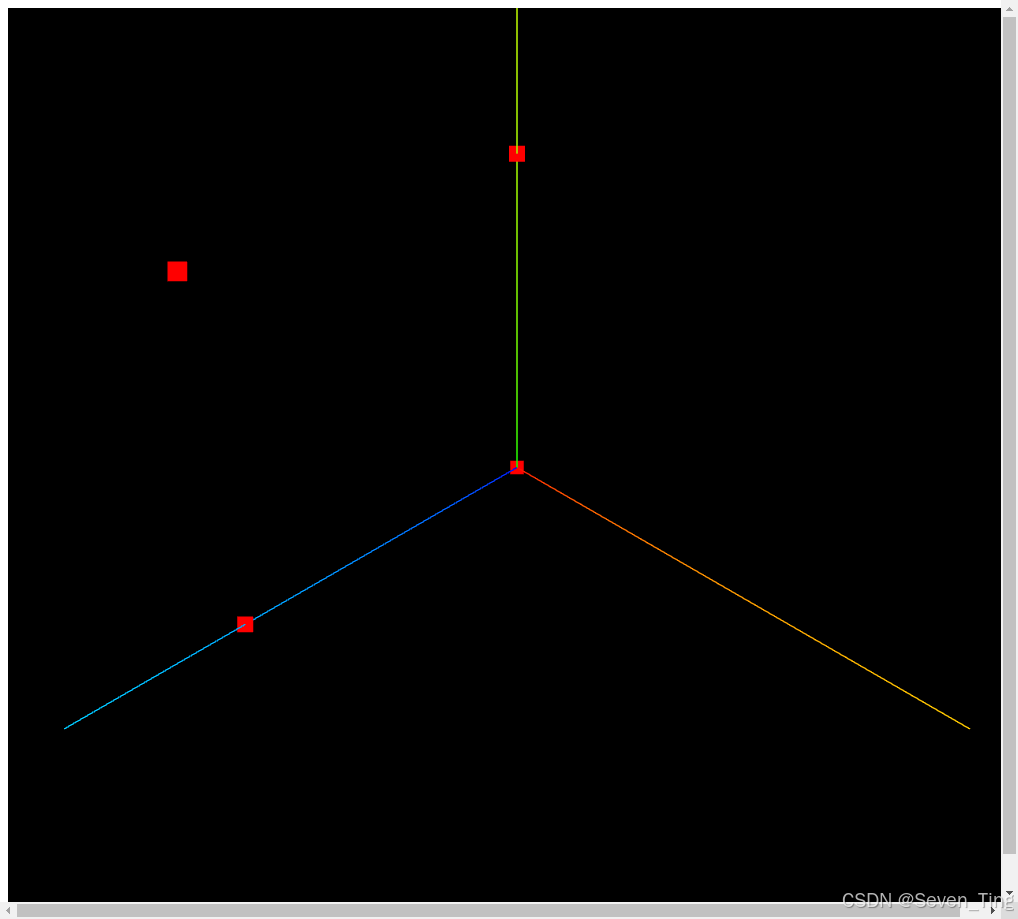
4、二维向量Vector2表示顶点坐标
用二维向量Vector2表示顶点的x、y坐标,作为数组元素创建一组顶点坐标。
const pointsArr = [
    // 三维向量Vector2表示的坐标值
    new THREE.Vector2(0,0),
    new THREE.Vector2(100,0),
    new THREE.Vector2(100,100),
    new THREE.Vector2(0,100),
];
二维向量Vector2构成的数组作为.setFromPoints()的参数
geometry.setFromPoints(pointsArr);
5、全部代码
import * as THREE from 'three';

const group = new THREE.Group();

const pointsArr = [
    new THREE.Vector3(0,0),
    new THREE.Vector3(100,0),
    new THREE.Vector3(100,100),
    new THREE.Vector3(0,100),
]

const geometry = new THREE.BufferGeometry();
geometry.setFromPoints(pointsArr)

const material = new THREE.PointsMaterial({
    color:'red',
    size:10
})

const point = new THREE.Points(geometry,material)

group.add(point)
export default group 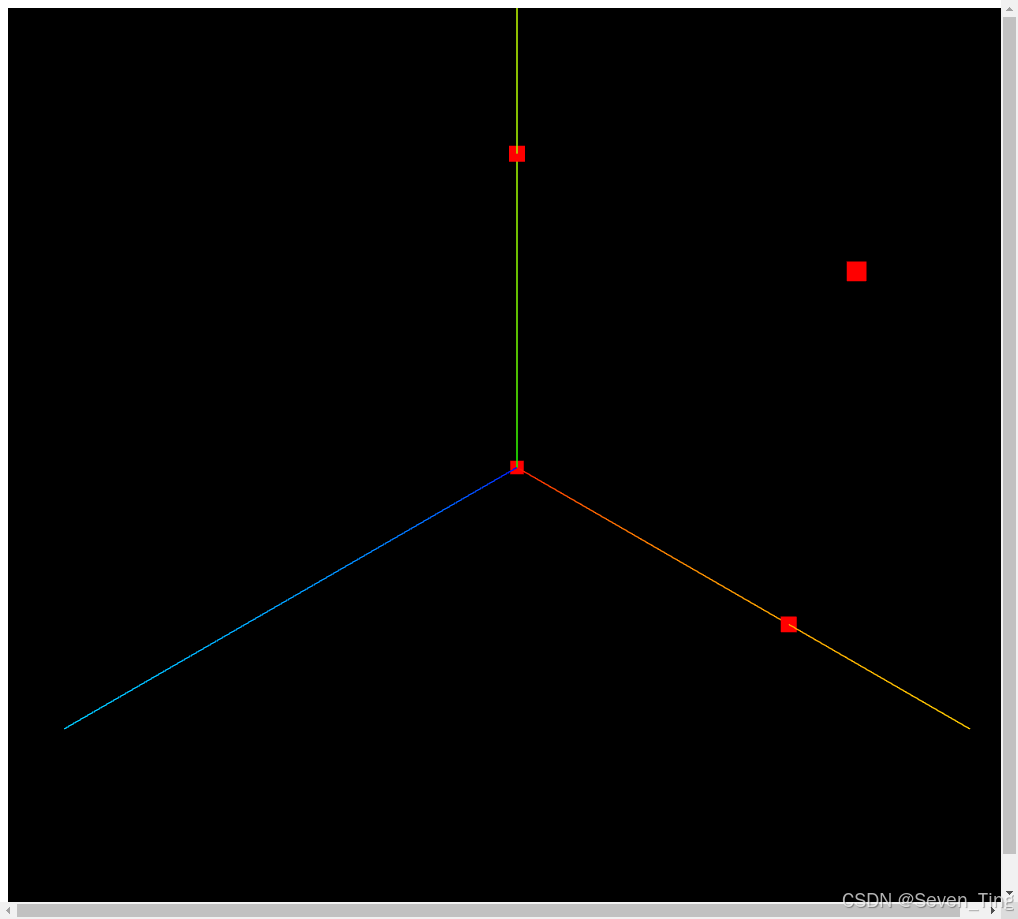
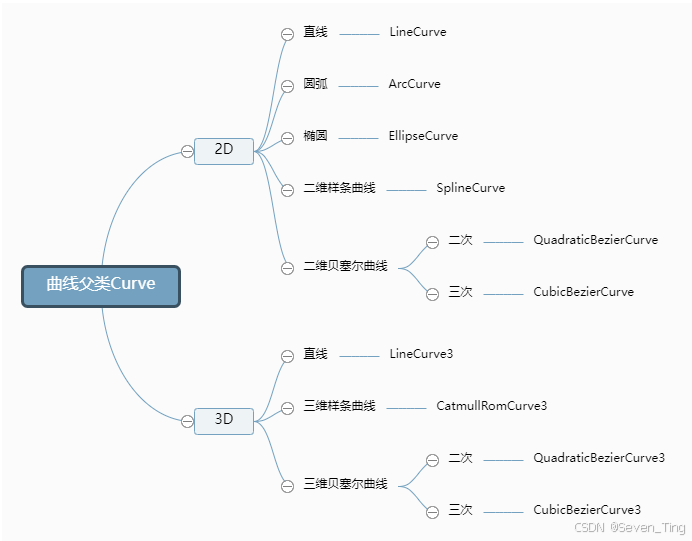
二、曲线Curve简介
1、椭圆EllipseCurve例子
// 参数1和2表示椭圆中心坐标  参数3和4表示x和y方向半径
const arc = new THREE.EllipseCurve(0, 0, 100, 50);
2、曲线Curve方法.getPoints()
椭圆弧线EllipseCurve的父类是曲线Curve,自然会继承父类曲线.getPoints()方法,通过.getPoints()可以从曲线上获取顶点数据。
通过方法.getPoints()可以从曲线上按照一定的细分精度返回沿着曲线分布的顶点坐标。细分数越高返回的顶点数量越多,自然轮廓越接近于曲线形状。方法.getPoints()的返回值是一个由二维向量Vector2或三维向量Vector3构成的数组,Vector2表示位于同一平面内的点,Vector3表示三维空间中一点。
//getPoints是基类Curve的方法,平面曲线会返回一个vector2对象作为元素组成的数组
const pointsArr = arc.getPoints(50); //分段数50,返回51个顶点
console.log('曲线上获取坐标',pointsArr);
3、.setFromPoints()提取曲线坐标数据
把数组pointsArr里面的坐标数据提取出来,赋值给geometry.attributes.position属性
const geometry = new THREE.BufferGeometry();
geometry.setFromPoints(pointsArr);
console.log('geometry.attributes',geometry.attributes);
4、全部代码
import * as THREE from 'three';

const group = new THREE.Group();

const src = new THREE.EllipseCurve(0,0,120,50)
const pointsArr = src.getPoints(50)

const geometry = new THREE.BufferGeometry();
geometry.setFromPoints(pointsArr)

const material = new THREE.PointsMaterial({
    color:'red',
    size:10
})

const point = new THREE.Points(geometry,material)

group.add(point)
export default group 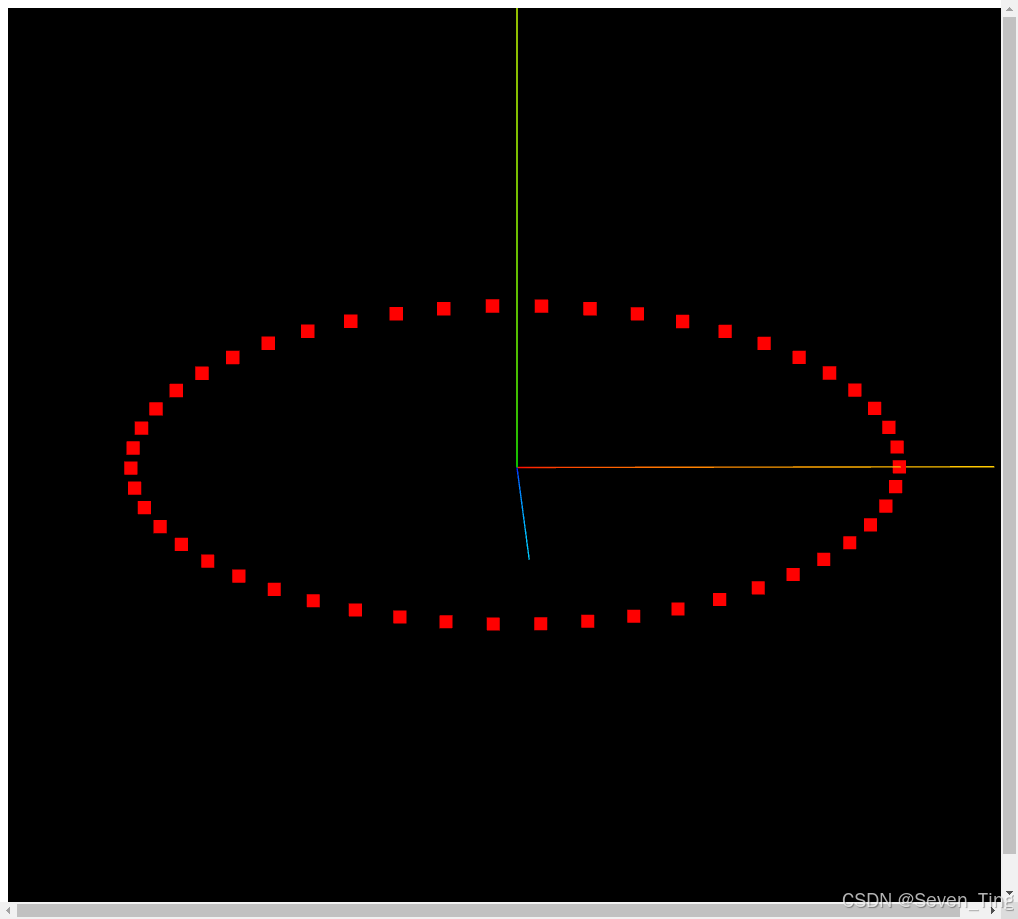
5、曲线Curve方法.getSpacedPoints()
通过.getSpacedPoints()和.getPoints()一样也可以从曲线Curve上返回一系列曲线上的顶点坐标。
通过.getSpacedPoints()是按照曲线长度等间距返回顶点数据,.getPoints()获取点的方式并不是按照曲线等间距的方式,而是会考虑曲线斜率变化,斜率变化快的位置返回的顶点更密集。
你可以通过案例源码测试对比,分别两种获取顶点方式曲线坐标,然后使用点模型渲染,观察点的分布规律。
const geometry = new THREE.BufferGeometry();
geometry.getSpacedPoints(pointsArr);
console.log('geometry.attributes',geometry.attributes);
6、全部代码
import * as THREE from 'three';

const group = new THREE.Group();

const src = new THREE.EllipseCurve(0,0,120,50)
const pointsArr = src.getSpacedPoints(50)

const geometry = new THREE.BufferGeometry();
geometry.setFromPoints(pointsArr)

const material = new THREE.PointsMaterial({
    color:'red',
    size:10
})

const point = new THREE.Points(geometry,material)

group.add(point)
export default group 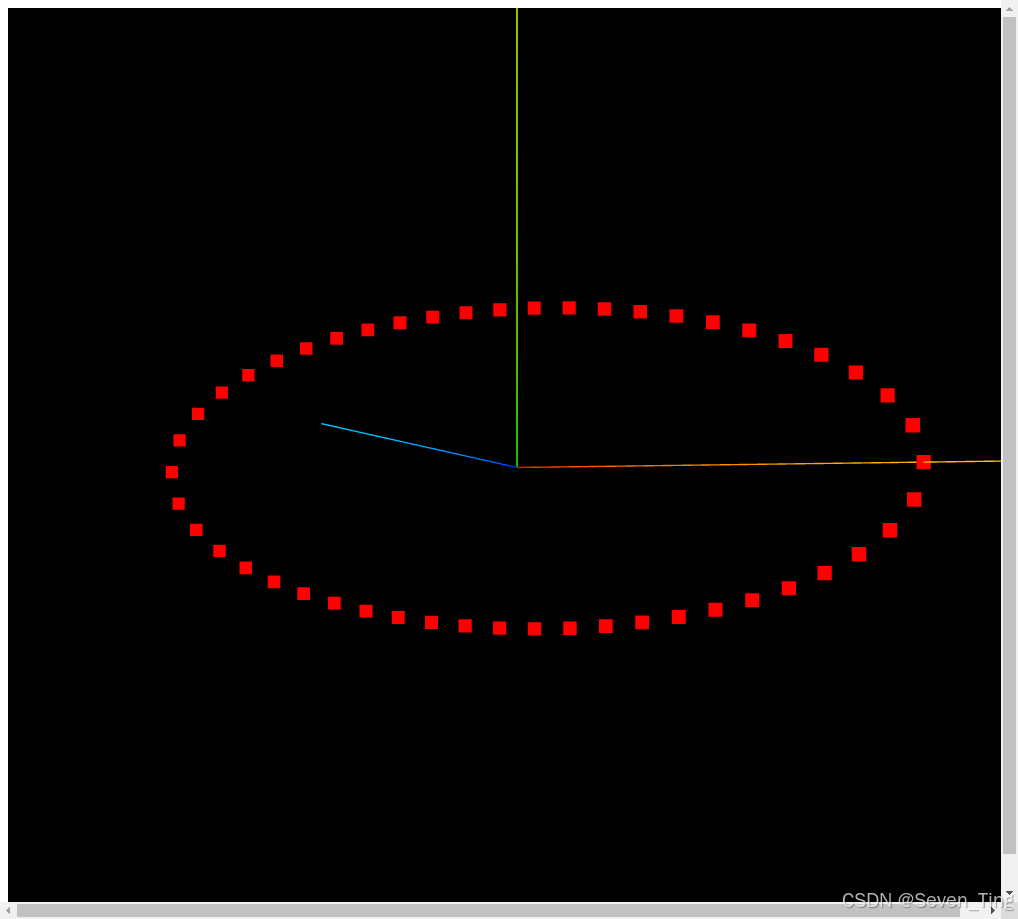
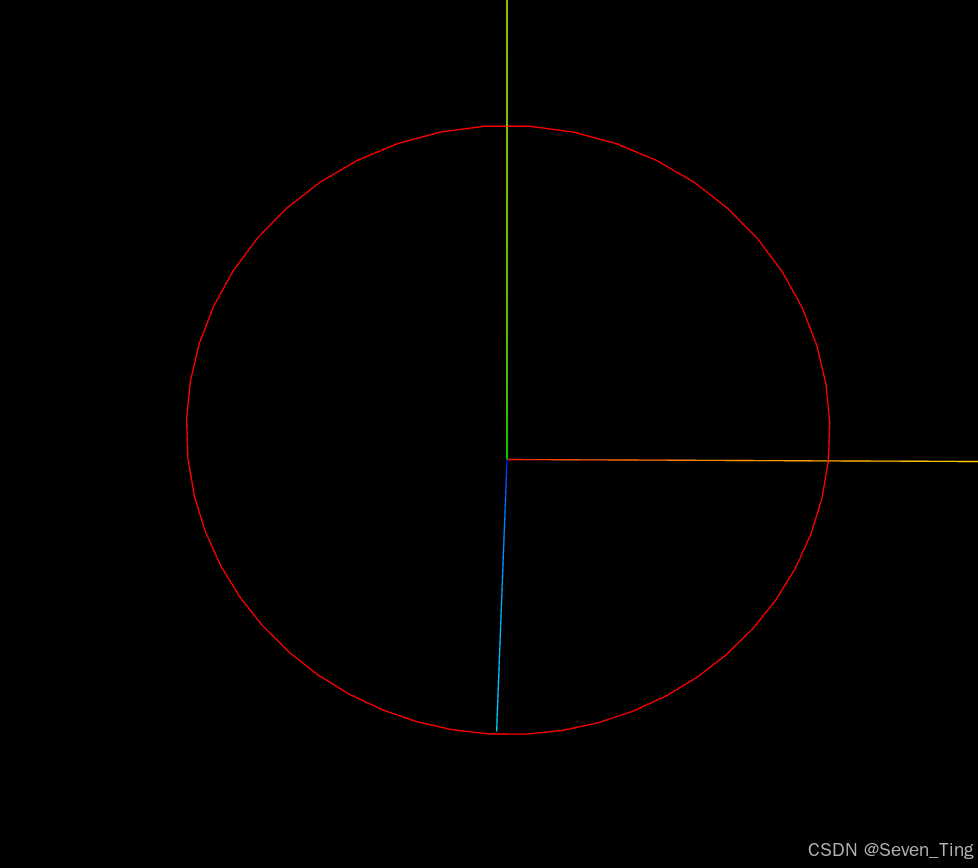
三、椭圆、圆
1、椭圆弧线EllipseCurve
EllipseCurve( aX, aY, xRadius,yRadius, aStartAngle, aEndAngle, aClockwise )
| 参数 | 含义 |
|---|---|
| aX, aY | 椭圆中心坐标 |
| xRadius | 椭圆x轴半径 |
| yRadius | 椭圆y轴半径 |
| aStartAngle | 弧线开始角度,从x轴正半轴开始,默认0,弧度单位 |
| aEndAngle | 弧线结束角度,从x轴正半轴算起,默认2 x Math.PI,弧度单位 |
| aClockwise | 是否顺时针绘制,默认值为false |
// 参数1和2表示椭圆中心坐标  参数3和4表示x和y方向半径
const arc = new THREE.EllipseCurve(0, 0, 100, 50);
椭圆曲线x和y方向半径相同,就是一个圆的效果。
// 参数1和2表示椭圆中心坐标  参数3和4表示x和y方向半径
const arc = new THREE.EllipseCurve(0, 0, 50, 50);
1.2、全部代码
import * as THREE from 'three';

const group = new THREE.Group();

const src = new THREE.EllipseCurve(0,0,50,50)
const pointsArr = src.getPoints(50)

const geometry = new THREE.BufferGeometry();
geometry.setFromPoints(pointsArr)

const material = new THREE.LineBasicMaterial({
    color:'red',
    size:10
})

const point = new THREE.LineLoop(geometry,material)

group.add(point)
export default group 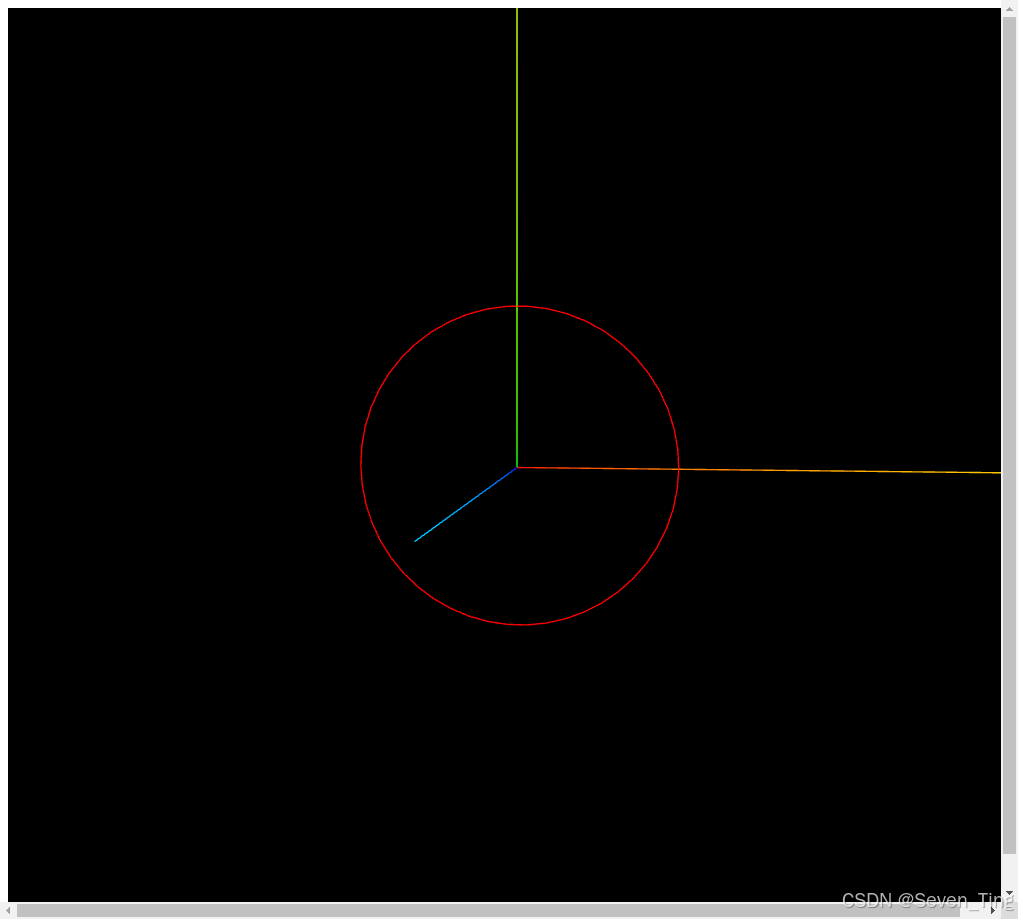
2、圆弧线ArcCurve
圆弧线ArcCurve的父类是椭圆弧线EllipseCurve,语法和椭圆弧线EllipseCurve相似,区别是参数3和参数4不同,椭圆需要定义xRadius和yRadius两个半径,圆只需要通过参数3定义半径aRadius即可。
//参数:0, 0圆弧坐标原点x,y  100:圆弧半径    0, 2 * Math.PI:圆弧起始角度
const arc = new THREE.ArcCurve(0, 0, 100, 0, 2 * Math.PI);
ArcCurve( aX, aY, aRadius, aStartAngle, aEndAngle, aClockwise )
| 参数 | 含义 |
|---|---|
| aX, aY | 圆心坐标 |
| aRadius | 圆弧半径 |
| aStartAngle | 弧线开始角度,从x轴正半轴开始,默认0,弧度单位 |
| aEndAngle | 弧线结束角度,从x轴正半轴算起,默认2 x Math.PI,弧度单位 |
| aClockwise | 是否顺时针绘制,默认值为false |
2.1、全部代码
import * as THREE from 'three';

const group = new THREE.Group();

const src = new THREE.ArcCurve(0, 0, 100, 0, 2 * Math.PI);
const pointsArr = src.getPoints(50)

const geometry = new THREE.BufferGeometry();
geometry.setFromPoints(pointsArr)

const material = new THREE.LineBasicMaterial({
    color: 'red',
    size: 10
})

const point = new THREE.LineLoop(geometry, material)

group.add(point)
export default group 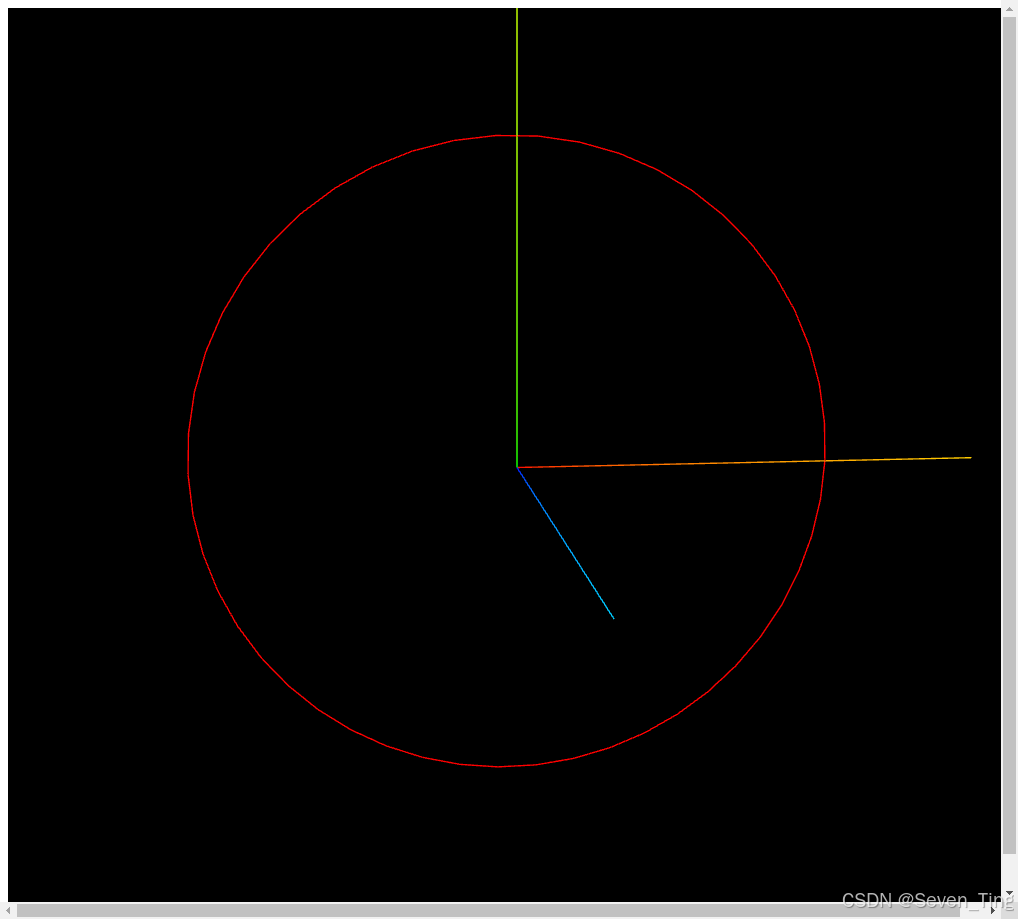
3、曲线精度
//曲线上取点,参数表示取点细分精度
const pointsArr = arc.getPoints(50); //分段数50,返回51个顶点
// const pointsArr = arc.getPoints(10);//取点数比较少,圆弧线不那么光滑

const pointsArr = arc.getPoints(10);//取点数比较少,圆弧线不那么光滑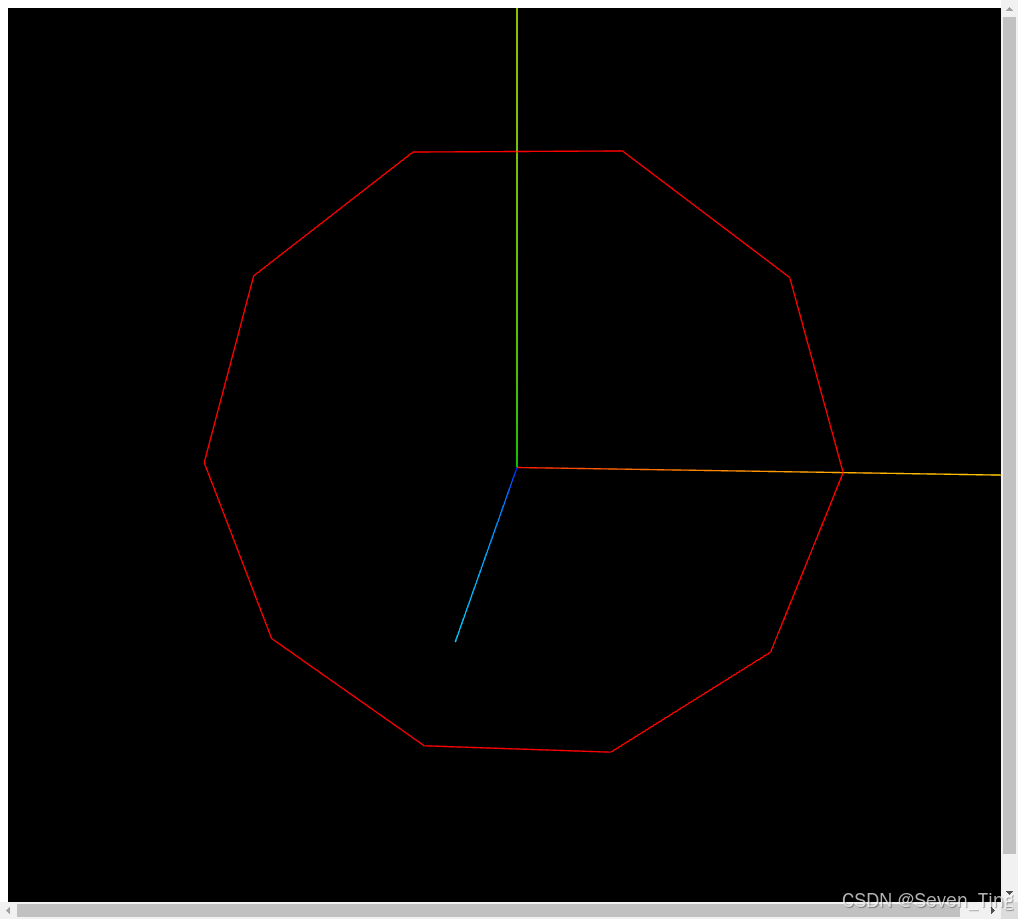
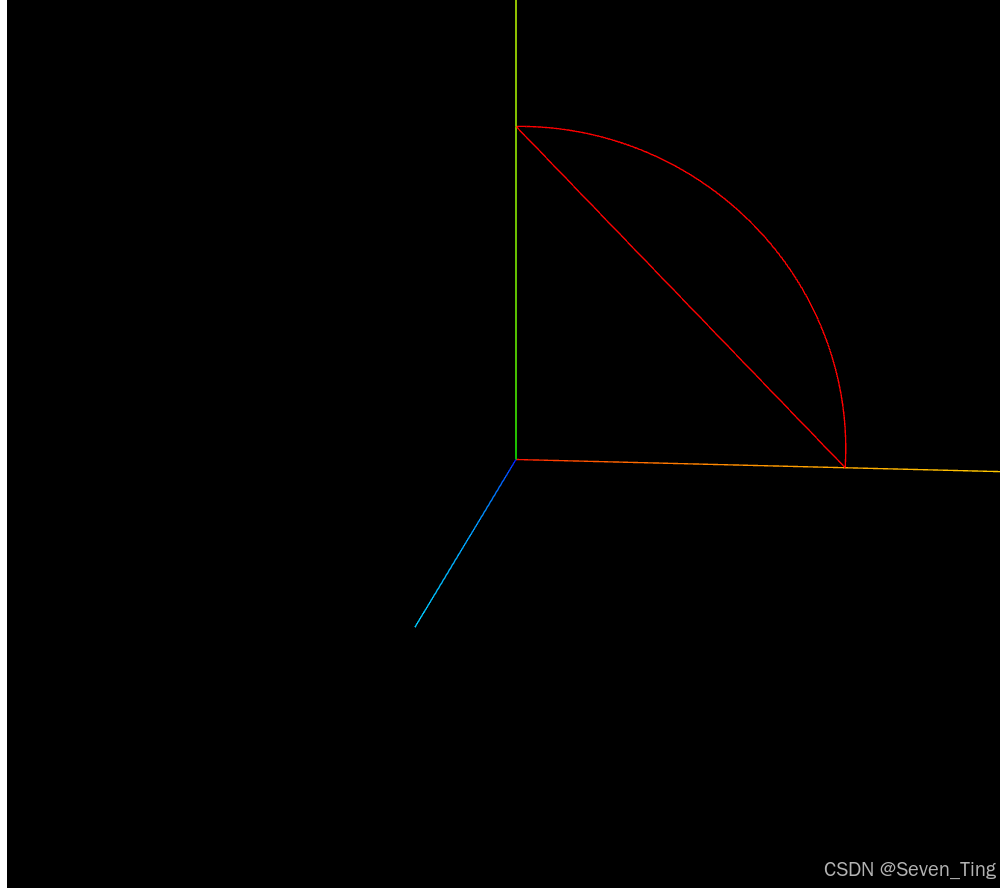
4、弧线起始角度
参数4和5表示圆弧线的起始角度,three.js默认是一个完整的圆弧,其实你也可以绘制一个半圆弧
// 完整圆弧
const arc = new THREE.ArcCurve(0, 0, 100, 0, 2 * Math.PI);
// 半圆弧
const arc = new THREE.ArcCurve(0, 0, 100, 0, Math.PI);

// 四分之一圆弧
const arc = new THREE.ArcCurve(0, 0, 100, 0, Math.PI/2);
5、顺逆时针
参数6默认false,逆时针绘制圆弧
const arc = new THREE.ArcCurve(0, 0, 100, 0, Math.PI/2,false);
参数6设置为true,顺时针绘制圆弧
const arc = new THREE.ArcCurve(0, 0, 100, 0, Math.PI/2,true);
四、样条曲线
对于一些不规则的曲线,很难用一个圆、椭圆或抛物线函数去描述,这时候,可以使用threejs提供的样条曲线或贝塞尔曲线去表达。
下面就给大家演示下样条曲线的使用特点。
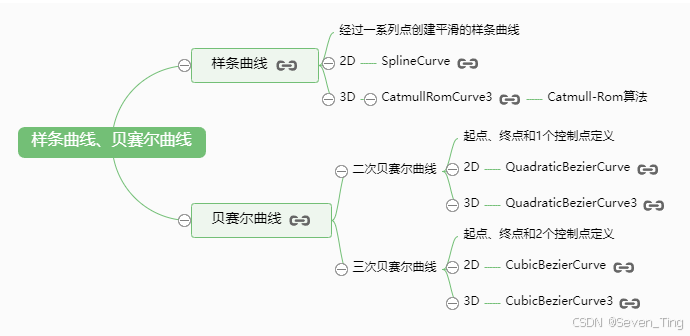
1、三维样条曲线CatmullRomCurve3
在三维空间中随意设置几个顶点坐标,然后作为三维样条曲线CatmullRomCurve3的参数,你就可以生成一条穿过这几个点的光滑曲线。
CatmullRomCurve3的参数是三维向量对象Vector3构成的数组。
// 三维向量Vector3创建一组顶点坐标
const arr = [
    new THREE.Vector3(-50, 20, 90),
    new THREE.Vector3(-10, 40, 40),
    new THREE.Vector3(0, 0, 0),
    new THREE.Vector3(60, -60, 0),
    new THREE.Vector3(70, 0, 80)
]
// 三维样条曲线
const curve = new THREE.CatmullRomCurve3(arr);
2、从曲线获取顶点坐标,绘制线条
从曲线获取一定量顶点数据,用于绘制线模型Line,一般来说获取顶点数量越多,渲染的曲线相对越光滑。
//曲线上获取点
const pointsArr = curve.getPoints(100);
const geometry = new THREE.BufferGeometry();
//读取坐标数据赋值给几何体顶点
geometry.setFromPoints(pointsArr);
// 线材质
const material = new THREE.LineBasicMaterial({
    color: 0x00fffff
});
// 线模型
const line = new THREE.Line(geometry, material);
3、点模型可视化曲线经过的点
点模型可视化曲线经过的点,验证样条曲线是否经过数数组arr表示的几个顶点坐标。
// 用点模型可视化样条曲线经过的顶点位置
const geometry2 = new THREE.BufferGeometry();
geometry2.setFromPoints(arr);
const material2 = new THREE.PointsMaterial({
    color: 0xff00ff,
    size: 10,
});
//点模型对象
const points = new THREE.Points(geometry2, material2);
4、全部代码
import * as THREE from 'three';

const group = new THREE.Group();

const arr = [
    new THREE.Vector3(-50, 20, 90),
    new THREE.Vector3(-10, 40, 40),
    new THREE.Vector3(0, 0, 0),
    new THREE.Vector3(60, -60, 0),
    new THREE.Vector3(70, 0, 80)
]

const curve = new THREE.CatmullRomCurve3(arr)

const pointArr = curve.getPoints(50);
const geometry = new THREE.BufferGeometry;
geometry.setFromPoints(pointArr)

const material = new THREE.LineBasicMaterial({
    color: 'red',
})

const Line = new THREE.Line(geometry, material)

const material2 =  new THREE.PointsMaterial({
    color: 'green',
    size: 10
})
const point = new THREE.Points(geometry, material2)
group.add(point,Line)
export default group 
5、2D样条曲线
CatmullRomCurve3是3D样条曲线API,曲线经过的点可以在3D空间中任何一个位置,二维样条曲线SplineCurve默认情况下就是在XOY平面生成一个平面的样条曲线。
SplineCurve的参数是二维向量对象Vector2构成的数组。
// 二维向量Vector2创建一组顶点坐标
const arr = [
    new THREE.Vector2(-100, 0),
    new THREE.Vector2(0, 30),
    new THREE.Vector2(100, 0),
];
// 二维样条曲线
const curve = new THREE.SplineCurve(arr);
6、全部代码
import * as THREE from 'three';

const group = new THREE.Group();

const arr = [
    new THREE.Vector2(-100, 0),
    new THREE.Vector2(0, 30),
    new THREE.Vector2(100, 0),
]

const curve = new THREE.SplineCurve(arr)

const pointArr = curve.getPoints(50);
const geometry = new THREE.BufferGeometry;
geometry.setFromPoints(pointArr)

const material = new THREE.LineBasicMaterial({
    color: 'red',
})

const Line = new THREE.Line(geometry, material)

const material2 =  new THREE.PointsMaterial({
    color: 'green',
    size: 10
})
const point = new THREE.Points(geometry, material2)
group.add(point,Line)
export default group 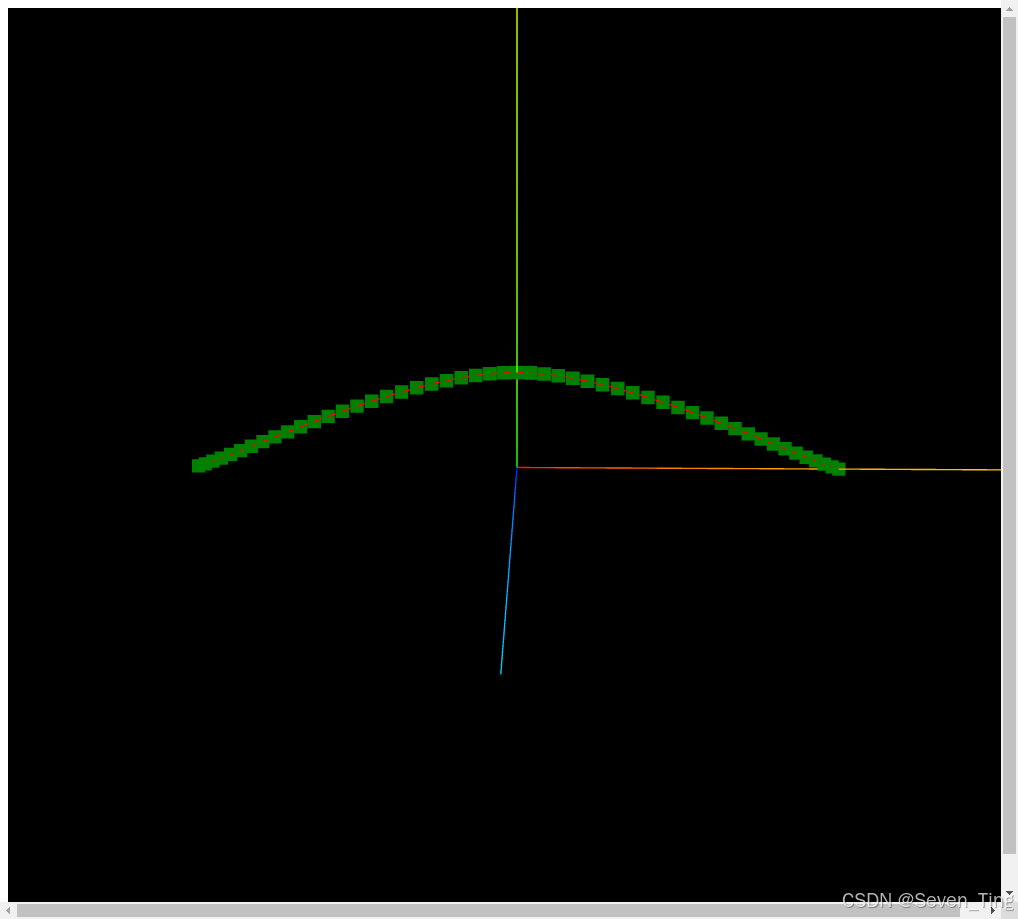
五、贝塞尔曲线
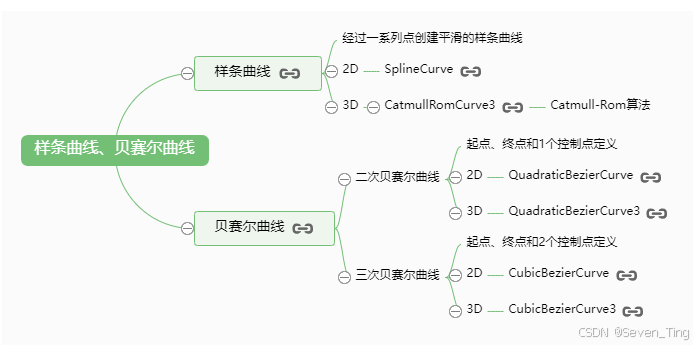
1、二维二次贝塞尔曲线QuadraticBezierCurve
// p1、p2、p3表示三个点坐标
// p1、p3是曲线起始点,p2是曲线的控制点
const p1 = new THREE.Vector2(-80, 0);
const p2 = new THREE.Vector2(20, 100);
const p3 = new THREE.Vector2(80, 0);
二维二次贝赛尔曲线QuadraticBezierCurve的前面三个参数是二维向量对象Vector2。
// 二维二次贝赛尔曲线
const curve = new THREE.QuadraticBezierCurve(p1, p2, p3);
曲线上获取一定数量点,线模型line渲染贝塞尔曲线。
const pointsArr = curve.getPoints(100); //曲线上获取点
const geometry = new THREE.BufferGeometry();
geometry.setFromPoints(pointsArr); //读取坐标数据赋值给几何体顶点
const material = new THREE.LineBasicMaterial({color: 0x00fffff});
const line = new THREE.Line(geometry, material);
2、观察贝塞尔曲线规则
可视化p1、p2、p3三个点的位置,并用直线相连接,便于观察贝塞尔曲线的绘制规律。
你可以发现贝塞尔曲线经过p1、p3两个点,但是不经过p2点,贝塞尔曲线与直线p12和p23相切。
const geometry2 = new THREE.BufferGeometry();
geometry2.setFromPoints([p1,p2,p3]);
const material2 = new THREE.PointsMaterial({
    color: 0xff00ff,
    size: 10,
});
//点模型对象
const points = new THREE.Points(geometry2, material2);
// 三个点构成的线条
const line2 = new THREE.Line(geometry2, new THREE.LineBasicMaterial());
3、全部代码
import * as THREE from 'three';

const group = new THREE.Group();

const p1 = new THREE.Vector2(-80,0);
const p2 = new THREE.Vector2(20,100)
const p3 = new THREE.Vector2(80,0)

const curve = new THREE.QuadraticBezierCurve(p1,p2,p3)

const pointsArr = curve.getPoints(50);
const geometry = new THREE.BufferGeometry();
geometry.setFromPoints(pointsArr) ;

const LineMaterial = new THREE.LineBasicMaterial({
    color:'red',
})
const Line = new THREE.Line(geometry,LineMaterial)

const geometry2 = new THREE.BufferGeometry();
geometry2.setFromPoints([p1,p2,p3])

const PointsMaterial = new THREE.PointsMaterial({
    color:'green',
    size:10
})

const Points = new THREE.Points(geometry2,PointsMaterial)
group.add(Line,Points)
export default group 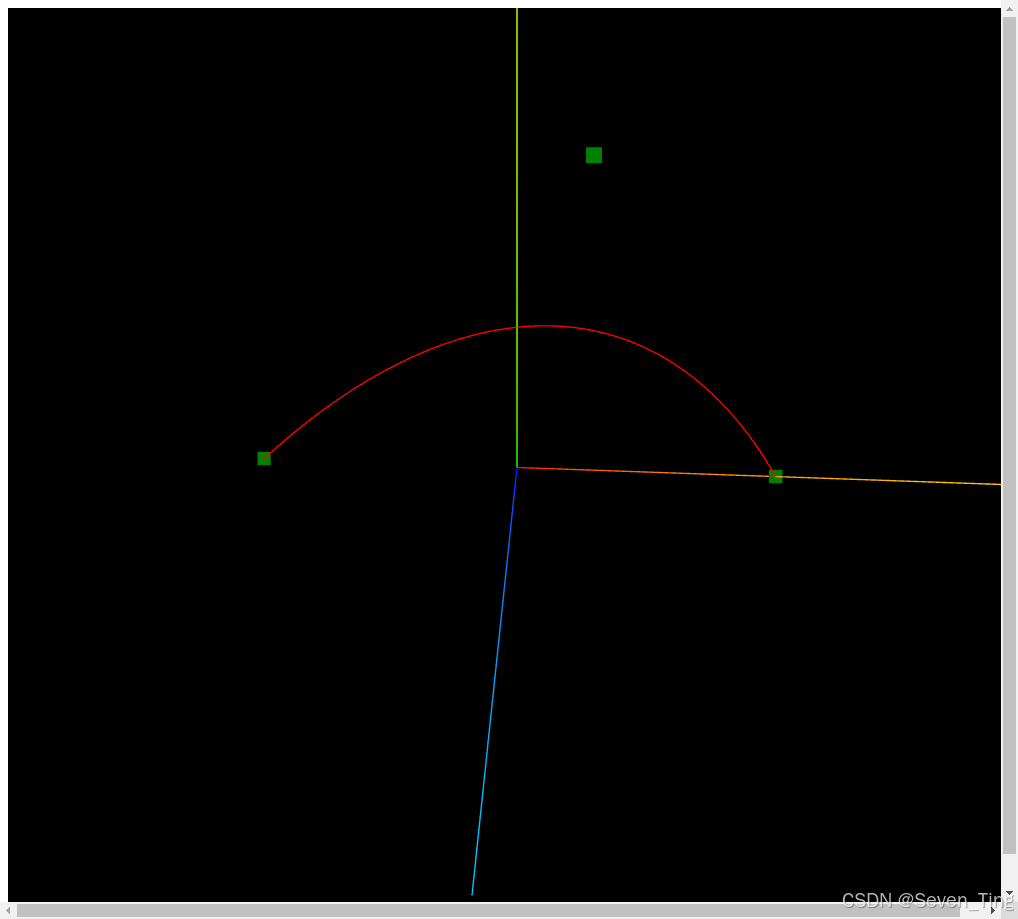
4、三维二次贝赛尔曲线QuadraticBezierCurve3
三维二次贝赛尔曲线QuadraticBezierCurve3与二维二次贝赛尔曲线QuadraticBezierCurve区别就是多了一个维度,参数是三维向量对象Vector3
// p1、p2、p3表示三个点坐标
const p1 = new THREE.Vector3(-80, 0, 0);
const p2 = new THREE.Vector3(20, 100, 0);
const p3 = new THREE.Vector3(80, 0, 100);
// 三维二次贝赛尔曲线
const curve = new THREE.QuadraticBezierCurve3(p1, p2, p3);
5、全部代码
import * as THREE from 'three';

const group = new THREE.Group();

const p1 = new THREE.Vector3(-80,0,0)
const p2 = new  THREE.Vector3(20,100,0)
const p3 = new THREE.Vector3(80,0,100)

const curve = new THREE.QuadraticBezierCurve3(p1,p2,p3)
const pointsArr = curve.getPoints(100);
const geometry = new THREE.BufferGeometry();
geometry.setFromPoints(pointsArr);
const lineMesh = new THREE.PointsMaterial({
    color:'red'
})
const MeshLine = new THREE.Line(geometry,lineMesh)

const geometry2 = new THREE.BufferGeometry()
geometry2.setFromPoints([p1,p2,p3])
const PointMesh = new THREE.PointsMaterial({
    color:'green',
    size:10
})
const MeshPoint = new THREE.Points(geometry2,PointMesh)

group.add(MeshPoint,MeshLine)
export default group 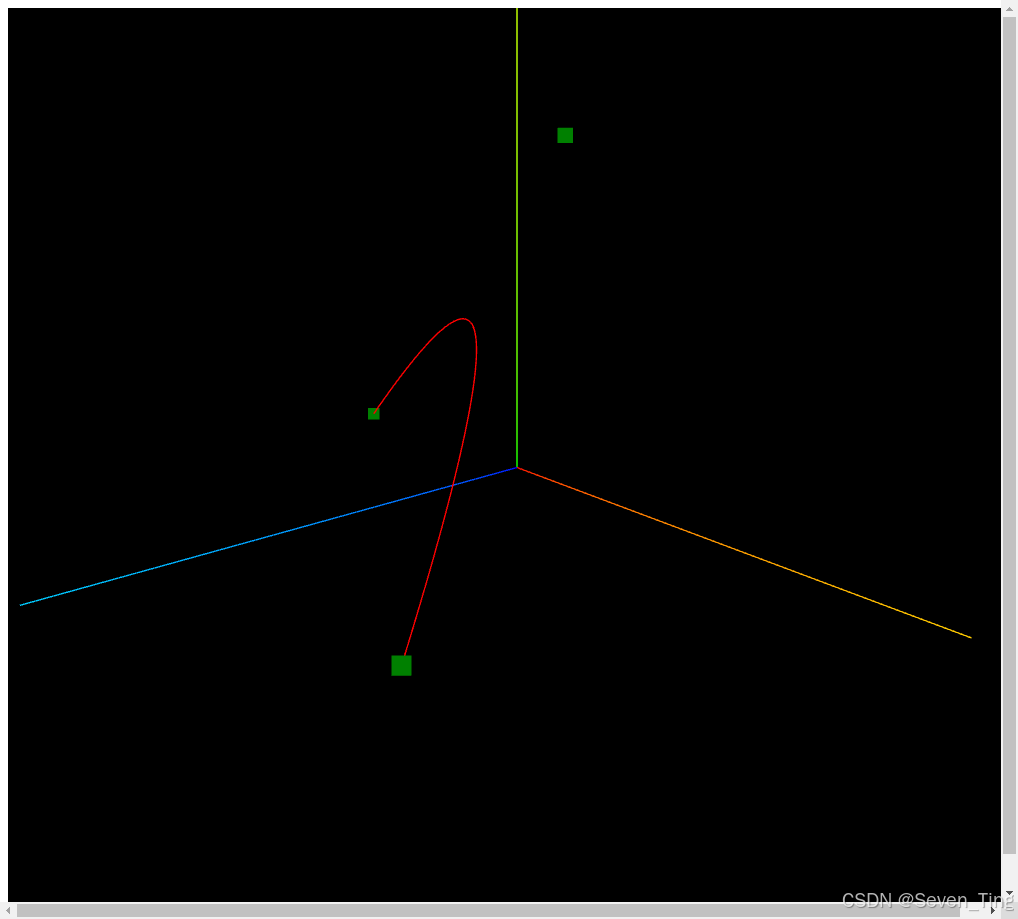
6、二维三次贝塞尔曲线CubicBezierCurve
二维三次贝塞尔曲线CubicBezierCurve与二维二次贝赛尔曲线QuadraticBezierCurve区别就是多了一个控制点。
// p1、p2、p3、p4表示4个点坐标
// p1、p4是曲线起始点,p2、p3是曲线的控制点
const p1 = new THREE.Vector2(-80, 0);
const p2 = new THREE.Vector2(-40, 50);
const p3 = new THREE.Vector2(50, 50);
const p4 = new THREE.Vector2(80, 0);

// 二维三次贝赛尔曲线
const curve = new THREE.CubicBezierCurve(p1, p2, p3, p4);
7、三维三次贝赛尔曲线CubicBezierCurve3
三维三次贝赛尔曲线CubicBezierCurve3与二维三次贝塞尔曲线CubicBezierCurve区别就是多了一个维度,参数是三维向量对象Vector3
const p1 = new THREE.Vector3(-80, 0, 0);
const p2 = new THREE.Vector3(-40, 50, 0);
const p3 = new THREE.Vector3(50, 50, 0);
const p4 = new THREE.Vector3(80, 0, 100);
// 三维三次贝赛尔曲线
const curve = new THREE.CubicBezierCurve3(p1, p2, p3, p4);
六、样条、贝塞尔曲线应用
比如你有一个项目,已知平面上两个点坐标(-100,-100)、(100,100),需要生成一条飞线轨迹线,要求轨迹线把这两个点作为起始点,曲线有一定的高度。
1、三维样条曲线CatmullRomCurve3实现飞线轨迹
下面曲线的起始点设置在XOZ平面上,y方向为曲线高度方向。
// p1、p3轨迹线起始点坐标
const p1 = new THREE.Vector3(-100, 0, -100);
const p3 = new THREE.Vector3(100, 0, 100);
// 计算p1和p3的中点坐标
const x2 = (p1.x + p3.x)/2;
const z2 = (p1.z + p3.z)/2;
const h = 50;
const p2 = new THREE.Vector3(x2, h, z2);

const arr = [p1, p2, p3];
// 三维样条曲线
const curve = new THREE.CatmullRomCurve3(arr);
1.1、全部代码
import * as THREE from 'three';

const group = new THREE.Group();

const p1 = new THREE.Vector3(-100, 0, -100);
const p3 = new THREE.Vector3(100, 0, 100);

const x2 = (p1.x + p3.x)/2;
const z2 = (p1.z + p3.z)/2;
const h = 50;
const p2 = new THREE.Vector3(x2, h, z2);
const arr = [p1, p2, p3];


const curve = new THREE.CatmullRomCurve3(arr)
const pointsArr = curve.getPoints(100);
const geometry = new THREE.BufferGeometry();
geometry.setFromPoints(pointsArr);
const lineMesh = new THREE.PointsMaterial({
    color:'red'
})
const MeshLine = new THREE.Line(geometry,lineMesh)

const geometry2 = new THREE.BufferGeometry()
geometry2.setFromPoints([p1,p2,p3])
const PointMesh = new THREE.PointsMaterial({
    color:'green',
    size:10
})
const MeshPoint = new THREE.Points(geometry2,PointMesh)

group.add(MeshPoint,MeshLine)
export default group 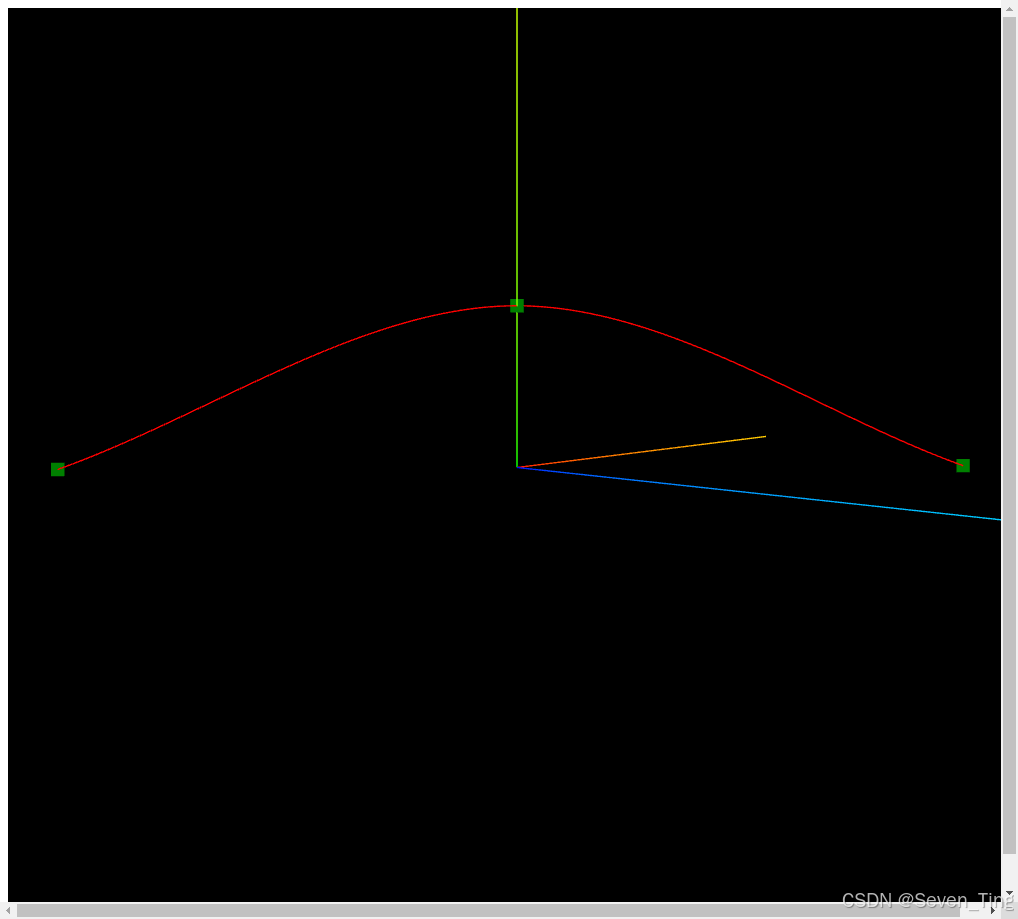
2、三维二次贝赛尔曲线QuadraticBezierCurve3实现飞线轨迹
下面曲线的起始点设置在XOZ平面上,y方向为曲线高度方向。
// p1、p3轨迹线起始点坐标
const p1 = new THREE.Vector3(-100, 0, -100);
const p3 = new THREE.Vector3(100, 0, 100);
// 计算p1和p3的中点坐标
const x2 = (p1.x + p3.x)/2;
const z2 = (p1.z + p3.z)/2;
const h = 100;
const p2 = new THREE.Vector3(x2, h, z2);
// 三维二次贝赛尔曲线
const curve = new THREE.QuadraticBezierCurve3(p1, p2, p3);
2.1、全部代码
import * as THREE from 'three';

const group = new THREE.Group();

const p1 = new THREE.Vector3(-100, 0, -100);
const p3 = new THREE.Vector3(100, 0, 100);

const x2 = (p1.x + p3.x)/2;
const z2 = (p1.z + p3.z)/2;
const h = 100;
const p2 = new THREE.Vector3(x2, h, z2);


const curve = new THREE.QuadraticBezierCurve3(p1, p2, p3)
const pointsArr = curve.getPoints(100);
const geometry = new THREE.BufferGeometry();
geometry.setFromPoints(pointsArr);
const lineMesh = new THREE.PointsMaterial({
    color:'red'
})
const MeshLine = new THREE.Line(geometry,lineMesh)

const geometry2 = new THREE.BufferGeometry()
geometry2.setFromPoints([p1,p2,p3])
const PointMesh = new THREE.PointsMaterial({
    color:'green',
    size:10
})
const MeshPoint = new THREE.Points(geometry2,PointMesh)

group.add(MeshPoint,MeshLine)
export default group 
七、组合曲线CurvePath拼接曲线
通过threejs组合曲线CurvePath对象,你可以把直线、圆弧、贝塞尔等线条拼接为一条曲线。
1、直线线段简介
three.js提供了3D直线LineCurve3和2D直线LineCurve。
3D直线线段LineCurve3,参数是表示x、y、z坐标的三维向量Vector3对象。
new THREE.LineCurve3(new THREE.Vector3(), new THREE.Vector3());
2D直线线段LineCurve,参数是表示x、y坐标的二维向量Vector2对象。
new THREE.LineCurve(new THREE.Vector2(), new THREE.Vector2());
2、整体思路CurvePath.curves
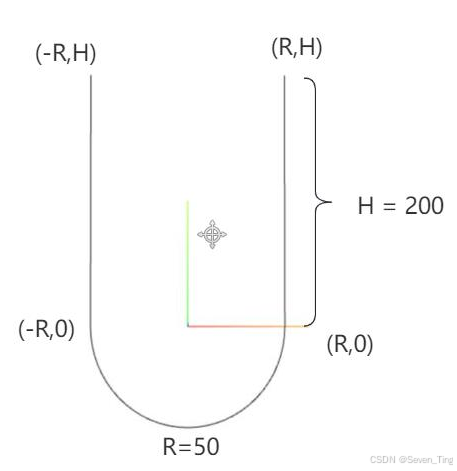
整体思路很简单,LineCurve创建两条直线线段,ArcCurve绘制一段圆弧线,然后把两段直线和一段圆弧线,通过组合曲线的CurvePath.curves属性拼接起来。
const R = 80;//圆弧半径
const H = 200;//直线部分高度
// 直线1
const line1 = new THREE.LineCurve(new THREE.Vector2(R, H), new THREE.Vector2(R, 0));
// 圆弧
const arc = new THREE.ArcCurve(0, 0, R, 0, Math.PI, true);
// 直线2
const line2 = new THREE.LineCurve(new THREE.Vector2(-R, 0), new THREE.Vector2(-R, H));

// CurvePath创建一个组合曲线对象
const CurvePath = new THREE.CurvePath();
//line1, arc, line2拼接出来一个U型轮廓曲线,注意顺序
CurvePath.curves.push(line1, arc, line2);
注意:曲线首尾相接
有一点要注意,组合曲线的坐标顺序和线条组合顺序不能随意写,总的方向,就是先确定整个曲线的起点,然后沿着一个方向依次绘制不同曲线,确保不同曲线首尾相接。
- 直线的起点是直线的第一个参数
- 圆弧线的起点,默认就是从x轴正半轴开始
const R = 80;//圆弧半径
const H = 200;//直线部分高度
// 直线1
const line1 = new THREE.LineCurve(new THREE.Vector2(R, H), new THREE.Vector2(R, 0));
// 圆弧
const arc = new THREE.ArcCurve(0, 0, R, 0, Math.PI, true);
// 直线2
const line2 = new THREE.LineCurve(new THREE.Vector2(-R, 0), new THREE.Vector2(-R, H));

// CurvePath创建一个组合曲线对象
const CurvePath = new THREE.CurvePath();
//line1, arc, line2拼接出来一个U型轮廓曲线,注意顺序
CurvePath.curves.push(line1, arc, line2);
3、组合曲线CurvePath取点
组合曲线CurvePath和它的父类Curve一样具有.getPoints()和.getSpacedPoints()取点方法
//组合曲线上获取点
const pointsArr = CurvePath.getPoints(16);
const geometry = new THREE.BufferGeometry();
geometry.setFromPoints(pointsArr); //读取坐标数据赋值给几何体顶点
4、点模型可视化组合曲线返回的顶点
执行.getPoints(),直线部分不会像曲线返回中间多余点,只需要起始点即可
// 执行.getPoints(),直线部分不会像曲线返回中间多余点,只需要起始点即可。
const pointsArr = CurvePath.getPoints(16); //曲线上获取点
const geometry = new THREE.BufferGeometry();
geometry.setFromPoints(pointsArr); //读取坐标数据赋值给几何体顶点

// 可视化curve.getPoints从曲线上获取的点坐标
const material2 = new THREE.PointsMaterial({
    color: 0xff00ff,
    size: 10,
});
//点模型对象
const points = new THREE.Points(geometry, material2);
4.1、全部代码
import * as THREE from 'three';

const group = new THREE.Group();

const R = 80;
const H = 200;

const Line1 = new THREE.LineCurve(new THREE.Vector2(R,H),new THREE.Vector2(R,0))
const arc = new THREE.ArcCurve(0,0,R,0,Math.PI,true);
const Line2 = new THREE.LineCurve(new THREE.Vector2(-R,0),new THREE.Vector2(-R,H));

const CurvePath = new THREE.CurvePath();
CurvePath.curves.push(Line1,arc,Line2)

const pointsArr = CurvePath.getPoints(16);
const geometry = new THREE.BufferGeometry();
geometry.setFromPoints(pointsArr);
const lineMesh = new THREE.LineBasicMaterial({
    color:'red'
})
const MeshLine = new THREE.Line(geometry,lineMesh)

const PointMesh = new THREE.PointsMaterial({
    color:'green',
    size:10
})
const MeshPoint = new THREE.Points(geometry,PointMesh)

group.add(MeshLine,MeshPoint)
export default group 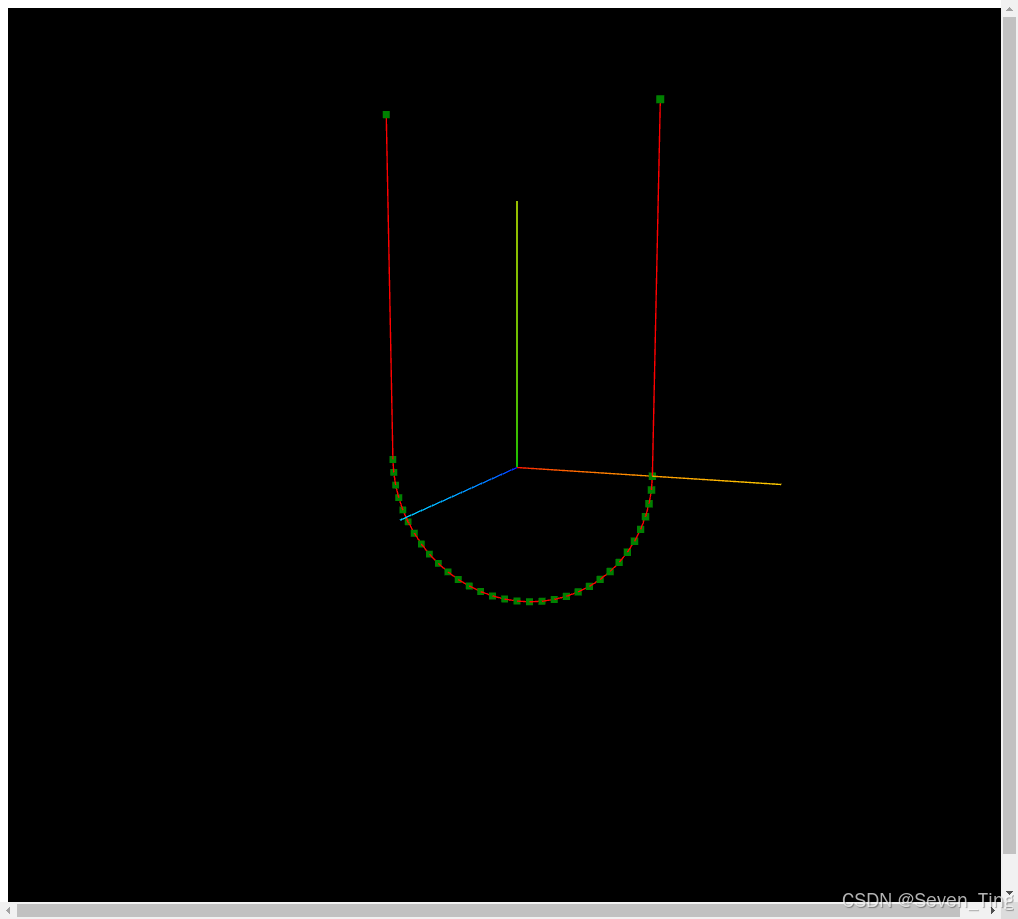
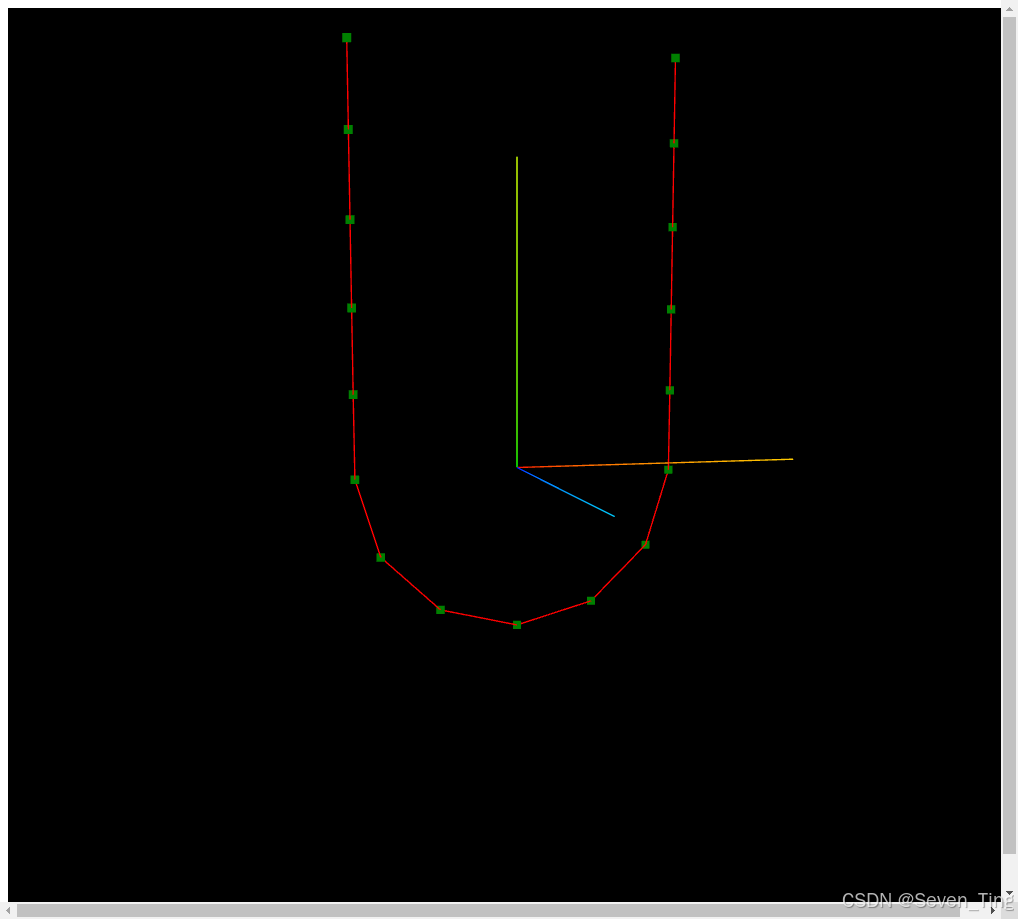
5、.getSpacedPoints()取点测试
复习前面知识,你可以通过测试曲线Curve方法.getSpacedPoints()从组合曲线获取点坐标。
这时候你会发现直线部分会按照等间距方式返回顶点数据,需要把.getSpacedPoints()的精度参数提升,圆弧部分才会更加圆滑。
const pointsArr = CurvePath.getSpacedPoints(16); //圆弧不够光滑
八、曲线路径管道TubeGeometry
1、管道TubeGeometry
管道TubeGeometry几何体的功能就是基于一个3D曲线路径,生成一个管道几何体。
构造函数格式:TubeGeometry(path, tubularSegments, radius, radiusSegments, closed)
| 参数 | 值 |
|---|---|
| path | 扫描路径,路径要用三维曲线 |
| tubularSegments | 路径方向细分数,默认64 |
| radius | 管道半径,默认1 |
| radiusSegments | 管道圆弧细分数,默认8 |
| closed | Boolean值,管道是否闭合 |
2、样条曲线生成圆管案例
// 三维样条曲线
const path = new THREE.CatmullRomCurve3([
    new THREE.Vector3(-50, 20, 90),
    new THREE.Vector3(-10, 40, 40),
    new THREE.Vector3(0, 0, 0),
    new THREE.Vector3(60, -60, 0),
    new THREE.Vector3(70, 0, 80)
]);

// path:路径   40:沿着轨迹细分数  2:管道半径   25:管道截面圆细分数
const geometry = new THREE.TubeGeometry(path, 40, 2, 25);
2.1、全部代码
import * as THREE from 'three';

const group = new THREE.Group();

const path = new THREE.CatmullRomCurve3([
    new THREE.Vector3(-50, 20, 90),
    new THREE.Vector3(-10, 40, 40),
    new THREE.Vector3(0, 0, 0),
    new THREE.Vector3(60, -60, 0),
    new THREE.Vector3(70, 0, 80)
])


const geometry = new THREE.TubeGeometry(path,40,2,25)
const lineMesh = new THREE.MeshLambertMaterial({
    color:'green',
    side:THREE.DoubleSide
})
const MeshLine = new THREE.Mesh(geometry,lineMesh)

group.add(MeshLine)
export default group 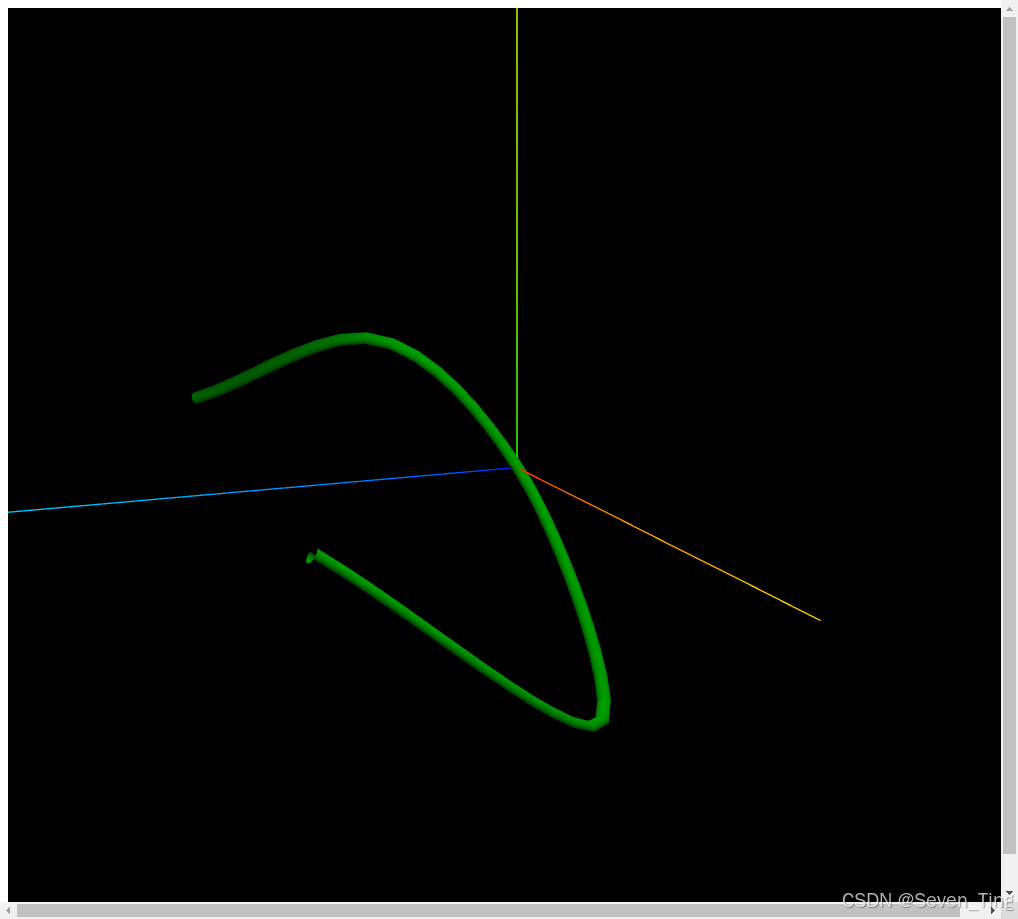
3、观察管道内壁
threejs默认只渲染mesh三角形的正面,如果想看到管道内壁,可以设置双面渲染THREE.DoubleSide。
const material = new THREE.MeshLambertMaterial({
    side:THREE.DoubleSide,//双面显示看到管道内壁
});
4、测试其他曲线
你也可以使用下面直线替换上面的样条曲线查看圆管生成效果
// LineCurve3创建直线段路径
const path = new THREE.LineCurve3(new THREE.Vector3(0, 100, 0), new THREE.Vector3(0, 0, 0));
4.1、全部代码
import * as THREE from 'three';

const group = new THREE.Group();

const path = new THREE.LineCurve3(new THREE.Vector3(0, 100, 0), new THREE.Vector3(0, 0, 0))

const geometry = new THREE.TubeGeometry(path, 40, 2, 25)
const lineMesh = new THREE.MeshLambertMaterial({
    color: 'green',
    side: THREE.DoubleSide
})
const MeshLine = new THREE.Mesh(geometry, lineMesh)

group.add(MeshLine)
export default group 
5、三维二次贝塞尔曲线生成管道几何体
// p1、p2、p3表示三个点坐标
const p1 = new THREE.Vector3(-80, 0, 0);
const p2 = new THREE.Vector3(20, 100, 0);
const p3 = new THREE.Vector3(80, 0, 100);
// 三维二次贝赛尔曲线
const path = new THREE.QuadraticBezierCurve3(p1, p2, p3);
5.1、全部代码
import * as THREE from 'three';

const group = new THREE.Group();

const p1 = new THREE.Vector3(-80, 0, 0);
const p2 = new THREE.Vector3(20, 100, 0);
const p3 = new THREE.Vector3(80, 0, 100);

const path = new THREE.QuadraticBezierCurve3(p1, p2, p3)

const geometry = new THREE.TubeGeometry(path, 100, 2, 25)
const lineMesh = new THREE.MeshLambertMaterial({
    color: 'green',
    side: THREE.DoubleSide
})
const MeshLine = new THREE.Mesh(geometry, lineMesh)

group.add(MeshLine)
export default group 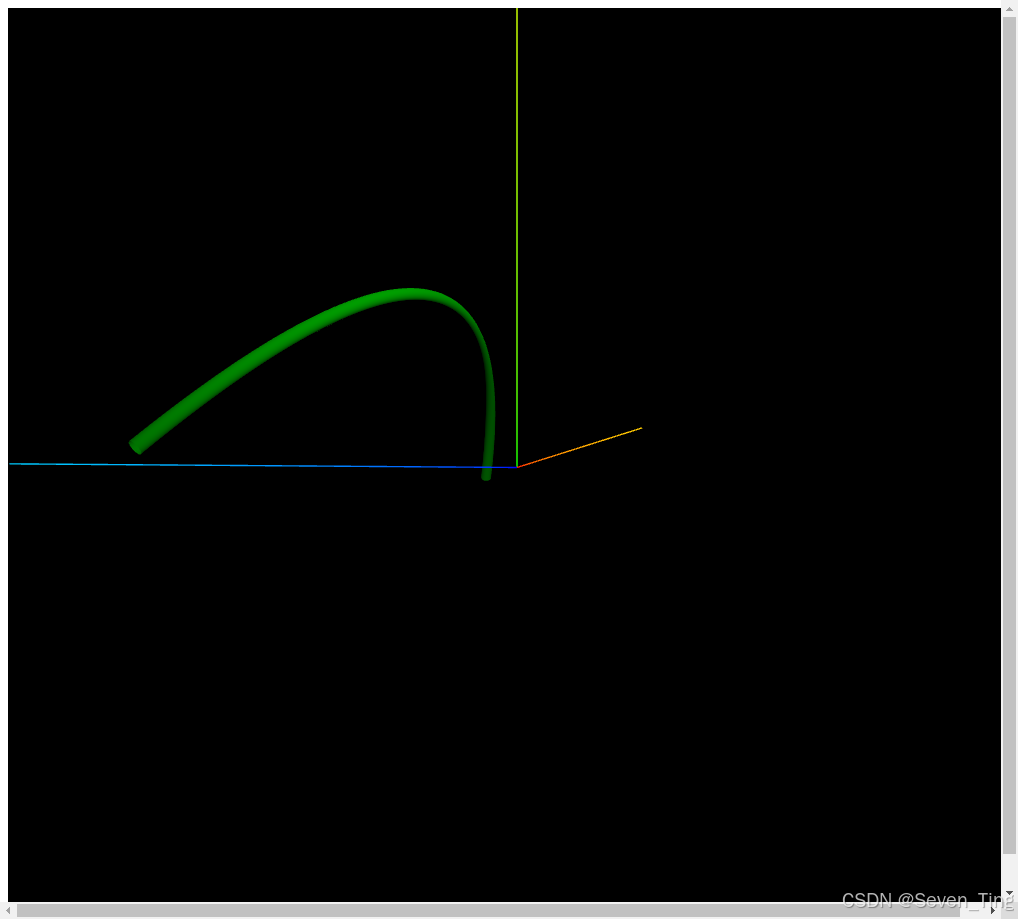
6、CurvePath多段路径生成管道案例
CurvePath组合曲线,也可以作为TubeGeometry的参数1,用于生成管道几何体。
下面组合曲线CurvePath是由一段三维贝塞尔曲线QuadraticBezierCurve3加上两段3D直线LineCurve3拼接组成。
// 创建多段线条的顶点数据
const p1 = new THREE.Vector3(0, 0,100)
const p2 = new THREE.Vector3(0, 0,30);
const p3 = new THREE.Vector3(0, 0,0);
const p4 = new THREE.Vector3(30, 0, 0);
const p5 = new THREE.Vector3(100, 0, 0);
// 1. 3D直线线段
const line1 = new THREE.LineCurve3(p1, p2);
// 2. 三维二次贝塞尔曲线
const curve = new THREE.QuadraticBezierCurve3(p2, p3, p4);
// 3. 3D直线线段
const line2 = new THREE.LineCurve3(p4, p5);

const CurvePath = new THREE.CurvePath();
// 三条线拼接为一条曲线
CurvePath.curves.push(line1, curve, line2);

// CurvePath:路径   40:沿着轨迹细分数  2:管道半径   25:管道截面圆细分数
const geometry = new THREE.TubeGeometry(CurvePath, 50, 2, 25);
6.1、全部代码
import * as THREE from 'three';

const group = new THREE.Group();

const p1 = new THREE.Vector3(0, 0,100)
const p2 = new THREE.Vector3(0, 0,30);
const p3 = new THREE.Vector3(0, 0,0);
const p4 = new THREE.Vector3(30, 0, 0);
const p5 = new THREE.Vector3(100, 0, 0);

const line1 = new THREE.LineCurve3(p1,p2)
const line2 = new THREE.QuadraticBezierCurve3(p2,p3,p4)
const line3 = new THREE.LineCurve3(p4,p5)


const CurvePath = new THREE.CurvePath()
CurvePath.curves.push(line1,line2,line3)

const geometry = new THREE.TubeGeometry(CurvePath,40,10,10)
const lineMesh = new THREE.MeshLambertMaterial({
    color: 'green',
    side: THREE.DoubleSide
})
const MeshLine = new THREE.Mesh(geometry, lineMesh)

group.add(MeshLine)
export default group 
九、旋转成型LatheGeometry
生活中有很多的几何体具备旋转特征, three.js提供了一个类LatheGeometry(), LatheGeometry可以利用一个2D轮廓,经过旋转变换生成一个3D的几何体曲面。
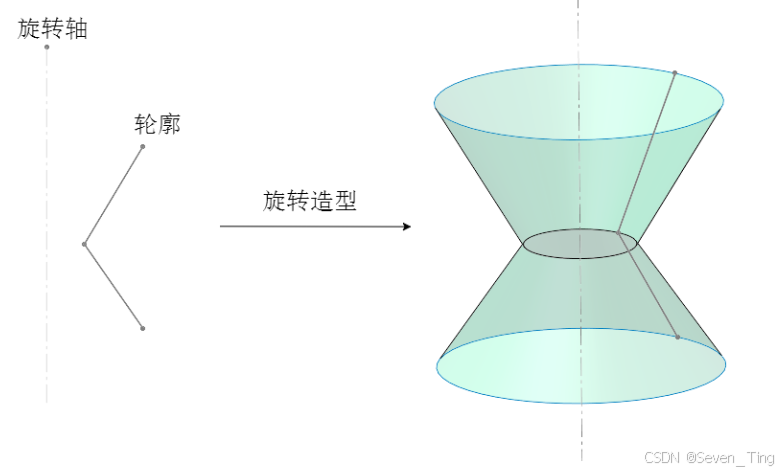
1、旋转LatheGeometry案例
格式:LatheGeometry(points, segments, phiStart, phiLength)
| 参数 | 值 |
|---|---|
| points | Vector2表示的坐标数据组成的数组 |
| segments | 圆周方向细分数,默认12 |
| phiStart | 开始角度,默认0 |
| phiLength | 旋转角度,默认2π |
-
LatheGeometry类第一个参数就是旋转轮廓,旋转轮廓使用多个二维向量Vector2表示的xy坐标去描述。 -
LatheGeometry的旋转轮廓默认绕y轴旋转生成曲面几何体。
// Vector2表示的三个点坐标,三个点构成的轮廓相当于两端直线相连接
const pointsArr = [
    new THREE.Vector2(50, 60),
    new THREE.Vector2(25, 0),
    new THREE.Vector2(50, -60)
];
// LatheGeometry:pointsArr轮廓绕y轴旋转生成几何体曲面
// pointsArr:旋转几何体的旋转轮廓形状
const geometry = new THREE.LatheGeometry(pointsArr);
1.1、全部代码
import * as THREE from 'three';

const group = new THREE.Group();

const pointsArr = [
    new THREE.Vector2(50, 60),
    new THREE.Vector2(25, 0),
    new THREE.Vector2(50, -60)
]

const geometry = new THREE.LatheGeometry(pointsArr)
const lineMesh = new THREE.MeshLambertMaterial({
    color: 'green',
    side: THREE.DoubleSide
})
const MeshLine = new THREE.Mesh(geometry, lineMesh)

group.add(MeshLine)
export default group 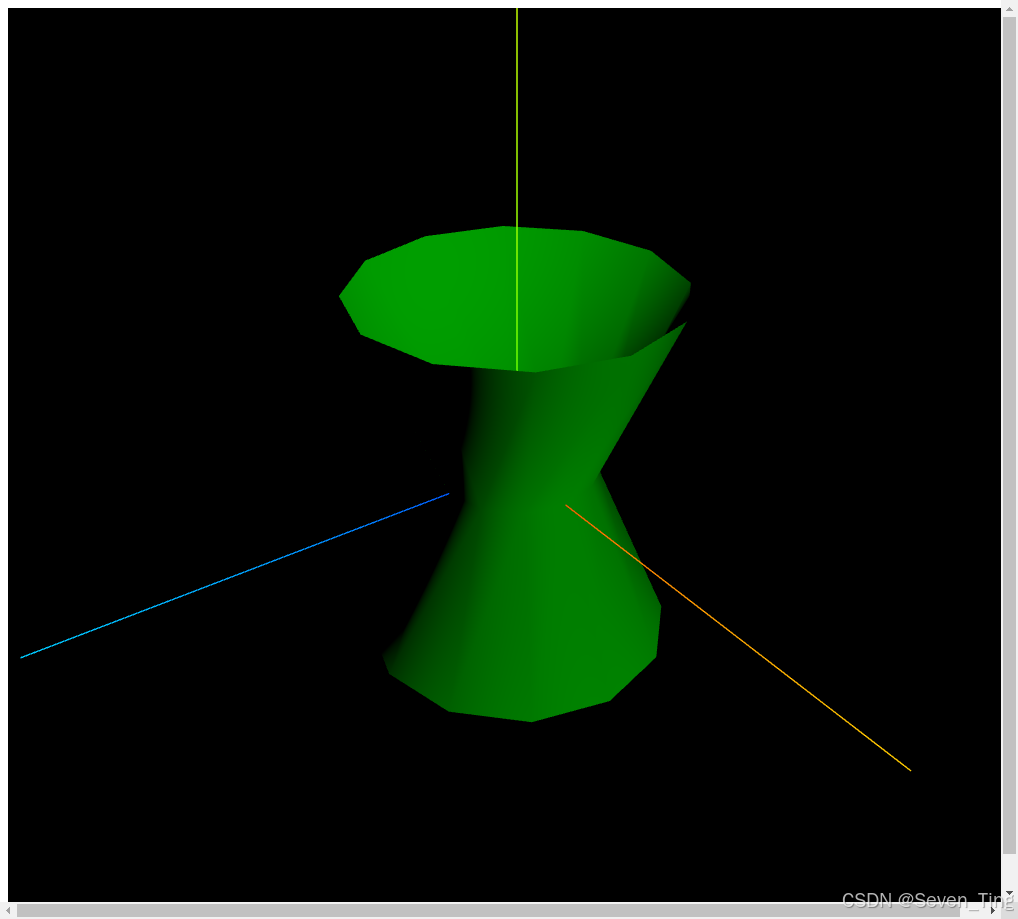
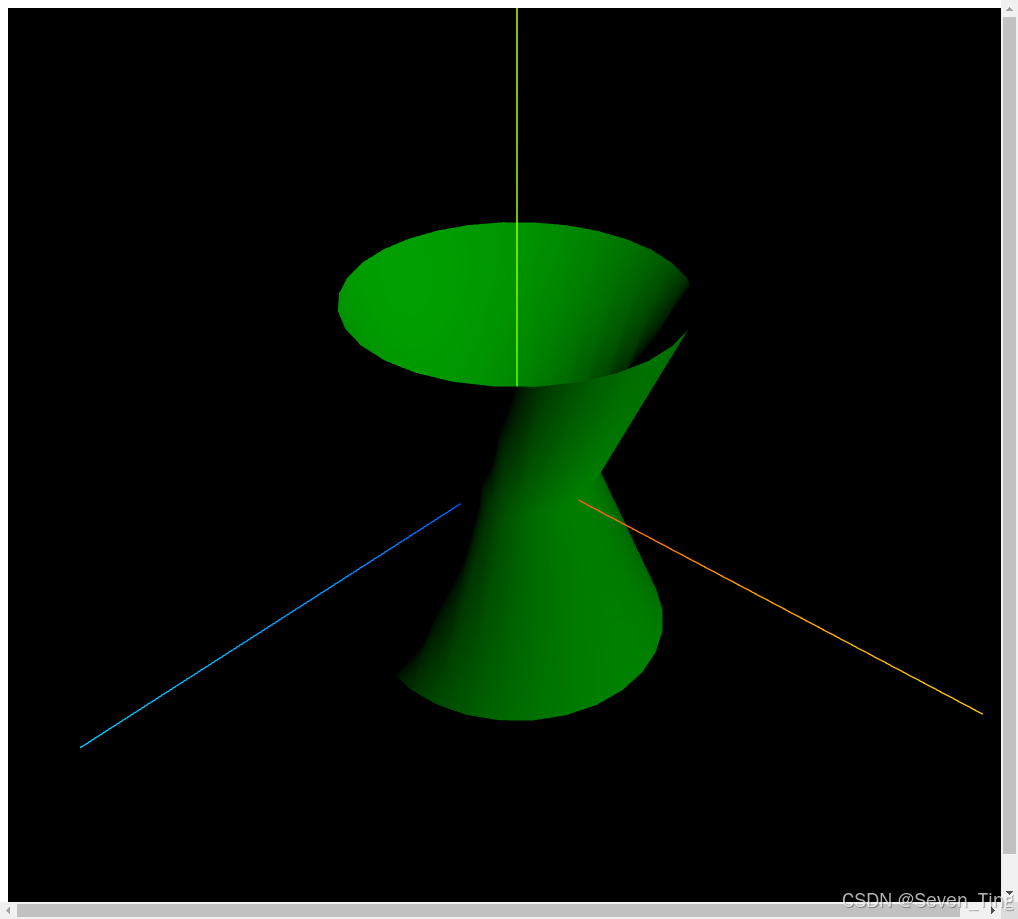
2、旋转细分精度
// 30:旋转圆周方向几何体细分精度
const geometry = new THREE.LatheGeometry(pointsArr, 30);
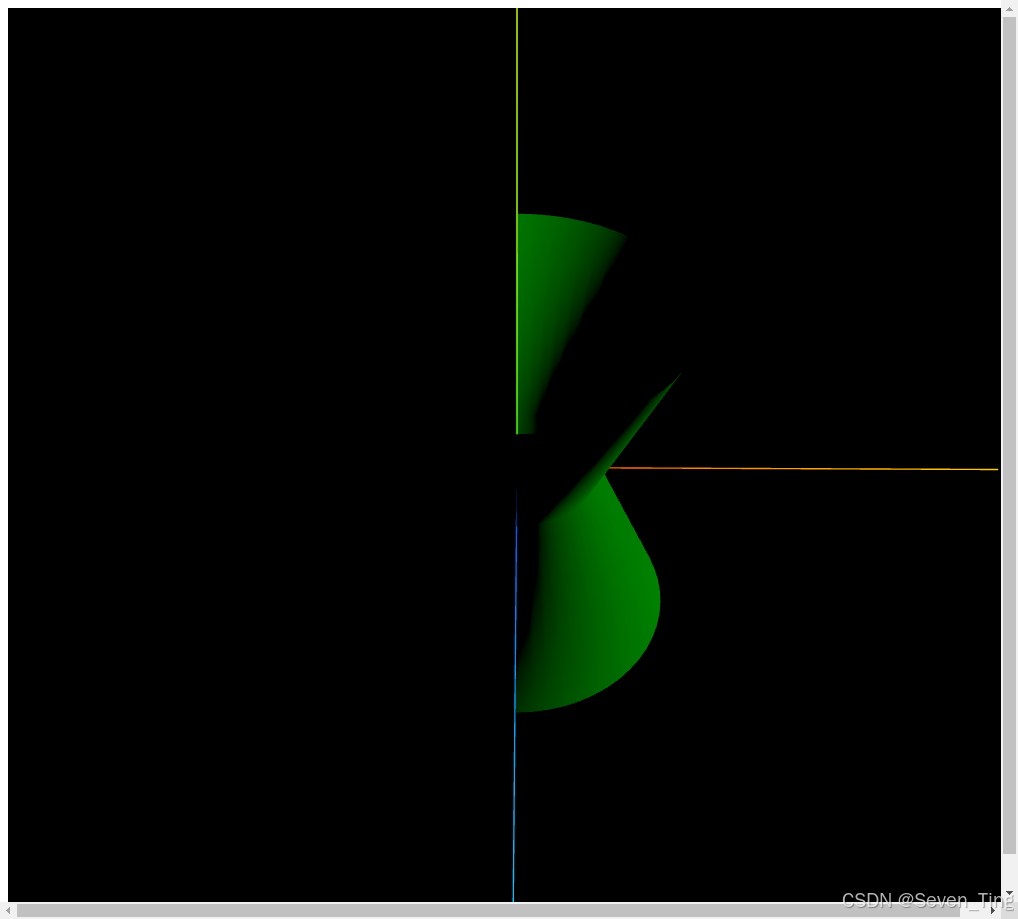
3、旋转角度
// 0, Math.PI:旋转的开始角度和结束角度
const geometry = new THREE.LatheGeometry(pointsArr, 30,0, Math.PI);
4、曲线生成旋转轮廓
通过二维样条曲线SplineCurve生成一个光滑的曲线旋转轮廓
// 通过三个点定义一个二维样条曲线
const curve = new THREE.SplineCurve([
    new THREE.Vector2(50, 60),
    new THREE.Vector2(25, 0),
    new THREE.Vector2(50, -60)
]);
//曲线上获取点,作为旋转几何体的旋转轮廓
const pointsArr = curve.getPoints(50);
console.log('旋转轮廓数据',pointsArr);
// LatheGeometry:pointsArr轮廓绕y轴旋转生成几何体曲面
const geometry = new THREE.LatheGeometry(pointsArr, 30);
4.1、全部代码
import * as THREE from 'three';

const group = new THREE.Group();

const pointsArr = [
    new THREE.Vector2(50, 60),
    new THREE.Vector2(25, 0),
    new THREE.Vector2(50, -60)
]

const curve = new THREE.SplineCurve(pointsArr)


const geometry = new THREE.LatheGeometry(curve.getPoints(50),30,0)
const lineMesh = new THREE.MeshLambertMaterial({
    color: 'green',
    side: THREE.DoubleSide
})
const MeshLine = new THREE.Mesh(geometry, lineMesh)

group.add(MeshLine)
export default group 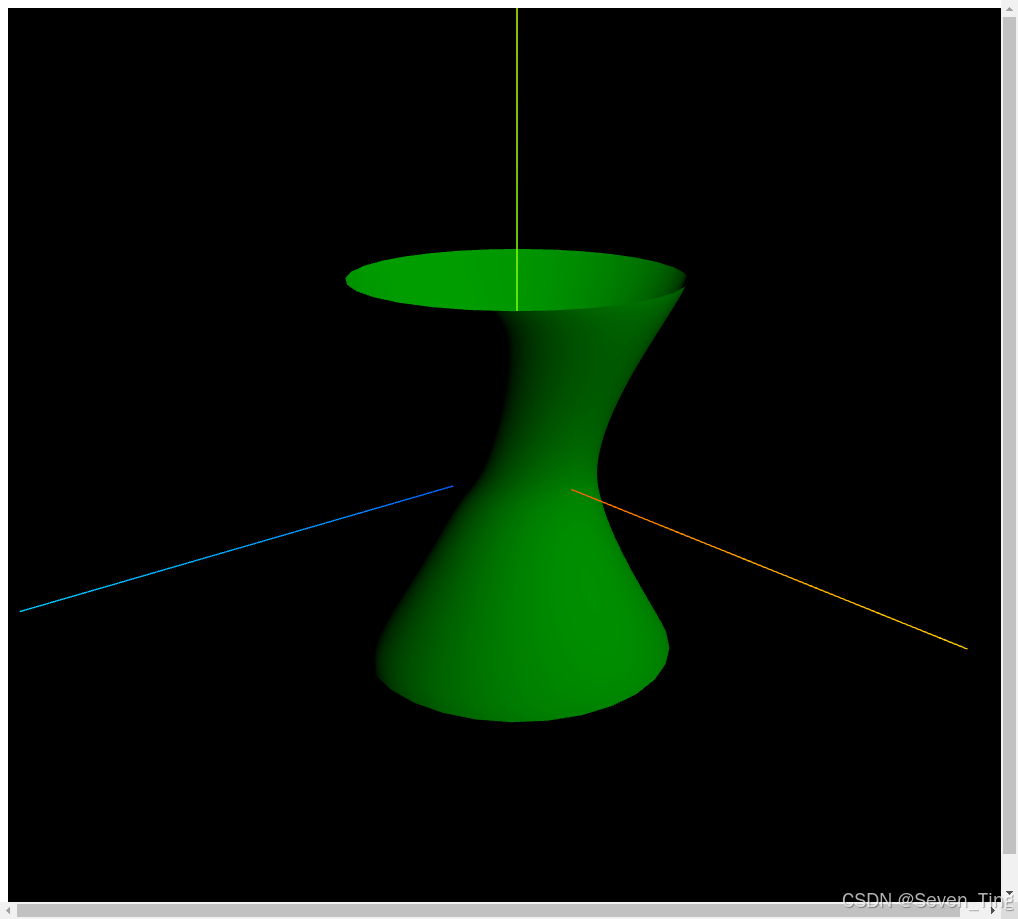
十、 轮廓填充ShapeGeometry
有些时候已知一个多边形的外轮廓坐标,想通过这些外轮廓坐标生成一个多边形几何体平面,这时候你可以借助threejs提供的轮廓填充ShapeGeometry几何体实现
1、多边形轮廓Shape
通过下面代码定义了5个点坐标,构成一个五边形区域,注意顺序问题,随意选择一个点作为起点都行,然后按照顺时针或逆时针依次写下点的坐标。
// 一组二维向量表示一个多边形轮廓坐标
const pointsArr = [
    new THREE.Vector2(-50, -50),
    new THREE.Vector2(-60, 0),
    new THREE.Vector2(0, 50),
    new THREE.Vector2(60, 0),
    new THREE.Vector2(50, -50),
]
这一组二维顶点坐标作为Shape的参数构成一个多边形轮廓。
// Shape表示一个平面多边形轮廓,参数是二维向量构成的数组pointsArr
const shape = new THREE.Shape(pointsArr);
2、轮廓填充几何体ShapeGeometry
把五边形轮廓Shape作为ShapeGeometry的参数,形成一个多边形平面几何体。
const geometry = new THREE.ShapeGeometry(shape);2.1、全部代码
import * as THREE from 'three';

const group = new THREE.Group();

const pointsArr = [
    new THREE.Vector2(-50, -50),
    new THREE.Vector2(-60, 0),
    new THREE.Vector2(0, 50),
    new THREE.Vector2(60, 0),
    new THREE.Vector2(50, -50),
]

const shape = new THREE.Shape(pointsArr)

const geometry = new THREE.ShapeGeometry(shape)

const lineMesh = new THREE.MeshBasicMaterial({
    color: 'green',
    side: THREE.DoubleSide
})
const MeshLine = new THREE.Mesh(geometry, lineMesh)

group.add(MeshLine)
export default group 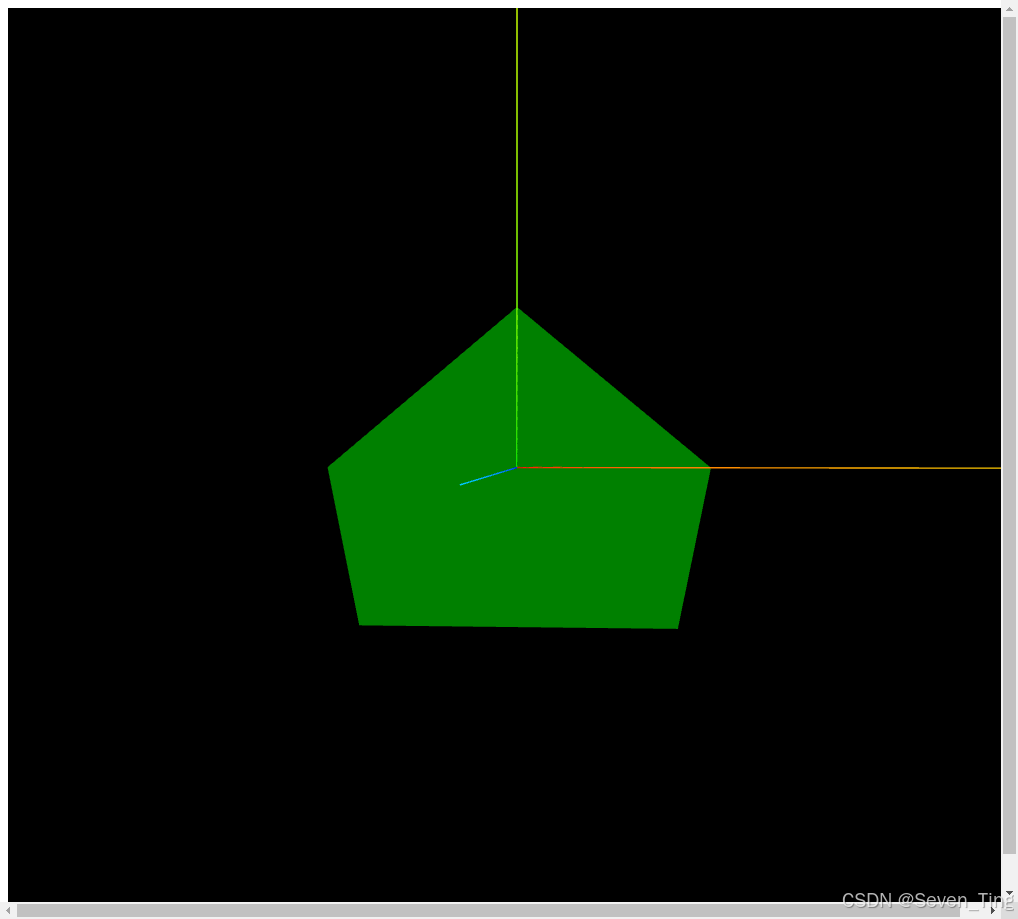
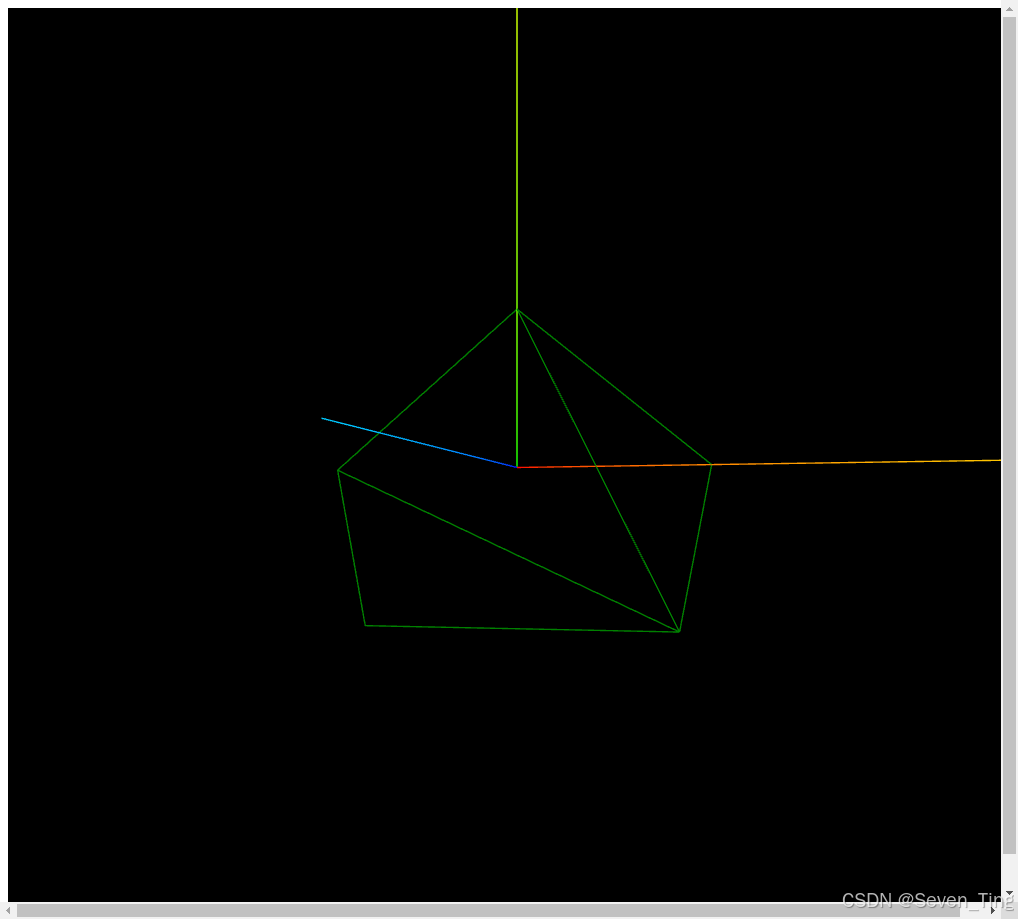
2、查看ShapeGeometry生成的三角形
ShapeGeometry形成一个多边形平面几何体,本质上就是根据轮廓坐标计算出一系列三角形面填充多边形,关于三角形的概念可以回一下章节2关于三角形 (opens new window)概念的讲解。有了ShapeGeometry,计算三角形的算法就不用自己写了。
const material = new THREE.MeshLambertMaterial({
    wireframe:true,
}); 
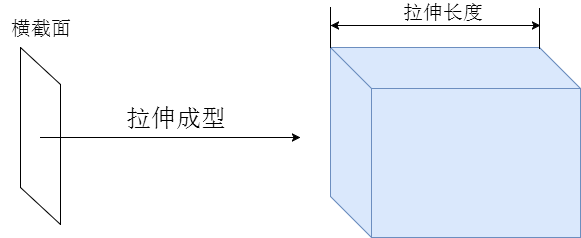
十一、拉伸ExtrudeGeometry
拉伸几何体ExtrudeGeometry和上节课讲到的轮廓填充几何体ShapeGeometry一样,都是基于一个基础的平面轮廓Shape进行变换,生成一个几何体。
查看案例源码,你可以看到ExtrudeGeometry的一个拉伸变换案例。
1、定义一个Shape轮廓
使用拉伸扫描ExtrudeGeometry和轮廓填充ShapeGeometry一样,需要首先定义一个用于拉伸或扫描的平面轮廓Shape。
多边形上随意选择一个点,作为起点,也就是Shape的第一个坐标,然后按照逆时针或顺时针方向依次书写坐标。
// Shape表示一个平面多边形轮廓
const shape = new THREE.Shape([
    // 按照特定顺序,依次书写多边形顶点坐标
    new THREE.Vector2(-50, -50), //多边形起点
    new THREE.Vector2(-50, 50),
    new THREE.Vector2(50, 50),
    new THREE.Vector2(50, -50),
]);
2、拉伸成型
//拉伸造型
const geometry = new THREE.ExtrudeGeometry(
    shape, //二维轮廓
    {
        depth: 20, //拉伸长度
    }
);
2.1、全部代码
import * as THREE from 'three';

const group = new THREE.Group();

const shape = new THREE.Shape([
    new THREE.Vector2(-50, -50), //多边形起点
    new THREE.Vector2(-50, 50),
    new THREE.Vector2(50, 50),
    new THREE.Vector2(50, -50),
])
const geometry = new THREE.ExtrudeGeometry(shape, {
    depth: 20
})

const lineMesh = new THREE.MeshLambertMaterial({
    color: 'green',
    side: THREE.DoubleSide,
})
const MeshLine = new THREE.Mesh(geometry, lineMesh)

group.add(MeshLine)
export default group 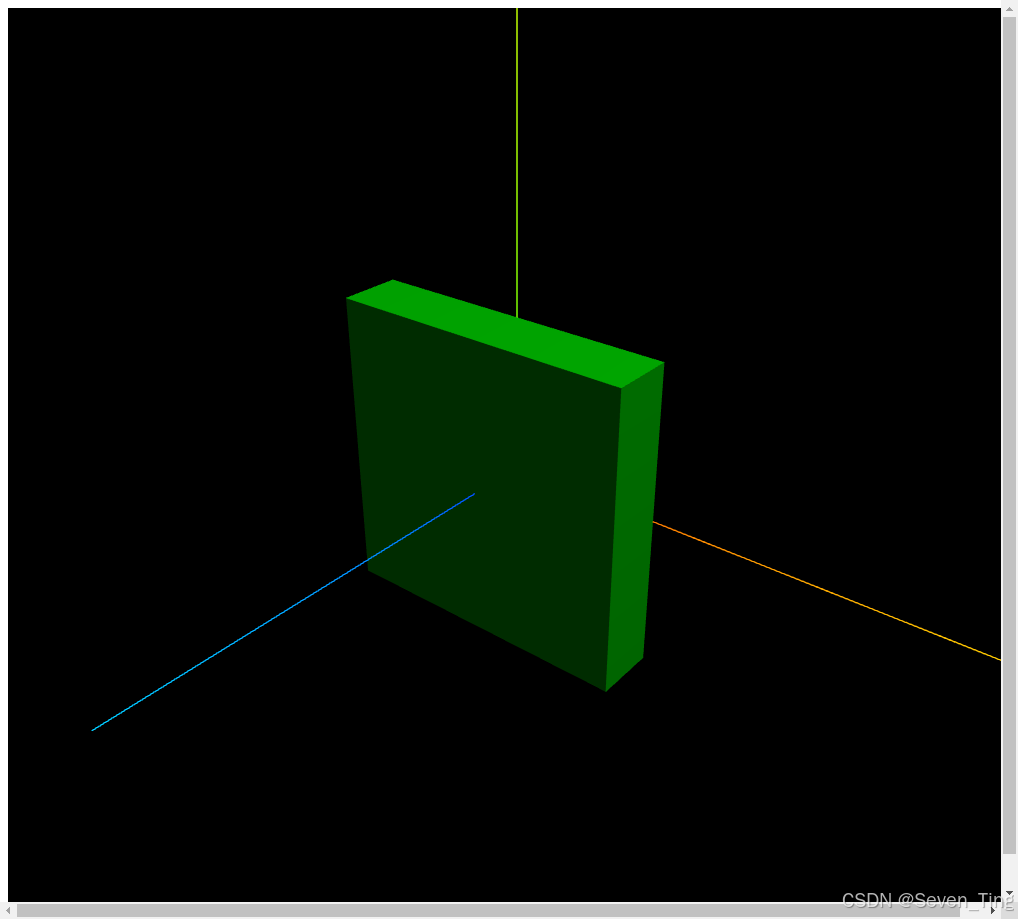
3、拉伸倒角
倒圆角
const geometry = new THREE.ExtrudeGeometry(
    shape,{
        depth: 20,
        bevelThickness: 5, //倒角尺寸:拉伸方向
        bevelSize: 5, //倒角尺寸:垂直拉伸方向
        bevelSegments: 20, //倒圆角:倒角细分精度,默认3
    }
);
3.1、全部代码
import * as THREE from 'three';

const group = new THREE.Group();

const shape = new THREE.Shape([
    new THREE.Vector2(-50, -50), //多边形起点
    new THREE.Vector2(-50, 50),
    new THREE.Vector2(50, 50),
    new THREE.Vector2(50, -50),
])
const geometry = new THREE.ExtrudeGeometry(shape, {
    depth: 20,
    bevelThickness:5,
    bevelSize:5,
    bevelSegments:20
})

const lineMesh = new THREE.MeshLambertMaterial({
    color: 'green',
    side: THREE.DoubleSide,
})
const MeshLine = new THREE.Mesh(geometry, lineMesh)

group.add(MeshLine)
export default group 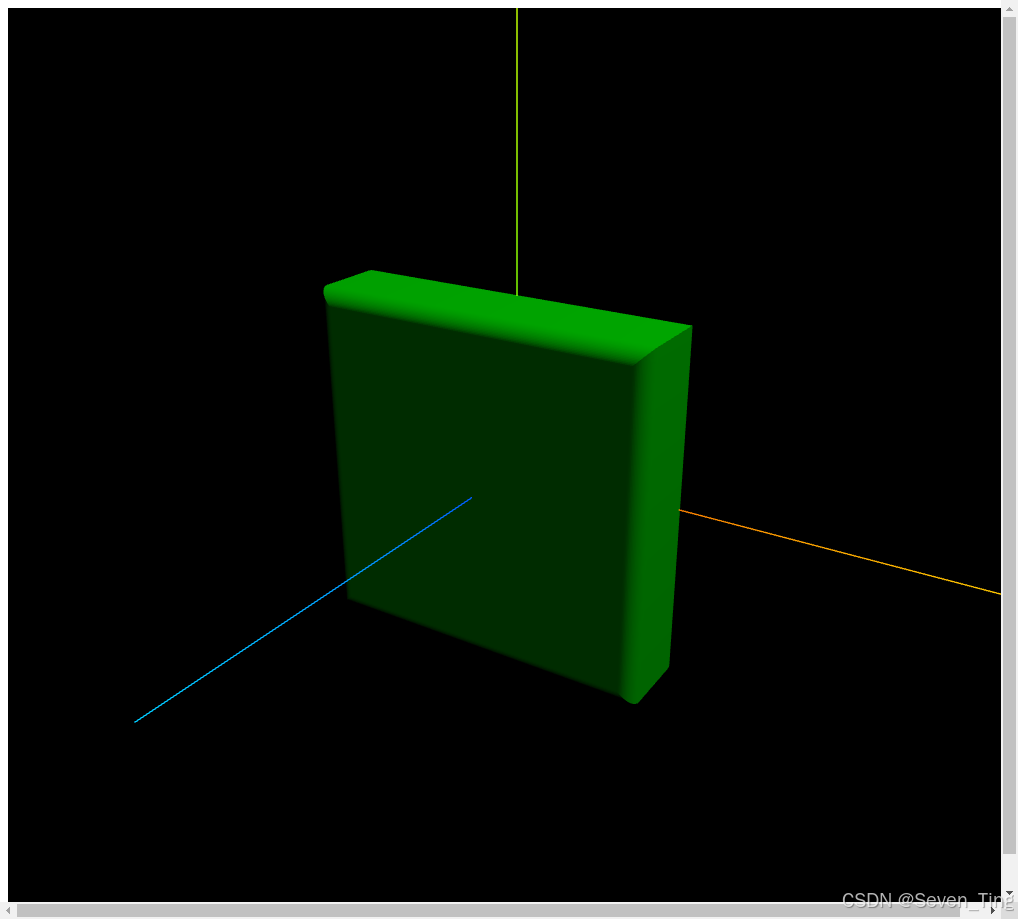
4、拉伸取消默认倒角
//拉伸造型
const geometry = new THREE.ExtrudeGeometry(
    shape, //二维轮廓
    {
        depth: 20, //拉伸长度
        bevelEnabled: false, //禁止倒角,默认true
    }
);
4.1、全部代码
import * as THREE from 'three';

const group = new THREE.Group();

const shape = new THREE.Shape([
    new THREE.Vector2(-50, -50), //多边形起点
    new THREE.Vector2(-50, 50),
    new THREE.Vector2(50, 50),
    new THREE.Vector2(50, -50),
])
const geometry = new THREE.ExtrudeGeometry(shape, {
    depth: 20,
    bevelThickness:5,
    bevelSize:5,
    bevelSegments:20,
    bevelEnabled:false
})

const lineMesh = new THREE.MeshLambertMaterial({
    color: 'green',
    side: THREE.DoubleSide,
})
const MeshLine = new THREE.Mesh(geometry, lineMesh)

group.add(MeshLine)
export default group 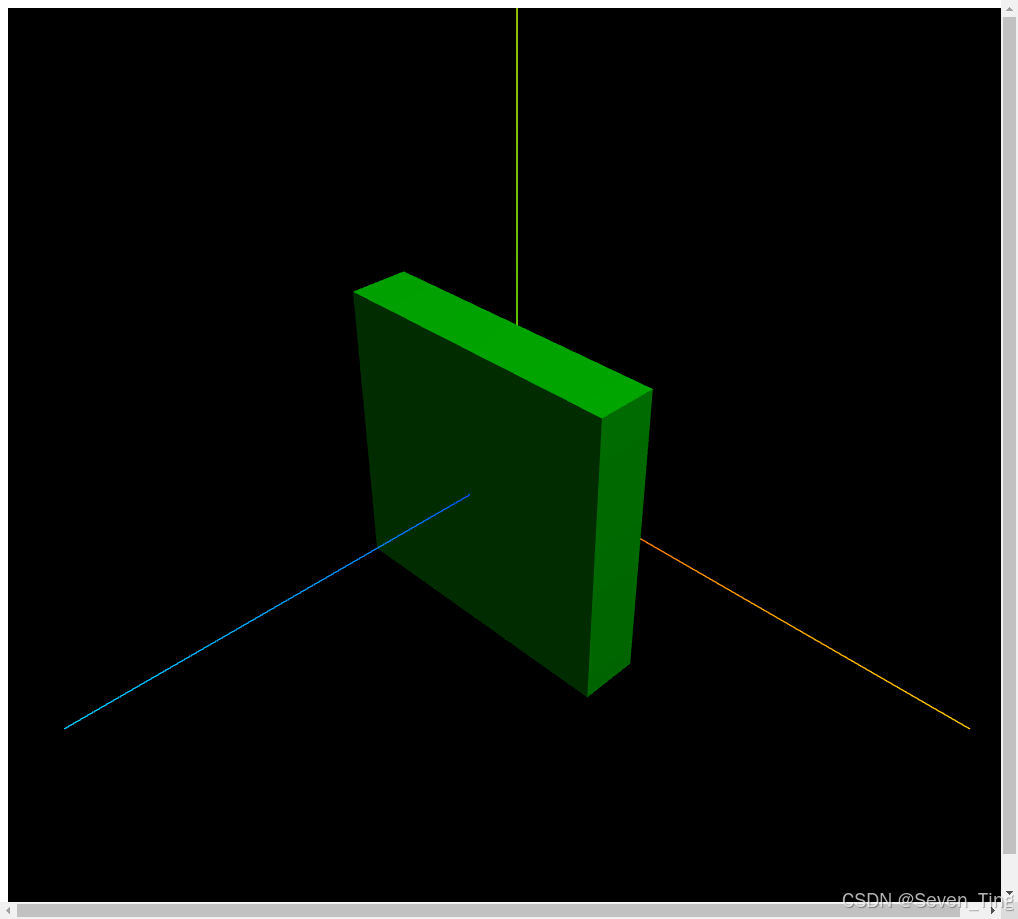
十二、扫描ExtrudeGeometry
通过ExtrudeGeometry除了可以实现拉伸成型,也可以让一个平面轮廓Shape沿着曲线扫描成型。
查看案例源码,你可以看到ExtrudeGeometry的一个扫描变换案例。
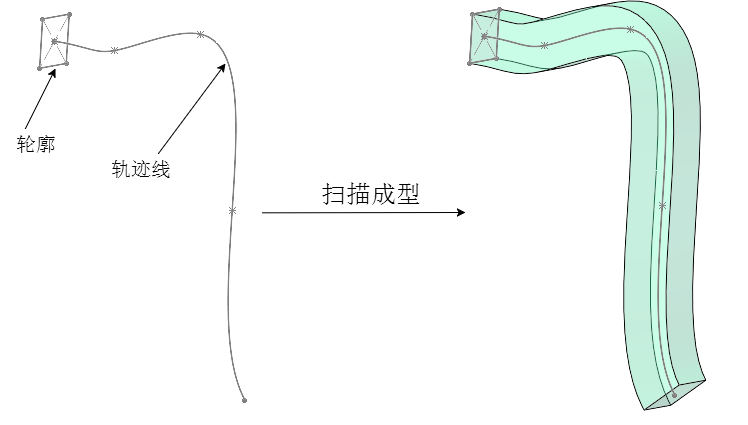
1、扫描轮廓
// 扫描轮廓:Shape表示一个平面多边形轮廓
const shape = new THREE.Shape([
    // 按照特定顺序,依次书写多边形顶点坐标
    new THREE.Vector2(0,0), //多边形起点
    new THREE.Vector2(0,10),
    new THREE.Vector2(10,10),
    new THREE.Vector2(10,0),
]);
2、扫描轨迹
// 扫描轨迹:创建轮廓的扫描轨迹(3D样条曲线)
const curve = new THREE.CatmullRomCurve3([
    new THREE.Vector3( -10, -50, -50 ),
    new THREE.Vector3( 10, 0, 0 ),
    new THREE.Vector3( 8, 50, 50 ),
    new THREE.Vector3( -5, 0, 100)
]);
3、扫描造型
//扫描造型:扫描默认没有倒角
const geometry = new THREE.ExtrudeGeometry(
    shape, //扫描轮廓
    {
        extrudePath:curve,//扫描轨迹
        steps:100//沿着路径细分精度,越大越光滑
    }
);
4、全部代码
import * as THREE from 'three';

const group = new THREE.Group();

const shape = new THREE.Shape([
    new THREE.Vector2(0,0), //多边形起点
    new THREE.Vector2(0,10),
    new THREE.Vector2(10,10),
    new THREE.Vector2(10,0),
])

const curve = new THREE.CatmullRomCurve3([
    new THREE.Vector3( -10, -50, -50 ),
    new THREE.Vector3( 10, 0, 0 ),
    new THREE.Vector3( 8, 50, 50 ),
    new THREE.Vector3( -5, 0, 100)
])

const geometry = new THREE.ExtrudeGeometry(shape,{
    extrudePath:curve,
    steps:100
})

const lineMesh = new THREE.MeshLambertMaterial({
    color: 'green',
    side: THREE.DoubleSide,
})
const MeshLine = new THREE.Mesh(geometry, lineMesh)

group.add(MeshLine)
export default group 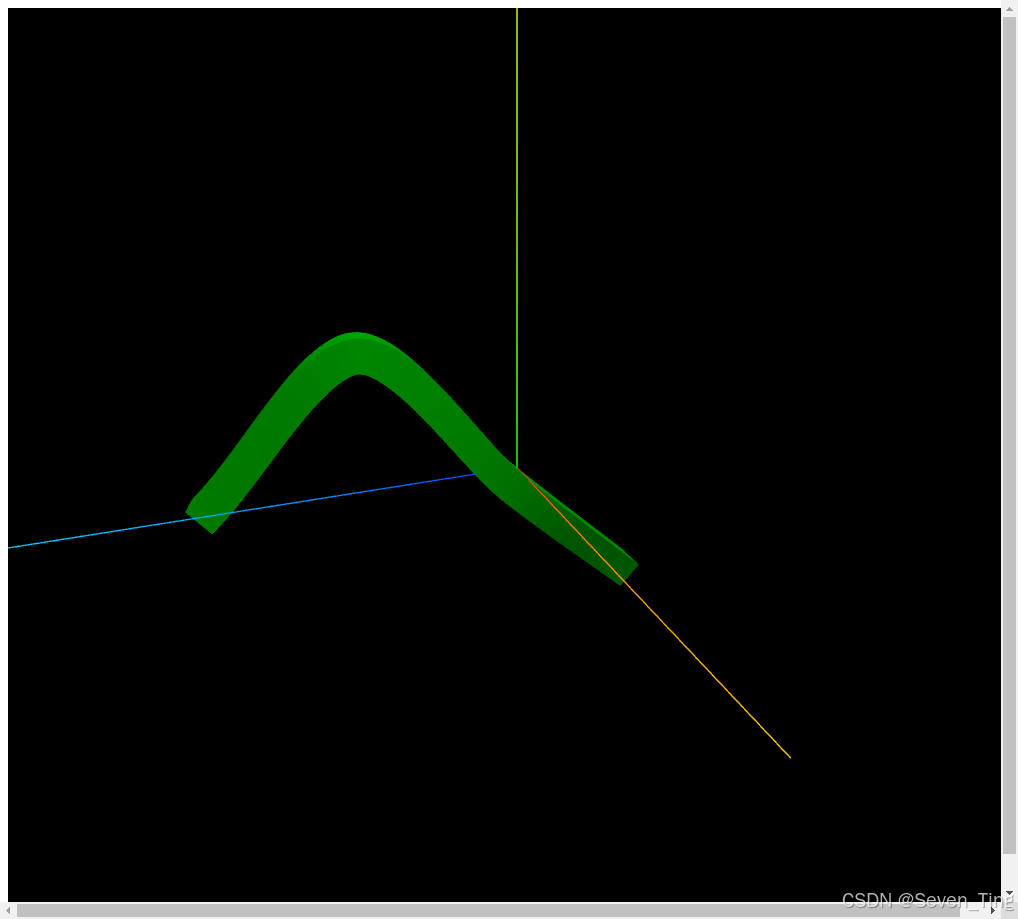
十三、多边形轮廓Shape简介
多边形轮廓Shape,是直接通过一组二维向量Vector2表示的xy点坐标创建。下面给大家讲解通过Shape的一些2D绘图API表达多边形轮廓。
// Shape表示一个平面多边形轮廓
const shape = new THREE.Shape([
    // 按照特定顺序,依次书写多边形顶点坐标
    new THREE.Vector2(-50, -50), //多边形起点
    new THREE.Vector2(-50, 50),
    new THREE.Vector2(50, 50),
    new THREE.Vector2(50, -50),
]);
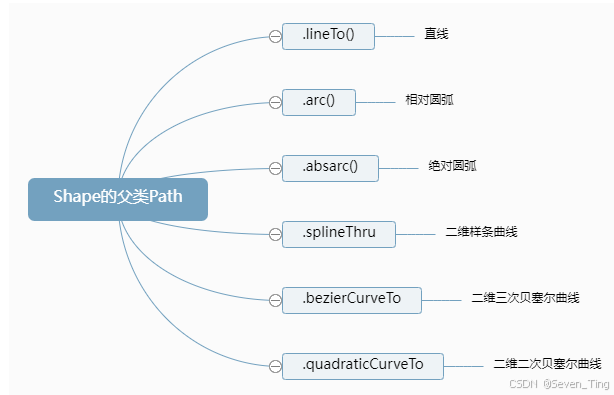
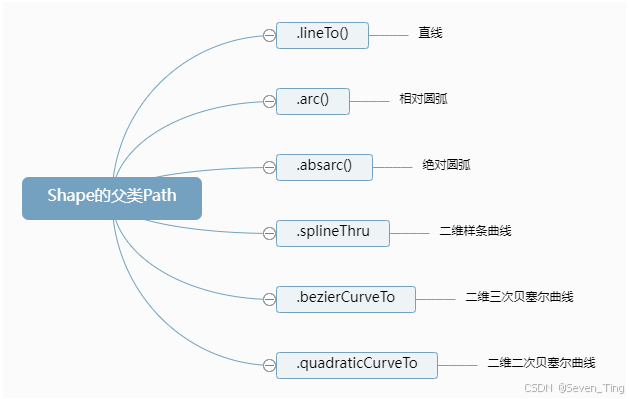
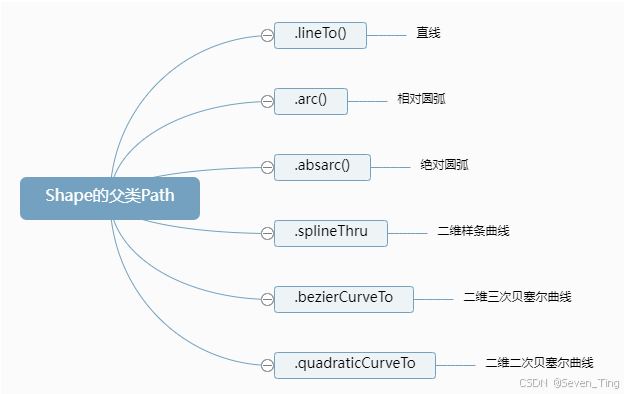
1、多边形轮廓Shape的父类Path
Shape的父类是Path,Path提供了直线、圆弧、贝塞尔、样条等绘制方法,Shape也会从父类是Path继承这些图形绘制方法。
如何使用Path的直线、圆弧等绘制方法,可以参考原来学习过的各种曲线API和Path的文档。
2、.currentPoint属性
.currentPoint属性字面意思是当前点,默认值Vector2(0,0)。
实例化一个Shape或Path对象,查看.currentPoint属性的默认值。
const shape = new THREE.Shape();
const path = new THREE.Path();
console.log('currentPoint',shape.currentPoint);3、.moveTo()方法
执行和.moveTo()方法查看.currentPoint属性变化。
const shape = new THREE.Shape();
shape.moveTo(10,0);
console.log('currentPoint',shape.currentPoint);
除了.moveTo()方法,Path其他的直线、圆弧等方法也可能会改变.currentPoint属性
4、绘制直线.lineTo()
.lineTo()绘制直线线段,直线线段的起点是当前点属性.currentPoint表示的位置,结束点是.lineTo()的参数表示的坐标。
const shape = new THREE.Shape();
shape.moveTo(10,0);//.currentPoint变为(10,0)
// 绘制直线线段,起点(10,0),结束点(100,0)
shape.lineTo(100,0);
.lineTo()方法和.moveTo()方法,一样会改变.currentPoint属性
shape.lineTo(100,0);//.currentPoint变为(100,0)
console.log('currentPoint',shape.currentPoint);
绘制一个矩形轮廓Shape
const shape = new THREE.Shape();
shape.moveTo(10, 0); //.currentPoint变为(10,0)
// 绘制直线线段,起点(10,0),结束点(100,0)
shape.lineTo(100, 0);//.currentPoint变为(100, 0)
shape.lineTo(100, 100);//.currentPoint变为(100, 100)
shape.lineTo(10, 100);//.currentPoint变为(10, 100)
4.1、全部代码
import * as THREE from 'three';

const group = new THREE.Group();

const shape = new THREE.Shape();
shape.moveTo(10,0);
shape.lineTo(100,0);
shape.lineTo(100,100);
shape.lineTo(10,100);

const geometry = new THREE.ShapeGeometry(shape);
const material = new THREE.MeshLambertMaterial({
    color:'green'
})
const mesh = new THREE.Mesh(geometry,material)

group.add(mesh)
export default group 
5、创建好的多边形轮廓Shape作为几何体的参数
// ShapeGeometry填充Shape获得一个平面几何体
const geometry = new THREE.ShapeGeometry(shape);
// ExtrudeGeometry拉伸Shape获得一个长方体几何体
const geometry = new THREE.ExtrudeGeometry(shape, {
    depth:20,//拉伸长度
    bevelEnabled:false,//禁止倒角
});
5.1、全部代码
import * as THREE from 'three';

const group = new THREE.Group();

const shape = new THREE.Shape();
shape.moveTo(10, 0);
shape.lineTo(100, 0);
shape.lineTo(100, 100);
shape.lineTo(10, 100);

const geometry = new THREE.ExtrudeGeometry(shape, {
    depth: 20,
    bevelEnabled: false,
});
const material = new THREE.MeshLambertMaterial({
    color: 'green'
})
const mesh = new THREE.Mesh(geometry, material)

group.add(mesh)
export default group 
十四、多边形轮廓Shape(圆弧)
1、圆弧方法.arc()
圆弧方法.arc()使用方式和原来学习过的圆弧曲线ArcCurve整体相似,区别在于圆心定位方式有差异。
圆弧.arc()参数的圆心坐标是相对当前.currentPoint而言,而不是坐标原点。
下面代码绘制了一个矩形+扇形的轮廓,圆心在(100, 0),半径50
// 下面代码绘制了一个矩形+扇形的轮廓,圆心在(100, 0),半径50。
const shape = new THREE.Shape();
shape.lineTo(100+50, 0); //.currentPoint变为(100+50,0)
// 圆弧.arc参数的圆心0,0坐标是相对当前.currentPoint而言,而不是坐标原点
shape.arc(-50,0,50,0,Math.PI/2); //.currentPoint变为圆弧线结束点坐标
console.log('currentPoint',shape.currentPoint);
// 绘制直线,直线起点:圆弧绘制结束的点  直线结束点:(0, 0)
shape.lineTo(0, 50);
十五、多边形Shape(内孔.holes)
有些多边形Shape内部是有孔洞的,这时候就需要借助多边形Shape的内孔.holes属性和Path对象实现。
1、外轮廓
先创建Shape的矩形外轮廓。
const shape = new THREE.Shape();
// .lineTo(100, 0)绘制直线线段,线段起点:.currentPoint,线段结束点:(100,0)
shape.lineTo(100, 0);
shape.lineTo(100, 100);
shape.lineTo(0, 100); 2、.holes设置内孔的轮廓
Path对象创建内部多个轮廓。
// Shape内孔轮廓
const path1 = new THREE.Path();// 圆孔1
path1.absarc(20, 20, 10);
const path2 = new THREE.Path();// 圆孔2
path2.absarc(80, 20, 10);
const path3 = new THREE.Path();// 方形孔
path3.moveTo(50, 50);
path3.lineTo(80, 50);
path3.lineTo(80, 80);
path3.lineTo(50, 80);
//三个内孔轮廓分别插入到holes属性中
shape.holes.push(path1, path2,path3);
3、Shape拉伸的效果图
上面代码定义的Shape,通过ExtrudeGeometry拉伸的效果图。
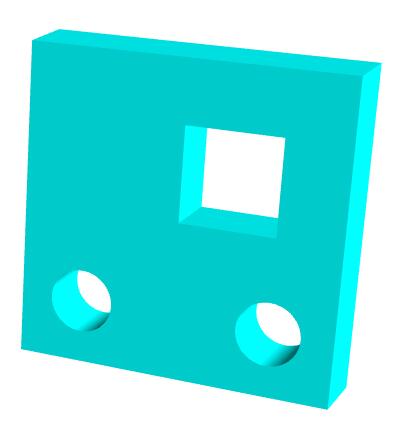
const geometry = new THREE.ExtrudeGeometry(shape, {
    depth:20,//拉伸长度
    bevelEnabled:false,//禁止倒角
    curveSegments:50,
});
4、全部代码
import * as THREE from 'three';

const group = new THREE.Group();

const shape = new THREE.Shape();
shape.lineTo(100, 0);
shape.lineTo(100, 100)
shape.lineTo(0, 100)

const path1 = new THREE.Path()
path1.absarc(20,20,10)
const path2 = new THREE.Path();
path2.absarc(80,20,10)
const path3 = new THREE.Path();
path3.moveTo(50, 50);
path3.lineTo(80, 50);
path3.lineTo(80, 80);
path3.lineTo(50, 80);

shape.holes.push(path1,path2,path3)

const geometry = new THREE.ExtrudeGeometry(shape, {
    depth: 10
})
const material = new THREE.MeshLambertMaterial({
    color: 'red'
})
const mesh = new THREE.Mesh(geometry,material)

group.add(mesh)
export default group 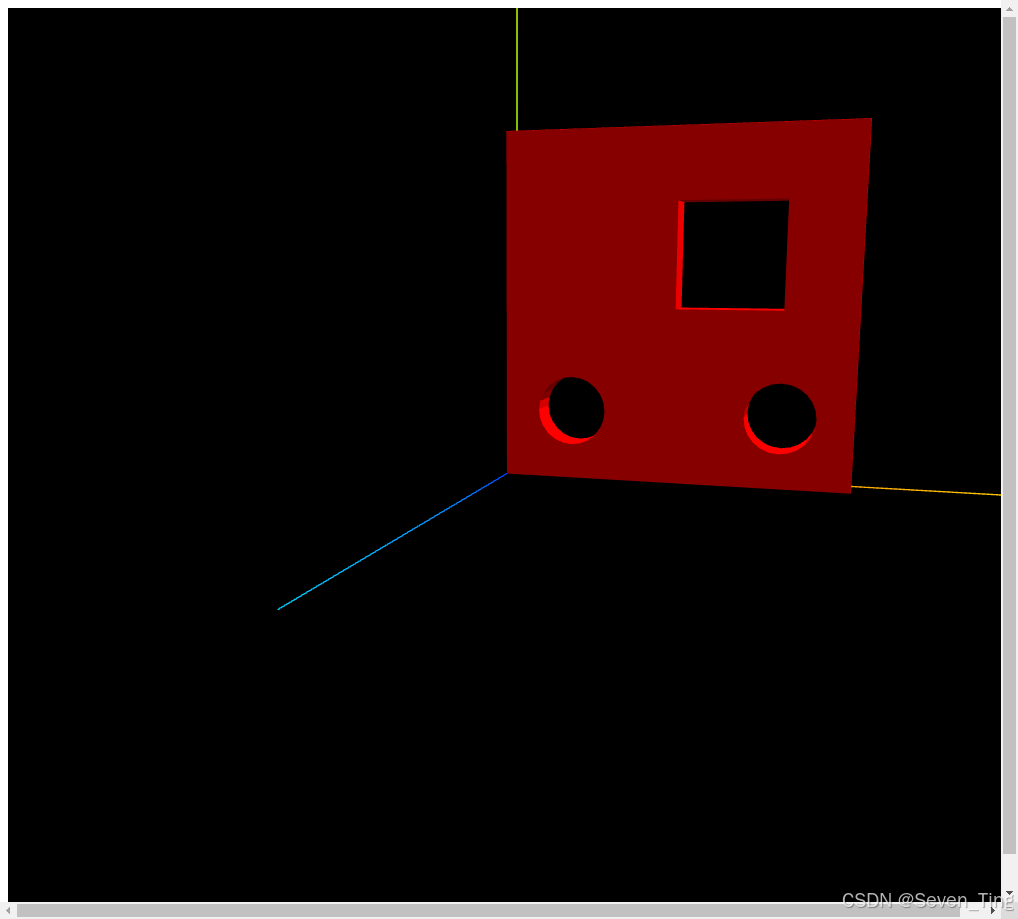
十六、模型边界线EdgesGeometry
借助EdgesGeometry可以给模型设置一个模型边界线。
1、长方体边线
先用EdgesGeometry重新计算长方体几何体,返回一个新的几何体,然后用线模型LineSegments模型渲染新的几何体即可。
const geometry = new THREE.BoxGeometry(50, 50, 50);
const material = new THREE.MeshLambertMaterial({
    color: 0x004444,
    transparent:true,
    opacity:0.5,
});
const mesh = new THREE.Mesh(geometry, material);

// 长方体作为EdgesGeometry参数创建一个新的几何体
const edges = new THREE.EdgesGeometry(geometry);
const edgesMaterial = new THREE.LineBasicMaterial({
  color: 0x00ffff,
})
const line = new THREE.LineSegments(edges, edgesMaterial);
mesh.add(line);
1.1、全部代码
import * as THREE from 'three';

const group = new THREE.Group();
const geometry = new THREE.BoxGeometry(100,100,100)
const material = new THREE.MeshLambertMaterial({
    color:'red',
    transparent:true,
    opacity:0.3
})
const mesh = new THREE.Mesh(geometry,material)

const edgs = new THREE.EdgesGeometry(geometry);
const edgsMaterial = new THREE.LineBasicMaterial({
    color:'#fff'
})
const line = new THREE.LineSegments(edgs,edgsMaterial)

group.add(mesh,line)
export default group 
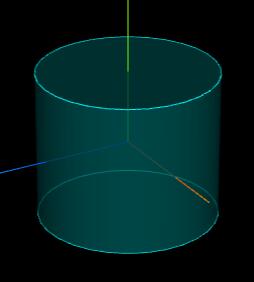
2、圆柱边线
const geometry = new THREE.CylinderGeometry(60, 60, 100, 30);
const edges = new THREE.EdgesGeometry(geometry);
2.1、全部代码
import * as THREE from 'three';

const group = new THREE.Group();
const geometry = new THREE.CylinderGeometry(100,100,100,30)
const material = new THREE.MeshLambertMaterial({
    color:'red',
    transparent:true,
    opacity:0.3
})
const mesh = new THREE.Mesh(geometry,material)

const edgs = new THREE.EdgesGeometry(geometry);
const edgsMaterial = new THREE.LineBasicMaterial({
    color:'#fff'
})
const line = new THREE.LineSegments(edgs,edgsMaterial)

group.add(mesh,line)
export default group 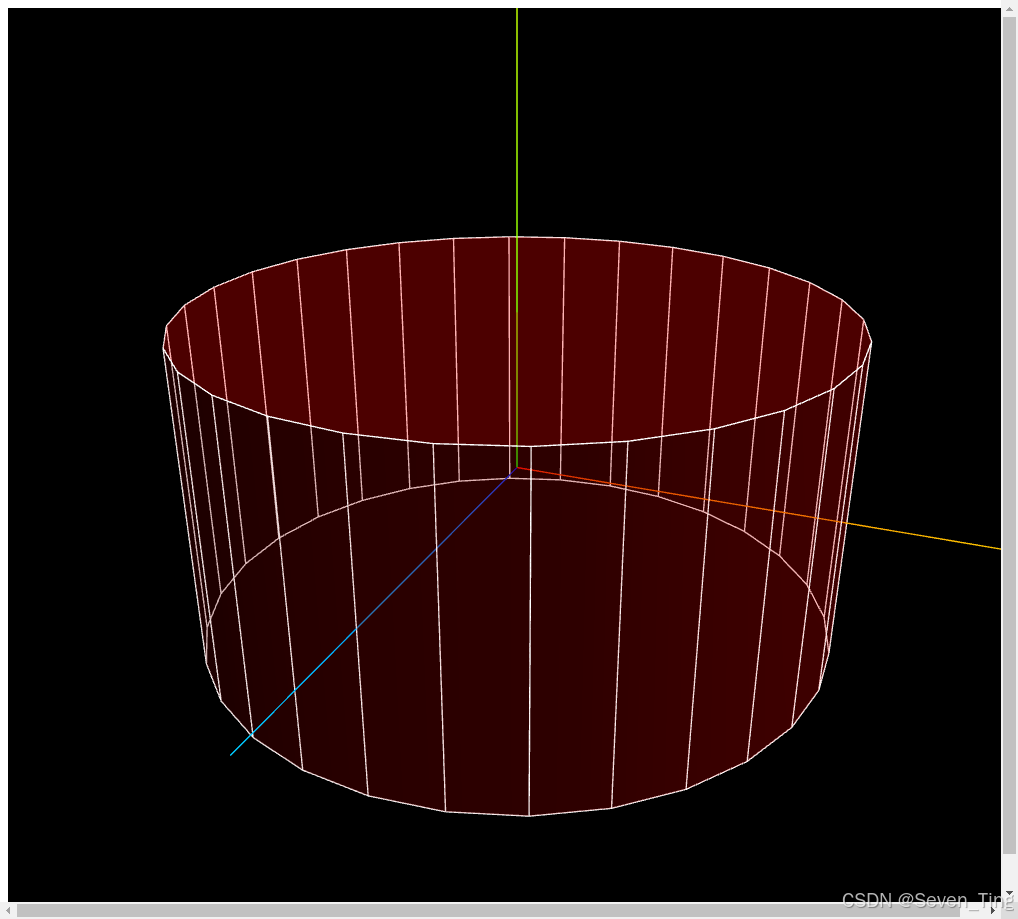
相邻面法线夹角大于30度,才会显示线条
const edges = new THREE.EdgesGeometry(geometry,30);
3、外部gltf模型设置材质和边线
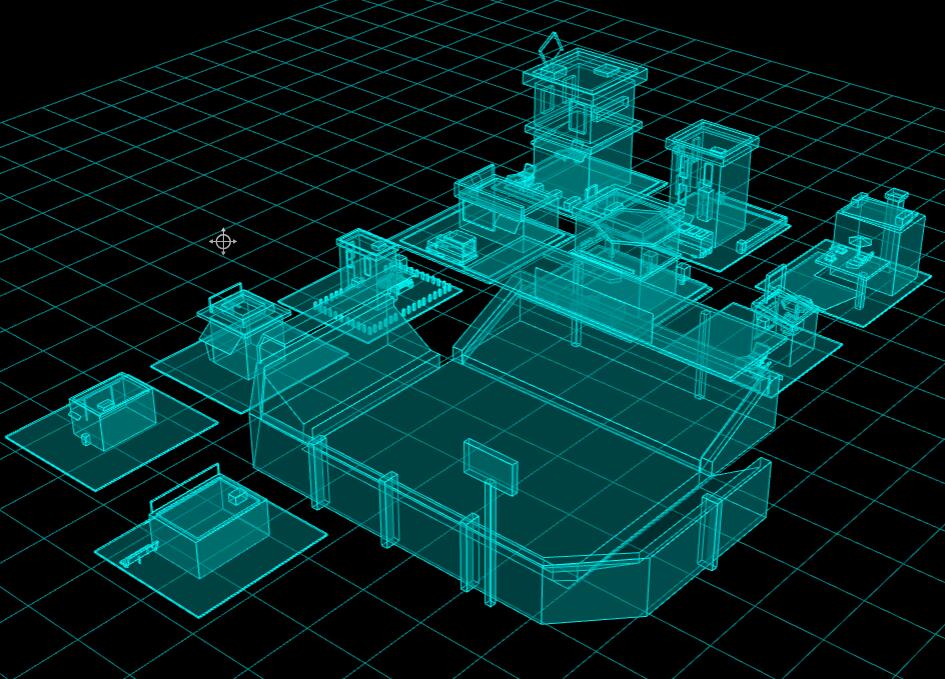
loader.load("../建筑模型.gltf", function (gltf) {
    // 递归遍历设置每个模型的材质,同时设置每个模型的边线
    gltf.scene.traverse(function (obj) {
        if (obj.isMesh) {
            // 模型材质重新设置
            obj.material = new THREE.MeshLambertMaterial({
                color: 0x004444,
                transparent: true,
                opacity: 0.5,
            });
            // 模型边线设置
            const edges = new THREE.EdgesGeometry(obj.geometry);
            const edgesMaterial = new THREE.LineBasicMaterial({
                color: 0x00ffff,
            })
            const line = new THREE.LineSegments(edges, edgesMaterial);
            obj.add(line);
        }
    });
    model.add(gltf.scene);
})
3.1、全部代码
import * as THREE from 'three';
// 引入gltf模型加载库GLTFLoader.js
import { GLTFLoader } from 'three/addons/loaders/GLTFLoader.js';
// const material
const group = new THREE.Group();
const loader = new GLTFLoader()
loader.load('./build/建筑模型.gltf', function (gltf) {
    gltf.scene.traverse(function (obj) {
        if (obj.isMesh) {
            obj.material = new THREE.MeshLambertMaterial({
                color: 'red',
                transparent: true,
                opacity: 0.3
            })
            const edgs = new THREE.EdgesGeometry(obj.geometry)
            const edgsMaterial = new THREE.LineBasicMaterial({
                color: '#fff'
            })
            const line = new THREE.LineSegments(edgs, edgsMaterial)

            obj.add( line)
        }
    })
    group.add(gltf.scene)
})

export default group 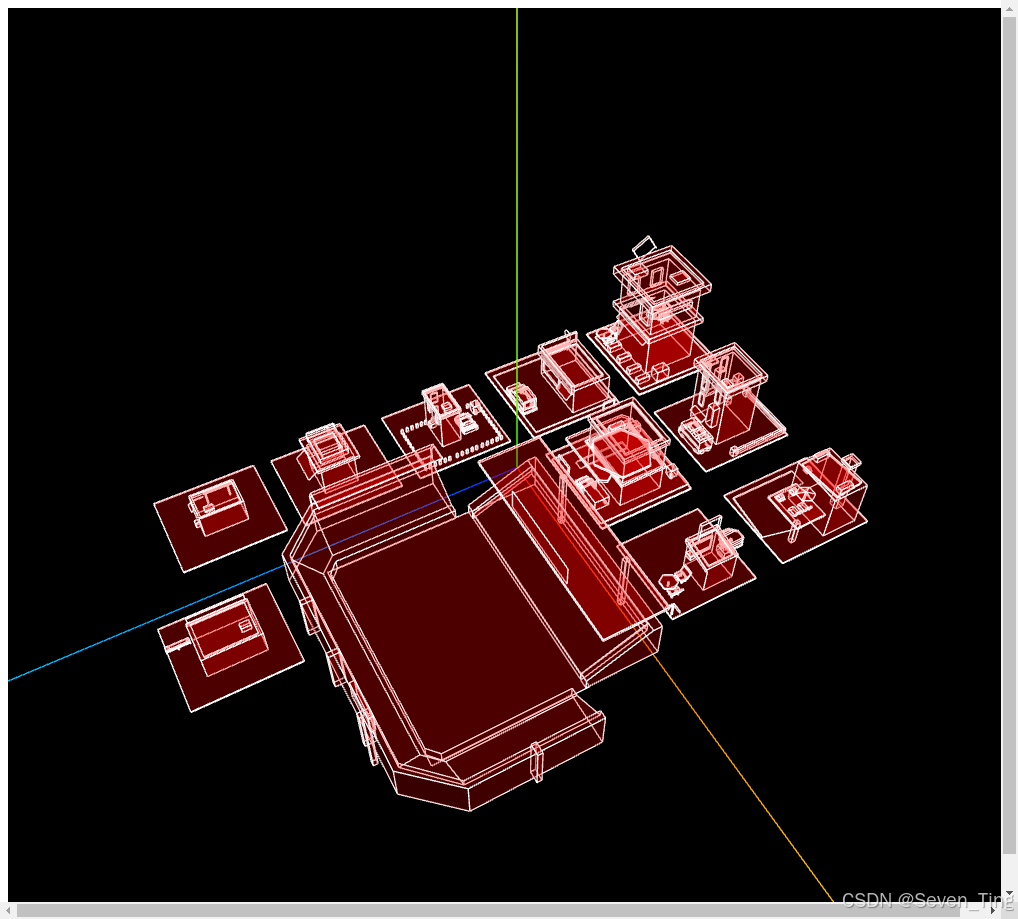
十七、几何体顶点颜色数数据
章节2中介绍过顶点位置、顶点法向量数据,下面给大家介绍顶点颜色.attributes.color数据。
- 顶点位置数据
geometry.attributes.position - 顶点法向量数据
geometry.attributes.normal - 顶点UV数据
geometry.attributes.uv - 顶点颜色数据
geometry.attributes.color
1、几何体顶点颜色.attributes.color
几何体BufferGeometry顶点位置数据.attributes.position。
const geometry = new THREE.BufferGeometry(); //创建一个几何体对象
const vertices = new Float32Array([
    0, 0, 0, //顶点1坐标
    50, 0, 0, //顶点2坐标
    0, 25, 0, //顶点3坐标
]);
// 顶点位置
geometry.attributes.position = new THREE.BufferAttribute(vertices, 3);
与几何体BufferGeometry顶点位置数据.attributes.position一一对应的顶点颜色数据.attributes.color。
每个点对应一个位置数据,同时对应一个颜色数据。
const colors = new Float32Array([
    1, 0, 0, //顶点1颜色
    0, 0, 1, //顶点2颜色
    0, 1, 0, //顶点3颜色
]);
// 设置几何体attributes属性的颜色color属性
//3个为一组,表示一个顶点的颜色数据RGB
geometry.attributes.color = new THREE.BufferAttribute(colors, 3); 2、点模型Points渲染顶点颜色数据
通过点、线、网格模型渲染几何体Geometry,如果希望顶点颜色.attributes.color起作用,需要设置材质属性vertexColors:true,下面以以点模型为例给大家演示,你可以看到geometry的不同点被你设置为了不同颜色。
// 点渲染模式
const material = new THREE.PointsMaterial({
    // color: 0x333333,//使用顶点颜色数据,color属性可以不用设置
    vertexColors:true,//默认false,设置为true表示使用顶点颜色渲染
    size: 20.0, //点对象像素尺寸
});
const points = new THREE.Points(geometry, material); //点模型对象
2.1、全部代码
import * as THREE from 'three';

const group = new THREE.Group();
const geometry = new THREE.BufferGeometry()
const vertices = new Float32Array([
    0, 0, 0,
    50, 0, 0,
    0, 25, 0
])
const attrbue = new THREE.BufferAttribute(vertices, 3)
geometry.attributes.position = attrbue;

//顶点颜色数据
const color = new Float32Array([
    1, 0, 0,
    0, 1, 0,
    0, 0, 1
])
const attrbueColor = new THREE.BufferAttribute(color, 3)
geometry.attributes.color = attrbueColor;

const material = new THREE.PointsMaterial({
    // color: 'red',
    vertexColors: true,
    size: 10
})
const point = new THREE.Points(geometry, material)

group.add(point)

export default group 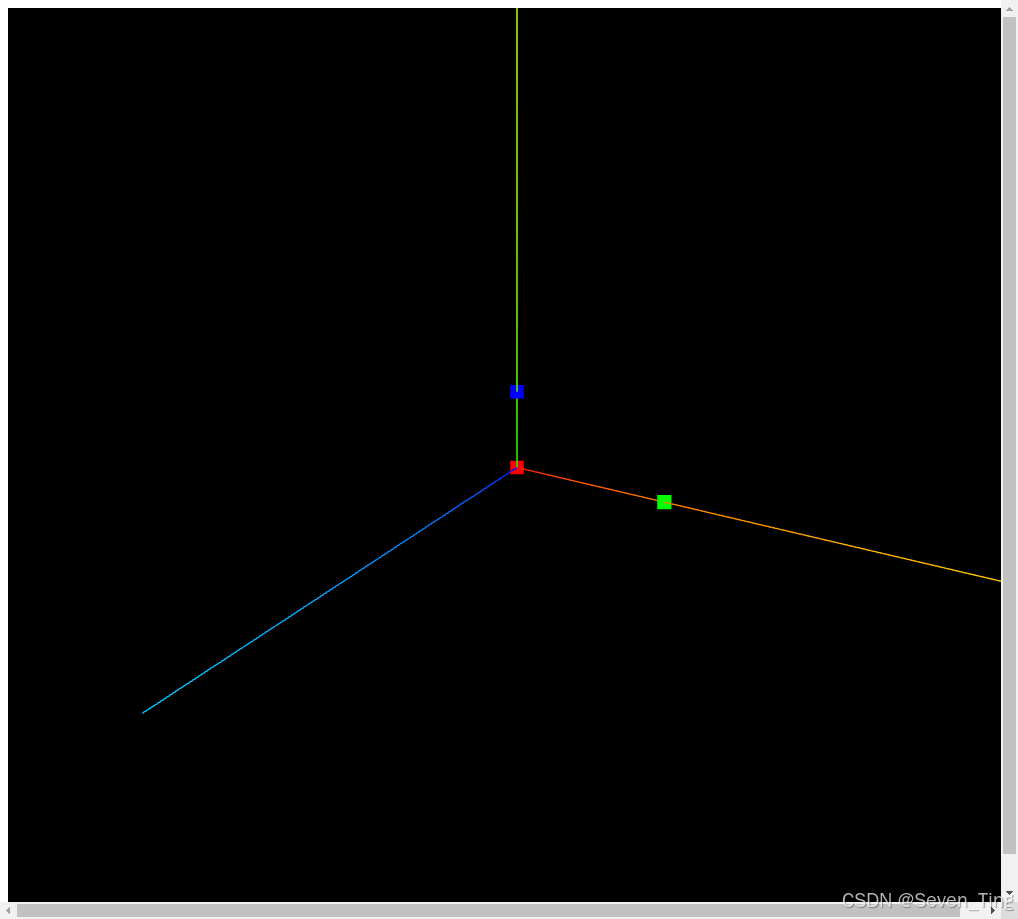
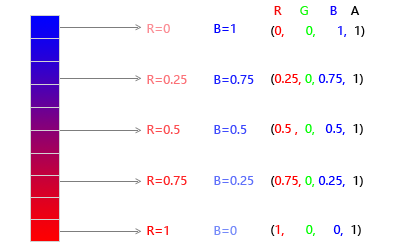
3、颜色渐变(颜色插值)
自定几何体顶点颜色数据,然后用线模型Line渲染,你可以看到直线的颜色是渐变的。
下面代码两端直线,分别是红色到蓝色渐变、蓝色到绿色渐变。
const colors = new Float32Array([
    1, 0, 0, //顶点1颜色
    0, 0, 1, //顶点2颜色
    0, 1, 0, //顶点3颜色
]);
geometry.attributes.color = new THREE.BufferAttribute(colors, 3);


const material = new THREE.LineBasicMaterial({
    vertexColors:true,//使用顶点颜色渲染
});
const line = new THREE.Line(geometry, material);
几何体顶点颜色.attributes.color设置的直线颜色渐变效果
![]()
3.1、全部代码
import * as THREE from 'three';

const group = new THREE.Group();
const geometry = new THREE.BufferGeometry()
const vertices = new Float32Array([
    0, 0, 0,
    50, 0, 0,
    0, 25, 0
])
const attrbue = new THREE.BufferAttribute(vertices, 3)
geometry.attributes.position = attrbue;

//顶点颜色数据
const color = new Float32Array([
    1, 0, 0,
    0, 1, 0,
    0, 0, 1
])
const attrbueColor = new THREE.BufferAttribute(color, 3)
geometry.attributes.color = attrbueColor;

const material = new THREE.LineBasicMaterial({
    // color: 'red',
    vertexColors: true,
    size: 10
})
const point = new THREE.Line(geometry, material)

group.add(point)

export default group 
4、网格模型颜色渐变
自定几何体顶点颜色数据,然后用网格模型Mesh渲染,和Line一样,也会产生颜色渐变效果。
const material = new THREE.MeshBasicMaterial({
    // color: 0x333333,//使用顶点颜色数据,color属性可以不用设置
    vertexColors:true,//默认false,设置为true表示使用顶点颜色渲染
    side: THREE.DoubleSide,
});
const mesh = new THREE.Mesh(geometry, material);
4.1、全部代码
import * as THREE from 'three';

const group = new THREE.Group();
const geometry = new THREE.BufferGeometry()
const vertices = new Float32Array([
    0, 0, 0,
    50, 0, 0,
    0, 25, 0
])
const attrbue = new THREE.BufferAttribute(vertices, 3)
geometry.attributes.position = attrbue;

//顶点颜色数据
const color = new Float32Array([
    1, 0, 0,
    0, 1, 0,
    0, 0, 1
])
const attrbueColor = new THREE.BufferAttribute(color, 3)
geometry.attributes.color = attrbueColor;

const material = new THREE.MeshBasicMaterial({
    // color: 'red',
    vertexColors: true,
    size: 10
})
const point = new THREE.Mesh(geometry, material)

group.add(point)

export default group 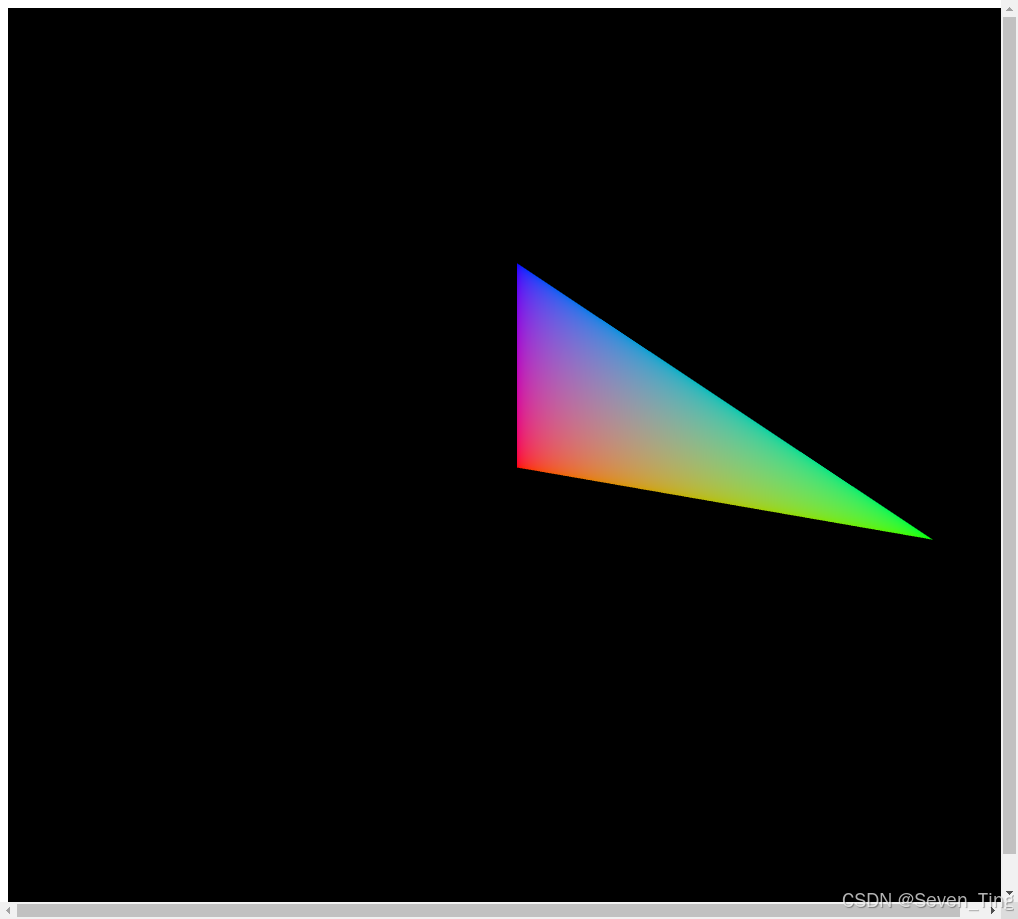
十八、一段曲线颜色渐变
可以通过几何体顶点颜色.attributes.color数据,实现一段曲线颜色渐变效果。
1、样条曲线几何体
首先提供一个样条曲线生成的几何体。
const geometry = new THREE.BufferGeometry(); //创建一个几何体对象
// 三维样条曲线
const curve = new THREE.CatmullRomCurve3([
    new THREE.Vector3(-50, 20, 90),
    new THREE.Vector3(-10, 40, 40),
    new THREE.Vector3(0, 0, 0),
    new THREE.Vector3(60, -60, 0),
    new THREE.Vector3(70, 0, 80)
]);
const pointsArr = curve.getSpacedPoints(100); //曲线取点
geometry.setFromPoints(pointsArr); //pointsArr赋值给顶点位置属性 2、设置几何体顶点颜色.attributes.color
曲线上不同位置设置不同的颜色,你可以按照点在曲线上索引值顺序来计算每个点对应的颜色数据。
const pos = geometry.attributes.position;
const count = pos.count; //顶点数量
// 计算每个顶点的颜色值
const colorsArr = [];
for (let i = 0; i < count; i++) {
    const percent = i / count; //点索引值相对所有点数量的百分比
    //根据顶点位置顺序大小设置颜色渐变
    // 红色分量从0到1变化,蓝色分量从1到0变化
    colorsArr.push(percent, 0, 1 - percent); //蓝色到红色渐变色
}
//类型数组创建顶点颜色color数据
const colors = new Float32Array(colorsArr);
// 设置几何体attributes属性的颜色color属性
geometry.attributes.color = new THREE.BufferAttribute(colors, 3);
3、线模型渲染渐变色曲线
const material = new THREE.LineBasicMaterial({
    vertexColors: true, //使用顶点颜色渲染
});
const line = new THREE.Line(geometry, material);
4、全部代码
import * as THREE from 'three';

const group = new THREE.Group();
const geometry = new THREE.BufferGeometry();
const curve = new THREE.CatmullRomCurve3([
    new THREE.Vector3(-50, 20, 90),
    new THREE.Vector3(-10, 40, 40),
    new THREE.Vector3(0, 0, 0),
    new THREE.Vector3(60, -60, 0),
    new THREE.Vector3(70, 0, 80)
])
const pointsArr = curve.getSpacedPoints(100)
geometry.setFromPoints(pointsArr)

const pos = geometry.attributes.position;
const count = pos.count;
const colorsArr = [];
for (let i = 0; i < count; i++) {
    const percent = i / count;
    colorsArr.push(percent, 0, 1 - percent);
}
const colors = new Float32Array(colorsArr);
geometry.attributes.color = new THREE.BufferAttribute(colors, 3);

const LineMa = new THREE.LineBasicMaterial({
    // color:'red',
    vertexColors: true
})
const LineM = new THREE.Line(geometry, LineMa)

group.add(LineM)

export default group 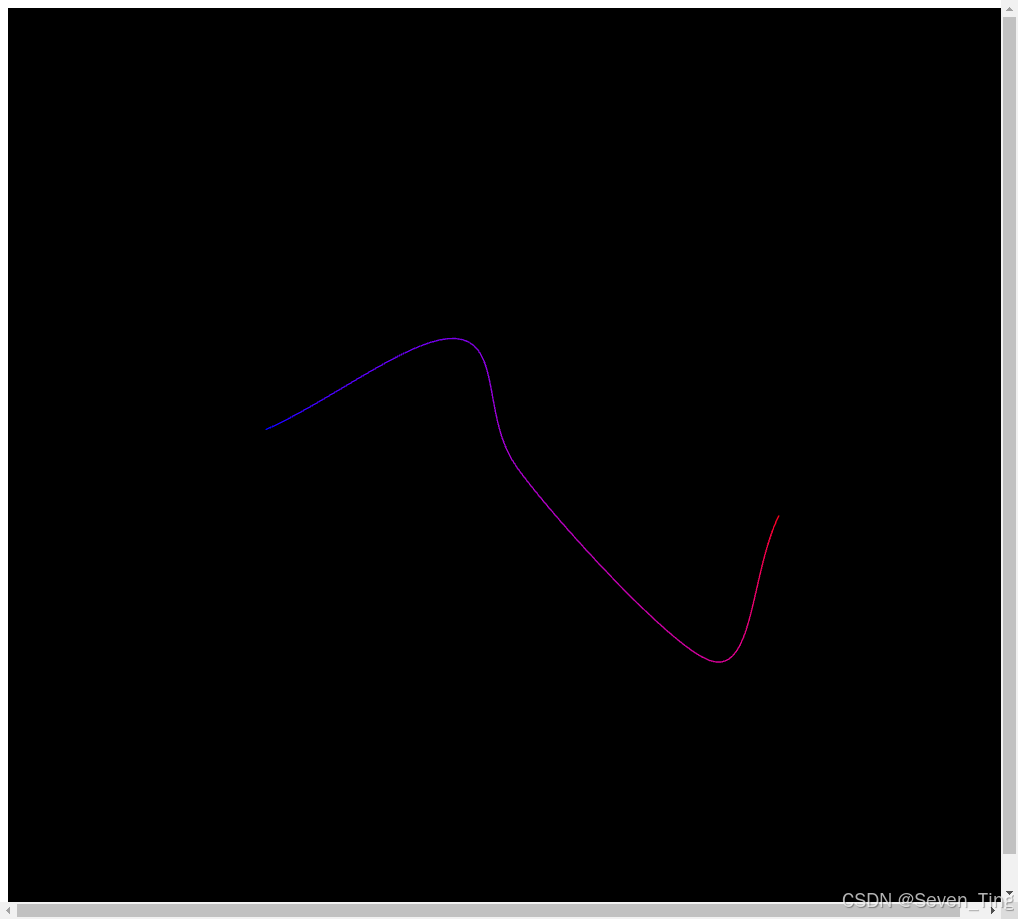
十九、Color颜色渐变插值
颜色对象Color颜色渐变插值方法.lerpColors()和.lerp()
1、颜色对象Color颜色插值方法.lerpColors()
通过浏览器控制台测试.lerpColors()方法颜色插值的规律。
执行.lerpColors(Color1,Color2, percent)通过一个百分比参数percent,可以控制Color1和Color2两种颜色混合的百分比,Color1对应1-percent,Color2对应percent。
const c1 = new THREE.Color(0xff0000); //红色
const c2 = new THREE.Color(0x0000ff); //蓝色
const c = new THREE.Color();
颜色插值结果,和c1一样rgb(1,0,0),100% c1 + 0% c2混合
c.lerpColors(c1,c2, 0);
console.log('颜色插值结果',c);
颜色插值结果rgb(0.5,0,0.5),c1和c2各取50%
c.lerpColors(c1,c2, 0.5);
console.log('颜色插值结果',c);
和c2一样rgb(0,0,1) 0% c1 + 100% c2混合
c.lerpColors(c1,c2, 1);
console.log('颜色插值结果',c);
2、颜色对象Color颜色插值方法.lerp()
.lerp()和.lerpColors()功能一样,只是具体语法细节不同。
c1与c2颜色混合,混合后的rgb值,赋值给c1的.r、.g、.b属性。
const c1 = new THREE.Color(0xff0000); //红色
const c2 = new THREE.Color(0x0000ff); //蓝色
c1.lerp(c2, percent);
3、颜色克隆.clone()
通过颜色对象克隆方法.clone()可以返回一个新的颜色对象。
注意c1.clone().lerp()和c1.lerp()写法是不同的,执行c1.clone().lerp(),c1和c2颜色混合后,不会改变c1的颜色值,改变的是c1.clone()返回的新颜色对象。
const c1 = new THREE.Color(0xff0000); //红色
const c2 = new THREE.Color(0x0000ff); //蓝色
const c = c1.clone().lerp(c2, percent);//颜色插值计算
4、Color颜色插值应用
const pos = geometry.attributes.position;
const count = pos.count; //顶点数量
// 计算每个顶点的颜色值
const colorsArr = [];
for (let i = 0; i < count; i++) {
    const percent = i / count;
    // 红色分量从0到1变化,蓝色分量从1到0变化
    colorsArr.push(percent, 0, 1 - percent); //蓝色到红色渐变色
}
// 根据顶点距离起点远近进行颜色插值计算
const c1 = new THREE.Color(0x00ffff); //曲线起点颜色 青色
const c2 = new THREE.Color(0xffff00); //曲线结束点颜色 黄色
for (let i = 0; i < count; i++) {
    const percent = i / count; //点索引值相对所有点数量的百分比
    //根据顶点位置顺序大小设置颜色渐变
    const c = c1.clone().lerp(c2, percent);//颜色插值计算
    colorsArr.push(c.r, c.g, c.b);
}
5、全部代码
import * as THREE from 'three';

const group = new THREE.Group();
const geometry = new THREE.BufferGeometry();
const curve = new THREE.CatmullRomCurve3([
    new THREE.Vector3(-50, 20, 90),
    new THREE.Vector3(-10, 40, 40),
    new THREE.Vector3(0, 0, 0),
    new THREE.Vector3(60, -60, 0),
    new THREE.Vector3(70, 0, 80)
])
const pointsArr = curve.getSpacedPoints(100)
geometry.setFromPoints(pointsArr)

const pos = geometry.attributes.position;
const count = pos.count;
const colorsArr = [];

const c1 = new THREE.Color('red');
const c2 = new THREE.Color('blue');

for (let i = 0; i < count; i++) {
    const percent = i / count;
    const c = c1.clone().lerp(c2, percent)

    colorsArr.push(c.r, c.g, c.b);
}
const colors = new Float32Array(colorsArr);
geometry.attributes.color = new THREE.BufferAttribute(colors, 3);

const LineMa = new THREE.LineBasicMaterial({
    // color:'red',
    vertexColors: true
})
const LineM = new THREE.Line(geometry, LineMa)

group.add(LineM)

export default group 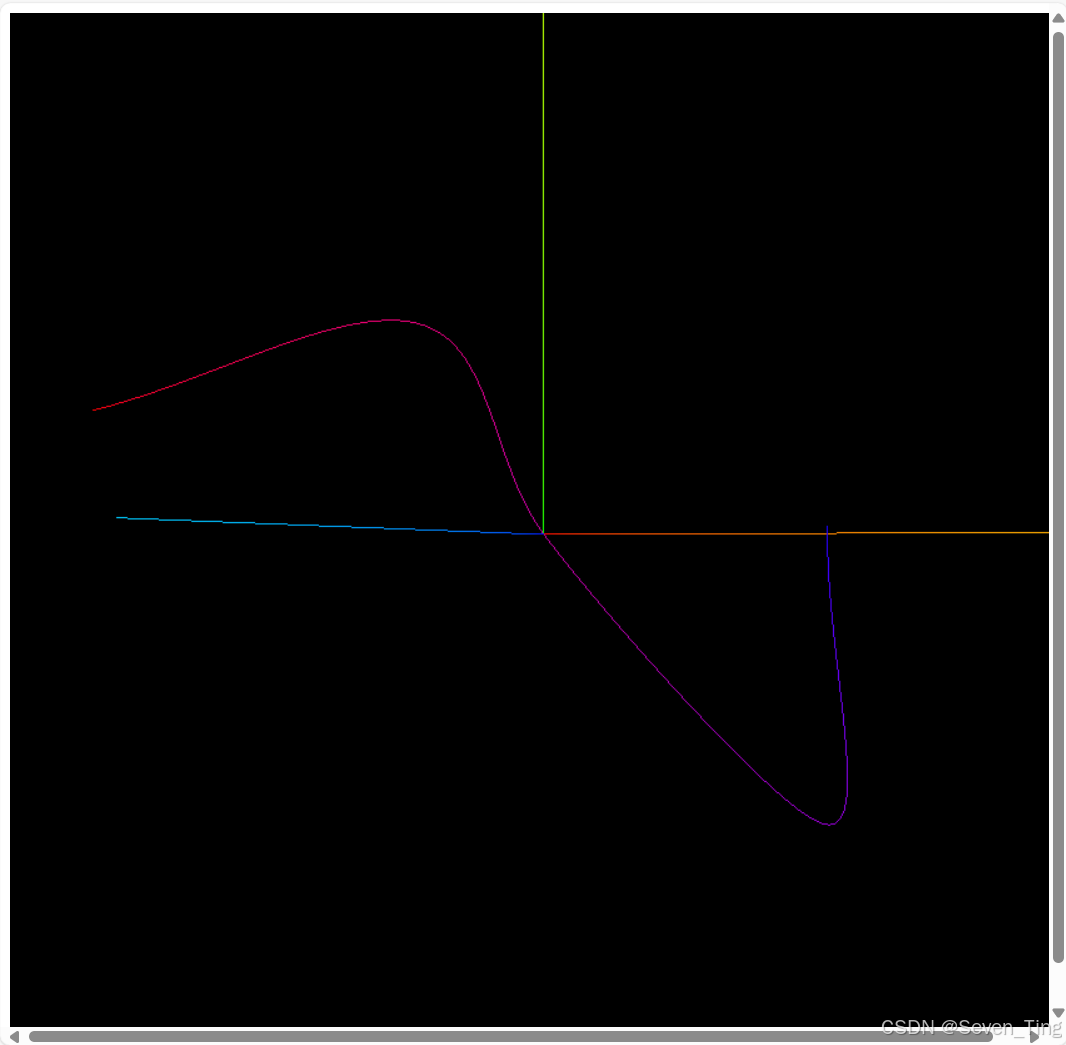
二十、查看或设置gltf几何体顶点
geometry.attributes.position = new THREE.BufferAttribute();
geometry.attributes.normal = new THREE.BufferAttribute();
geometry.attributes.color = new THREE.BufferAttribute();
geometry.attributes.uv = new THREE.BufferAttribute();
geometry.index = new THREE.BufferAttribute();
1、获取gltf模型几何体顶点数据
loader.load("../地形.glb", function (gltf) { //gltf加载成功后返回一个对象
    model.add(gltf.scene); //三维场景添加到model组对象中
    //mesh表示地形网格模型
    const mesh = gltf.scene.children[0];
    // 顶点数据
    const att = mesh.geometry.attributes;
    console.log('att', att);
    // 顶点位置数据
    const pos = mesh.geometry.attributes.position;
    console.log('pos', pos);
})
2、几何体顶点索引属性geometry.index
three.js大部分自带的几何体API默认有.index属性,不过外部加载的gltf等模型,geometry.index数据可能有,也可能没有,具体看外部模型情况。
console.log('index', mesh.geometry.index);3、顶点数量BufferAttribute.count
const count = pos.count; //几何体顶点数量
console.log('count', count); 4、.getX()、.getY()和.getZ()
BufferAttribute对象具有.getX()、.getY()和.getZ()方法。
BufferAttribute共有顶点数量count,通过.getX(i)方法可以获取第i+1个点的x分量,i的范围就是[0,count-1]。
const pos = mesh.geometry.attributes.position;
// 获取几何体第一个顶点的x坐标
const x = pos.getX(0);
console.log('x', x);
.getY()、.getZ()是获取顶点数据BufferAttribute的y、z分量,使用方式和.getX()方法一样。
5、.setX()、.setY()和.setZ()
通过.getY()是获取顶点y坐标,通过.setY()是设置顶点y坐标。
pos.setY(0,100)把索引为0,也就是第一个顶点的y坐标设置为100.
const pos = mesh.geometry.attributes.position;
pos.setX(0,100);
6、批量重置几何体顶点y坐标
loader.load("../地形.glb", function (gltf) {
    model.add(gltf.scene);
    //mesh表示地形网格模型
    const mesh = gltf.scene.children[0];
    // 顶点位置数据
    const pos = mesh.geometry.attributes.position;
    const count = pos.count; //几何体顶点数量
    // 批量设置所有几何体顶点位置的y坐标
    for (let i = 0; i < count; i++) {
        const y = pos.getY(i);//获取第i+1个顶点y坐标
        pos.setY(i,y*2)//设置第i+1个顶点y坐标为自身2倍
    }
})
7、全部代码
import * as THREE from 'three';
import { GLTFLoader } from 'three/addons/loaders/GLTFLoader.js';

const group = new THREE.Group();
const gltf = new GLTFLoader();
gltf.load('./地形.glb', function (glb) {
    group.add(glb.scene)
    const mesh = glb.scene.children[0]
    const att = mesh.geometry.attributes;
    const pos = mesh.geometry.attributes.position;
    for (let i = 0; i < pos.count; i++) {
        const y = pos.getY(i);
        pos.setY(i, y * 2)
    }

})

export default group 
二十一、山脉地形高度可视化
1、全部代码
import * as THREE from 'three';
import { GLTFLoader } from 'three/addons/loaders/GLTFLoader.js';

const group = new THREE.Group();
const gltf = new GLTFLoader();
gltf.load('./地形.glb', function (glb) {
    group.add(glb.scene)
    const mesh = glb.scene.children[0]
    const pos = mesh.geometry.attributes.position;
    const count = pos.count;

    const yArr = [];

    for (let i = 0; i < count; i++) {
        yArr.push(pos.getY(i))
    }
    yArr.sort();
    const miny = yArr[0];
    const maxy = yArr[count - 1]
    const height = maxy - miny;
    console.log(miny, maxy, height);

    const colorsArr = [];
    const c1 = new THREE.Color('green');
    const c2 = new THREE.Color('#fff');
    for (let i = 0; i < count; i++) {
        const percent = (pos.getY(i) - miny) / height;
        const c = c1.clone().lerp(c2, percent);
        colorsArr.push(c.r, c.g, c.b)
    }
    const colors = new Float32Array(colorsArr)
    mesh.geometry.attributes.color = new THREE.BufferAttribute(colors, 3)
    mesh.material = new THREE.MeshLambertMaterial({
        vertexColors: true
    })
})


export default group 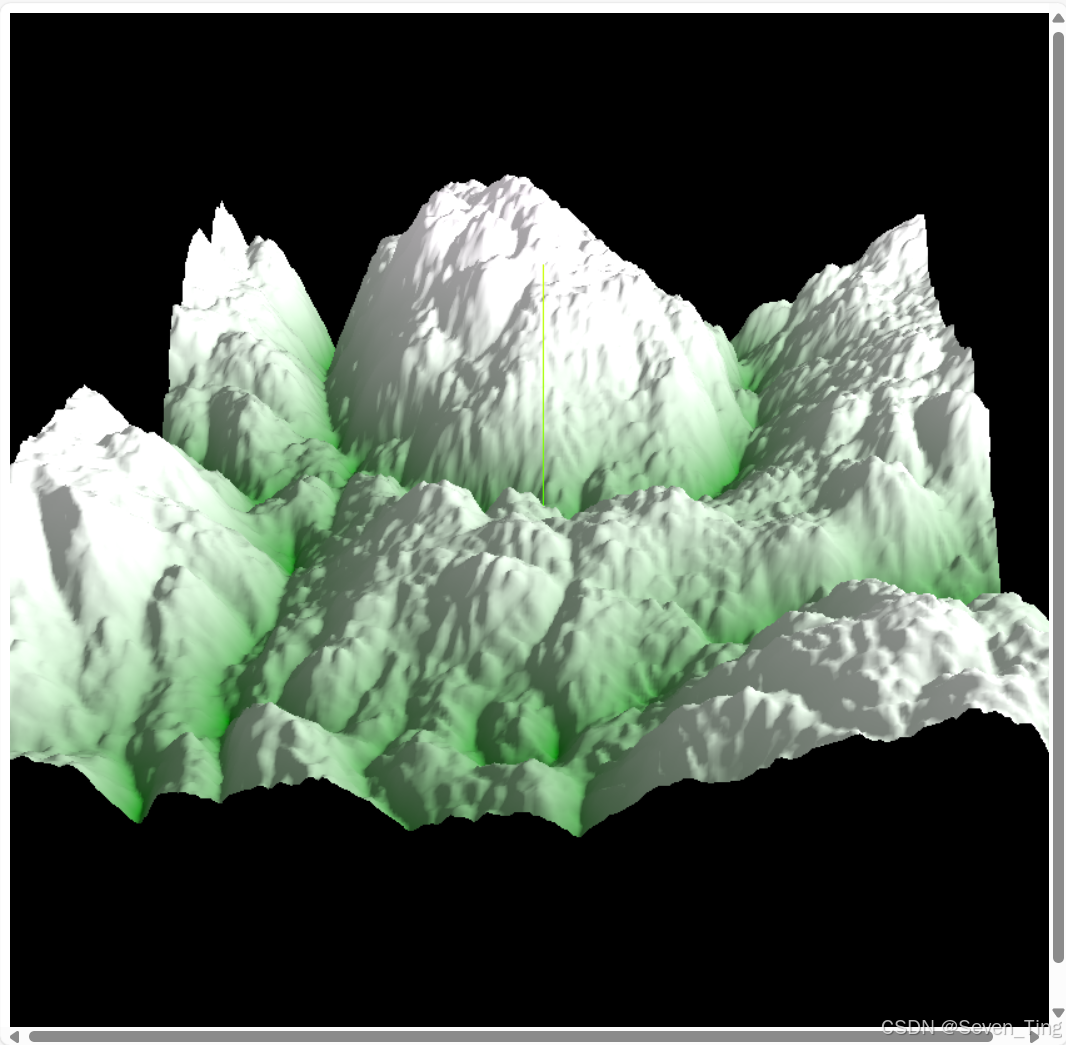


 975
975

 被折叠的 条评论
为什么被折叠?
被折叠的 条评论
为什么被折叠?
 到【灌水乐园】发言


