


香橙派5部署chatglm2-6b模型
环境信息:
部署服务器:orangepi 5 16G版本
系统版本:Ubuntu 22.04.3 LTS
参考文档:
利用GPU加速,在Orange Pi上跑LLMs : https://zhuanlan.zhihu.com/p/650110025
遥遥领先!手把手带你用国产香橙派部署清华AI语言模型,比肩GPT,树莓派做得到吗?:https://zhuanlan.zhihu.com/p/663853222
一、基础环境调整
(1)替换apt下载源
#更新软件包
apt update
#安装vim
apt install vim -y

#备份原sources.list文件
cp /etc/apt/sources.list /etc/apt/sources.list_bak
vim /etc/apt/sources.list
#插入以下信息
deb http://repo.huaweicloud.com/ubuntu-ports/ jammy main restricted universe multiverse
#deb-src http://repo.huaweicloud.com/ubuntu-ports/ jammy main restricted universe multiverse

deb http://repo.huaweicloud.com/ubuntu-ports/ jammy-security main restricted universe multiverse
#deb-src http://repo.huaweicloud.com/ubuntu-ports/ jammy-security main restricted universe multiverse

deb http://repo.huaweicloud.com/ubuntu-ports/ jammy-updates main restricted universe multiverse
#deb-src http://repo.huaweicloud.com/ubuntu-ports/ jammy-updates main restricted universe multiverse

deb http://repo.huaweicloud.com/ubuntu-ports/ jammy-backports main restricted universe multiverse
#deb-src http://repo.huaweicloud.com/ubuntu-ports/ jammy-backports main restricted universe multiverse

#更新软件包
apt update && apt upgrade -y
#安装cmake
apt install cmake -y
二、安装miniforge
(1)、获取miniforge安装包
#安装wget
apt install wget -y

#方法1:不使用科学上网下载速度可能较慢
wget -e https://github.com/conda-forge/miniforge/releases/download/23.3.1-1/Miniforge3-Linux-aarch64.sh
#方法2:本地下载完成后上传scp命令或使用桌面端Winscp等
scp -p22 username@ip:物理机目录/Miniforge3-Linux-aarch64.sh ~/
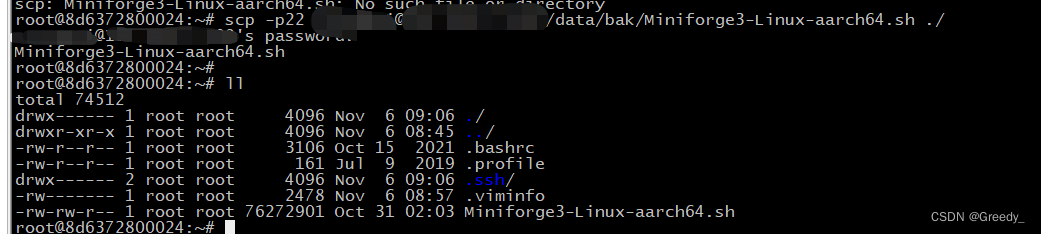
图为方法2
(2)、安装miniforge
cd ~/
sh Miniforge3-Linux-aarch64.sh
安装过程:

输入回车
q退出即可

输入yes
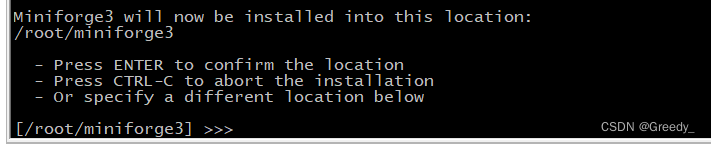
Miniforge3 will now be installed into this location: #Miniforge3现在将安装到此位置:
/root/miniforge3

  - Press ENTER to confirm the location		#-按ENTER确认位置
  - Press CTRL-C to abort the installation	#-按CTRL-C中止安装
  - Or specify a different location below	#-或者在下面指定其他位置
想省事可以直接回车,如果想安装到其他目录输入具体目录。

安装完成后:
#激活一下conda的python环境
source ~/.bashrc
conda -V
conda 23.3.1
三、下载llvm
(1)、下载压缩包
#方式1:下载较慢
wget -e https://github.com/llvm/llvm-project/releases/download/llvmorg-17.0.2/clang+llvm-17.0.2-aarch64-linux-gnu.tar.xz
#方式2:本地下载完成后上传scp命令或使用桌面端Winscp等
scp -p22 username@ip:物理机目录/clang+llvm-17.0.2-aarch64-linux-gnu.tar.xz ~/

#解压
tar -xvf clang+llvm-17.0.2-aarch64-linux-gnu.tar.xz
四、下载mlc-ai
(1)、获取项目代码
#方式1:下载较慢
git clone --recursive https://github.com/mlc-ai/relax.git tvm_unity && cd tvm_unity/
#方式2:同之前,直接上传压缩包
scp -p22 username@ip:物理机目录/tvm_utity.tar.gz ~/
tar -zxvf tvm_utity.tar.gz
(2)、编译
cd tvm_unity/
mkdir -p build && cd build
cp ../cmake/config.cmake .

vi config.cmake
set(CMAKE_BUILD_TYPE RelWithDebInfo) #这一项在文件中没有,需要添加
set(USE_OPENCL ON) #这一项在文件中可以找到,需要修改
set(HIDE_PRIVATE_SYMBOLS ON) #这一项在文件中没有,需要添加
set(USE_LLVM /root/clang+llvm-17.0.2-aarch64-linux-gnu/bin/llvm-config) #这一项在文件中可以找到,需要修改

#安装编译环境
apt install g++ zlib1g-dev -y
apt-get install libvcflib-tools

cmake ..
#开始编译tvm
make -j8
(3)、python依赖安装
cd ../python
apt install pip git -y
#安装依赖
pip3 install --user .
#如果直接安装报错,可以指定python安装依赖地址
pip3 install --user . -i http://pypi.douban.com/simple --trusted-host pypi.douban.com
(4)、添加环境变量
vim /root/.bashrc
#添加以下环境变量
export PATH="$PATH:/root/.local/bin"
#生效环境变量
source /root/.bashrc
#测试安装
tvmc
#输出结果
usage: tvmc [--config CONFIG] [-v] [--version] [-h] {run,tune,compile} ...

TVM compiler driver

options:
  --config CONFIG     configuration json file
  -v, --verbose       increase verbosity
  --version           print the version and exit
  -h, --help          show this help message and exit.

commands:
  {run,tune,compile}
    run               run a compiled module
    tune              auto-tune a model
    compile           compile a model.

TVMC - TVM driver command-line interface
五、安装mlc-llm
(1)、下载源码
#方式1:下载较慢
git clone --recursive https://github.com/mlc-ai/mlc-llm.git && cd mlc-llm
#方式2:本地下载完成后上传scp命令或使用桌面端Winscp等
scp -p22 username@ip:物理机目录/mlc-llm.tar.gz ~/

#解压
tar -xvf mlc-llm.tar.gz
cd mlc-llm/
(2)、安装python依赖
cd ~/mlc-llm/
pip3 install --user .
#如果直接安装异常,可以指定python安装依赖地址
pip3 install --user . -i http://pypi.douban.com/simple --trusted-host pypi.douban.com
#安装完成后验证
python3 -m mlc_llm.build –help
#输出结果
usage: build.py [-h] [--model MODEL] [--hf-path HF_PATH]
                [--quantization {autogptq_llama_q4f16_0,autogptq_llama_q4f16_1,q0f16,q0f32,q3f16_0,q3f16_1,q4f16_0,q4f16_1,q4f16_2,q4f16_ft,q4f32_0,q4f32_1,q8f16_ft,q8f16_1}] [--max-seq-len MAX_SEQ_LEN]
                [--target TARGET] [--reuse-lib REUSE_LIB] [--artifact-path ARTIFACT_PATH] [--use-cache USE_CACHE] [--convert-weight-only] [--build-model-only] [--debug-dump] [--debug-load-script]
                [--llvm-mingw LLVM_MINGW] [--cc-path CC_PATH] [--system-lib] [--sep-embed] [--use-safetensors] [--enable-batching] [--no-cutlass-attn] [--no-cutlass-norm] [--no-cublas] [--use-cuda-graph]
                [--num-shards NUM_SHARDS] [--use-flash-attn-mqa] [--pdb] [--use-vllm-attention]
build.py: error: unrecognized arguments: –help
六、下载chatglm2-6b模型
(1)、下载模型
#创建目录,用于存放模型
mkdir -p dist/models && cd dist/models
#方法1:下载模型,需要科学上网
git lfs install && git clone https://huggingface.co/THUDM/chatglm2-6b
#方法2:本地上传
scp -p22 username@ip:物理机目录/mlc-llm.tar.gz ~/
tar -zxvf chatglm2-6b.tar.gz
七、安装OpenCL驱动
(1)、安装驱动
#步骤安装教程地址,需要科学上网
https://llm.mlc.ai/docs/install/gpu.html#orange-pi-5-rk3588-based-sbc
#步骤内容
#Download and install the Ubuntu 22.04 for your board from here
#Download and install libmali-g610.so
cd /usr/lib && sudo wget https://github.com/JeffyCN/mirrors/raw/libmali/lib/aarch64-linux-gnu/libmali-valhall-g610-g6p0-x11-wayland-gbm.so

#Check if file mali_csffw.bin exist under path /lib/firmware, if not download it with command:
cd /lib/firmware && sudo wget https://github.com/JeffyCN/mirrors/raw/libmali/firmware/g610/mali_csffw.bin

#Download OpenCL ICD loader and manually add libmali to ICD
apt update
apt install mesa-opencl-icd
mkdir -p /etc/OpenCL/vendors
echo "/usr/lib/libmali-valhall-g610-g6p0-x11-wayland-gbm.so" | sudo tee /etc/OpenCL/vendors/mali.icd

#Download and install libOpenCL
apt install ocl-icd-opencl-dev

#Download and install dependencies for Mali OpenCL
apt install libxcb-dri2-0 libxcb-dri3-0 libwayland-client0 libwayland-server0 libx11-xcb1

#Download and install clinfo to check if OpenCL successfully installed
apt install clinfo

#To verify you have correctly installed OpenCL runtime and Mali GPU driver, run clinfo in command line and see if you can get the GPU information. You are expect to see the following information:

clinfo
arm_release_ver: g13p0-01eac0, rk_so_ver: 3
Number of platforms                               2
   Platform Name                                   ARM Platform
   Platform Vendor                                 ARM
   Platform Version                                OpenCL 2.1 v1.g6p0-01eac0.2819f9d4dbe0b5a2f89c835d8484f9cd
   Platform Profile                                FULL_PROFILE
   ...

#注:以上下载文件可以手动上传物理机传入容器内,放置指定目录即可
八、安装rust
(1)安装
#下载安装rust
#方法1
apt install curl -y
curl --proto '=https' --tlsv1.2 -sSf https://sh.rustup.rs | sh
#方法2
apt install rustc cargo -y
#添加环境变量
vim /root/.bashrc
#添加内容
export PATH="$PATH:/root/.cargo/bin"
source ~/.bashrc

rustc --version
#输出
rustc 1.66.1 (90743e729 2023-01-10) (built from a source tarball)
九、编译模型
(1)、编译模型
#切换到mlc-llm目录
cd /root/mlc-llm
#chatglm2-6b根据model目录下信息自行修改
python3 -m mlc_llm.build --model chatglm2-6b --target opencl --max-seq-len 32768 --quantization q8f16_1
#编译完成会生成一个so文件
ll dist/chatglm2-6b-q8f16_1/chatglm2-6b-q8f16_1-opencl.so
-rwxr-xr-x 1 root root 3065776 Nov 10 15:27 dist/chatglm2-6b-q8f16_1/chatglm2-6b-q8f16_1-opencl.so*

#在/root/mlc-llm目录下执行
mkdir -p build && cd build
cmake .. && cmake --build . --parallel $(nproc) && cd ..

#编译完成后
ls -l ./build/
total 89208
-rw-r--r--  1 root root    26782 Nov 10 15:31 CMakeCache.txt
drwxr-xr-x 11 root root     4096 Nov 10 15:34 CMakeFiles
-rw-r--r--  1 root root     6529 Nov 10 15:31 cmake_install.cmake
-rw-r--r--  1 root root     3095 Nov 10 15:31 CPackConfig.cmake
-rw-r--r--  1 root root     3387 Nov 10 15:31 CPackSourceConfig.cmake
-rw-r--r--  1 root root 16976604 Nov 10 15:34 libmlc_llm.a
-rwxr-xr-x  1 root root 35807824 Nov 10 15:34 libmlc_llm_module.so
-rwxr-xr-x  1 root root 35807824 Nov 10 15:34 libmlc_llm.so
-rw-r--r--  1 root root    23948 Nov 10 15:31 Makefile
-rwxr-xr-x  1 root root  2659392 Nov 10 15:34 mlc_chat_cli
drwxr-xr-x  6 root root     4096 Nov 10 15:34 tokenizers
drwxr-xr-x  3 root root     4096 Nov 10 15:34 tvm
-rw-r--r--  1 root root     1886 Nov 10 15:31 TVMBuildOptions.txt

./build/mlc_chat_cli –help
Maximum number of positional arguments exceeded
Usage: mlc_chat_cli [--help] [--version] [--model VAR] [--model-lib-path VAR] [--device VAR] [--evaluate] [--eval-prompt-len VAR] [--eval-gen-len VAR]

MLCChat CLI is the command line tool to run MLC-compiled LLMs out of the box.
Note: the --model argument is required. It can either be the model name with its quantization scheme or a full path to the model folder. In the former case, the provided name will be used to search for the model folder over possible paths. --model-lib-path argument is optional. If unspecified, the --model argument will be used to search for the library file over possible paths.

Optional arguments:
  -h, --help            shows help message and exits
  -v, --version         prints version information and exits
  --model               [required] the model to use
  --model-lib-path      [optional] the full path to the model library file to use
  --device              [default: "auto"]
  --evaluate
  --eval-prompt-len     [default: 128]
  --eval-gen-len        [default: 1024]

#运行模型
./build/mlc_chat_cli --model chatglm2-6b-q8f16_1 --device opencl
#输出
Use MLC config: "/root/mlc-llm/dist/chatglm2-6b-q8f16_1/params/mlc-chat-config.json"
Use model weights: "/root/mlc-llm/dist/chatglm2-6b-q8f16_1/params/ndarray-cache.json"
Use model library: "/root/mlc-llm/dist/chatglm2-6b-q8f16_1/chatglm2-6b-q8f16_1-opencl.so"
You can use the following special commands:
  /help               print the special commands
  /exit               quit the cli
  /stats              print out the latest stats (token/sec)
  /reset              restart a fresh chat
  /reload [model]  reload model `model` from disk, or reload the current model if `model` is not specified

Loading model...
arm_release_ver of this libmali is 'g6p0-01eac0', rk_so_ver is '7'.
Loading finished
Running system prompts...
System prompts finished
问: 你是谁
答: 我是一个名为 ChatGLM2-6B 的人工智能助手,是基于清华大学 KEG 实验室和智谱 AI 公司于 2023 年共同训练的语言模型开发的。我的任务是针对用户的问题和要求提供适当的答复和支持。
问: /stats
prefill: 0.7 tok/s, decode: 1.9 tok/s
十、代码调用demo
(1)、测试代码
vi ~/.bashrc
#添加环境变量,$(pwd)替换为安装目录
export TVM_HOME=$(pwd)/tvm_unity
export MLC_LLM_HOME=$(pwd)/mlc-llm
export PYTHONPATH=$TVM_HOME/python:$MLC_LLM_HOME/python:${PYTHONPATH}
#生效环境变量
source ~/.bashrc

#在/root/mlc-llm目录下创建demo.py(调用模型需要),插入以下内容
from mlc_chat import ChatModule
from mlc_chat.callback import StreamToStdout
cm = ChatModule(model="chatglm2-6b-q8f16_1")

# Generate a response for a given prompt
output = cm.generate(
           prompt="你是谁?",
              progress_callback=StreamToStdout(callback_interval=2),
              )

# Print prefill and decode performance statistics
print(f"Statistics: {cm.stats()}\n")

#注,部分python依赖可能需要手动安装
python demo.py
#测试输出
arm_release_ver of this libmali is 'g6p0-01eac0', rk_so_ver is '7'.
我是一个名为 ChatGLM2-6B 的人工智能助手,是基于清华大学 KEG 实验室和智谱 AI 公司于 2023 年共同训练的语言模型开发的。我的任务是针对用户的问题和要求提供适当的答复和支持。
Statistics: prefill: 1.4 tok/s, decode: 2.2 tok/s


 4130
4130


 被折叠的 条评论
为什么被折叠?
被折叠的 条评论
为什么被折叠?
 到【灌水乐园】发言


