


背景
最近紧急承接了一个以ES为基础的项目,核心功能是数据检索,然而我发现项目的性能有大问题😡亟待优化。因此ES学习任务的优先级被提到了最高,而容器化和事务专题的整理任务往后顺延。正好赶上中秋节,有机会巩固一下基础🕴顺便对之前学习的内容进行阶段性总结。
本文作为三方件专题的第一篇,介绍ES的基础内容,包括:ES的基本概念、Http接口以及Java相关API等;分布式相关的概念和ES性能调优等放在ES高级篇中介绍。
本文的核心目的是支撑后续开发中的快速查询,也可以帮助读者快速入门ES。
1.概念
1.1 索引
索引类似Mysql的schema,是一个分组的概念,不同的索引库相互隔离;也可以理解成是文档数据的集合。ES对外提供的能力都以HTTP接口形式呈现,而这些接口基本都需要指定索引。在ES节点或集群中可以有任意数量的索引,需要保证索引名全局唯一。
1.2 类型
ES废弃了其他不必要的类型(6.X版本后),目前只有_doc文档类型一种。
1.3 文档
文档以JSON格式存在于索引库中(类似于数据库记录),是ES与外界交互的最小颗粒,入库和查询时都以文档为单位。在百度或google上搜索关键字得到的返回结果就是文档列表。
1.4 mapping
1.4.1 mapping介绍
为所属ES库指定字段类型,可以自己定义(显示映射),也可以让ES自动生成(动态映射);后续入库文档对应的字段类型必须与此保持一致,否则会入库失败并抛出异常。
可在新建索引时同时设置mapping,不设置mapping默认为空:
#创建索引库-同时指定mapping映射
PUT http://localhost:9200/sheng
{
    "mappings":{
        "properties":{
            "name":{
                "type":"text",
                "index":true,
                "analyzer":"ik_max_word"
            },
            "age":{
                "type":"integer",
                "index":true
            },
            "email":{
                "type":"keyword",
                "index":true
            }
        }
    }
}
查询sheng索引库的映射:
GET http://localhost:9200/sheng/_mapping
#得到结果:
{
    "sheng": {
        "mappings": {
            "properties": {
                "age": {
                    "type": "integer"
                },
                "email": {
                    "type": "keyword"
                },
                "name": {
                    "type": "text",
                    "analyzer": "ik_max_word"
                }
            }
        }
    }
}
其中:
type为字段指定类型,如keyword和text表示字符串类型,在字段类型汇中进行介绍;
analyzer用于指定入库分析器类型,包括ik_max_word和ik_smart等,后续在分析器中介绍;
index表示是否作为索引,false表示不作为索引,即不进行倒排索引,因此无法作为关键字搜索;
需要注意:mapping中的字段类型只能新增不能修改或删除;
1.4.2 mapping常用的字段类型
1.字符串类型:
ES取消了string类型(5.x版本以后),由text和keyword取代:
(1) text支持分词—全文检索,不支持聚合、排序操作;
(2) keyword不进行分词—直接检索,支持聚合、排序操作。
2.整数和浮点类型:
常见有integer, long, short, byte, double, float(与java无区别🥸略); 注意也可以传入类似"1"等字符串型整数;
3.布尔类型:
boolean(与java无区别🥸略)
4.日期类型:
类型为date,支持以下格式:
[1]2015-01-01, 2015/01/01 12:10:30
[2] long类型的毫秒数
[3] integer的秒数
建议同时使用format指定时间格式(指定后-必须完全匹配), 如:
#POST http://localhost:9200/sheng/_mapping
{
    "properties":{
        "testdayf":{
            "type":"date",
            "format": "yyyy-MM-dd HH:mm:ss",
            "index":true
        }
    }
}
入库时,文档的testdayf字段必须为 2022-12-12 12:12:12形式,即使2022-12-12也会报错;
5.二进制类型
binary类型接受base64编码的字符串和二进制数据,默认不可搜索。
使用被指定为binay类型的字段进行搜索时,抛出如下异常:
{
    "type": "query_shard_exception",
    "reason": "Binary fields do not support searching",
    "index_uuid": "coAY6GXuRfm7V4Dca5fKpQ",
    "index": "sheng"
}
返回时,随文档一起放回:
GET http://localhost:9200/sheng/_doc/21
{
    "_index": "sheng",
    "_type": "_doc",
    "_id": "21",
    "_version": 1,
    "_seq_no": 3,
    "_primary_term": 1,
    "found": true,
    "_source": {
        "name": "sy21",
        "age": 21,
        "binatytest": "1MOyoQIABAAAAAAAAAAAAAAABAAEABkzMau+fbwAACABF..."
    }
}
6.复合类型:
数组: 默认任何字段都可以包括多个值,不过数组中所有值必须具有相同的数据类型
在索引库中新增以下映射:
{
    "properties": {
        "name": {
            "type": "text",
            "index": true
        },
        "addr": {
            "type": "text",
            "index": true
        }
    }
}
新建文档:
POST http://localhost:9200/sheng/_doc/1
{
    "name":"sy1",
    "addr":["beijing","nanjing","shanghai"]
}
查询文档:
{
    "_index": "sheng",//...
    "_source": {
        "name": "sy1",
        "addr": [
            "beijing",
            "nanjing",
            "shanghai"
        ]
    }
}
对象: JSON格式数据
在索引库中新增以下映射:
{
    "properties": {
        "name": {
            "type": "text"
        },
        "addr1": {
            "properties": {
                "addr21": {
                    "type": "text"
                },
                "addr22": {
                    "properties": {
                        "addr31": {
                            "type": "text"
                        },
                        "addr32": {
                            "type": "text"
                        }
                    }
                }
            }
        }
    }
}
新建文档:
{
    "name": "sy1",
    "addr1": {
        "addr21": "21",
        "addr22": {
            "addr31": "31",
            "addr32": "32"
        }
    }
}
查询文档:
{
    "_index": "sheng", //...
    "_source": {
        "name": "sy1",
        "addr1": {
            "addr21": "21",
            "addr22": {
                "addr31": "31",
                "addr32": "32"
            }
        }
    }
}
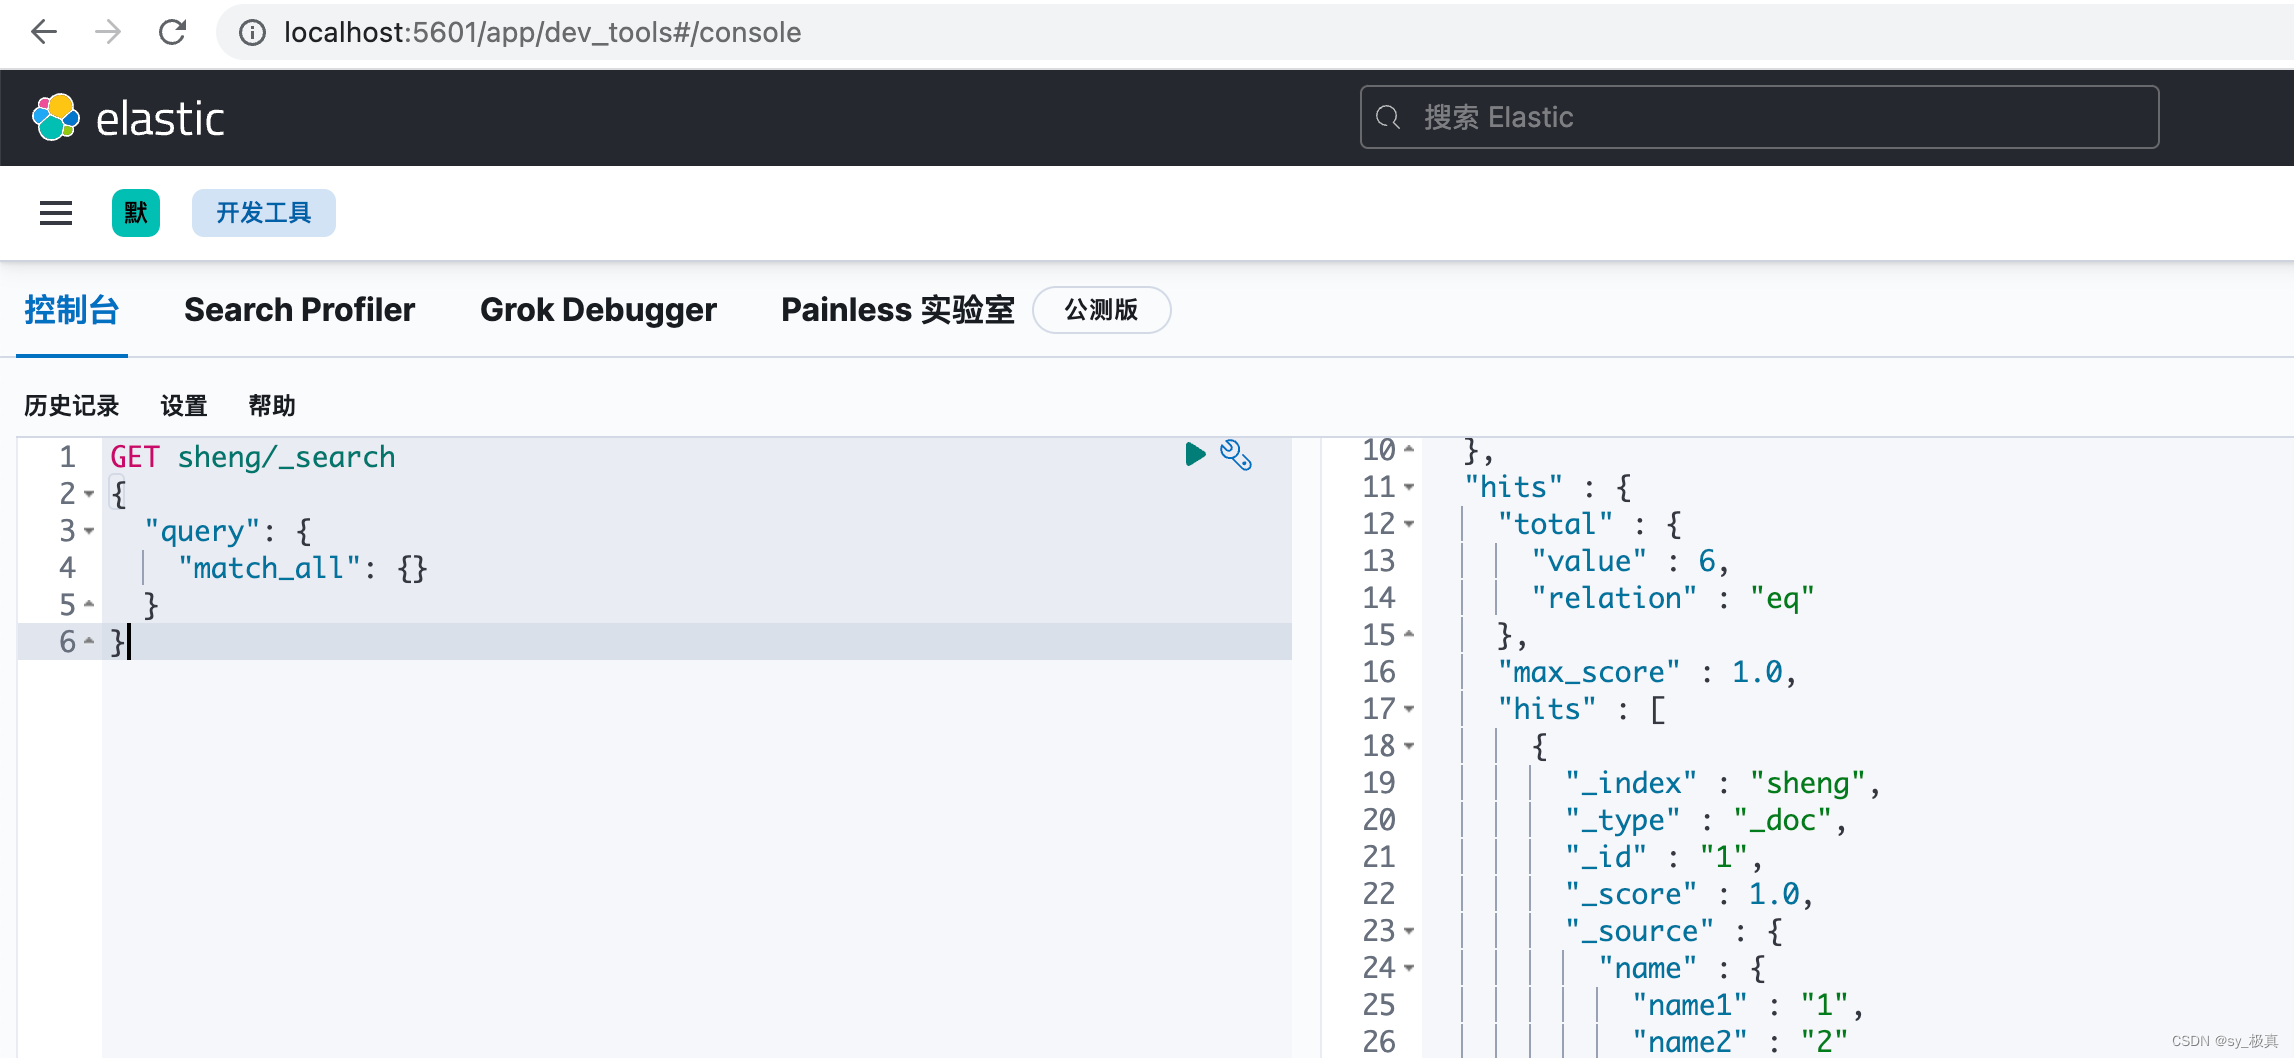
嵌套: Map格式数据
在索引库中新增以下映射:
{
    "properties": {
        "name": {
            "type": "nested"
        }
    }
}
新增文档:
{
    "name":{
        "name1":"1",
        "name2":"2"
    }
}
查询文档:
{
    "_index": "sheng",//...
    "_source": {
        "name": {
            "name1": "1",
            "name2": "2"
        }
    }
}
1.6 分词器
分析器由字符过滤器s、 一个分词器、词元过滤器s组成。其中核心是分词器,因此很多资料上对二者没有严格的区分;过滤器主要用于剥离HTML元素、字符替换,以及去除停词(如:a, is,the)等。本文不深究分析器内部组成原理,因此后文对分析器和分词器概念不再做区分,一律使用分词器表示。
需要注意的是:text字符类型支持分词而keyword不支持,因此分析器的概念是针对text类型的字符串,对其他类型字段分词没有意义;因此后文提及文档入库以及检索时的分词概念均针对text类型, 不再单独强调。
分词器在文档入库以及检索时发挥作用,可手动指定或使用默认分词器:
文档入库时,分词器的优先级顺序排序如下:
1.字段指定的analyzer(文档中指定或者mapping中指定);
2.settings中配置的默认分词器;
3.使用默认的standard分词器;
检索文档时,分词器的优先级顺序排序如下:
1.搜索时指定的search_analyzer;
2.mapping中对应字段的search_analyzer分词器类型;
3.settings中配置的默认分词器;
4.使用默认的standard分词器;
在ES中,可配置ES自带的或第三方提供的或自定义的分词器。如默认的standard分析器为ES自带,中文相关的ik_smart和ik_max_word插件来自第三方(安装教程见附录2😎),以下简单介绍一下这三类分词器的使用:
standard:
基于unicode文本分割算法进行分词:
POST http://localhost:9200/_analyze
{
    "analyzer":"standard",
    "text":"I had a dream, when I was young."
}
按照空格和特殊字符进行分割后,还会将所有单词转为小写:
{
    "tokens": [
        {
            "token": "i",
            "start_offset": 0,
            "end_offset": 1,
            "type": "word",
            "position": 0
        },
        {
            "token": "had",
            "start_offset": 2,
            "end_offset": 5,
            "type": "word",
            "position": 1
        },
        {
            "token": "a",
            "start_offset": 6,
            "end_offset": 7,
            "type": "word",
            "position": 2
        },
        {
            "token": "dream",
            "start_offset": 8,
            "end_offset": 13,
            "type": "word",
            "position": 3
        },
        {
            "token": "when",
            "start_offset": 15,
            "end_offset": 19,
            "type": "word",
            "position": 4
        },
        {
            "token": "i",
            "start_offset": 20,
            "end_offset": 21,
            "type": "word",
            "position": 5
        },
        {
            "token": "was",
            "start_offset": 22,
            "end_offset": 25,
            "type": "word",
            "position": 6
        },
        {
            "token": "young",
            "start_offset": 26,
            "end_offset": 31,
            "type": "word",
            "position": 7
        }
    ]
}
ik_smart和ik_max_word
使用ik_smart分词器:
POST http://localhost:9200/_analyze
{
    "analyzer":"ik_smart",
    "text":"我年轻时有个梦想"
}
得到以下分词结果:
{
    "tokens": [
        {
            "token": "我",
            "start_offset": 0,
            "end_offset": 1,
            "type": "CN_CHAR",
            "position": 0
        },
        {
            "token": "年轻",
            "start_offset": 1,
            "end_offset": 3,
            "type": "CN_WORD",
            "position": 1
        },
        {
            "token": "时有",
            "start_offset": 3,
            "end_offset": 5,
            "type": "CN_WORD",
            "position": 2
        },
        {
            "token": "个",
            "start_offset": 5,
            "end_offset": 6,
            "type": "CN_CHAR",
            "position": 3
        },
        {
            "token": "梦想",
            "start_offset": 6,
            "end_offset": 8,
            "type": "CN_WORD",
            "position": 4
        }
    ]
}
使用ik_max_word分词器:
{
    "tokens": [
        {
            "token": "我",
            "start_offset": 0,
            "end_offset": 1,
            "type": "CN_CHAR",
            "position": 0
        },
        {
            "token": "年轻时",
            "start_offset": 1,
            "end_offset": 4,
            "type": "CN_WORD",
            "position": 1
        },
        {
            "token": "年轻",
            "start_offset": 1,
            "end_offset": 3,
            "type": "CN_WORD",
            "position": 2
        },
        {
            "token": "时有",
            "start_offset": 3,
            "end_offset": 5,
            "type": "CN_WORD",
            "position": 3
        },
        {
            "token": "个",
            "start_offset": 5,
            "end_offset": 6,
            "type": "CN_CHAR",
            "position": 4
        },
        {
            "token": "梦想",
            "start_offset": 6,
            "end_offset": 8,
            "type": "CN_WORD",
            "position": 5
        }
    ]
}
发现ik_max_word尽可能地进行拆词和组词,而ik_smart基本按照语义进行拆词。
2.ES和kibana安装流程
2.1 ES安装流程
在MAC上基于brew安装ES流程比较简单:
#1.安装ES
brew install elastic/tap/elasticsearch-full

#2.启动ES
brew services start elastic/tap/elasticsearch-full
验证安装是否成功:
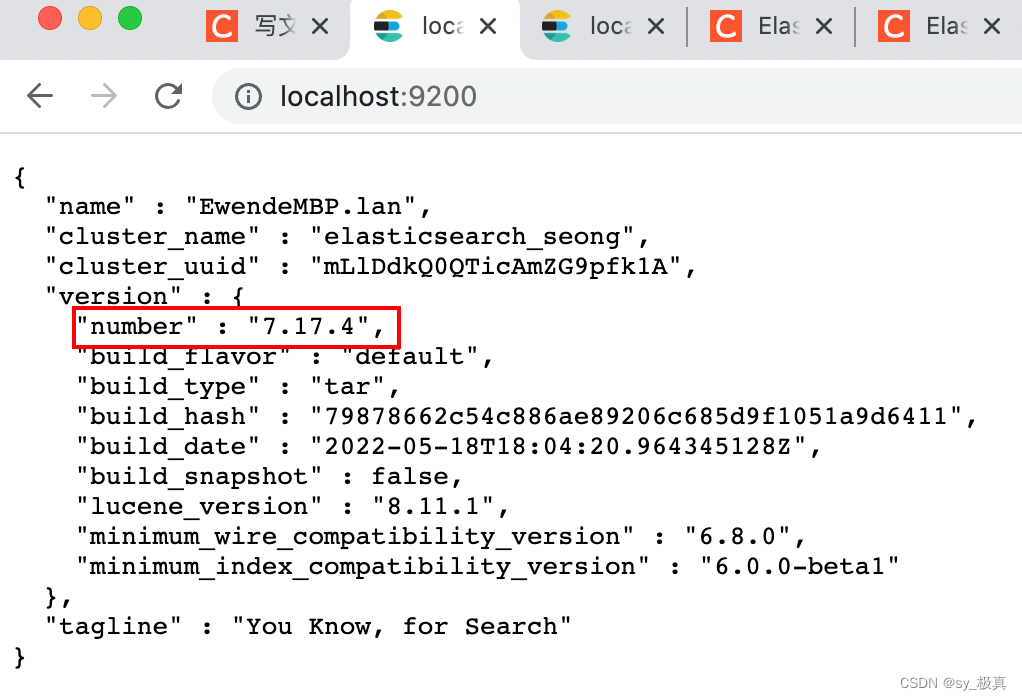
注意ES的版本号,安装kibana和ik插件时需要保持版本一致;
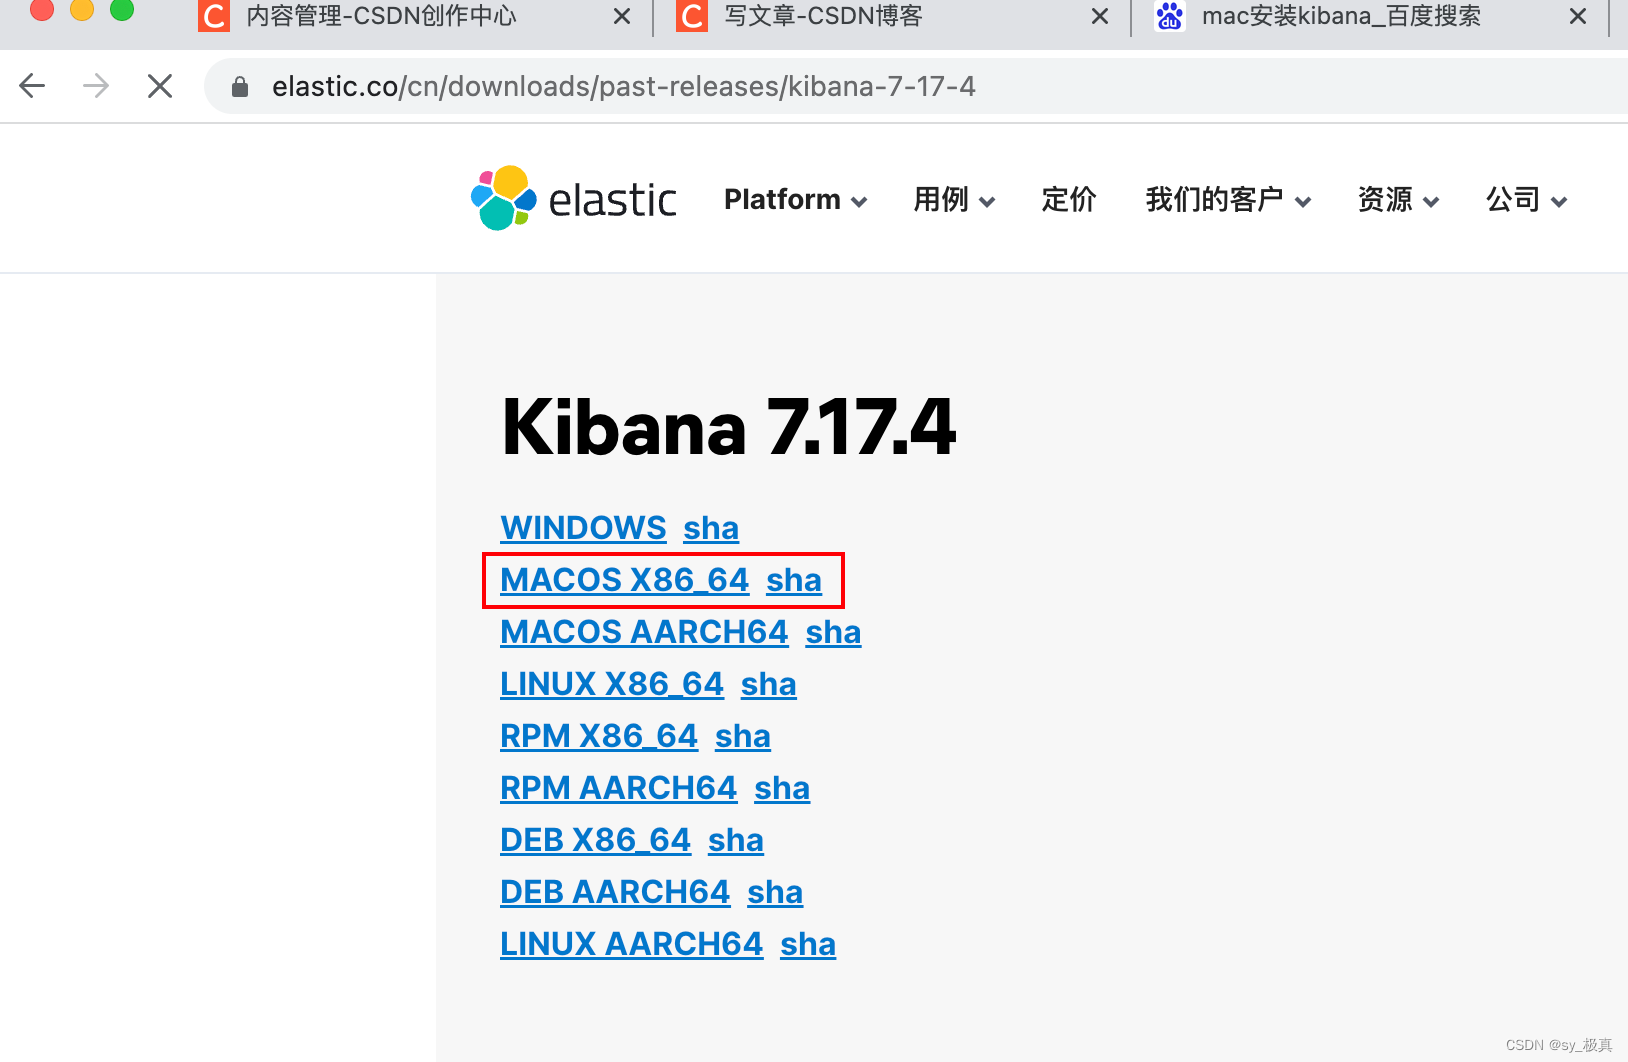
2.2 kibana安装流程
kibana可以作为的可视化工具,安装时需要注意保持kibana与es的版本一致性;
下载后进行解压缩安装:
[1] 修改./config/kibana.yml配置文件
server.host: "0.0.0.0"
elasticsearch.hosts: ["http://localhost:9200"]
i18n.locale: "zh-CN"
[2] 使用非root用户执行kibana
# 注意:给用户添加访问和执行kibana的权限
su seong
sh kibana
安装完kibana后,在5601端口侦听:
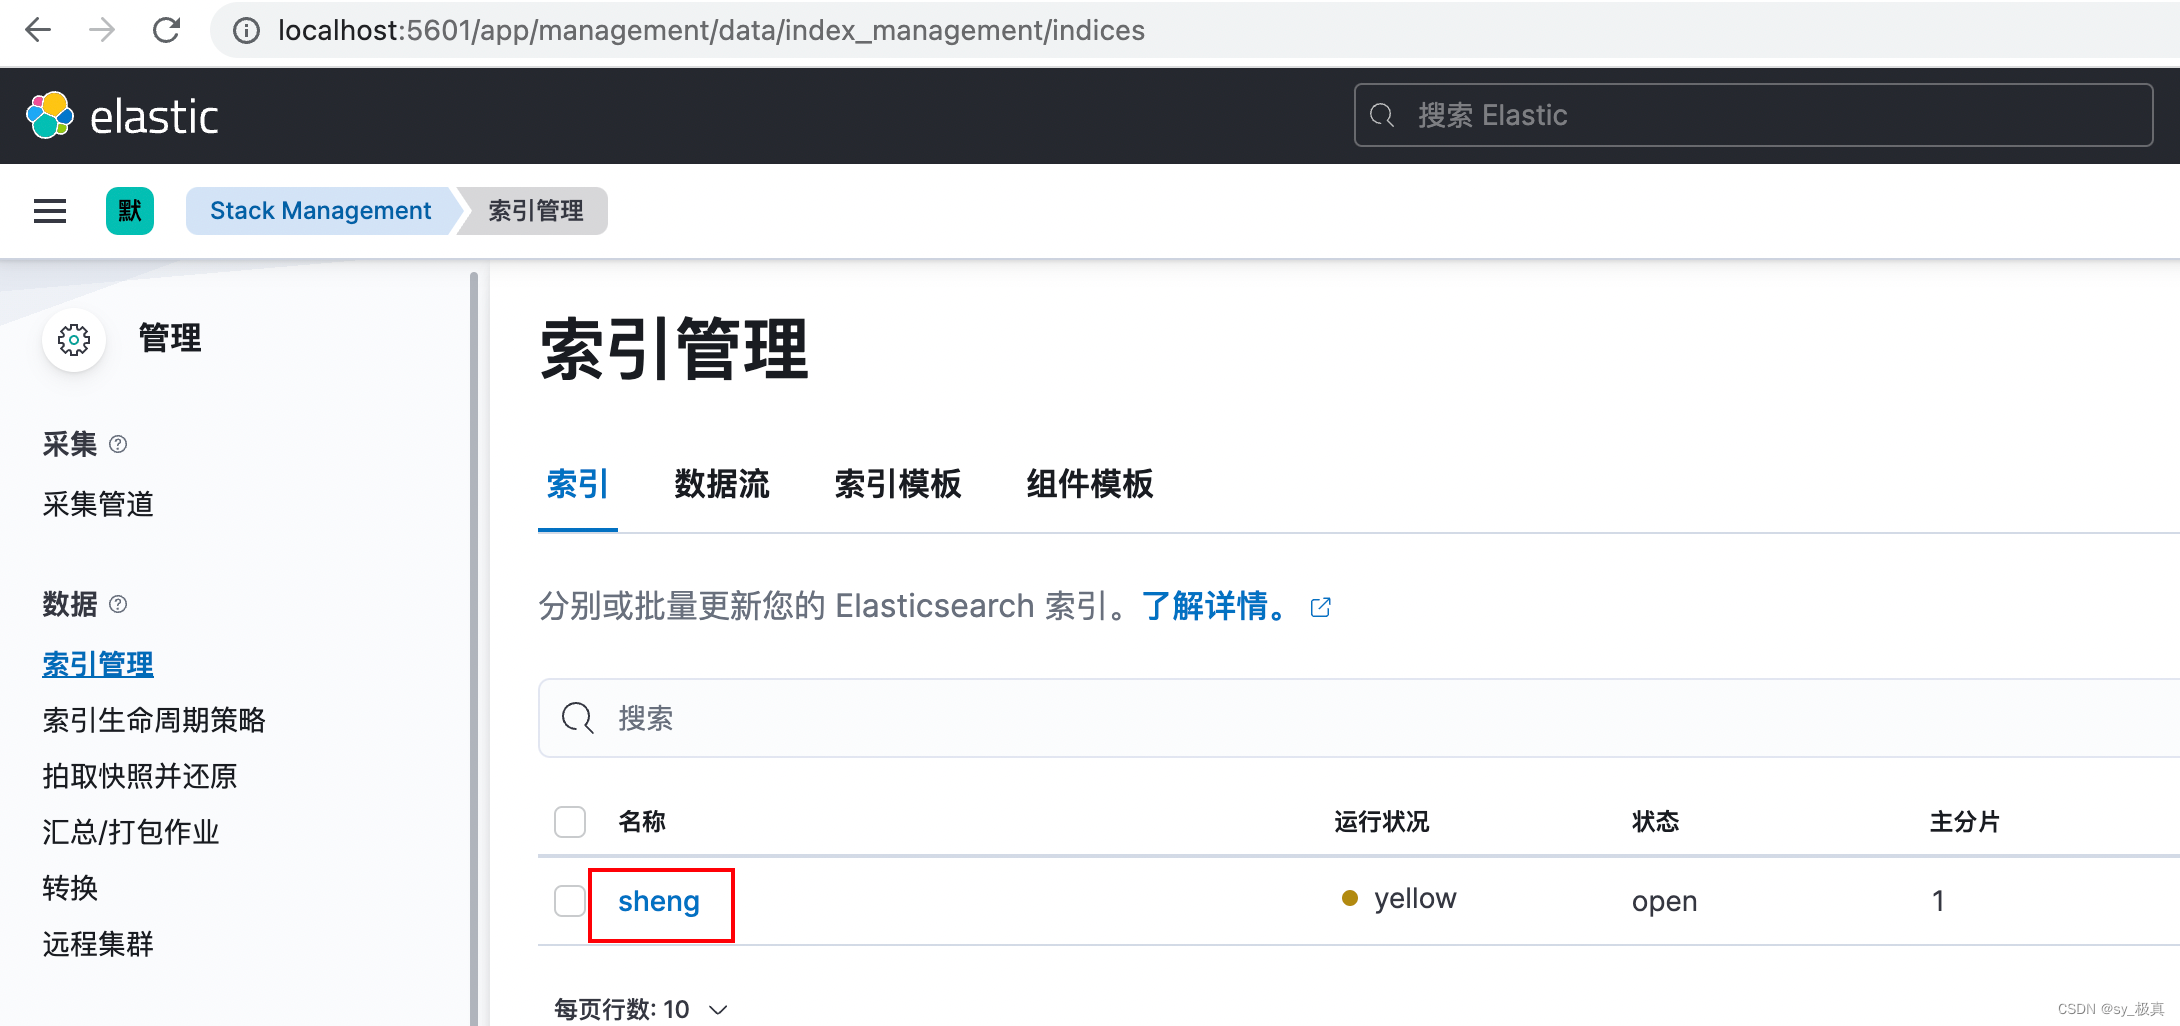
如上图所示,该ES实例中只有sheng一个索引库,且该索引库只有一个分片。
另外,开发工具页面提供了与ES交互的接口:
3.HTTP接口介绍
ES对外提供Restful风格的Http接口,部分与Restful风格有出入:如创建索引时使用PUT而非POST.
3.1 索引相关
索引接口格式为:http://localhost:9200/${index_name}, 支持 [DELETE, PUT, GET, HEAD]方法,即索引支持新增、按名称删除和查询,不支持修改。
3.1.1 创建索引
PUT http://localhost:9200/sheng
#得到
{
    "acknowledged": true,
    "shards_acknowledged": true,
    "index": "seong"
}
如果索引已存在,会抛出异常:resource_already_exists_exception.
3.1.2 删除索引
DELETE http://localhost:9200/sheng
#得到
{
    "acknowledged": true
}
被删除的索引不存在时,抛出异常:index_not_found_exception.
3.1.3 查询索引
PUT http://localhost:9200/sheng
#得到
{
    "acknowledged": true,
    "shards_acknowledged": true,
    "index": "seong"
}
不存在时,抛出异常:index_not_found_exception.
3.2 mapping相关
映射的接口格式为http://localhost:9200/sheng/_mapping, 支持 [POST, PUT, GET]方法,即映射支持新增、修改和查询,不支持删除;
需要注意🥸映射中字段类型一旦创建,不可修改和删除,因此PUT方法只能新增字段类型。
{
    "properties": {
        "name1": {
            "type": "text",
            "index": true
        },
        "name2": {
            "type": "long",
            "index": true
        }
    }
}
该接口可同时添加多个字段的类型,操作为事务型,一个失败-所有添加操作都会失败;
注意:mapping的字段类型只能添加不能修改和删除;当新增的字段与原字段相同时-忽略,冲突时-抛出异常;
3.3 settings相关
3.3.1 查询指定索引的settings配置
仅支持PUT和GET方法,支持查询和局部修改;
GET http://localhost:9200/seong1/_settings
#得到
{
    "seong1": {
        "settings": {
            "index": {
                "creation_date": "1662348474856", // 时间戳
                "number_of_shards": "1", // 分片数
                "number_of_replicas": "0", // 副本数
                "uuid": "Plq_afNyQtuCLSixd9-1vA", // 唯一Id
                "version": {
                    "created": "7090399" // ES版本号
                },
                "provided_name": "seong1" // 所属索引
            }
        }
    }
}
3.3.3 修改指定索引的settings配置
settings中的配置分为静态配置和动态配置,其中静态配置(如 number_of_shards)不可修改;
PUT http://localhost:9200/seong1/_settings
{
 "settings": {
  "number_of_replicas": "2"
 }
}
3.4 文档操作相关
文档支持新增、修改、删除、查询以及批量查询和关键字检索等;
3.4.1 文档新增
#POST http://localhost:9200/sheng/_doc/{id}
{
 "name":"zhangsan",
 "age":18,
 "email":"zhangsan@163.com"
}
创建时,可以指定文档的id,建议与文档内容保持相关性;如文档为身份信息,可以用身份证ID作为文档的id;
如果文档存在,则覆盖原来的文档;
3.4.2 文档更新
更新效果同新增,完全覆盖;没有-新增,有-覆盖;对应PUT方法;
3.4.3 按文档ID删除文档
#DELETE http://localhost:9200/sheng/_doc/{id}
3.4.4 按文档ID查询文档
GET http://localhost:9200/sheng/_doc/{id}
#得到
{
    "_index": "test1",
    "_type": "_doc",
    "_id": "3",
    "_version": 2,
    "_seq_no": 20,
    "_primary_term": 1,
    "found": true,
    "_source": {
        "id": 2,
        "name": "test2"
    }
}
3.4.5 按文档ID批量查询文档
GET http://localhost:9200/test1/_mget
#得到
{
    "docs":[
        {
            "_id":"4"
        },
        {
            "_id":"5"
        }
    ]

}
3.5 检索功能
文档检索使用http://localhost:9200/test1/_search, 为GET类型方法,存在不同的检索方式,区别在于消息体;
{
 "query":{
  #ES多种类型的检索条件
  match:{} // 1.直接匹配
        wildcard:{} //2.可解析通配符,模糊查询
     fuzzy:{} //3.模糊、纠错查询
  bool:{}//4.布尔查询,重点
 },
    "from": 0, #from从0开始表示第一项,size表示一次查询的数量,基于此可以实现分页查询。
    "size": 6
}
常用的查询有以上四种类型,且query中不能同时支持多种类型的查询条件。
3.5.1 match
#GET http://localhost:9200/test1/_search
{
    "query":{
        "match":{
            "name":"test2"
        }
    }
}
query.match中的字段表示需要精确匹配的项,案例表示在test1索引库中搜索所有name为test2的文档;
3.5.2 wildcard
#GET http://localhost:9200/test1/_search
{
    "query":{
        "wildcard":{
            "name":"*test*"
        }
    }
}
query.wildcard中的字段表示进行模糊匹配,案例表示在test1索引库中搜索所有name包含test的文档;
3.5.3 fuzzy
#GET http://localhost:9200/test1/_search
{
    "query":{
        "wildcard":{
            "name":"*test*"
        }
    }
}
query.fuzzy中与wildcard类似,但是有纠错能力,如test2, 也可以搜索test;
3.5.4 bool
bool功能较为强大,内部可以包含must和must_not以及should:
{
 "query":{
  "bool":{
   "must":[], #表示必须
   "must_not":[], #表示必须不
   "should":[] #表示至少满足一个
  }
 }
}
每个must,must_not,should为数组类型,内部可以包含多个条件项;
另外,must/must_not/should可以同时出现,根据组合的不同-发挥的效果也不同:
(1) 单独出现:
must:[] 表示内部条件项必须全部满足;
must_not:[] 表示内部条件向必须全部不满足——要么不存在,要么存在-值不满足;
must_not:[] 表示内部条件至少有一个满足;
(2) must与must_not组合
must内所有条件项满足,must_not所有条件项不满足;
(3) must与should组合
must内所有条件项满足,should不用于过滤而仅用于打分,满足should的分数被提高;
(4) must_not与should组合
此时should至少满足一个,然后与must_not取并集;
(5) must与must_not与should组合
must与must_not组合过滤,此时should不用于过滤而用于打分
如下所示是一个布尔查询,结合了must,must_not和should:
#GET http://localhost:9200/sheng/_search
{
 "query":{
  "bool":{
   "must":[
             {
              "match":{
               "name":"xx"
           }
          }
         ],
         "must_not":[
                {
              "match":{
               "age":22
           }
          }
            ],
         "should":[
                {
              "match":{
               "email":"xx@163.com"
           }
          }
            ]
  }
 }
}
上述案例表示:查询所有name为"xx"且age不为22(文档不存在该字段或文档age字段值不为22),并提高满足email为"xx@163.com"的文档的得分。
需要注意的是bool除了可以存在于query内部,也可以作为查询条件嵌入到must中(详见附录: 附录中总结了一些常见条件逻辑关于Bool查询的实现,方便以后查询).
注意点:
[1] must可被filter替换,二者均表示必须满足条件;区别在于filter不进行打分且存在缓存,因此效率高于must;
[2] match可被term替换,区别在于term精确匹配, match模糊匹配。
除此之外,还有很多查询条件如terms等,本文不再介绍。
3.6 高亮显示
在检索文档时,可在query平行位置添加hightlight对象,提示ES返回高亮信息;
{
 "query": {
  "bool": {
            "must":[
                // {"term":{"A":"x"}},
                {"term":{"B":"x"}}
            ]
  }
 },
    "highlight": {
        "require_field_match": "false",
        "fields": {
            "A": {},
            "B": {},
            "C": {}
        }
    }
}
默认require_field_match为true, 表示仅会高亮用于搜索的字段;即此时仅会高亮B字段中的x值;
当require_field_match设置为false时,fields中的字段值均会高亮; 即此时会高亮A或B或C字段中x值.
3.7 遍历全部数据
ES提供了分页查询的能力,如下所示:
# http://localhost:9200/sheng/_search
{
    "query": {
        "match": {
            "name": "sy"
        }
    },
    "from": 0,
    "size": 50
}
但是出现深查询或者特殊场景全量查询时,分页查询就无能为力了。一方面是因为ES默认最多查询1W条数据(可配置),另一方面是深查询效率较低,分页的实现机制:查询前n条数据,并从中截取所需的分页返回。
此时可借助scroll进行滚动查询:
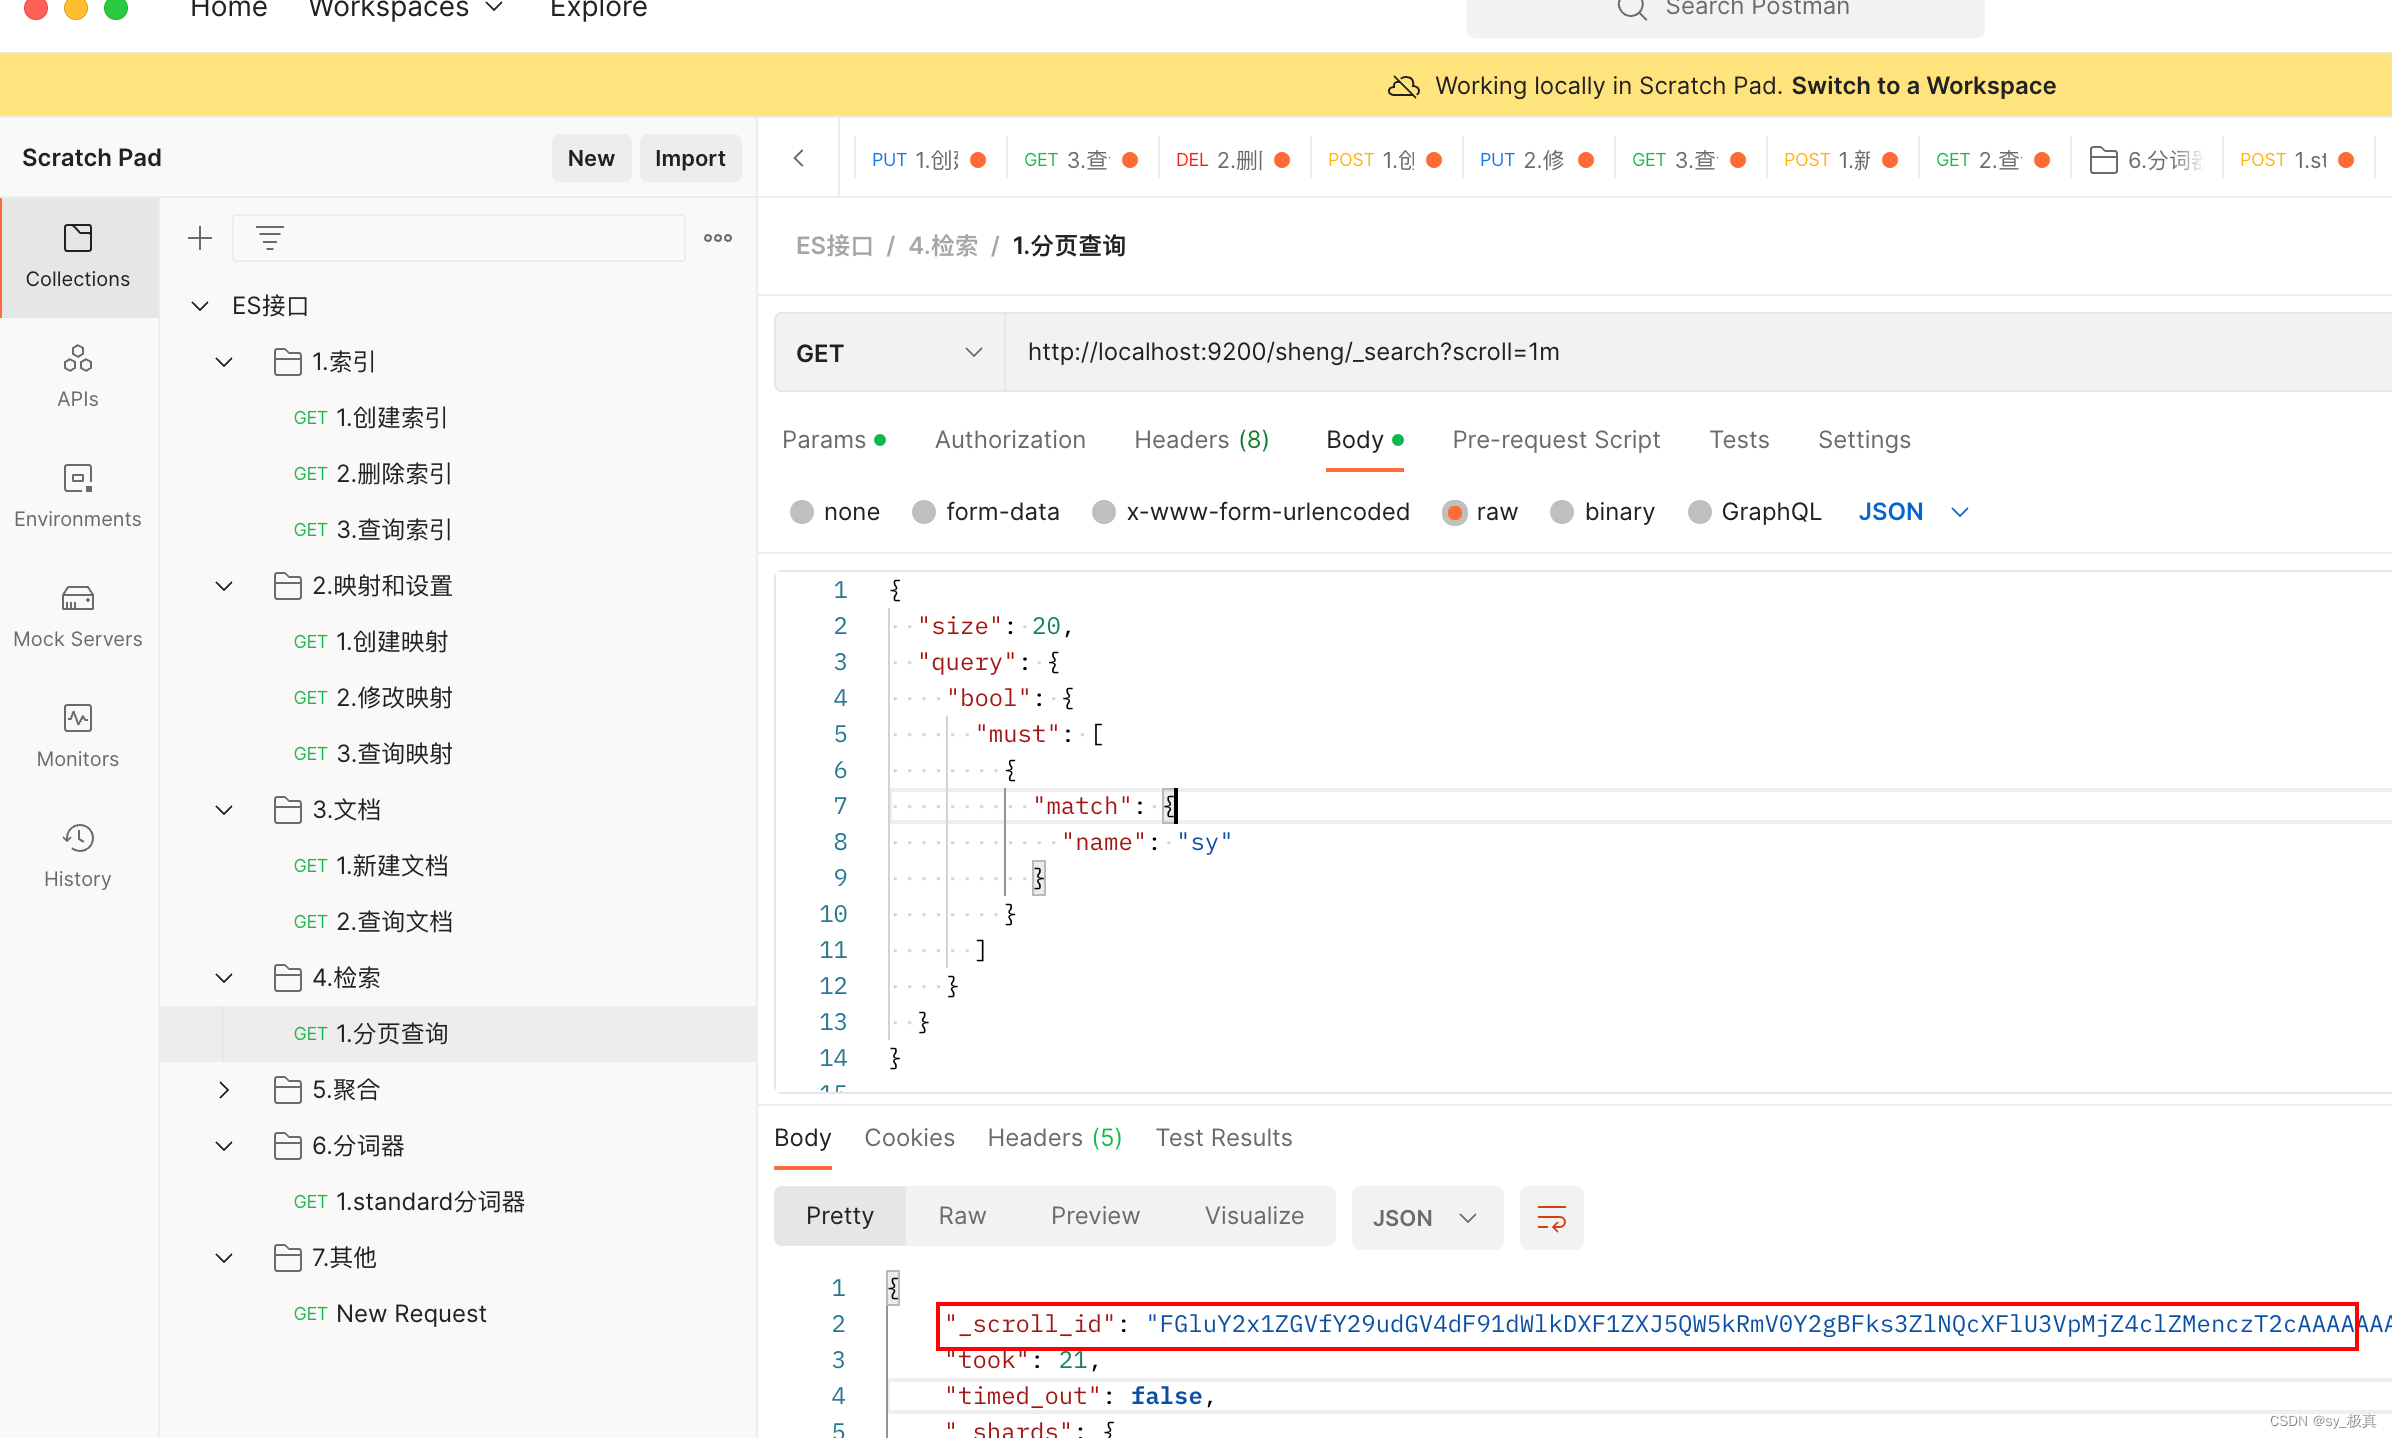
返回值有有一个_scroll_id字段,再次查询时可借助该字段标记的位置继续往下查询:
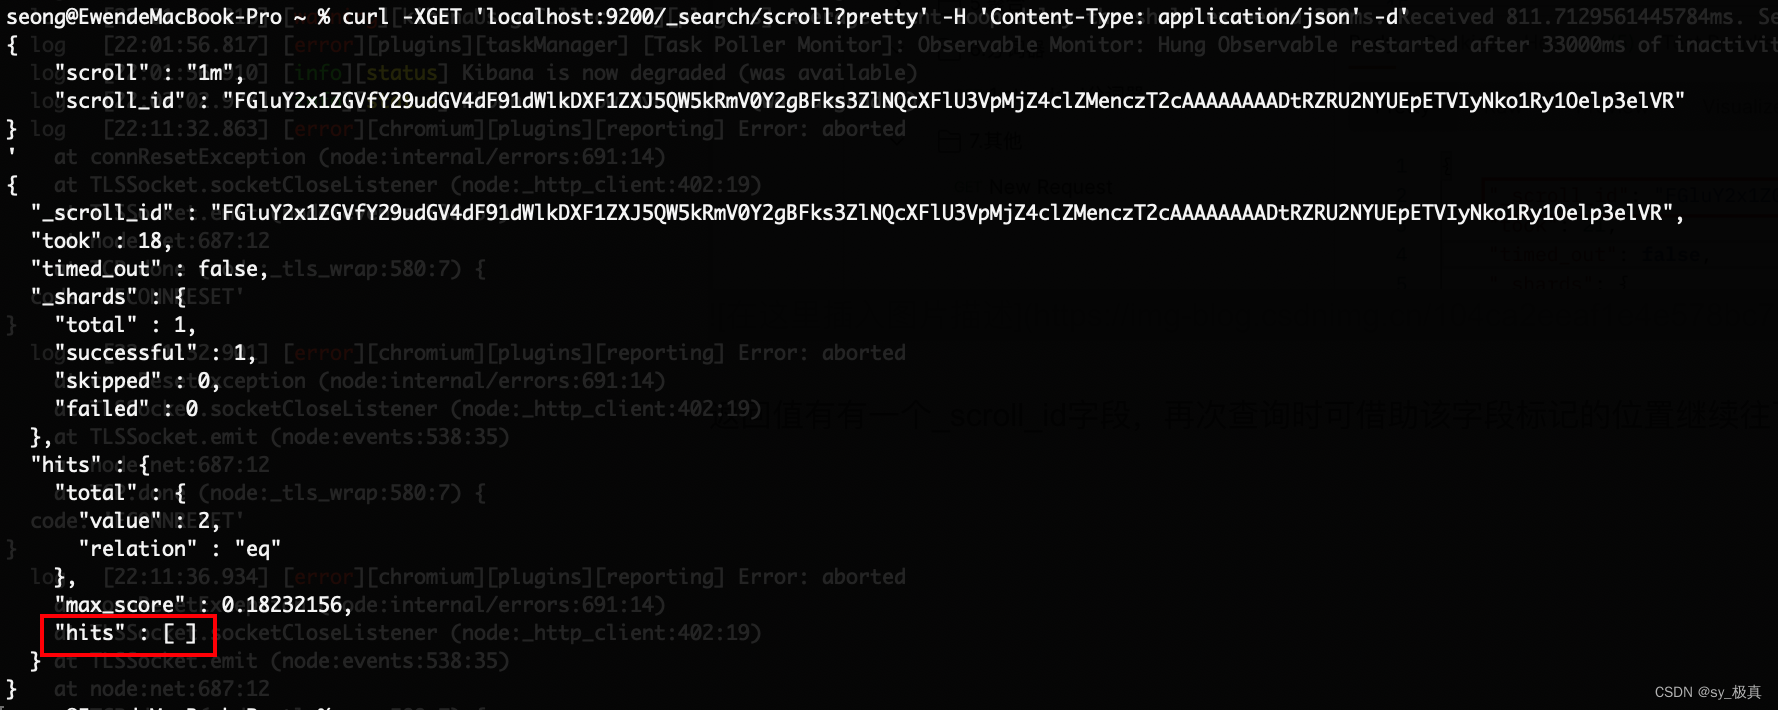
此时查询的结果为空,即上一次查询已查完了所有文档;递归遍历ES索引库时,也可以根据返回的hits数组长度是否为0作为结束条件。
4. Java相关API
Java基于ES提供的restful型HTTP接口进行了一层封装;
4.1 建立与关闭链接对象
Java与ES的操作被封装成RestHighLevelClient对象,可以通过调用RestHighLevelClient类提供的方法,间接调用ES提供的restful型的HTTP接口。
// 通过es服务器的ip和端口进行连接,port默认一般为9200
public RestHighLevelClient getClient() {
 return new RestHighLevelClient(RestClient.builder(new HttpHost(host, port, "http")));
}
关闭client对象:
public void closeClient(RestHighLevelClient client) {
 if (client != null) {
  try {
   client.close();
  } catch (Exception e) {
   logger.warn("close client failed", e);
  }
 }
}
4.2 新增文档
如果ID为2的文档存在—进行覆盖,不存在—新增;
IndexRequest indexRequest = new IndexRequest();

    Map<String, Object> map = new HashMap();
    map.put("name", "testSy002");
    map.put("description", "hello sy!");

indexRequest.index("seong").id(2).source(map);
client.index(indexRequest, RequestOptions.DEFAULT);
4.3 修改文档
4.3.1 修改指定文档的字段
// 必要操作,更新前如果不存在-会抛出ElasticsearchStatusException异常
GetResponse getResponse =
    client.get(new GetRequest().index("seong").id(id), RequestOptions.DEFAULT);
if (!getResponse.isExists()) {
    return;// 更新之前进行查询,如果文档不存在不进行更新
}

// 以map形式构建更新的文档,如果id文档有name字段-进行覆盖,没有-新增
Map<String, Object> map = new HashMap<>(1);
map.put("name", "testSy");

// 执行更新操作
UpdateRequest updateRequest = new UpdateRequest().index("seong1").id(id).doc(map);
client.update(updateRequest, RequestOptions.DEFAULT);
4.3.2 删除指定文档的字段
UpdateRequest支持脚本语言,通过Script对象进行包装;
// 删除指定的字段
Script script = new Script("ctx._source.remove(\"" + field + "\")")

UpdateRequest updateRequest = new UpdateRequest.index("seong").id("1").script(script));
=> 可用于 删除所有文档的指定字段:查询文档集合-bulkrequest-bulk();
此时,仅删除文档中的该字段,但是mapping中数据不会变化;
4.4 删除文档
4.4.1 根据文档id删除文档
// 根据ID删除文档对应DeleteRequest对象
DeleteRequest request = new DeleteRequest().index("seong").id(id);
DeleteResponse response = client.delete(request, RequestOptions.DEFAULT);
4.5 批量操作
批量操作对应于BulkRequest和BulkResponse对象;
BulkRequest对象中可以添加任意数量的操作,从而进行批次处理;
BulkRequest request = new BulkRequest();
  request.add(new DeleteRequest().index("seong").id(1);
  request.add(new DeleteRequest().index("seong").id(2);
  request.add(new DeleteRequest().index("seong").id(3);
  request.add(new DeleteRequest().index("seong").id(4);
  request.add(new DeleteRequest().index("seong").id(5);
  ...
BulkResponse response = client.bulk(request, RequestOptions.DEFAULT);
case:批量删除ES索引库中的所有文档
while (true) {
 BulkRequest request = new BulkRequest();
 SearchResponse response = client.search(new SearchRequest().indices("seong")
  .source(new SearchSourceBuilder().size(10000)), RequestOptions.DEFAULT);
 if (response.getHits().getHits().length > 0) {
  for (SearchHit hit : response.getHits().getHits()) {
   request.add(new DeleteRequest().index("seong").id(hit.getId()));
  }
  client.bulk(request, RequestOptions.DEFAULT);
 } else {
  break;
 }
}
4.6 查询操作
4.6.1 根据文档id进行查询
// 根据id查询操作对应GetRequest和GetResponse对象
GetRequest request = new GetRequest().index("seong").id(id);
GetResponse response = client.get(request, RequestOptions.DEFAULT)
4.6.2 根据字段-精确匹配查询
// 查询操作对应SearchRequest对象
SearchRequest request = new SearchRequest();

SearchSourceBuilder sourceBuilder = new SearchSourceBuilder()
     .query(QueryBuilders.termQuery(field, fieldValue)) //hit.field=fieldValue精确匹配
        .from(0).size(10000) //分页查询从1到1万

request.indices("seong") //指定需要查询的索引库
   .source(sourceBuilder);// 设置查询条件

// 可以从response的hits属性中可以得到查询结果
SearchResponse response = client.search(request, RequestOptions.DEFAULT);
SearchHits hits = response.getHits();
4.6.3 根据关键字匹配
// 构建BoolQuery
BoolQueryBuilder boolQuery = QueryBuilders.boolQuery()
    //should表示可以
    .should(QueryBuilders.wildcardQuery("id", "*1*")) *表示匹配全部
    .should(QueryBuilders.matchQuery("name", "sy"))
    .must(QueryBuilders.matchQuery("age", 11)
// query中加入查询的过滤条件,也可以加上from(0).size(10000)分页进行查询
SearchSourceBuilder source = new SearchSourceBuilder().query(boolQuery);

// 查询模板
SearchRequest request = new SearchRequest().indices("seong").source(source);
SearchResponse response = client.search(request, RequestOptions.DEFAULT);
BoolQuery实现原理:
{
 "query":{
  "bool":{
   "must":[
             {
              "match":{ "age":"11"}
          }
         ],
         "should":[
                {
                    "match":{ "id":"*1*"}
          },
                {
              "match":{"name":"sy"}
          },
            ]
  }
 }
}
4.7 Mapping操作
mapping用于为索引库中文档的字段指定类型,不指定时-ES自动推测; 添加mapping时,可以通过Map也可以通过XContentBuilder,但是传入Map对象时,也会转成XContentBuilder对象,且mapping中层次比较多,因此推荐直接使用XContentBuilder.
// 构建XContentBuilder对象
XContentBuilder builder = XContentFactory.jsonBuilder()
    .startObject()
        .startObject("properties")
            .startObject(tagType.getType())
                .field("type", "text")
                .field("analyzer", "ik_smart")
                .field("search_analyzer", "ik_smart")
                .startObject("fields")
                    .startObject("raw")
                     .field("type", "keyword")
                    .endObject()
                .endObject()
            .endObject()
        .endObject()
    .endObject();

// 向"seong"索引库添加mapping信息
PutMappingRequest mappingRequest = new PutMappingRequest("seong").source(builder);
client.indices().putMapping(mappingRequest, RequestOptions.DEFAULT);
上述XContentBuilder对于的json对象可以表示为:
{
    "properties": {
        "type": "text",
        "analyzer": "ik_smart",
        "search_analyzer": "ik_smart",
        "fields":{
         "raw":{"type": "keyword"}
     }
    }
}
附录:
附录1:bool搜索与条件逻辑
使用A、B、C、D表示文档的4种属性; 用A表示文档的属性为a,B表示文档的属性为b;
条件1:A and B
{
 "query":{
  "bool":{
   "must":[
             {
              "match":{"A":"a"}
          },
    {
              "match":{"A":"a"}
          }
         ]
  }
 }
}
条件2:A or B
{
 "query":{
  "bool":{
   "should":[
             {
              "match":{"A":"a"}
          },
    {
              "match":{"A":"a"}
          }
         ]
  }
 }
}
条件3:A or !B
{
 "query": {
  "bool": {
   "should": [
    {
     "bool": {
      "should": [
         {
                 "match":{"A":"a"}
             }
      ]
     }
    },

    {
     "bool": {
      "must_not": [
             {
                 "match":{"B":"b"}
             }
      ]
     }
    }
   ]
  }
 }
}
条件4:A and (B or c)
{
 "query": {
  "bool": {
   "must": [
    {
     "bool": {
      "must": [
                            {
                 "match":{"A":"a"}
             }
      ]
     }
    },
    {
     "bool": {
      "should": [
         {
                 "match":{"B":"b"}
             },
             {
                 "match":{"C":"c"}
             }

      ]
     }
    }
   ]
  }
 }
}
条件5:(A or B) && (C or D)
{
 "query": {
  "bool": {
   "should": [
    {
     "bool": {
      "must": [
         {
                 "match":{"A":"a"}
             },
             {
                 "match":{"B":"b"}
             }
      ]
     }
    },
    {
     "bool": {
      "must": [
         {
                 "match":{"C":"c"}
             },
             {
                 "match":{"D":"d"}
             }
      ]
     }
    }
   ]
  }
 }
}
附录2:ik分词器安装教程
步骤1: 下载ik插件压缩包,注意版本号需要与ES版本还保持一致,否则重启ES可能会失败😎ik插件下载地址
步骤2: 在./plugins目录下新增ik文件夹;
步骤3: 将压缩文件解压缩到./plugins/ik目录下;
步骤4: 重启ES.
倒排原理:放在ES下篇中


 5668
5668


 被折叠的 条评论
为什么被折叠?
被折叠的 条评论
为什么被折叠?
 到【灌水乐园】发言


