


平时开发整理出了一些自己常用的控件啊,方法之类的,每次创建工程的时候,都得拷贝进去,发现将自己的常用的这些东西折腾成一个开源的库,放到cocoapods上,下次使用的时候,直接借助cocoapods就解决,省很多事情,但是在将我自己的开源库添加到cocoapods中遇到了不少问题,先说说自己一步步的操作吧(举个例子:新建一个叫CommonAlertFramework库):
这些基本上都是在terminal下操作:
1、创建
$ pod lib create CommonAlertFramework<p style="margin-top: 0px; margin-bottom: 0px; font-size: 11px; font-family: Menlo;">Cloning `https://github.com/CocoaPods/pod-template.git` into `CommonAlertFramework`.</p><p style="margin-top: 0px; margin-bottom: 0px; font-size: 11px; font-family: Menlo;">Configuring CommonAlertFramework template.</p><p style="margin-top: 0px; margin-bottom: 0px; font-size: 11px; font-family: Menlo;"><span style="font-variant-ligatures: no-common-ligatures; color: #afad24">! </span>Before you can create a new library we need to setup your git credentials.</p><p style="margin-top: 0px; margin-bottom: 0px; font-size: 11px; font-family: Menlo; min-height: 13px;">
</p><p style="margin-top: 0px; margin-bottom: 0px; font-size: 11px; font-family: Menlo;"> What is your email?</p><p style="margin-top: 0px; margin-bottom: 0px; font-size: 11px; font-family: Menlo;"><span style="font-variant-ligatures: no-common-ligatures; color: #34bd26"> > </span>************</p><p style="margin-top: 0px; margin-bottom: 0px; font-size: 11px; font-family: Menlo; min-height: 13px;">
</p><p style="margin-top: 0px; margin-bottom: 0px; font-size: 11px; font-family: Menlo;"><span style="font-variant-ligatures: no-common-ligatures; color: #34bd26">! </span>Setting your email in git to shouyuzhu@hotmail.com</p><p style="margin-top: 0px; margin-bottom: 0px; font-size: 11px; font-family: Menlo; color: rgb(213, 59, 211);"><span style="font-variant-ligatures: no-common-ligatures; color: #000000"> </span>git config user.email "************"</p><p style="margin-top: 0px; margin-bottom: 0px; font-size: 11px; font-family: Menlo; min-height: 13px;">
</p><p style="margin-top: 0px; margin-bottom: 0px; font-size: 11px; font-family: Menlo;">------------------------------</p><p style="margin-top: 0px; margin-bottom: 0px; font-size: 11px; font-family: Menlo; min-height: 13px;">
</p><p style="margin-top: 0px; margin-bottom: 0px; font-size: 11px; font-family: Menlo;">To get you started we need to ask a few questions, this should only take a minute.</p><p style="margin-top: 0px; margin-bottom: 0px; font-size: 11px; font-family: Menlo; min-height: 13px;">
</p><p style="margin-top: 0px; margin-bottom: 0px; font-size: 11px; font-family: Menlo;">If this is your first time we recommend running through with the guide: </p><p style="margin-top: 0px; margin-bottom: 0px; font-size: 11px; font-family: Menlo; color: rgb(83, 48, 225);"><span style="font-variant-ligatures: no-common-ligatures; color: #000000"> - </span><span style="text-decoration: underline ; font-variant-ligatures: no-common-ligatures">http://guides.cocoapods.org/making/using-pod-lib-create.html</span></p><p style="margin-top: 0px; margin-bottom: 0px; font-size: 11px; font-family: Menlo; color: rgb(213, 59, 211);"> ( hold cmd and double click links to open in a browser. )</p><p style="margin-top: 0px; margin-bottom: 0px; font-size: 11px; font-family: Menlo; min-height: 13px;">
</p><p style="margin-top: 0px; margin-bottom: 0px; font-size: 11px; font-family: Menlo; min-height: 13px;">
</p><p style="margin-top: 0px; margin-bottom: 0px; font-size: 11px; font-family: Menlo;">What language do you want to use?? [ <span style="text-decoration: underline ; font-variant-ligatures: no-common-ligatures">ObjC</span> / Swift ]</p><p style="margin-top: 0px; margin-bottom: 0px; font-size: 11px; font-family: Menlo;"><span style="font-variant-ligatures: no-common-ligatures; color: #34bd26"> > </span>ObjC</p><p style="margin-top: 0px; margin-bottom: 0px; font-size: 11px; font-family: Menlo; min-height: 13px;">
</p><p style="margin-top: 0px; margin-bottom: 0px; font-size: 11px; font-family: Menlo;">Would you like to include a demo application with your library? [ <span style="text-decoration: underline ; font-variant-ligatures: no-common-ligatures">Yes</span> / No ]</p><p style="margin-top: 0px; margin-bottom: 0px; font-size: 11px; font-family: Menlo;"><span style="font-variant-ligatures: no-common-ligatures; color: #34bd26"> > </span>Yes</p><p style="margin-top: 0px; margin-bottom: 0px; font-size: 11px; font-family: Menlo; min-height: 13px;">
</p><p style="margin-top: 0px; margin-bottom: 0px; font-size: 11px; font-family: Menlo;">Which testing frameworks will you use? [ <span style="text-decoration: underline ; font-variant-ligatures: no-common-ligatures">Specta</span> / Kiwi / None ]</p><p style="margin-top: 0px; margin-bottom: 0px; font-size: 11px; font-family: Menlo;"><span style="font-variant-ligatures: no-common-ligatures; color: #34bd26"> > </span>None</p><p style="margin-top: 0px; margin-bottom: 0px; font-size: 11px; font-family: Menlo; min-height: 13px;">
</p><p style="margin-top: 0px; margin-bottom: 0px; font-size: 11px; font-family: Menlo;">Would you like to do view based testing? [ <span style="text-decoration: underline ; font-variant-ligatures: no-common-ligatures">Yes</span> / No ]</p><p style="margin-top: 0px; margin-bottom: 0px; font-size: 11px; font-family: Menlo;"><span style="font-variant-ligatures: no-common-ligatures; color: #34bd26"> > </span>Yes</p><p style="margin-top: 0px; margin-bottom: 0px; font-size: 11px; font-family: Menlo; min-height: 13px;">
</p><p style="margin-top: 0px; margin-bottom: 0px; font-size: 11px; font-family: Menlo;">What is your class prefix?</p><p style="margin-top: 0px; margin-bottom: 0px; font-size: 11px; font-family: Menlo; color: rgb(52, 189, 38);"> > <span style="font-variant-ligatures: no-common-ligatures; color: #000000">CA</span></p><p style="margin-top: 0px; margin-bottom: 0px; font-size: 11px; font-family: Menlo; min-height: 13px;">
</p><p style="margin-top: 0px; margin-bottom: 0px; font-size: 11px; font-family: Menlo;">Running <span style="font-variant-ligatures: no-common-ligatures; color: #d53bd3">pod install</span> on your new library.</p><div>
</div>
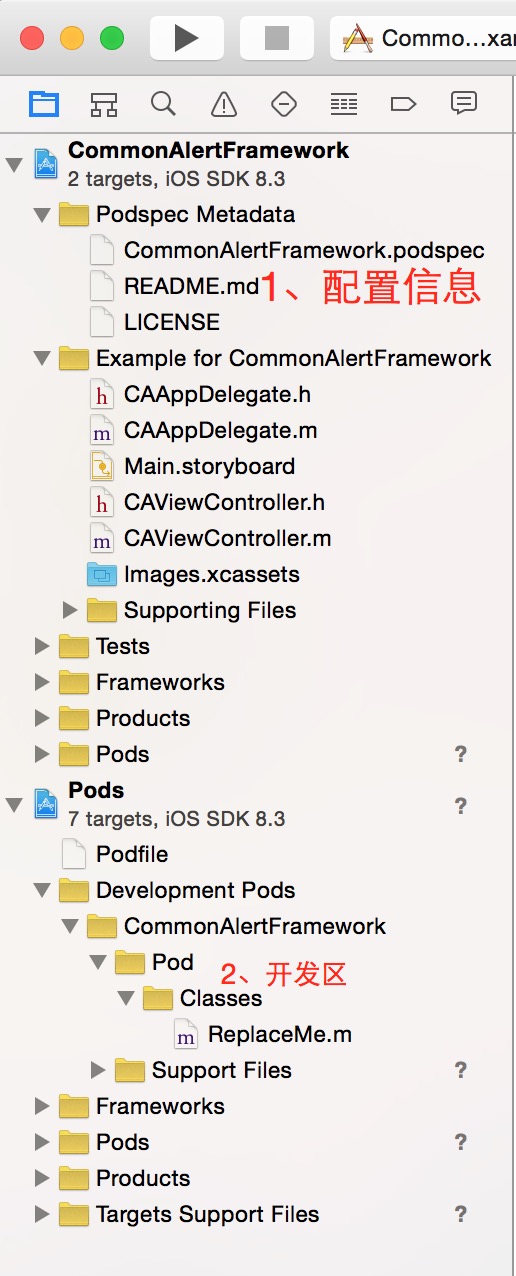
3、点开配置信息里面的.podsec文件,如下所示:
#
# Be sure to run `pod lib lint CommonAlertFramework.podspec' to ensure this is a
# valid spec and remove all comments before submitting the spec.
#
# Any lines starting with a # are optional, but encouraged
#
# To learn more about a Podspec see http://guides.cocoapods.org/syntax/podspec.html
#

Pod::Spec.new do |s|
  s.name             = "CommonAlertFramework"
  <span style="color:#ff0000;">s.version          = "0.1.0"</span>
  <span style="color:#ff0000;">s.summary          = "A short description of CommonAlertFramework."
  s.description      = <<-DESC
                       An optional longer description of CommonAlertFramework

                       * Markdown format.
                       * Don't worry about the indent, we strip it!
                       DESC</span>
  s.homepage         = "https://github.com/<span style="color:#ff0000;"><GITHUB_USERNAME></span>/CommonAlertFramework"
  # s.screenshots     = "www.example.com/screenshots_1", "www.example.com/screenshots_2"
  s.license          = 'MIT'
  s.author           = { "<span style="color:#ff0000;">UserName</span>" => "<span style="color:#ff0000;">**********</span>" }
  s.source           = { :git => "https://github.com/<span style="color:#ff0000;"><GITHUB_USERNAME></span>/CommonAlertFramework.git", :tag => s.version.to_s }
  # s.social_media_url = 'https://twitter.com/<TWITTER_USERNAME>'

  s.platform     = :ios, '7.0'
  s.requires_arc = true

  s.source_files = 'Pod/Classes/**/*'
  s.resource_bundles = {
    'CommonAlertFramework' => ['Pod/Assets/*.png']
  }

  # s.public_header_files = 'Pod/Classes/**/*.h'
  # s.frameworks = 'UIKit', 'MapKit'
  # s.dependency 'AFNetworking', '~> 2.3'
end
s.homepage 和 s.source里面标红的地方<GITHUB_USERNAME>要修改成你自己的用户名,或者说这两个后面的地址要改成你这个库在github上的绝对地址,不能有错。
4、所有的文件都是在开发区里面,比如,我们现在要做一个helloworld的弹出框,代码如下(CAHelloWorld):
.h文件
#import <Foundation/Foundation.h>

@interface CAHelloWorld : NSObject

/**
 *  弹出一个hello world的弹出框
 */
+ (void)sayHelloWorld;

@end
#import <UIKit/UIKit.h>
#import "CAHelloWorld.h"

@implementation CAHelloWorld

/**
 *  弹出一个hello world的弹出框
 */
+ (void)sayHelloWorld
{
    [[[UIAlertView alloc] initWithTitle:@"Hello" message:@"world" delegate:nil cancelButtonTitle:@"OK" otherButtonTitles:nil, nil] show];
}
@end
5、文件添加之后,需要运行pod install 或者pod update,否则,你添加的文件,在DEMO工程里是看不到的
6、在DEMO工程里测试正常,开始进行下一步的操作(这个时候,你应该已经将这个工程上传到你的github上去了)
7、发布之前,做个测试:
$ pod lib lint

 -> CommonAlertFramework (0.1.0)
    - WARN  | The summary is not meaningful.
    - WARN  | The description is not meaningful.
    - WARN  | There was a problem validating the URL https://github.com/<GITHUB_USERNAME>/CommonAlertFramework.

[!] CommonAlertFramework did not pass validation.
You can use the `--no-clean` option to inspect any issue.
发现出现了三个警告,在发布到cocoapods上,不能出现任何警告(工程出现警告无所谓)
- WARN | The summary is not meaningful.- WARN | The description is not meaningful.summary和description两者不能相同且description要比summary长,否则也会报错
- WARN | There was a problem validating the URL https://github.com/<GITHUB_USERNAME>/CommonAlertFramework.8、修改完成之后,再测试一下,当出现如下的提示的时候,:
$ pod lib lint

 -> CommonAlertFramework (0.1.0)

CommonAlertFramework passed validation.
9、发布之前,新建一个工程测试一下:
Podfile里输入:
pod '<span style="color:#33cc00;">CommonAlertFramework</span>', :git => '<span style="color:#ff0000;">https://github.com/*********/CommonAlertFramework.git</span>'绿色为我们库的名称,红色为库在github上的地址
pod install打开测试工程,如果正常使用该库,则表示该库没有问题,准备push到cocoapods上去
10、上传之前,先注册一下(push到cocoapods根据的是每一次的session,否则无权push)
$ pod trunk register <span style="color:#ff0000;">***********</span>
[!] Please verify the session by clicking the link in the verification email that has been sent to <span style="color: rgb(255, 0, 0); font-family: Arial, Helvetica, sans-serif;">***********</span>pod trunk register <span style="font-family: Arial, Helvetica, sans-serif; color: rgb(255, 0, 0);">********* </span><span style="font-family: Arial, Helvetica, sans-serif;"> "</span><span style="color:#ffff66;font-family: Arial, Helvetica, sans-serif;">CommonAlertFramework</span><span style="font-family: Arial, Helvetica, sans-serif;">"</span>你会收到一个连接邮件,点击邮件里的链接即可,会出现如下的提示:
11、设置tag(不知道这货是干嘛的):
$ git tag "0.1.0"
$ <span style="color:#ff0000;">git push --tags</span>
Total 0 (delta 0), reused 0 (delta 0)
To https://github.com/******/CommonAlertFramework.git
 * [new tag]         0.1.0 -> 0.1.0
红色的这个你必须的执行
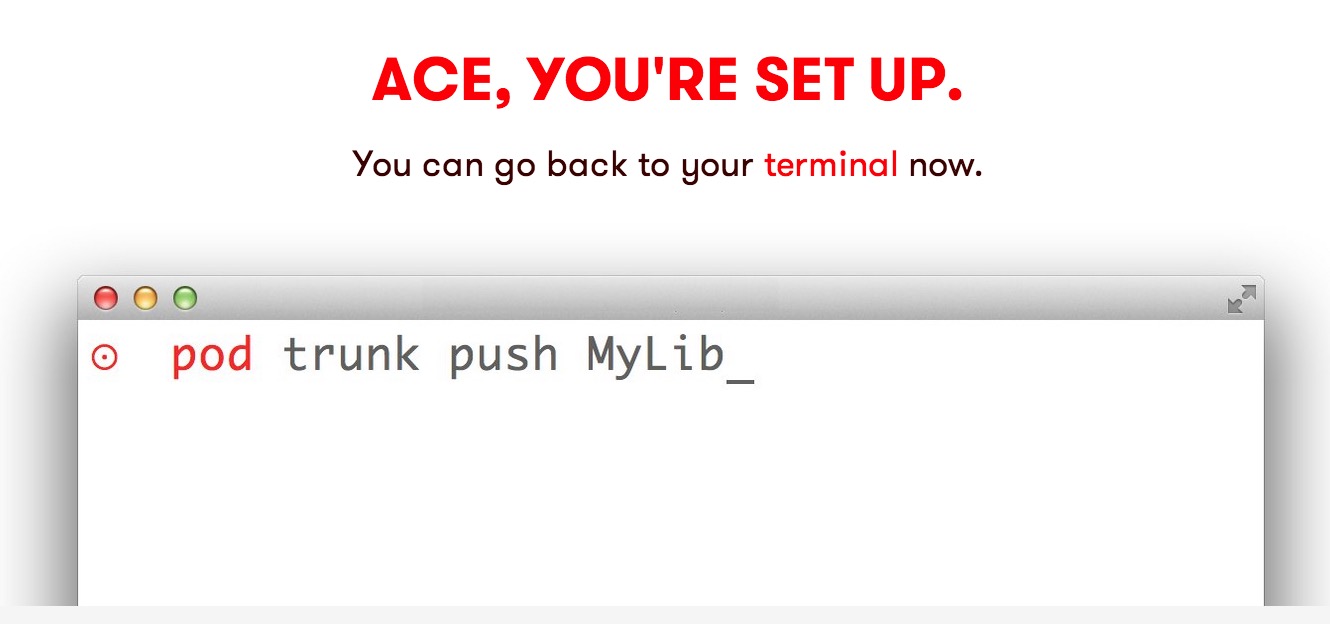
12、push到cocoapods
$ pod trunk push CommonAlertFramework.podspec
Updating spec repo `master`

CocoaPods 0.38.0.beta.1 is available.
To update use: `gem install cocoapods --pre`
[!] This is a test version we'd love you to try.

For more information see http://blog.cocoapods.org
and the CHANGELOG for this version http://git.io/BaH8pQ.

Validating podspec
 -> CommonAlertFramework (0.1.0)

Updating spec repo `master`

CocoaPods 0.38.0.beta.1 is available.
To update use: `gem install cocoapods --pre`
[!] This is a test version we'd love you to try.

For more information see http://blog.cocoapods.org
and the CHANGELOG for this version http://git.io/BaH8pQ.

  - Data URL: https://raw.githubusercontent.com/CocoaPods/Specs/a96ed674714c60b95aeaacbd5c4fa732ce17c988/Specs/CommonAlertFramework/0.1.0/CommonAlertFramework.podspec.json
  - Log messages:
    - June 30th, 03:09: Push for `CommonAlertFramework 0.1.0' initiated.
    - June 30th, 03:09: Push for `CommonAlertFramework 0.1.0' has been pushed (1.620009634 s).
如果上一步标红的你没有执行的话,会出现如下的错误信息:
$ pod trunk push CommonAlertFramework.podspec
Updating spec repo `master`

CocoaPods 0.38.0.beta.1 is available.
To update use: `gem install cocoapods --pre`
[!] This is a test version we'd love you to try.

For more information see http://blog.cocoapods.org
and the CHANGELOG for this version http://git.io/BaH8pQ.

Validating podspec
<span style="color:#ff0000;">[!] /usr/bin/git clone https://github.com/*****/CommonAlertFramework.git /var/folders/bq/94b3k1g55lndg97g1bnk58w80000gn/T/d20150630-12006-1apb9xw --single-branch --depth 1 --branch 0.1.0

Cloning into '/var/folders/bq/94b3k1g55lndg97g1bnk58w80000gn/T/d20150630-12006-1apb9xw'...

warning: Could not find remote branch 0.1.0 to clone.

fatal: Remote branch 0.1.0 not found in upstream origin</span>
13、到此,public模式的下的库成功添加。
需要注意的地方总结如下:
- summary和description必须填写且description内容比summary长
- s.homepage和s.source里面的地址要填写对
- 库文件是在步骤2标注的开发区里面
- 每次添加新的文件之类操作的话,别忘记执行pod install 或者 pod update
- tag设置好之后,要push上去
- 每次push之前,如果提示无权或者啥的,就register一下
暂时就这些吧,如果有什么问题,欢迎提出


 1157
1157

 被折叠的 条评论
为什么被折叠?
被折叠的 条评论
为什么被折叠?
 到【灌水乐园】发言


