


题外话:项目中有一些组件需要从项目中剥离出来,使用Cocoapods创建私有的podspec并在项目中部署使用
实现步骤(基于pods自动创建)
在github 上新建一个repository
名字为 YYLib,如图:

git checkout /clone 这个项目到本地。
使用命令pod lib create [podName] 创建模板项目。
该命令会根据输入的信息自动创建名为podName的本地git仓库,在项目的根目录下自动创建了podName.podspec、README.md、LICENSE文件,自动创建使用了podName库的Demo项目,在Pods工程下自动创建pod个人库开发文件夹。
$ pod lib create YYLib
命令执行后,会让确认一下几个问题
What language do you want to use?? [ Swift / ObjC ]
ObjC
Would you like to include a demo application with your library? [ Yes / No ]
yes
Which testing frameworks will you use? [ Specta / Kiwi / None ]
Kiwi
Would you like to do view based testing? [ Yes / No ]
yes
What is your class prefix?
CY
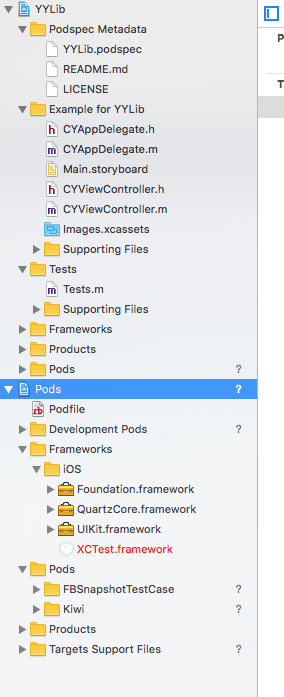
回答完这几个问题,用 XCode打开该库,如图所示:
用 XCode打开 YYLib.podspec,进行修改
Pod::Spec.new do |s|
  s.name             = 'YYLib'
  s.version          = '0.1.0'
  s.summary          = 'it is my pod Demo'

# This description is used to generate tags and improve search results.
#   * Think: What does it do? Why did you write it? What is the focus?
#   * Try to keep it short, snappy and to the point.
#   * Write the description between the DESC delimiters below.
#   * Finally, don't worry about the indent, CocoaPods strips it!

  s.description      = <<-DESC
it is my pod Demo.
                       DESC

  s.homepage         = 'https://github.com/<GITHUB_USERNAME>/YYLib'
  # s.screenshots     = 'www.example.com/screenshots_1', 'www.example.com/screenshots_2'
  s.license          = { :type => 'MIT', :file => 'LICENSE' }
  s.author           = { 'yanyanforest' => 'yanyanforest@163.com' }
  s.source           = { :git => 'https://github.com/yanyanforest/YYLib.git', :tag => s.version.to_s }
  # s.social_media_url = 'https://twitter.com/<TWITTER_USERNAME>'

  s.ios.deployment_target = '7.0'

  s.source_files = 'YYLib/Classes/**/*'

  # s.resource_bundles = {
  #   'YYLib' => ['YYLib/Assets/*.png']
  # }

  # s.public_header_files = 'Pod/Classes/**/*.h'
   s.frameworks = 'UIKit'
  # s.dependency 'AFNetworking', '~> 2.3'
end
修改文件podspec和README 文件,添加封装的类。确保无误。
验证本地.podspec 文件的有效性(下面文中)
再把本地的文件提交并打 tag
$ git add .
$ git commit -a -m ‘first commit’//提交代码,并标注此次提交的信息
$ git push --set-upstream origin master$ git remote add origin https://github.com/yanyanforest/YYLib.git
$ git push -u origin master
$ git tag -m “first release” “0.1.0”
$ git push --tags #推送tag到远端仓库
验证本地.podspec 文件的有效性
$ pod lib lint YYLib.podspec
 -> YYLib (0.1.0)
    - WARN  | url: The URL (https://github.com/yanyanforest/YYLib) is not reachable.

[!] YYLib did not pass validation, due to 1 warning (but you can use `--allow-warnings` to ignore it) and all results apply only to public specs, but you can use `--private` to ignore them if linting the specification for a private pod.
You can use the `--no-clean` option to inspect any issue.
如果有 Error这需要更改 error。如果有 warning, 但有不改正需要执行下面的命令:
$ pod lib lint YYLib.podspec --allow-warnings
在 pod 上创建库 远程托管地址为https://github.com/yanyanforest/YYLib.git
$ pod repo add YYLib https://github.com/yanyanforest/YYLib.git
正常执行结果为:
Cloning spec repo `YYOCFramework` from `https://github.com/yanyanforest/YYLib.git`如果报错为
[!] /usr/bin/git clone https://github.com/yanyanforest/YYLib.git YYLib

Cloning into 'YYLib'...
remote: Repository not found.
fatal: repository 'https://github.com/yanyanforest/YYLib.git/' not found
解决方法:去自己的git官网 创建一个repository 名字为YYLib,之后执行
$ pod repo add YYLib https://github.com/yanyanforest/YYLib.git
Cloning spec repo
YYLibfromhttps://github.com/yanyanforest/YYLib.git
再次执行
$ pod lib lint YYLib.podspec
YYLib passed validation.
推到 pod 上
$ pod trunk push YYLib.podspec --allow-warningsLog messages:
- December 1st, 20:18: Push forYYLib 0.1.0' initiated.YYLib 0.1.0’ has been pushed
- December 1st, 20:18: Push for
(0.207867721 s).
分支
查看自己 pod 的信息。
$ pod trunk me
  - Name:     yanyanforest
  - Email:    yanyanforest@163.com
  - Since:    November 28th, 20:30
  - Pods:
    - UICollectionViewLeftAlignFlowLayout
    - YYLib
  - Sessions:
    - November 28th, 20:30 日期地址
    Description: yanyan
$ pod trunk push YYLib.podspec
[!] You need to register a session first.
$ pod trunk register yanyanforest@163.com ‘yanyanforest’ –description=’yanyan’
[!] Please verify the session by clicking the link in the verification email that has been sent to yanyanforest@163.com
进入自己的邮箱,打开链接即可。
新建一个项目测试一下自己的类库
pod search 一下自己的类库
$ pod search YYLib
问题
pod search 搜索不到库
Unable to find a pod with name, author, summary, or descriptionmatching 「库名」
解决方法:输入下面命令
rm ~/Library/Caches/CocoaPods/search_index.json
An unexpected version directory Assets was encountered for the /Users/yanyan/.cocoapods/repos/** Pod in the YYLib repository.
解决方法:进入指定文件夹repos把YYLib删除即可。
回到指定 tag 的版本
$ git checkout -B master 0.1.3
注意这里的参数-B 和-b 的区别
git checkout -b
git checkout -b|-B []
Specifying -b causes a new branch to be created as if git-branch(1)
were called and then checked out. In this case you can use the
–track or –no-track options, which will be passed to git branch.
As a convenience, –track without -b implies branch creation; see
the description of –track below.
       If -B is given, <new_branch> is created if it doesn't exist;
       otherwise, it is reset. This is the transactional equivalent of

           $ git branch -f <branch> [<start point>]
           $ git checkout <branch>

       that is to say, the branch is not reset/created unless "git
       checkout" is successful.
-b
Create a new branch named and start it at
; see git-branch(1) for details.-B
Creates the branch and start it at ; if
it already exists, then reset it to . This is
equivalent to running “git branch” with “-f”; see git-branch(1) for
details.
bug
1.
[!] Authentication token is invalid or unverified. Either verify it with the email that was sent or register a new session.
或者
[!] You need to register a session first.
解决方法:
终端输入命令:$ pod trunk register 邮箱地址 名字
2.
- ERROR | [iOS] unknown: Encountered an unknown error (Simulator iPhone 4s is not available.) during validation.
Pods workspace available at/var/folders/wx/yl8z3mrs3_x4hrznm38rhdj00000gn/T/CocoaPods/Lint/App.xcworkspacefor inspection.
解决方法:
3.
! [rejected] master -> master (non-fast-forward)
error: failed to push some refs to ‘https://github.com/yanyanforest/UICollectionViewLeftAlignFlowLayout.git’
解决方法:
$ git push -f origin master
更新
打开Example 下的项目文件: 库名.xcworkspace
找到Podfile,修改 pod ‘CYFramework’, :path => ‘../’
在终端进入到库文件夹
执行$ pod update
这里注意:有时会报如下错误
$ pod update
Update all pods
Updating local specs repositories
  $ /usr/bin/git -C /Users/yanyan/.cocoapods/repos/master fetch origin
  --progress
  fatal: unable to access 'https://github.com/CocoaPods/Specs.git/': LibreSSL SSL_connect: SSL_ERROR_SYSCALL in connection to github.com:443
[!] CocoaPods was not able to update the `master` repo. If this is an unexpected issue and persists you can inspect it running `pod repo update --verbose`
解决方法
$ env GIT_SSL_NO_VERIFY=true
再执行$ pod update
这里顺便注意一下,只要在过程中遇到LibreSSL SSL_connect: SSL_ERROR_SYSCALL ... 443 的错误就在终端输入该命令即可$ env GIT_SSL_NO_VERIFY=true
修改或者添加相应的文件, 修改对应的文件 :[库名].podspec 版本号
验证podspec文件的有效性
$ pod lib lint --allow-warnings
提交代码 打tag 该tag值和[库名].podspec中版本号保持一致
$ git tag 0.1.3
 $ git push --tags
最后 trunk push [ 库名].podspec
$ pod trunk push [ 库名].podspec --allow-warnings
结果:


 2959
2959

 被折叠的 条评论
为什么被折叠?
被折叠的 条评论
为什么被折叠?
 到【灌水乐园】发言


