


十六、 网络编程
16.1 网络编程概述
- 网络编程的目的:
直接或间接地通过网络协议与其它计算机实现数据交换,进行通讯。 - 网络编程中有两个主要的问题:
- 如何准确地定位网络上一台或多台主机;定位主机上的特定的应用。
- 找到主机后如何可靠高效地进行数据传输。
16.2 网络通信要素概述
网络编程中的两个主要问题,分别对应以下两个要素:
-
要素一:IP和端口号
- IP :相当于每台主机的身份证号码,是网络当中唯一定位的一台主机。
- 端口号:区分一台主机上不同的应用程序,哪一个应用程序来进行通信。
-
要素二:网络通信协议
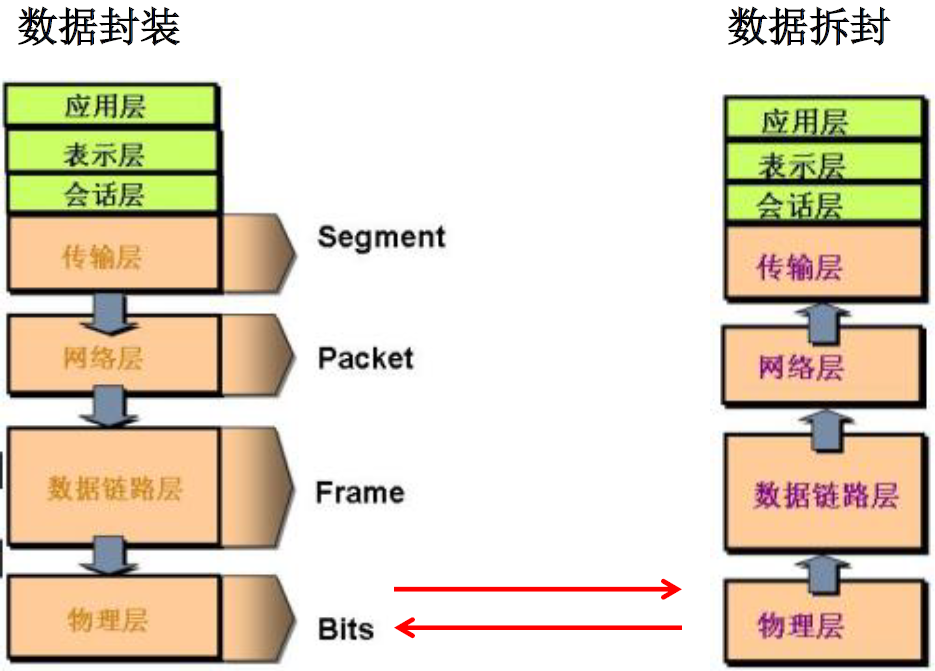
网络通信数据流动方向:
16.3 通信要素1:IP和端口号
16.3.1 IP的理解
IP 地址有两种分类方式,一是按 IPV4/IPV6 划分;另一种是按公网地址/私有地址划分。
1.分类方式一:IPV4 和 IPV6
-
IPV4 :4 个字节 (Byte) 组成, 4 × 8 = 32 4×8=32 4×8=32 bit 。可表示 2 32 = 2^{32}= 232= 42.9亿个 IP 地址。由 4 个 0~255 组成,例如:
192.168.0.1 -
IPV6 :16 个字节 (Byte) 组成, 16 × 8 = 128 16×8=128 16×8=128 bit 。可表示 2 128 = 3.4 × 1 0 38 2^{128}=3.4×10^{38} 2128=3.4×1038 个 IP 地址。写成8个无符号整数,每个整数用 4 个十六进制位表示,每个整数的范围是 (0000~ffff),十进制是 0~65535 。数之间用冒号 (😃 隔开。例如:
3ffe:3201:1401:1280:c8ff:fe4d:db39:1984
**2.分类方式二:公网地址 (万维网使用) 和 私有地址 (局域网使用) **
- 以
192.168开头的就是私有地址,范围是 192.168.0.0 ~ 192.168.255.255 ,能表示 2 16 = 65536 2^{16}=65536 216=65536 个 IP 地址。专门为组织机构内部使用。
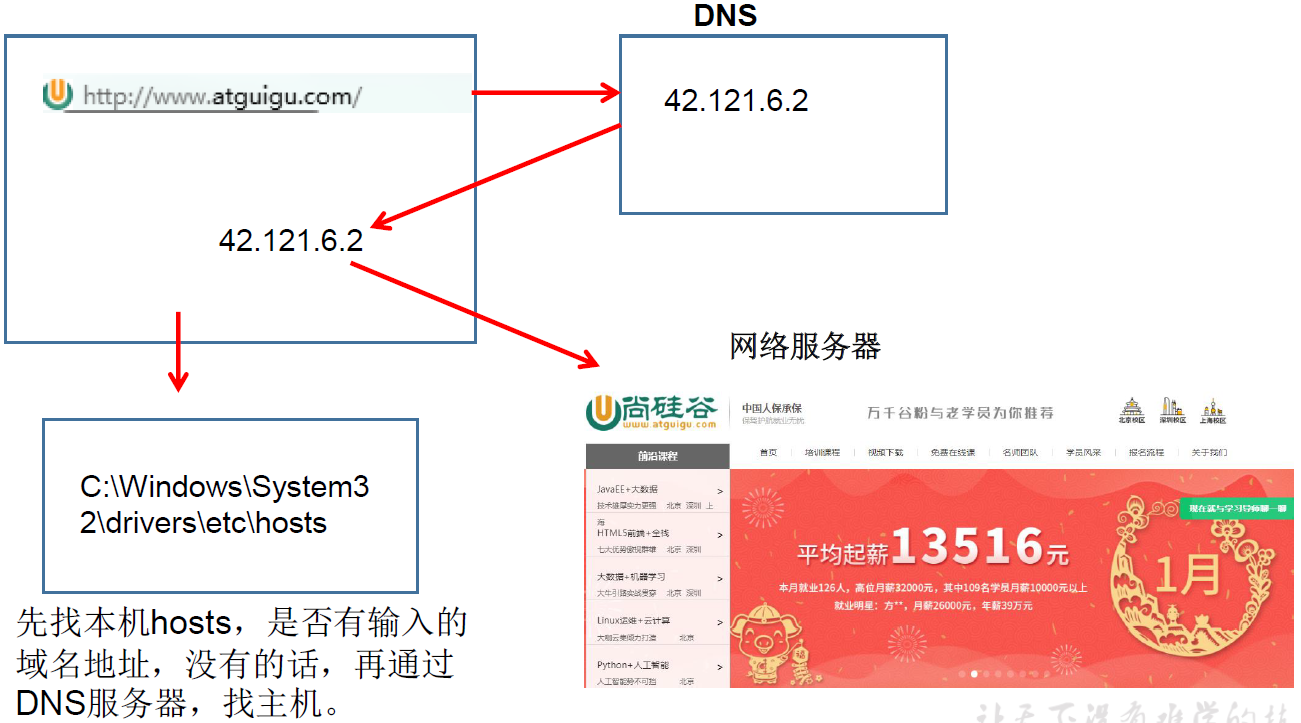
3.根据域名访问对应 IP 地址的主机的流程图
16.3.2 InetAddress类的使用
-
Java 中使用 InetAddress 类的对象来表示 IP 地址。就和用 File 类表示本地的一个文件一样。
-
一个 InetAddress 类的对象,就代表一个 IP 地址。
-
本地的回路地址是 127.0.0.1 ,对应域名是 localhost 。
-
InetAddress 类把构造器私有化了,只能通过以下静态方法返回一个 InetAddress 对象来实例化:
方法 作用 static InetAddress getByName(String host) 形参可以输入域名或者IP地址,返回该IP地址的InetAddress实例 static InetAddress getLocalHost() 返回本机 IP 的 InetAddress 实例 【注意】本地回路地址 127.0.0.1 与本机 IP 地址是两个不同的概念。本地回路地址 127.0.0.1 指的是直接访问本地的资源;本机 IP 地址指的是本机在网络中的身份证号码。
-
InetAddress 还提供了 2 个方法:
方法 作用 String getHostName() 返回 InetAddress 对象的主机域名 String getHostAddress() 返回 InetAddress 对象的 IP 地址
例子:
public static void main(String[] args) {
    try {
        //方法一:通过域名返回InetAddress实例
        InetAddress inet1 = InetAddress.getByName("www.ouc.edu.cn");
        System.out.println(inet1);

        //方法二:通过IP地址返回InetAddress实例
        InetAddress inet2 = InetAddress.getByName("39.156.66.18");
        System.out.println(inet2);

        //获取本机的IP
        InetAddress inet3 = InetAddress.getLocalHost();
        System.out.println(inet3);

        //返回 InetAddress 对象的主机域名
        System.out.println(inet1.getHostName());

        //返回 InetAddress 对象的 IP 地址
        System.out.println(inet1.getHostAddress());

    } catch (UnknownHostException e) {
        e.printStackTrace();
    }
}
输出:
www.ouc.edu.cn/211.64.142.153
/39.156.66.18
DESKTOP-90ISQ2L/169.254.79.141
www.ouc.edu.cn
211.64.142.153
16.3.3 端口号的理解
端口号标识正在计算机上运行的进程 (程序) 。
- 不同的进程有不同的端口号。
- 端口号用一个 16 位二进制的整数表示,一共能表示 2 16 = 65536 2^{16}=65536 216=65536 个进程,范围是 0 ~ 65535 。
2.端口号分类
- 公认端口:0 ~ 1023 。被预先定义的服务通信占用 (如:HTTP占用端口80,FTP占用端口21,Telnet占用端口23) 。
- 注册端口:1024 ~ 49151 。分配给用户进程或应用程序。(如:Tomcat占用端口8080,MySQL占用端口3306,Oracle占用端口1521等,这些只是程序的默认端口,是可以设置更改的) 。
- 动态/私有端口:49152 ~ 65535 。
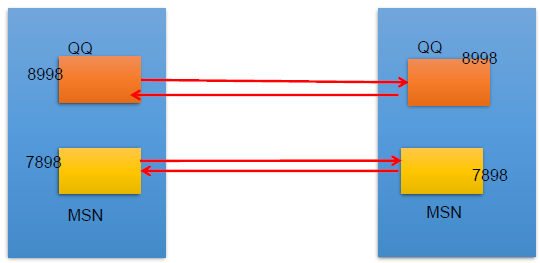
从上面这幅图可以看出,光有 IP 地址的话,只是定位到某一台主机,而 IP 地址 + 端口号才能精准定位到 2 个要通信的进程。因此,不同计算机上的进程才是网络通信中最小的节点单元。
端口号与 IP 地址的组合得出一个网络套接字:Socket 。
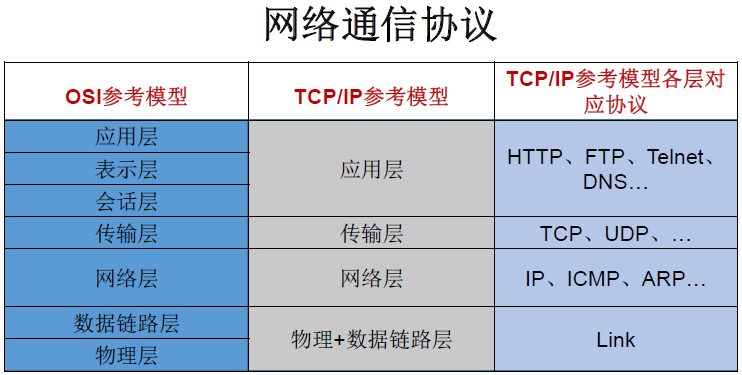
16.4 通信要素2:网络协议
- 同层间可以通信、上一层可以调用下一层,而与再下一层不发生关系。各层互不影响,利于系统的开发和扩展。

16.4.1 TCP/IP协议簇
- TCP 协议:传输控制协议 (Transmission Control Protocol)
- IP 协议:网络互联协议 (Internet Protocol)
- UDP 协议:用户数据报协议 (User Datagram Protocol)
- TCP/IP 以其两个主要协议:传输控制协议 (TCP) 和网络互联协议 (IP) 而得名,实际上是一组协议,包括多个具有不同功能且互为关联的协议。
- IP 协议是网络层的主要协议,支持网间互连的数据通信。
- TCP/IP 协议模型从更实用的角度出发,形成了高效的四层体系结构,即物理链路层、IP 层、传输层和应用层 。
16.4.2 TCP和UDP网络协议的对比
1.TCP 协议:
-
使用 TCP 协议前,须先建立 TCP 连接,形成传输数据通道;
-
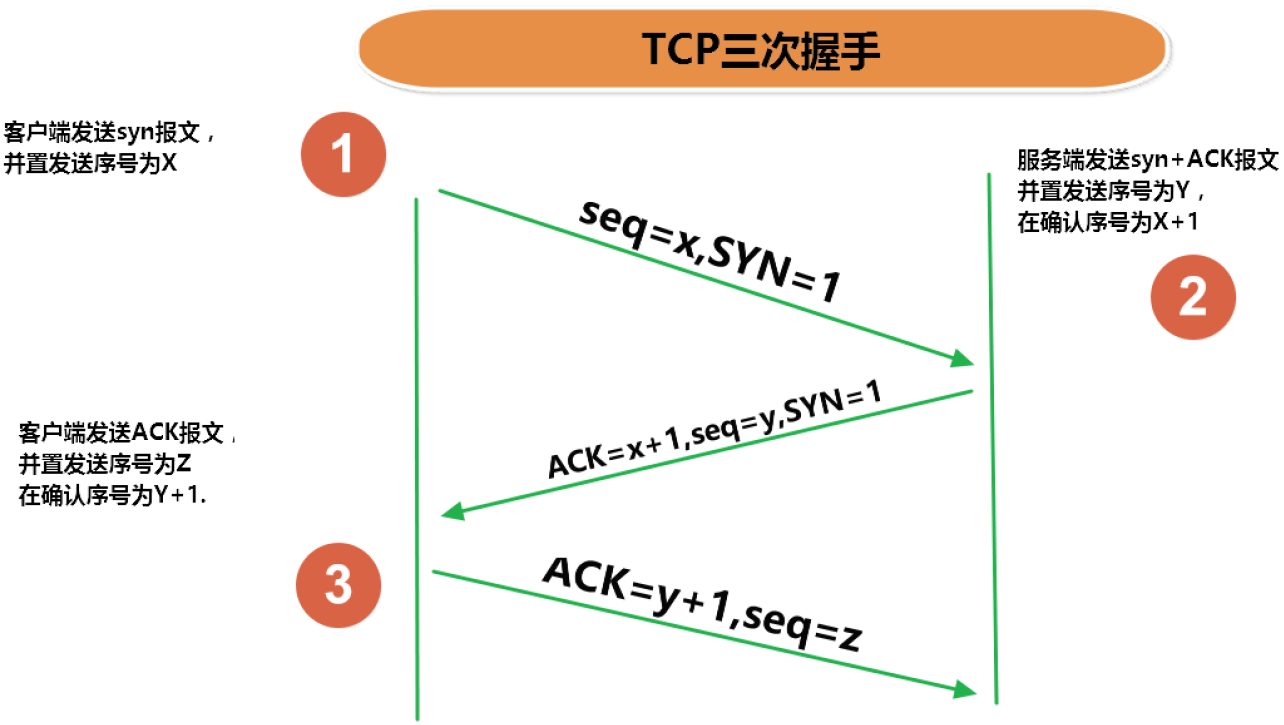
传输前,采用 “三次握手” 方式 ,点对点通信, 是可靠的;
-
TCP 协议进行通信的两个应用进程:客户端、 服务端;
-
在连接中可进行大数据量的传输;
-
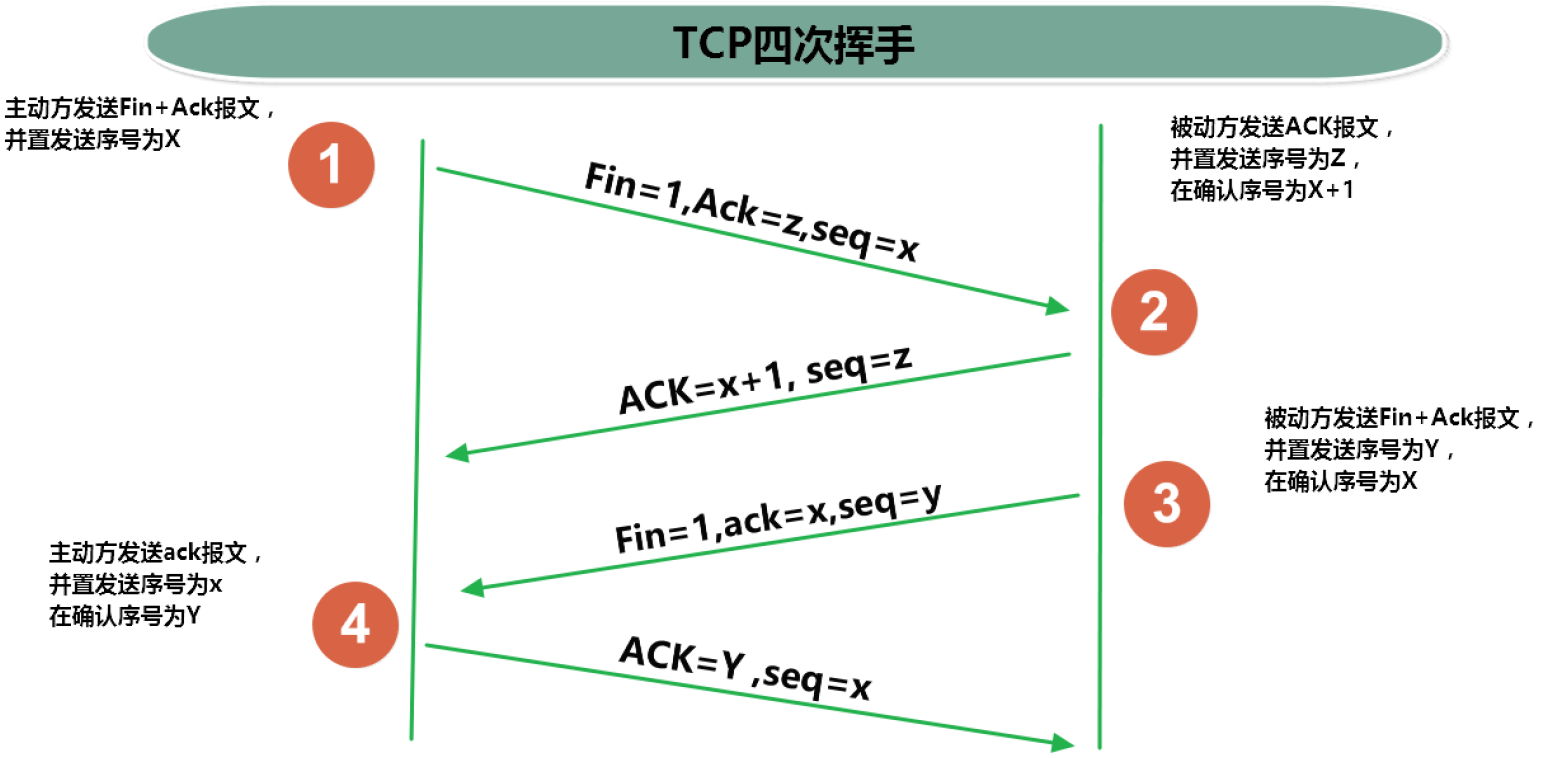
传输完毕,需通过 “四次挥手” 方式释放已建立的连接,效率低。
2.UDP协议:
- 将数据、源、目的封装成数据包,不需要建立连接;
- 每个数据报的大小限制在 64K 内;
- 发送不管对方是否准备好,接收方收到也不确认,故是不可靠的;
- 可以广播发送;
- 发送数据结束时无需释放资源,开销小,速度快。
3.总结
TCP 协议适合对数据精准度要求很高的场景;而 UDP 适合对丢包容忍度较高,但对实时性比较高的场景。
4.TCP 协议的 “三次握手” 描述
5.TCP 协议的 “四次挥手” 描述
16.4.3 Socket的使用
1.Socket 类的简介
-
利用套接字 (Socket) 开发网络应用程序早已被广泛的采用,以至于成为事实上的标准 。
-
网络上具有唯一标识的 IP 地址和端口号组合在一起才能构成唯一能识别的标识符套接字。
-
通信的两端都要有 Socket,是两台机器间通信的端点 。
-
网络通信其实就是 Socket 间的通信。
-
Socket 允许程序把网络连接当成一个流,数据在两个 Socket 间通过 IO 传输。
-
一般主动发起通信的应用程序属客户端 ,等待通信请求的为服务端。
-
Socket 分类:
流套接字( stream socket ) 数据报套接字( datagram socket ) 使用 TCP 提供可依赖的字节流服务 使用 UDP 提供 “尽力而为” 的数据报服务
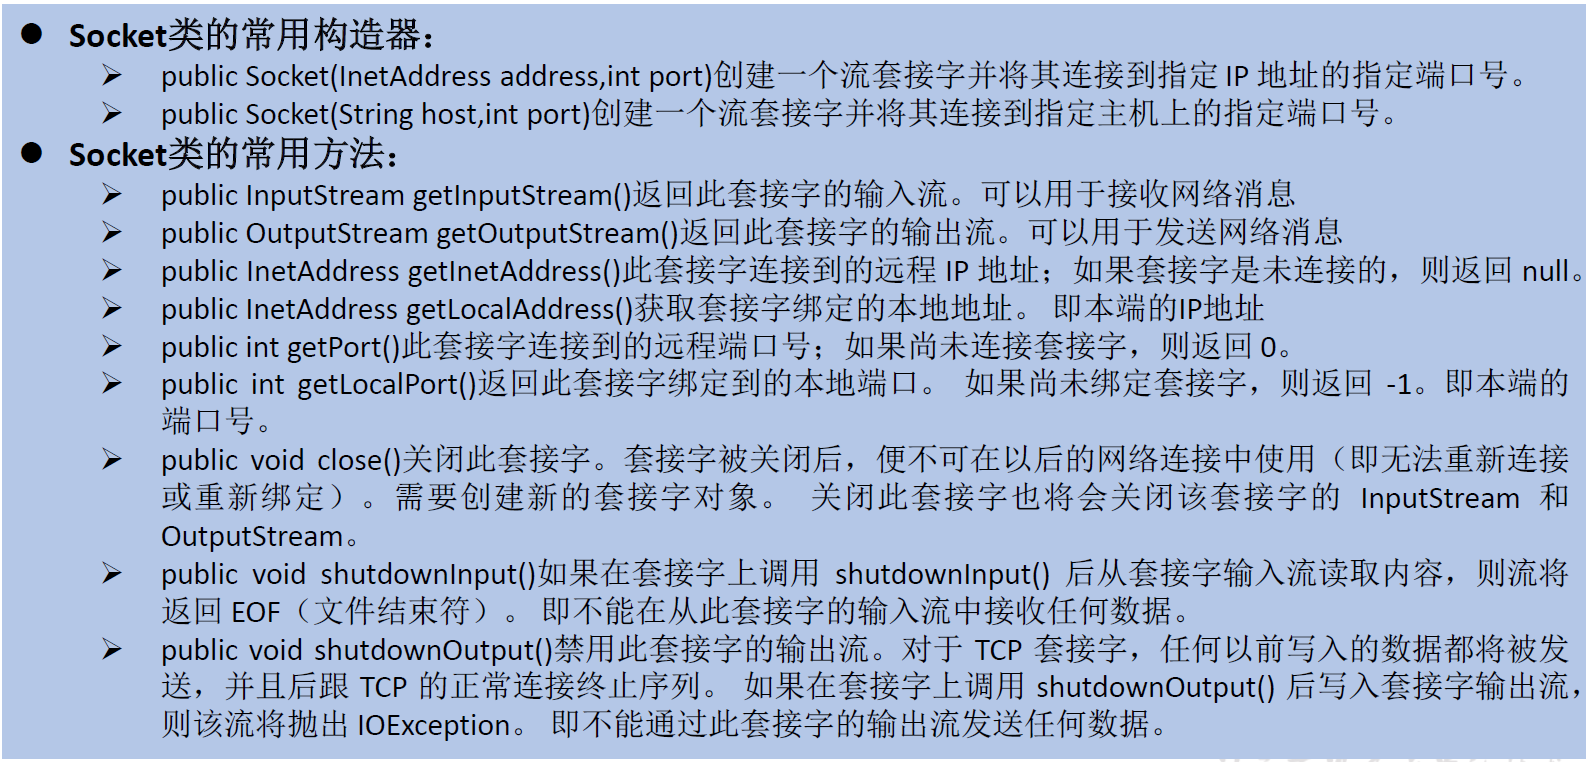
16.4.4 Socket常用方法
16.5 TCP网络编程
16.5.1 例子1
需求:客户端发送信息给客户端,服务端将数据显示在控制台上。
1.客户端代码
@Test
public void client() {//客户端
    Socket socket = null;
    OutputStream os = null;
    try {
        InetAddress inet = InetAddress.getByName("127.0.0.1");
        //1.创建Socket对象,指明通信对象的IP地址和端口号
        socket = new Socket(inet, 1998);

        //2.getOutputStream()方法:返回此套接字的输出流。用于发送网络消息
        os = socket.getOutputStream();

        //3.用write()写要传输的数据
        os.write("我一定要去大厂!".getBytes());

    } catch (IOException e) {
        e.printStackTrace();
    } finally {
        //4.关闭流和socket
        try {
            if (os != null)
                os.close();
        } catch (IOException e) {
            e.printStackTrace();
        }
        try {
            if (socket != null)
                socket.close();
        } catch (IOException e) {
            e.printStackTrace();
        }
    }
}
2.服务端代码:
@Test
public void server() {//服务端
    Socket socket = null;
    InputStream is = null;
    ServerSocket serverSocket = null;
    ByteArrayOutputStream baos = null;
    try {
        //1.创建ServerSocket,构造器形参是通信的端口号,客户端必须跟服务端的端口号一致
        serverSocket = new ServerSocket(1998);

        //2.调用ServerSocket的accept()方法,表示可以接收来自客户端的Socket
        socket = serverSocket.accept();

        //3.调用Socket的getInputStream()方法返回输入流
        is = socket.getInputStream();

        //4.把输入流的数据显示到控制台上
        //不建议直接使用String输出, 会出现buffer太小,装不完完整中文编码出现乱码的情况
//        byte[] buffer = new byte[1024];
//        int len;
//        while ((len = is.read(buffer)) != -1) {
//            System.out.println(new String(buffer, 0, len));
//        }

        //建议使用上一节说到的ByteArrayOutputStream,读取输出流中的数据
        baos = new ByteArrayOutputStream();
        byte[] buffer = new byte[16];
        int len;
        while ((len = is.read(buffer)) != -1) {
            baos.write(buffer, 0, len);
        }
        //把ByteArrayOutputStream内部的字节数组全部整体上转换成字符串
        System.out.println(baos.toString());

        //显示一下别的信息
        System.out.println("收到了来自于:" + socket.getInetAddress().getHostAddress() + "的数据");

    } catch (IOException e) {
        e.printStackTrace();
    } finally {
        //5.关闭所有流和Socket
        try {
            if (baos != null)
                baos.close();
        } catch (IOException e) {
            e.printStackTrace();
        }
        try {
            if (is != null)
                is.close();
        } catch (IOException e) {
            e.printStackTrace();
        }
        try {
            if (socket != null)
                socket.close();
        } catch (IOException e) {
            e.printStackTrace();
        }
        try {
            if (serverSocket != null)
                serverSocket.close();
        } catch (IOException e) {
            e.printStackTrace();
        }
    }
}
【注意】要先启动服务端,再启动客户端。
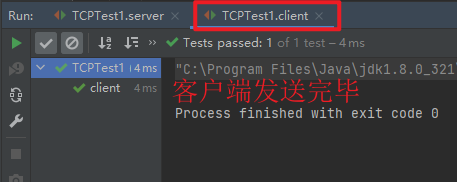
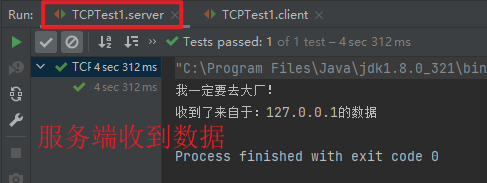
【体会】写完这个例子我真的激动了好久。这一节的学习让我有一个新的质的飞跃,能让我跨网络传输 Java 数据了。不再只局限于在本地主机上编写代码,真正开启我的 Java 互联网时代!
16.5.2 例子2
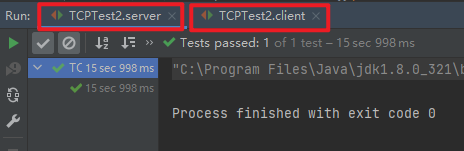
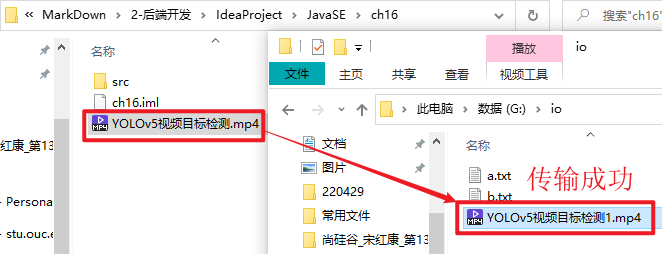
需求:客户端发送文件给服务端, 服务端将文件保存在本地。
1.客户端代码
@Test
public void client() {//客户端
    Socket socket = null;
    OutputStream os = null;
    BufferedInputStream bis = null;
    try {

        // 1.创建Socket,指明要发送的IP地址和端口
        InetAddress inet = InetAddress.getByName("127.0.0.1");
        socket = new Socket(inet, 2500);

        // 2.调用Socket的getOutputStream()方法,返回输出流
        os = socket.getOutputStream();

        // 3.把客户端本地的文件读进来,并写出到输出流OutputStream
        bis = new BufferedInputStream(new FileInputStream("YOLOv5视频目标检测.mp4"));
        byte[] buffer = new byte[1024];
        int len;
        while ((len = bis.read(buffer)) != -1) {
            os.write(buffer, 0, len);
        }

    } catch (IOException e) {
        e.printStackTrace();
    } finally {
        // 4.关闭流和Socket资源
        try {
            if (bis != null)
                bis.close();
        } catch (IOException e) {
            e.printStackTrace();
        }
        try {
            if (os != null)
                os.close();
        } catch (IOException e) {
            e.printStackTrace();
        }
        try {
            if (socket != null)
                socket.close();
        } catch (IOException e) {
            e.printStackTrace();
        }
    }
}
2.服务端代码
@Test
public void server() {//服务端
    ServerSocket serverSocket = null;
    Socket socket = null;
    InputStream is = null;
    BufferedOutputStream bos = null;
    try {

        // 1.创建ServerSocket,指明对外服务的端口号,客户端的端口号必须与服务端的端口号一致
        serverSocket = new ServerSocket(2500);

        // 2.调用serverSocket.accept(),返回接收Socket
        socket = serverSocket.accept();

        // 3.调用socket.getInputStream(),返回一个输入流
        is = socket.getInputStream();

        // 4.创建字节输出流,用来输出接收到的文件
        bos = new BufferedOutputStream(new FileOutputStream("G:\\io\\YOLOv5视频目标检测1.mp4"));

        // 5.把从客户端输入流的文件输出到服务端本机上
        byte[] buffer = new byte[1024];
        int len;
        while ((len = is.read(buffer)) != -1) {
            bos.write(buffer, 0, len);
        }

    } catch (IOException e) {
        e.printStackTrace();
    } finally {
        // 6.关闭流和Socket
        try {
            if (bos != null)
                bos.close();
        } catch (IOException e) {
            e.printStackTrace();
        }
        try {
            if (is != null)
                is.close();
        } catch (IOException e) {
            e.printStackTrace();
        }
        try {
            if (socket != null)
                socket.close();
        } catch (IOException e) {
            e.printStackTrace();
        }
        try {
            if (serverSocket != null)
                serverSocket.close();
        } catch (IOException e) {
            e.printStackTrace();
        }
    }
}
【注意】要先启动服务端,再启动客户端。
16.5.3 例子3
需求:从客户端发送文件给服务端,服务端保存到本地。并返回“发送成功”给客户端。并关闭相应的连接。
可以基于例子2的代码基础上进行迭代优化。
以下是我的首次代码,运行之后不断转圈。首要原因是大体思路错了,不应该在一个客户端或一个服务端中同时有 Socket 和 ServerSocket 。其实一个 Socket 是即可以发送,也可以接收的。
1.客户端代码
@Test
public void client() {//客户端
    Socket socket = null;
    OutputStream os = null;
    BufferedInputStream bis = null;
    ByteArrayOutputStream baos = null;
    InputStream is = null;
    Socket socketReceive = null;
    ServerSocket serverSocket = null;
    try {

        // 1.创建Socket,指明要发送的IP地址和端口
        InetAddress inet = InetAddress.getByName("127.0.0.1");
        socket = new Socket(inet, 2500);

        // 2.调用Socket的getOutputStream()方法,返回输出流
        os = socket.getOutputStream();

        // 3.把客户端本地的文件读进来,并写出到输出流OutputStream
        bis = new BufferedInputStream(new FileInputStream("YOLOv5视频目标检测.mp4"));
        byte[] buffer = new byte[1024];
        int len;
        while ((len = bis.read(buffer)) != -1) {
            os.write(buffer, 0, len);
        }

        // 4.接收客户端发回来的发送是否成功的消息
        // 虽然是客户端,但创建ServerSocket感觉有点怪怪的
        serverSocket = new ServerSocket(8086);
        socketReceive = serverSocket.accept();
        is = socketReceive.getInputStream();
        byte[] buffer1 = new byte[16];
        int len1;
        baos = new ByteArrayOutputStream();
        while ((len1 = is.read(buffer1)) != -1) {
            baos.write(buffer1, 0, len);
        }
        System.out.println(baos.toString());


    } catch (IOException e) {
        e.printStackTrace();
    } finally {
        // 4.关闭流和Socket资源

        try {
            if (baos != null)
                baos.close();
        } catch (IOException e) {
            e.printStackTrace();
        }
        try {
            if (is != null)
                is.close();
        } catch (IOException e) {
            e.printStackTrace();
        }
        try {
            if (socketReceive != null)
                socketReceive.close();
        } catch (IOException e) {
            e.printStackTrace();
        }
        try {
            if (serverSocket != null)
                serverSocket.close();
        } catch (IOException e) {
            e.printStackTrace();
        }
        try {
            if (bis != null)
                bis.close();
        } catch (IOException e) {
            e.printStackTrace();
        }
        try {
            if (os != null)
                os.close();
        } catch (IOException e) {
            e.printStackTrace();
        }
        try {
            if (socket != null)
                socket.close();
        } catch (IOException e) {
            e.printStackTrace();
        }
    }
}
2.服务端代码
@Test
public void server() {//服务端
    ServerSocket serverSocket = null;
    Socket socket = null;
    InputStream is = null;
    BufferedOutputStream bos = null;
    OutputStream os = null;
    Socket socketReturn = null;
    try {

        // 1.创建ServerSocket,指明对外服务的端口号,客户端的端口号必须与服务端的端口号一致
        serverSocket = new ServerSocket(2500);

        // 2.调用serverSocket.accept(),返回接收Socket
        socket = serverSocket.accept();

        // 3.调用socket.getInputStream(),返回一个输入流
        is = socket.getInputStream();

        // 4.创建字节输出流,用来输出接收到的文件
        bos = new BufferedOutputStream(new FileOutputStream("G:\\io\\YOLOv5视频目标检测1.mp4"));

        // 5.把从客户端输入流的文件输出到服务端本机上
        byte[] buffer = new byte[1024];
        int len;
        while ((len = is.read(buffer)) != -1) {
            bos.write(buffer, 0, len);
        }

        // 6.检查文件是否保存到服务端本机上?如是,则返回“发送成功”给客户端
        File file = new File("G:\\io\\YOLOv5视频目标检测1.mp4");
        // 获取客户端的IP地址
        String clientAddress = socket.getInetAddress().getHostAddress();
        // 创建发送到客户端的Socket
        socketReturn = new Socket(clientAddress, 8086);
        // 创建发送到客户端的输出流
        os = socketReturn.getOutputStream();
        if (file.exists()) {
            os.write("发送成功!".getBytes());
        } else {//文件不存在,返回“发送失败”给客户端
            os.write("发送失败!".getBytes());
        }

    } catch (IOException e) {
        e.printStackTrace();
    } finally {
        // 6.关闭流和Socket
        try {
            if (os != null)
                os.close();
        } catch (IOException e) {
            e.printStackTrace();
        }
        try {
            if (socketReturn != null)
                socketReturn.close();
        } catch (IOException e) {
            e.printStackTrace();
        }
        try {
            if (bos != null)
                bos.close();
        } catch (IOException e) {
            e.printStackTrace();
        }
        try {
            if (is != null)
                is.close();
        } catch (IOException e) {
            e.printStackTrace();
        }
        try {
            if (socket != null)
                socket.close();
        } catch (IOException e) {
            e.printStackTrace();
        }
        try {
            if (serverSocket != null)
                serverSocket.close();
        } catch (IOException e) {
            e.printStackTrace();
        }
    }
}
以下是我的第二次代码,保证了一个客户端/服务端只有一个 Socket 。但是运行之后还是不断转圈。究其原因,是因为服务端的 InputStream 的 read() 方法是一个阻塞式的,它不知道客户端到底发送完毕了没有,因此会一直读取。只有当客户端的 Socket 包含了一个 “发送完毕,关闭 Socket 的 OutputStream” 信号时,服务端的 InputStream.read() 才会终止接收,继续执行后面的代码。
【体会】这一切都是旧的 IO 的阻塞式造成的后果,新版的 NIO 的读写方法就升级为非阻塞式的了。等到框架部分会仔细学习这部分的内容。
1.客户端代码
@Test
public void client() {//客户端
    Socket socket = null;
    OutputStream os = null;
    BufferedInputStream bis = null;
    ByteArrayOutputStream baos = null;
    InputStream is = null;
    try {

        // 1.创建Socket,指明要发送的IP地址和端口
        InetAddress inet = InetAddress.getByName("127.0.0.1");
        socket = new Socket(inet, 2500);

        // 2.调用Socket的getOutputStream()方法,返回输出流
        os = socket.getOutputStream();

        // 3.把客户端本地的文件读进来,并写出到输出流OutputStream
        bis = new BufferedInputStream(new FileInputStream("YOLOv5视频目标检测.mp4"));
        byte[] buffer = new byte[1024];
        int len;
        while ((len = bis.read(buffer)) != -1) {
            os.write(buffer, 0, len);
        }

        // 4.接收客户端发回来的发送是否成功的消息(第二次更改后的代码)
        is = socket.getInputStream();
        byte[] buffer1 = new byte[16];
        int len1;
        baos = new ByteArrayOutputStream();
        while ((len1 = is.read(buffer1)) != -1) {
            baos.write(buffer1, 0, len1);
        }
        System.out.println(baos.toString());


    } catch (IOException e) {
        e.printStackTrace();
    } finally {
        // 4.关闭流和Socket资源
        try {
            if (baos != null)
                baos.close();
        } catch (IOException e) {
            e.printStackTrace();
        }
        try {
            if (is != null)
                is.close();
        } catch (IOException e) {
            e.printStackTrace();
        }
        try {
            if (bis != null)
                bis.close();
        } catch (IOException e) {
            e.printStackTrace();
        }
        try {
            if (os != null)
                os.close();
        } catch (IOException e) {
            e.printStackTrace();
        }
        try {
            if (socket != null)
                socket.close();
        } catch (IOException e) {
            e.printStackTrace();
        }
    }
}
2.服务端代码
@Test
public void server() {//服务端
    ServerSocket serverSocket = null;
    Socket socket = null;
    InputStream is = null;
    BufferedOutputStream bos = null;
    OutputStream os = null;
    try {

        // 1.创建ServerSocket,指明对外服务的端口号,客户端的端口号必须与服务端的端口号一致
        serverSocket = new ServerSocket(2500);

        // 2.调用serverSocket.accept(),返回接收Socket
        socket = serverSocket.accept();

        // 3.调用socket.getInputStream(),返回一个输入流
        is = socket.getInputStream();

        // 4.创建字节输出流,用来输出接收到的文件
        bos = new BufferedOutputStream(new FileOutputStream("G:\\io\\YOLOv5视频目标检测1.mp4"));

        // 5.把从客户端输入流的文件输出到服务端本机上
        byte[] buffer = new byte[1024];
        int len;
        while ((len = is.read(buffer)) != -1) {
            bos.write(buffer, 0, len);
        }

        // 6.检查文件是否保存到服务端本机上?如是,则返回“发送成功”给客户端
        // 6.修改后的代码,不用再创建新的Socket,直接用原有Socket返回给客户端即可
        os = socket.getOutputStream();
        File file = new File("G:\\io\\YOLOv5视频目标检测1.mp4");
        if (file.exists()) {
            os.write("发送成功!".getBytes());
        } else {//文件不存在,返回“发送失败”给客户端
            os.write("发送失败!".getBytes());
        }


    } catch (IOException e) {
        e.printStackTrace();
    } finally {
        // 6.关闭流和Socket
        try {
            if (os != null)
                os.close();
        } catch (IOException e) {
            e.printStackTrace();
        }
        try {
            if (bos != null)
                bos.close();
        } catch (IOException e) {
            e.printStackTrace();
        }
        try {
            if (is != null)
                is.close();
        } catch (IOException e) {
            e.printStackTrace();
        }
        try {
            if (socket != null)
                socket.close();
        } catch (IOException e) {
            e.printStackTrace();
        }
        try {
            if (serverSocket != null)
                serverSocket.close();
        } catch (IOException e) {
            e.printStackTrace();
        }
    }
}
最后正确的代码:只需要在客户端发送数据完毕后添加 socket.shutdownOutput() 方法,向服务端指明发送完毕,可以结束 InputStream 的 read() 方法了。后面的所有代码都可以正常运行。
1.客户端代码
@Test
public void client() {//客户端
    Socket socket = null;
    OutputStream os = null;
    BufferedInputStream bis = null;
    ByteArrayOutputStream baos = null;
    InputStream is = null;
    try {

        // 1.创建Socket,指明要发送的IP地址和端口
        InetAddress inet = InetAddress.getByName("127.0.0.1");
        socket = new Socket(inet, 2500);

        // 2.调用Socket的getOutputStream()方法,返回输出流
        os = socket.getOutputStream();

        // 3.把客户端本地的文件读进来,并写出到输出流OutputStream
        bis = new BufferedInputStream(new FileInputStream("YOLOv5视频目标检测.mp4"));
        byte[] buffer = new byte[1024];
        int len;
        while ((len = bis.read(buffer)) != -1) {
            os.write(buffer, 0, len);
        }

        // 4.Socket的shutdownOutput()方法是不转圈圈的关键,指示服务端已经传输完成,可以关闭流了
        socket.shutdownOutput();

        // 5.接收客户端发回来的发送是否成功的消息
        is = socket.getInputStream();
        byte[] buffer1 = new byte[16];
        int len1;
        baos = new ByteArrayOutputStream();
        while ((len1 = is.read(buffer1)) != -1) {
            baos.write(buffer1, 0, len1);
        }
        System.out.println(baos.toString());


    } catch (IOException e) {
        e.printStackTrace();
    } finally {
        // 4.关闭流和Socket资源
        try {
            if (baos != null)
                baos.close();
        } catch (IOException e) {
            e.printStackTrace();
        }
        try {
            if (is != null)
                is.close();
        } catch (IOException e) {
            e.printStackTrace();
        }
        try {
            if (bis != null)
                bis.close();
        } catch (IOException e) {
            e.printStackTrace();
        }
        try {
            if (os != null)
                os.close();
        } catch (IOException e) {
            e.printStackTrace();
        }
        try {
            if (socket != null)
                socket.close();
        } catch (IOException e) {
            e.printStackTrace();
        }
    }
}
2.服务端代码
@Test
public void server() {//服务端
    ServerSocket serverSocket = null;
    Socket socket = null;
    InputStream is = null;
    BufferedOutputStream bos = null;
    OutputStream os = null;
    try {

        // 1.创建ServerSocket,指明对外服务的端口号,客户端的端口号必须与服务端的端口号一致
        serverSocket = new ServerSocket(2500);

        // 2.调用serverSocket.accept(),返回接收Socket
        socket = serverSocket.accept();

        // 3.调用socket.getInputStream(),返回一个输入流
        is = socket.getInputStream();

        // 4.创建字节输出流,用来输出接收到的文件
        bos = new BufferedOutputStream(new FileOutputStream("G:\\io\\YOLOv5视频目标检测1.mp4"));

        // 5.把从客户端输入流的文件输出到服务端本机上
        byte[] buffer = new byte[1024];
        int len;
        while ((len = is.read(buffer)) != -1) {
            bos.write(buffer, 0, len);
        }

        // 6.检查文件是否保存到服务端本机上?如是,则返回“发送成功”给客户端
        // 6.修改后的代码,不用再创建新的Socket,直接用原有Socket返回给客户端即可
        os = socket.getOutputStream();
        File file = new File("G:\\io\\YOLOv5视频目标检测1.mp4");
        if (file.exists()) {
            os.write("发送成功!".getBytes());
        } else {//文件不存在,返回“发送失败”给客户端
            os.write("发送失败!".getBytes());
        }


    } catch (IOException e) {
        e.printStackTrace();
    } finally {
        // 6.关闭流和Socket
        try {
            if (os != null)
                os.close();
        } catch (IOException e) {
            e.printStackTrace();
        }
        try {
            if (bos != null)
                bos.close();
        } catch (IOException e) {
            e.printStackTrace();
        }
        try {
            if (is != null)
                is.close();
        } catch (IOException e) {
            e.printStackTrace();
        }
        try {
            if (socket != null)
                socket.close();
        } catch (IOException e) {
            e.printStackTrace();
        }
        try {
            if (serverSocket != null)
                serverSocket.close();
        } catch (IOException e) {
            e.printStackTrace();
        }
    }
}
输出:
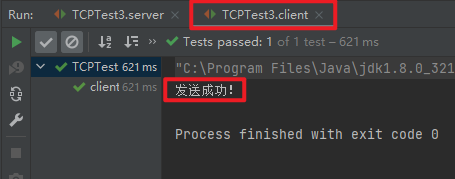
Ohhhhhhhh! 我太激动了,客户端收到了服务端返回的发送成功的消息了。这说明我正式进入了客户端与服务端互动的阶段了~

【总结】客户端必须在发送数据完毕后,调用 socket.shutdownOutput() 的方法。相当于写入一个 “流的末尾” 标记,对方才能读到 -1 ,否则对方的读取方法会一直阻塞。
16.5.4 练习
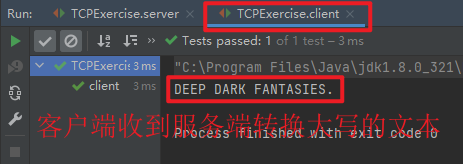
需求:客户端给服务端发送文本,服务端将文本转成大写,再返回给客户端。
1.客户端代码
@Test
public void client() {
    Socket socket = null;
    OutputStream os = null;
    ByteArrayOutputStream baos = null;
    InputStream is = null;
    try {
        socket = new Socket("127.0.0.1", 5200);
        os = socket.getOutputStream();
        os.write("Deep Dark Fantasies.".getBytes());
        socket.shutdownOutput();

        is = socket.getInputStream();
        byte[] buffer = new byte[16];
        int len;
        baos = new ByteArrayOutputStream();
        while ((len = is.read(buffer)) != -1) {
            baos.write(buffer, 0, len);
        }
        System.out.println(baos.toString());

    } catch (IOException e) {
        e.printStackTrace();
    } finally {
        try {
            if (baos != null)
                baos.close();
        } catch (IOException e) {
            e.printStackTrace();
        }
        try {
            if (is != null)
                is.close();
        } catch (IOException e) {
            e.printStackTrace();
        }
        try {
            if (os != null)
                os.close();
        } catch (IOException e) {
            e.printStackTrace();
        }
        try {
            if (socket != null)
                socket.close();
        } catch (IOException e) {
            e.printStackTrace();
        }
    }
}
2.服务端代码
@Test
public void server() {
    ServerSocket serverSocket = null;
    Socket socket = null;
    InputStream is = null;
    ByteArrayOutputStream baos = null;
    OutputStream os = null;
    try {

        serverSocket = new ServerSocket(5200);
        socket = serverSocket.accept();
        is = socket.getInputStream();
        byte[] buffer = new byte[16];
        int len;
        baos = new ByteArrayOutputStream();
        while ((len = is.read(buffer)) != -1) {
            baos.write(buffer, 0, len);
        }
        String upStr = baos.toString().toUpperCase();//核心需求的实现
        os = socket.getOutputStream();
        os.write(upStr.getBytes());
        socket.shutdownOutput();

    } catch (IOException e) {
        e.printStackTrace();
    } finally {
        try {
            if (os != null)
                os.close();
        } catch (IOException e) {
            e.printStackTrace();
        }
        try {
            if (baos != null)
                baos.close();
        } catch (IOException e) {
            e.printStackTrace();
        }
        try {
            if (is != null)
                is.close();
        } catch (IOException e) {
            e.printStackTrace();
        }
        try {
            if (socket != null)
                socket.close();
        } catch (IOException e) {
            e.printStackTrace();
        }
        try {
            if (serverSocket != null)
                serverSocket.close();
        } catch (IOException e) {
            e.printStackTrace();
        }
    }
}
输出:
16.6 UDP网络编程
16.6.1 UDP简介
- 类 DatagramSocket 和 DatagramPacket 实现了基于 UDP 协议网络程序。
- UDP 协议是一个 “尽力而为” 的协议。UDP 数据报通过数据报套接字 DatagramSocket 发送和接收,系统 不保证 UDP 数据报一定能够安全送到目的地,也不能确定什么时候可以抵达。缺点是数据传输不可靠,但优点是快速、可以广播。
- DatagramPacket 对象封装了 UDP 数据报,在数据报中包含了发送端的 IP 地址和端口号,以及接收端的 IP 地址和端口号。也就是一个 DatagramPacket 就包含了 2 端的 IP 地址和端口号信息。
- UDP 协议中每个数据报都给出了完整的地址信息,因此无须建立发送方和接收方的连接。 如同发快递包裹一样 。
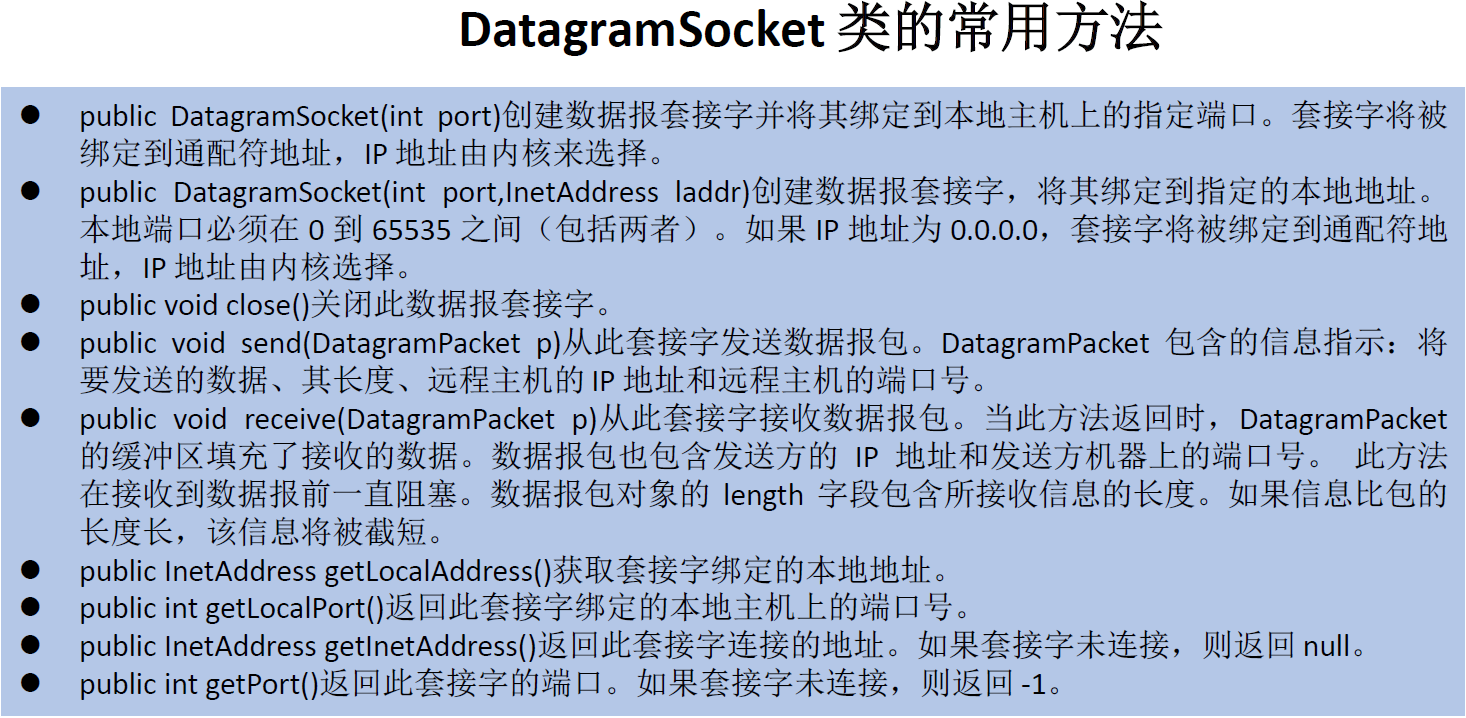
16.6.2 DatagramSocket 的常用方法
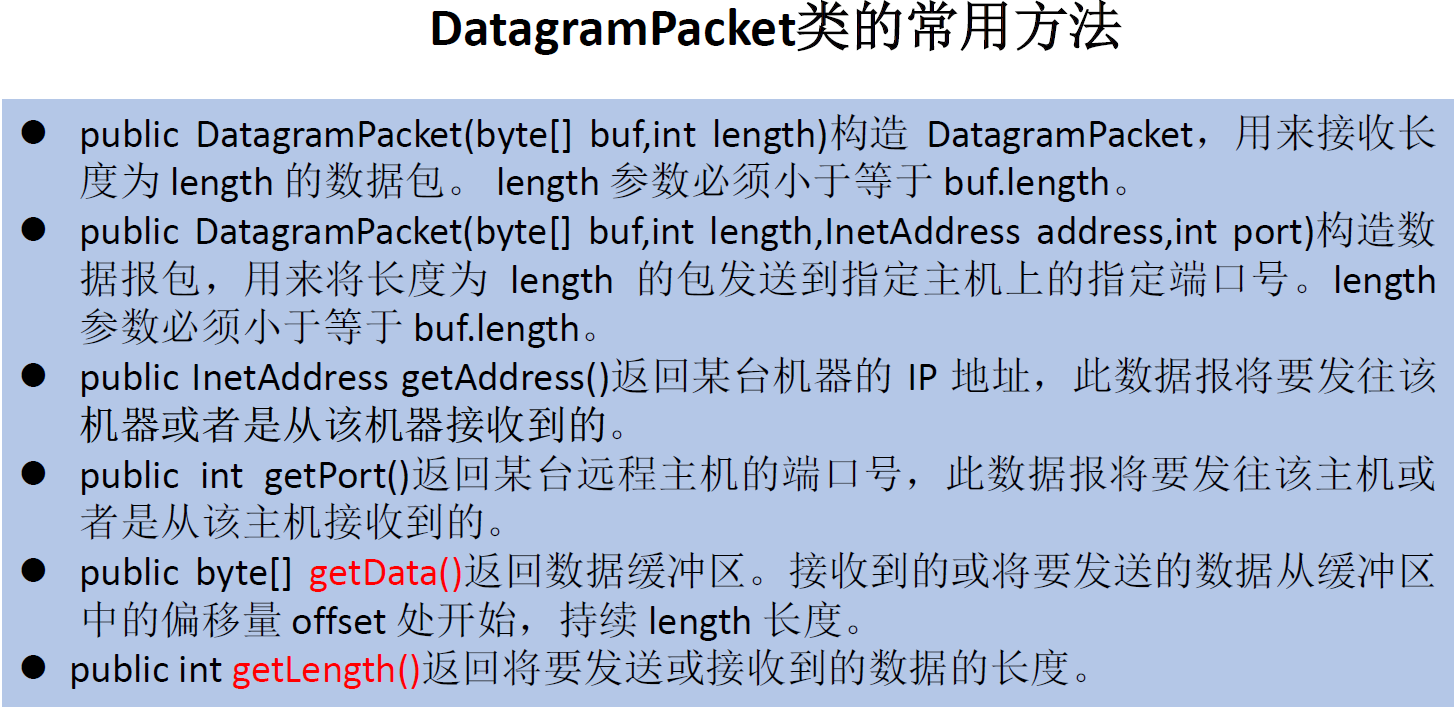
16.6.3 DatagramPacket 的常用方法
16.6.4 例子
需求:从发送端发送一句话到接收端。
1.发送端代码
@Test
public void sender() {
    DatagramSocket socket = null;
    try {

        // 1.创建DatagramSocket
        socket = new DatagramSocket();

        // 3.创建InetAddress,指明接收端的IP地址
        InetAddress inet = InetAddress.getByName("127.0.0.1");

        // 4.建立数据包
        byte[] data = "我是UDP协议海王发送的消息!".getBytes();

        // 2.创建DatagramPacket
        DatagramPacket packet = new DatagramPacket(data, 0, data.length, inet, 10086);

        // 5.调用DatagramSocket的send()方法,表明是发送数据
        socket.send(packet);

    } catch (IOException e) {
        e.printStackTrace();
    } finally {
        // 6.关闭DatagramSocket
        if (socket != null)
            socket.close();
    }
}
2.接收端代码
@Test
public void receive() {
    DatagramSocket socket = null;
    try {
        // 1.创建DatagramSocket, 需指明接收的端口号
        socket = new DatagramSocket(10086);

        // 3.建立接收的容器
        byte[] buffer = new byte[100];

        // 2.创建DatagramPacket
        DatagramPacket packet = new DatagramPacket(buffer, 0, buffer.length);

        // 4.调用DatagramSocket的receive()方法,表明是接收数据
        socket.receive(packet);

        // 5.把数据输出到控制台上
        System.out.println(new String(packet.getData(), 0, packet.getLength()));

    } catch (IOException e) {
        e.printStackTrace();
    } finally {
        // 6.资源关闭
        if (socket != null)
            socket.close();
    }
}
输出:
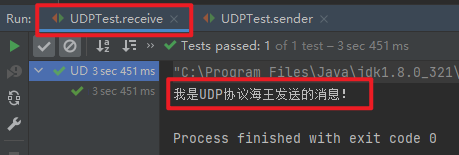
【总结】正常来说,UDP 协议也是要先启动接收端,再启动发送端。但是可以看到,就算只启动发送端,也不会报错。因为 UDP 协议只管发送,“尽力而为” ,数据发出去之后就与我无关,因此 UDP 协议的不可靠性就体现在此处。
16.7 URL编程
16.7.1 URL编程的理解
-
URL (Uniform Resource Locator) :统一资源定位符。它表示 Internet 上某一资源的地址。
-
通过 URL 我们可以访问 Internet 上的各种网络资源,比如最常见的www、ftp站点。浏览器通过解析给定的 URL 可以在网络上查找相应的文件或其他资源。
-
URL 的基本结构由 5 部分组成:
<传输协议>://<主机名>:<端口号>/<文件名>#片段名?参数列表- 如:
http://192.168.1.100:8080/helloworld/index.jsp#a?username=shkstart&password=123
其中,#片段名 即锚点,例如看小说,直接定位到章节。
参数列表格式:参数名=参数值&参数名=参数值…
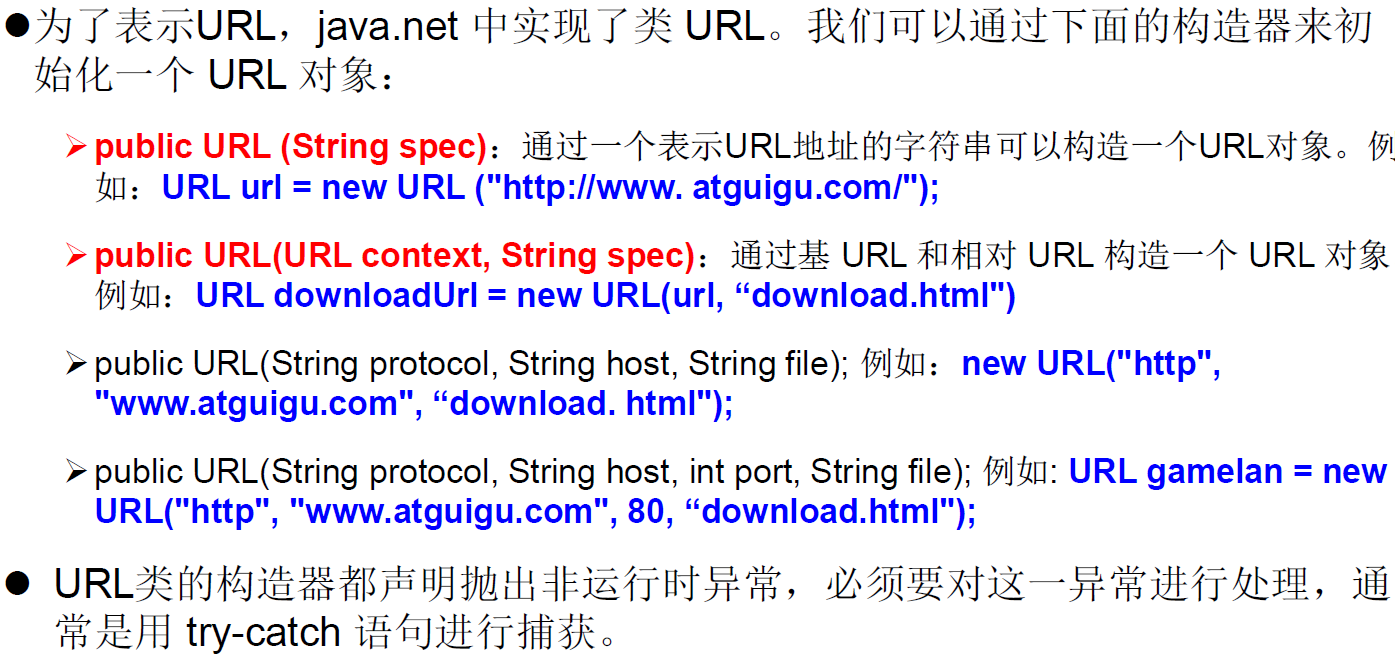
16.7.2 java.net.URL类的使用
1.构造器
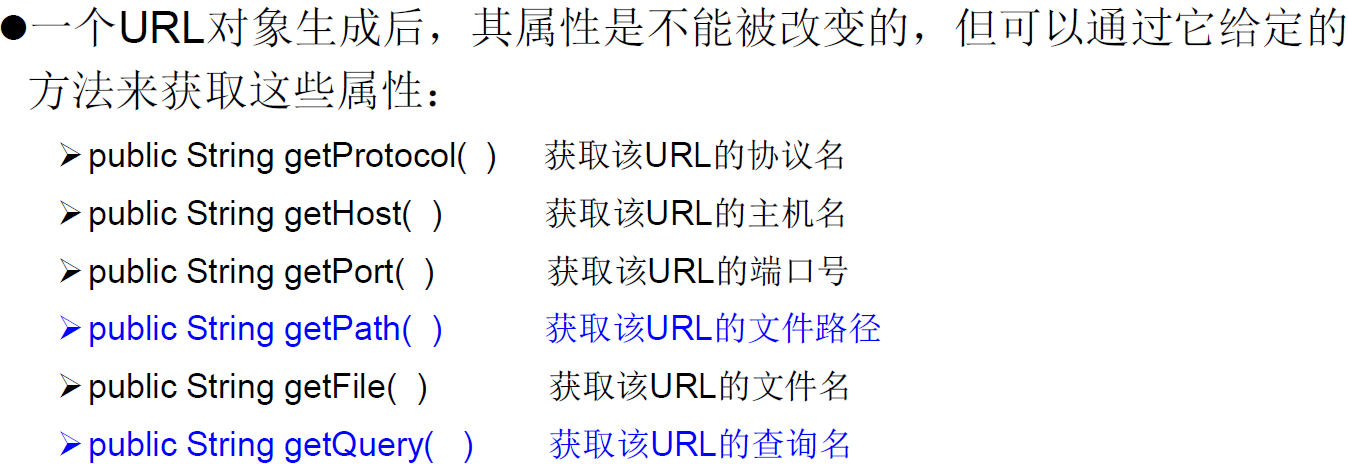
2.常用方法
16.7.3 java.net.URL类的URL资源下载
public static void main(String[] args) {
    HttpURLConnection urlConnection = null;
    InputStream is = null;
    BufferedOutputStream bos = null;

    try {

        // 1.创建URL对象,形参是具体的资源地址
        URL url = new URL("http://localhost:8080/examples/beauty.jpg");

        // 2.调用URL的openConnection()方法,创建与服务器的Http链接对象,需要强转
        urlConnection = (HttpURLConnection) url.openConnection();

        // 3.调用HttpURLConnection的connect()方法,获取与服务器的链接
        urlConnection.connect();

        // 4.调用HttpURLConnection的getInputStream()方法,获取输入流
        is = urlConnection.getInputStream();

        // 5.利用输入流把资源文件保存到本地
        bos = new BufferedOutputStream(new FileOutputStream("ch16\\beauty1.jpg"));
        byte[] buffer = new byte[1024];
        int len;
        while ((len = is.read()) != -1) {
            bos.write(buffer, 0, len);
        }

    } catch (IOException e) {
        e.printStackTrace();
    } finally {
        // 6.关闭流资源
        try {
            if (bos != null)
                bos.close();
        } catch (IOException e) {
            e.printStackTrace();
        }
        try {
            if (is != null)
                is.close();
        } catch (IOException e) {
            e.printStackTrace();
        }

        // 7.调用HttpURLConnection的disconnect()方法,断开与服务器的链接
        if (urlConnection != null)
            urlConnection.disconnect();
    }
}


 450
450


 被折叠的 条评论
为什么被折叠?
被折叠的 条评论
为什么被折叠?
 到【灌水乐园】发言


