


自定义View画一个钟表
第一次看到别人的程序上面一个钟表自动走动感觉好神奇,好厉害的样子,然后就很感兴趣,自己鼓捣了一通,也明白了,理清思路其实很简单,下面来和大家一起分享一下我的思路.
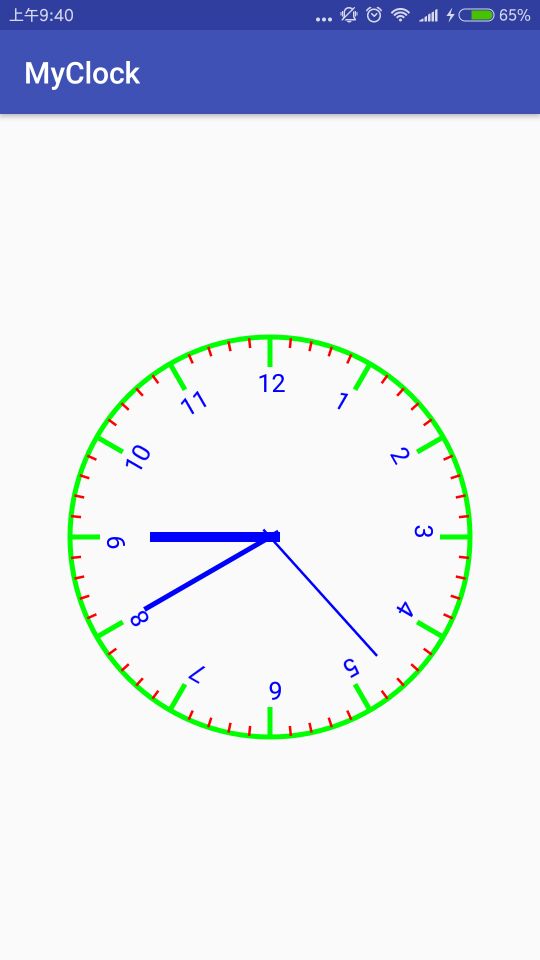
首先确定一个圆心点和半径画一个圆,这个应该难不住聪明的你们吧,接下来要考虑的是圆上面钟表的刻度数字,这个想来发现挺的,怎么画?难道要知道每个小刻度线的横纵坐标?后来当我知道画布可以旋转的时候.....不说了,都是泪.既然画布可以旋转,我们就在一个整刻度线的地方画一个刻度线,比如12点的方向,这个刻度线的坐标就比较好得到了,它的起点x坐标就是用二分之一的屏幕宽度,即:getWidth()/2,高度也一样,就是二分之一的屏幕高度减去圆的半径:getHeight()/2-r,它的终点坐标和起点差不多,就是你想让刻度线有多长,加上多少就行了. 小刻度线也分长短,可以来个60次for循环,如果它是5的倍数就画长线,否则短线..额..感觉自己有点啰嗦.
代码如下:
public class ClockView  extends View implements Handler.Callback{
    private Calendar calendar;
    private    float x;
    private float y;
    private float z;
    private  float r = 400;
    private Paint mPaint;
    private Paint mPaint1;//刻度线
    private Paint mPaint2;//秒针
    private Paint mPaint3;//钟表圆形点,时针,分针的轴
    private Paint mPaint4;//分针
    private Paint mPaint5;//时针
    private  Paint mPaint6;//数字

    private Handler handler=new Handler(this);


    public ClockView(Context context) {
        super(context);

    }

    public ClockView(Context context, @Nullable AttributeSet attrs) {
        super(context, attrs);
        init();
        handler.sendEmptyMessage(100);

    }


    private void init() {
        mPaint = new Paint();
        mPaint.setStyle(Paint.Style.STROKE);
        mPaint.setColor(Color.GREEN);
        mPaint.setStrokeWidth(10);
        mPaint.setAntiAlias(true);

        mPaint1=new Paint();
        mPaint1.setColor(Color.RED);
        mPaint1.setStrokeWidth(5);
        mPaint1.setAntiAlias(true);

        mPaint2=new Paint();
        mPaint2.setColor(Color.BLUE);
        mPaint2.setStrokeWidth(5);
        mPaint2.setAntiAlias(true);

        mPaint3=new Paint();
        mPaint3.setColor(Color.BLUE);
        mPaint3.setStrokeWidth(20);
        mPaint3.setAntiAlias(true);

        mPaint4=new Paint();
        mPaint4.setStrokeWidth(10);
        mPaint4.setAntiAlias(true);
        mPaint4.setColor(Color.BLUE);

        mPaint5=new Paint();
        mPaint5.setStrokeWidth(20);
        mPaint5.setAntiAlias(true);
        mPaint5.setColor(Color.BLUE);

        mPaint6=new Paint();
        mPaint6.setAntiAlias(true);
        mPaint6.setColor(Color.DKGRAY);
        mPaint6.setStrokeWidth(15);

    }


    @Override
    protected void onDraw(final Canvas canvas) {
        super.onDraw(canvas);
        canvas.save();


        canvas.drawCircle(getWidth() / 2, getHeight() / 2, r, mPaint);
        //画一个圆心点(本意是想三个针围着这个点转,效果更真实,不过感觉用处不大,可写可不写 )
        canvas.drawPoint(getWidth() / 2, getHeight() / 2, mPaint3);
        for (int i = 0; i < 60; i++) {
            if (i % 5 == 0) {
                //画一条小时的刻度线 (就是表盘上略长的刻度线 ,一共需要12条)
                canvas.drawLine(getWidth() / 2 , getHeight() / 2-r, getWidth() / 2, getHeight() / 2-r+60, mPaint);
                //让画布旋转继续画
                canvas.rotate(6, getWidth() / 2, getHeight() / 2);

            } else {
                //这个是表盘上短的刻度线
                canvas.drawLine(getWidth() / 2 , getHeight() / 2-r, getWidth() / 2 , getHeight() / 2-r+20, mPaint1);
                canvas.rotate(6, getWidth() / 2, getHeight() / 2);

            }

        }
        mPaint4.setTextSize(50);
        for (int i = 1; i <= 12; i++) {
            canvas.save();//保存当前画布
            canvas.rotate(360/12*i,getWidth()/2,getHeight()/2);
            canvas.drawText(Integer.toString(i),getWidth()/2,getHeight()/2-r+110,mPaint4);
            canvas.restore();//让画布回滚到未旋转的位置(刚开始的位置);

        }
      canvas.save();
上面在钟表上画数字出来以后可能会有数字和刻度线稍微偏移了一点点,将canvas.drawText();中起点的X轴坐标改一下,我改的是getWidth()/2-25,
然后画时分秒针,画布旋转来实现的话,这个应该没问题,直接看代码吧:
  //时针
        canvas.rotate(x,getWidth()/2,getHeight()/2);
        canvas.drawLine(getWidth()/2,getHeight()/2-r+160,getWidth()/2,getHeight()/2+20,mPaint5);
        canvas.restore();
        canvas.save();


        //分针
        canvas.rotate(y,getWidth()/2,getHeight()/2);
        canvas.drawLine(getWidth()/2,getHeight()/2-r+110,getWidth()/2,getHeight()/2+20,mPaint4);
        canvas.restore();
        canvas.save();

       //秒针
        canvas.rotate(z,getWidth()/2,getHeight()/2);
        canvas.drawLine(getWidth()/2,getHeight()/2-r+80,getWidth()/2,getHeight()/2+20,mPaint2);

        canvas.save();
然后就是获取当前的时间 ,用Handler每隔一秒发送一条消息,让钟表动起来:
@RequiresApi(api = Build.VERSION_CODES.N)
    @Override
    public boolean handleMessage(Message msg) {
        switch(msg.what){
           case 100:
                calendar = Calendar.getInstance();//使用calendar获取当前的事时间

               x=calendar.get(Calendar.HOUR)/12f*360;//获取当前的小时
               y=calendar.get(Calendar.MINUTE)/60f*360;//分钟
               z = calendar.get(Calendar.SECOND)/60f*360;//秒

               //每隔一秒再给自己重新发送一条消息
               handler.sendEmptyMessageDelayed(100,1000);
               invalidate();//让画笔从新绘制


               break;
           default:
              break;
        }
        return false;
}<?xml version="1.0" encoding="utf-8"?>
<LinearLayout xmlns:android="http://schemas.android.com/apk/res/android"
xmlns:tools="http://schemas.android.com/tools"
android:layout_width="match_parent"
android:layout_height="match_parent"
android:orientation="vertical"
tools:context="com.example.subang.myclock.MainActivity">
<com.example.subang.myclock.weight.ClockView
android:layout_width="match_parent"
android:layout_height="match_parent" />-
</LinearLayout>


 386
386

 被折叠的 条评论
为什么被折叠?
被折叠的 条评论
为什么被折叠?
 到【灌水乐园】发言


