


一.概述
今天我们来搞一下底层一点的东西,大家可能对Activity的生命周期比较熟悉,但是一个Activity是如何启动起来的,你知道吗?今天就来探究一下。
二.分析
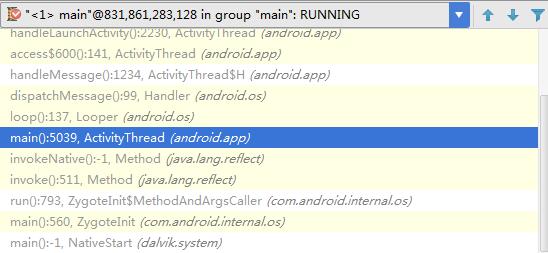
我们先随便写一个demo,然后在某个地方打开断点,debug模式运行程序,然后我们在Debug视图中把主线程暂停,我们可以看到调用栈,如下图所示,
在android中,应用程序的入口是ActivityThead中的main函数。
于是我们先看android.app.ActivityThread的main()方法。我们进入到这个方法里面。
 public static void main(String[] args) {
        SamplingProfilerIntegration.start();

        // CloseGuard defaults to true and can be quite spammy.  We
        // disable it here, but selectively enable it later (via
        // StrictMode) on debug builds, but using DropBox, not logs.
        CloseGuard.setEnabled(false);

        Environment.initForCurrentUser();

        // Set the reporter for event logging in libcore
        EventLogger.setReporter(new EventLoggingReporter());

        Security.addProvider(new AndroidKeyStoreProvider());

        Process.setArgV0("<pre-initialized>");
        //获取Looper
        Looper.prepareMainLooper();

        ActivityThread thread = new ActivityThread();
        thread.attach(false);

        if (sMainThreadHandler == null) {
            sMainThreadHandler = thread.getHandler();
        }

        AsyncTask.init();

        if (false) {
            Looper.myLooper().setMessageLogging(new
                    LogPrinter(Log.DEBUG, "ActivityThread"));
        }

        Looper.loop();

        throw new RuntimeException("Main thread loop unexpectedly exited");
main方法中先调用下面的方法对Looper进行初始化
Looper.prepareMainLooper();我们进入Looper中的这个方法
  public static void prepareMainLooper() {
        prepare(false);
        synchronized (Looper.class) {
            if (sMainLooper != null) {
                throw new IllegalStateException("The main Looper has already been prepared.");
            }
            sMainLooper = myLooper();
        }
    }
又调用了prepare方法
   private static void prepare(boolean quitAllowed) {
        if (sThreadLocal.get() != null) {
            throw new RuntimeException("Only one Looper may be created per thread");
        }
        //创建Looper对象,放入ThreadLocal中
        sThreadLocal.set(new Looper(quitAllowed));
    }
我们看看Looper的构造函数
 private Looper(boolean quitAllowed) {
        mQueue = new MessageQueue(quitAllowed);
        mRun = true;
        mThread = Thread.currentThread();
    }
然后调用了myLooper()方法
  public static Looper myLooper() {
        return sThreadLocal.get();
    }
这里从存放Looper的线程池里面取出一个Looper对象。
最后main方法里面调用Looper.loop()方法,我们看看
 public static void loop() {
         //取出当前线程对应的Looper对象
        final Looper me = myLooper();
        if (me == null) {
        //调用Looper.loop()方法前如果不掉用prepareMainLooper()方法就会抛出这个异常
            throw new RuntimeException("No Looper; Looper.prepare() wasn't called on this thread.");
        }
        //获得Looper对应的消息队列
        final MessageQueue queue = me.mQueue;

        // Make sure the identity of this thread is that of the local process,
        // and keep track of what that identity token actually is.
        Binder.clearCallingIdentity();
        final long ident = Binder.clearCallingIdentity();
        //死循环,不断从消息队列中取出消息,没有则阻塞
        for (;;) {
            Message msg = queue.next(); // might block
            if (msg == null) {
                // No message indicates that the message queue is quitting.
                return;
            }

            // This must be in a local variable, in case a UI event sets the logger
            Printer logging = me.mLogging;
            if (logging != null) {
                logging.println(">>>>> Dispatching to " + msg.target + " " +
                        msg.callback + ": " + msg.what);
            }
            //调用了msg.target的dispatchMessage方法处理消息,其实这个msg.target就是当前线程的Handler对象
            msg.target.dispatchMessage(msg);

            if (logging != null) {
                logging.println("<<<<< Finished to " + msg.target + " " + msg.callback);
            }

            // Make sure that during the course of dispatching the
            // identity of the thread wasn't corrupted.
            final long newIdent = Binder.clearCallingIdentity();
            if (ident != newIdent) {
                Log.wtf(TAG, "Thread identity changed from 0x"
                        + Long.toHexString(ident) + " to 0x"
                        + Long.toHexString(newIdent) + " while dispatching to "
                        + msg.target.getClass().getName() + " "
                        + msg.callback + " what=" + msg.what);
            }

            msg.recycle();
这里我们看下面这行代码
msg.target.dispatchMessage(msg);通过查看源码我们知道msg.target是一个Handler对象,于是我们进入到Handler中的dispatchMessage方法中去,
 public void dispatchMessage(Message msg) {
        if (msg.callback != null) {
            handleCallback(msg);
        } else {
            if (mCallback != null) {
                if (mCallback.handleMessage(msg)) {
                    return;
                }
            }
            handleMessage(msg);
        }
    }
最终我们可以看到,调用了handleMessage方法,而handleMessage方法在Handler里面是一个空的方法,因为我们需要自己来处理消息,这下大家明白了我们使用Handler时的handleMessage方法是如何被调用的了吧。
接下来回到正题,既然在main方法里面初始化了Looper,那么我们去找找和这个Looper相关联的Handler对象,经过漫长的寻找,我们终于找到了,
private class H extends Handler {
        public static final int LAUNCH_ACTIVITY         = 100;
        public static final int PAUSE_ACTIVITY          = 101;
        public static final int PAUSE_ACTIVITY_FINISHING= 102;
        public static final int STOP_ACTIVITY_SHOW      = 103;
        public static final int STOP_ACTIVITY_HIDE      = 104;
        public static final int SHOW_WINDOW             = 105;
        public static final int HIDE_WINDOW             = 106;
        public static final int RESUME_ACTIVITY         = 107;
        public static final int SEND_RESULT             = 108;
        public static final int DESTROY_ACTIVITY        = 109;
        public static final int BIND_APPLICATION        = 110;
        public static final int EXIT_APPLICATION        = 111;
这是一个内部类,名字叫做H,继承自Handler,然后我们去看它的handleMessage方法,
 public void handleMessage(Message msg) {
            if (DEBUG_MESSAGES) Slog.v(TAG, ">>> handling: " + codeToString(msg.what));
            switch (msg.what) {
                case LAUNCH_ACTIVITY: {
                    Trace.traceBegin(Trace.TRACE_TAG_ACTIVITY_MANAGER, "activityStart");
                    ActivityClientRecord r = (ActivityClientRecord)msg.obj;

                    r.packageInfo = getPackageInfoNoCheck(
                            r.activityInfo.applicationInfo, r.compatInfo);
                    handleLaunchActivity(r, null);
                    Trace.traceEnd(Trace.TRACE_TAG_ACTIVITY_MANAGER);
                } break;
那么这个消息是从哪发送过来的呢?是在ApplicationThread的scheduleLaunchActivity发送过来的
  public final void scheduleLaunchActivity(Intent intent, IBinder token, int ident,
                ActivityInfo info, Configuration curConfig, CompatibilityInfo compatInfo,
                Bundle state, List<ResultInfo> pendingResults,
                List<Intent> pendingNewIntents, boolean notResumed, boolean isForward,
                String profileName, ParcelFileDescriptor profileFd, boolean autoStopProfiler) {
            ActivityClientRecord r = new ActivityClientRecord();

            r.token = token;
            r.ident = ident;
            r.intent = intent;
            r.activityInfo = info;
            r.compatInfo = compatInfo;
            r.state = state;

            r.pendingResults = pendingResults;
            r.pendingIntents = pendingNewIntents;

            r.startsNotResumed = notResumed;
            r.isForward = isForward;

            r.profileFile = profileName;
            r.profileFd = profileFd;
            r.autoStopProfiler = autoStopProfiler;

            updatePendingConfiguration(curConfig);

            queueOrSendMessage(H.LAUNCH_ACTIVITY, r);
           }
handleMessage中调用了一个重要的方法handleLaunchActivity,从名字上看我们觉得应该是处理Activity的启动的,进去看看,
  private void handleLaunchActivity(ActivityClientRecord r, Intent customIntent) {
        // If we are getting ready to gc after going to the background, well
        // we are back active so skip it.
        unscheduleGcIdler();

        if (r.profileFd != null) {
            mProfiler.setProfiler(r.profileFile, r.profileFd);
            mProfiler.startProfiling();
            mProfiler.autoStopProfiler = r.autoStopProfiler;
        }

        // Make sure we are running with the most recent config.
        handleConfigurationChanged(null, null);

        if (localLOGV) Slog.v(
            TAG, "Handling launch of " + r);
            //执行启动Activity的方法
        Activity a = performLaunchActivity(r, customIntent);

        if (a != null) {
            r.createdConfig = new Configuration(mConfiguration);
            Bundle oldState = r.state;
            //执行activity的resume操作
            handleResumeActivity(r.token, false, r.isForward,
                    !r.activity.mFinished && !r.startsNotResumed);

            if (!r.activity.mFinished && r.startsNotResumed) {

                try {
                    r.activity.mCalled = false;
                    mInstrumentation.callActivityOnPause(r.activity);

                    if (r.isPreHoneycomb()) {
                        r.state = oldState;
                    }
                    if (!r.activity.mCalled) {
                        throw new SuperNotCalledException(
                            "Activity " + r.intent.getComponent().toShortString() +
                            " did not call through to super.onPause()");
                    }

                } catch (SuperNotCalledException e) {
                    throw e;

                } catch (Exception e) {
                    if (!mInstrumentation.onException(r.activity, e)) {
                        throw new RuntimeException(
                                "Unable to pause activity "
                                + r.intent.getComponent().toShortString()
                                + ": " + e.toString(), e);
                    }
                }
                r.paused = true;
            }
        } else {
            // If there was an error, for any reason, tell the activity
            // manager to stop us.
            try {
                ActivityManagerNative.getDefault()
                    .finishActivity(r.token, Activity.RESULT_CANCELED, null);
            } catch (RemoteException ex) {
                // Ignore
            }
        }
这里调用了两个比较重要的方法,performLaunchActivity和handleResumeActivity。
我们先看performLaunchActivity做了什么事情,
  private Activity performLaunchActivity(ActivityClientRecord r, Intent customIntent) {
    //省去大量代码

        Activity activity = null;
        try {
            java.lang.ClassLoader cl = r.packageInfo.getClassLoader();
            //通过Activity的类名构建一个Activity对象,具体的创建Activity对象的操作在mInstrumentation中
            activity = mInstrumentation.newActivity(
                    cl, component.getClassName(), r.intent);
                    //省去一些代码
               if (activity != null) {
                Context appContext = createBaseContextForActivity(r, activity);
                CharSequence title = r.activityInfo.loadLabel(appContext.getPackageManager());
                Configuration config = new Configuration(mCompatConfiguration);
                if (DEBUG_CONFIGURATION) Slog.v(TAG, "Launching activity "
                        + r.activityInfo.name + " with config " + config);
                        //调用activity的attach方法
                activity.attach(appContext, this, getInstrumentation(), r.token,
                        r.ident, app, r.intent, r.activityInfo, title, r.parent,
                        r.embeddedID, r.lastNonConfigurationInstances, config);

//省去一些代码
 activity.mCalled = false;
//通过Instrumentation对象执行Activity的onCreate()方法,Activity的生命周期方法都是由Instrumentation对象来调用的。                mInstrumentation.callActivityOnCreate(activity, r.state);
                if (!activity.mCalled) {
                    throw new SuperNotCalledException(
                        "Activity " + r.intent.getComponent().toShortString() +
                        " did not call through to super.onCreate()");
                }
其实attach方法里面做了不少事情,我们看看
  final void attach(Context context, ActivityThread aThread,
            Instrumentation instr, IBinder token, int ident,
            Application application, Intent intent, ActivityInfo info,
            CharSequence title, Activity parent, String id,
            NonConfigurationInstances lastNonConfigurationInstances,
            Configuration config) {
        attachBaseContext(context);

        mFragments.attachActivity(this, mContainer, null);
          //给Window对象赋值
        mWindow = PolicyManager.makeNewWindow(this);
        mWindow.setCallback(this);
        mWindow.getLayoutInflater().setPrivateFactory(this);
        if (info.softInputMode != WindowManager.LayoutParams.SOFT_INPUT_STATE_UNSPECIFIED) {
            mWindow.setSoftInputMode(info.softInputMode);
        }
        if (info.uiOptions != 0) {
            mWindow.setUiOptions(info.uiOptions);
        }
        mUiThread = Thread.currentThread();

        mMainThread = aThread;
        mInstrumentation = instr;
        mToken = token;
        mIdent = ident;
        mApplication = application;
        mIntent = intent;
        mComponent = intent.getComponent();
        mActivityInfo = info;
        mTitle = title;
        mParent = parent;
        mEmbeddedID = id;
        mLastNonConfigurationInstances = lastNonConfigurationInstances;
        //给Window对象设置WindowManager
        mWindow.setWindowManager(
                (WindowManager)context.getSystemService(Context.WINDOW_SERVICE),
                mToken, mComponent.flattenToString(),
                (info.flags & ActivityInfo.FLAG_HARDWARE_ACCELERATED) != 0);
        if (mParent != null) {
            mWindow.setContainer(mParent.getWindow());
        }
        //给Activity的mWindowManager 赋值
        mWindowManager = mWindow.getWindowManager();
        mCurrentConfig = config;
mWindow是一个Window类型的变量,但实际上它是一个PhoneWindow对象,与Activity的内容显示相关。
上面的attach()方法调用完成后,就自然而然的调用了Activity的onCreate()方法了。在onCreate方法中,我们会调用setContentView方法,关于这个方法的讲解,请看
setContentView源码解析
当setContentView执行完毕以后,这个时候界面还没有显示出任何东西来,而仅仅是将mDecor->mContentParent->(customer layout)一个这样的树状结构给搭建好了而已。
假设setContentView()方法是onCreate()方法中唯一一个方法,那么onCreate()方法也执行完了,调用栈继续回退,就回到了android.app.ActivityThread.handleLaunchActivity()中,以上的所以就是刚刚执行完了android.app.ActivityThread.performLaunchActivity()。
接下来执行第二个关键性的方法handleResumeActivity()。
//省去一些代码
        ActivityClientRecord r = performResumeActivity(token, clearHide);

        if (r != null) {
            final Activity a = r.activity;

            if (localLOGV) Slog.v(
                TAG, "Resume " + r + " started activity: " +
                a.mStartedActivity + ", hideForNow: " + r.hideForNow
                + ", finished: " + a.mFinished);

            final int forwardBit = isForward ?
                    WindowManager.LayoutParams.SOFT_INPUT_IS_FORWARD_NAVIGATION : 0;

            // If the window hasn't yet been added to the window manager,
            // and this guy didn't finish itself or start another activity,
            // then go ahead and add the window.
            boolean willBeVisible = !a.mStartedActivity;
            if (!willBeVisible) {
                try {
                    willBeVisible = ActivityManagerNative.getDefault().willActivityBeVisible(
                            a.getActivityToken());
                } catch (RemoteException e) {
                }
            }
            if (r.window == null && !a.mFinished && willBeVisible) {
            //获取window
                r.window = r.activity.getWindow();
                //获取DecorView
                View decor = r.window.getDecorView();
                decor.setVisibility(View.INVISIBLE);
                //获取ViewManager,ViewManager是WindowManager的父类
                ViewManager vm = a.getWindowManager();
                WindowManager.LayoutParams l = r.window.getAttributes();
                a.mDecor = decor;
                l.type = WindowManager.LayoutParams.TYPE_BASE_APPLICATION;
                l.softInputMode |= forwardBit;
                if (a.mVisibleFromClient) {
                    a.mWindowAdded = true;
                    vm.addView(decor, l);//添加decorview到Activity中
                }
//省去海量代码
先是调用performResumeActivity方法,这个方法内就是通过Instrumentation调用Activity的onResume()方法。下面的addView方法非常关键,vm是上面的a.getWindowManager()获得的,a是activity对象,Activity中的getWindowManager返回的是mWindowManager,而WindowManager的实现类是WindowManagerImpl,于是我们看它里面的addView方法
    @Override
    public void addView(View view, ViewGroup.LayoutParams params) {
        mGlobal.addView(view, params, mDisplay, mParentWindow);
    }
又调用了mGlobal里面的addView方法,mGlobal是WindowManagerGlobal的对象,然后进去WindowManagerGlobal里面
  public void addView(View view, ViewGroup.LayoutParams params,
            Display display, Window parentWindow) {
      //省去大量代码

        ViewRootImpl root;
        View panelParentView = null;
//省去部分代码

            root = new ViewRootImpl(view.getContext(), display);

            view.setLayoutParams(wparams);

            if (mViews == null) {
                index = 1;
                mViews = new View[1];
                mRoots = new ViewRootImpl[1];
                mParams = new WindowManager.LayoutParams[1];
            } else {
                index = mViews.length + 1;
                Object[] old = mViews;
                mViews = new View[index];
                System.arraycopy(old, 0, mViews, 0, index-1);
                old = mRoots;
                mRoots = new ViewRootImpl[index];
                System.arraycopy(old, 0, mRoots, 0, index-1);
                old = mParams;
                mParams = new WindowManager.LayoutParams[index];
                System.arraycopy(old, 0, mParams, 0, index-1);
            }
            index--;

            mViews[index] = view;
            mRoots[index] = root;
            mParams[index] = wparams;
             try {
            root.setView(view, wparams, panelParentView);
        } catch (RuntimeException e) {
            // BadTokenException or InvalidDisplayException, clean up.
            synchronized (mLock) {
                final int index = findViewLocked(view, false);
                if (index >= 0) {
                    removeViewLocked(index, true);
                }
            }
            throw e;
        }
这里创建了ViewRootImpl对象,然后调用了setView方法
public void setView(View view, WindowManager.LayoutParams attrs, View panelParentView) {
    synchronized (this) {
        if (mView == null) {
            mView = view;//这个view是上面层层传递下来的decorview
            //省去大量代码
            requestLayout();
            //省去海量代码
            view.assignParent(this);//将viewParent标记为decorview的父类
            //省去部分代码
        }
    }
}
省略后的代码如上所示,首先将传进来的参数view赋值给mView,这里有一点要明确ViewRootImpl其实并不是一个View的子类……因此我认为,mView将是这个对象所认识的root节点,也是整个Activity的root的节点。
接下来调用了requestLayout()方法,这个方法是有效的!
最后设置DecorView的父类为ViewParent。终于终于,mDecor知道了自己父亲是谁,或者说,整个Activity设置了一个根节点,在此之前,我们setContentView()将自己的layout布局add到PhoneWindow.mContentParent的时候,mDecor都不知道自己的parent是哪个,现在整个view的树形结构中有了根节点,也就是ViewRootImpl,那么requestLayout()就有效了,就可以进行后面的measure,layout,draw三步操作了。
  @Override
    public void requestLayout() {
        if (!mHandlingLayoutInLayoutRequest) {
            checkThread();
            mLayoutRequested = true;
            scheduleTraversals();
        }
    }
该方法首先检查是否在主线程,然后就执行了scheduleTraversals()方法。看这个方法的名字,就知道是执行一次遍历,遍历的对象就是根节点开始的view tree。
void scheduleTraversals() {
        if (!mTraversalScheduled) {
            mTraversalScheduled = true;
            mTraversalBarrier = mHandler.getLooper().postSyncBarrier();
            mChoreographer.postCallback(
                    Choreographer.CALLBACK_TRAVERSAL, mTraversalRunnable, null);
            scheduleConsumeBatchedInput();
        }
    }
我们注意这个mTraversalRunnable对象,这时会调用run方法
final class TraversalRunnable implements Runnable {
        @Override
        public void run() {
            doTraversal();
        }
    }
run方法里面会调用doTraversal方法,
 void doTraversal() {
        if (mTraversalScheduled) {
            mTraversalScheduled = false;
            mHandler.getLooper().removeSyncBarrier(mTraversalBarrier);

            if (mProfile) {
                Debug.startMethodTracing("ViewAncestor");
            }

            Trace.traceBegin(Trace.TRACE_TAG_VIEW, "performTraversals");
            try {
                performTraversals();//开始绘制view
            } finally {
                Trace.traceEnd(Trace.TRACE_TAG_VIEW);
            }

            if (mProfile) {
                Debug.stopMethodTracing();
                mProfile = false;
            }
        }
这里又调用了performTraversals()方法,这个方法非常长,依次调用了performMeasure(),performLayout(),performDraw()三个方法,终于开始了控件层的测量,布局,绘制三个步骤。


 758
758

 被折叠的 条评论
为什么被折叠?
被折叠的 条评论
为什么被折叠?
 到【灌水乐园】发言


