


鸿蒙开发HarmonyOS4.0
配合视频一起食用,效果更佳
课程地址:https://www.bilibili.com/video/BV1Sa4y1Z7B1/
源码地址:https://gitee.com/szxio/harmonyOS4
准备工作
官网地址
鸿蒙开发者官网:https://developer.huawei.com/consumer/cn/develop/
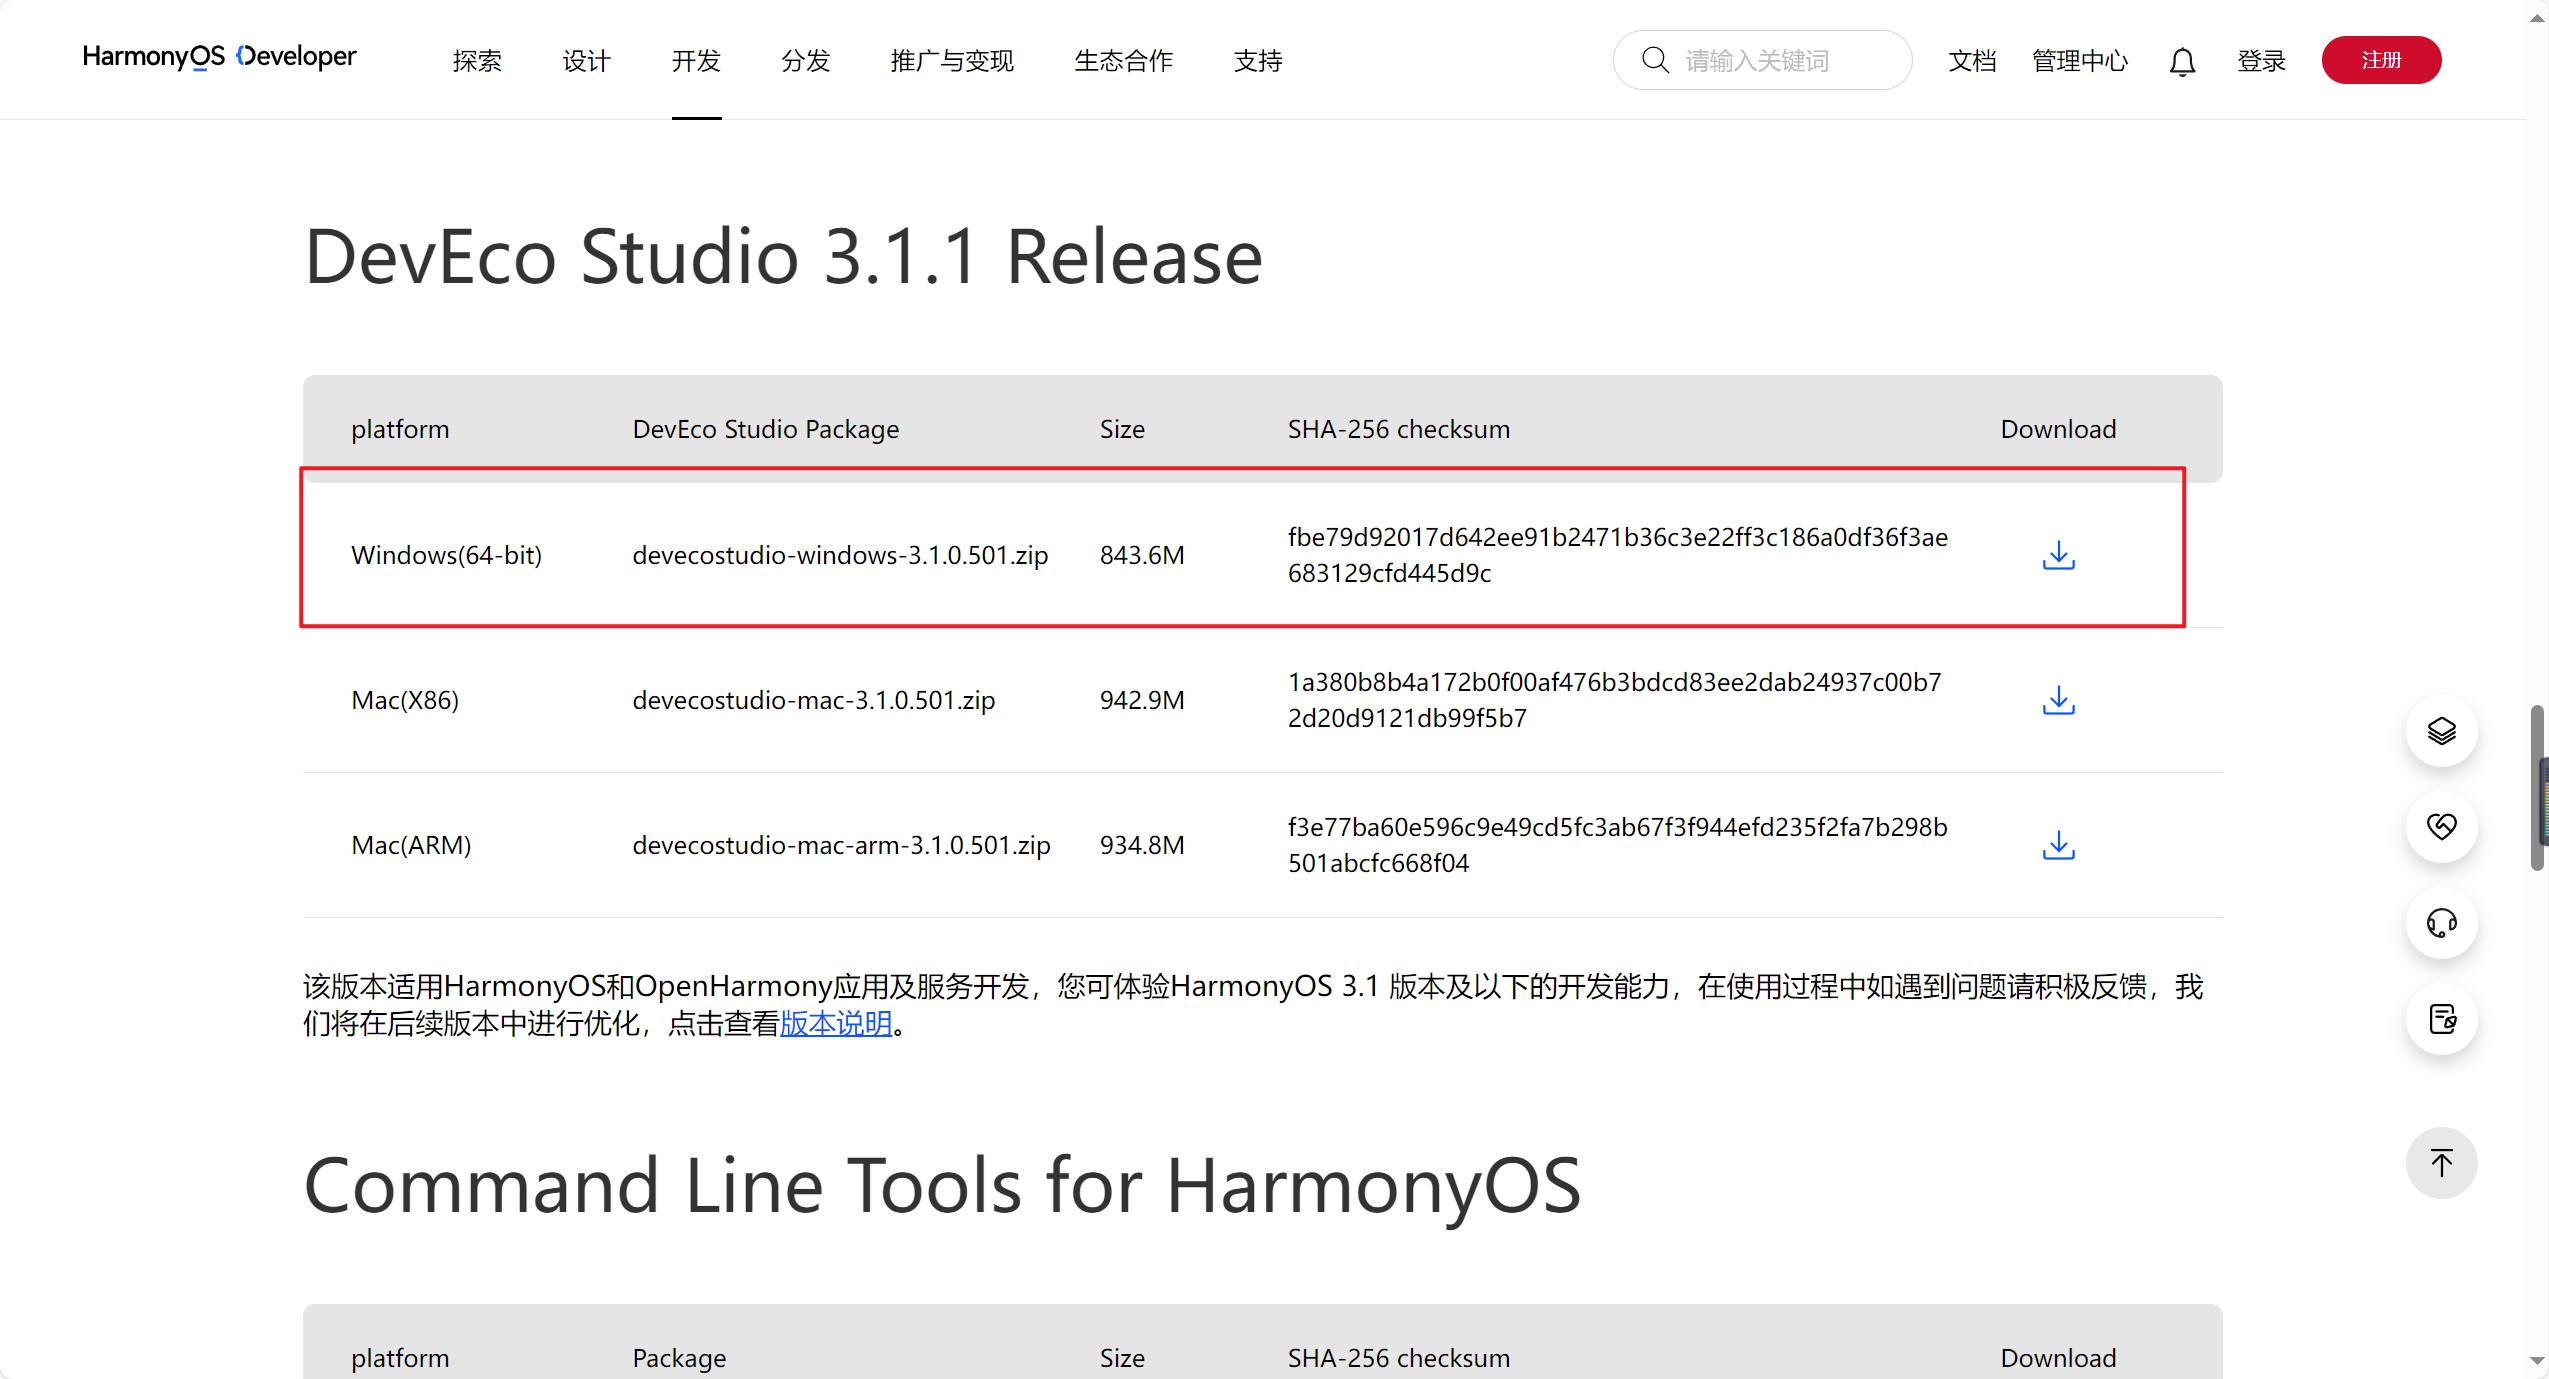
工具下载
打开 HUAWEI DevEco Studio和SDK下载和升级 | 华为开发者联盟 网站,选择对应的文件点击下载安装即可
入门案例
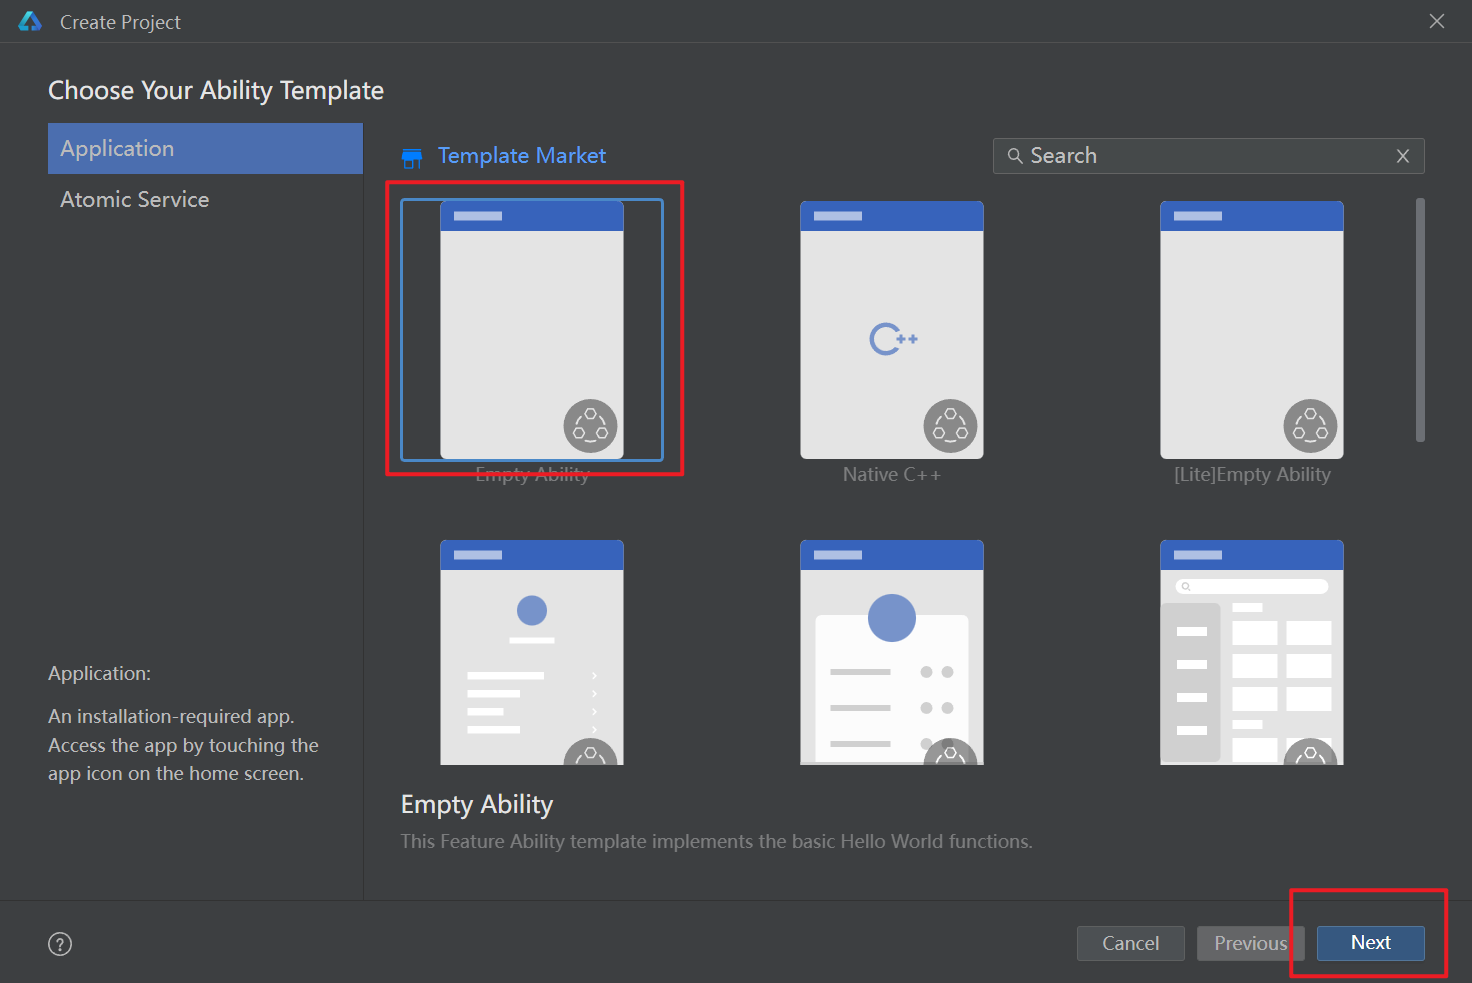
安装好之后,选择一个空白项目创建
等待工具加载完成,打开这个 pages/Index.ets 文件
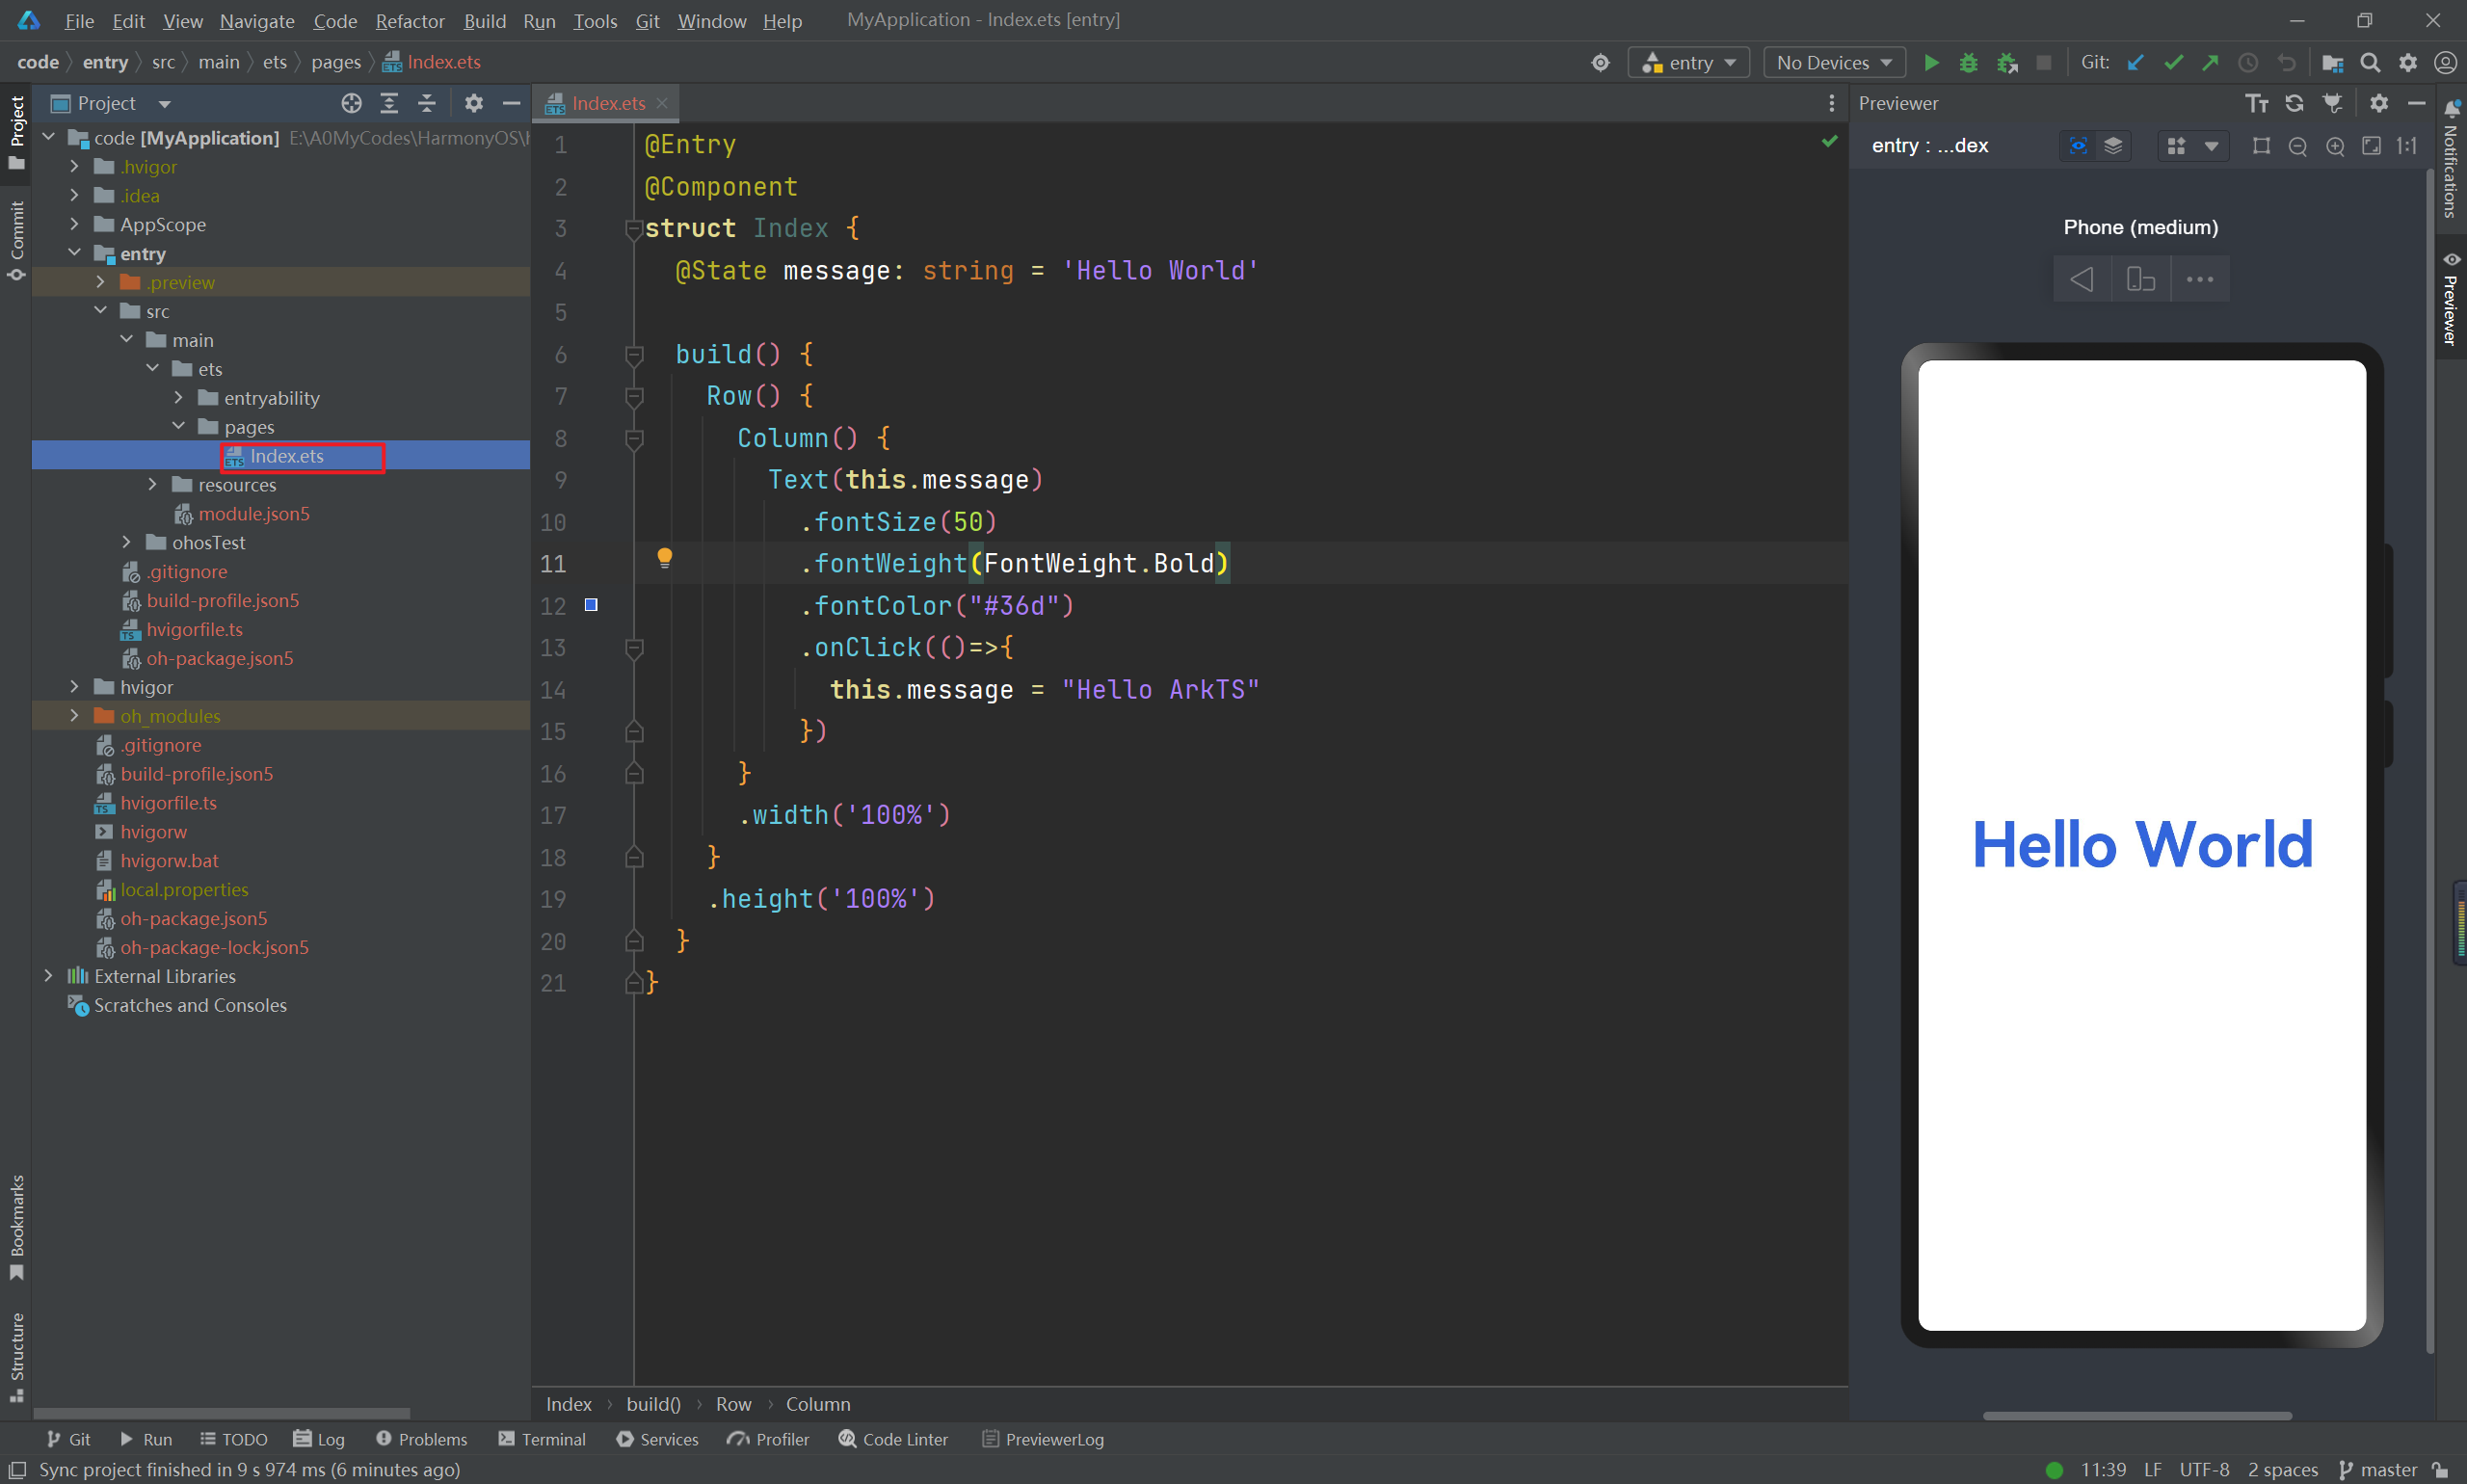
这个文件是一个入口文件,点击工具的右侧 Previewer 按钮,会出来预览界面,我们在左侧改动代码会实时的在这里显示
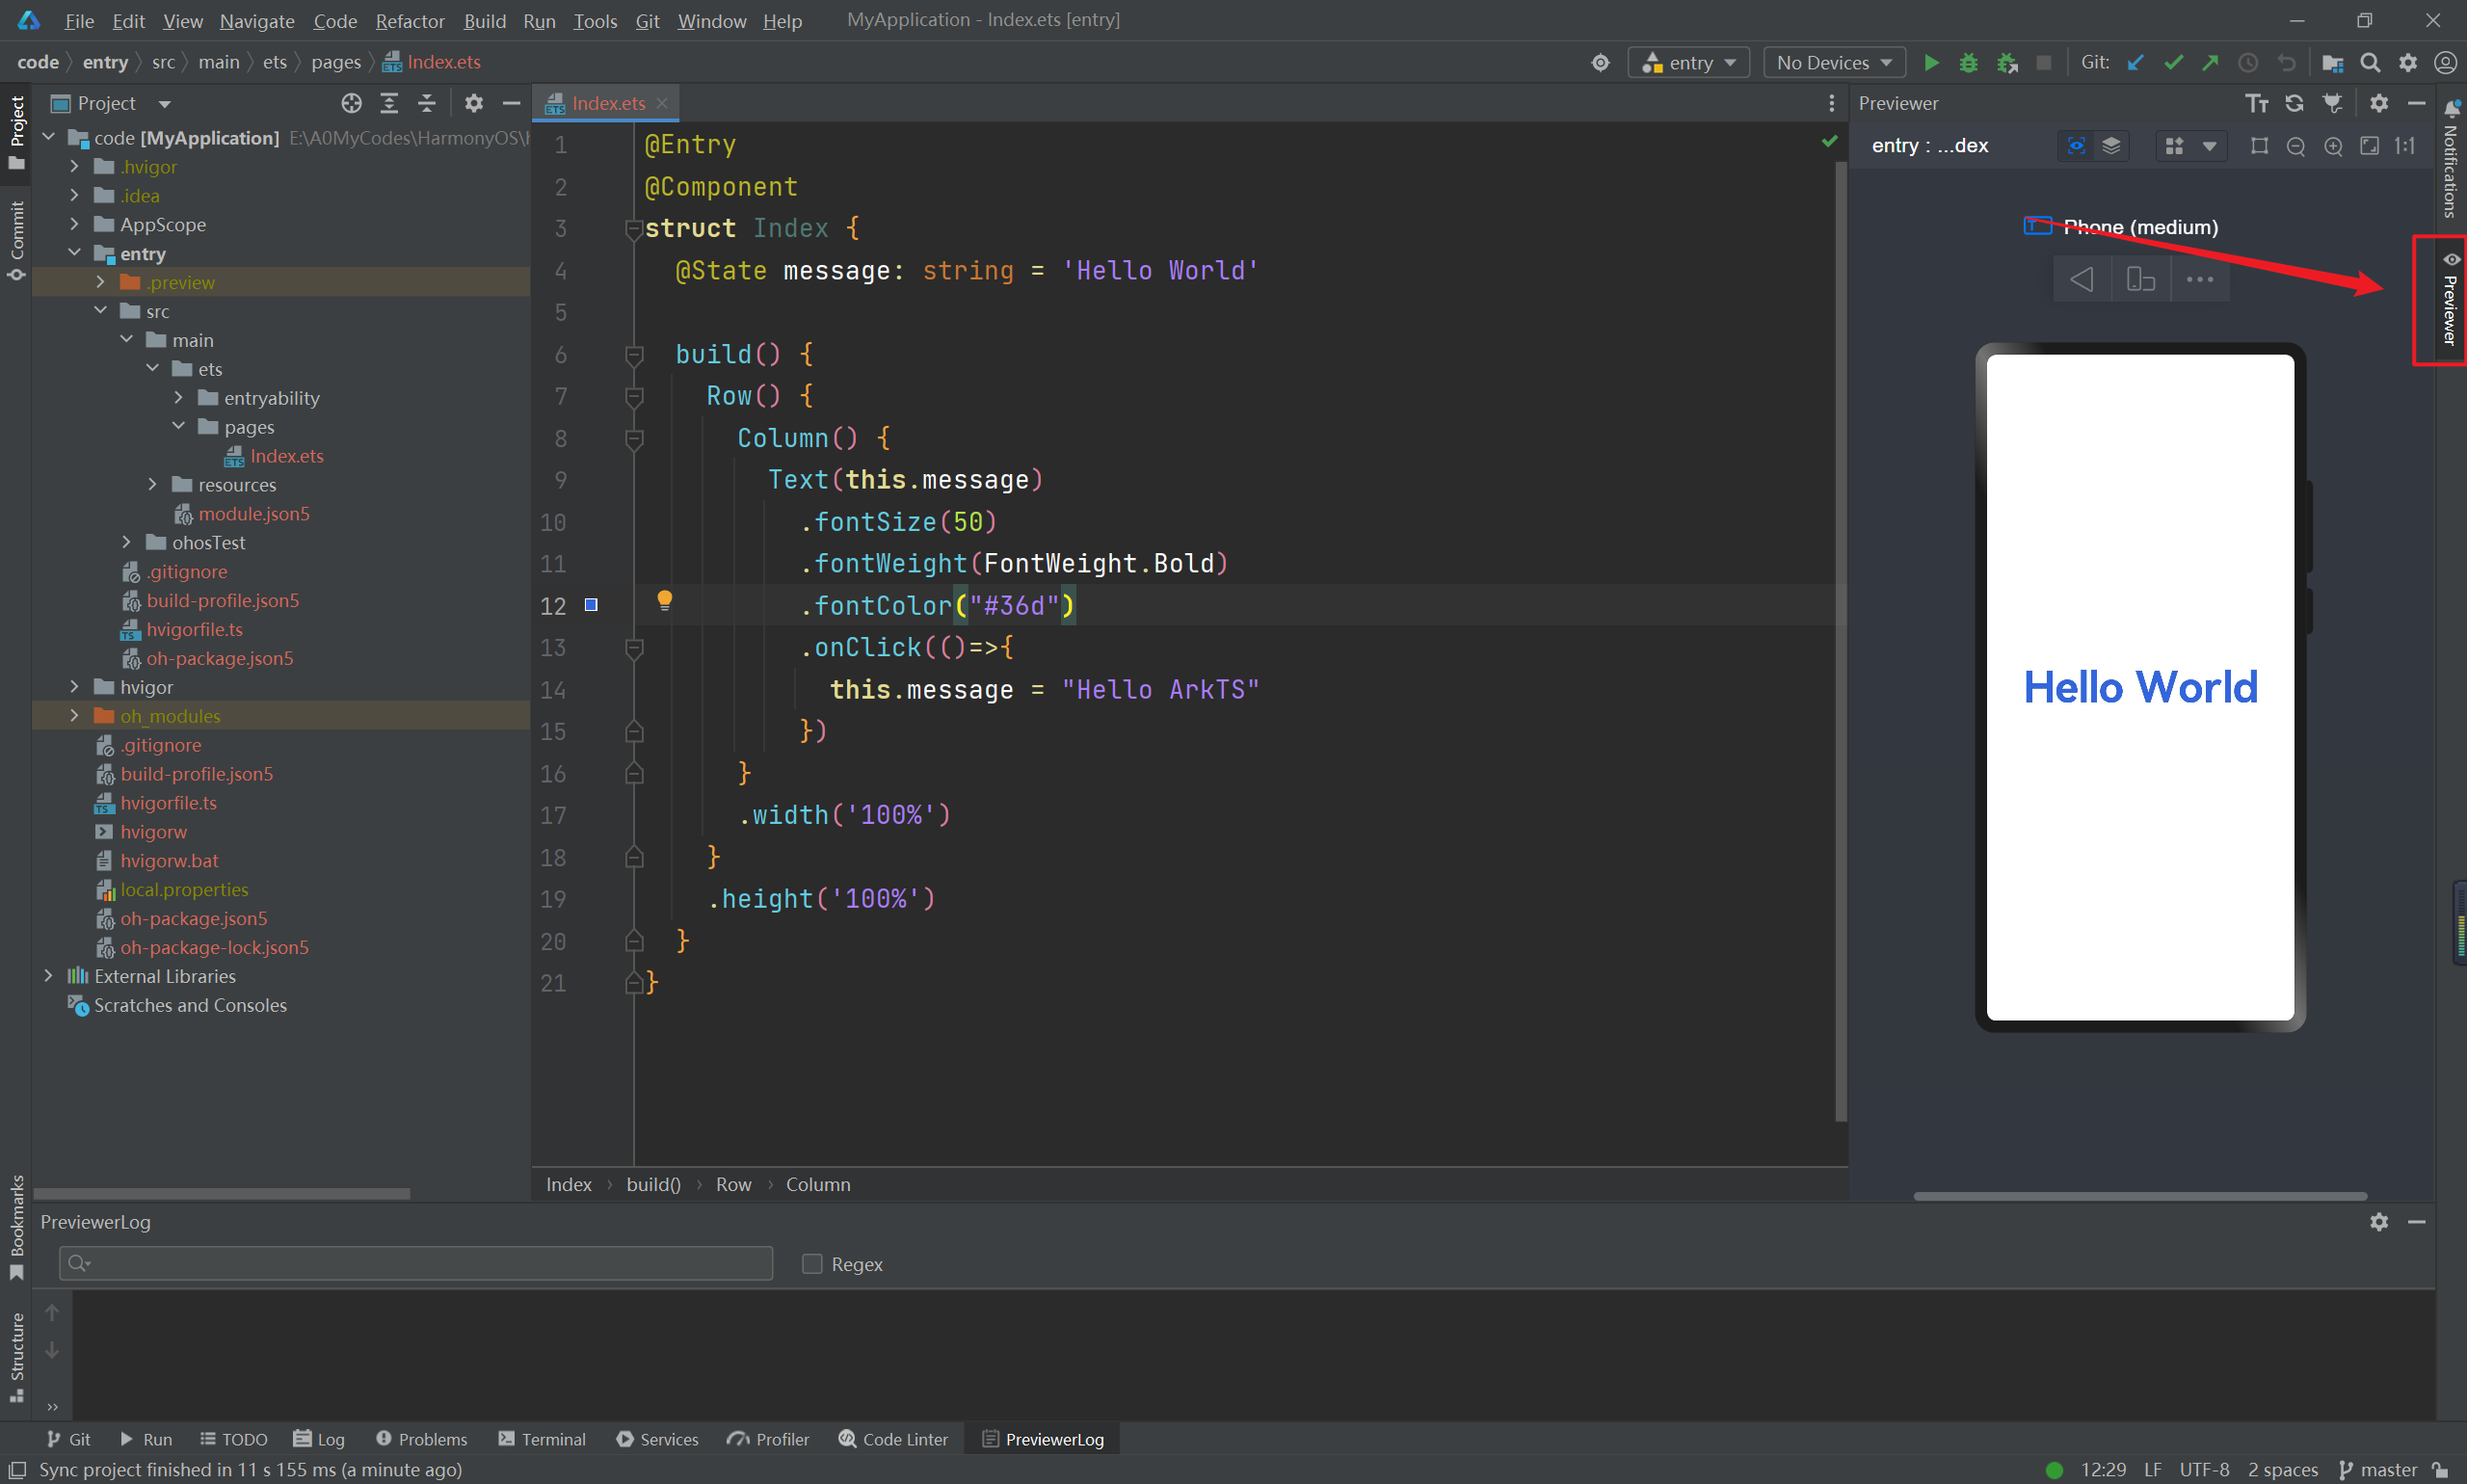
如果点击 Previewer 按钮出来的是一对文字,可以关掉工具,重启一下即可
上面我们修改了文字的颜色,并且给文字添加了一个点击事件,点击之后改变文字的内容为 Hello ArkTS
华为手机模拟器安装
安装文档:https://b11et3un53m.feishu.cn/wiki/LGprwXi1biC7TQkWPNDc45IXndh
ArkUI组件
Image组件
方式一:加载网络图片
Image("https://pic.rmb.bdstatic.com/bjh/37f17dae02f15085e1becd5954b990839309.jpeg@h_1280")
  .width(300)
这种方式需要开通网络访问权限才可以在真机上正常加载
添加网络权限,更多文档说明
找到 module.json5 文件,添加如下配置
{
  "module" : {
    "requestPermissions": [
      {
        "name": "ohos.permission.INTERNET" // 开启网络访问权限
      }
    ],
  }
}
此时就可正常查看这个图片了
方式二:加载本地文件
// 加载本地文件
Image($r("app.media.icon"))
  .width(300)
  .interpolation(ImageInterpolation.High)
app 是固定的开头,media.icon 表示当前图片所在目录,图片的后缀不需要写
interpolation(ImageInterpolation.High) 表示抗锯齿效果,可以提高图片的清晰度
抗锯齿打开效果
抗锯齿关闭效果
Text组件
基本用法
Text("hello world") // 字体内容
    .fontSize(30) // 字体大小
    .fontWeight(FontWeight.Bold) // 字体加粗
    .textAlign(TextAlign.Center) // 水平居中
    .width("100%") // 宽度
    .textCase(TextCase.UpperCase) // 设置字体变大写
    .fontColor("#09c") // 字体颜色
配置国际显示
首先在 string.json 文件中定义好键值对
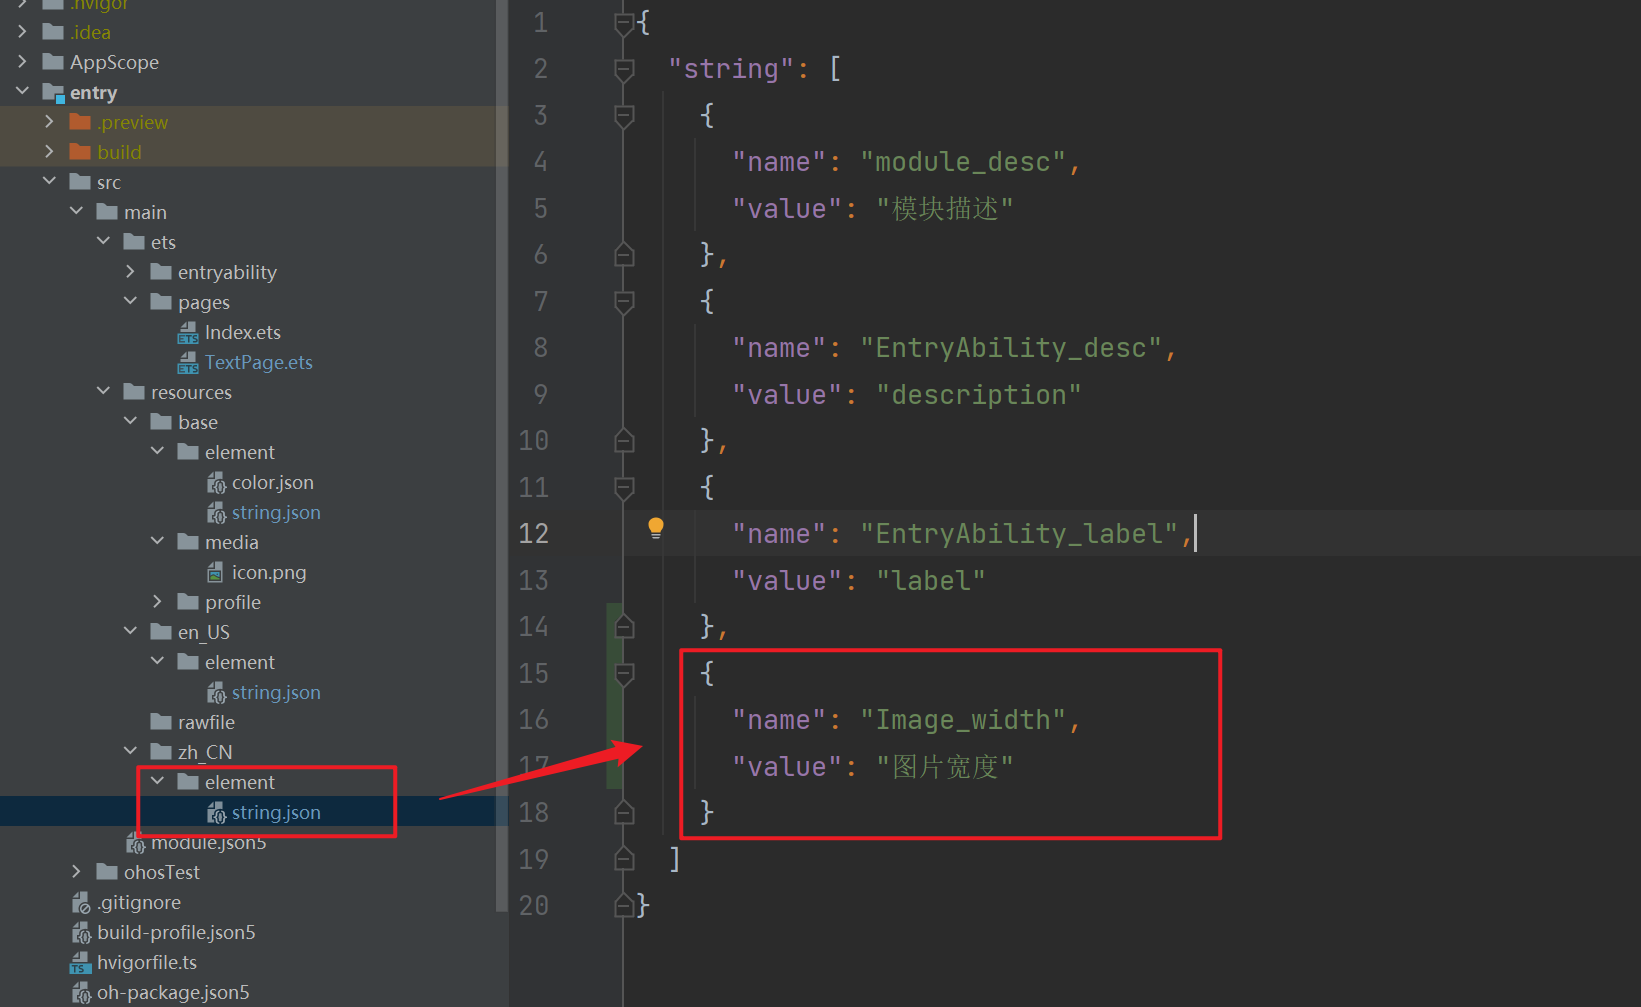
英文也对应的配置成一样的
然后基础的 element.string.json 中配置一个name一样的,value无所谓
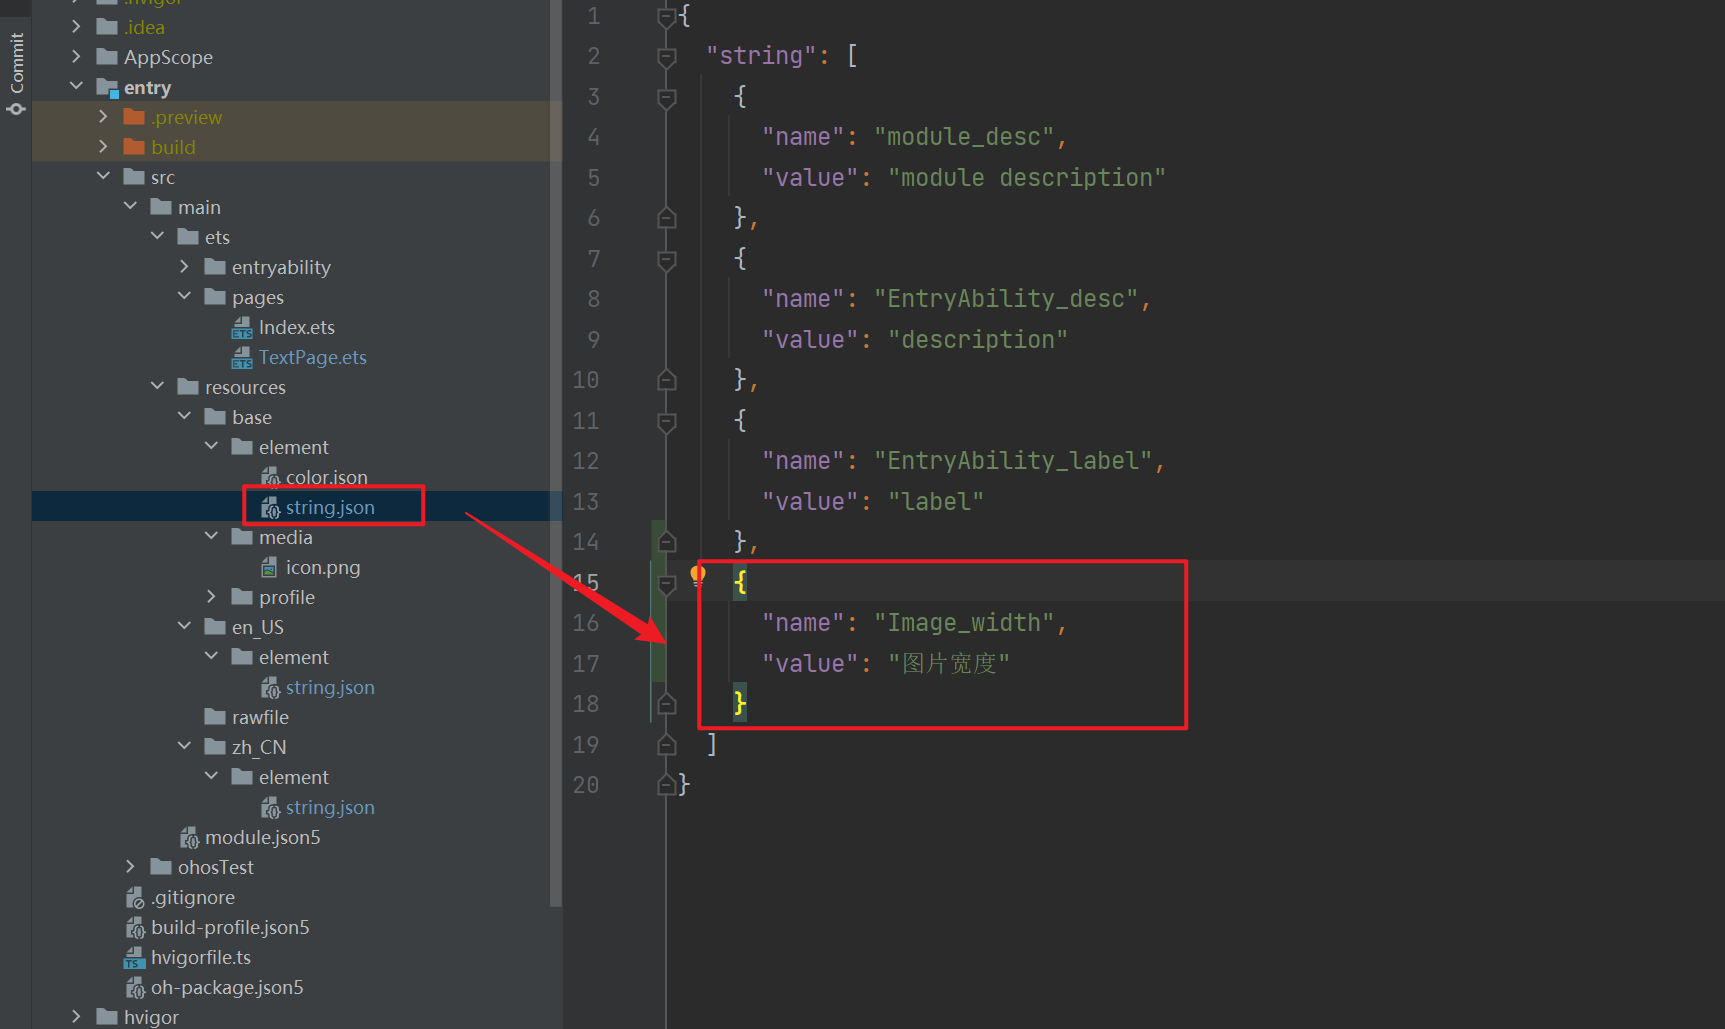
然后可以使用下面方式来展示配置的国际化语言
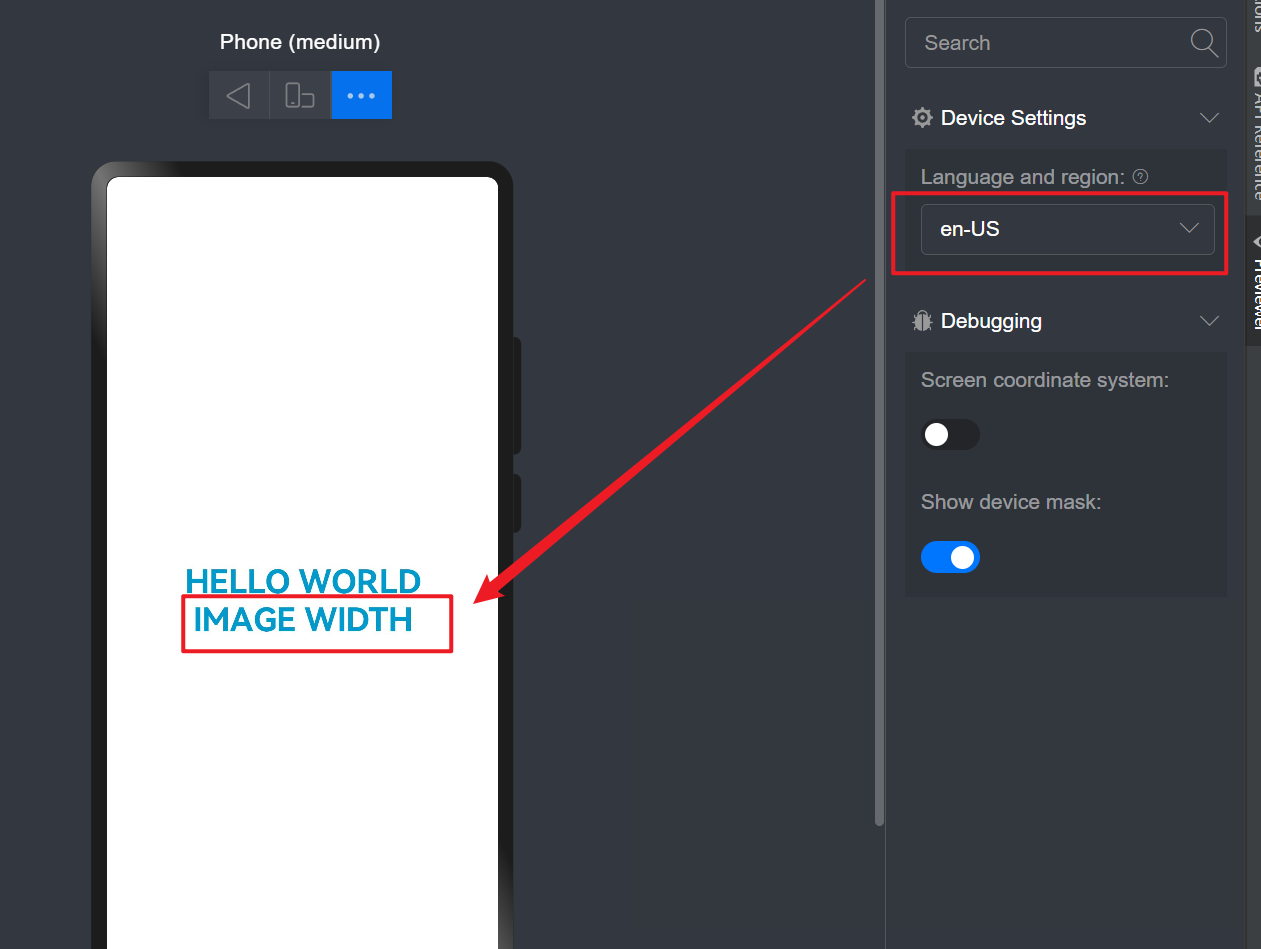
Text($r("app.string.Image_width")) // 字体内容
  .fontSize(30) // 字体大小
  .fontWeight(FontWeight.Bold) // 字体加粗
  .textAlign(TextAlign.Center) // 水平居中
  .width("100%") // 宽度
  .textCase(TextCase.UpperCase) // 设置字体变大写
  .fontColor("#09c") // 字体颜色
默认根据当前手机系统的语言,显示对应的value值,可以修改系统语言,显示不同的文字
TextInput组件
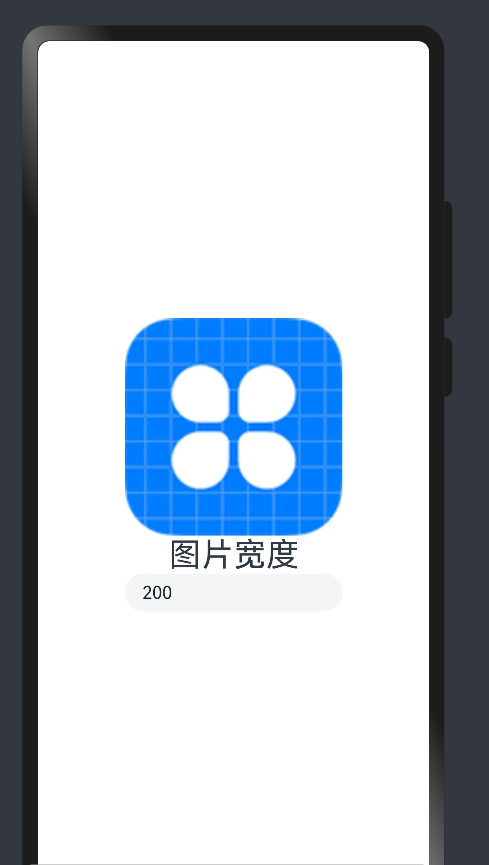
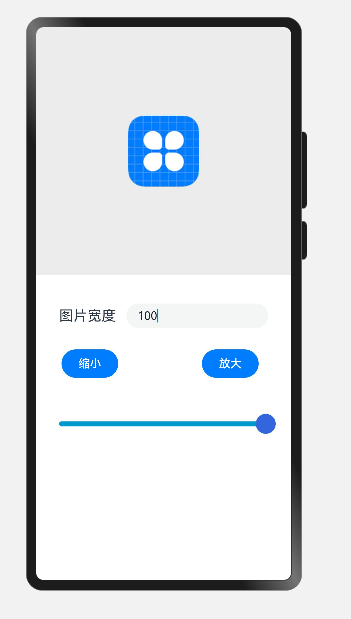
绑定一个值改变图片宽度
@Entry
@Component
struct ImagePage {
  @State imageWidth:number = 200
  build() {
    Row(){
      Column(){
        Image($r("app.media.icon"))
          .width(this.imageWidth)
          .interpolation(ImageInterpolation.High)

        Text($r("app.string.Image_width"))
          .fontSize(30)

        TextInput({
          placeholder:"请输入图片宽度",
          text:this.imageWidth.toString()
        })
          .width(200)
          .type(InputType.Number)
          .onChange(value=>{
            this.imageWidth = value ? parseInt(value) : 20
          })
      }
      .width("100%")
    }
    .height("100%")
  }
}
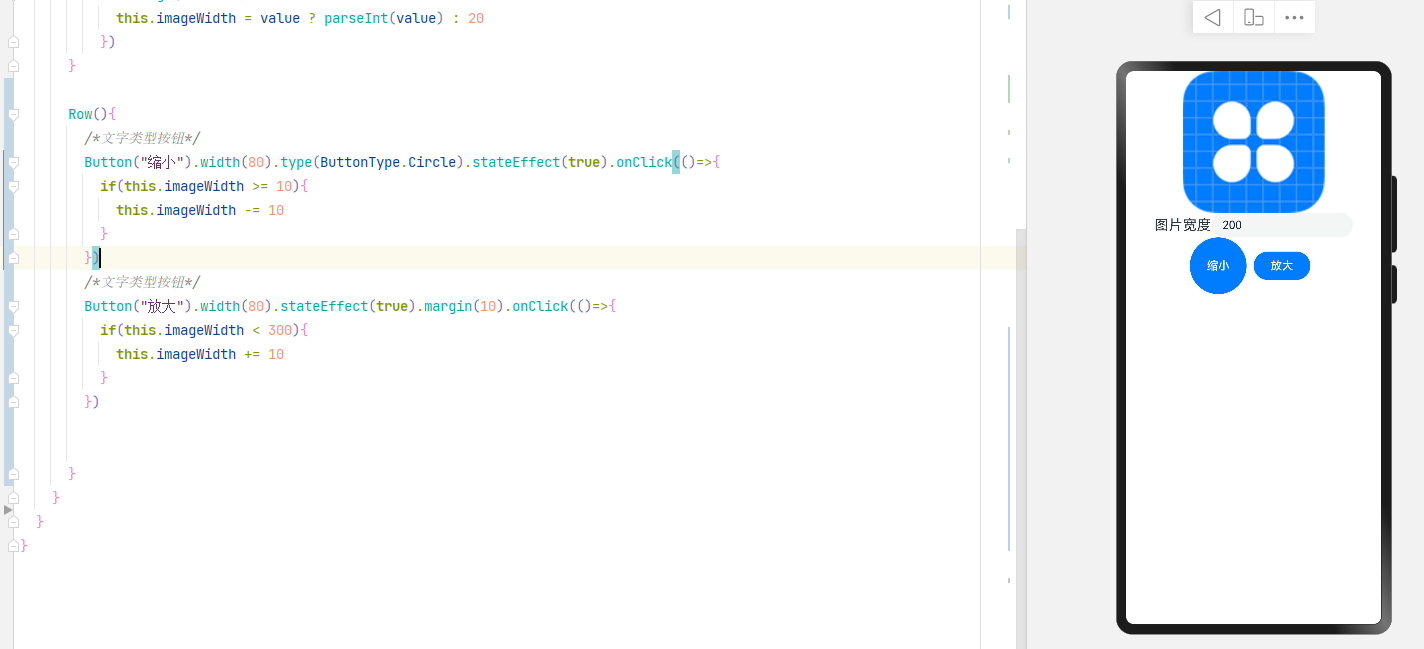
Button组件
普通用法
Button("缩小").width(80).type(ButtonType.Circle).stateEffect(true).onClick(()=>{
    if(this.imageWidth >= 10){
        this.imageWidth -= 10
    }
})

Button("放大").width(80).stateEffect(true).margin(10).onClick(()=>{
    if(this.imageWidth < 300){
        this.imageWidth += 10
    }
})
type支持的类型
| 类型 | 描述 |
|---|---|
| Capsule | 胶囊型按钮(圆角默认为高度的一半)。 |
| Circle | 圆形按钮。 |
| Normal | 普通按钮(默认不带圆角)。 |
图片按钮
Button(){
  Image($r("app.media.jian")).width(20).margin(15)
}
.width(80)
.type(ButtonType.Circle)
.stateEffect(true)
.onClick(()=>{
  if(this.imageWidth >= 10){
    this.imageWidth -= 10
  }
})
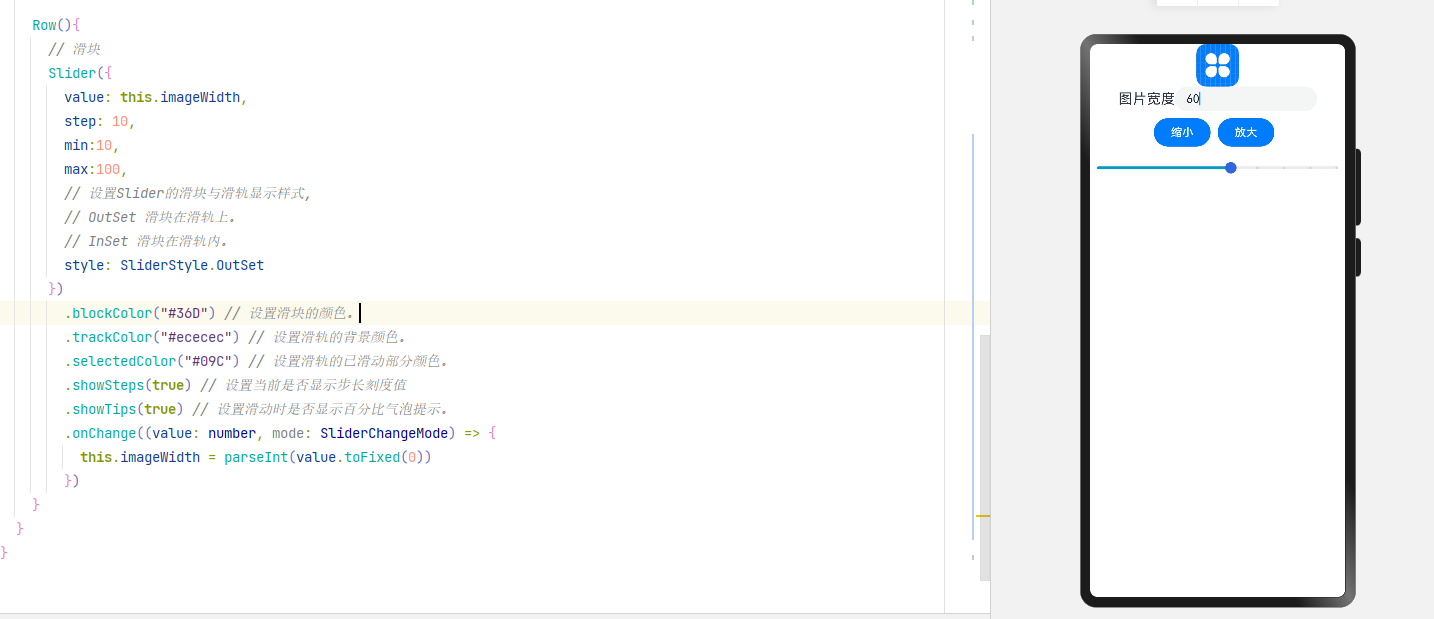
Slider滑动条
// 滑块
Slider({
        value: this.imageWidth,
        step: 10,
        min:10,
        max:100,
        // 设置Slider的滑块与滑轨显示样式,
        // OutSet 滑块在滑轨上。
        // InSet 滑块在滑轨内。
        style: SliderStyle.OutSet
	})
    .blockColor("#36D") // 设置滑块的颜色。
    .trackColor("#ececec") // 设置滑轨的背景颜色。
    .selectedColor("#09C") // 设置滑轨的已滑动部分颜色。
    .showSteps(true) // 设置当前是否显示步长刻度值
    .showTips(true) // 设置滑动时是否显示百分比气泡提示。
    .trackThickness(7) // 滑动条的粗细
    .onChange((value: number, mode: SliderChangeMode) => {
        this.imageWidth = parseInt(value.toFixed(0))
    })
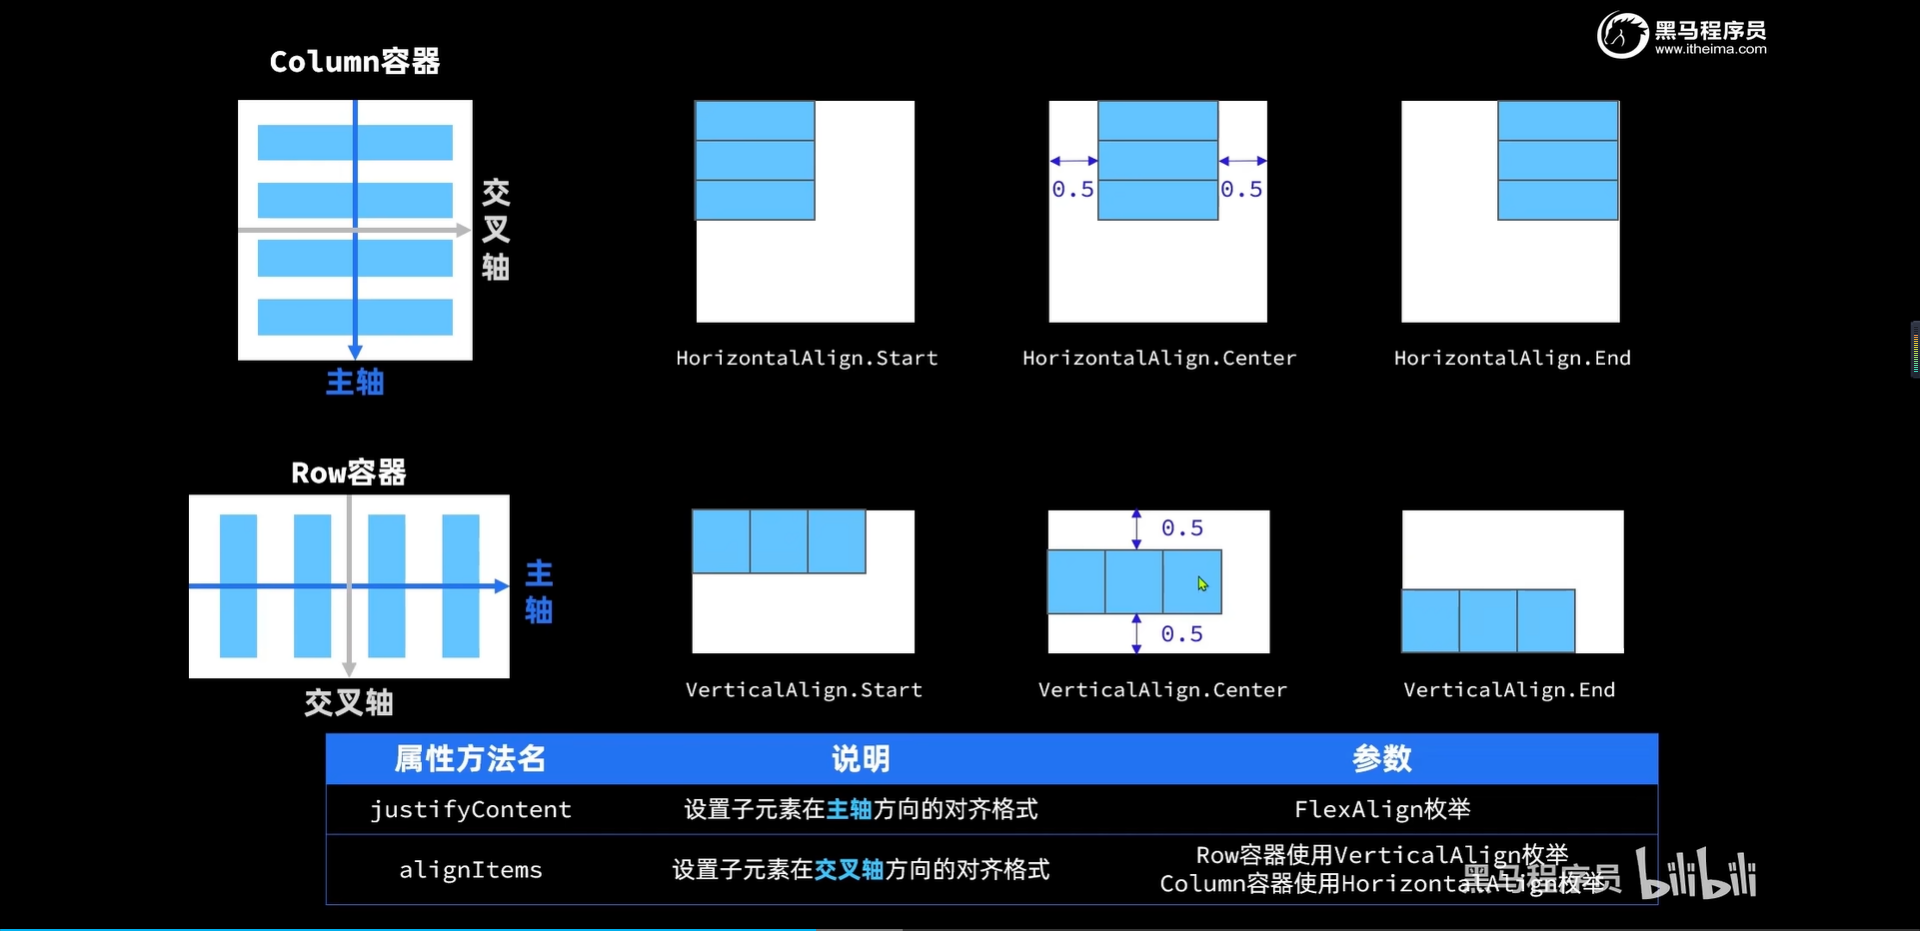
Columl和Row
Column和Row在主轴方向上的对齐方式
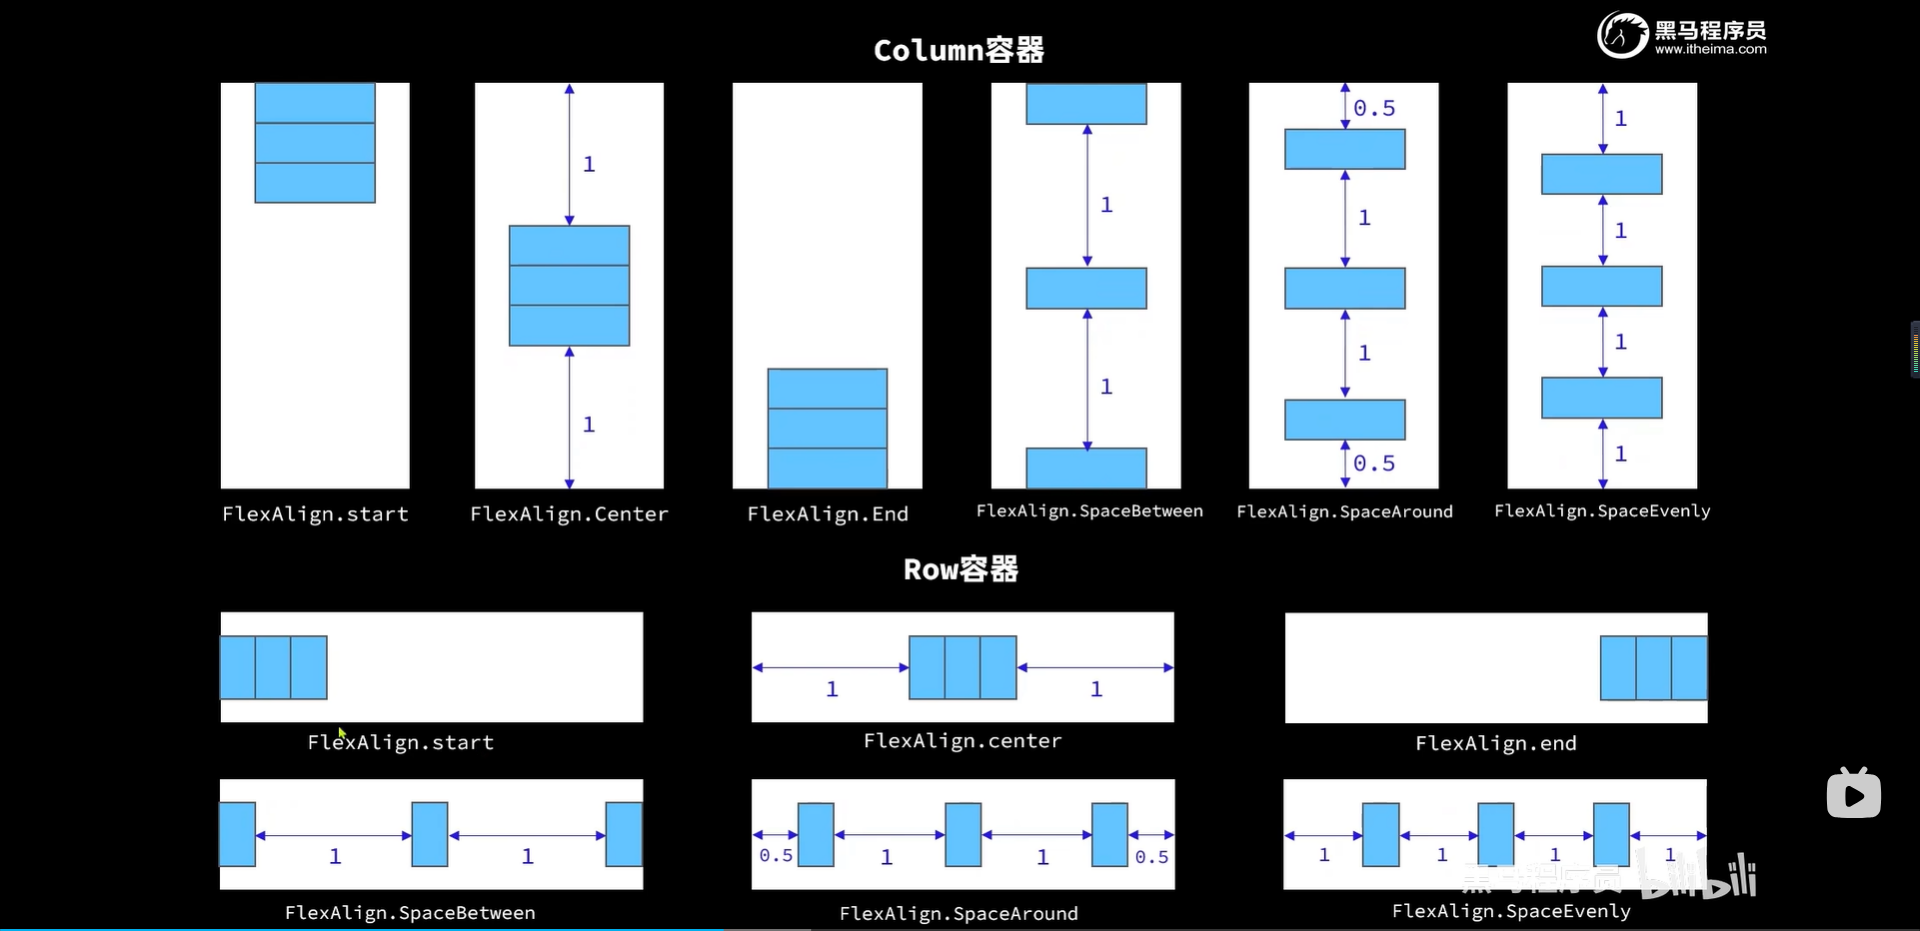
在交叉轴的对齐方式
设置图片大小Demo
@Entry
@Component
struct ImagePage {
  @State imageWidth:number = 200
  build() {
    Column({
      space:20
    }){
      Row(){
        Image($r("app.media.icon"))
          .width(this.imageWidth)
          .interpolation(ImageInterpolation.High)
      }
      .width("100%")
      .height(350)
      .margin({
        bottom:20
      })
      .justifyContent(FlexAlign.Center)
      .backgroundColor("#ececec")

      Row(){
        Text($r("app.string.Image_width"))
          .fontSize(20)
          .margin({
            right:15
          })

        TextInput({
          placeholder:"请输入图片宽度",
          text:this.imageWidth.toString()
        })
          .width(200)
          .type(InputType.Number)
          .onChange(value=>{
            this.imageWidth = value ? parseInt(value) : 20
          })
      }

      Row(){
        /*文字类型按钮*/
        Button("缩小").width(80).stateEffect(true).onClick(()=>{
          if(this.imageWidth >= 10){
            this.imageWidth -= 10
          }
        })

        /*文字类型按钮*/
        Button("放大").width(80).stateEffect(true).margin(10).onClick(()=>{
          if(this.imageWidth < 300){
            this.imageWidth += 10
          }
        })
      }
      .width("80%")
      .justifyContent(FlexAlign.SpaceBetween)

      Row(){
        // 滑块
        Slider({
          value: this.imageWidth,
          step: 10,
          min:10,
          max:100,
          // 设置Slider的滑块与滑轨显示样式,
          // OutSet 滑块在滑轨上。
          // InSet 滑块在滑轨内。
          style: SliderStyle.OutSet
        })
          .blockColor("#36D") // 设置滑块的颜色。
          .trackColor("#ececec") // 设置滑轨的背景颜色。
          .selectedColor("#09C") // 设置滑轨的已滑动部分颜色。
          .showSteps(true) // 设置当前是否显示步长刻度值
          .showTips(true) // 设置滑动时是否显示百分比气泡提示。
          .trackThickness(7) // 滑动条的粗细
          .onChange((value: number, mode: SliderChangeMode) => {
            this.imageWidth = parseInt(value.toFixed(0))
          })
      }
      .width("90%")
    }
    .width("100%")
    .height("100%")
  }
}
List和ForEach
- layoutWeight(1) 样式权重,数值越大,权重越高,会将除了其他低权重区域的高度减掉之后,剩下的都是自己的
class Item {
  name:string
  price:number
  img:Resource
  discount:number

  constructor(name:string,img:Resource,price:number,discount?:number) {
    this.name = name
    this.img = img
    this.price = price
    this.discount = discount
  }
}

@Entry
@Component
struct ItemsPage {
  @State ItemList:Array<Item> = []

  // 页面显示时触发
  onPageShow(){
    // 模拟从后端加载数据
    setTimeout(()=>{
      this.ItemList = [
        new Item("华为Meta60",$r("app.media.phone"),6799,500),
        new Item("小米14",$r("app.media.phone"),4999),
        new Item("vivo X100",$r("app.media.phone"),4699),
        new Item("红米K70",$r("app.media.phone"),2799),
        new Item("vivo X100",$r("app.media.phone"),4699),
        new Item("红米K70",$r("app.media.phone"),2799),
        new Item("vivo X100",$r("app.media.phone"),4699),
        new Item("红米K70",$r("app.media.phone"),2799)
      ]
    },2000)
  }

  build() {
    Column(){
      // 顶部标题
      Row(){
        Text("百亿补贴")
          .fontSize(30)
          .fontColor(Color.Red)
          .fontWeight(FontWeight.Bold)
      }
      .width("100%")
      .height(45)
      .margin({bottom:20})

      List({space:15}){
        // 遍历每一个
        ForEach(this.ItemList,(item:Item)=>{
          // List组件内必须用ListItem组件包裹
          ListItem(){
            // 每一个商品卡片
            Row(){
              // 左侧商品图片
              Image(item.img)
                .width("30%")

              // 右侧商品信息
              Column({space:10}){
                // 商品名称
                Row(){
                  Text(item.name)
                    .fontSize(25)
                }
                .width("100%")

                // 判断是否有折扣
                if(item.discount){
                  // 原价
                  Row(){
                    Text(`原价 ¥${item.price}`)
                      .fontSize(16)
                      .fontColor("#ccc")
                      .decoration({type:TextDecorationType.LineThrough})
                  }
                  .width("100%")

                  // 折扣价
                  Row(){
                    Text(`补贴 ¥${item.discount}`)
                      .fontSize(18)
                      .fontColor(Color.Red)
                  }
                  .width("100%")

                  // 现在价格
                  Row(){
                    Text(`折扣价 ¥${item.price - item.discount}`)
                      .fontSize(20)
                      .fontColor(Color.Red)
                  }
                  .width("100%")

                }else{
                  // 价格
                  Row(){
                    Text(`折扣价 ¥${item.price}`)
                      .fontSize(20)
                      .fontColor(Color.Red)
                  }
                  .width("100%")
                }
              }
            }
            .width("100%")
            .padding(10)
            .borderRadius(5)
            .alignItems(VerticalAlign.Top)
            .backgroundColor(Color.White)
          }
        })
      }
      .width("100%")
      .layoutWeight(1) // 样式权重,数值越大,权重越高,会将除了其他低权重区域的高度减掉之后,剩下的都是自己的


    }
    .padding(15)
    .width("100%")
    .height("100%")
    .backgroundColor("#ececec")
  }
}
实现效果

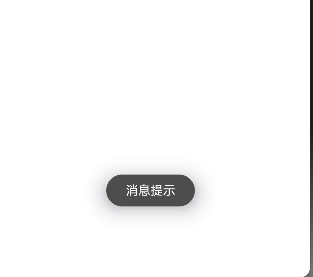
Toast
import promptAction from '@ohos.promptAction'

Button("Toast").onClick(()=>{
    promptAction.showToast({
        message:"消息提示"
    })
})
自定义组件
新建组件 src/main/ets/components/Header.ets
// 定义Header组件
@Component
export struct Header {
  // 定义参数,父组件使用时通过参数传递过来
  private title:string

  build() {
    // 顶部标题
    Row(){
      Text(this.title)
        .fontSize(30)
        .fontColor(Color.Red)
        .fontWeight(FontWeight.Bold)
    }
    .width("100%")
    .height(45)
  }
}
使用方法
import { Header } from '../components/Header'

@Entry
@Component
struct ItemsPage {
  build() {
    Column(){
      // 引用顶部标题
      Header({title:"百亿补贴"}).margin({bottom:20})
    }
  }
}
自定义构建函数
全局自定义构建函数
可以定义在组件外部,并且可以接受参数
// 全局自定义构建函数,函数前面加上 @Builder
@Builder function ItemCar(item:Item){
  // 每一个商品卡片
  Row(){
    // 左侧商品图片
    Image(item.img)
      .width("30%")

    // ......
  }
}
使用方法
build() {
  Column(){
    Header({title:"百亿补贴"}).margin({bottom:20})

    List({space:15}){
      ForEach(this.ItemList,(item:Item)=>{
        ListItem(){
          // 使用自定义构建函数
          ItemCar(item)
        }
      })
    }
  }
}
局部构建函数
和全局定义构建函数类似,不需要添加 function 关键词,必须和 build 函数同级,不能放在 build 函数内部
// 局部自定义构建函数
@Builder function ItemCar(item:Item){
  // 每一个商品卡片
  Row(){
    // 左侧商品图片
    Image(item.img)
      .width("30%")

    // ......
  }
}
使用局部构建函数时要添加 this.xxx
build() {
  Column(){
    Header({title:"百亿补贴"}).margin({bottom:20})

    List({space:15}){
      ForEach(this.ItemList,(item:Item)=>{
        ListItem(){
          // 使用自定义构建函数
          this.ItemCar(item)
        }
      })
    }
  }
}

// 局部自定义构建函数
@Builder function ItemCar(item:Item){
  // 每一个商品卡片
  Row(){
    // 左侧商品图片
    Image(item.img)
      .width("30%")

    // ......
  }
}
样式封装
公共样式封装
封装公共样式包含的属性也必须是公共的属性,特殊组件的特殊属性不支持在公共样式内
// 公共样式封装
@Styles function pageCommonStyle(){
  .padding(15)
  .width("100%")
  .height("100%")
  .backgroundColor("#ececec")
}

@Entry
@Component
struct ItemsPage {
    build() {
      Column() {
        //......
      }.pageCommonStyle() // 使用公共样式
    }
}
自定义样式封装
可以封装特殊组件的样式
// 特殊组件的样式封装
@Extend(Text) function textStyle(fontSize:number){
  .fontSize(fontSize)
  .fontColor(Color.Red)
}
使用
// 折扣价
Row() {
    Text(`补贴 ¥${item.discount}`)
        .textStyle(18)
}
.width("100%")

// 现在价格
Row() {
    Text(`折扣价 ¥${item.price - item.discount}`)
        .textStyle(20)
}
.width("100%")
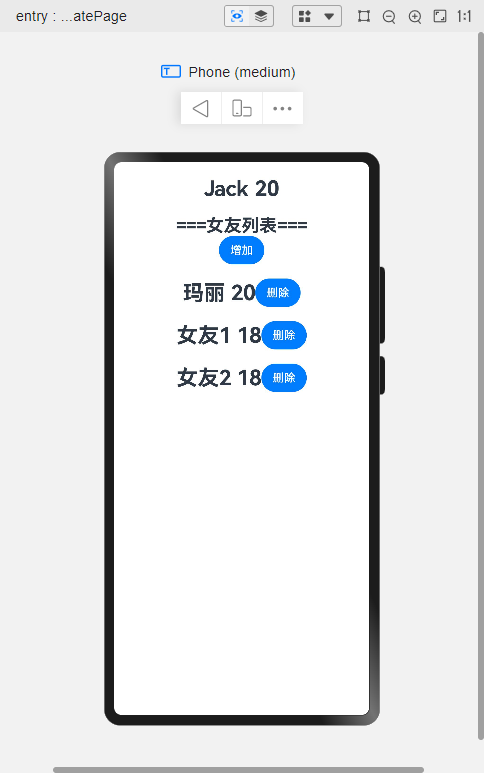
状态管理
@State
- @State装饰器标记的变量必须初始化,不能为空值
- @State支持Object,class,string,number,boolean,enum类型以及这些类型的数组
- 嵌套类型以及数组中的对象属性发生变化,无法触发页面更新
class User{
  name:string
  age:number

  constructor(name,age) {
    this.name = name
    this.age = age
  }
}

@Entry
@Component
struct Index {
  @State age: number = 18
  @State jack:User = new User("Jack",19)
  @State gfs:User[] = [
    new User("露丝",18),
    new User("玛丽",20)
  ]

  build() {
    Column() {
      // Row(){
      //   Text(`${this.age}`)
      //     .fontSize(25)
      //     .onClick(()=>{
      //       // 基础类型的数据变化可以触发页面更新
      //       this.age++
      //     })
      // }

      Row(){
        Text(`${this.jack.name} ${this.jack.age}`)
          .fontSize(30)
          .fontWeight(FontWeight.Bold)
          .onClick(()=>{
            // 单层对象的内容是可以实时响应的
            this.jack.age++
          })
      }

      Row(){
        Text(`===女友列表===`)
          .fontSize(25)
          .fontWeight(FontWeight.Bold)
      }
      .width("100%")
      .margin({top:20})
      .justifyContent(FlexAlign.Center)

      Row(){
        Button("增加").onClick(()=>{
          // 新增一项也可以触发更新
          this.gfs.push(new User(`女友${this.gfs.length}`,18))
        })
      }

      ForEach(this.gfs,(gf:User,index)=>{
        Row(){
          Text(`${gf.name} ${gf.age}`)
            .fontSize(30)
            .fontWeight(FontWeight.Bold)
            .onClick(()=>{
              // 嵌套层级的数据改变,不会触发页面更新
              gf.age++
            })

          Button("删除").onClick(()=>{
            // 删除数组可以触发更新
            this.gfs.splice(index,1)
          })
        }
        .margin({top:20})
      })
    }
    .width('100%')
    .height('100%')
    .padding(20)
  }
}
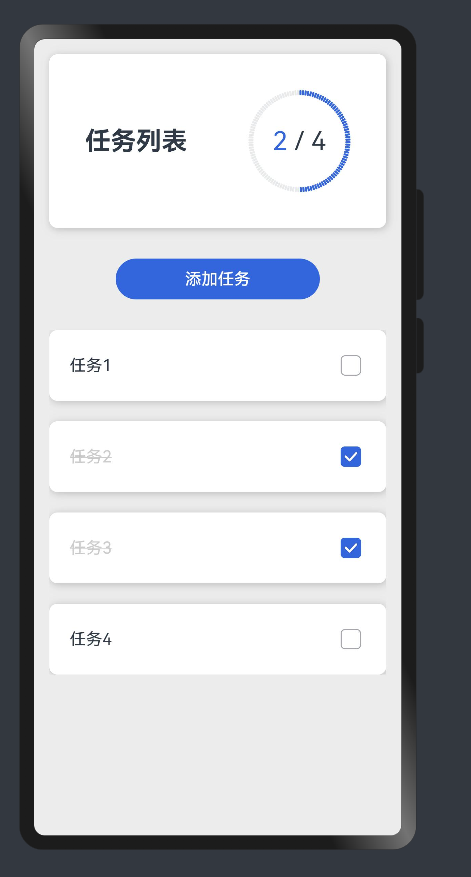
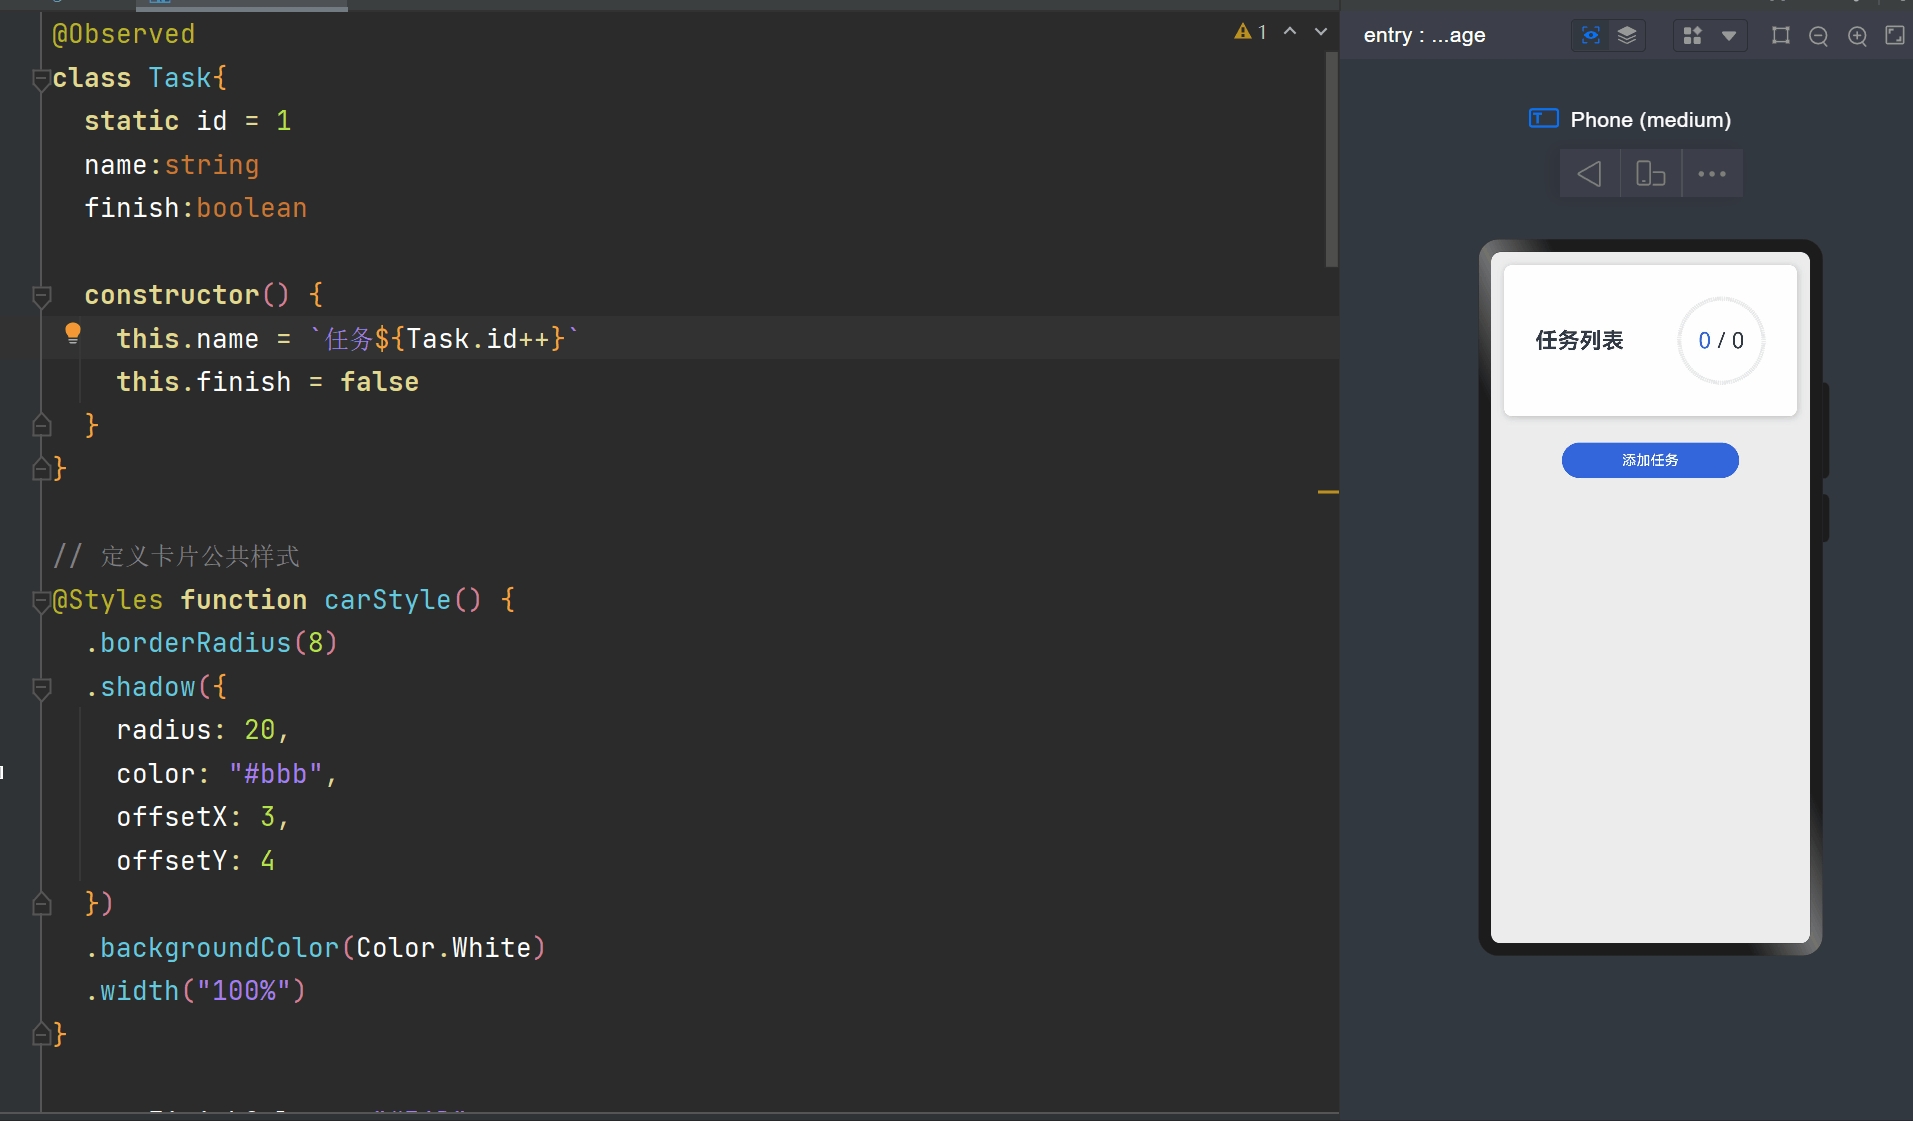
任务列表Demo
// 任务对象
class Task{
  static id = 1
  name:string
  finish:boolean

  constructor() {
    this.name = `任务${Task.id++}`
    this.finish = false
  }
}

// 定义卡片公共样式
@Styles function carStyle() {
  .borderRadius(8)
  .shadow({
    radius: 20,
    color: "#bbb",
    offsetX: 3,
    offsetY: 4
  })
  .backgroundColor(Color.White)
  .width("100%")
}

const FinishColor = "#36D"

@Entry
@Component
struct TaskList {
  // 任务总数量
  @State taskTotal:number = 0
  // 已完成数量
  @State finishTotal:number = 0
  // 任务数组
  @State taskList:Task[] = [
    new Task(),
    new Task()
  ]

  handleTaskChange(){
    this.taskTotal = this.taskList.length
    this.finishTotal = this.taskList.filter(i=>i.finish).length
  }

  onPageShow(){
    this.handleTaskChange()
  }

  build() {
    Column() {
      Row(){
        Text("任务列表")
          .fontSize(25)
          .fontWeight(FontWeight.Bold)


        // 栈组件,让多个组件堆叠在一起
        Stack(){
          // 进度条
          Progress({
            value:this.finishTotal,
            total:this.taskTotal,
            type:ProgressType.ScaleRing // 设置成环形进度条
          })
            .width(100)
            .color(FinishColor)
            .style({
              strokeWidth:5
            })

          Row(){
            Text(`${this.finishTotal}`)
              .fontColor(FinishColor)
              .fontSize(25)

            Text(` / ${this.taskTotal}`)
              .fontSize(25)
          }
        }
      }
      .carStyle()
      .padding(35)
      .justifyContent(FlexAlign.SpaceBetween)

      Row(){
        Button("添加任务")
          .width(200)
          .margin({top:30,bottom:30})
          .backgroundColor(FinishColor)
          .onClick(()=>{
            this.taskList.push(new Task())
            this.handleTaskChange()
          })
      }

      List({space:20}){
        ForEach(this.taskList,(task:Task,index)=> {
          ListItem(){
            Row(){
              if(task.finish){
                Text(`${task.name}`)
                  .fontColor("#ccc")
                  .decoration({ type: TextDecorationType.LineThrough })
              }else{
                Text(`${task.name}`)
              }

              Checkbox()
                .select(task.finish)
                .selectedColor(FinishColor)
                .onChange(val=>{
                  task.finish = val
                  this.handleTaskChange()
                })
            }
            .carStyle()
            .padding(20)
            .justifyContent(FlexAlign.SpaceBetween)
          }
          .swipeAction({ // 往左边滑动时出现自定义的构建函数
            end:this.deleteBuilder(index)
          })
        })
      }
      .width("100%")
      .layoutWeight(1)
    }
    .width("100%")
    .height("100%")
    .padding(15)
    .backgroundColor("#ececec")
  }

  @Builder deleteBuilder(index){
    Button(){
      Image($r("app.media.deleteIcon"))
        .width(20)
        .interpolation(ImageInterpolation.High)
    }
    .width(40)
    .height(40)
    .margin({left:15})
    .backgroundColor(Color.Red)
    .onClick(()=>{
      this.taskList.splice(index,1)
      this.handleTaskChange()
    })
  }
}
实现效果

@Prop和@Link
| @prop | @LInk | |
|---|---|---|
| 同步类型 | 单项同步 | 双向同步 |
| 允许装饰的变量类型 | @Prop只支持string、number、boolean、enum类型 父组件是对象类型,子组件是对象属性 不可以是数组、any | 父子类型一致:string、number、boolean、enum、object、class、以及他们的数组 数组中的元素增、删、改、查等都会引起刷新 嵌套类型以及数组中的对象属性无法引起刷新 |
| 初始化方式 | 不允许子组件进行初始化 | 父组件传递、禁止子组件进进行初始化 |
现在我们使用@Prop和@Link将上面的代码进行组件封装
新建 components/taskComponents/HeaderCar 定义顶部卡片组件
const FinishColor = "#36D"
// 定义卡片公共样式
@Styles function carStyle() {
  .borderRadius(8)
  .shadow({
    radius: 20,
    color: "#bbb",
    offsetX: 3,
    offsetY: 4
  })
  .backgroundColor(Color.White)
  .width("100%")
}


@Component
export struct HeaderCar {
  // 定义从父组件接收的字段
  @Prop finishTotal: number
  @Prop taskTotal: number

  build() {
    Row(){
      Text("任务列表")
        .fontSize(25)
        .fontWeight(FontWeight.Bold)


      // 栈组件,让多个组件堆叠在一起
      Stack(){
        // 进度条
        Progress({
          value:this.finishTotal,
          total:this.taskTotal,
          type:ProgressType.ScaleRing // 设置成环形进度条
        })
          .width(100)
          .color(FinishColor)
          .style({
            strokeWidth:5
          })

        Row(){
          Text(`${this.finishTotal}`)
            .fontColor(FinishColor)
            .fontSize(25)

          Text(` / ${this.taskTotal}`)
            .fontSize(25)
        }
      }
    }
    .carStyle()
    .padding(35)
    .justifyContent(FlexAlign.SpaceBetween)
  }
}
新建 components/taskComponents/TaskListItem 封装任务列表组件
class Task{
  static id = 1
  name:string
  finish:boolean

  constructor() {
    this.name = `任务${Task.id++}`
    this.finish = false
  }
}

// 定义卡片公共样式
@Styles function carStyle() {
  .borderRadius(8)
  .shadow({
    radius: 20,
    color: "#bbb",
    offsetX: 3,
    offsetY: 4
  })
  .backgroundColor(Color.White)
  .width("100%")
}

const FinishColor = "#36D"

@Component
export struct TaskItem {
  @Link taskTotal: number
  @Link finishTotal: number
  @State taskList: Task[] = []


  handleTaskChange(){
    this.taskTotal = this.taskList.length
    this.finishTotal = this.taskList.filter(i=>i.finish).length
  }

  build() {
    Column(){
      Button("添加任务")
        .width(200)
        .margin({top:30,bottom:30})
        .backgroundColor(FinishColor)
        .onClick(()=>{
          this.taskList.push(new Task())
          this.handleTaskChange()
        })

      Row(){
        List({space:20}){
          ForEach(this.taskList,(task:Task,index)=> {
            ListItem(){
              Row(){
                if(task.finish){
                  Text(`${task.name}`)
                    .fontColor("#ccc")
                    .decoration({ type: TextDecorationType.LineThrough })
                }else{
                  Text(`${task.name}`)
                }

                Checkbox()
                  .select(task.finish)
                  .selectedColor(FinishColor)
                  .onChange(val=>{
                    task.finish = val
                    this.handleTaskChange()
                  })
              }
              .carStyle()
              .padding(20)
              .justifyContent(FlexAlign.SpaceBetween)
            }
            .swipeAction({ // 往左边滑动时出现自定义的构建函数
              end:this.deleteBuilder(index)
            })
          })
        }
        .width("100%")
        .layoutWeight(1)
      }
    }
  }

  // 自定义删除按钮的构建函数
  @Builder deleteBuilder(index){
    Button(){
      Image($r("app.media.deleteIcon"))
        .width(20)
        .interpolation(ImageInterpolation.High)
    }
    .width(40)
    .height(40)
    .margin({left:15})
    .backgroundColor(Color.Red)
    .onClick(()=>{
      this.taskList.splice(index,1)
      this.handleTaskChange()
    })
  }
}
最后父组件引用上面个子组件
// 任务对象
import { HeaderCar } from '../components/taskComponents/HeaderCar'
import { TaskItem } from '../components/taskComponents/TaskListItem'

@Entry
@Component
struct TaskList {
  // 任务总数量
  @State taskTotal:number = 0
  // 已完成数量
  @State finishTotal:number = 0

  onPageShow(){
    // 调用子组件的方法
    TaskItem.prototype.handleTaskChange()
  }

  build() {
    Column() {
      // 头部卡片
      HeaderCar({
        taskTotal:this.taskTotal,
        finishTotal:this.finishTotal
      })

      // 底部的任务列表组件
      TaskItem({
        taskTotal:$taskTotal,
        finishTotal:$finishTotal
      })
        .layoutWeight(1)
    }
    .width("100%")
    .height("100%")
    .padding(15)
    .backgroundColor("#ececec")
  }
}
效果一致
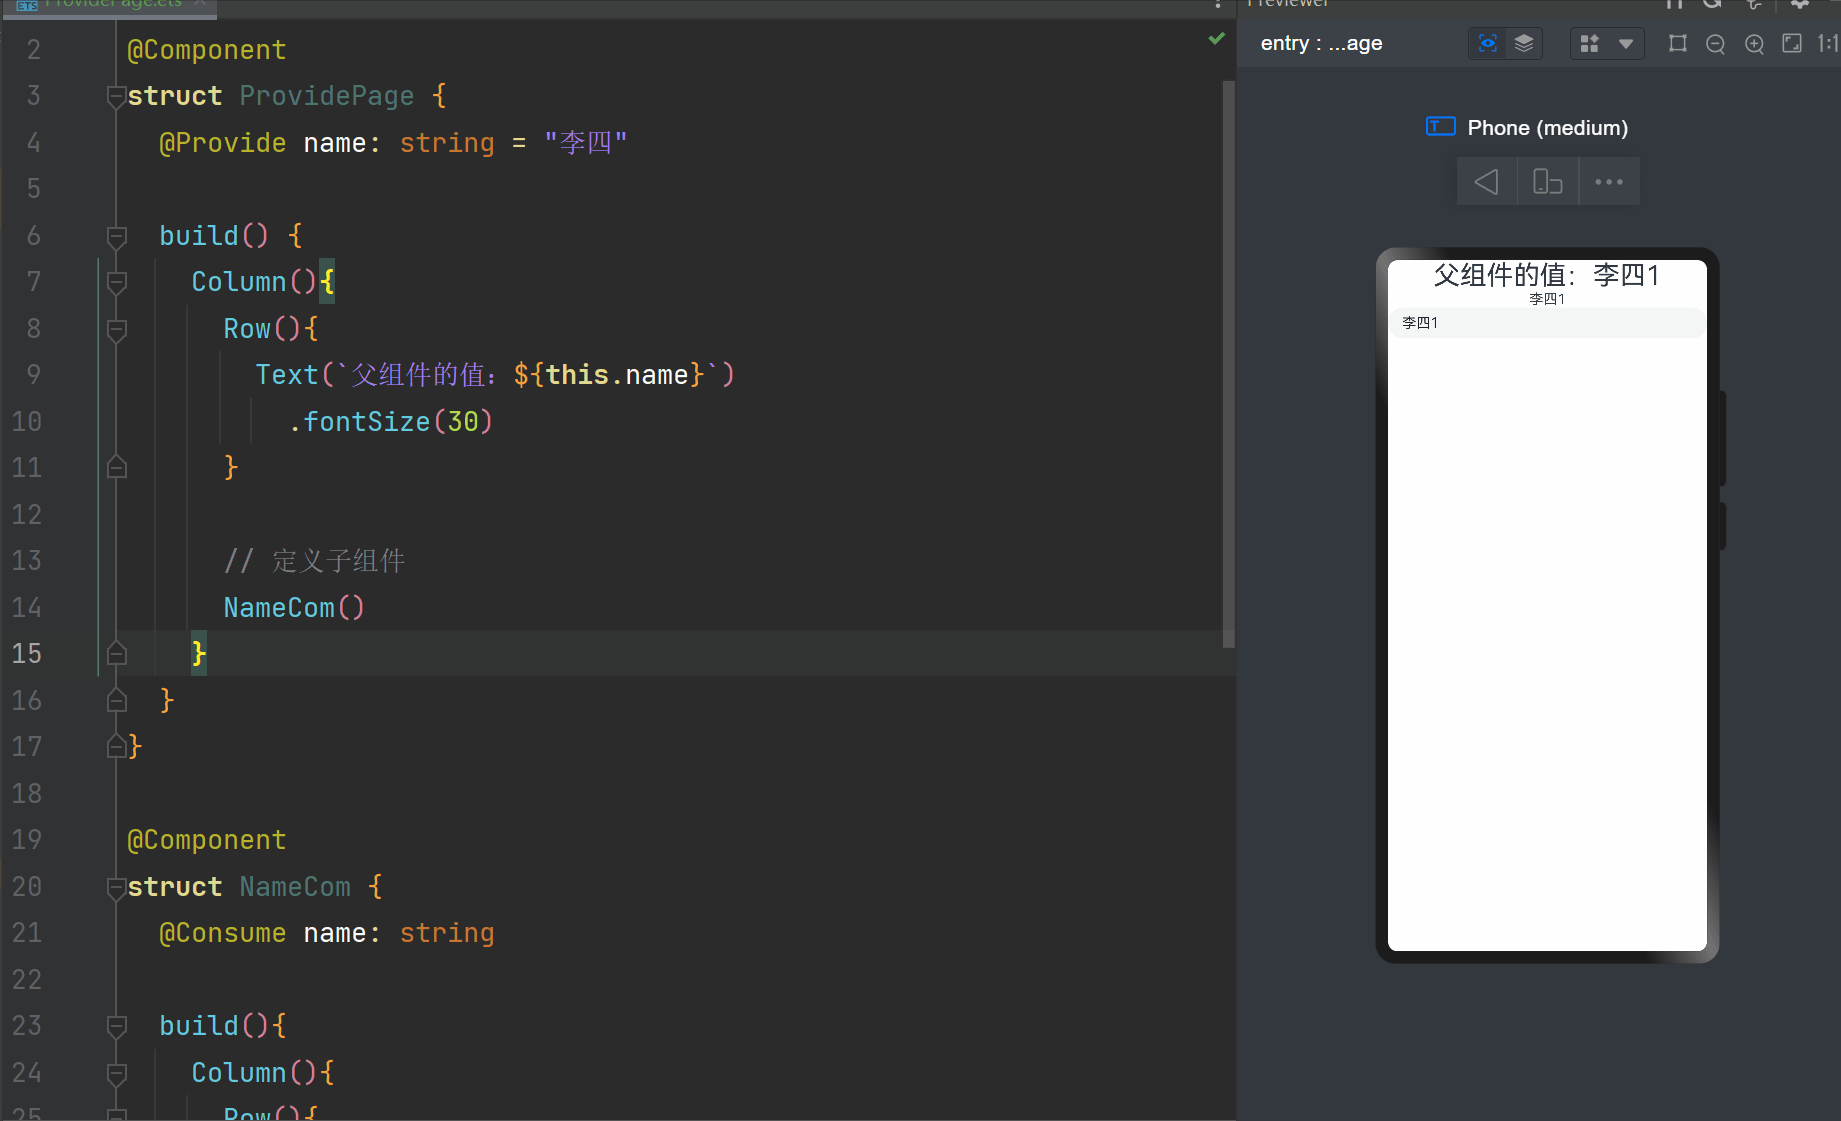
@Provide和@Consume
@Provide和@Consume适用于跨组件传递数据的场景
在父组件定义一个变量,并且用@Provide修饰,然后子组件或者孙子组件使用@Consume修饰接收的变量,然后父组件引用这些子组件时不需要传递参数,子组件可以自动的获取父组件的变量值。并且支持双向同步
代码示例
@Entry
@Component
struct ProvidePage {
  @Provide name: string = "李四"

  build() {
    Column(){
      Row(){
        Text(`父组件的值:${this.name}`)
          .fontSize(30)
      }

      // 定义子组件
      NameCom()
    }
  }
}

@Component
struct NameCom {
  @Consume name: string

  build(){
    Column(){
      Row(){
        Text(`${this.name}`)
      }

      Row(){
        TextInput({
          text:this.name
        })
          .onChange(val => {
            this.name = val
          })
      }
    }
  }
}
效果展示
@Observed和@ObjectLink
上面我们知道,嵌套的字段发生改变时,页面不会刷新。为了解决这个问题,我们就要使用 @Observed和@ObjectLink
现在我们来修改任务列表这个代码,我们发现点击完右侧的复选框后,文字的样式并没有发生变化
修改 components/taskComponents/TaskListItem
@Observed
class Task{
  static id = 1
  name:string
  finish:boolean

  constructor() {
    this.name = `任务${Task.id++}`
    this.finish = false
  }
}

// 定义卡片公共样式
@Styles function carStyle() {
  .borderRadius(8)
  .shadow({
    radius: 20,
    color: "#bbb",
    offsetX: 3,
    offsetY: 4
  })
  .backgroundColor(Color.White)
  .width("100%")
}

const FinishColor = "#36D"

@Component
export struct TaskItem {
  @Link taskTotal: number
  @Link finishTotal: number
  @State taskList: Task[] = []


  handleTaskChange(){
    this.taskTotal = this.taskList.length
    this.finishTotal = this.taskList.filter(i=>i.finish).length
  }

  build() {
    Column(){
      Button("添加任务")
        .width(200)
        .margin({top:30,bottom:30})
        .backgroundColor(FinishColor)
        .onClick(()=>{
          this.taskList.push(new Task())
          this.handleTaskChange()
        })

      Row(){
        List({space:20}){
          ForEach(this.taskList,(task:Task,index)=> {
            ListItem(){
              // 每一行组件
              RowItem({
                task:task,
                // 将父组件定义的方法传递给子组件,并绑定this为父组件的this
                handleTaskChange:this.handleTaskChange.bind(this)
              })
            }
            .swipeAction({ // 往左边滑动时出现自定义的构建函数
              end:this.deleteBuilder(index)
            })
          })
        }
        .width("100%")
        .layoutWeight(1)
      }
    }
  }

  // 自定义删除按钮的构建函数
  @Builder deleteBuilder(index){
    Button(){
      Image($r("app.media.deleteIcon"))
        .width(20)
        .interpolation(ImageInterpolation.High)
    }
    .width(40)
    .height(40)
    .margin({left:15})
    .backgroundColor(Color.Red)
    .onClick(()=>{
      this.taskList.splice(index,1)
      this.handleTaskChange()
    })
  }
}

@Component
struct RowItem {
  @ObjectLink task:Task
  handleTaskChange: ()=>void

  build() {
    Row(){
      if(this.task.finish){
        Text(`${this.task.name}`)
          .fontColor("#ccc")
          .decoration({ type: TextDecorationType.LineThrough })
      }else{
        Text(`${this.task.name}`)
      }

      Checkbox()
        .select(this.task.finish)
        .selectedColor(FinishColor)
        .onChange(val=>{
          this.task.finish = val
          this.handleTaskChange()
        })
    }
    .carStyle()
    .padding(20)
    .justifyContent(FlexAlign.SpaceBetween)
  }
}
给 class Task 添加了 @Observe 修饰,然后将每一行做了组件抽离,并接收参数,使用 @ObjectLink 修饰
然后我们需要在RowItem组件中调用父组件的handleTaskChange方法,所以定义了一个handleTaskChange参数,通过父组件传递过来,但是在子组件调用时,this指向会发生变化,所以父组件在传递方法时,使用bind改变这个方法内部的this指向
现在代码的运行效果就是正常的
页面路由
- 页面栈的最大容量上限是32个,使用
router.clear()方法可以清空页面栈,释放内存 - Router有两种跳转模式,分别为:
- router.pushUrl():目标页面不会替换当前页面,而是压入页面栈,因此可以用
router.back()返回当前页面 - router.replaceUrl():目标页面会替换当前页面,当前页面会被销毁并释放资源,无法返回当前页面
- router.pushUrl():目标页面不会替换当前页面,而是压入页面栈,因此可以用
- Router有两种页面实例模式,分别是:
- Standard:标准页面实例,每次跳转都会新建一个目标页面压入页面栈,默认就是此模式
- Single:单实例模式,如果目标页已经在页面栈中,则距离页面栈顶部最近的同Url页面会被移动到栈顶,并重新加载
修改首页代码
import router from '@ohos.router'
class RouterItem {
url: string
title: string
constructor(url, title) {
this.url = url
this.title = title
}
}
@Entry
@Component
struct Index {
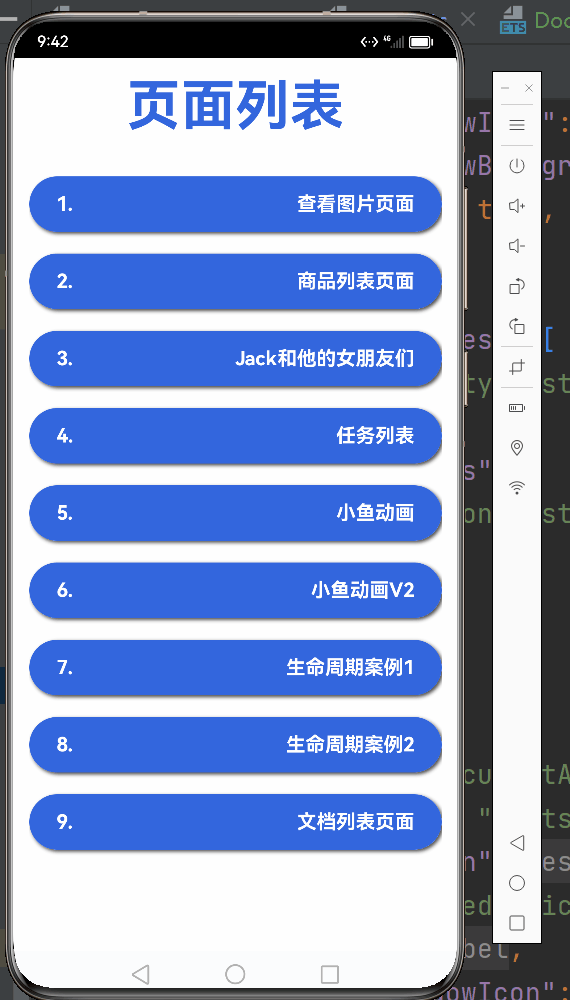
@State message: string = '页面列表'
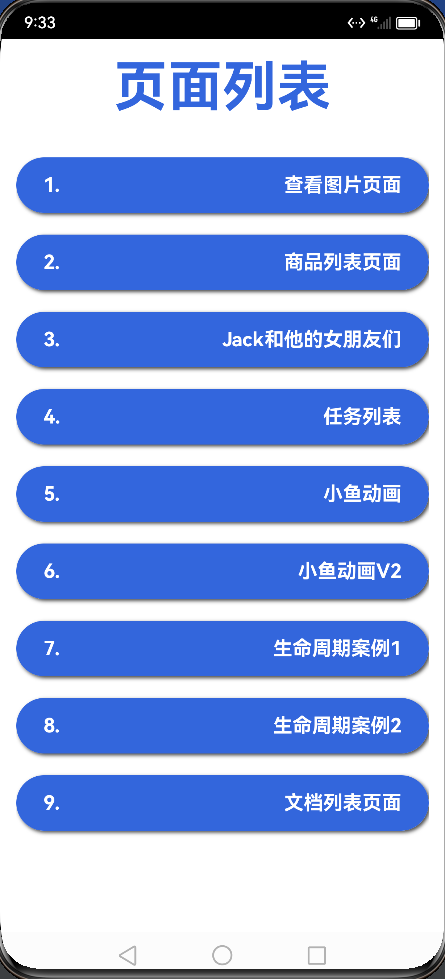
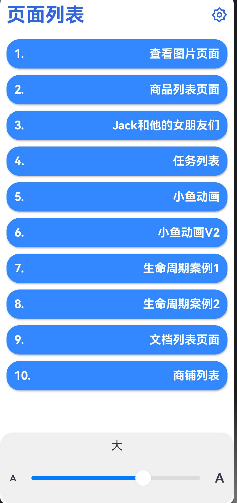
routerList: RouterItem[] = [
new RouterItem("pages/ImagePage", "查看图片页面"),
new RouterItem("pages/ItemsPage", "商品列表页面"),
new RouterItem("pages/StatePage", "Jack和他的女朋友们"),
new RouterItem("pages/TaskListPage", "任务列表"),
]
build() {
Column() {
Row() {
Text(this.message)
.fontSize(50)
.fontWeight(FontWeight.Bold)
.fontColor("#36d")
.onClick(() => {
this.message = "Hello ArkTS"
})
}
List({ space: 20 }) {
ForEach(this.routerList, (r: RouterItem, index: number) => {
ListItem() {
RouterItemBox({
item: r,
rid: index + 1
})
}
})
}
.width("100%")
.margin({ top: 35 })
.layoutWeight(1)
}
.width('100%')
.height("100%")
.padding(15)
}
}
@Component
struct RouterItemBox {
item: RouterItem
rid: number
build() {
Row() {
Text(`${this.rid}.`)
.fontColor(Color.White)
.fontSize(18)
.fontWeight(FontWeight.Bold)
Blank()
Text(`${this.item.title}`)
.fontColor(Color.White)
.fontSize(18)
.fontWeight(FontWeight.Bold)
}
.width("100%")
.padding({
top: 15,
right: 25,
bottom: 15,
left: 25
})
.backgroundColor("#36D")
.borderRadius(30)
.shadow({
radius: 8,
color: "#ff484848",
offsetX: 5,
offsetY: 5
})
.justifyContent(FlexAlign.SpaceBetween)
.onClick(() => {
router.pushUrl(
{
url: this.item.url
},
router.RouterMode.Single,
err => {
if(err){
console.log(`页面跳转出错,errCode:${err.code},errMsg:${err.message}`)
}
}
)
})
}
}
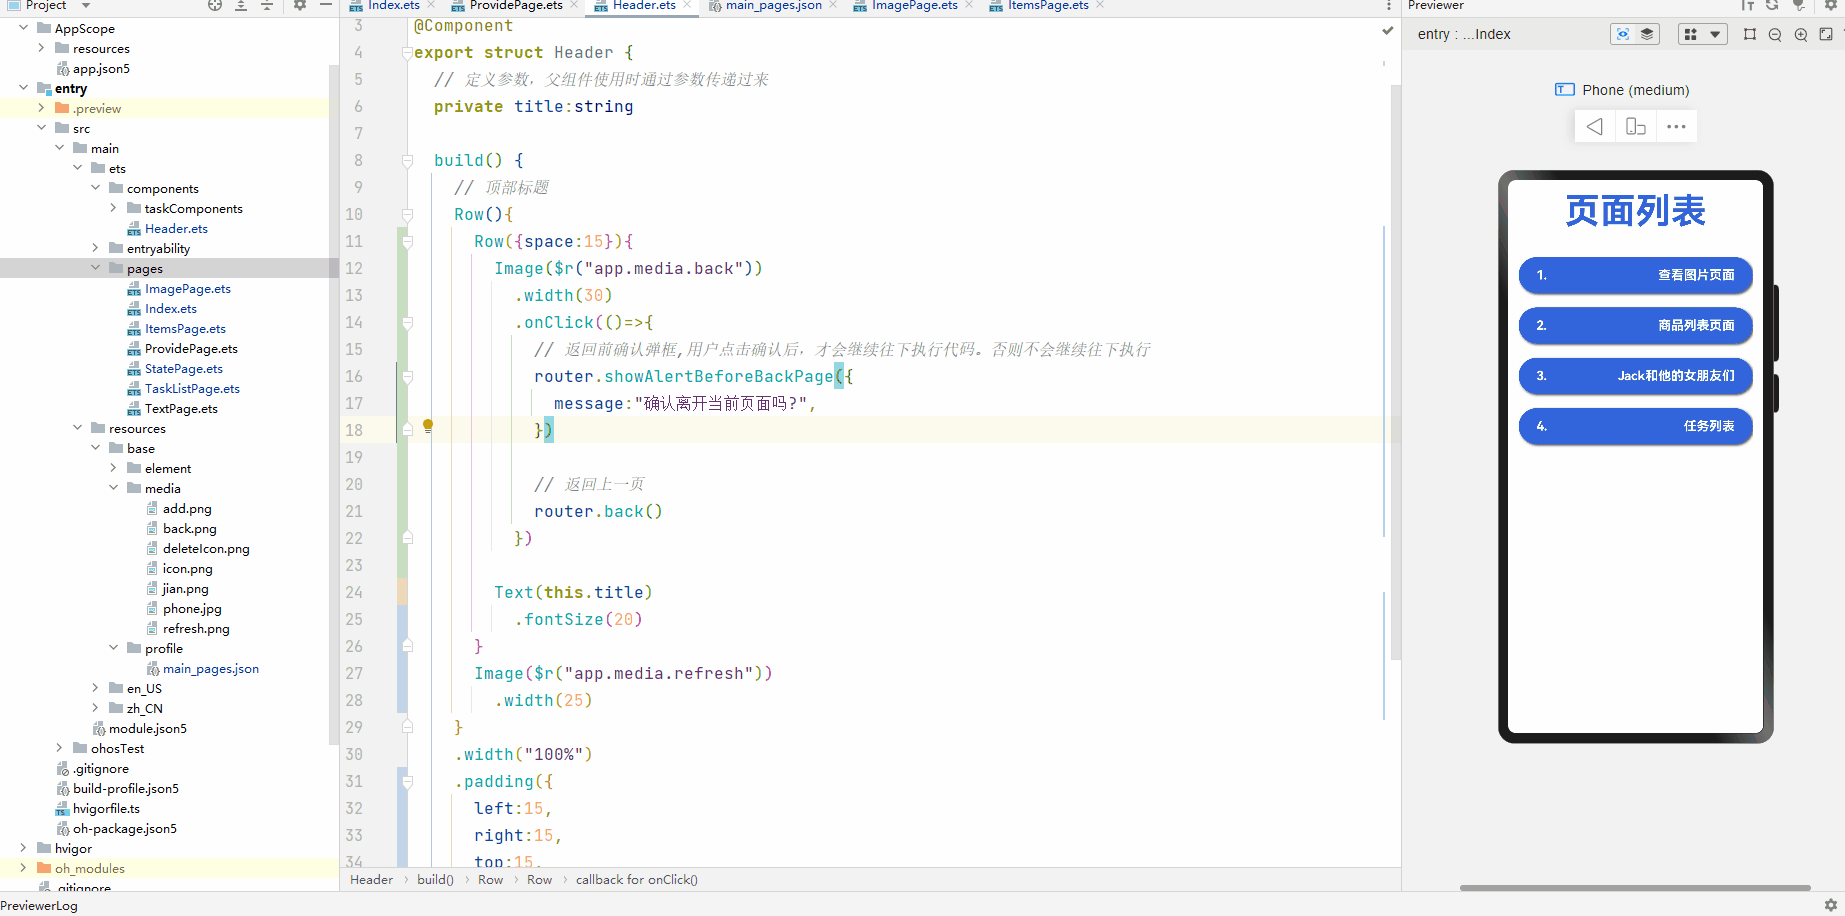
修改公共的Header组件,添加点击返回功能
// 定义Header组件
import router from '@ohos.router'
@Component
export struct Header {
  // 定义参数,父组件使用时通过参数传递过来
  private title:string

  build() {
    // 顶部标题
    Row(){
      Row({space:15}){
        Image($r("app.media.back"))
          .width(30)
          .onClick(()=>{
            // 返回前确认弹框,用户点击确认后,才会继续往下执行代码。否则不会继续往下执行
            router.showAlertBeforeBackPage({
              message:"确认离开当前页面吗?",
            })

            // 返回上一页
            router.back()
          })

        Text(this.title)
          .fontSize(20)
      }
      Image($r("app.media.refresh"))
        .width(25)
    }
    .width("100%")
    .padding({
      left:15,
      right:15,
      top:15,
      bottom:15
    })
    .alignItems(VerticalAlign.Center)
    .justifyContent(FlexAlign.SpaceBetween)
  }
}
最后需要配置页面地址,找到 resources/base/profile/main_pages.json 文件,添加页面路由信息
{
  "src": [
    "pages/Index",
    "pages/ImagePage",
    "pages/ItemsPage",
    "pages/StatePage",
    "pages/TaskListPage"
  ]
}
如果不配置,则不会跳转
另外,在新建时,可以选择新建 Page,这样会自动的往该文件中添加路由信息
效果展示
动画
属性动画
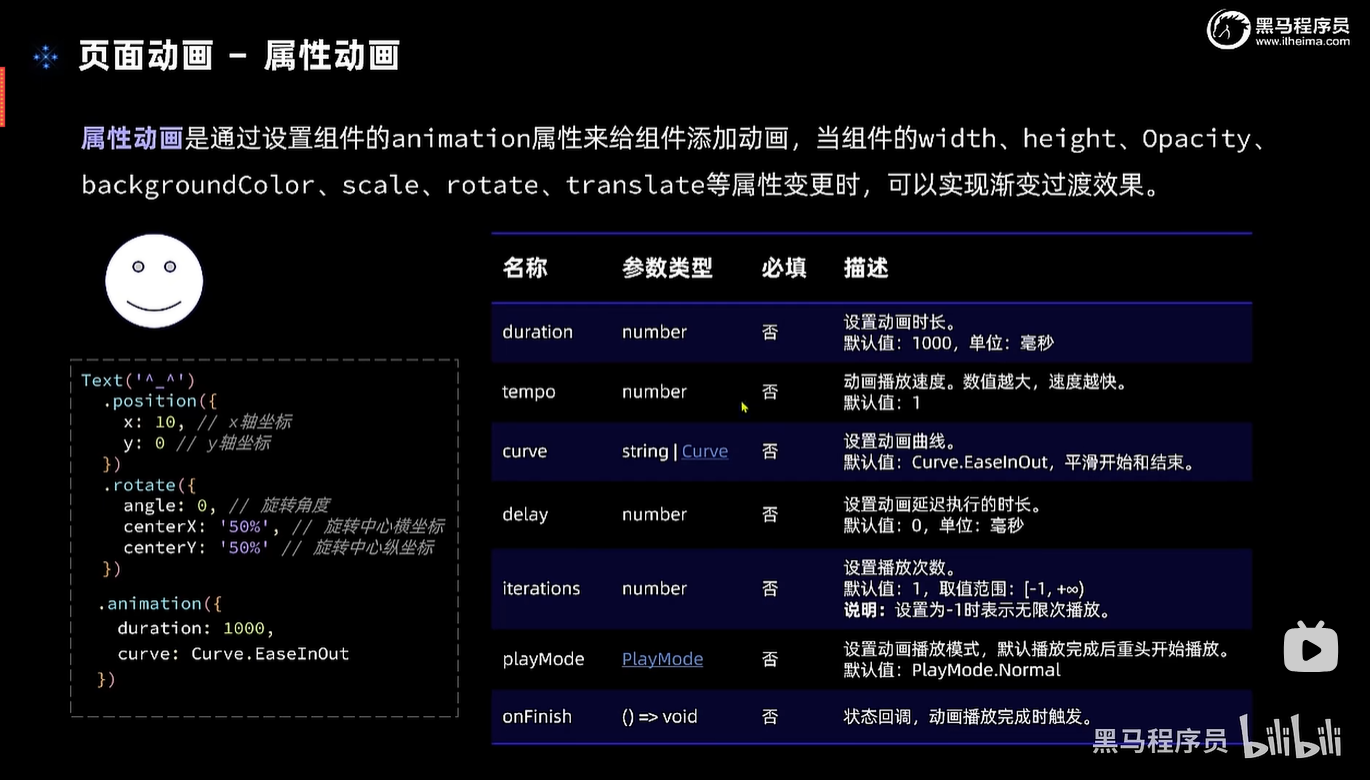
实例代码
import router from '@ohos.router'

@Entry
@Component
struct AnimationPage {
  // 小鱼坐标
  @State fishX: number = 200
  @State fishY: number = 180
  // 小鱼角度
  @State angle: number = 0
  // 小鱼图片
  @State src: Resource = $r("app.media.yu")
  // 是否开始游戏
  @State isBegin: boolean = false
  // 移动速度
  @State speed: number = 20

  build() {
    Row() {
      Stack() {
        Button("返回")
          .position({ x: 15, y: 15 })
          .width(80)
          .backgroundColor("#bc515151")
          .onClick(() => {
            router.back()
          })


        if (!this.isBegin) {
          Button("开始游戏")
            .onClick(() => {
              this.isBegin = true
            })
        } else {
          Image(this.src)
            .position({ x: this.fishX - 40, y: this.fishY - 40 })
            .rotate({ angle: this.angle, centerX: "50%", centerY: "50%" })
            .width(80)
            .height(80)
            .animation({
              duration: 500, // 动画时长,当上面的动画值发生变化时会触发动画
            })
        }

        // 摇杆区域
        if (this.isBegin) {
          Row() {
            Button("←")
              .backgroundColor("#bc515151")
              .onClick(() => {
                this.fishX -= this.speed
                this.src = $r("app.media.yu")
              })

            Column({ space: 40 }) {
              Button("↑")
                .backgroundColor("#bc515151")
                .onClick(() => {
                  this.fishY -= this.speed
                })

              Button("↓")
                .backgroundColor("#bc515151")
                .onClick(() => {
                  this.fishY += this.speed
                })
            }

            Button("→")
              .backgroundColor("#bc515151")
              .onClick(() => {
                this.fishX += this.speed
                this.src = $r("app.media.yuR")
              })
          }
          .width(240)
          .height(240)
          .position({ x: 15, y: 150 })
        }
      }
      .height('100%')
      .width("100%")
    }
    .justifyContent(FlexAlign.Center)
    .alignItems(VerticalAlign.Center)
    .backgroundImage($r("app.media.yuBg"))
    .backgroundImageSize(ImageSize.Cover) // 背景图片铺满
  }
}
上面代码完成了小鱼游动的效果,点击上下箭头,可以看到小鱼很平滑的在移动

显示动画
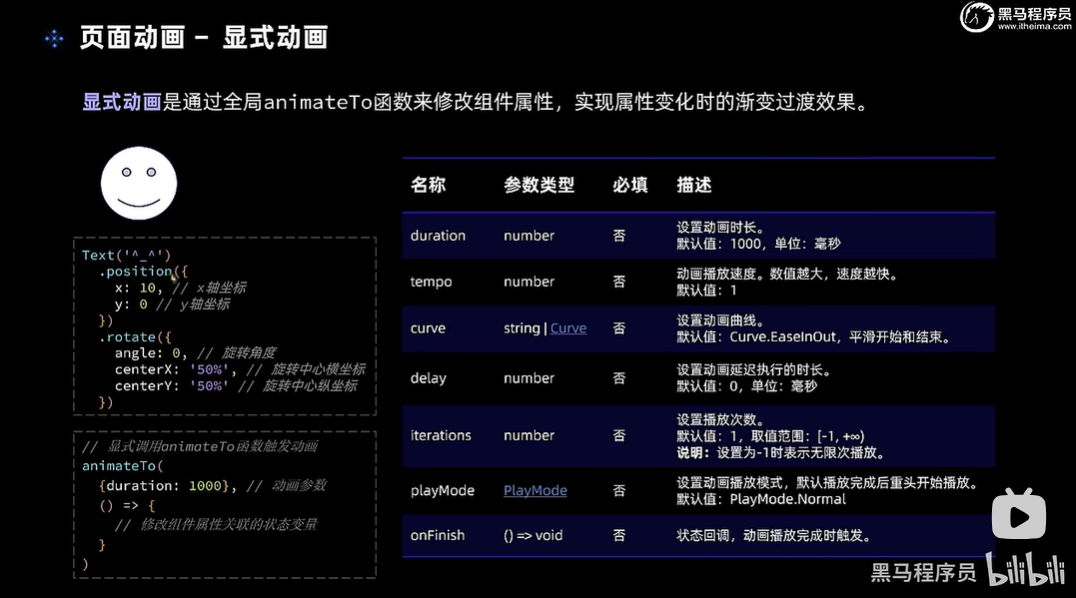
修改上面的代码为显示动画
Stack() {
  Button("返回")
    .position({ x: 15, y: 15 })
    .width(80)
    .backgroundColor("#bc515151")
    .onClick(() => {
      router.back()
    })


  if (!this.isBegin) {
    Button("开始游戏")
      .onClick(() => {
        this.isBegin = true
      })
  } else {
    Image(this.src)
      .position({ x: this.fishX - 40, y: this.fishY - 40 })
      .rotate({ angle: this.angle, centerX: "50%", centerY: "50%" })
      .width(80)
      .height(80)
  }

  // 摇杆区域
  if (this.isBegin) {
    Row() {
      Button("←")
        .backgroundColor("#bc515151")
        .onClick(() => {
          // 全局暴露的动画函数,第一个参数设置动画相关内容
          // 第二个是修改的动画值
          animateTo(
            {
              duration: 500
            },
            () => {
              this.fishX -= this.speed
              this.src = $r("app.media.yu")
            })
        })

      Column({ space: 40 }) {
        Button("↑")
          .backgroundColor("#bc515151")
          .onClick(() => {
            animateTo(
              {
                duration: 500
              },
              () => {
                this.fishY -= this.speed
              })
          })

        Button("↓")
          .backgroundColor("#bc515151")
          .onClick(() => {
            animateTo(
              {
                duration: 500
              },
              () => {
                this.fishY += this.speed
              })
          })
      }

      Button("→")
        .backgroundColor("#bc515151")
        .onClick(() => {
          animateTo(
            {
              duration: 500
            },
            () => {
              this.fishX += this.speed
              this.src = $r("app.media.yuR")
            })
        })
    }
    .width(240)
    .height(240)
    .position({ x: 15, y: 150 })
  }
}
.height('100%')
.width("100%")
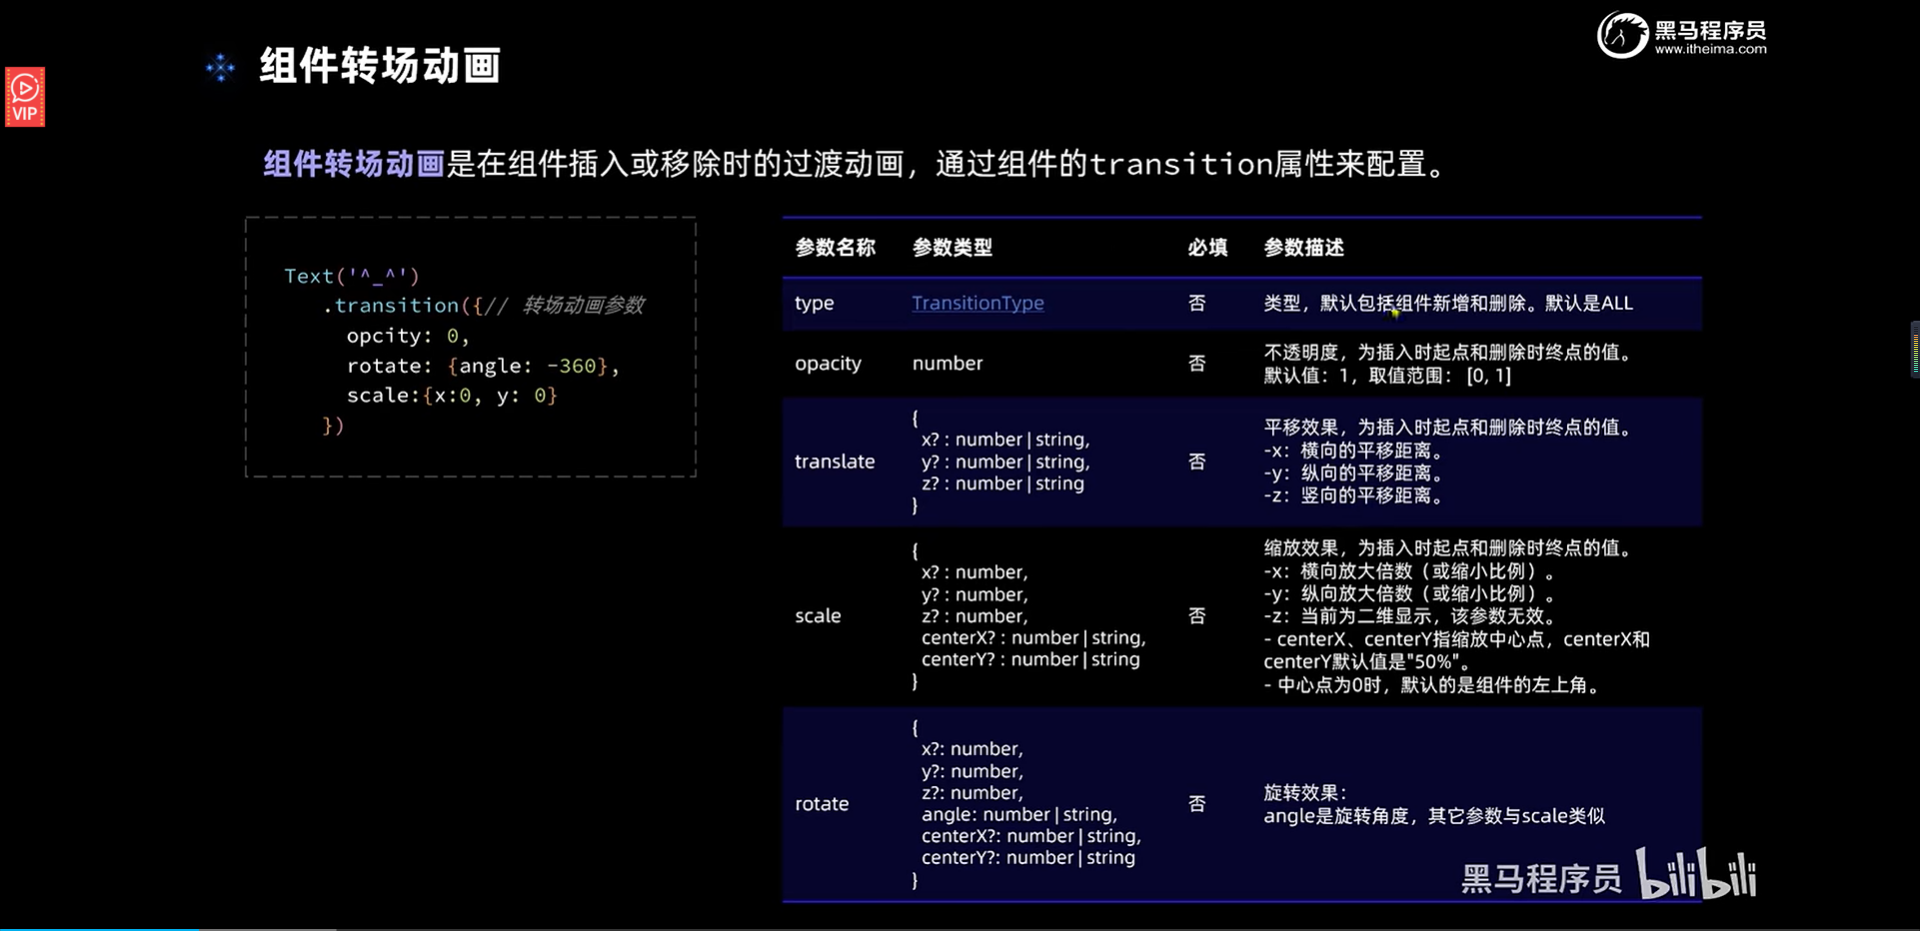
组件转场动画
为小鱼添加入场动画,修改开始游戏按钮的方法
if (!this.isBegin) {
Button("开始游戏")
.onClick(() => {
// 点击开始游戏后,使用animateTo控制小鱼开始执行入场动画
// 注意:必须使用animateTo方法的回调控制变量,才能触发transition动画
animateTo(
{
duration:1000
},
()=>{
this.isBegin = true
}
)
})
} else {
Image(this.src)
.position({ x: this.fishX - 40, y: this.fishY - 40 })
.rotate({ angle: this.angle, centerX: "50%", centerY: "50%" })
.width(80)
.height(80)
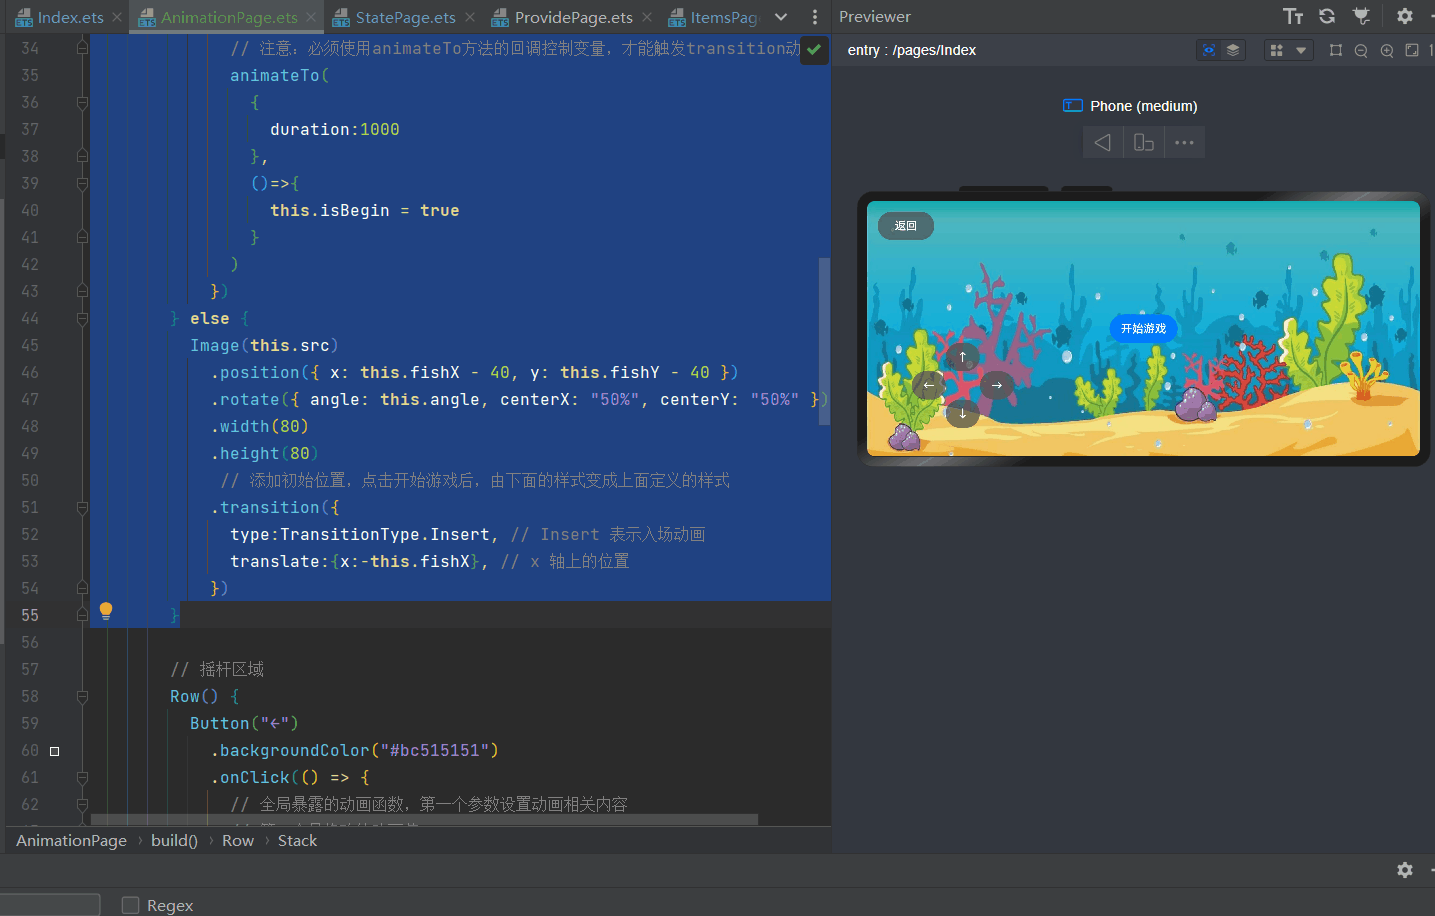
// 添加初始位置,点击开始游戏后,由下面的样式变成上面定义的样式
.transition({
type:TransitionType.Insert, // Insert 表示入场动画
translate:{x:-this.fishX}, // x 轴上的位置,设置为负数,表示从屏幕外面移动到屏幕里面
})
}
效果展示
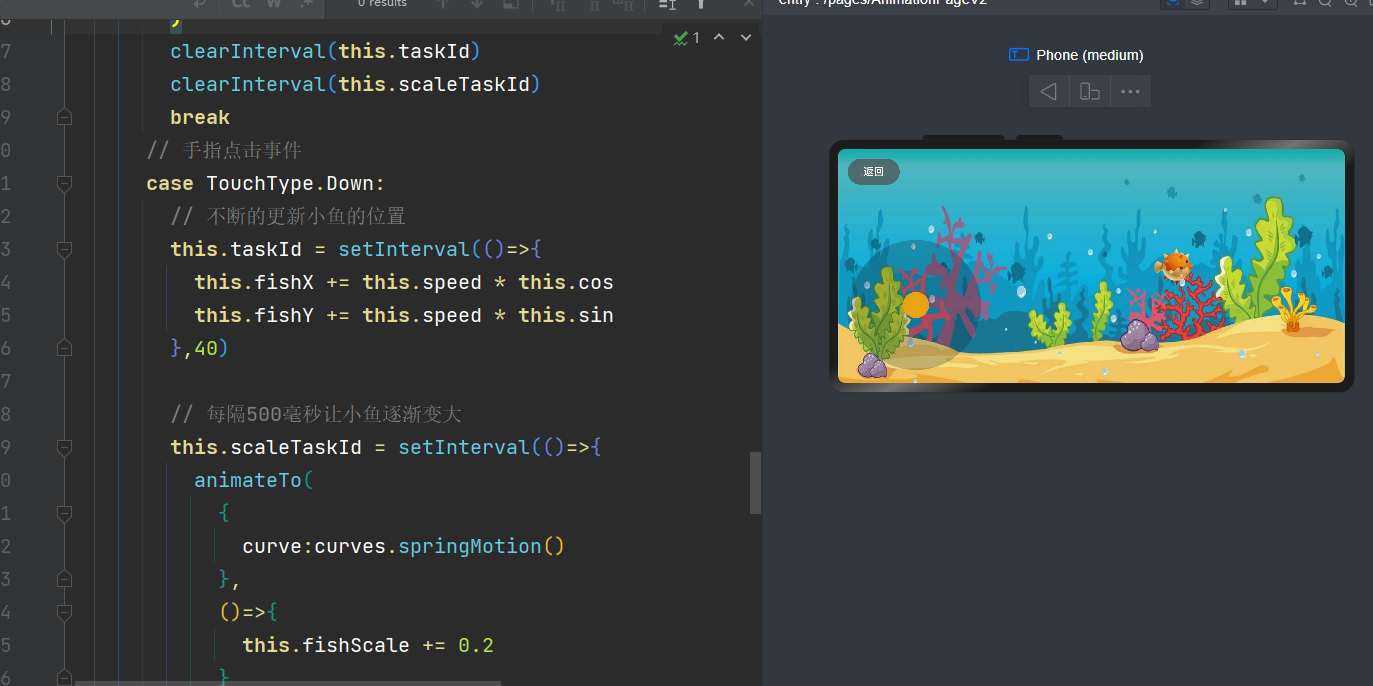
实现摇杆功能
完整代码
import router from '@ohos.router'
import curves from '@ohos.curves'

@Entry
@Component
struct AnimationPage {
  // 小鱼坐标
  @State fishX: number = 300
  @State fishY: number = 180
  // 小鱼角度
  @State angle: number = 0
  // 小鱼图片
  @State src: Resource = $r("app.media.yuR")
  // 是否开始游戏
  @State isBegin: boolean = false
  // 移动速度
  @State speed: number = 20

  // 摇杆中心区域坐标
  centerX: number = 120
  centerY: number = 120

  // 大小圆的半径
  maxRadius: number = 100
  radius: number = 20

  // 摇杆小圆球的初始位置
  @State positionX: number = this.centerX
  @State positionY: number = this.centerY

  // 角度正弦和余弦
  sin: number = 0
  cos: number = 0

  taskId: number = 1
  scaleTaskId: number = 1

  @State fishScale:number = 1

  build() {
    Row() {
      Stack() {
        Button("返回")
          .position({ x: 15, y: 15 })
          .width(80)
          .backgroundColor("#bc515151")
          .onClick(() => {
            router.back()
          })


        if (!this.isBegin) {
          Button("开始游戏")
            .onClick(() => {
              // 点击开始游戏后,使用animateTo控制小鱼开始执行入场动画
              // 注意:必须使用animateTo方法的回调控制变量,才能触发transition动画
              animateTo(
                {
                  duration:1000
                },
                ()=>{
                  this.isBegin = true
                }
              )
            })
        } else {
          Image(this.src)
            .position({ x: this.fishX - 40, y: this.fishY - 40 })
            .rotate({ angle: this.angle, centerX: "50%", centerY: "50%" })
            .width(80)
            .height(80)
            .scale({x:this.fishScale,y:this.fishScale})
             // 添加初始位置,点击开始游戏后,由下面的样式变成上面定义的样式
            .transition({
              type:TransitionType.Insert, // Insert 表示入场动画
              translate:{x:-this.fishX}, // x 轴上的位置
            })
            .interpolation(ImageInterpolation.High)

        }

        // 摇杆区域
        Row() {
          Circle({width:this.maxRadius * 2,height:this.maxRadius * 2})
            .fill("#3a101020")
            .position({x:this.centerX-this.maxRadius,y:this.centerY-this.maxRadius})

          Circle({width:this.radius*2,height:this.radius *2})
            .fill("#ffeaa311")
            .position({x:this.positionX-this.radius,y:this.positionY-this.radius})
        }
        .width(240)
        .height(240)
        .justifyContent(FlexAlign.Center)
        .position({ x: 0, y: 120 })
        .onTouch(this.onTouchEvent.bind(this))
      }
      .height('100%')
      .width("100%")
    }
    .justifyContent(FlexAlign.Center)
    .alignItems(VerticalAlign.Center)
    .backgroundImage($r("app.media.yuBg"))
    .backgroundImageSize(ImageSize.Cover) // 背景图片铺满
  }

  // 处理摇杆区域的触摸事件
  onTouchEvent(event:TouchEvent){
    // 区分不同的类型
    switch (event.type){
      // 手指松开事件
      case TouchType.Up:
        animateTo(
          {
            curve:curves.springMotion()
          },
          ()=>{
            // 还原小球的位置
            this.positionX = this.centerX
            this.positionY = this.centerY
            // 还原小鱼的倾斜角度
            this.angle = 0
            // 还原小鱼大小
            this.fishScale = 1
          }
        )
        clearInterval(this.taskId)
        clearInterval(this.scaleTaskId)
        break
      // 手指点击事件
      case TouchType.Down:
        // 不断的更新小鱼的位置
        this.taskId = setInterval(()=>{
          this.fishX += this.speed * this.cos
          this.fishY += this.speed * this.sin
        },40)

        // 每隔500毫秒让小鱼逐渐变大
        this.scaleTaskId = setInterval(()=>{
          animateTo(
            {
              curve:curves.springMotion()
            },
            ()=>{
              this.fishScale += 0.2
            }
          )
        },500)
        break
      // 手指移动事件
      case TouchType.Move:
        // 1.获取手指位置坐标
        let x = event.touches[0].x
        let y = event.touches[0].y
        // 2.计算手指与中心点坐标的差值
        let vx = x - this.centerX
        let vy = y - this.centerY
        // 3.计算手指与中心点连线和x轴半径的夹角,单位是弧度
        let angle = Math.atan2(vy,vx)
        // 4.计算手指与中心点的距离
        let distance = this.getDistance(vx,vy)
        // 5.计算摇杆小球的坐标
        this.cos = Math.cos(angle)
        this.sin = Math.sin(angle)

        animateTo(
          {
            // 设置动画为连续动画
            curve:curves.responsiveSpringMotion()
          },
          ()=>{
            this.positionX = this.centerX + distance * Math.cos(angle)
            this.positionY = this.centerY + distance * Math.sin(angle)
            // 6.计算小鱼的位置
            this.speed = 5
            // 计算角度绝对值,如果小于90则需要翻转图片
            if(Math.abs(angle * 2) < Math.PI){
              this.src = $r("app.media.yuR")
            }else{
              this.src = $r("app.media.yu")
              angle = angle < 0 ? angle + Math.PI : angle - Math.PI
            }

            // 弧度转角度计算公式:弧度 * (180 / π)
            this.angle = angle * (180 / Math.PI)
          }
        )
        break
    }
  }

  getDistance(x,y){
    // 求平方根,计算两点的距离
    let d = Math.sqrt(x*x + y*y)
    return Math.min(d,this.maxRadius)
  }
}
Stage模型
文档介绍
https://developer.huawei.com/consumer/cn/doc/harmonyos-guides-V2/application-configuration-file-overview-stage-0000001428061460-V2
在需要的时候来翻阅文档即可
生命周期
页面及组件的生命周期
完成流程图
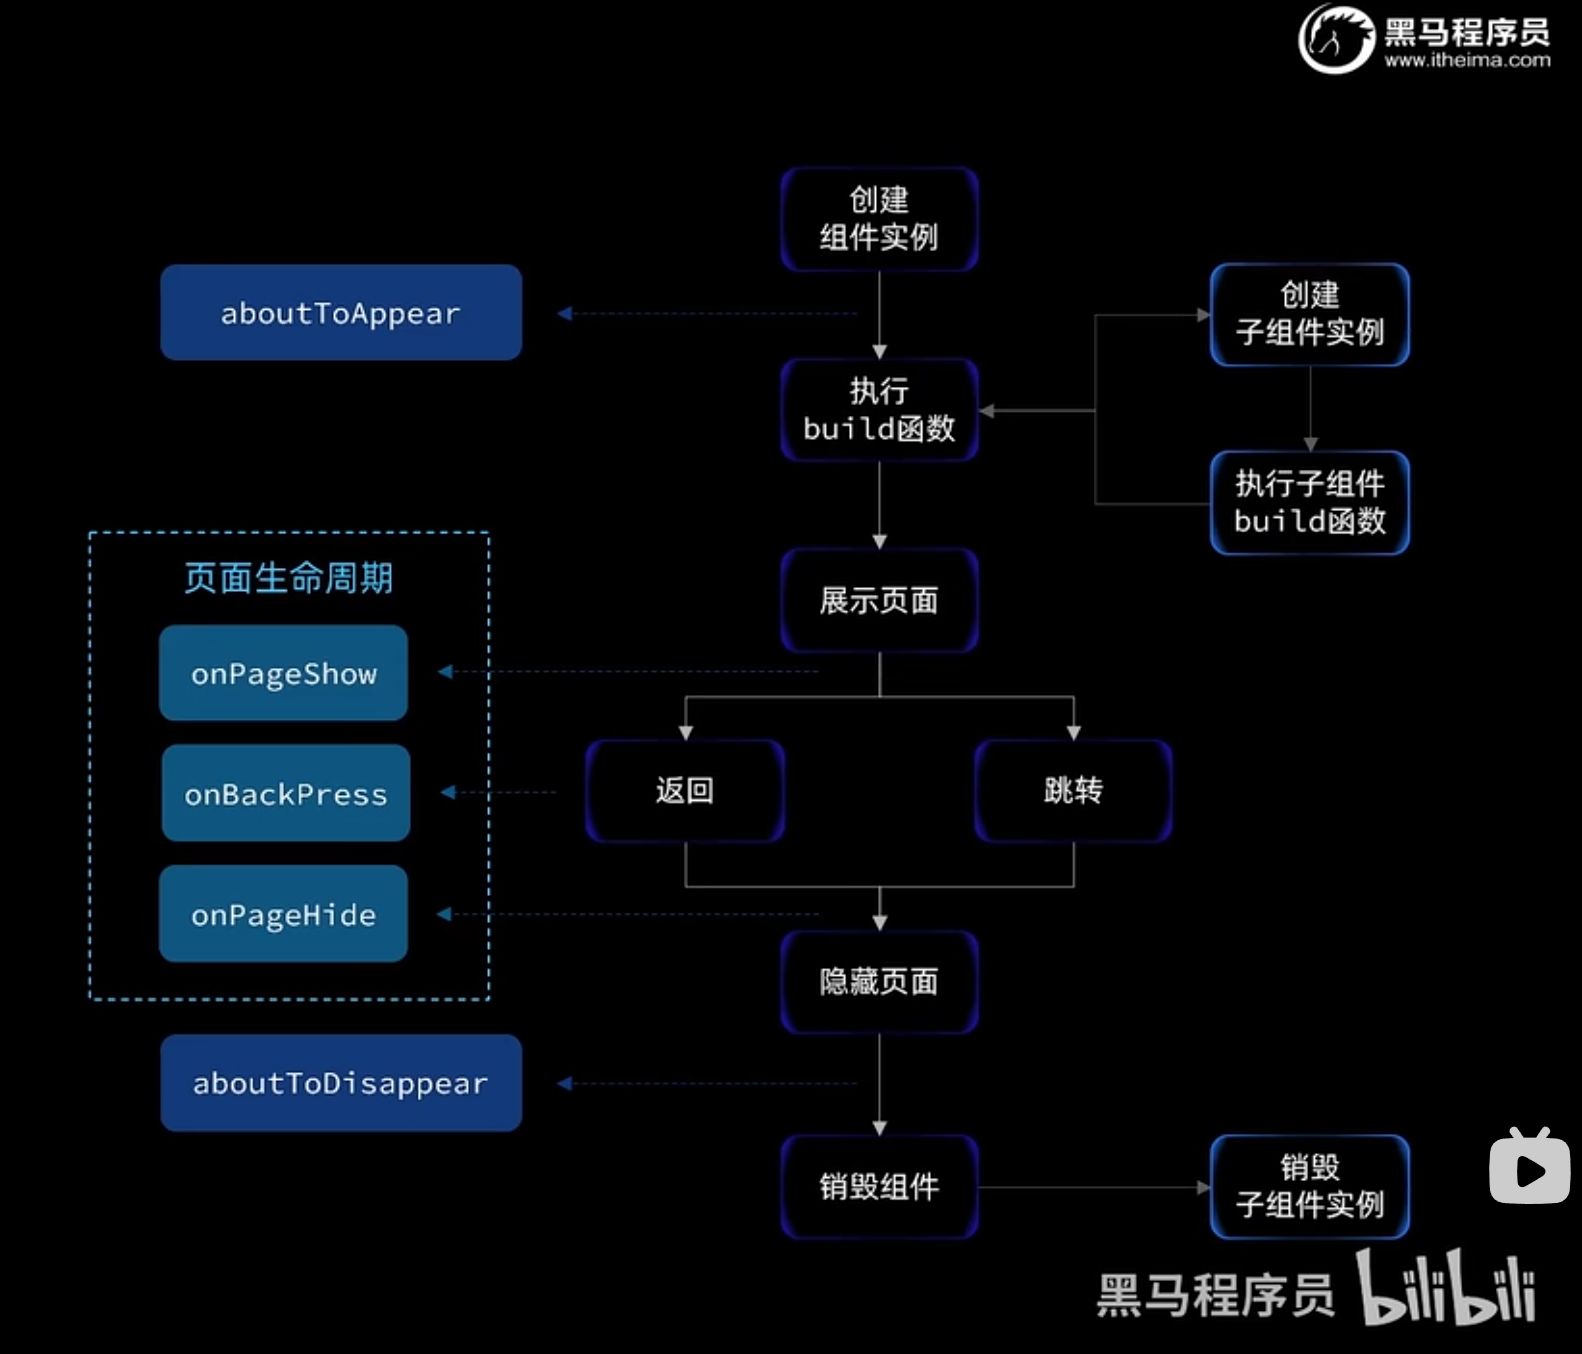
接下来通过两个案例来查看生命周期函数的执行情况
案例一
首先给首页添加生命周期函数
import router from '@ohos.router'

class RouterItem {
  url: string
  title: string

  constructor(url, title) {
    this.url = url
    this.title = title
  }
}

@Entry
@Component
struct Index {
  @State message: string = '页面列表'
  routerList: RouterItem[] = [
    new RouterItem("pages/ImagePage", "查看图片页面"),
    new RouterItem("pages/ItemsPage", "商品列表页面"),
    new RouterItem("pages/StatePage", "Jack和他的女朋友们"),
    new RouterItem("pages/TaskListPage", "任务列表"),
    new RouterItem("pages/AnimationPage", "小鱼动画"),
    new RouterItem("pages/AnimationPageV2", "小鱼动画V2"),
    new RouterItem("pages/LifeCyclePage", "生命周期案例1"),
    new RouterItem("pages/LifeCyclePage1", "生命周期案例2"),
  ]

  tag: string = "Index Page"

  aboutToAppear(){
    console.log(`${this.tag} aboutToAppear,页面创建完成`)
  }

  onBackPress(){
    console.log(`${this.tag} aboutToAppear,页面返回前触发`)
  }

  onPageShow(){
    console.log(`${this.tag} aboutToAppear,页面显示完成`)
  }

  onPageHide(){
    console.log(`${this.tag} aboutToAppear,页面隐藏完成`)
  }

  aboutToDisappear(){
    console.log(`${this.tag} aboutToAppear,页面销毁完成`)
  }

  build() {
    Column() {
      Row() {
        Text(this.message)
          .fontSize(50)
          .fontWeight(FontWeight.Bold)
          .fontColor("#36d")
      }

      List({ space: 20 }) {
        ForEach(this.routerList, (r: RouterItem, index: number) => {
          ListItem() {
            RouterItemBox({
              item: r,
              rid: index + 1
            })
          }
        })
      }
      .width("100%")
      .margin({ top: 35 })
      .layoutWeight(1)
    }
    .width('100%')
    .height("100%")
    .padding(15)
  }
}

@Component
struct RouterItemBox {
  item: RouterItem
  rid: number

  build() {
    Row() {
      Text(`${this.rid}.`)
        .fontColor(Color.White)
        .fontSize(18)
        .fontWeight(FontWeight.Bold)
      Blank()
      Text(`${this.item.title}`)
        .fontColor(Color.White)
        .fontSize(18)
        .fontWeight(FontWeight.Bold)
    }
    .width("100%")
    .padding({
      top: 15,
      right: 25,
      bottom: 15,
      left: 25
    })
    .backgroundColor("#36D")
    .borderRadius(30)
    .shadow({
      radius: 8,
      color: "#ff484848",
      offsetX: 5,
      offsetY: 5
    })
    .justifyContent(FlexAlign.SpaceBetween)
    .onClick(() => {
      router.pushUrl(
        {
          url: this.item.url
        },
        router.RouterMode.Single,
        err => {
          if(err){
            console.log(`页面跳转出错,errCode:${err.code},errMsg:${err.message}`)
          }
        }
      )
    })
  }
}
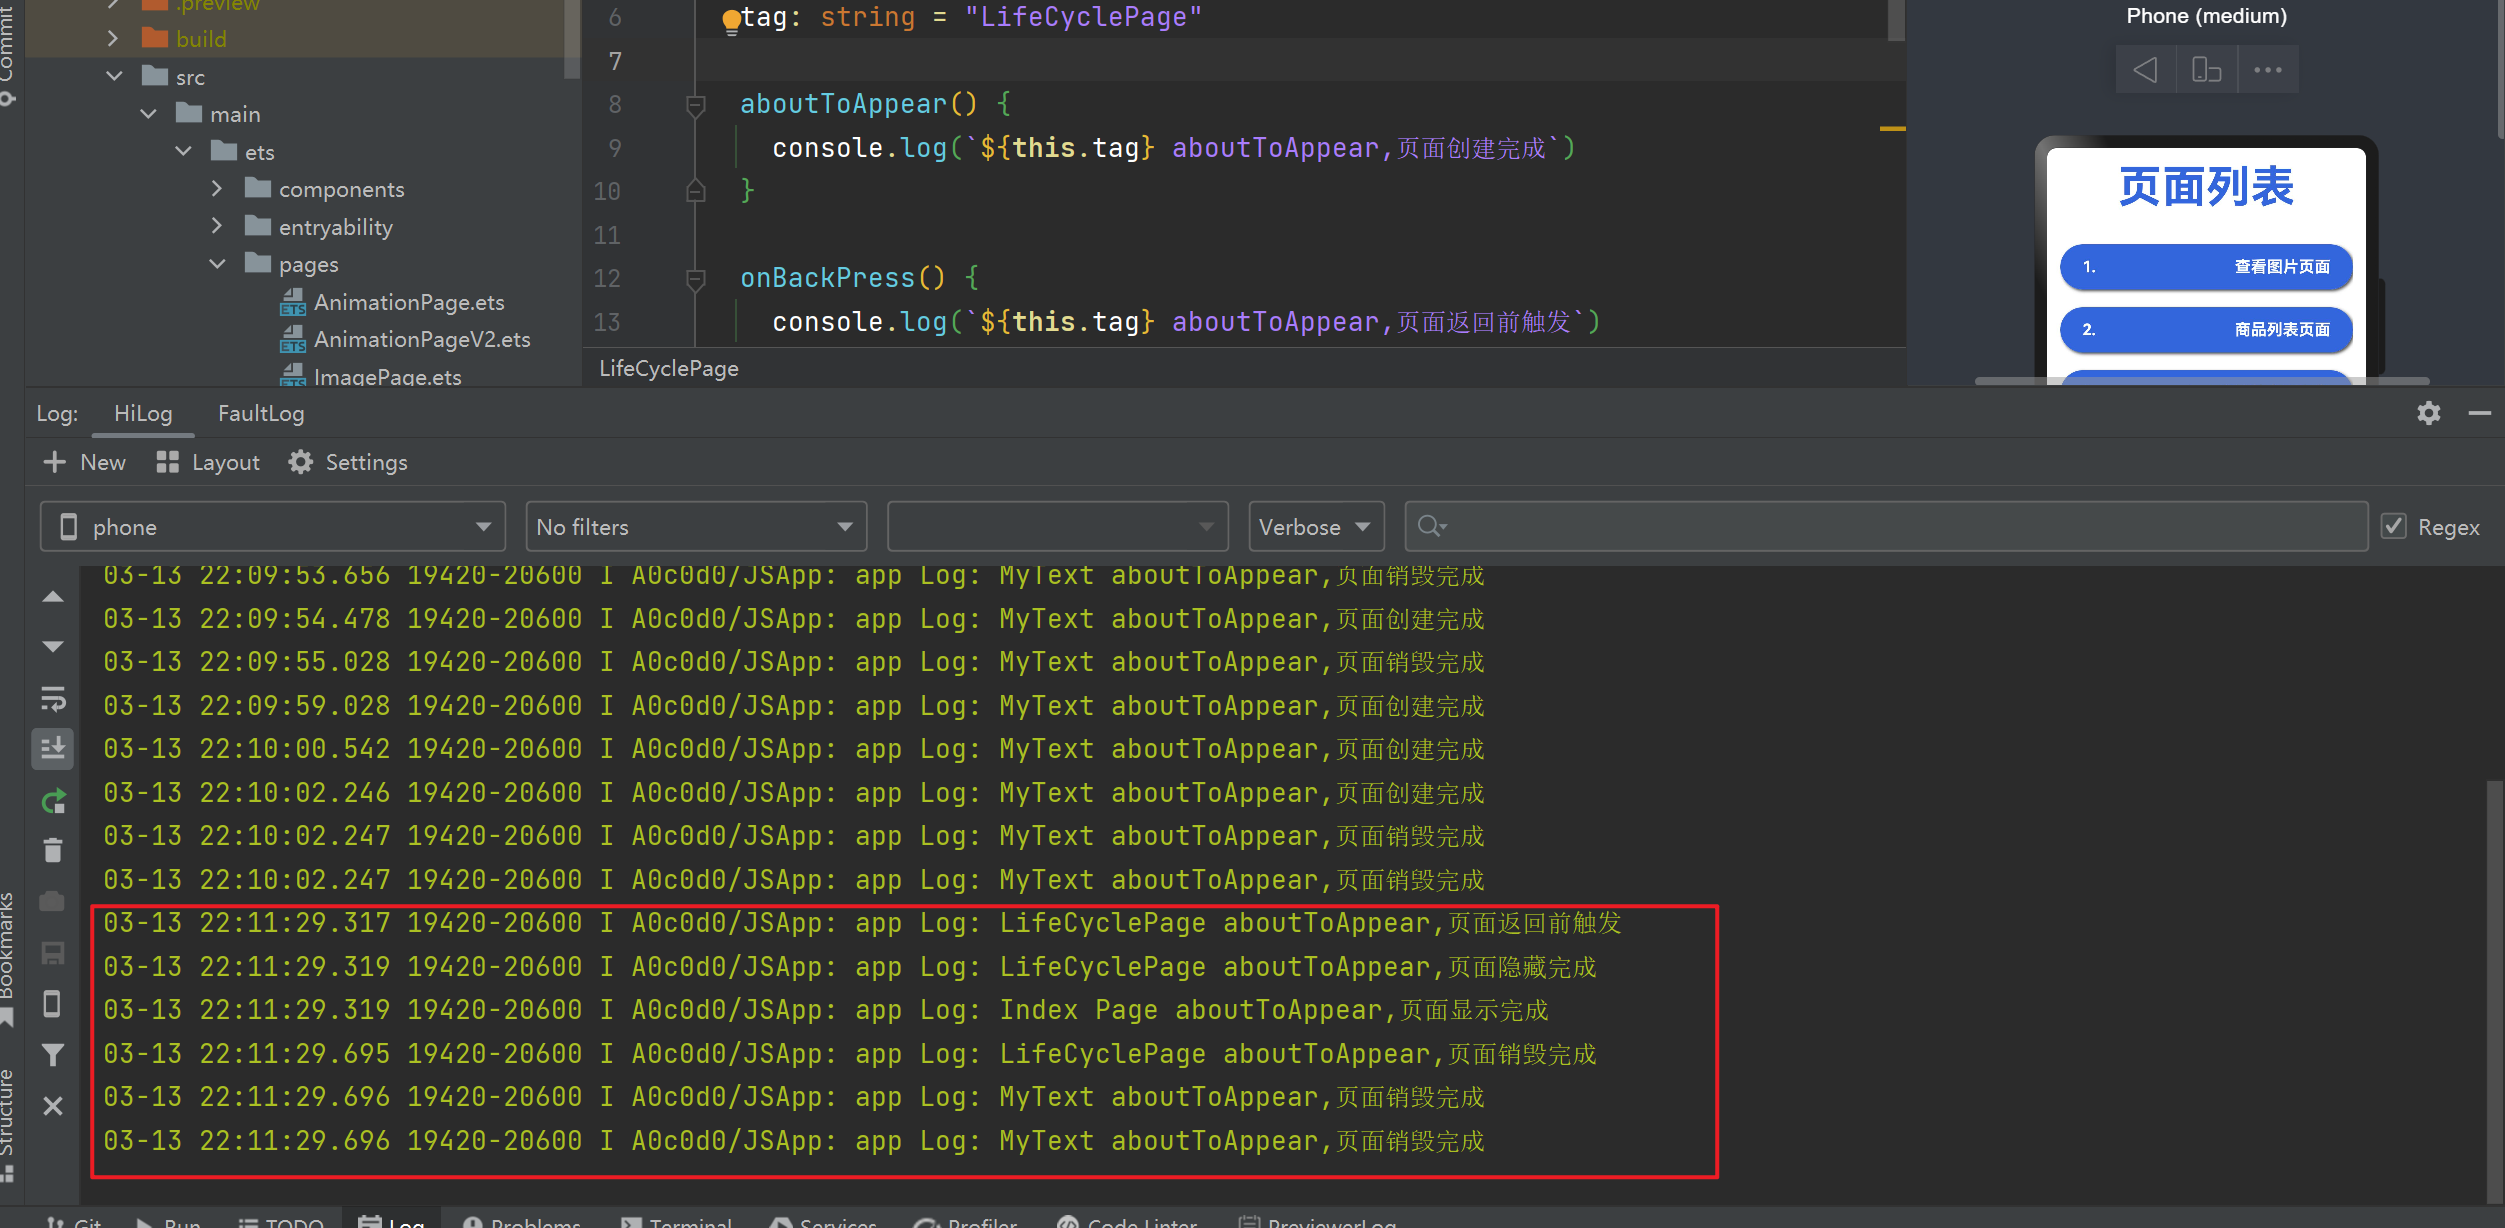
在加载完首页后会触发 aboutToAppear 和 onPageShow
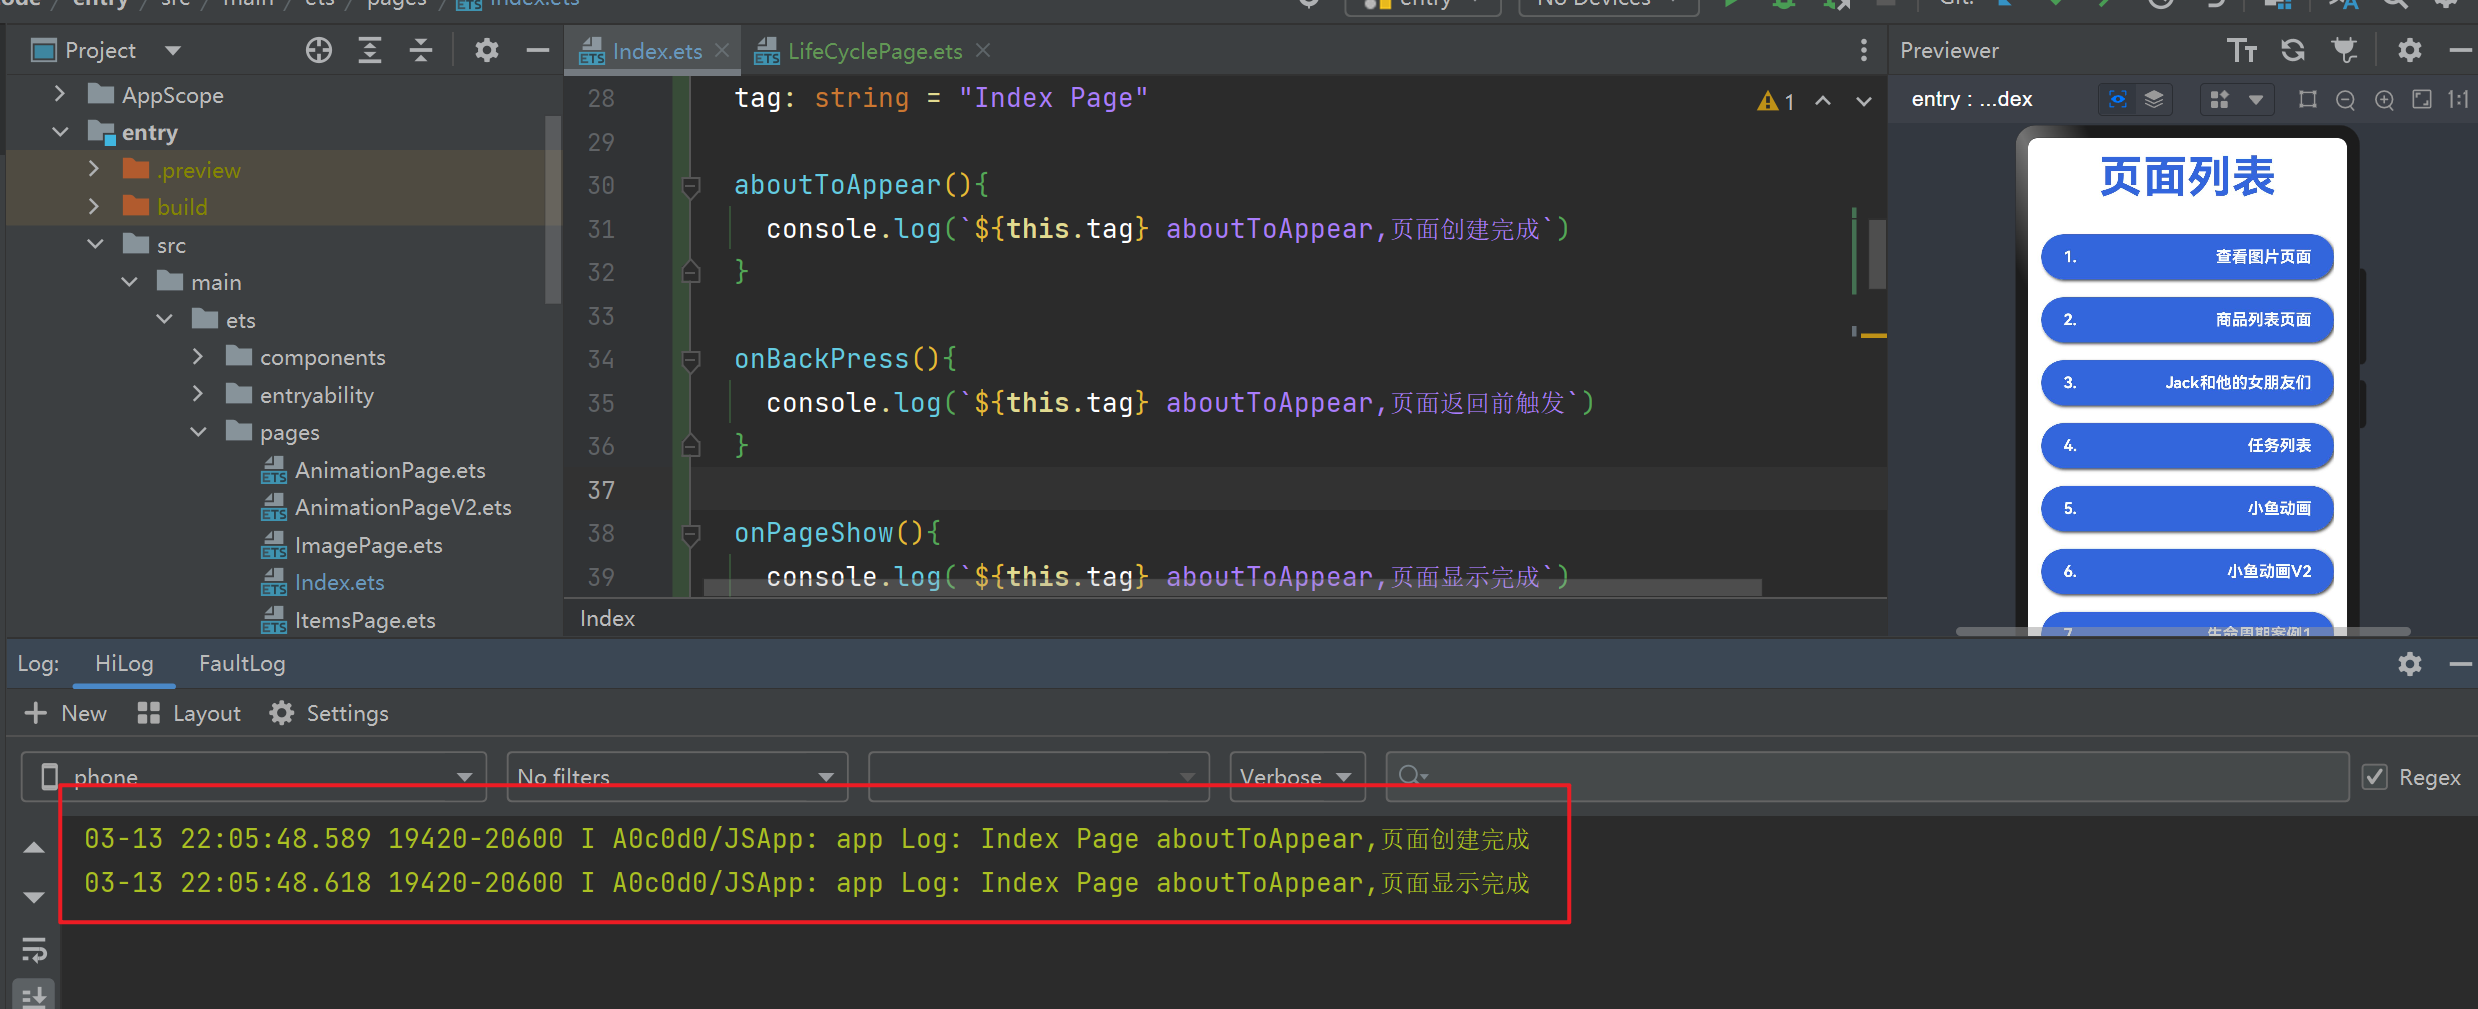
然后点击跳转到 pages/LifeCyclePage,页面代码如下
@Entry
@Component
struct LifeCyclePage {
  @State isShow: boolean = false
  @State emptyList: any[] = [0]
  tag: string = "LifeCyclePage"

  aboutToAppear() {
    console.log(`${this.tag} aboutToAppear,页面创建完成`)
  }

  onBackPress() {
    console.log(`${this.tag} aboutToAppear,页面返回前触发`)
  }

  onPageShow() {
    console.log(`${this.tag} aboutToAppear,页面显示完成`)
  }

  onPageHide() {
    console.log(`${this.tag} aboutToAppear,页面隐藏完成`)
  }

  aboutToDisappear() {
    console.log(`${this.tag} aboutToAppear,页面销毁完成`)
  }

  build() {
    Row() {
      Column({ space: 35 }) {
        Button("显示组件")
          .margin({ top: 30 })
          .onClick(() => {
            this.isShow = !this.isShow
          })

        if (this.isShow) {
          MyText()
        }

        Button("增加组件")
          .onClick(() => {
            this.emptyList.push(this.emptyList.length + 1)
          })

        ForEach(this.emptyList, (item,index) => {
          Row({ space: 25 }) {
            MyText()

            Button("删除")
              .onClick(() => {
                this.emptyList.splice(index, 1)
              })
          }
          .width("100%")
          .justifyContent(FlexAlign.Center)
        })
      }
      .width('100%')
      .height("100%")
      .alignItems(HorizontalAlign.Center)
    }
    .height('100%')
  }
}

@Component
struct MyText {
  messages: string = "hello world"

  tag: string = "MyText"

  aboutToAppear() {
    console.log(`${this.tag} aboutToAppear,页面创建完成`)
  }

  // 组件没有onBackPress、onPageShow、onPageHide这三个钩子函数
  onBackPress() {
    console.log(`${this.tag} aboutToAppear,页面返回前触发`)
  }

  onPageShow() {
    console.log(`${this.tag} aboutToAppear,页面显示完成`)
  }

  onPageHide() {
    console.log(`${this.tag} aboutToAppear,页面隐藏完成`)
  }

  aboutToDisappear() {
    console.log(`${this.tag} aboutToAppear,页面销毁完成`)
  }

  build() {
    Column() {
      Text(this.messages)
    }
  }
}
会打印如下
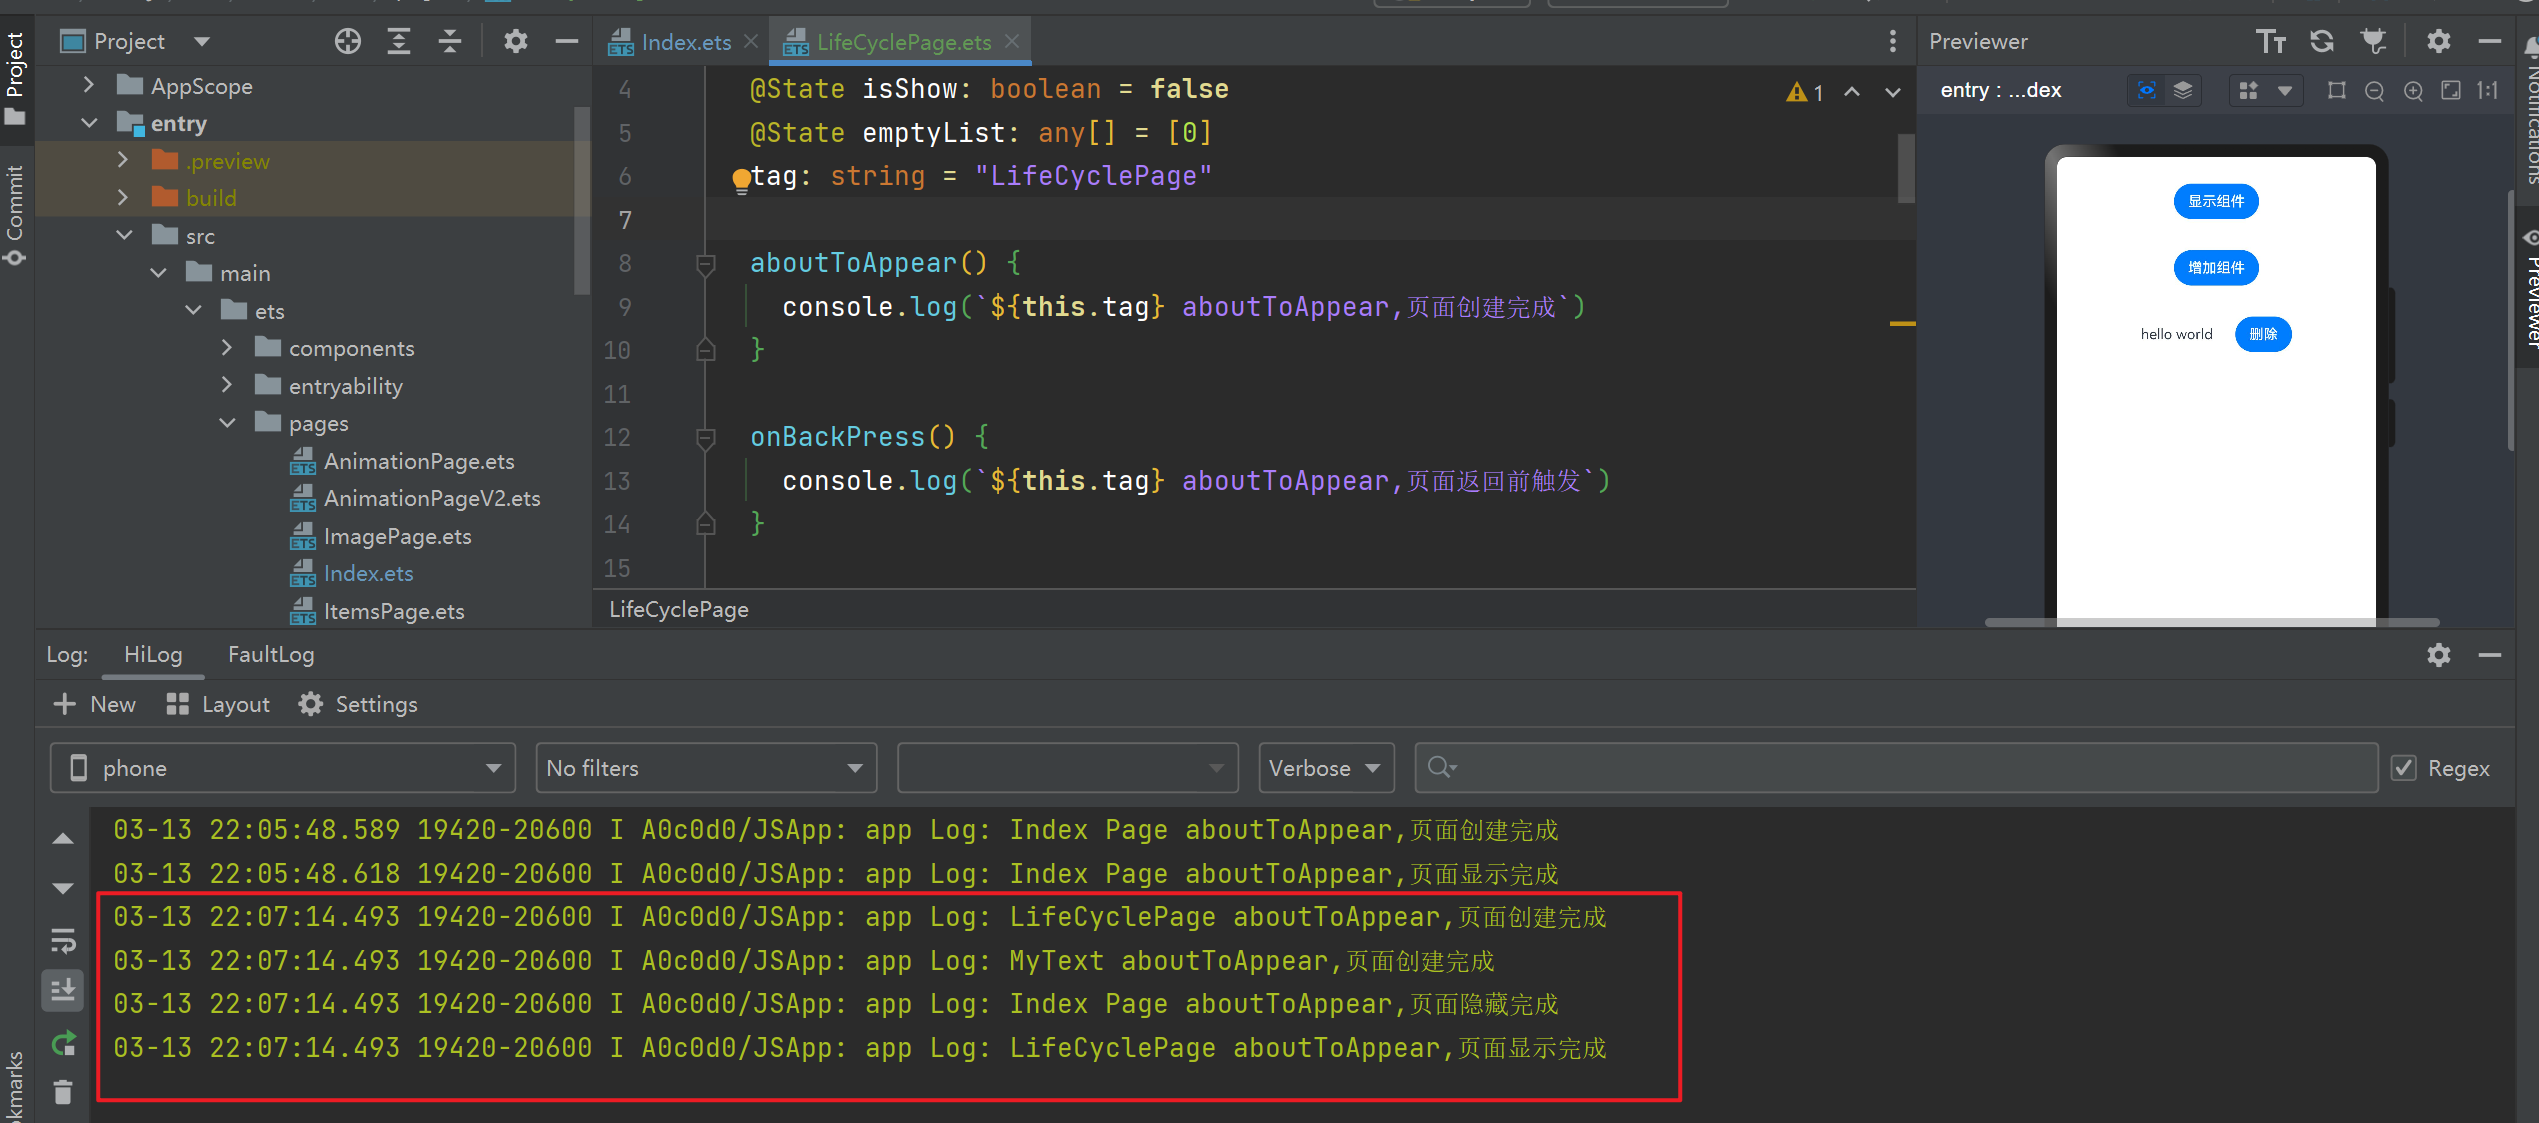
- 首先调用页面的 aboutToAppear 页面创建钩子
- 然后触发组件的 aboutToAppear 页面创建钩子
- 接着触发首页的 aboutToDisappear 页面销毁钩子
- 最后触发页面的 onPageShow 显示钩子
这时在页面上显示和隐藏组件,或者增加遍历组件,都只会触发组件的 aboutToAppear 创建和 aboutToDisappear 销毁

这也再次印证了组件是不包含 onBackPress 、onPageShow、onPageHide 这三个页面级别的生命周期函数
然后再返回首页时,会触发下面的钩子
案例二
首先准备两个页面
LifeCyclePage1.ets
import router from '@ohos.router'
@Entry
@Component
struct LifeCyclePage1 {
  pageName: string = "LifeCycle Page1"

  aboutToAppear() {
    console.log(`${this.pageName} aboutToAppear,页面创建完成`)
  }

  onBackPress() {
    console.log(`${this.pageName} aboutToAppear,页面返回前触发`)
  }

  onPageShow() {
    console.log(`${this.pageName} aboutToAppear,页面显示完成`)
  }

  onPageHide() {
    console.log(`${this.pageName} aboutToAppear,页面隐藏完成`)
  }

  aboutToDisappear() {
    console.log(`${this.pageName} aboutToAppear,页面销毁完成`)
  }

  build() {
    Column({space:35}) {
      Row(){
        Text(this.pageName)
          .fontSize(30)
          .fontWeight(FontWeight.Bold)
      }
      .margin({top:35})

      Row({space:5}){
        Button("push 跳转Page2")
          .onClick(()=>{
            router.pushUrl({
              url:"pages/LifeCyclePage2"
            })
          })

        Button("replace 跳转Page2")
          .onClick(()=>{
            router.replaceUrl({
              url:"pages/LifeCyclePage2"
            })
          })
      }
    }
    .height('100%')
    .width("100%")
  }
}
LifeCyclePage2.ets
import router from '@ohos.router'
@Entry
@Component
struct LifeCyclePage2 {
  pageName: string = "LifeCycle Page2"

  aboutToAppear() {
    console.log(`${this.pageName} aboutToAppear,页面创建完成`)
  }

  onBackPress() {
    console.log(`${this.pageName} aboutToAppear,页面返回前触发`)
  }

  onPageShow() {
    console.log(`${this.pageName} aboutToAppear,页面显示完成`)
  }

  onPageHide() {
    console.log(`${this.pageName} aboutToAppear,页面隐藏完成`)
  }

  aboutToDisappear() {
    console.log(`${this.pageName} aboutToAppear,页面销毁完成`)
  }

  build() {
    Column({space:35}) {
      Row(){
        Text(this.pageName)
          .fontSize(30)
          .fontWeight(FontWeight.Bold)
      }
      .margin({top:35})

      Row({space:5}){
        Button("push 跳转Page1")
          .onClick(()=>{
            router.pushUrl({
              url:"pages/LifeCyclePage1"
            })
          })

        Button("replace 跳转Page1")
          .onClick(()=>{
            router.replaceUrl({
              url:"pages/LifeCyclePage1"
            })
          })
      }
    }
    .height('100%')
    .width("100%")
  }
}
首先点击 “push跳转” 按钮,查看打印结果
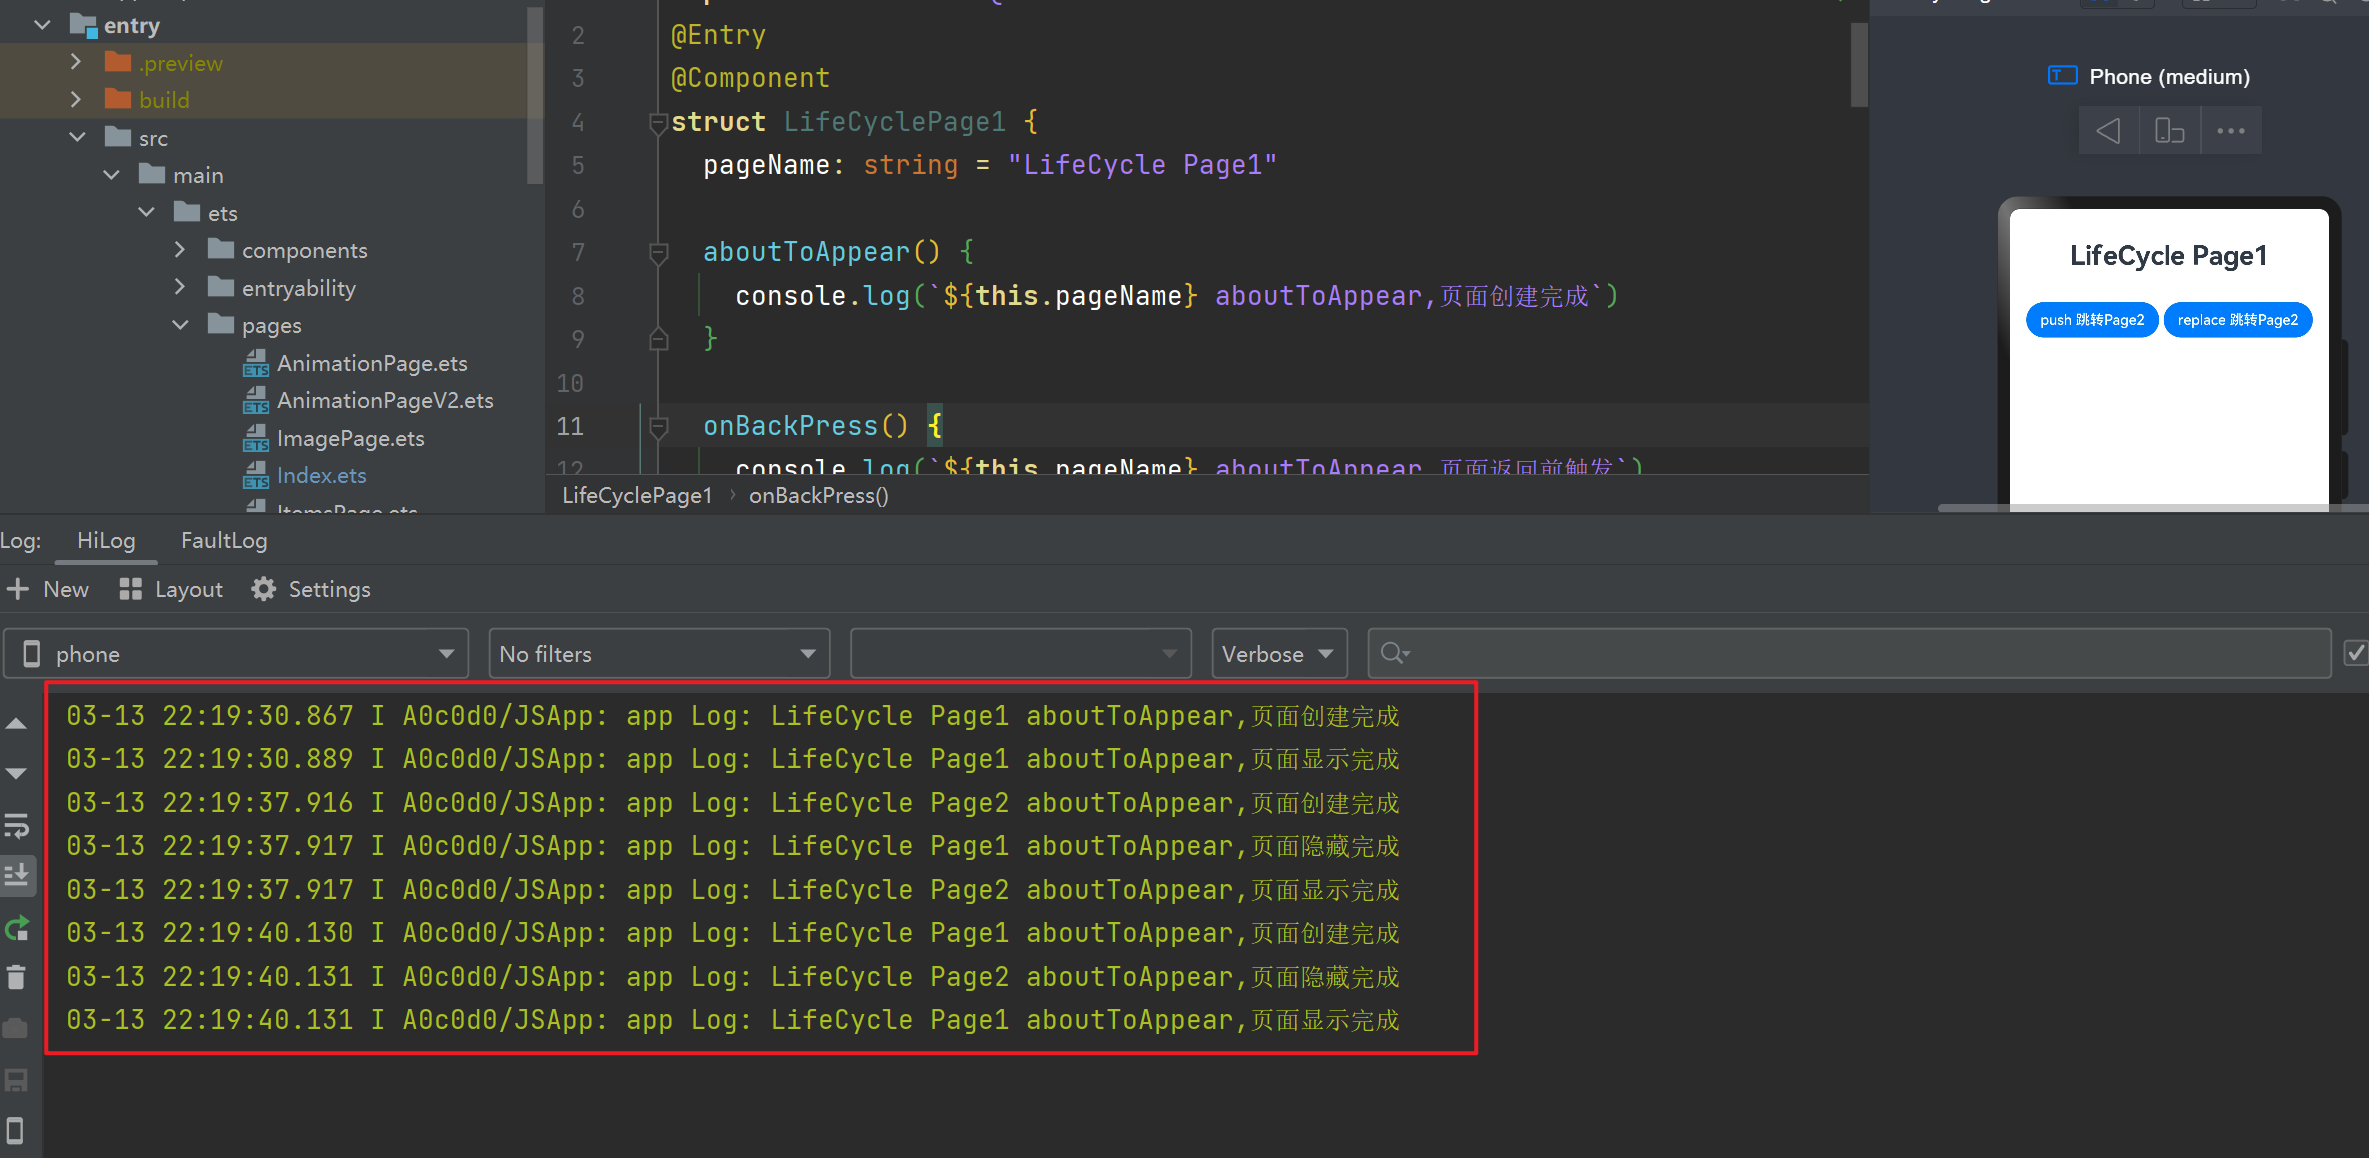
会发现在不断地触发创建和隐藏钩子,但是没有触发
aboutToDisappear页面销毁钩子,这说明通过push方式跳转的页面,系统会帮我们做缓存
接下来点击 “replace跳转” 按钮,查看打印结果
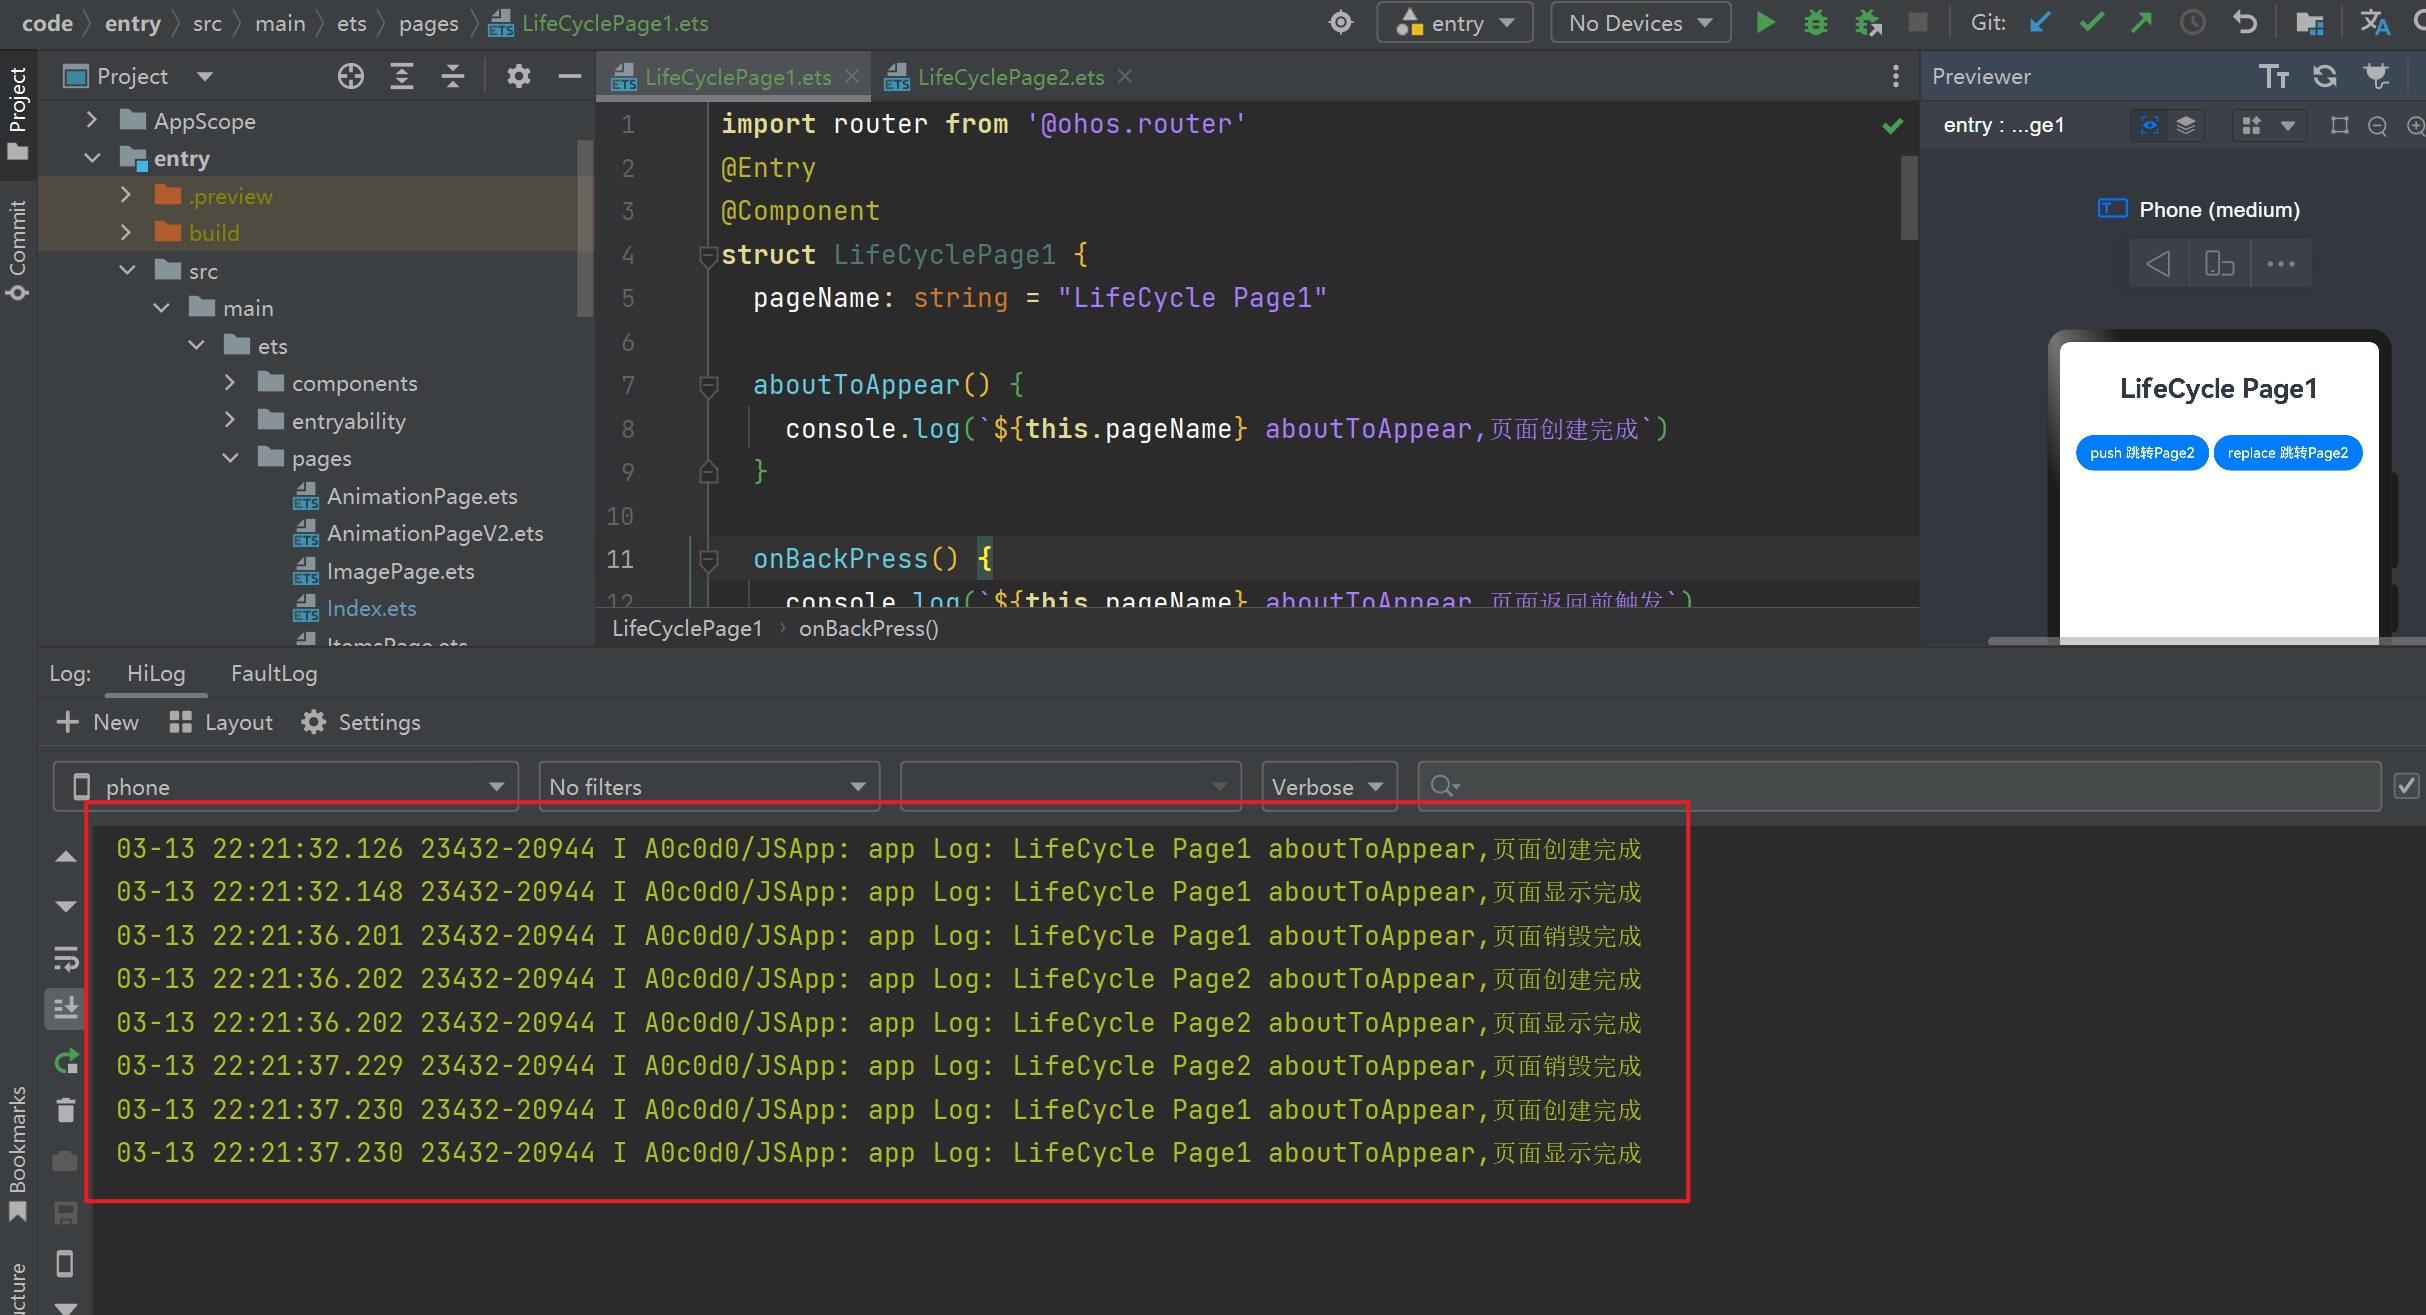
发现通过 replace 跳转会触发上一页面的销毁钩子
UIAbility的启动模式
模式介绍
| 模式类型 | 作用 |
|---|---|
| singleton | 每一个UIAbility只存在唯一实例。是默认启动模式,任务列表中只会存在一个相同的UIAbility |
| standard | 每次启动UIAbility都会创建一个实例。任务列表中会存在多个相同的UIAbility |
| specified | 每个UIAbility实例可以设置key标识,启动UIAbility时,需要指定Key,存在相同的Key的实力会直接被拉起,不存在则创建一个新的实例 |
案例演示
下面我们来使用一下 specified 模式
首先新建 pages/DocumentPage.ets 页面
import { Header } from '../components/Header'
import common from '@ohos.app.ability.common'
import Want from '@ohos.app.ability.Want'
@Entry
@Component
struct DocumentPage {
  @State index: number = 1
  @State documentList:number[] = []

  context = getContext(this) as common.UIAbilityContext

  build() {
    Column() {
      Header({title:"文档列表"})

      Column({space:15}){
        Row(){
          Button("添加文档")
            .onClick(()=>{
              this.documentList.push(this.index)

              let want:Want = {
                deviceId:"",// deviceId为空表示本设备
                bundleName:"com.example.myapplication", // 包的名称,对应AppScope/app.json5的app.bundleName
                abilityName:"DocumentAbility", // 要跳转到目标ability名称
                moduleName:"entry", // 当前的模块名称
                parameters:{
                  instanceKey: this.index // 传过去的key
                }
              }

              // 跳转到一个新的Ability
              this.context.startAbility(want)

              this.index++
            })
        }

        ForEach(this.documentList,id=>{
          Row({space:15}){
            Image($r("app.media.doc"))
              .width(25)

            Text(`文档${id}`)
              .fontSize(20)
              .fontWeight(FontWeight.Bold)
              .onClick(()=>{
                let want:Want = {
                  deviceId:"",// deviceId为空表示本设备
                  bundleName:"com.example.myapplication", // 包的名称,对应AppScope/app.json5的app.bundleName
                  abilityName:"DocumentAbility", // 要跳转到目标ability名称
                  moduleName:"entry", // 当前的模块名称
                  parameters:{
                    instanceKey: id // 传过去的key
                  }
                }
                // 跳转到一个新的Ability
                this.context.startAbility(want)
              })
          }
          .width("100%")
        })
      }
      .width('100%')
      .height('100%')
      .padding(15)
    }
    .width('100%')
    .height('100%')
  }
}
接着新建文档编辑页面 pages/DocumentEdit.ets
import Want from '@ohos.app.ability.Want'
import common from '@ohos.app.ability.common'
@Entry
@Component
struct DocumentEdit {
  @State docEdit: boolean = true
  @State docName: string = ""
  context = getContext(this) as common.UIAbilityContext

  onPageShow(){
    let abilityInfo = this.context
    console.log(`DocumnetAbility: ${JSON.stringify(abilityInfo)}`)
  }

  build() {
    Column() {
      Row({ space: 15 }) {
        Image($r("app.media.back"))
          .width(25)
        .onClick(()=>{
          let want:Want = {
            deviceId:"",// deviceId为空表示本设备
            bundleName:"com.example.myapplication", // 包的名称,对应AppScope/app.json5的app.bundleName
            abilityName:"EntryAbility", // 要跳转到目标ability名称
            moduleName:"entry", // 当前的模块名称
          }
          // 跳转到一个新的Ability
          this.context.startAbility(want)
        })

        if(this.docEdit){
          TextInput({
            placeholder: "请输入文档名称",
            text: this.docName
          })
            .onChange(val=>{
              this.docName = val
            })
            .layoutWeight(1)
        }else {
          Text(this.docName)
            .fontSize(25)
            .layoutWeight(1)
        }


        Button("确定")
          .onClick(() => {
            this.docEdit = !this.docEdit
          })
      }
      .width('100%')

      Row(){
        TextArea({
          placeholder: 'The text area can hold an unlimited amount of text. input your word...',
        })
          .placeholderFont({ size: 16, weight: 400 })
          .fontSize(16)
          .fontColor('#182431')
          .height("98%")
      }
      .width('100%')
      .layoutWeight(1)
    }
    .width('100%')
    .height('100%')
    .padding(15)
  }
}
然后再首页中添加跳转按钮
import router from '@ohos.router'

class RouterItem {
  url: string
  title: string

  constructor(url, title) {
    this.url = url
    this.title = title
  }
}

@Entry
@Component
struct Index {
  @State message: string = '页面列表'
  routerList: RouterItem[] = [
    new RouterItem("pages/ImagePage", "查看图片页面"),
    new RouterItem("pages/ItemsPage", "商品列表页面"),
    new RouterItem("pages/StatePage", "Jack和他的女朋友们"),
    new RouterItem("pages/TaskListPage", "任务列表"),
    new RouterItem("pages/AnimationPage", "小鱼动画"),
    new RouterItem("pages/AnimationPageV2", "小鱼动画V2"),
    new RouterItem("pages/LifeCyclePage", "生命周期案例1"),
    new RouterItem("pages/LifeCyclePage1", "生命周期案例2"),
    new RouterItem("pages/DocumentPage", "文档列表页面"),
  ]

  tag: string = "Index Page"

  aboutToAppear(){
    console.log(`${this.tag} aboutToAppear,页面创建完成`)
  }

  onBackPress(){
    console.log(`${this.tag} aboutToAppear,页面返回前触发`)
  }

  onPageShow(){
    console.log(`${this.tag} aboutToAppear,页面显示完成`)
  }

  onPageHide(){
    console.log(`${this.tag} aboutToAppear,页面隐藏完成`)
  }

  aboutToDisappear(){
    console.log(`${this.tag} aboutToAppear,页面销毁完成`)
  }

  build() {
    Column() {
      Row() {
        Text(this.message)
          .fontSize(50)
          .fontWeight(FontWeight.Bold)
          .fontColor("#36d")
      }

      List({ space: 20 }) {
        ForEach(this.routerList, (r: RouterItem, index: number) => {
          ListItem() {
            RouterItemBox({
              item: r,
              rid: index + 1
            })
          }
        })
      }
      .width("100%")
      .margin({ top: 35 })
      .layoutWeight(1)
    }
    .width('100%')
    .height("100%")
    .padding(15)
  }
}

@Component
struct RouterItemBox {
  item: RouterItem
  rid: number

  build() {
    Row() {
      Text(`${this.rid}.`)
        .fontColor(Color.White)
        .fontSize(18)
        .fontWeight(FontWeight.Bold)
      Blank()
      Text(`${this.item.title}`)
        .fontColor(Color.White)
        .fontSize(18)
        .fontWeight(FontWeight.Bold)
    }
    .width("100%")
    .padding({
      top: 15,
      right: 25,
      bottom: 15,
      left: 25
    })
    .backgroundColor("#36D")
    .borderRadius(30)
    .shadow({
      radius: 8,
      color: "#ff484848",
      offsetX: 5,
      offsetY: 5
    })
    .justifyContent(FlexAlign.SpaceBetween)
    .onClick(() => {
      router.pushUrl(
        {
          url: this.item.url
        },
        router.RouterMode.Single,
        err => {
          if(err){
            console.log(`页面跳转出错,errCode:${err.code},errMsg:${err.message}`)
          }
        }
      )
    })
  }
}
然后再 ets 文件夹右键,选择新建一个 Ability,名称是 DocumentAbility.ts
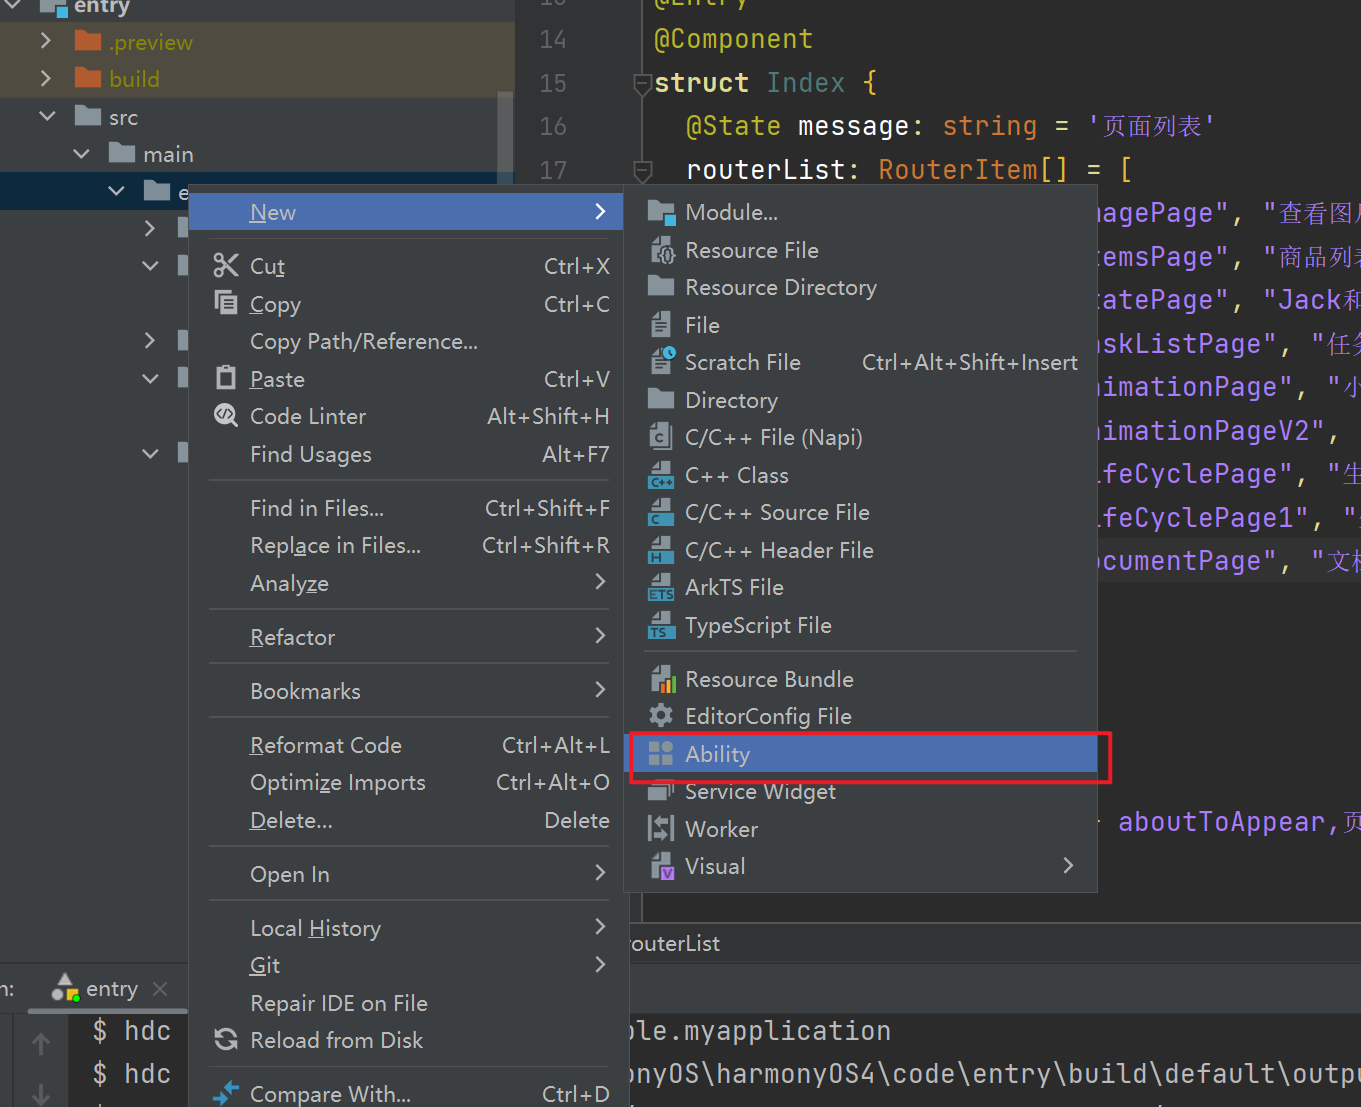
完成之后会自动帮我们创建好文件,将 DocumentAbility.ts 文件中的默认打开页面修改成文档编辑页面
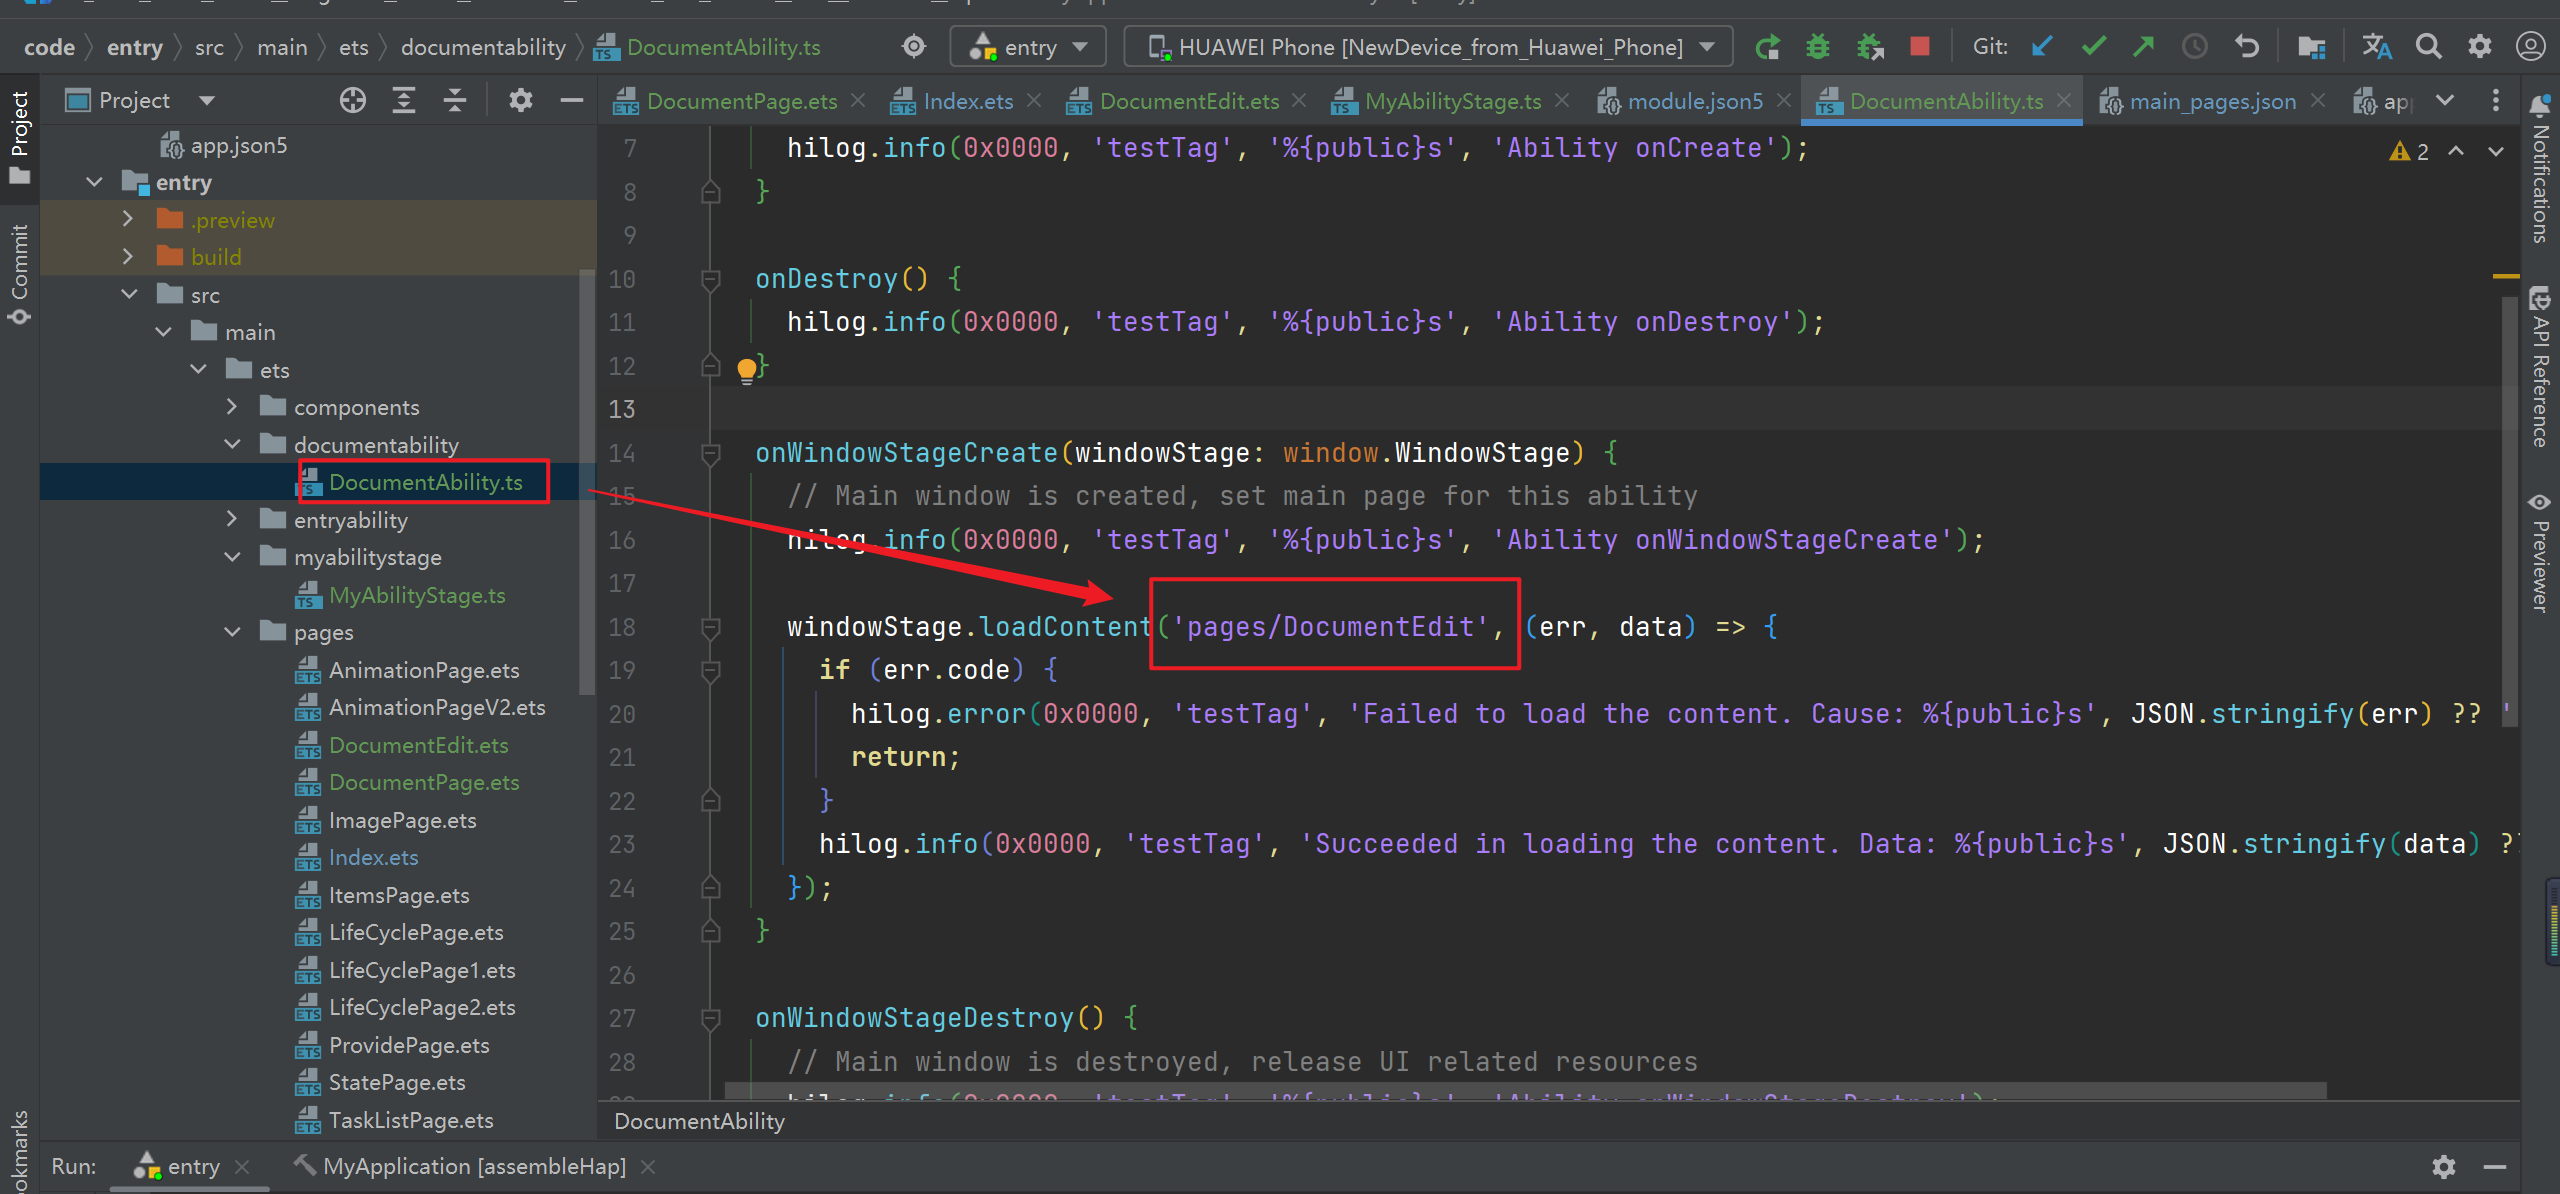
接着修改 src/main/resources/base/profile/main_pages.json ,设置 DocumentAbility 的启动模式为 specified
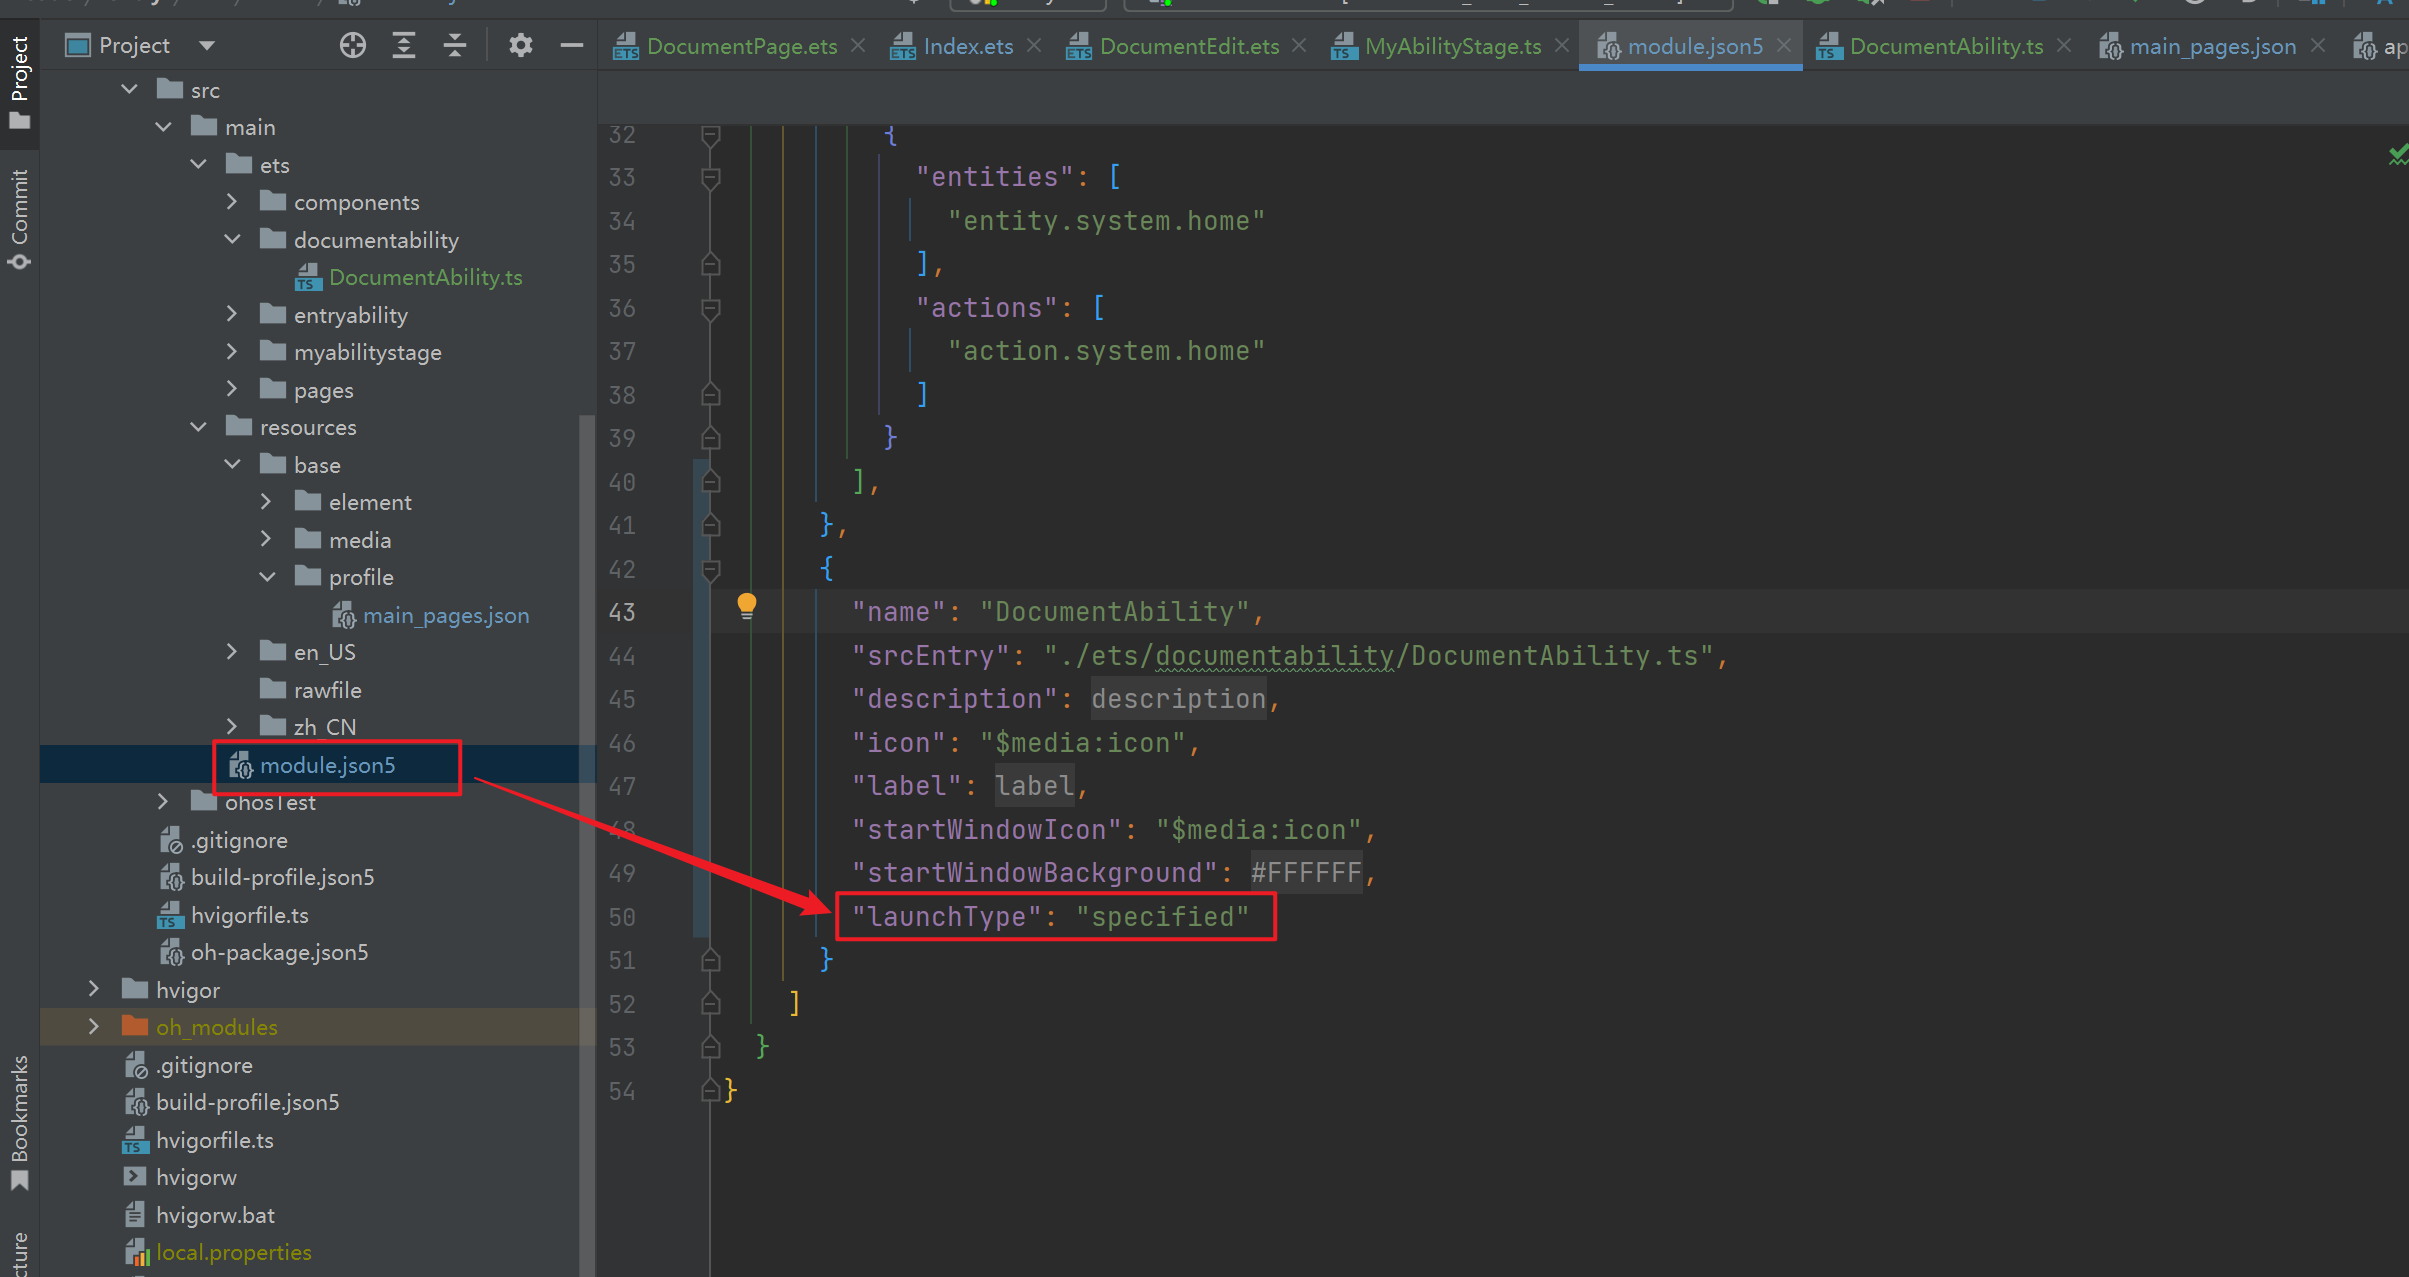
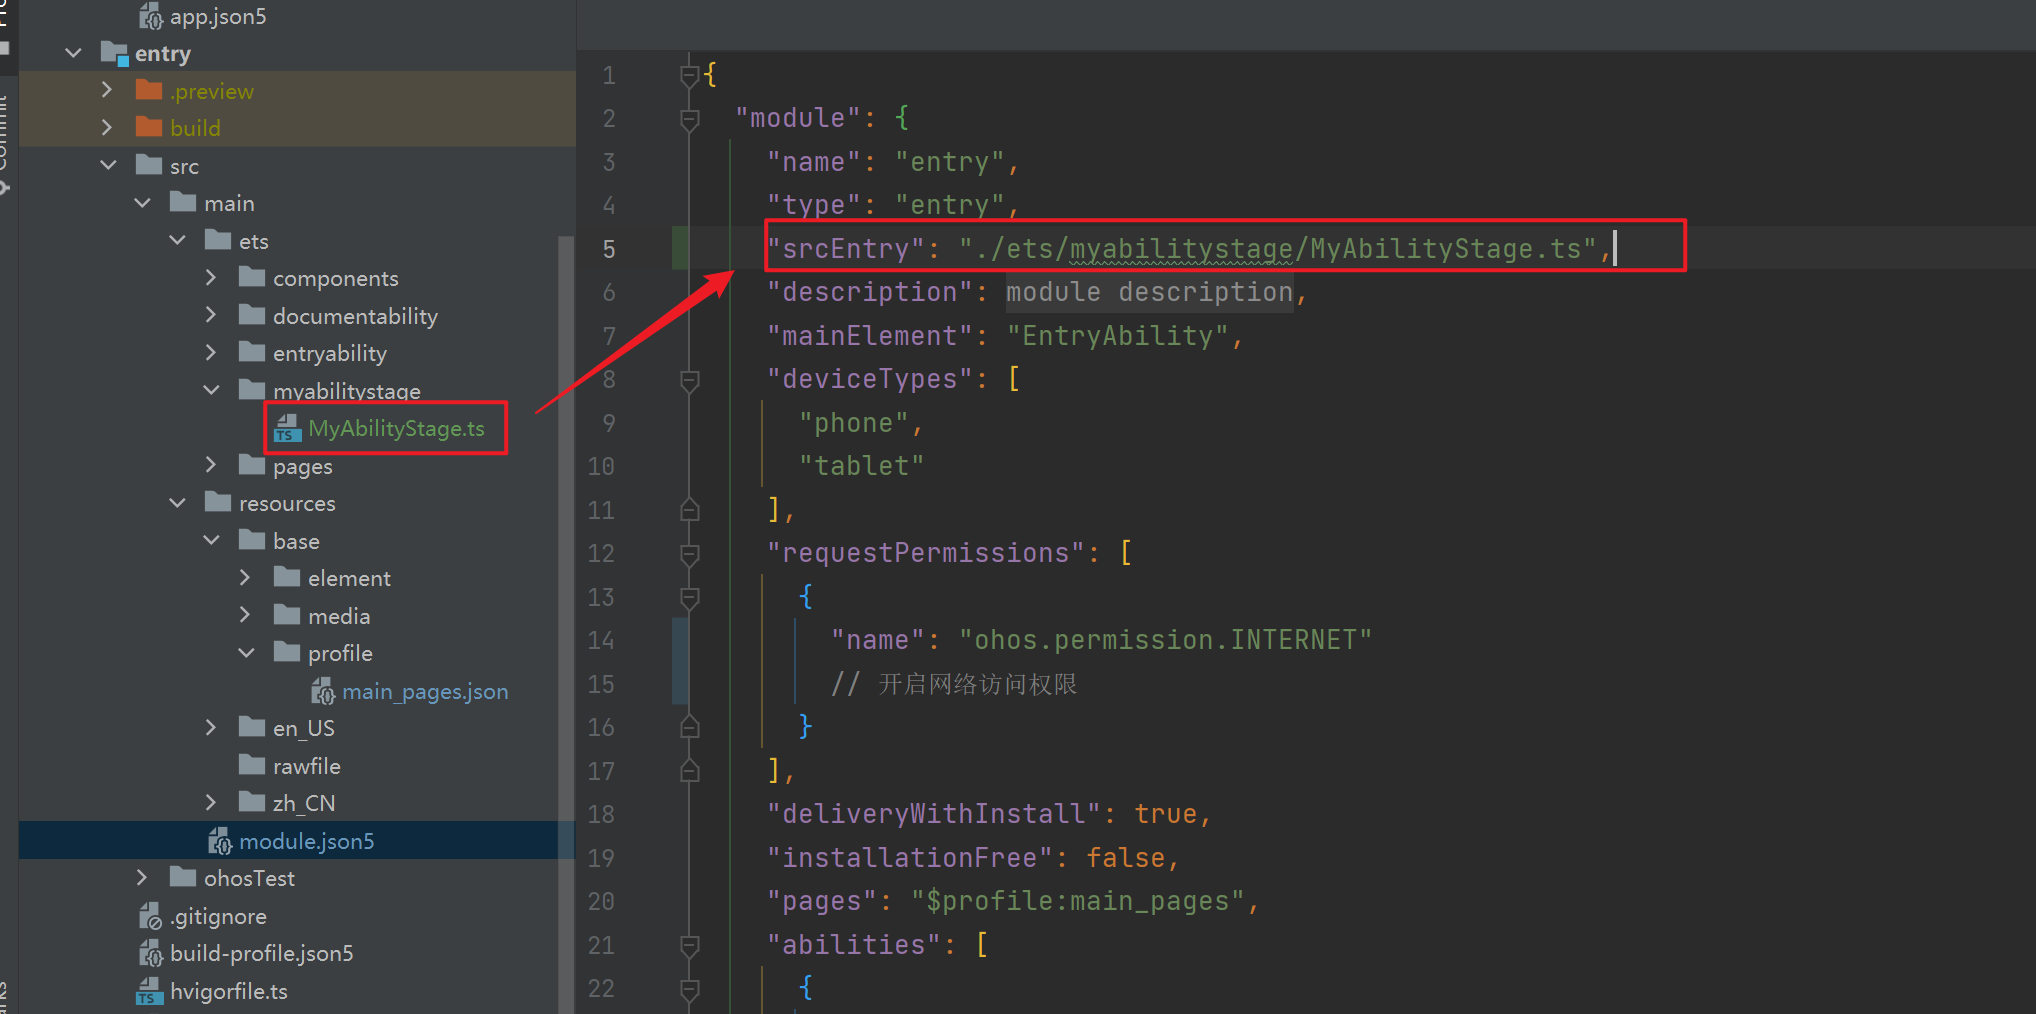
然后新建 src/main/ets/myabilitystage/MyAbilityStage.ts 接收key,并返回一个新的key
import AbilityStage from '@ohos.app.ability.AbilityStage';
import Want from '@ohos.app.ability.Want';
export default class MyAbility extends AbilityStage{
  onAcceptWant(want:Want): string{
    // 判断被启动的Ability的名称
    if(want.abilityName === "DocumentAbility"){
      return `DocumentAbility_${want.parameters.instanceKey}`
    }
    return ""
  }
}
然后在 src/main/ets/myabilitystage/MyAbilityStage.ts 中指定 srcEntry
现在启动手机模拟器,查看效果,通过动画我们就实现根据Key打开Ability
网络请求
内置的Httprequest请求
准备node服务
需要安装 express
npm install express
新建 nodeServe/index.js
let express = require('express');
let app = express();
let allData = require("./data.json")
app.use('/images', express.static('images')); // 设置静态资源目录

app.get("/shop", (req, res) => {
    console.log(req.query,'接收的参数')
    let {pageNo, pageSize} = req.query
    // 确保pageNo和pageSize是正整数
    pageNo = Math.max(1, parseInt(pageNo, 10));
    pageSize = Math.max(1, parseInt(pageSize, 10));
    // 计算起始索引和结束索引
    let startIndex = (pageNo - 1) * pageSize;
    let endIndex = startIndex + pageSize;
    // 返回当前页的数据
    let currentPageData = allData.slice(startIndex, endIndex);
    // 返回总页数
    let totalPages = Math.ceil(allData.length / pageSize);
    res.send({
        code: "200",
        data: {
            total: allData.length,
            rows: currentPageData,
            totalPages: totalPages
        }
    })
})

app.listen(3000, () => {
    console.log(`服务启动成功 http://localhost:3000`)
})
准备json数据,新建 data.json 文件,内容如下,这个文件模拟了10条数据
[{"id":1,"name":"新白鹿烤鱼餐厅(西湖店)","images":["/images/1.jpg"],"area":"西湖区","address":"西湖大道1号西湖天地F5","avgPrice":61,"comments":8045,"score":47,"openHours":"11:00-21:00"},{"id":2,"name":"两岸咖啡(下城区店)","images":["/images/2.jpg","/images/3.jpg"],"area":"下城区","address":"中山路5号下城区广场F7","avgPrice":80,"comments":1500,"score":39,"openHours":"09:00-23:00"},{"id":3,"name":"味庄餐厅(上城区店)","images":["/images/4.jpg","/images/5.jpg"],"area":"上城区","address":"清泰街5号上城区购物中心F4","avgPrice":55,"comments":5689,"score":43,"openHours":"11:00-21:00"},{"id":4,"name":"杭州小笼包(拱墅区店)","images":[],"area":"拱墅区","address":"莫干山路2号拱墅区购物中心F2","avgPrice":48,"comments":4500,"score":42,"openHours":"07:00-21:00"},{"id":5,"name":"咖啡时光(江干区店)","images":[],"area":"江干区","address":"钱塘路10号江干区广场F1","avgPrice":75,"comments":3200,"score":41,"openHours":"10:00-22:00"},{"id":6,"name":"大福来餐厅(滨江店)","images":[],"area":"滨江区","address":"江南大道6号滨江购物中心F6","avgPrice":68,"comments":2900,"score":40,"openHours":"11:30-21:30"},{"id":7,"name":"老杭州餐厅(下城区店)","images":[],"area":"下城区","address":"中山路3号下城区广场F3","avgPrice":58,"comments":6500,"score":45,"openHours":"10:30-20:30"},{"id":8,"name":"豪客来牛排馆(江干区店)","images":[],"area":"江干区","address":"钱塘路8号江干区广场F8","avgPrice":95,"comments":1200,"score":38,"openHours":"11:00-21:00"},{"id":9,"name":"小尾羊火锅(上城区店)","images":[],"area":"上城区","address":"清泰街10号上城区购物中心F10","avgPrice":70,"comments":0,"score":37,"openHours":"11:00-21:00"},{"id":10,"name":"新概念咖啡(下城区店)","images":[],"area":"下城区","address":"中山路12号下城区广场F8","avgPrice":50,"comments":1000,"score":36,"openHours":"08:00-22:00"}]
然后启动 node 服务
node index.js

测试服务是否正常运行

viewModel
新建 src/main/ets/viewModel,这个文件用来放所有页面模型数据
在该文件夹下添加如下文件
ShopInfo.ts
export default class ShopInfo{
  id: number
  name: string
  images: string[]
  area: string
  address: string
  avgPrice: number
  comments: number
  score: number
  openHours: string
}
ResponseInfo.ts
class responseData{
  total: number
  totalPages: number
  rows: any[]
}

export default class ResponseInfo{
  code: number
  data: responseData
}
model
新建 src/main/ets/model 文件夹,这个文件夹用来放有关请求的文件
在该文件夹下新增
ShopModel.ts
import http from '@ohos.net.http'
import ResponseInfo from '../viewModel/ResponseInfo'

class ShopModel {
  pageNo: number = 1
  pageSize: number = 3
  baseUrl: string = "http://localhost:3000"

  buildUrl(url) {
    return `${this.baseUrl}${url}`
  }

  getListFun(): Promise<ResponseInfo> {
    return new Promise((resolve, reject) => {
      // 1.创建Http请求对象
      let httpRequest = http.createHttp()
      // 2.发送请求体
      httpRequest.request(
        // 请求路径
        this.buildUrl(`/shop?pageNo=${this.pageNo}&pageSize=${this.pageSize}}`),
        // 请求体
        {
          method: http.RequestMethod.GET,  // 请求方式
        })
        .then(res => {
          // 3.拿到请求结果
          if (res.responseCode === 200) {
            resolve(JSON.parse(res.result.toString()))
          } else {
            console.log(`请求失败:${JSON.stringify(res)}`)
            reject()
          }
        })
        .catch(err => {
          console.log(`请求失败:${JSON.stringify(err)}`)
          reject()
        })
    })
  }
}

export default new ShopModel()
pages
新建页面 ShopPage.ets
import { Header } from '../components/Header'
import ShopInfo from '../viewModel/ShopInfo'
import { ShopItem } from '../views/ShopItem'
import ShopModel from "../model/ShopModel"

@Entry
@Component
struct ShopPage {
  @State shopList: ShopInfo[] = []
  @State total: number = 0
  @State isLoading: boolean = false

  aboutToAppear() {
    this.getShopList()
  }

  build() {
    Column() {
      Header({ title: "商铺列表" })

      List({ space: 10 }) {
        ForEach(this.shopList, (shop: ShopInfo, index: number) => {
          ListItem() {
            ShopItem({ shop: shop })
          }
        })
      }
      .layoutWeight(1)
      .width('100%')
      .padding(10)
      .onReachEnd(()=>{
        console.log("触底")
        // 页面触底方法
        if(!this.isLoading && this.shopList.length < this.total){
          this.isLoading = true
          ShopModel.pageNo++
          this.getShopList()
          console.log("触底加载")
        }
      })

    }
    .width('100%')
    .height('100%')
    .backgroundColor("#ececec")
  }

  getShopList() {
    ShopModel.getListFun().then(res => {
      const shops = res.data.rows
      shops.forEach(item=>{
        if(item.images && item.images.length > 0){
          item.images.forEach((img,i)=>{
            item.images[i] = `http://localhost:3000` + img
          })
        }else{
          item.images = [$r("app.media.mt")]
        }
      })

      this.shopList = this.shopList.concat(shops)
      this.total = res.data.total // 获取总数
      this.isLoading = false
    })
  }
}
里面用到了 ShopItem 组件,代码如下
view
新建 src/main/ets/views 文件夹,我们将页面用到的组件都放在这个文件夹中
新增 ShopItem.ets
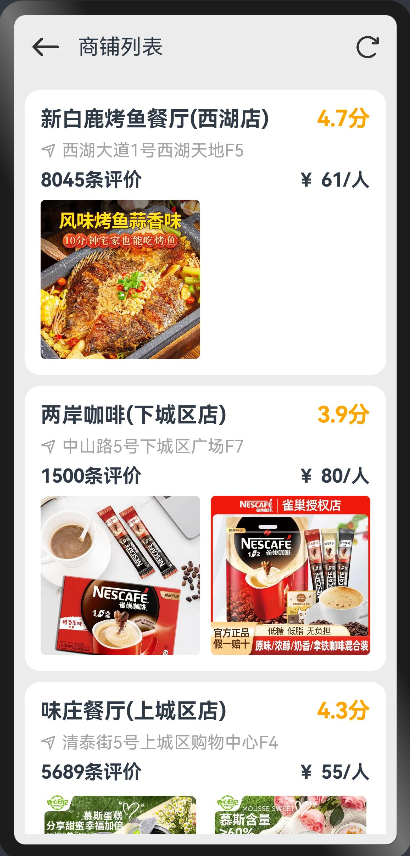
import ShopInfo from '../viewModel/ShopInfo'
@Component
export struct ShopItem {
  shop: ShopInfo

  build() {
    Column({space:8}){
      Row(){
        Text(this.shop.name)
          .fontSize(20)
          .fontWeight(FontWeight.Bold)

        Text(`${this.computedScore(this.shop.score)}分`)
          .fontColor(Color.Orange)
          .fontSize(21)
          .fontWeight(FontWeight.Bold)
      }
      .width("100%")
      .justifyContent(FlexAlign.SpaceBetween)

      Row({space:5}){
        Image($r("app.media.dh"))
          .width(15)

        Text(this.shop.address)
          .fontColor("#a3a3a3")
      }
      .width("100%")

      Row(){
        Text(`${this.shop.comments}条评价`)
          .fontSize(18)
          .fontWeight(FontWeight.Bold)

        Text(`¥ ${this.shop.avgPrice}/人`)
          .fontSize(18)
          .fontWeight(FontWeight.Bold)
      }
      .width("100%")
      .justifyContent(FlexAlign.SpaceBetween)

      List({space:10}){
        ForEach(this.shop.images,src=>{
          ListItem(){
            Image(src)
              .width(150)
              .borderRadius(5)
          }
        })
      }
      .width("100%")
      .listDirection(Axis.Horizontal) // 水平滑动
    }
    .width("100%")
    .padding(15)
    .borderRadius(15)
    .backgroundColor(Color.White)
  }

  computedScore(score:number){
    return (score / 10).toFixed(1)
  }
}
实现效果
总结
上面商铺列表的核心请求逻辑在 ShopModel.ts 文件中,主要代码利用了内置的 httpRequest 来完成请求
// 1.创建Http请求对象
let httpRequest = http.createHttp()
// 2.发送请求体
httpRequest.request(
    // 请求路径
    this.buildUrl(`/shop?pageNo=${this.pageNo}&pageSize=${this.pageSize}}`),
    // 请求体
    {
        method: http.RequestMethod.GET,  // 请求方式
    }
)
.then(res => {
    // 3.拿到请求结果
    if (res.responseCode === 200) {
        resolve(JSON.parse(res.result.toString()))
    } else {
        console.log(`请求失败:${JSON.stringify(res)}`)
        reject()
    }
})
.catch(err => {
    console.log(`请求失败:${JSON.stringify(err)}`)
    reject()
})
第三方库Axios使用
工具安装
首先需要安装一个命令行工具
打开官网相关文档,点击如下按钮
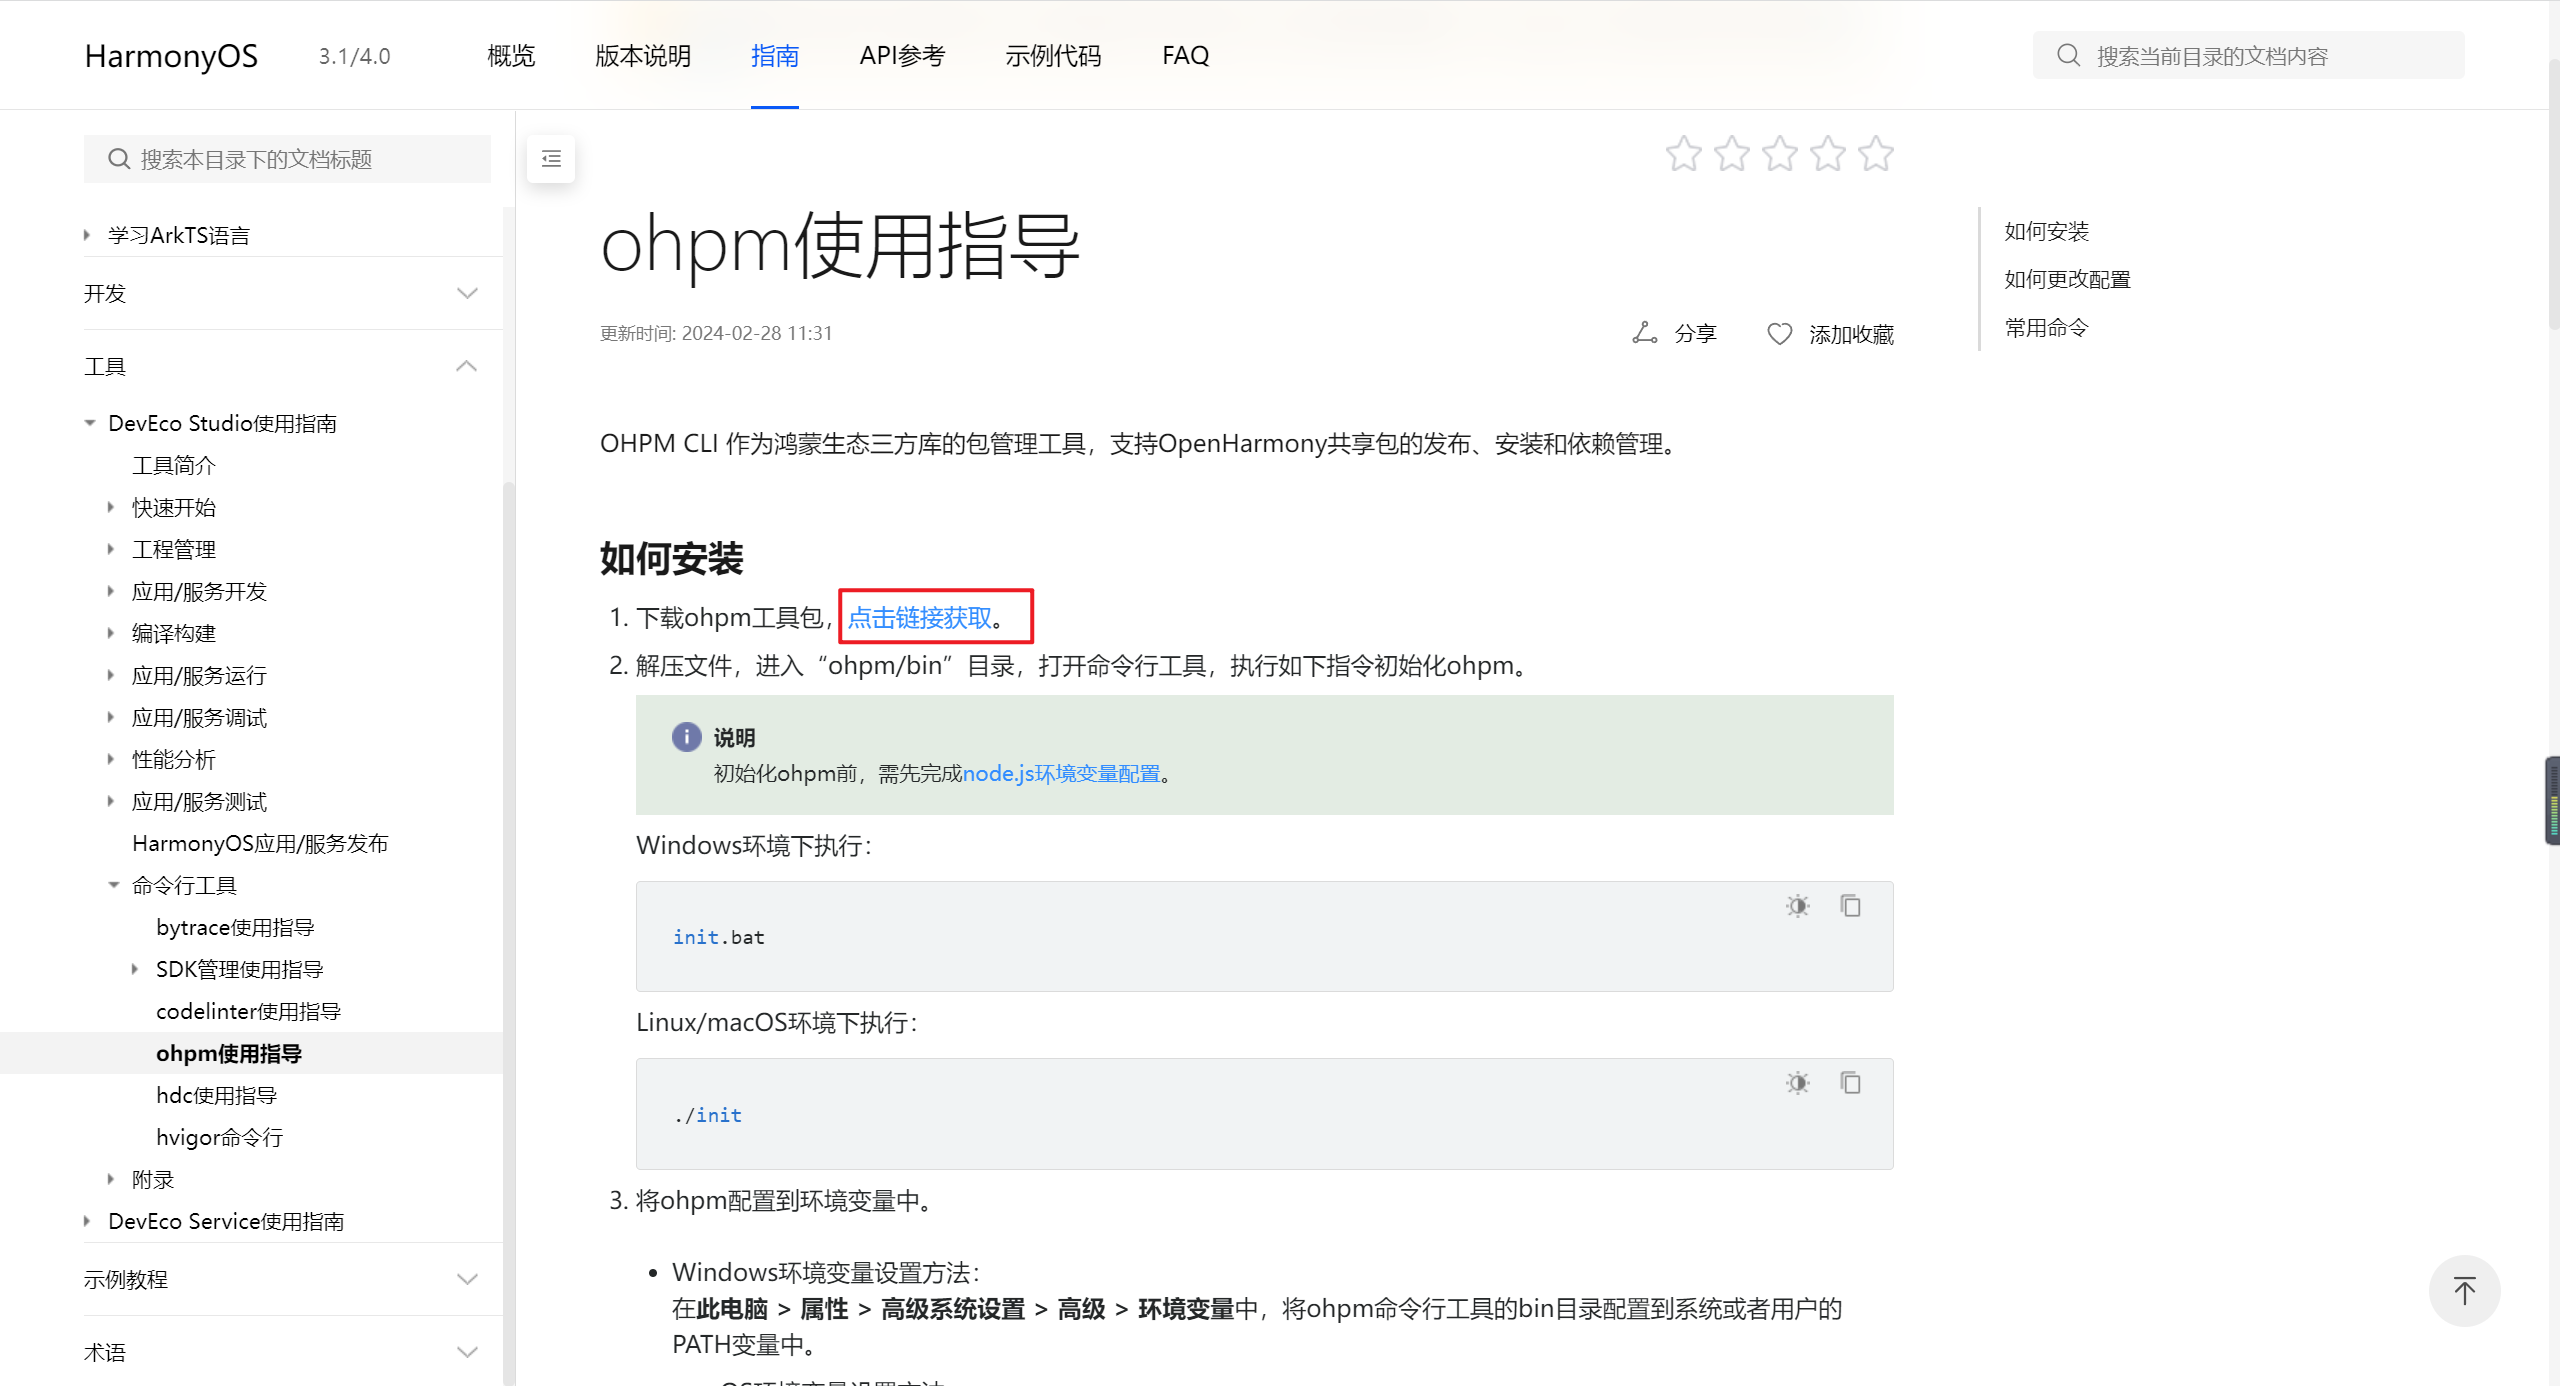
选择自己的系统进行下载
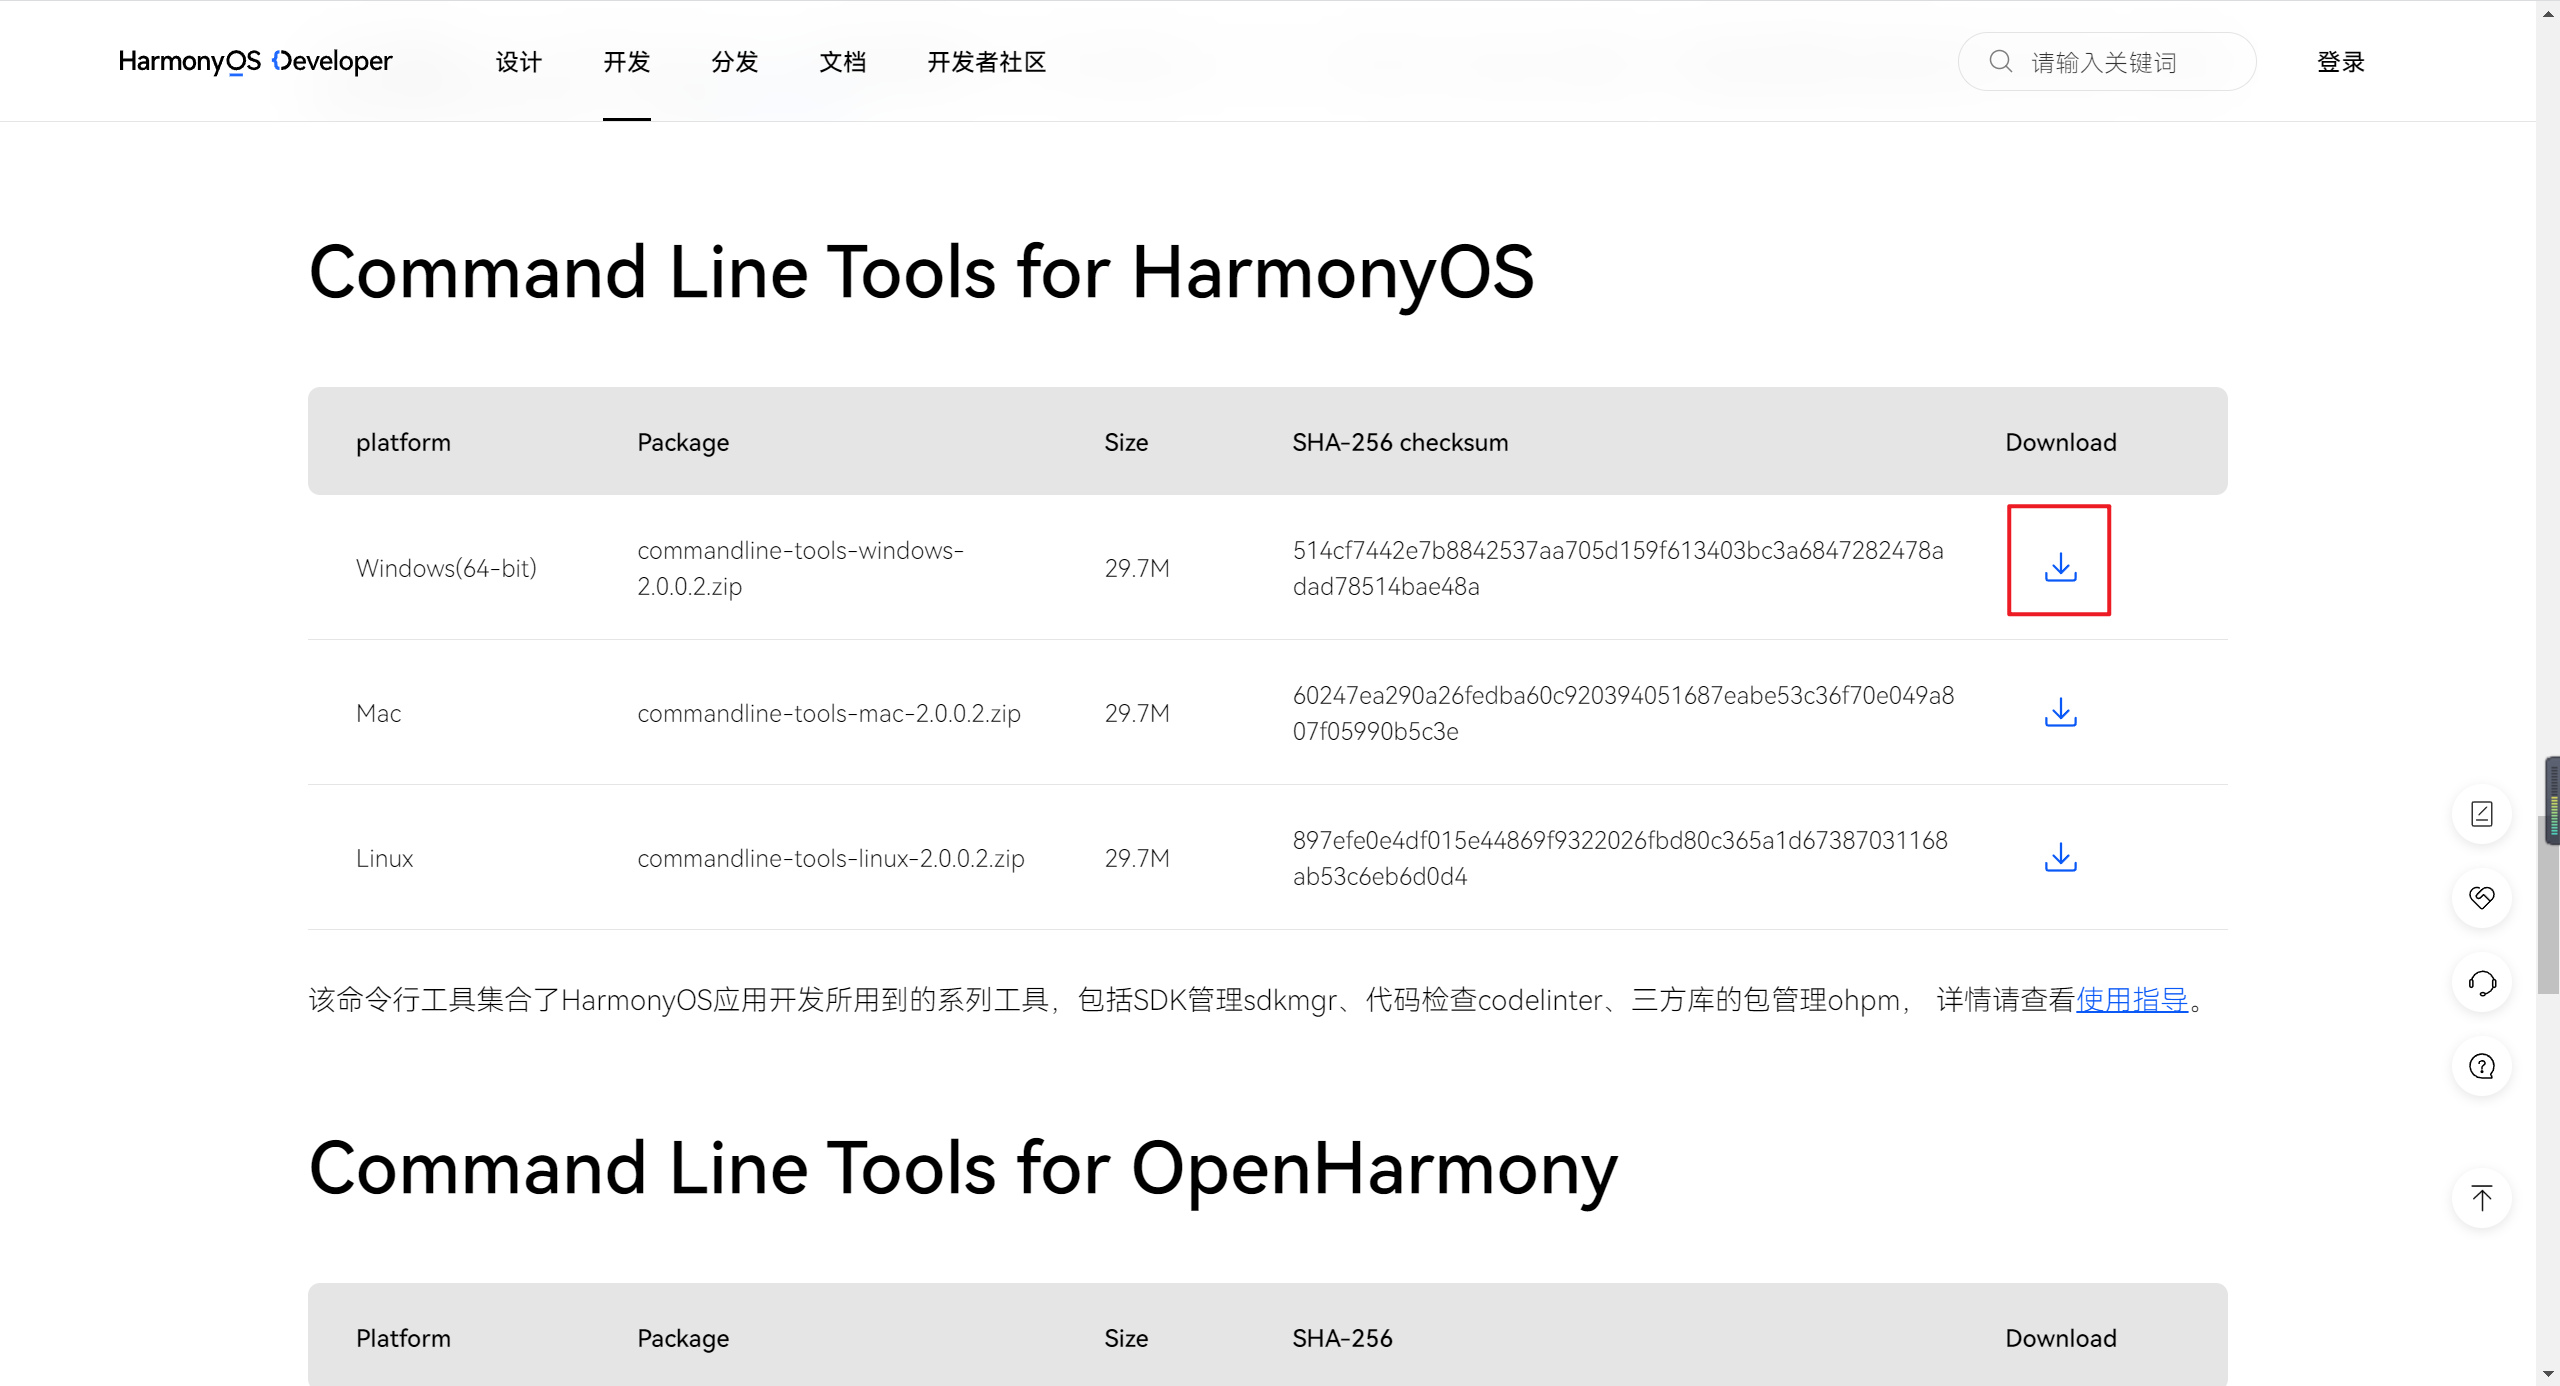
下载好之后,进入ohpm/bin 目录下,执行 init.bat
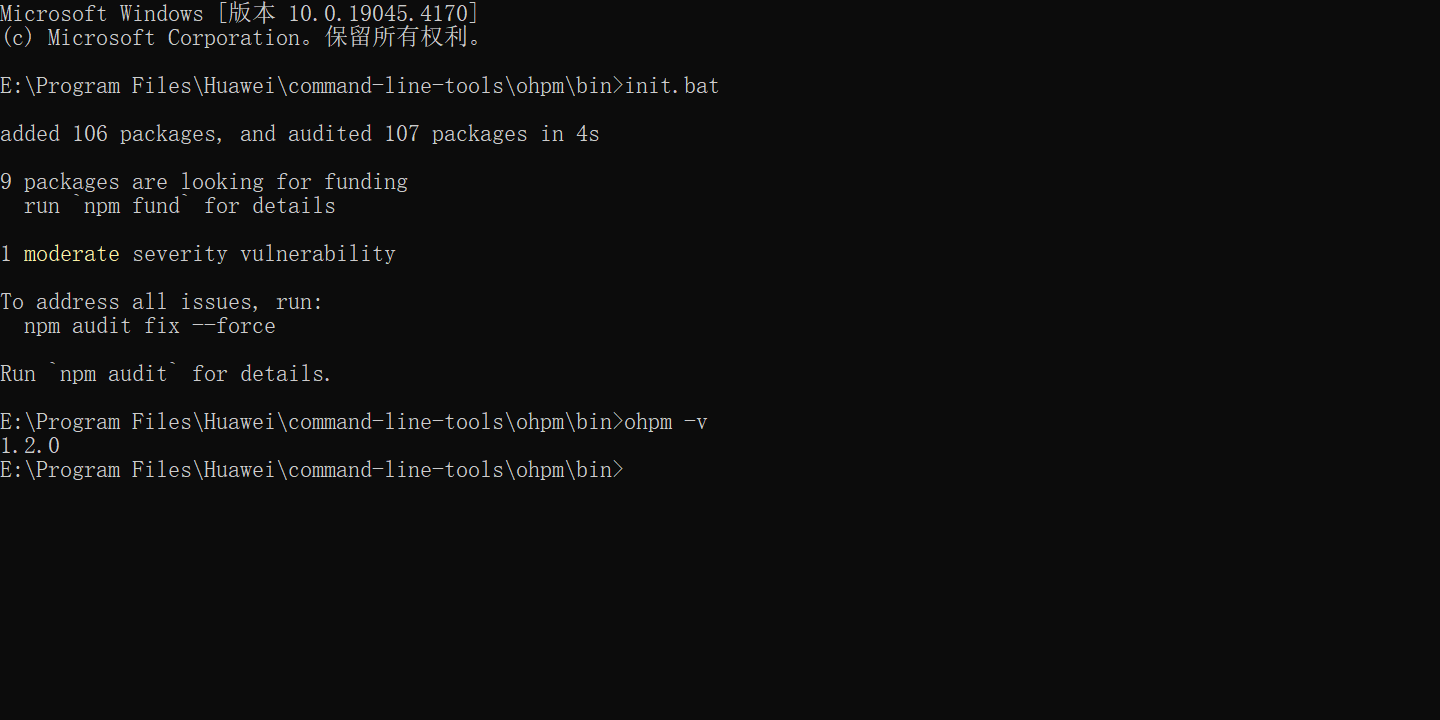
然后等待安装完成后,输入 ohpm -v 查看版本
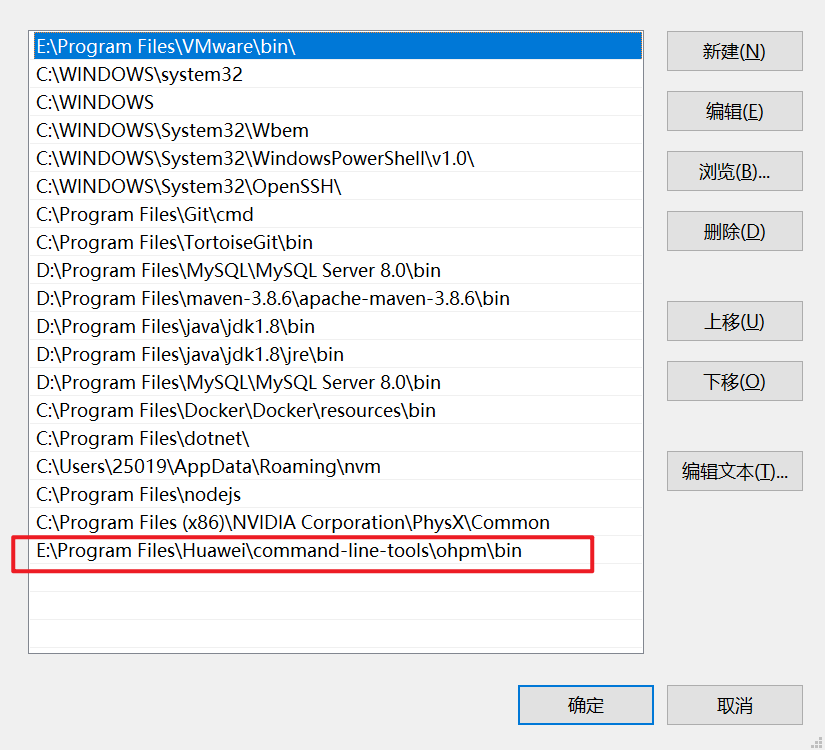
接着配置环境变量
将 bin 目录的位置添加到环境变量中
然后再随便目录下查看版本

可以出现版本号表示安装成功
安装axios
打开**OpenHarmony三方库中心仓**网站,搜索 axios 即可查看安装和使用方式
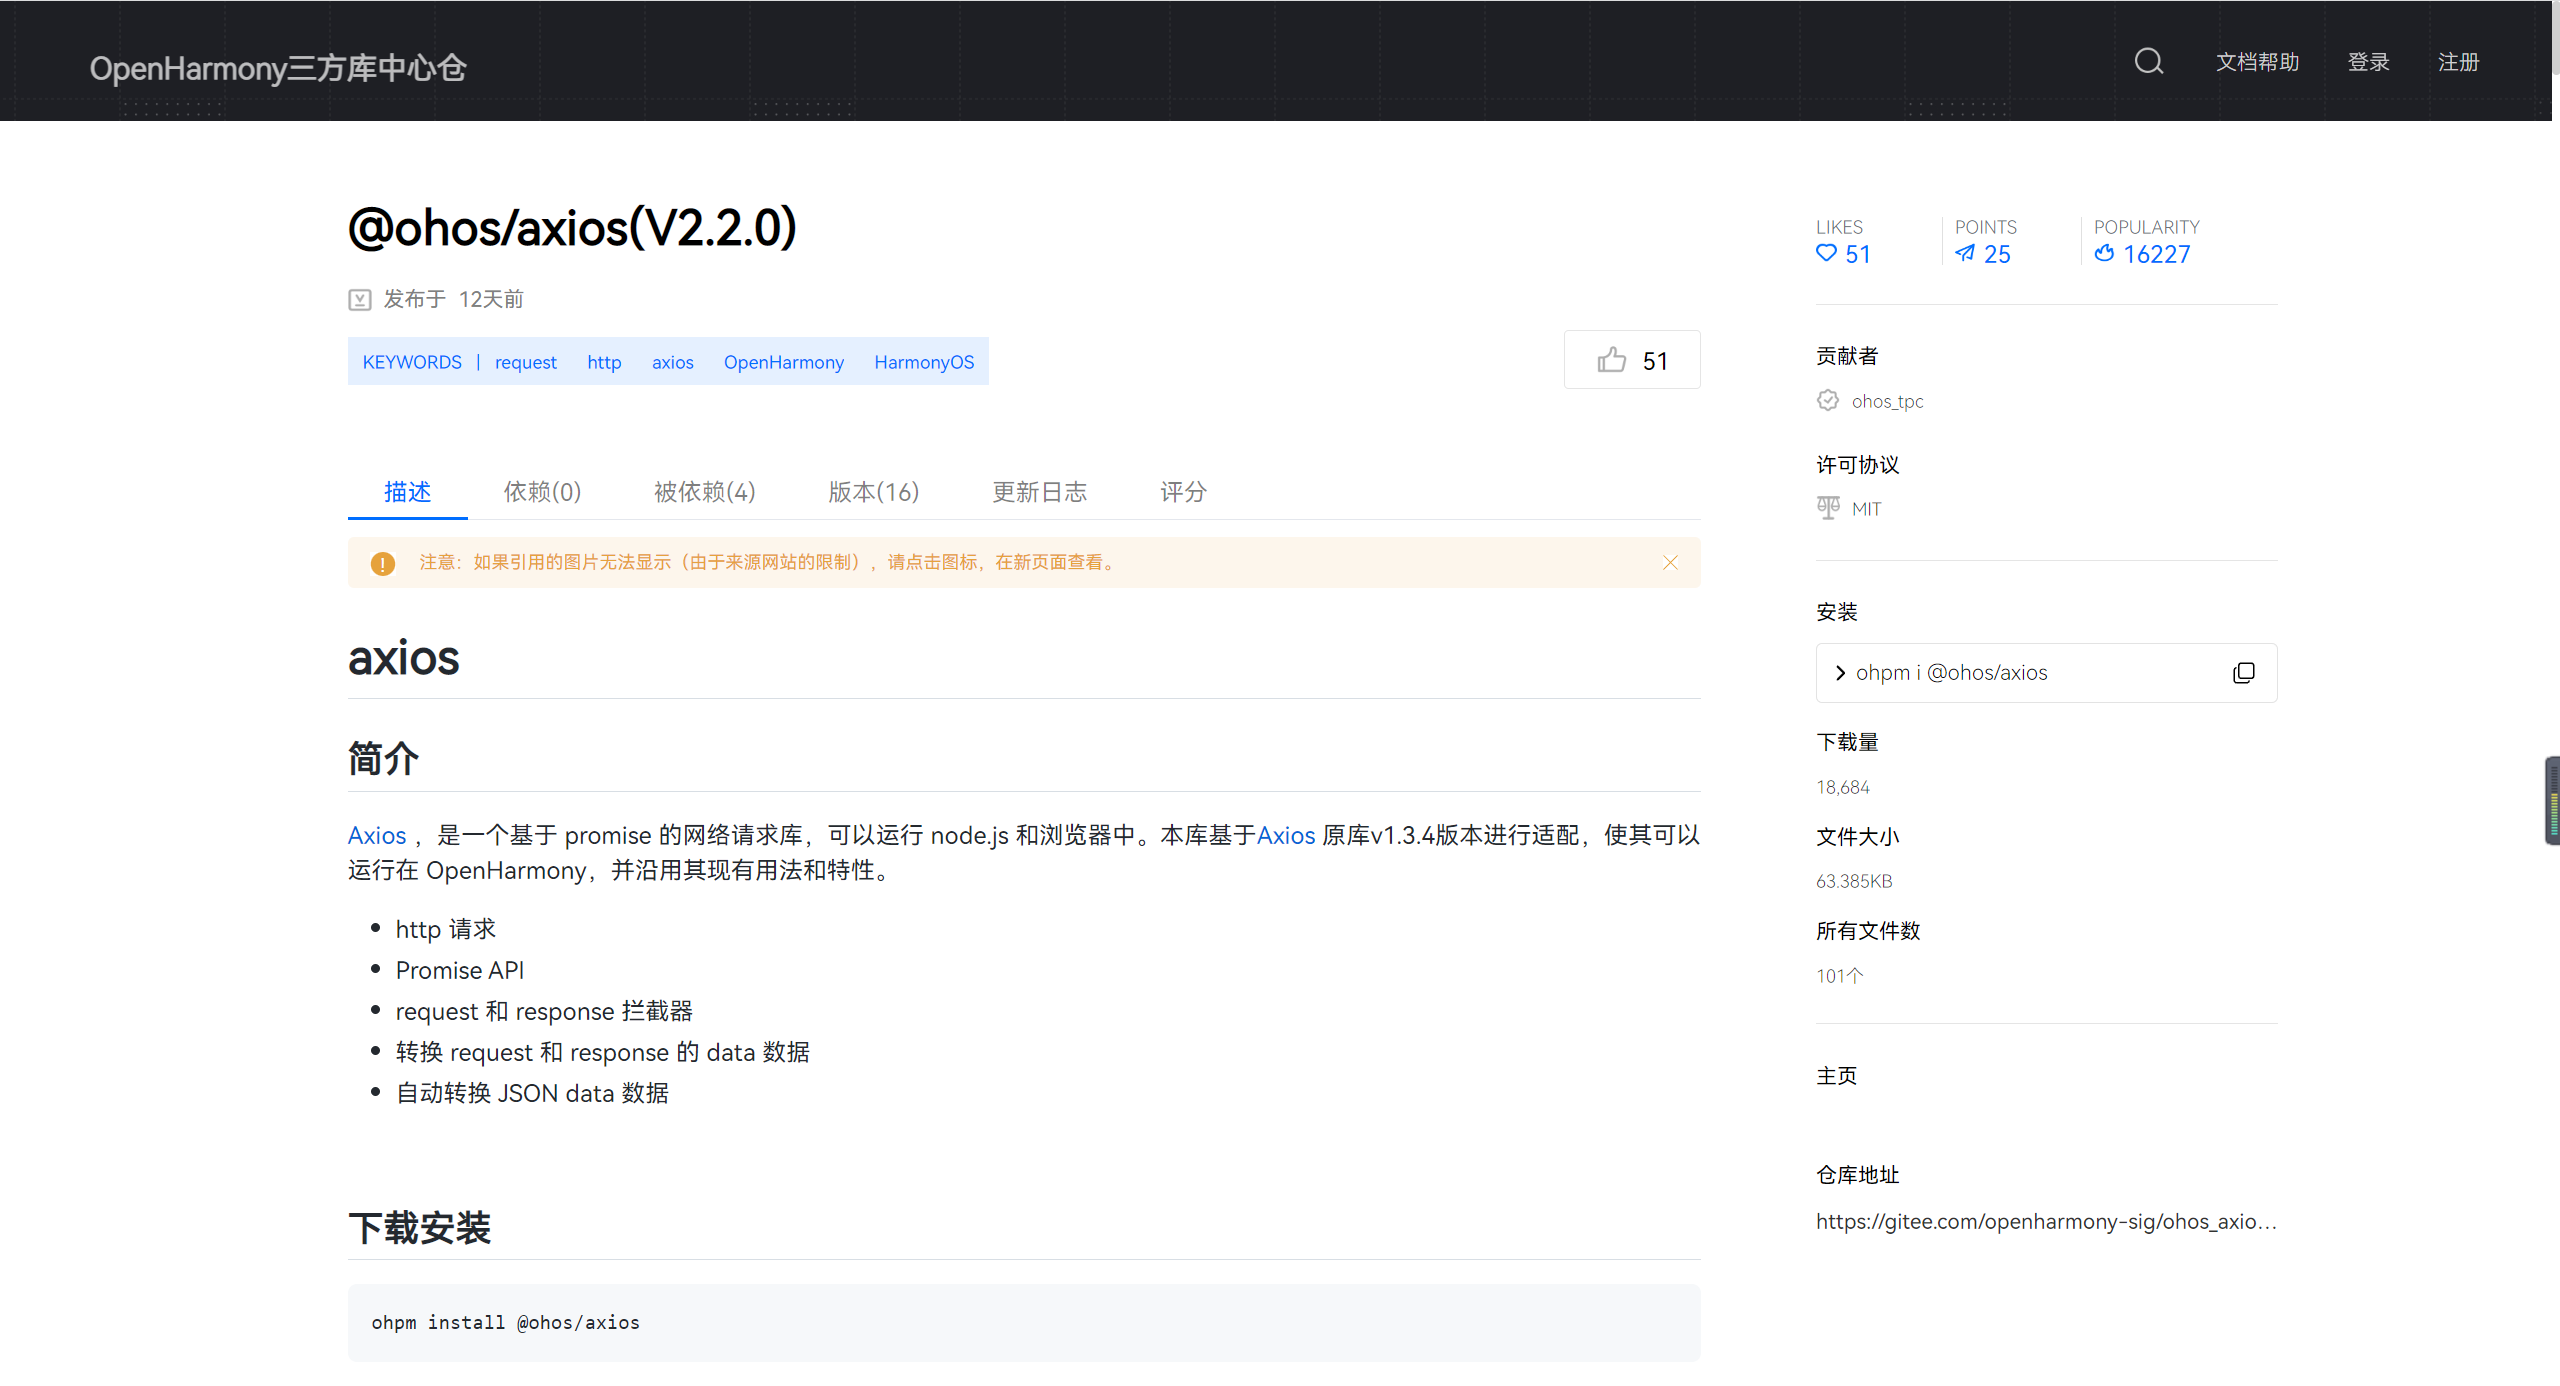
在项目根目录下执行
ohpm install @ohos/axios

项目中使用
首先简单封装一下 axios,新建 src/main/ets/utils/service.ts
import axios from '@ohos/axios'

axios.defaults.headers['Content-Type'] = 'application/json;charset=utf-8'

// 创建axios实例
const service = axios.create({
  // axios中请求配置有baseURL选项,表示请求URL公共部分
  baseURL: "http://localhost:3000",
  // 超时1分钟
  timeout: 1000 * 60 * 60,
})

// request拦截器
service.interceptors.request.use(
  (config) => {
    return config
  },
  (error) => {
    Promise.reject(error)
  }
)

// 响应拦截器
service.interceptors.response.use(
  (res) => {
    // 二进制数据则直接返回
    if (res.request.responseType === 'blob' || res.request.responseType === 'arraybuffer') {
      return res.data
    }
    return res.data
  },
  (error) => {
    return Promise.reject(error)
  }
)

export default service
然后新建接口请求api文件,这个文件用来放所有的请求部分
src/main/ets/api/ShopModelApi.ts
import service from "../utils/service"

/**
 * 获取商铺列表方法
 * @param pageNo
 * @param pageSize
 * @returns
 */
export function getShopModelListFun(pageNo, pageSize) {
  return service({
    url: "/shop",
    method: "get",
    params: {
      pageNo,
      pageSize
    }
  })
}
然后修改 src/main/ets/model/ShopModel.ts,使用我们上面写好的方法来加载数据
import { getShopModelListFun } from '../api/ShopModelApi'

class ShopModel {
  pageNo: number = 1
  pageSize: number = 3

  getListFun() {
    return getShopModelListFun(this.pageNo,this.pageSize)
  }
}

export default new ShopModel()
应用数据持久化
首选项实现轻量级数据持久化
场景介绍
用户首选项为应用提供Key-Value键值型的数据处理能力,支持应用持久化轻量级数据,并对其修改和查询。当用户希望有一个全局唯一存储的地方,可以采用用户首选项来进行存储。Preferences会将该数据缓存在内存中,当用户读取的时候,能够快速从内存中获取数据。Preferences会随着存放的数据量越多而导致应用占用的内存越大,因此,Preferences不适合存放过多的数据,适用的场景一般为应用保存用户的个性化设置(字体大小,是否开启夜间模式)等。
运作机制
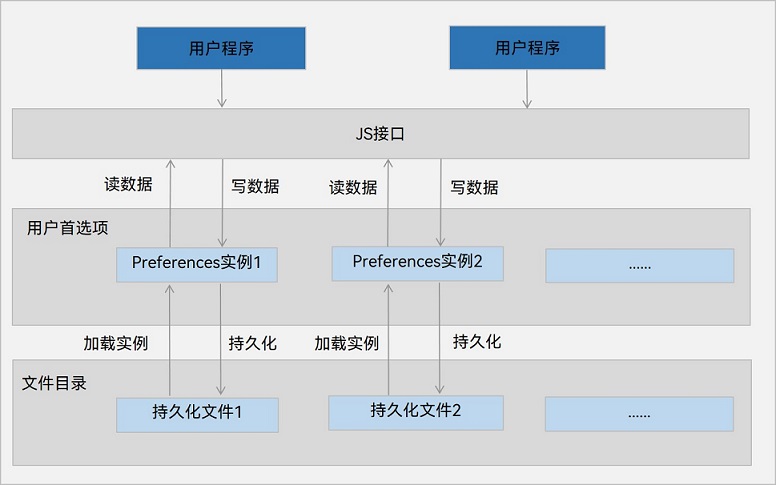
如图所示,用户程序通过JS接口调用用户首选项读写对应的数据文件。开发者可以将用户首选项持久化文件的内容加载到Preferences实例,每个文件唯一对应到一个Preferences实例,系统会通过静态容器将该实例存储在内存中,直到主动从内存中移除该实例或者删除该文件。
应用首选项的持久化文件保存在应用沙箱内部,可以通过context获取其路径。具体可见获取应用开发路径。
约束限制
- Key键为string类型,要求非空且长度不超过80个字节。
- 如果Value值为string类型,可以为空,不为空时长度不超过8192个字节。
- 内存会随着存储数据量的增大而增大,所以存储的数据量应该是轻量级的,建议存储的数据不超过一万条,否则会在内存方面产生较大的开销。
使用方法
封装 PreferenceUtils 文件,添加操作缓存的几个方法。新建 src/main/ets/utils/PreferencesUtils.ts
import dataPreferences from '@ohos.data.preferences';

class PreferencesUtils {
  private prefMap: Map<string, dataPreferences.Preferences> = new Map()

  /**
   * 加载Preference
   * @param context 上下文实例
   * @param name 每个Preferences实例的唯一标识
   */
  async onLoadPreferences(context, name: string) {
    try {
      // 创建Preference实例
      let pre = await dataPreferences.getPreferences(context, name)
      // 将得到的Preference保存到一个map中
      this.prefMap.set(name, pre)
      console.log("test-preference", `创建【preference ${name}】成功`)
    } catch (e) {
      console.log("test-preference", `创建【preference ${name}】失败`, JSON.stringify(e))
    }
  }

  /**
   * 保存缓存数据
   * @param name preference唯一表示
   * @param key 缓存的键名
   * @param value 缓存的键值
   */
  async putPreferences(name: string, key: string, value: dataPreferences.ValueType) {
    const pref = this.prefMap.get(name)
    if (!pref) {
      console.log("test-preferences", `preferences:【${name}】实例不存在`)
      return
    }
    try {
      // 写入数据
      await pref.put(key, value)
      // 刷入磁盘
      await pref.flush()
      console.log("test-preferences", `保存【${key} = ${value}】成功`)
    } catch (e) {
      console.log("test-preferences", `保存【${key} = ${value}】失败`, JSON.stringify(e))
    }
  }

  /**
   * 读取缓存数据
   * @param name preference唯一表示
   * @param key 读取的键名
   * @param defValue 当键名不存在时默认的返回值
   * @returns
   */
  async getPreferences(name: string, key: string, defValue: dataPreferences.ValueType) {
    const pref = this.prefMap.get(name)
    if (!pref) {
      console.log("test-preferences", `preferences:【${name}】实例不存在`)
      return
    }
    try {
      let value = await pref.get(key, defValue)
      console.log("test-preferences", `读取【${key} = ${value}】成功`)
      return value
    } catch (e) {
      console.log("test-preferences", `读取【${key}】失败`, JSON.stringify(e))
    }
  }

  /**
   * 删除指定key的缓存数据
   * @param name preference唯一表示
   * @param key 要删除的键名
   */
  async deletePreferences(name: string, key: string) {
    const pref = this.prefMap.get(name)
    if (!pref) {
      console.log("test-preferences", `preferences:【${name}】实例不存在`)
      return
    }
    try {
      await pref.delete(key)
      console.log("test-preferences", `删除【${key}】成功`)
    } catch (e) {
      console.log("test-preferences", `删除【${key}】失败`, JSON.stringify(e))
    }
  }

  /**
   * 监听缓存变化
   * @param name preference唯一表示
   * @param callback 缓存变化后触发的回调,会通过参数传递当前变化的key
   */
  async onPreferences(name: string, callback) {
    const pref = this.prefMap.get(name)
    if (!pref) {
      console.log("test-preferences", `preferences:【${name}】实例不存在`)
      return
    }
    pref.on("change", callback)
  }
}

export default new PreferencesUtils()
然后再应用Ability启动时,去获取 Preference 实例
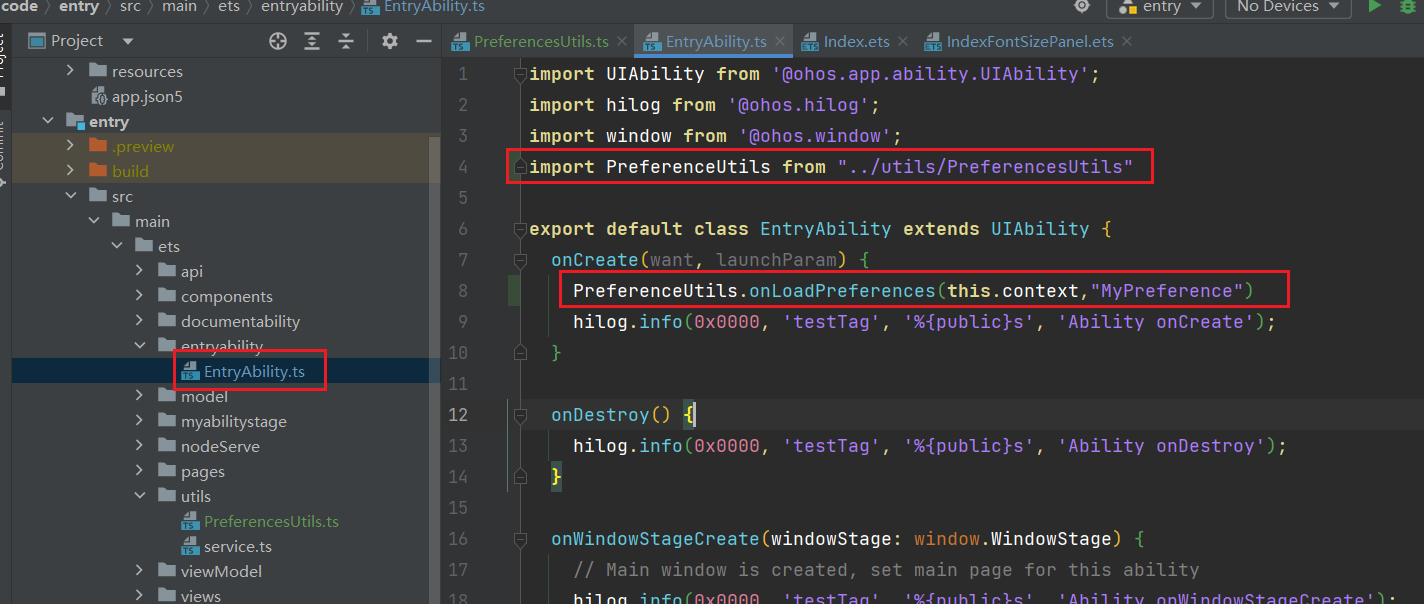
然后修改首页,增加了控制字体大小的功能,并且将修改后的结果保存到缓存中,重新启动时会从缓存读取上次保存的字体大小
新增一个控制字体大小的组件 src/main/ets/views/IndexFontSizePanel.ets
import PreferenceUtils from "../utils/PreferencesUtils"

@Component
export struct IndexFontSizePanel {
  @Consume fontSize:number

  fontSizeMap:object = {
    14:"小",
    16:"标准",
    18:"大",
    20:"特大"
  }

  build() {
    Column({space:10}){
      Row(){
        Text(`${this.fontSizeMap[this.fontSize]}`)
          .fontSize(this.fontSize)
      }
      .width("100%")
      .height(20)
      .justifyContent(FlexAlign.Center)

      Row({space:10}){
        Text(`A`).fontSize(14).fontWeight(FontWeight.Bold)

        Slider({
          min:14,
          max:20,
          step:2,
          value:this.fontSize
        })
          .onChange(val=>{
            this.fontSize = val
            // 修改字体大小后将最新值保存到缓存中
            PreferenceUtils.putPreferences("MyPreference","fontSize",val)
          })
          .layoutWeight(1)
          .trackThickness(6)

        Text(`A`).fontSize(20).fontWeight(FontWeight.Bold)
      }
      .width("100%")
      .padding({left:5,right:5})
    }
    .width("100%")
    .padding(10)
    .backgroundColor('#fff1f0f0')
    .borderRadius(20)
  }
}
然后再IndexPages中使用
import RouterItem from '../viewModel/RouterItem'
import { IndexFontSizePanel } from '../views/IndexFontSizePanel'
import { RouterItemBox } from '../views/RouterItemBox'
import PreferenceUtils from "../utils/PreferencesUtils"

const routerList: RouterItem[] = [
  new RouterItem("pages/ImagePage", "查看图片页面"),
  new RouterItem("pages/ItemsPage", "商品列表页面"),
  new RouterItem("pages/StatePage", "Jack和他的女朋友们"),
  new RouterItem("pages/TaskListPage", "任务列表"),
  new RouterItem("pages/AnimationPage", "小鱼动画"),
  new RouterItem("pages/AnimationPageV2", "小鱼动画V2"),
  new RouterItem("pages/LifeCyclePage", "生命周期案例1"),
  new RouterItem("pages/LifeCyclePage1", "生命周期案例2"),
  new RouterItem("pages/DocumentPage", "文档列表页面"),
  new RouterItem("pages/ShopPage", "商铺列表"),
]

@Entry
@Component
struct Index {
  @State message: string = '页面列表'
  tag: string = "Index Page"
  @State isShowPanel: boolean = false
  @Provide fontSize:number = 16

  // 页面加载成功后,从缓存中读取fontSize
  async aboutToAppear() {
    this.fontSize = await PreferenceUtils.getPreferences("MyPreference","fontSize",16) as number
  }

  build() {
    Column() {
      Row() {
        Text(this.message)
          .fontSize(30)
          .fontWeight(FontWeight.Bold)
          .fontColor("#36d")

        Image($r("app.media.settingPng"))
          .width(25)
          .onClick(()=>{
            animateTo({
              duration:500,
              curve: Curve.EaseOut
            },()=>{
              this.isShowPanel = !this.isShowPanel
            })
          })
      }
      .width("100%")
      .justifyContent(FlexAlign.SpaceBetween)
      .padding(10)

      List({ space: 10 }) {
        ForEach(routerList, (r: RouterItem, index: number) => {
          ListItem() {
            RouterItemBox({
              item: r,
              rid: index + 1
            })
          }
        })
      }
      .width("100%")
      .layoutWeight(1)
      .padding(10)

      if(this.isShowPanel){
        IndexFontSizePanel()
          .transition({
            translate:{y:115}
          })
      }
    }
    .width('100%')
    .height("100%")
  }
}
注意:首选项缓存只能在模拟器或者真机中有效
关系型数据库
新建页面
新建页面 src/main/ets/pages/TaskSqlPage.ets
import { Header } from '../components/Header'
import { HeaderCar } from '../views/task/HeaderCar'
import { TaskItem } from '../views/task/TaskListItem'

@Entry
@Component
struct TaskSqlPage {
  // 任务总数量
  @State taskTotal: number = 0
  // 已完成数量
  @State finishTotal: number = 0

  build() {
    Column() {
      Header({ title: "任务列表SQL版本" })

      Column() {
        // 头部卡片
        HeaderCar({
          taskTotal: this.taskTotal,
          finishTotal: this.finishTotal
        })

        // 底部的任务列表组件
        TaskItem({
          taskTotal: $taskTotal,
          finishTotal: $finishTotal
        })
          .layoutWeight(1)
      }
      .height('100%')
      .width('100%')
      .padding(15)
    }
    .height('100%')
    .width('100%')
  }
}
views/task/HeaderCar
const FinishColor = "#36D"
// 定义卡片公共样式
@Styles function carStyle() {
  .borderRadius(8)
  .shadow({
    radius: 20,
    color: "#bbb",
    offsetX: 3,
    offsetY: 4
  })
  .backgroundColor(Color.White)
  .width("100%")
}


@Component
export struct HeaderCar {
  // 定义从父组件接收的字段
  @Prop finishTotal: number
  @Prop taskTotal: number

  build() {
    Row(){
      Text("任务列表")
        .fontSize(25)
        .fontWeight(FontWeight.Bold)


      // 栈组件,让多个组件堆叠在一起
      Stack(){
        // 进度条
        Progress({
          value:this.finishTotal,
          total:this.taskTotal,
          type:ProgressType.ScaleRing // 设置成环形进度条
        })
          .width(100)
          .color(FinishColor)
          .style({
            strokeWidth:5
          })

        Row(){
          Text(`${this.finishTotal}`)
            .fontColor(FinishColor)
            .fontSize(25)

          Text(` / ${this.taskTotal}`)
            .fontSize(25)
        }
      }
    }
    .carStyle()
    .padding(35)
    .justifyContent(FlexAlign.SpaceBetween)
  }
}
src/main/ets/views/task/TaskListItem.ets
import { Task } from '../../viewModel/TaskInfo'
import { TaskDialog } from './TaskDialog'
import { RowItem } from './TaskRowItem'
import taskModel from "../../model/TaskModel"

@Component
export struct TaskItem {
  @Link taskTotal: number
  @Link finishTotal: number
  @State taskList: Task[] = []

  // 任务弹框
  dialogController: CustomDialogController = new CustomDialogController({
    builder: TaskDialog({
      onTaskConfirm: this.addTaskName.bind(this)
    }),
  })

  aboutToAppear() {
    console.log("test-tag:TaskItem onPageShow")
    taskModel.getTaskList().then(res=>{
      this.taskList = res
      console.log("test-tag:查询数据",JSON.stringify(this.taskList))
      this.handleTaskChange()
    })
  }

  handleTaskChange() {
    this.taskTotal = this.taskList.length
    this.finishTotal = this.taskList.filter(i => i.finish).length
  }

  addTaskName(taskName: string) {
    taskModel.addTask(taskName)
      .then(() => {
        console.log(`test-tag:添加任务成功:${taskName}`)
        this.taskList.push(new Task(1, taskName))
        this.handleTaskChange()
      })
      .catch(err => {
        console.log(`test-tag:添加任务失败:${JSON.stringify(err)}`)
      })

  }

  build() {
    Column() {
      Row() {
        Button("添加任务")
          .width(200)
          .margin({ top: 30, bottom: 30 })
          .backgroundColor("#36D")
          .onClick(() => {
            this.dialogController.open()
          })
      }

      List({ space: 20 }) {
        ForEach(this.taskList, (task: Task, index) => {
          ListItem() {
            // 每一行组件
            RowItem({
              task: task,
              // 将父组件定义的方法传递给子组件,并绑定this为父组件的this
              handleTaskChange: this.handleTaskChange.bind(this)
            })
          }
          .swipeAction({
            // 往左边滑动时出现自定义的构建函数
            end: this.deleteBuilder(index, task.id)
          })
        })
      }
      .width("100%")
      .layoutWeight(1)
    }
  }

  // 自定义删除按钮的构建函数
  @Builder deleteBuilder(index, id: number) {
    Button() {
      Image($r("app.media.deleteIcon"))
        .width(20)
        .interpolation(ImageInterpolation.High)
    }
    .width(40)
    .height(40)
    .margin({ left: 15 })
    .backgroundColor(Color.Red)
    .onClick(() => {
      // 删除任务
      taskModel.deleteTaskById(id)
      this.taskList.splice(index, 1)
      this.handleTaskChange()
    })
  }
}
添加弹框组件
src/main/ets/views/task/TaskDialog.ets
@CustomDialog
export struct TaskDialog {
  controller: CustomDialogController
  // 任务名称
  name: string
  // 点击确认后触发的事件
  onTaskConfirm: (name: string) => void

  build() {
    Column({ space: 20 }) {
      Row() {
        TextInput({
          placeholder: "请输入任务名称",
          text: this.name
        })
          .onChange(val => {
            this.name = val
          })
      }
      .width("100%")

      Row() {
        Button("取消")
          .backgroundColor(Color.Gray)
          .width("100")
          .onClick(() => {
            this.controller.close()
          })

        Button("确定")
          .backgroundColor("#36d")
          .fontColor(Color.White)
          .width("100")
          .onClick(() => {
            // 对外触发确认事件,并发送填写的任务名称
            this.onTaskConfirm(this.name)
            this.controller.close()
          })
      }
      .width("100%")
      .justifyContent(FlexAlign.SpaceAround)
    }
    .width('100%')
    .padding(20)
  }
}
src/main/ets/views/task/TaskRowItem.ets
import { Task } from '../../viewModel/TaskInfo'
// 定义卡片公共样式
@Styles function carStyle() {
  .borderRadius(8)
  .shadow({
    radius: 20,
    color: "#bbb",
    offsetX: 3,
    offsetY: 4
  })
  .backgroundColor(Color.White)
  .width("100%")
}

@Component
export  struct RowItem {
  @ObjectLink task: Task
  handleTaskChange: () => void

  build() {
    Row() {
      if (this.task.finish) {
        Text(`${this.task.name}`)
          .fontColor("#ccc")
          .decoration({ type: TextDecorationType.LineThrough })
      } else {
        Text(`${this.task.name}`)
      }

      Checkbox()
        .select(this.task.finish)
        .selectedColor("#036D")
        .onChange(val => {
          this.task.finish = val
          this.handleTaskChange()
        })
    }
    .carStyle()
    .padding(20)
    .justifyContent(FlexAlign.SpaceBetween)
  }
}
封装接口方法
src/main/ets/model/TaskModel.ets
import relationalStore from "@ohos.data.relationalStore"
import { Task } from '../viewModel/TaskInfo';

class TaskModel {
  // 数据库实例
  private rdbStore: relationalStore.RdbStore
  // 表名称
  private tableName: string = 'TASK'

  /**
   * 初始化数据库
   * @param context 上下文
   */
  initTaskDB(context) {
    // rdb配置
    const config = {
      name: "Task.db", // 数据库文件名,也是数据库唯一标识符。
      securityLevel: relationalStore.SecurityLevel.S1
    };
    // 创建数据库的SQL语句
    const sql = `CREATE TABLE IF NOT EXISTS TASK (
                  ID INTEGER PRIMARY KEY AUTOINCREMENT,
                  NAME TEXT NOT NULL,
                  FINISH bit
                 )`
    relationalStore.getRdbStore(context, config, (err, rdbStore) => {
      if (err) {
        console.log("test-tag", `数据库Task.db创建失败`)
        return
      }
      // 执行SQL
      rdbStore.executeSql(sql)
      // 保存rdb
      this.rdbStore = rdbStore
      console.log(`test-tag 初始化数据库成功`)
    })
  }


  /**
   * 查询数据
   */
  async getTaskList() {
    // 1.构建查询条件
    let predicates = new relationalStore.RdbPredicates(this.tableName)
    // 2.查询
    let result = await this.rdbStore.query(predicates, ['ID', 'NAME', 'FINISH'])
    // 3.解析查询结果
    // 3.1.定义一个数组,组装最终的查询结果
    let tasks: Task[] = []
    // 3.2.遍历封装
    while(!result.isAtLastRow){
      // 3.3.指针移动到下一行
      result.goToNextRow()
      // 3.4.获取数据
      let id = result.getLong(result.getColumnIndex('ID'))
      let name = result.getString(result.getColumnIndex('NAME'))
      let finish = result.getLong(result.getColumnIndex('FINISH'))
      // 3.5.封装到数组
      tasks.push({id, name, finish: !!finish})
    }
    console.log('test-tag', '查询到数据:', JSON.stringify(tasks))
    return tasks
  }

  /**
   * 添加任务
   * @param name 任务名称
   */
  async addTask(name: string) {
    return await this.rdbStore.insert(this.tableName, {
      name,
      finish: false
    })
  }

  /**
   * 更新数据
   * @param id
   * @param finish
   * @returns
   */
  async updateTaskById(id: number, finish: boolean) {
    // 1 要更新的数据
    let data = { finish }
    // 2 创建条件构造器
    let predicates = new relationalStore.RdbPredicates(this.tableName)
    // 3 先找到这个数据
    predicates.equalTo("ID", id)
    // 4 更新
    return await this.rdbStore.update(data, predicates)
  }

  /**
   * 删除数据
   * @param id
   * @param finish
   * @returns
   */
  async deleteTaskById(id: number) {
    // 1 创建条件构造器
    let predicates = new relationalStore.RdbPredicates(this.tableName)
    // 2 先找到这个数据
    predicates.equalTo("ID", id)
    // 3 删除
    return await this.rdbStore.delete(predicates)
  }
}

export default new TaskModel()
通知
基础通知
import notify from '@ohos.notificationManager';
import { Header } from '../components/Header'
import image from '@ohos.multimedia.image';
@Entry
@Component
struct NotificationMessagePage {
  @State mid: number = 100
  @State picture: PixelMap = null

  async aboutToAppear(){
    // 获取资源管理器
    let rm = getContext(this).resourceManager;
    // 读取图片
    let file = await rm.getMediaContent($r('app.media.xiaomi14'))
    // 创建PixelMap
    image.createImageSource(file.buffer).createPixelMap()
      .then(value => this.picture = value)
      .catch(reason => console.log('testTag', '加载图片异常', JSON.stringify(reason)))
  }

  build() {
    Column() {
      Header({title:"消息通知"})

      Column(){
        Row(){
          Button("发送normal通知").onClick(()=>{
            this.publishBasicText()
          })
        }
        .width('100%')

        Row(){
          Button("发送longText通知").onClick(()=>{
            this.publishLongText()
          })
        }
        .width('100%')

        Row(){
          Button("发送multiLine通知").onClick(()=>{
            this.publishMultilineText()
          })
        }
        .width('100%')

        Row(){
          Button("发送picture通知").onClick(()=>{
            this.publishPictureText()
          })
        }
        .width('100%')
      }
      .width('100%')
      .height('100%')
      .padding(15)
    }
    .width('100%')
    .height('100%')
  }

  // normal通知
  publishBasicText(){
    let request:notify.NotificationRequest = {
      id:this.mid++,
      content:{
        contentType:notify.ContentType.NOTIFICATION_CONTENT_BASIC_TEXT,
        normal:{
          title:"通知标题" + this.mid,
          text:"我是通知内容",
          additionalText:"我是附加内容"
        }
      },
      showDeliveryTime:true, // 是否显示通知时间
      deliveryTime:new Date().getTime(), // 通知时间
      groupName:"wechat", // 通知分组
      slotType:notify.SlotType.SOCIAL_COMMUNICATION // 通知通道
    }
    this.publish(request)
  }

  // 长文本通知
  publishLongText(){
    let request:notify.NotificationRequest = {
      id:this.mid++,
      content:{
        contentType:notify.ContentType.NOTIFICATION_CONTENT_LONG_TEXT,
        longText:{
          title:"通知标题" + this.mid,
          text:"我是通知内容",
          additionalText:"我是附加内容",
          longText:"我是很长的文本,我是很长的文本,我是很长的文本,我是很长的文本",
          expandedTitle:"展开后的标题",
          briefText:"通知展开后的概要"
        }
      },
      showDeliveryTime:true, // 是否显示通知时间
      deliveryTime:new Date().getTime(), // 通知时间
      groupName:"wechat", // 通知分组
      slotType:notify.SlotType.SOCIAL_COMMUNICATION // 通知通道
    }
    this.publish(request)
  }

  // 多行标题
  publishMultilineText(){
    let request:notify.NotificationRequest = {
      id:this.mid++,
      content:{
        contentType:notify.ContentType.NOTIFICATION_CONTENT_MULTILINE,
        multiLine:{
          title:"通知标题" + this.mid,
          text:"我是通知内容",
          additionalText:"我是附加内容",
          briefText:"通知展开时的概要",
          longTitle:"展开时的标题",
          lines:[
            "第一行",
            "第二行",
            "第三行"
          ]
        }
      },
      showDeliveryTime:true, // 是否显示通知时间
      deliveryTime:new Date().getTime(), // 通知时间
      groupName:"wechat", // 通知分组
      slotType:notify.SlotType.SOCIAL_COMMUNICATION // 通知通道
    }
    this.publish(request)
  }

  // 图文消息
  publishPictureText(){
    let request:notify.NotificationRequest = {
      id:this.mid++,
      content:{
        contentType:notify.ContentType.NOTIFICATION_CONTENT_PICTURE,
        picture:{
          title:"通知标题" + this.mid,
          text:"我是通知内容",
          additionalText:"我是附加内容",
          briefText:"通知展开时的概要",
          expandedTitle:"展开时的标题",
          picture:this.picture // 图片信息
        }
      },
      showDeliveryTime:true, // 是否显示通知时间
      deliveryTime:new Date().getTime(), // 通知时间
      groupName:"wechat", // 通知分组
      slotType:notify.SlotType.SOCIAL_COMMUNICATION // 通知通道
    }
    this.publish(request)
  }


  publish(request:notify.NotificationRequest){
    notify.publish(request).then(()=>{
      console.log("通知发送成功")
    }).catch(err=>{
      console.log(`通知发送失败:${JSON.stringify(err)}`)
    })
  }
}
不同的通道类型,发送消息提醒的权限
notify.SlotType 枚举类型
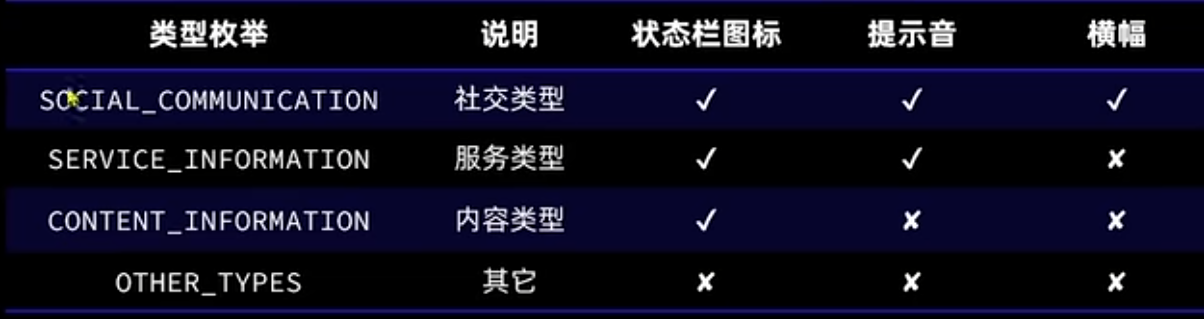
效果展示
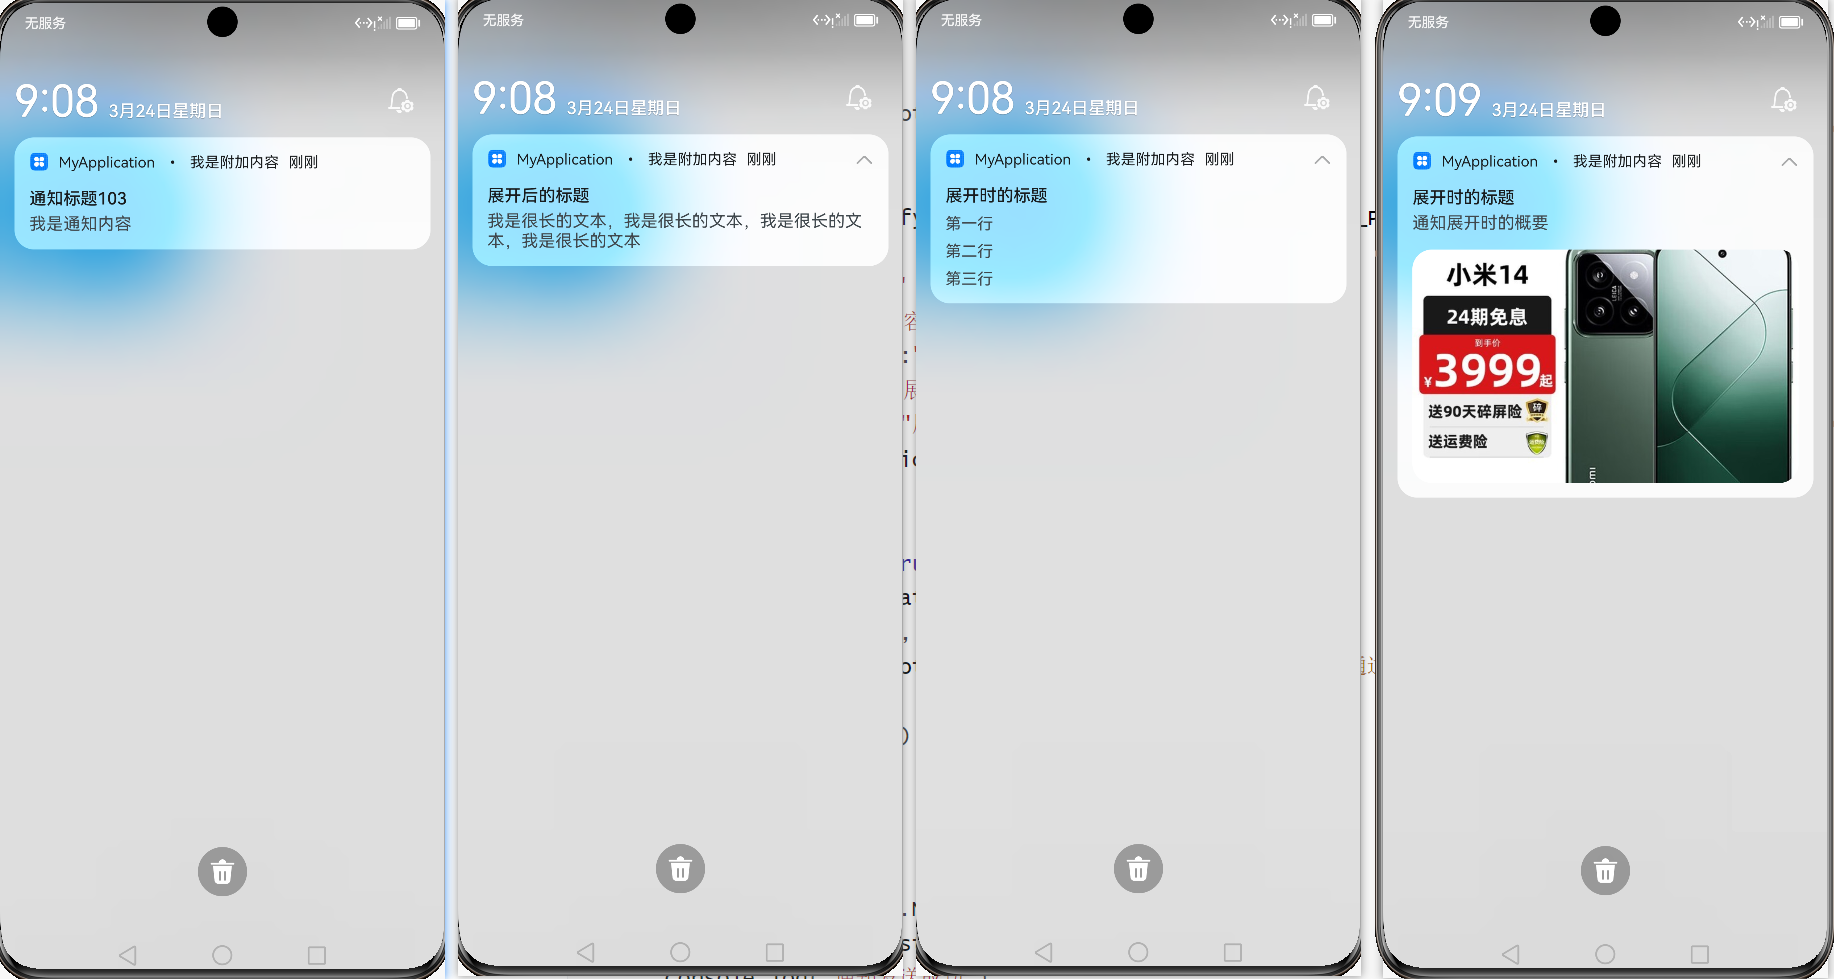
进度条通知
import promptAction from '@ohos.promptAction'
import notify from '@ohos.notificationManager';

enum DownloadState {
  NOT_BEGIN = '未开始',
  DOWNLOADING = '下载中',
  PAUSE = '已暂停',
  FINISHED = '已完成',
}

@Component
export struct ProgressCar {
  // 下载进度
  @State progressValue: number = 0
  progressMaxValue: number = 100
  // 任务状态
  @State state: DownloadState = DownloadState.NOT_BEGIN
  // 下载的文件名
  filename: string = '圣诞星.mp4'
  // 模拟下载的任务的id
  taskId: number = -1
  // 通知id
  notificationId: number = 999
  isSupport: boolean = false

  async aboutToAppear(){
    // 1.判断当前系统是否支持进度条模板
    // 注意:进度条模板名称固定 downloadTemplate
    this.isSupport = await notify.isSupportTemplate("downloadTemplate")
  }

  build() {
    Column({space:10}){
      Row({ space: 10 }) {
        Image($r('app.media.video')).width(50)

        Column({ space: 5 }) {
          Row() {
            Text(this.filename)
            Text(`${this.progressValue}%`).fontColor('#c1c2c1')
          }
          .width('100%')
          .justifyContent(FlexAlign.SpaceBetween)

          Progress({
            value: this.progressValue,
            total: this.progressMaxValue,
          })

          Row({ space: 5 }) {
            Text(`${(this.progressValue * 0.43).toFixed(2)}MB`)
              .fontSize(14).fontColor('#c1c2c1')

            Blank()

            if (this.state === DownloadState.NOT_BEGIN) {
              Button('开始').downloadButton()
                .onClick(() => this.download())

            } else if (this.state === DownloadState.DOWNLOADING) {
              Button('取消').downloadButton().backgroundColor('#d1d2d3')
                .onClick(() => this.cancel())

              Button('暂停').downloadButton()
                .onClick(() => this.pause())

            } else if (this.state === DownloadState.PAUSE) {
              Button('取消').downloadButton().backgroundColor('#d1d2d3')
                .onClick(() => this.cancel())

              Button('继续').downloadButton()
                .onClick(() => this.download())
            } else {
              Button('打开').downloadButton()
                .onClick(() => this.open())
            }
          }.width('100%')
        }
        .layoutWeight(1)
      }
      .width('100%')
      .borderRadius(20)
      .padding(15)
      .backgroundColor(Color.White)
      .shadow({ radius: 15, color: "#ff929292", offsetX: 10, offsetY: 10 })

      Row(){
        Button("重新开始")
          .onClick(()=>{
            this.cancel()
          })
      }
    }
  }

  // 下载
  download() {
    if(this.taskId > -1){
      clearInterval(this.taskId)
    }
    this.taskId = setInterval(()=>{
      if(this.progressValue >= 100){
        // 如果已经下载完成,删除定时任务
        clearInterval(this.taskId)
        // 标记任务已完成
        this.state = DownloadState.FINISHED
        // 发送通知
        this.publishDownloadNotification()
        return
      }
      this.progressValue += 2
      // 发送通知
      this.publishDownloadNotification()
    },500)

    this.state = DownloadState.DOWNLOADING
  }

  // 取消
  cancel() {
    if(this.taskId > -1){
      clearInterval(this.taskId)
      this.taskId = -1
    }
    this.progressValue = 0
    this.state = DownloadState.NOT_BEGIN
    // 取消通知
    this.cleanProgressNotifyMessage()
  }

  // 暂停
  pause() {
    // 取消定时任务
    if(this.taskId > 0){
      clearInterval(this.taskId);
      this.taskId = -1
    }
    // 标记任务状态:已暂停
    this.state = DownloadState.PAUSE
    // 发送通知
    this.publishDownloadNotification()
  }

  // 打开
  open() {
    promptAction.showToast({
      message: "功能暂未实现"
    })
  }

  // 发送进度条模板
  publishDownloadNotification(){
    // 1.判断当前系统是否支持进度条模板
    if(!this.isSupport){
      return
    }
    // 2.准备进度条模板的参数
    let template = {
      name:"downloadTemplate",
      data:{
        // 当前的进度
        progressValue:this.progressValue,
        // 最大进度
        progressMaxValue:this.progressMaxValue
      }
    }
    // 3.准备消息request
    let request: notify.NotificationRequest = {
      id:this.notificationId,
      template:template,
      content:{
        contentType:notify.ContentType.NOTIFICATION_CONTENT_BASIC_TEXT,
        normal:{
          title:this.filename + ":" + this.state,
          text:"",
          additionalText:this.progressValue + "%"
        }
      }
    }
    // 4.发送通知
    notify.publish(request)
      .then(()=>{
        console.log("test-notify","发送通知成功")
      })
      .catch(err=>{
        console.log("test-notify","发送通知失败",JSON.stringify(err))
      })
  }

  // 取消进度条通知
  cleanProgressNotifyMessage(){
    // 根据消息ID清除通知
    notify.cancel(this.notificationId)
  }
}

@Extend(Button) function downloadButton() {
  .width(75).height(28).fontSize(14)
}
效果
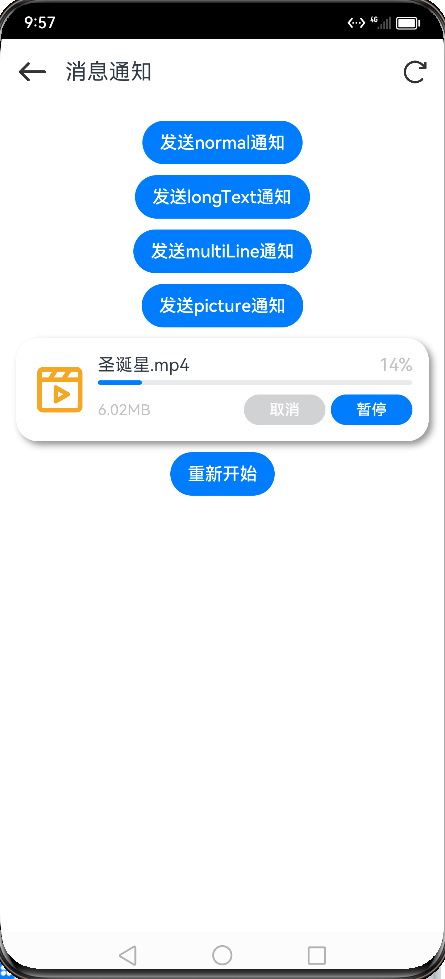
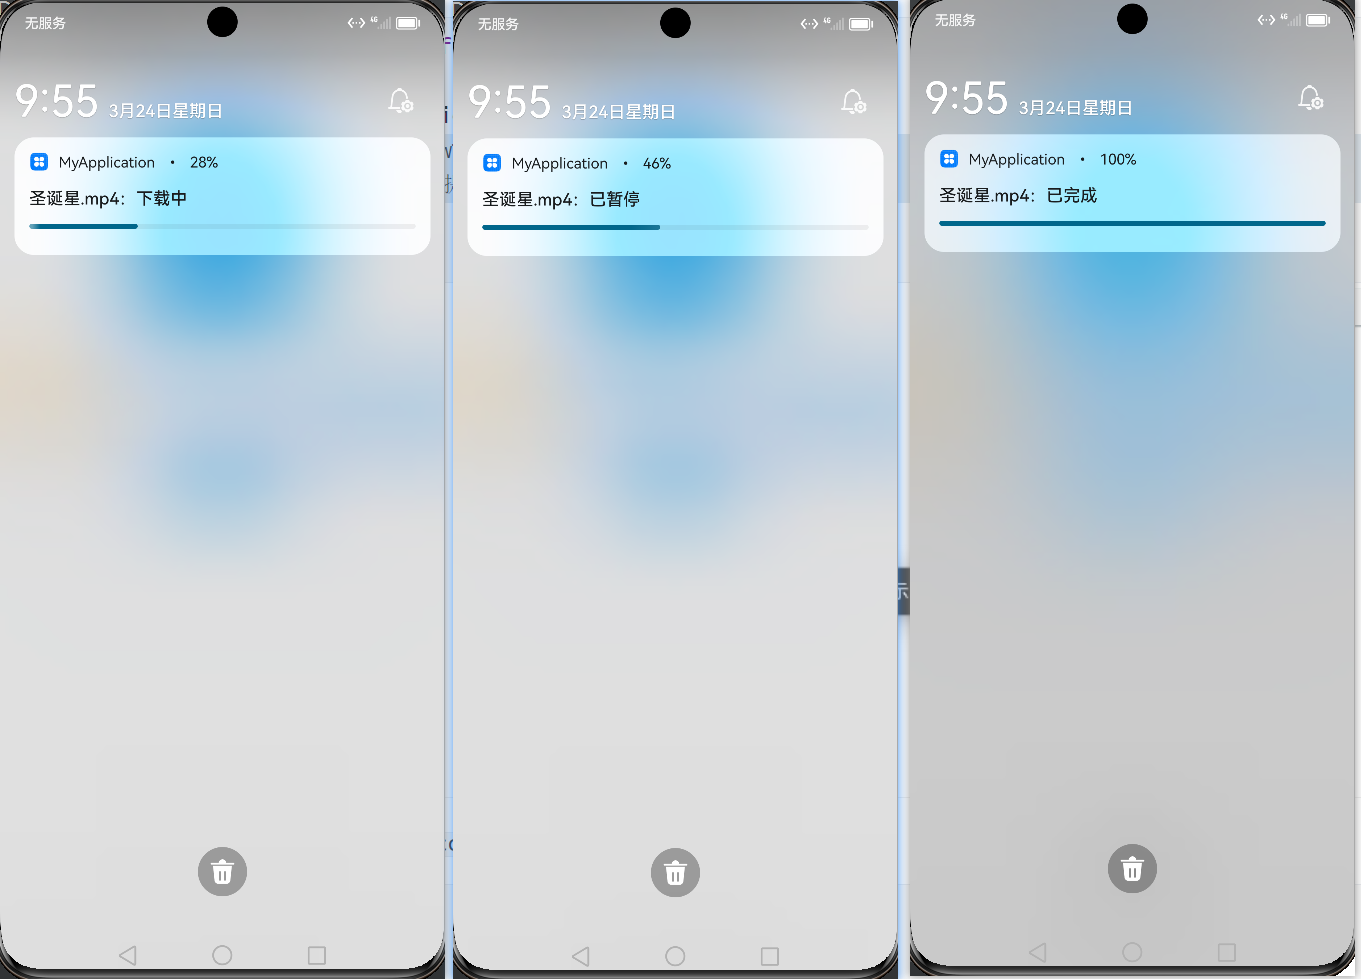
添加行为意图
通过给通知添加行为意图,可以实现点击通知后自动返回到应用内
import wantAgent, { WantAgent } from '@ohos.app.ability.wantAgent'

@Component
export struct ProgressCar{
  // 行为意图
  wantAgentInstance: WantAgent

  async aboutToAppear(){
    // 1.判断当前系统是否支持进度条模板
    // 注意:进度条模板名称固定 downloadTemplate
    this.isSupport = await notify.isSupportTemplate("downloadTemplate")

    // 2. 创建拉取当前应用的行为意图
    // 2.1 创建wantInfo信息
    let wantInfo: wantAgent.WantAgentInfo = {
      wants:[
        {
          bundleName:"com.example.myapplication",
          abilityName:"EntryAbility" // 声明要拉起的AbilityName
        }
      ],
      requestCode:0,
      operationType:wantAgent.OperationType.START_ABILITY, // 开启一个Ability
      wantAgentFlags:[wantAgent.WantAgentFlags.CONSTANT_FLAG]
    }
    // 2.2 创建wantAgent实例
    this.wantAgentInstance = await wantAgent.getWantAgent(wantInfo)
  }

  // .....省略其他代码

  // 发送进度条模板
  publishDownloadNotification(){
    // 1.判断当前系统是否支持进度条模板
    if(!this.isSupport){
      return
    }
    // 2.准备进度条模板的参数
    let template = {
      name:"downloadTemplate",
      data:{
        // 当前的进度
        progressValue:this.progressValue,
        // 最大进度
        progressMaxValue:this.progressMaxValue
      }
    }
    // 3.准备消息request
    let request: notify.NotificationRequest = {
      id:this.notificationId,
      template:template,
      // 设置行为意图
      wantAgent:this.wantAgentInstance,
      content:{
        contentType:notify.ContentType.NOTIFICATION_CONTENT_BASIC_TEXT,
        normal:{
          title:this.filename + ":" + this.state,
          text:"",
          additionalText:this.progressValue + "%"
        }
      }
    }
    // 4.发送通知
    notify.publish(request)
      .then(()=>{
        console.log("test-notify","发送通知成功")
      })
      .catch(err=>{
        console.log("test-notify","发送通知失败",JSON.stringify(err))
      })
  }
}
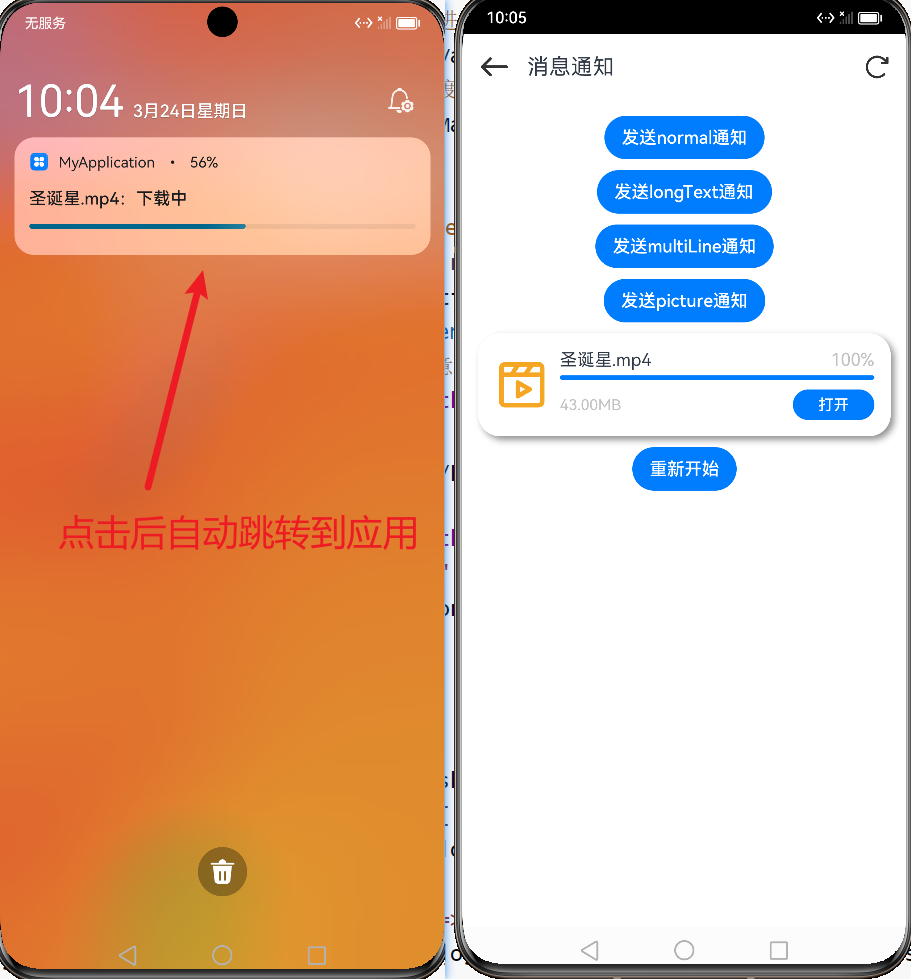
黑马健康实战案例
欢迎页实现
静态代码
// 文字样式封装
@Extend(Text) function opacityColor(opacity:number,fontSize:number = 10){
  .fontColor(Color.White)
  .fontSize(fontSize)
  .opacity(opacity)
}

@Entry
@Component
struct WelcomePage {
  build() {
    Column({space:10}) {
      Row() {
        Image($r("app.media.home_slogan")).width(200)
      }
      .layoutWeight(1)

      Image($r("app.media.home_logo")).width(150)

      Row() {
        Text("黑马健康APP支持")
          .opacityColor(0.8,13)
        Text("IPV6")
          .opacityColor(0.8,13)
          .border({ style: BorderStyle.Solid, width: 1, color: Color.White, radius: 16 })
          .padding({ left: 5, right: 5 })
        Text("网络")
          .opacityColor(0.8,13)
      }

      Text(`'减更多'指黑马健康App希望通过软件工具的形式,帮助更多用户实现身材管理`)
        .opacityColor(0.6)

      Text(`浙ICP备0000000号-36D`)
        .opacityColor(0.4)
        .margin({bottom:35})

    }
    .width('100%')
    .height('100%')
    .backgroundColor($r("app.color.welcome_page_background"))
  }
}
用户协议弹框
新建一个弹框组件页面
src/main/ets/view/welcome/UserPrivacyDialog.ets
@CustomDialog
export default  struct UserPrivacyDialog {
  // 定义一个构造器,类型是自定义弹框类型
  controller: CustomDialogController
  confirm:()=>void
  cancel:()=>void

  build() {
    Column({space:10}){
      Text($r("app.string.user_privacy_title"))
        .fontSize(22)
        .fontWeight(FontWeight.Bold)

      Text($r("app.string.user_privacy_content"))

      Button("我同意")
        .width(150)
        .backgroundColor($r("app.color.primary_color"))
        .onClick(()=>{
          this.confirm()
        })

      Button("不同意")
        .width(150)
        .backgroundColor($r("app.color.lightest_primary_color"))
        .onClick(()=>{
          this.cancel()
          this.controller.close()
        })
    }
    .width("100%")
    .padding(15)
  }
}
然后在欢迎页使用
// 首选项工具
import preferenceUtil from "../common/utils/PreferenceUtil"
import router from '@ohos.router'
import common from '@ohos.app.ability.common'

// 是否同意的Key
const PREF_KEY = 'userPrivacyKey'

@Entry
@Component
struct WelcomePage {
  // 上下文
  context = getContext(this) as common.UIAbilityContext
  // 定义弹框
  controller: CustomDialogController = new CustomDialogController({
    builder: UserPrivacyDialog({
      confirm: this.confirm.bind(this),
      cancel: this.cancel.bind(this)
    })
  })

  // 弹框确定方法
  confirm() {
    // 设置首选项
    preferenceUtil.putPreferenceValue(PREF_KEY,true)
    // 跳转到首页
    this.jumpToIndex()
  }

  // 弹框不同意方法
  cancel() {
    // terminateSelf 终止自身
    this.context.terminateSelf()
  }

  // 页面显示触发
  async aboutToAppear(){
    // 判断用户是否同意
    let isAgree = await preferenceUtil.getPreferenceValue(PREF_KEY,false)
    if(isAgree){
      this.jumpToIndex()
    }else{
      this.controller.open()
    }
  }

  // 跳转到首页
  jumpToIndex(){
    setTimeout(()=>{
      router.replaceUrl({
        url:"pages/Index"
      })
    },2000)
  }

  build() {
    // .... 省略重复代码
  }
}
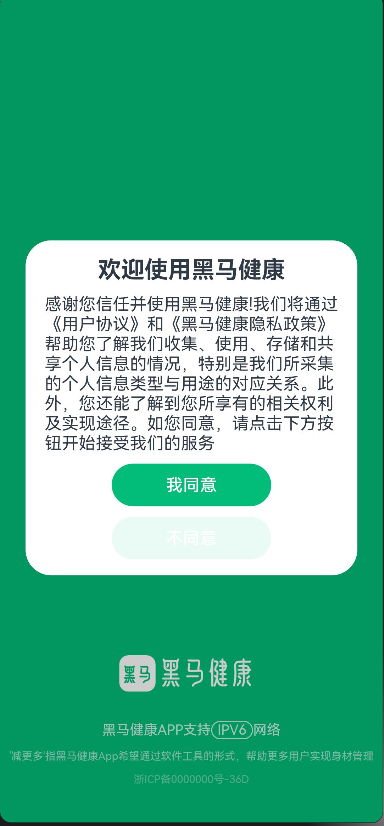
首页Tab实现
import { CommonConstants } from '../common/constants/CommonConstants'

@Entry
@Component
struct Index {
  @State currentIndex: number = 0

  // 自定义tabBar
  @Builder builderTabBar(title: Resource, image: Resource, index: number) {
    Column({ space: CommonConstants.SPACE_2 }) {
      Image(image)
        .width(22)
        .fillColor(this.selectColor(index))
      Text(title)
        .fontSize(14)
        .fontColor(this.selectColor(index))
    }
  }

  // 根据当前选中的tab自动切换选中颜色
  selectColor(index: number) {
    return this.currentIndex === index ? $r("app.color.primary_color") : $r("app.color.gray")
  }

  build() {
    // barPosition:BarPosition.End 定义Tab的位置
    Tabs({ barPosition: BarPosition.End }) {
      TabContent() {
        Text("页签1")
      }
      .tabBar(this.builderTabBar($r("app.string.tab_record"), $r("app.media.ic_calendar"), 0))

      TabContent() {
        Text("页签2")
      }
      .tabBar(this.builderTabBar($r("app.string.tab_discover"), $r("app.media.discover"), 1))

      TabContent() {
        Text("页签3")
      }
      .tabBar(this.builderTabBar($r("app.string.tab_user"), $r("app.media.ic_user_portrait"), 2))
    }
    .width('100%')
    .onChange(index => {
      this.currentIndex = index
    })
  }
}
头部搜索框
import { CommonConstants } from '../../common/constants/CommonConstants'
@Component
export default struct HeaderSearch {
  build() {
    Row({space:CommonConstants.SPACE_4}){
      Search({placeholder:"请输入食物名称"})
        .layoutWeight(1)

      // 角标
      Badge({count:2,style:{fontSize:12}}){
        Image($r("app.media.ic_public_email"))
          .width(24)
      }

    }
    .width(CommonConstants.THOUSANDTH_940)
  }
}

日期和日期弹框
日期展示组件
import { CommonConstants } from '../../common/constants/CommonConstants'
import DateUtils from '../../common/utils/DateUtils'
import DatePickDialog from './DatePickDialog'


@Component
export default struct StatsCard {
  // 从全局存储中读取数据
  @StorageProp("selectedDate") selectedDate:number = DateUtils.beginTimeOfDate(new Date())

  controller: CustomDialogController = new CustomDialogController({
    builder: DatePickDialog({
      selectedDate: new Date(this.selectedDate)
    })
  })

  build() {
    Column() {
      // 日期行
      Row({ space: CommonConstants.SPACE_4 }) {
        Text(DateUtils.formatDateTime(this.selectedDate))
          .fontColor($r("app.color.secondary_color"))

        Image($r("app.media.ic_public_spinner"))
          .width(25)
          .fillColor($r("app.color.secondary_color"))
      }
      .width("100%")
      .padding({ left: 15, top: 10, bottom: 25 })
      .onClick(() => {
        this.controller.open()
      })

      // 轮播卡片
      Row() {

      }
      .width("100%")
      .height(200)
      .backgroundColor(Color.White)
      .borderRadius(18)
      .margin({ top: -20 })

    }
    .width(CommonConstants.THOUSANDTH_940)
    .backgroundColor($r("app.color.stats_title_bgc"))
    .borderRadius(18)
  }
}
日期弹框组件
import { CommonConstants } from '../../common/constants/CommonConstants'

@CustomDialog
export default struct DatePickDialog {
  controller: CustomDialogController
  private selectedDate: Date = new Date()

  build() {
    Column({space:CommonConstants.SPACE_4}) {
      DatePicker({
        start: new Date('2020-1-1'),
        end: new Date('2100-1-1'),
        selected: this.selectedDate
      })
        .onChange((value: DatePickerResult) => {
          this.selectedDate.setFullYear(value.year, value.month, value.day)
        })

      Row({space:CommonConstants.SPACE_4}) {
        Button("取消")
          .width(120)
          .backgroundColor($r("app.color.light_gray"))
          .onClick(()=>{
            this.controller.close()
          })

        Button("确定")
          .width(120)
          .backgroundColor($r("app.color.primary_color"))
          .onClick(()=>{
            // 将选中的日期保存到全局存储中
            AppStorage.SetOrCreate("selectedDate",this.selectedDate.getTime())
            this.controller.close()
          })

      }
    }
    .padding(CommonConstants.SPACE_2)
  }
}
用到的日期工具类代码
DateUtils.ts
export default class DateUtils{
  static beginTimeOfDate(date:Date){
    // 获取日期对象的时间戳(包含时分秒)
    const timestampWithTime = date.getTime();

    // 创建一个新的Date对象,将时间设置为1970-01-01 00:00:00
    const dateWithoutTime = new Date(1970, 0, 1, 0, 0, 0, 0);

    // 将包含时分秒的时间戳赋值给不含时分秒的日期对象
    dateWithoutTime.setTime(timestampWithTime);

    // 返回不包含时分秒的时间戳
    return dateWithoutTime.getTime();
  }

  static formatDateTime(dateTime:number){
    let date = new Date(dateTime)
    // 获取年、月、日
    const year = date.getFullYear();
    const month = date.getMonth() + 1; // 月份是从0开始的,所以需要+1
    const day = date.getDate();

    // 格式化月和日,如果不足两位数,前面补0
    const formattedMonth = month < 10 ? '0' + month : month;
    const formattedDay = day < 10 ? '0' + day : day;

    // 返回格式化的日期字符串
    return `${year}/${formattedMonth}/${formattedDay}`;
  }
}
统计信息卡片
使用轮播组件,将两个组件包裹起来
import { CommonConstants } from '../../common/constants/CommonConstants'
import CalorieState from './CalorieStats'
import NutrientState from './NutrientStats'


@Component
export default struct StatsCard {
  build() {
    Column() {
      // 1. 日期行

      // 2. 轮播卡片
      Swiper() {
        // 2.1 热量信息
        CalorieState()
        // 2.2 卡路里信息
        NutrientState()
      }
      .width("100%")
      .backgroundColor(Color.White)
      .borderRadius(18)
      .margin({ top: -20 })
      .indicatorStyle({selectedColor:$r("app.color.primary_color")})

    }
    .width(CommonConstants.THOUSANDTH_940)
    .backgroundColor($r("app.color.stats_title_bgc"))
    .borderRadius(18)
  }
}
热量信息卡片
CalorieStats.ets
import { CommonConstants } from '../../common/constants/CommonConstants'
@Component
export default struct CalorieState {
  intake:number = 600 // 饮食摄入
  expend:number = 192 // 运动消耗
  recommend:number = CommonConstants.RECOMMEND_CALORIE // 推荐卡路里

  // 计算还可以吃多少
  remainCalorie(){
    return this.recommend - this.intake + this.expend
  }

  build() {
    Row(){
      this.StatsBuilder("饮食摄入",this.intake)

      Stack(){
        // 进度条
        Progress({
          value:this.intake,
          total:this.recommend,
          type:ProgressType.Ring
        })
          .width(130)
          .style({strokeWidth:8})
          .color(this.remainCalorie() < 0 ? Color.Red : $r("app.color.primary_color"))

        this.StatsBuilder("还可以吃",this.remainCalorie(),this.recommend)
      }

      this.StatsBuilder("运动消耗",this.expend)
    }
    .width("100%")
    .justifyContent(FlexAlign.SpaceEvenly)
    .padding({top:30,bottom:35})
  }

  @Builder StatsBuilder(label:string,value:number,tip?:number){
    Column({space:CommonConstants.SPACE_6}){
      Text(label)
        .fontSize(16)
        .fontWeight(FontWeight.Bold)

      Text(`${value.toFixed(0)}`)
        .fontSize(25)
        .fontWeight(FontWeight.Bold)

      if(tip){
        Text(`推荐${tip.toFixed(0)}`)
          .fontSize(14)
          .fontColor($r("app.color.light_gray"))
      }
    }
  }
}
卡路里信息卡片
NutrientState.ets
import { CommonConstants } from '../../common/constants/CommonConstants'
@Component
export default struct NutrientState {
  carbon:number = 23 // 碳水
  protein:number = 9 // 蛋白质
  fat:number = 7 // 脂肪

  recommendCarbon:number = CommonConstants.RECOMMEND_CARBON
  recommendProtein:number = CommonConstants.RECOMMEND_PROTEIN
  recommendFat:number = CommonConstants.RECOMMEND_FAT

  build() {
    Row(){
      this.StatsBuilder("碳水化合物",this.carbon,this.recommendCarbon,$r("app.color.carbon_color"))

      this.StatsBuilder("蛋白质",this.protein,this.recommendProtein,$r("app.color.protein_color"))

      this.StatsBuilder("脂肪",this.fat,this.recommendFat,$r("app.color.fat_color"))
    }
    .width("100%")
    .justifyContent(FlexAlign.SpaceEvenly)
    .padding({top:30,bottom:35})
  }

  @Builder StatsBuilder(label:string,value:number,recommend:number,color:ResourceStr){
    Column({space:CommonConstants.SPACE_6}){
      Stack(){
        // 进度条
        Progress({
          value:value,
          total:recommend,
          type:ProgressType.Ring
        })
          .width(105)
          .style({strokeWidth:6})
          .color(value > recommend ? Color.Red : color)

        Column({space:CommonConstants.SPACE_6}){
          Text("摄入推荐")
            .fontColor($r("app.color.gray"))

          Text(`${value.toFixed(0)}/${recommend.toFixed(0)}`)
            .fontSize(20)
            .fontWeight(FontWeight.Bold)
        }
      }

      Text(`${label}(克)`)
        .fontColor($r("app.color.light_gray"))
    }

  }
}
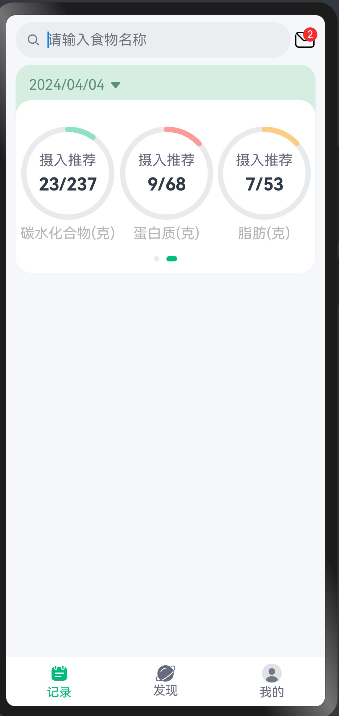
实现记录列表
import { CommonConstants } from '../../common/constants/CommonConstants'

@Extend(Text) function grayText(){
  .fontSize(14)
  .fontColor($r("app.color.light_gray"))
}

@Component
export default struct RecordList {
  build() {
    List({space:CommonConstants.SPACE_10}){
      ForEach([1,2,3,4,5],item => {
        ListItem(){
          Column({space:CommonConstants.SPACE_6}){
            // 主分类信息
            Row({space:CommonConstants.SPACE_6}){
              Image($r("app.media.ic_breakfast"))
                .width(24)

              Text("早餐")
                .fontSize(18)
                .fontWeight(CommonConstants.FONT_WEIGHT_700)
              Text("建议423~592千卡")
                .grayText()
              Blank()
              Text("190")
                .fontColor($r("app.color.primary_color"))
                .fontWeight(CommonConstants.FONT_WEIGHT_700)
              Text("千卡")
                .grayText()
              Image($r("app.media.ic_public_add_norm_filled"))
                .width(24)
                .fillColor($r("app.color.primary_color"))

            }
            .width("100%")

            // 子分类信息
            List({space:CommonConstants.SPACE_6}){
              ForEach([1,2],child => {
                ListItem(){
                  Row({space:CommonConstants.SPACE_4}){
                    Image($r("app.media.toast"))
                      .width(50)

                    Column({space:CommonConstants.SPACE_6}){
                      Text("全麦吐司")
                        .fontWeight(CommonConstants.FONT_WEIGHT_500)
                        .fontSize(14)
                      Text("1片")
                        .fontSize(12)
                        .fontColor($r("app.color.gray"))
                        .textAlign(TextAlign.Start)
                    }
                    .alignItems(HorizontalAlign.Start)

                    Blank()

                    Text("91千卡")
                      .grayText()
                  }
                  .width("100%")
                }
                .swipeAction({
                  // 左滑出现删除按钮
                  end:this.deleteBuilder.bind(this)
                })
              })
            }
          }
          .padding(15)
          .backgroundColor(Color.White)
          .borderRadius(10)
        }
      })
    }
    .layoutWeight(1)
    .width(CommonConstants.THOUSANDTH_940)
    .margin({top:15,bottom:15})
  }

  // 左滑出现删除按钮
  @Builder deleteBuilder(){
    Row(){
      Image($r("app.media.ic_public_delete_filled"))
        .width(25)
        .fillColor(Color.Red)
        .margin({left:5})
    }
    .width(35)
    .justifyContent(FlexAlign.End)
  }
}
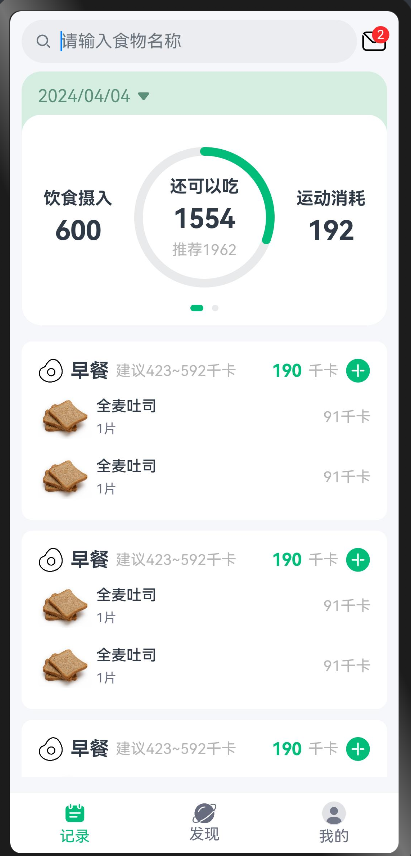
添加食物列表页面
新建页面ItemIndexPage
import { CommonConstants } from '../common/constants/CommonConstants'
import router from '@ohos.router'
import ItemTabList from '../view/ItemIndex/ItemTabList'

@Entry
@Component
struct ItemIndexPage {
  build() {
    Column() {
      // 头部导航组件
      this.ItemHeaderBuilder()

      // tab列表组件
      ItemTabList()
    }
    .width('100%')
    .height('100%')
  }

  @Builder ItemHeaderBuilder(){
    Row(){
      Image($r("app.media.ic_public_back"))
        .width(30)
        .interpolation(ImageInterpolation.High)
        .onClick(()=>{
          router.back()
        })

      Text("早餐")
        .fontSize(18)
        .fontWeight(CommonConstants.FONT_WEIGHT_700)
    }
    .height(35)
    .width(CommonConstants.THOUSANDTH_940)
    .justifyContent(FlexAlign.SpaceBetween)
  }
}
tab列表组件代码
ItemTabList.ets
import { CommonConstants } from '../../common/constants/CommonConstants'

@Component
export default struct ItemTabList {
  build() {
    Column() {
      Tabs() {
        TabContent() {
          this.TabContentList()
        }
        .tabBar("全部")

        TabContent() {
          this.TabContentList()
        }
        .tabBar("主食")

        TabContent() {
          this.TabContentList()
        }
        .tabBar("肉蛋奶")
      }
    }
    .layoutWeight(1)
    .width(CommonConstants.THOUSANDTH_940)
  }

  @Builder TabContentList(){
    List({space:CommonConstants.SPACE_6}){
      ForEach([1,2,3,4,5],child => {
        ListItem(){
          Row({space:CommonConstants.SPACE_4}){
            Image($r("app.media.toast"))
              .width(50)

            Column({space:CommonConstants.SPACE_6}){
              Text("全麦吐司")
                .fontWeight(CommonConstants.FONT_WEIGHT_500)
                .fontSize(14)
              Text("91千卡/1片")
                .fontSize(12)
                .fontColor($r("app.color.gray"))
                .textAlign(TextAlign.Start)
            }
            .alignItems(HorizontalAlign.Start)

            Blank()

            Image($r("app.media.ic_public_add_norm_filled"))
              .width(25)
              .fillColor($r("app.color.primary_color"))
              .interpolation(ImageInterpolation.High)
          }
          .width("100%")
        }
      })
    }
    .height("100%")
    .width("100%")
  }
}
效果显示
底部Panel实现
ItemIndexPage.ets 页面增加 Panel 组件
import { CommonConstants } from '../common/constants/CommonConstants'
import router from '@ohos.router'
import ItemTabList from '../view/ItemIndex/ItemTabList'
import PanelHeader from '../view/ItemIndex/PanelHeader'
import PanelFoodInfo from '../view/ItemIndex/PanelFoodInfo'
import PanelInput from '../view/ItemIndex/PanelInput'

@Entry
@Component
struct ItemIndexPage {
  @State showPanel: boolean = false

  onPanelShow(){
    this.showPanel = true
  }

  onPanelClose(){
    this.showPanel = false
  }

  build() {
    Column() {
      // 头部导航组件
      this.ItemHeaderBuilder()
      // tab列表组件
      ItemTabList({onPanelShow:this.onPanelShow.bind(this)})
      // 底部弹框组件
      Panel(this.showPanel) {
        // 弹框顶部日期
        PanelHeader()
        // 食物信息
        PanelFoodInfo()
        // 键盘区域
        PanelInput({
          onPanelClose:this.onPanelClose.bind(this)
        })
      }
      .mode(PanelMode.Full)
      .dragBar(false)
      .backgroundMask("#98eeeeee")
      .backgroundColor(Color.White)
    }
    .width('100%')
    .height('100%')
  }

  @Builder ItemHeaderBuilder() {
    Row() {
      Image($r("app.media.ic_public_back"))
        .width(30)
        .interpolation(ImageInterpolation.High)
        .onClick(() => {
          router.back()
        })

      Text("早餐")
        .fontSize(18)
        .fontWeight(CommonConstants.FONT_WEIGHT_700)
    }
    .height(35)
    .width(CommonConstants.THOUSANDTH_940)
    .justifyContent(FlexAlign.SpaceBetween)
  }
}
PanelHeader 弹框顶部日期
import { CommonConstants } from '../../common/constants/CommonConstants'
@Component
export default struct PanelHeader {
  build() {
    Row({space:CommonConstants.SPACE_4}){
      Text("1月17日 早餐")
      Image($r("app.media.ic_public_spinner"))
        .width(20)
    }
    .height(45)
  }
}
PanelFoodInfo 食物信息
import { CommonConstants } from '../../common/constants/CommonConstants'
@Component
export default struct PanelFoodInfo {
  build() {
    Column({space:CommonConstants.SPACE_10}){
      Row(){
        Image($r("app.media.toast"))
          .width(130)
      }

      Row(){
        Text("全麦吐司")
          .fontWeight(CommonConstants.FONT_WEIGHT_700)
      }
      .backgroundColor($r("app.color.lightest_primary_color"))
      .padding(10)
      .borderRadius(4)
      .margin({bottom:10})

      Divider().width(CommonConstants.THOUSANDTH_940).opacity(0.6)

      Row({space:CommonConstants.SPACE_10}){
        this.NutrientInfo("热量(千卡)",91.0)
        this.NutrientInfo("碳水(克)",15.5)
        this.NutrientInfo("蛋白质(克)",4.4)
        this.NutrientInfo("脂肪(克)",1.3)
      }

      Divider().width(CommonConstants.THOUSANDTH_940).opacity(0.6)
    }
    .margin({top:-10})
  }

  @Builder NutrientInfo(label:string,number:number){
    Column({space:CommonConstants.SPACE_6}){
      Text(label)
        .fontSize(13)
        .fontColor($r("app.color.light_gray"))

      Text(`${number}`)
        .fontSize(16)
        .fontWeight(CommonConstants.FONT_WEIGHT_700)
    }
  }
}
PanelInput 键盘区域
import { CommonConstants } from '../../common/constants/CommonConstants'
@Component
export default struct PanelInput {
  onPanelClose:()=>void

  build() {
    Column(){
      Row({space:CommonConstants.SPACE_10}){
        Column(){
          Text(`1`)
            .fontSize(50)
            .fontWeight(CommonConstants.FONT_WEIGHT_700)
            .fontColor($r("app.color.primary_color"))

          Divider().width(100).backgroundColor($r("app.color.primary_color"))
        }

        Text(" / 片")
          .fontSize(25)
          .fontWeight(CommonConstants.FONT_WEIGHT_700)
          .fontColor($r("app.color.primary_color"))

      }
      .alignItems(VerticalAlign.Bottom)

      // 自定义键盘
      Row(){

      }
      .height(300)

      // 按钮
      Row({space:CommonConstants.SPACE_10}){
        Button("取消")
          .width(110)
          .backgroundColor($r("app.color.light_gray"))
          .type(ButtonType.Normal)
          .borderRadius(5)
          .onClick(()=>{
            this.onPanelClose()
          })

        Button("确定")
          .width(110)
          .backgroundColor($r("app.color.primary_color"))
          .type(ButtonType.Normal)
          .borderRadius(5)
          .onClick(()=>{
            this.onPanelClose()
          })
      }
      .margin({top:10})
    }
  }
}
实现数字键盘
这里使用到了Grid布局
键盘组件代码实现
import { CommonConstants } from '../../common/constants/CommonConstants'


@Component
export default struct PanelInput {
  // 父组件传递过来的关闭Panel方法
  onPanelClose: () => void
  onChangeAmount: (amount) => void
  gridList: string[] = [
    "1", "2", "3",
    "4", "5", "6",
    "7", "8", "9",
    ".", "0"
  ]

  // 食物数量,声明成Link类型,实现父子组件双向绑定
  @Link amount: number
  // 每次点击的数组
  @State value: string = ""

  @Styles keyBoxStyle(){
    .height(60)
    .backgroundColor(Color.White)
    .borderRadius(5)
  }

  build() {
    Column() {
      Row({ space: CommonConstants.SPACE_10 }) {
        Column() {
          Text(`${this.amount.toFixed(1)}`)
            .fontSize(50)
            .fontWeight(CommonConstants.FONT_WEIGHT_700)
            .fontColor($r("app.color.primary_color"))

          Divider().width(100).backgroundColor($r("app.color.primary_color"))
        }

        Text(" / 片")
          .fontSize(20)
          .fontWeight(CommonConstants.FONT_WEIGHT_700)
          .fontColor($r("app.color.light_gray"))

      }
      .alignItems(VerticalAlign.Bottom)

      // 自定义键盘
      Grid() {
        ForEach(this.gridList, item => {
          GridItem() {
            Text(`${item}`).fontSize(16).fontWeight(CommonConstants.FONT_WEIGHT_900)
          }
          .keyBoxStyle()
          .onClick(() => {
            this.clickNumber(item)
          })
        })

        GridItem() {
          Text(`删除`).fontSize(16).fontWeight(CommonConstants.FONT_WEIGHT_900)
        }
        .keyBoxStyle()
        .onClick(() => {
          this.removeKey()
        })
      }
      .width("100%")
      .height(280)
      .columnsTemplate("1fr 1fr 1fr")
      .columnsGap(8)
      .rowsGap(8)
      .backgroundColor($r("app.color.index_page_background"))
      .padding(8)
      .margin({ top: 10 })


      // 按钮
      Row({ space: CommonConstants.SPACE_10 }) {
        Button("取消")
          .width(110)
          .backgroundColor($r("app.color.light_gray"))
          .type(ButtonType.Normal)
          .borderRadius(5)
          .onClick(() => {
            this.onPanelClose()
          })

        Button("确定")
          .width(110)
          .backgroundColor($r("app.color.primary_color"))
          .type(ButtonType.Normal)
          .borderRadius(5)
          .onClick(() => {
            this.onPanelClose()
          })
      }
      .margin({ top: 10 })
    }
  }

  // 删除按钮
  removeKey(){
    this.value = this.value.substring(0,this.value.length - 1)
    this.amount = this.parseFloat(this.value)
  }

  // 点击键盘事件
  clickNumber(num: string) {
    // 1.拼接用户输入的内容
    let val = this.value + num
    // 2.校验输入的格式是否正确
    let firstIndex = val.indexOf(".")
    let lastIndex = val.lastIndexOf(".")
    if (firstIndex !== lastIndex || (lastIndex !== -1 && lastIndex < val.length - 2)) {
      return
    }
    // 3.将字符串转成数值类型
    let amount = this.parseFloat(val)
    // 4.保存
    if (amount > 999) {
      this.amount = 999
      this.value = "999"
    } else {
      this.amount = amount
      this.value = val
    }
  }

  parseFloat(str: string) {
    if (!str) {
      return 0
    }
    if(str.endsWith(".")){
      str = str.substring(0,str.length - 1)
    }
    return parseFloat(str || '0')
  }
}
父组件代码
import { CommonConstants } from '../common/constants/CommonConstants'
import router from '@ohos.router'
import ItemTabList from '../view/ItemIndex/ItemTabList'
import PanelHeader from '../view/ItemIndex/PanelHeader'
import PanelFoodInfo from '../view/ItemIndex/PanelFoodInfo'
import PanelInput from '../view/ItemIndex/PanelInput'

@Entry
@Component
struct ItemIndexPage {
  @State showPanel: boolean = false
  @State amount:number = 1

  onPanelShow(){
    this.showPanel = true
  }

  onPanelClose(){
    this.showPanel = false
  }

  build() {
    Column() {
      // 头部导航组件
      this.ItemHeaderBuilder()
      // tab列表组件
      ItemTabList({onPanelShow:this.onPanelShow.bind(this)})
      // 底部弹框组件
      Panel(this.showPanel) {
        // 弹框顶部日期
        PanelHeader()
        // 食物信息
        PanelFoodInfo({
          amount:$amount
        })
        // 键盘区域
        PanelInput({
          onPanelClose:this.onPanelClose.bind(this),
          amount:$amount
        })
      }
      .mode(PanelMode.Full)
      .dragBar(false)
      .backgroundMask("#98eeeeee")
      .backgroundColor(Color.White)
    }
    .width('100%')
    .height('100%')
  }

  @Builder ItemHeaderBuilder() {
    Row() {
      Image($r("app.media.ic_public_back"))
        .width(30)
        .interpolation(ImageInterpolation.High)
        .onClick(() => {
          router.back()
        })

      Text("早餐")
        .fontSize(18)
        .fontWeight(CommonConstants.FONT_WEIGHT_700)
    }
    .height(35)
    .width(CommonConstants.THOUSANDTH_940)
    .justifyContent(FlexAlign.SpaceBetween)
  }
}
食物信息组件修改,根据传递进来的数量,自动计算对应的热量信息
import { CommonConstants } from '../../common/constants/CommonConstants'
@Component
export default struct PanelFoodInfo {
  @Link amount:number

  build() {
    Column({space:CommonConstants.SPACE_10}){
      Row(){
        Image($r("app.media.toast"))
          .width(130)
      }

      Row(){
        Text("全麦吐司")
          .fontWeight(CommonConstants.FONT_WEIGHT_700)
      }
      .backgroundColor($r("app.color.lightest_primary_color"))
      .padding(10)
      .borderRadius(4)
      .margin({bottom:10})

      Divider().width(CommonConstants.THOUSANDTH_940).opacity(0.6)

      Row({space:CommonConstants.SPACE_10}){
        this.NutrientInfo("热量(千卡)",91.0)
        this.NutrientInfo("碳水(克)",15.5)
        this.NutrientInfo("蛋白质(克)",4.4)
        this.NutrientInfo("脂肪(克)",1.3)
      }

      Divider().width(CommonConstants.THOUSANDTH_940).opacity(0.6)
    }
    .margin({top:-10})
  }

  @Builder NutrientInfo(label:string,number:number){
    Column({space:CommonConstants.SPACE_6}){
      Text(label)
        .fontSize(13)
        .fontColor($r("app.color.light_gray"))

      Text(`${(number * this.amount).toFixed(1)}`)
        .fontSize(16)
        .fontWeight(CommonConstants.FONT_WEIGHT_700)
    }
  }
}
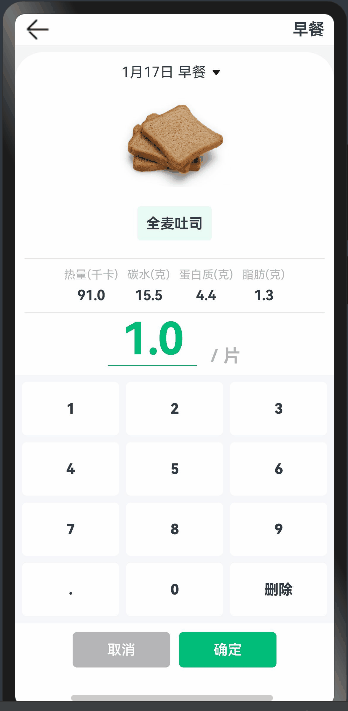
多设备响应式开发
同一个页面,在手机、折叠手机、平板等设备上显示的方式是不一样的,我们可以通过官方提供的 @ohos.mediaquery 库来获取当前屏幕的宽度,然后根据不同宽度做不同处理
第一步:定义一个Bean,这个文件的作用是传入一个配置对象,然后调用 getValue 方法返回不同尺寸下对应的值
src/main/ets/common/bean/BreanpointType.ets
declare interface BreakpointTypeOptions<T>{
  sm?:T,
  md?:T,
  lg?:T
}

export default class BreakpointType<T>{
  options: BreakpointTypeOptions<T>

  constructor(options: BreakpointTypeOptions<T>) {
    this.options = options
  }

  getValue(breakpoint: string): T{
    return this.options[breakpoint]
  }
}
第二步:定义一个常量类,声明各种查询条件及配置对象
src/main/ets/common/constants/BreakpointConstants.ets
import BreakpointType from '../bean/BreanpointType';

export default class BreakpointConstants {
  /**
   * 小屏幕设备的 Breakpoints 标记.
   */
  static readonly BREAKPOINT_SM: string = 'sm';

  /**
   * 中等屏幕设备的 Breakpoints 标记.
   */
  static readonly BREAKPOINT_MD: string = 'md';

  /**
   * 大屏幕设备的 Breakpoints 标记.
   */
  static readonly BREAKPOINT_LG: string = 'lg';

  /**
   * 当前设备的 breakpoints 存储key
   */
  static readonly CURRENT_BREAKPOINT: string = 'currentBreakpoint';

  /**
   * 小屏幕设备宽度范围.
   */
  static readonly RANGE_SM: string = '(320vp<=width<600vp)';

  /**
   * 中屏幕设备宽度范围.
   */
  static readonly RANGE_MD: string = '(600vp<=width<840vp)';

  /**
   * 大屏幕设备宽度范围.
   */
  static readonly RANGE_LG: string = '(840vp<=width)';

  /**
   * 定义Bar在不同屏幕下的位置
   */
  static readonly BAR_POSITION: BreakpointType<BarPosition> = new BreakpointType({
    sm: BarPosition.End,
    md: BarPosition.Start,
    lg: BarPosition.Start,
  })

  /**
   * 定义Bar在不同屏幕下的布局方向
   */
  static readonly BAR_VERTICAL: BreakpointType<boolean> = new BreakpointType({
    sm:false,
    md:true,
    lg:true
  })

}
第三步:创建媒体查询工具类,创建不同尺寸的监听器,当命中时将结果保存到全局存储中
src/main/ets/common/utils/BreakpotionSystem.ets
import mediaQuery from '@ohos.mediaquery';
import BreakpointConstants from '../constants/BreakpointConstants';

export default class BreakpointSystem{
  // 创建容器宽度监听器
  private smListener: mediaQuery.MediaQueryListener = mediaQuery.matchMediaSync(BreakpointConstants.RANGE_SM)
  private mdListener: mediaQuery.MediaQueryListener = mediaQuery.matchMediaSync(BreakpointConstants.RANGE_MD)
  private lgListener: mediaQuery.MediaQueryListener = mediaQuery.matchMediaSync(BreakpointConstants.RANGE_LG)

  // 开始监听容器
  register(){
    this.smListener.on("change",this.smListenerCallback.bind(this))
    this.mdListener.on("change",this.mdListenerCallback.bind(this))
    this.lgListener.on("change",this.lgListenerCallback.bind(this))
  }

  // 取消注册
  unRegister(){
    this.smListener.off("change",this.smListenerCallback.bind(this))
    this.mdListener.off("change",this.mdListenerCallback.bind(this))
    this.lgListener.off("change",this.lgListenerCallback.bind(this))
  }

  // 监听器命中的回调
  smListenerCallback(result:mediaQuery.MediaQueryResult){
    if(result.matches){
      this.updateCurrentBreakpoint(BreakpointConstants.BREAKPOINT_SM)
    }
  }

  mdListenerCallback(result:mediaQuery.MediaQueryResult){
    if(result.matches){
      this.updateCurrentBreakpoint(BreakpointConstants.BREAKPOINT_MD)
    }
  }

  lgListenerCallback(result:mediaQuery.MediaQueryResult){
    if(result.matches){
      this.updateCurrentBreakpoint(BreakpointConstants.BREAKPOINT_LG)
    }
  }

  // 更新缓存值
  updateCurrentBreakpoint(breakpoint:string){
    AppStorage.SetOrCreate(BreakpointConstants.CURRENT_BREAKPOINT,breakpoint)
  }
}
第四步:页面使用
现在我们来修改首页代码,加入响应式功能,实现在不同设备上,Bar的位置显示到不同的地方
src/main/ets/pages/Index.ets
import BreakpointConstants from '../common/constants/BreakpointConstants'
import { CommonConstants } from '../common/constants/CommonConstants'
import BreakpointSystem from '../common/utils/BreakpotionSystem'
import RecordIndex from '../view/record/RecordIndex'

@Entry
@Component
struct Index {
  @State currentIndex: number = 0
  // 创建监听设备宽度的实例
  breakpointSystem:BreakpointSystem = new BreakpointSystem()
  // 获取当前设备宽度的缓存值
  @StorageProp("currentBreakpoint") currentBreakpoint:string = BreakpointConstants.BREAKPOINT_SM


  aboutToAppear(){
    this.breakpointSystem.register()
  }

  aboutToDisappear(){
    this.breakpointSystem.unRegister()
  }

  // 自定义tabBar
  @Builder builderTabBar(title: Resource, image: Resource, index: number) {
    Column({ space: CommonConstants.SPACE_2 }) {
      Image(image)
        .width(22)
        .fillColor(this.selectColor(index))
      Text(title)
        .fontSize(14)
        .fontColor(this.selectColor(index))
    }
  }

  // 根据当前选中的tab自动切换选中颜色
  selectColor(index: number) {
    return this.currentIndex === index ? $r("app.color.primary_color") : $r("app.color.gray")
  }

  // 根据设备宽度设置Bar栏位置
  chooseBarPosition(){
    return BreakpointConstants.BAR_POSITION.getValue(this.currentBreakpoint)
  }

  build() {
    // barPosition:BarPosition.End 定义Tab的位置
    Tabs({ barPosition: this.chooseBarPosition() }) {
      TabContent() {
        RecordIndex()
      }
      .tabBar(this.builderTabBar($r("app.string.tab_record"), $r("app.media.ic_calendar"), 0))

      TabContent() {
        Text("页签2")
      }
      .tabBar(this.builderTabBar($r("app.string.tab_discover"), $r("app.media.discover"), 1))

      TabContent() {
        Text("页签3")
      }
      .tabBar(this.builderTabBar($r("app.string.tab_user"), $r("app.media.ic_user_portrait"), 2))
    }
    .width('100%')
    .onChange(index => {
      this.currentIndex = index
    })
    .vertical(BreakpointConstants.BAR_VERTICAL.getValue(this.currentBreakpoint))
  }
}
还要修改卡片信息,在平板设备上就不要左右滑动显示了,而是直接显示两个卡片
src/main/ets/view/record/StatsCard.ets
import BreakpointType from '../../common/bean/BreanpointType'
import BreakpointConstants from '../../common/constants/BreakpointConstants'
import { CommonConstants } from '../../common/constants/CommonConstants'
import DateUtils from '../../common/utils/DateUtils'
import CalorieState from './CalorieStats'
import DatePickDialog from './DatePickDialog'
import NutrientState from './NutrientStats'


@Component
export default struct StatsCard {
  // 从全局存储中读取数据
  @StorageProp("selectedDate") selectedDate:number = DateUtils.beginTimeOfDate(new Date())
  @StorageProp("currentBreakpoint") currentBreakpoint:string = BreakpointConstants.BREAKPOINT_SM

  controller: CustomDialogController = new CustomDialogController({
    builder: DatePickDialog({
      selectedDate: new Date(this.selectedDate)
    })
  })

  build() {
    Column() {
      // 1. 日期行
      Row({ space: CommonConstants.SPACE_4 }) {
        Text(DateUtils.formatDateTime(this.selectedDate))
          .fontColor($r("app.color.secondary_color"))

        Image($r("app.media.ic_public_spinner"))
          .width(25)
          .fillColor($r("app.color.secondary_color"))
      }
      .padding({ left: 15, top: 5, bottom: 5 })
      .onClick(() => {
        this.controller.open()
      })

      // 2. 轮播卡片
      Swiper() {
        // 2.1 热量信息
        CalorieState()
        // 2.2 卡路里信息
        NutrientState()
      }
      .width("100%")
      .backgroundColor(Color.White)
      .borderRadius(18)
      .indicatorStyle({selectedColor:$r("app.color.primary_color")})
      // 设置滑动组件一页显示几个组件
      .displayCount(
        new BreakpointType({
          sm:1,
          md:1,
          lg:2
        }).getValue(this.currentBreakpoint)
      )
      // 设置是否显示指示点
      .indicator(
        new BreakpointType({
          sm:true,
          md:true,
          lg:false
        }).getValue(this.currentBreakpoint)
      )
      // 设置是否禁用滑动功能
      .disableSwipe(
        new BreakpointType({
          sm:false,
          md:false,
          lg:true
        }).getValue(this.currentBreakpoint)
      )
    }
    .width(CommonConstants.THOUSANDTH_940)
    .backgroundColor($r("app.color.stats_title_bgc"))
    .borderRadius(18)
  }
}
最后来看预览效果
首先点击这里,将多设备预览功能按钮打开,这样可以同时看到页面在手机、折叠屏、平板三种设备的显示效果

下面是不同设备的显示结果
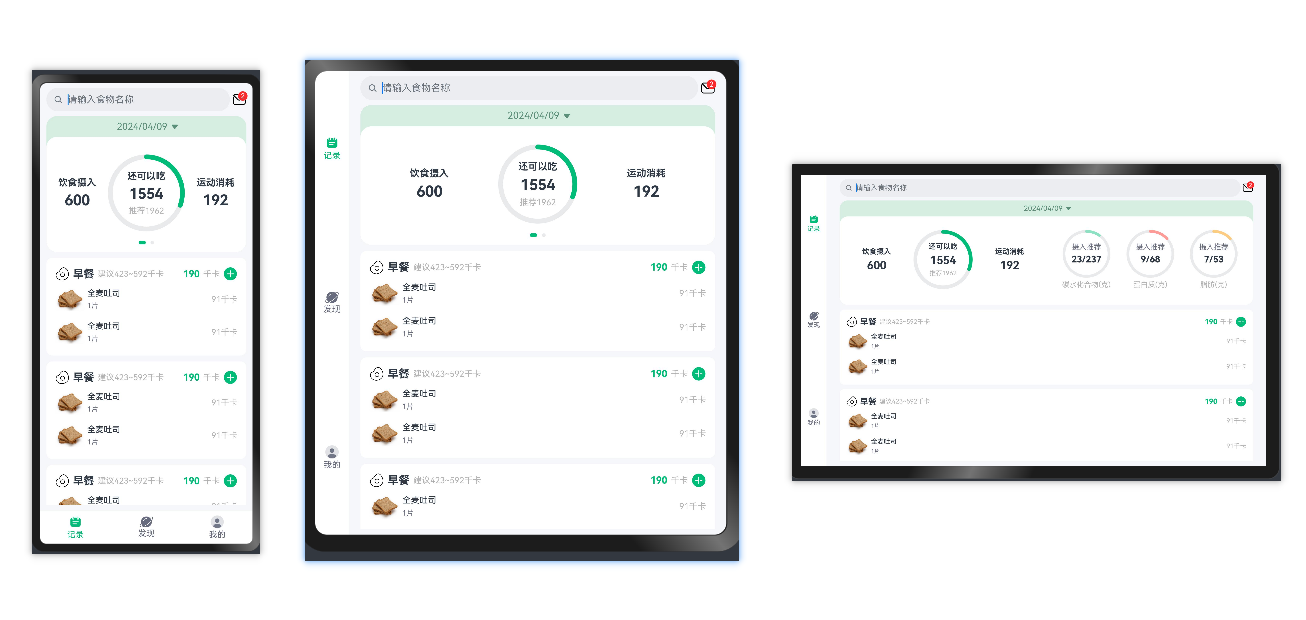
显示不同的记录项
核心处理代码
ItemModel.ets
import GroupInfo from '../viewmodel/GroupInfo'
import RecordItem from '../viewmodel/RecordItem'
import { FoodCategories, FoodCategoryEnum, WorkoutCategories, WorkoutCategoryEnum } from './ItemCategoryModel'

const foods: RecordItem[] = [
  new RecordItem(0, '米饭', $r('app.media.rice'), FoodCategoryEnum.STAPLE, '碗', 209, 46.6, 4.7, 0.5),
  new RecordItem(1, '馒头', $r('app.media.steamed_bun'), FoodCategoryEnum.STAPLE, '个', 114, 24.0, 3.6, 0.6),
  new RecordItem(2, '面包', $r('app.media.bun'), FoodCategoryEnum.STAPLE, '个', 188, 35.2, 5.0, 3.1),
  new RecordItem(3, '全麦吐司', $r('app.media.toast'), FoodCategoryEnum.STAPLE, '片', 91, 15.5, 4.4, 1.3),
  new RecordItem(4, '紫薯', $r('app.media.purple_potato'), FoodCategoryEnum.STAPLE, '个', 163, 42.0, 1.6, 0.4),
  new RecordItem(5, '煮玉米', $r('app.media.corn'), FoodCategoryEnum.STAPLE, '根', 111, 22.6, 4.0, 1.2),
  new RecordItem(6, '黄瓜', $r('app.media.cucumber'), FoodCategoryEnum.FRUIT, '根', 29, 5.3, 1.5, 0.4),
  new RecordItem(7, '蓝莓', $r('app.media.blueberry'), FoodCategoryEnum.FRUIT, '盒', 71, 18.1, 0.9, 0.4),
  new RecordItem(8, '草莓', $r('app.media.strawberry'), FoodCategoryEnum.FRUIT, '颗', 14, 3.1, 0.4, 0.1),
  new RecordItem(9, '火龙果', $r('app.media.pitaya'), FoodCategoryEnum.FRUIT, '个', 100, 24.6, 2.2, 0.5),
  new RecordItem(10, '奇异果', $r('app.media.kiwi'), FoodCategoryEnum.FRUIT, '个', 25, 8.4, 0.5, 0.3),
  new RecordItem(11, '煮鸡蛋', $r('app.media.egg'), FoodCategoryEnum.MEAT, '个', 74, 0.1, 6.2, 5.4),
  new RecordItem(12, '煮鸡胸肉', $r('app.media.chicken_breast'), FoodCategoryEnum.MEAT, '克', 1.15, 0.011, 0.236, 0.018),
  new RecordItem(13, '煮鸡腿肉', $r('app.media.chicken_leg'), FoodCategoryEnum.MEAT, '克', 1.87, 0.0, 0.243, 0.092),
  new RecordItem(14, '牛肉', $r('app.media.beef'), FoodCategoryEnum.MEAT, '克', 1.22, 0.0, 0.23, 0.033),
  new RecordItem(15, '鱼肉', $r("app.media.fish"), FoodCategoryEnum.MEAT, '克', 1.04, 0.0, 0.206, 0.024),
  new RecordItem(16, '牛奶', $r("app.media.milk"), FoodCategoryEnum.MEAT, '毫升', 0.66, 0.05, 0.03, 0.038),
  new RecordItem(17, '酸奶', $r("app.media.yogurt"), FoodCategoryEnum.MEAT, '毫升', 0.7, 0.10, 0.032, 0.019),
  new RecordItem(18, '核桃', $r("app.media.walnut"), FoodCategoryEnum.NUT, '颗', 42, 1.2, 1.0, 3.8),
  new RecordItem(19, '花生', $r("app.media.peanut"), FoodCategoryEnum.NUT, '克', 3.13, 0.13, 0.12, 0.254),
  new RecordItem(20, '腰果', $r("app.media.cashew"), FoodCategoryEnum.NUT, '克', 5.59, 0.416, 0.173, 0.367),
  new RecordItem(21, '无糖拿铁', $r("app.media.coffee"), FoodCategoryEnum.OTHER, '毫升', 0.43, 0.044, 0.028, 0.016),
  new RecordItem(22, '豆浆', $r("app.media.soybean_milk"), FoodCategoryEnum.OTHER, '毫升', 0.31, 0.012, 0.030, 0.016),
]

const workouts: RecordItem[] = [
  new RecordItem(10000, '散步', $r('app.media.ic_walk'), WorkoutCategoryEnum.WALKING, '小时', 111),
  new RecordItem(10001, '快走', $r('app.media.ic_walk'), WorkoutCategoryEnum.WALKING, '小时', 343),
  new RecordItem(10002, '慢跑', $r('app.media.ic_running'), WorkoutCategoryEnum.RUNNING, '小时', 472),
  new RecordItem(10003, '快跑', $r('app.media.ic_running'), WorkoutCategoryEnum.RUNNING, '小时', 652),
  new RecordItem(10004, '自行车', $r('app.media.ic_ridding'), WorkoutCategoryEnum.RIDING, '小时', 497),
  new RecordItem(10005, '动感单车', $r('app.media.ic_ridding'), WorkoutCategoryEnum.RIDING, '小时', 587),
  new RecordItem(10006, '瑜伽', $r('app.media.ic_aerobics'), WorkoutCategoryEnum.AEROBICS, '小时', 172),
  new RecordItem(10007, '健身操', $r('app.media.ic_aerobics'), WorkoutCategoryEnum.AEROBICS, '小时', 429),
  new RecordItem(10008, '游泳', $r('app.media.ic_swimming'), WorkoutCategoryEnum.SWIMMING, '小时', 472),
  new RecordItem(10009, '冲浪', $r('app.media.ic_swimming'), WorkoutCategoryEnum.SWIMMING, '小时', 429),
  new RecordItem(10010, '篮球', $r('app.media.ic_basketball'), WorkoutCategoryEnum.BALLGAME, '小时', 472),
  new RecordItem(10011, '足球', $r('app.media.ic_football'), WorkoutCategoryEnum.BALLGAME, '小时', 515),
  new RecordItem(10012, '排球', $r("app.media.ic_volleyball"), WorkoutCategoryEnum.BALLGAME, '小时', 403),
  new RecordItem(10013, '羽毛球', $r("app.media.ic_badminton"), WorkoutCategoryEnum.BALLGAME, '小时', 386),
  new RecordItem(10014, '乒乓球', $r("app.media.ic_table_tennis"), WorkoutCategoryEnum.BALLGAME, '小时', 257),
  new RecordItem(10015, '哑铃飞鸟', $r("app.media.ic_dumbbell"), WorkoutCategoryEnum.STRENGTH, '小时', 343),
  new RecordItem(10016, '哑铃卧推', $r("app.media.ic_dumbbell"), WorkoutCategoryEnum.STRENGTH, '小时', 429),
  new RecordItem(10017, '仰卧起坐', $r("app.media.ic_sit_up"), WorkoutCategoryEnum.STRENGTH, '小时', 515),
]

class ItemModel {
  // 根据大类返回对应的所有内容
  list(isFood: boolean) {
    return isFood ? foods : workouts
  }
  // 获取不同的分类以及分类对应的list
  getGroupList(isFood: boolean) {
    // 根据是否是食物切换显示不同的类型列表
    let categories = isFood ? FoodCategories : WorkoutCategories
    let items = isFood ? foods : workouts

    // 遍历tab类型
    let data = categories.map(itemCategory => new GroupInfo(itemCategory, []))
    items.forEach(item=>{
      data[item.categoryId].items.push(item)
    })
    return data
  }
}

let itemModel = new ItemModel()

export default itemModel as ItemModel
tab列表页面获取数据后遍历显示不同的页签以及对应的list
ItemTabList.ets
import { CommonConstants } from '../../common/constants/CommonConstants'
import RecordItem from '../../viewmodel/RecordItem'
import itemModel from "../../model/ItemModel"
import GroupInfo from '../../viewmodel/GroupInfo'

@Component
export default struct ItemTabList {
  onPanelShow:(item:RecordItem)=>void
  // 是否是食物类型
  @State isFood:boolean = true

  build() {
    Column() {
      Tabs() {
        TabContent() {
          this.TabContentList(itemModel.list(this.isFood))
        }
        .tabBar("全部")

        // 获取不同的分类信息
        ForEach(itemModel.getGroupList(this.isFood),(groupInfo:GroupInfo)=>{
          TabContent() {
            this.TabContentList(groupInfo.items)
          }
          .tabBar(groupInfo.type.name)
        })
      }
      .barMode(BarMode.Scrollable)
    }
    .layoutWeight(1)
    .width(CommonConstants.THOUSANDTH_940)
  }

  @Builder TabContentList(items:RecordItem[]){
    List({space:CommonConstants.SPACE_6}){
      ForEach(items,(item:RecordItem) => {
        ListItem(){
          Row({space:CommonConstants.SPACE_4}){
            Image(item.image)
              .width(50)

            Column({space:CommonConstants.SPACE_6}){
              Text(item.name)
                .fontWeight(CommonConstants.FONT_WEIGHT_500)
                .fontSize(14)
              Text(`${item.calorie}千卡 / ${item.unit}`)
                .fontSize(12)
                .fontColor($r("app.color.gray"))
                .textAlign(TextAlign.Start)
            }
            .alignItems(HorizontalAlign.Start)

            Blank()

            Image($r("app.media.ic_public_add_norm_filled"))
              .width(25)
              .fillColor($r("app.color.primary_color"))
              .interpolation(ImageInterpolation.High)
          }
          .width("100%")
          .onClick(()=>{
            this.onPanelShow(item)
          })
        }
      })
    }
    .height("100%")
    .width("100%")
  }
}
然后点击每一个分类时将当前的分类信息传递给信息展示弹框中
PanelFoodInfo.ets
import { CommonConstants } from '../../common/constants/CommonConstants'
import RecordItem from '../../viewmodel/RecordItem'

@Component
export default struct PanelFoodInfo {
  @Link amount: number
  @Link recordItem: RecordItem

  build() {
    Column({ space: CommonConstants.SPACE_10 }) {
      Row() {
        Image(this.recordItem.image)
          .width(130)
      }

      Row() {
        Text(this.recordItem.name)
          .fontWeight(CommonConstants.FONT_WEIGHT_700)
      }
      .backgroundColor($r("app.color.lightest_primary_color"))
      .padding(10)
      .borderRadius(4)
      .margin({ bottom: 10 })

      Divider().width(CommonConstants.THOUSANDTH_940).opacity(0.6)

      Row({ space: CommonConstants.SPACE_10 }) {
        this.NutrientInfo("热量(千卡)", this.recordItem.calorie)
        if(this.recordItem.id < 10000){
          this.NutrientInfo("碳水(克)", this.recordItem.carbon)
          this.NutrientInfo("蛋白质(克)", this.recordItem.protein)
          this.NutrientInfo("脂肪(克)", this.recordItem.fat)
        }
      }

      Divider().width(CommonConstants.THOUSANDTH_940).opacity(0.6)
    }
    .margin({ top: -10 })
  }

  @Builder NutrientInfo(label: string, number: number) {
    Column({ space: CommonConstants.SPACE_6 }) {
      Text(label)
        .fontSize(13)
        .fontColor($r("app.color.light_gray"))

      Text(`${(number * this.amount).toFixed(1)}`)
        .fontSize(16)
        .fontWeight(CommonConstants.FONT_WEIGHT_700)
    }
  }
}
实现效果
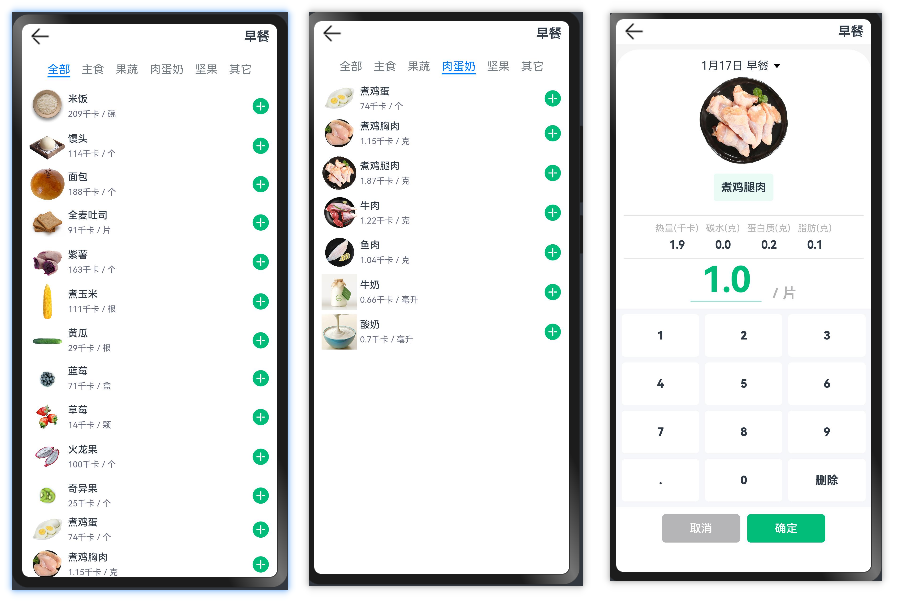


 被折叠的 条评论
为什么被折叠?
被折叠的 条评论
为什么被折叠?
 到【灌水乐园】发言


