


目录
3.1 准备实验 Mysql 的 Replication 环境
3.6.1 在 master 节点关闭 mysql 服务,模拟主节点数据崩溃
MySQL 集群高可用方案
-
(1).MMM:淘汰了,在一致性和高并发稳定性等方面有些问题。
-
(2).MHA:有些人还在用,但也有些问题,也是趋于淘汰的MySQL主从高可用方案。
-
(3).Galera:引领时代的主从复制高可用技术。
-
(4).MariaDB Galera Cluster:MariaDB对Galera的实现。
-
(5).PXC:Percona XtraDB Cluster,是Percona对Galera的自我实现,用的人很多。
-
(6).GR:Group Replication,MySQL官方提供的组复制技术(MySQL 5.7.17引入的技术),基于Paxos算法。
-
MariaDB Galera Cluster、PXC、GR是类似的,都各有优点。但GR是革命性的,基于原生复制技术,据传很多方面都优于PXC。
-
MariaDB Galera Cluster、PXC、GR为了安全性和性能考虑,做出了很多强制性的限制。例如基于GTID复制、只能InnoDB表,每表都必须有主键等。要使用它们提供主从复制的高可用,必须要了解它们的各项限制。
-
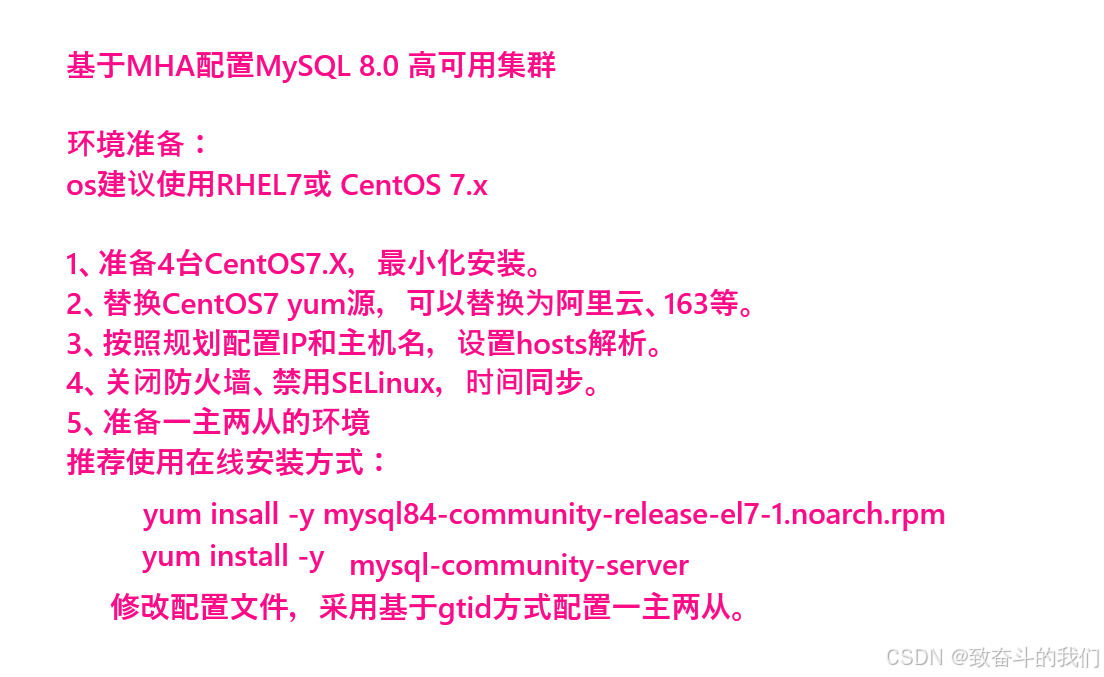
mysql8.0使用MHA实现高可用
一、简介
MHA(Master HA)是一款开源的 MySQL 的高可用程序,它为 MySQL 主从复制架构提供了 automating master failover 功能。MHA 在监控到 master 节点故障时,会提升其中拥有最新数据的 slave 节点成为新的master 节点,在此期间,MHA 会通过于其它从节点获取额外信息来避免一致性方面的问题。MHA 还提供了 master 节点的在线切换功能,即按需切换 master/slave 节点。
MHA 是由日本人 yoshinorim(原就职于DeNA现就职于FaceBook)开发的比较成熟的 MySQL 高可用方案。MHA 能够在30秒内实现故障切换,并能在故障切换中,最大可能的保证数据一致性。目前淘宝也正在开发相似产品 TMHA, 目前已支持一主一从。
二、MHA 服务
2.1 服务角色
MHA 服务有两种角色, MHA Manager(管理节点)和 MHA Node(数据节点):
MHA Manager:
通常单独部署在一台独立机器上管理多个 master/slave 集群(组),每个 master/slave 集群称作一个 application,用来管理统筹整个集群。
MHA node:
运行在每台 MySQL 服务器上(master/slave/manager),它通过监控具备解析和清理 logs 功能的脚本来加快故障转移。
主要是接收管理节点所发出指令的代理,代理需要运行在每一个 mysql 节点上。简单讲 node 就是用来收集从节点服务器上所生成的 bin-log 。对比打算提升为新的主节点之上的从节点的是否拥有并完成操作,如果没有发给新主节点在本地应用后提升为主节点。
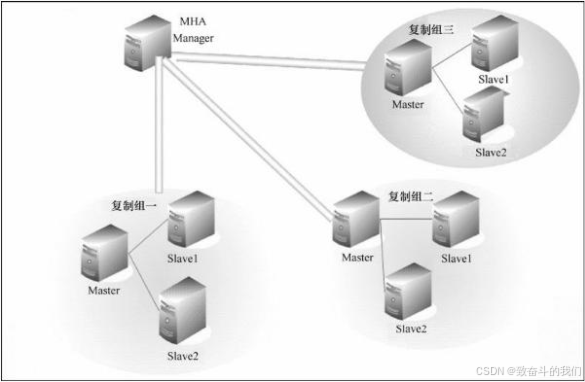
由上图我们可以看出,每个复制组内部和 Manager 之间都需要ssh实现无密码互连,只有这样,在 Master 出故障时, Manager 才能顺利的连接进去,实现主从切换功能。
2.2提供的工具
MHA会提供诸多工具程序, 其常见的如下所示:
Manager节点:
masterha_check_ssh:MHA 依赖的 ssh 环境监测工具;masterha_check_repl:MYSQL 复制环境检测工具;masterga_manager:MHA 服务主程序;masterha_check_status:MHA 运行状态探测工具;masterha_master_monitor:MYSQL master 节点可用性监测工具;masterha_master_swith:master:节点切换工具;masterha_conf_host:添加或删除配置的节点;masterha_stop:关闭 MHA 服务的工具。
Node节点:(这些工具通常由MHA Manager的脚本触发,无需人为操作)
save_binary_logs:保存和复制 master 的二进制日志;apply_diff_relay_logs:识别差异的中继日志事件并应用于其他 slave;purge_relay_logs:清除中继日志(不会阻塞 SQL 线程);- 自定义扩展:
secondary_check_script:通过多条网络路由检测master的可用性;master_ip_failover_script:更新application使用的masterip;report_script:发送报告;init_conf_load_script:加载初始配置参数;master_ip_online_change_script;更新master节点ip地址。
2.3工作原理
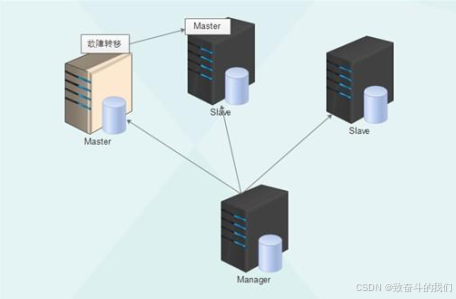
MHA工作原理总结为以下几条:
(1) 从宕机崩溃的 master 保存二进制日志事件(binlog events);
(2) 识别含有最新更新的 slave ;
(3) 应用差异的中继日志(relay log) 到其他 slave ;
(4) 应用从 master 保存的二进制日志事件(binlog events);
(5) 提升一个 slave 为新 master ;
(6) 使用其他的 slave 连接新的 master 进行复制。
三、实现过程
3.1 准备实验 Mysql 的 Replication 环境
3.1.1 相关配置
MHA 对 MYSQL 复制环境有特殊要求,例如各节点都要开启二进制日志及中继日志,各从节点必须显示启用其read-only属性,并关闭relay_log_purge功能等,这里对配置做事先说明。 本实验环境共有四个节点, 其角色分配如下(实验机器均为centos 7.x):
| 机器名称 | IP配置 | 服务角色 | 备注 |
|---|---|---|---|
| manager | 172.16.90.211 | manager控制器 | 用于监控管理 |
| master | 172.16.90.212 | 数据库主服务器 | 开启bin-log relay-log 关闭relay_log |
| slave1 | 172.16.90.213 | 数据库从服务器 | 开启bin-log relay-log 关闭relay_log |
| slave2 | 172.16.90.214 | 数据库从服务器 | 开启bin-log relay-log 关闭relay_log |
为了方便我们后期的操作,我们在各节点的/etc/hosts文件配置内容中添加如下内容:
172.16.90.211 node1.kongd.com node1
172.16.90.212 node2.kongd.com node2
172.16.90.213 node3.kongd.com node3
172.16.90.214 node4.kongd.com node4
3.1.2 初始主节点 master 的配置
我们需要修改 master 的数据库配置文件来对其进行初始化配置:
[root@master ~]# vim /etc/my.cnf
[client]
port	= 3306
socket	= /data/mysql/mysql.sock

[mysql]
prompt = (\\u@\\h) [\d] >\\
no_auto_rehash

[mysqld]
user	= mysql
port	= 3306
server_id = 1					//复制集群中的各节点的id均必须唯一
basedir	= /usr/local/mysql
datadir	= /data/mysql
socket	= /data/mysql/mysql.sock
character_set_server = utf8mb4
skip_name_resolve				//关闭名称解析(非必须)
gtid-mode = on					//启用gtid类型
enforce-gtid-consistency = true //强制GTID的一致性
log-slave-updates = 1			//slave更新是否记入日志
log-bin = mysql-bin				//开启二进制日志
relay-log = relay-log			//开启中继日志
log_error = /data/mysql/error.log

[root@master ~]# systemctl restart mysql.server
3.1.3 所有 slave 节点依赖的配置
我们修改两个 slave 的数据库配置文件,两台机器都做如下操作:
[root@slave1 ~]# vim /etc/my.cnf
[client]
port	= 3306
socket	= /data/mysql/mysql.sock

[mysql]
prompt = (\\u@\\h) [\d] >\\
no_auto_rehash

[mysqld]
user	= mysql
port	= 3306
server_id = 2						//复制集群中的各节点的id均必须唯一
basedir	= /usr/local/mysql
datadir	= /data/mysql
socket	= /data/mysql/mysql.sock
character_set_server = utf8mb4
skip_name_resolve					//关闭名称解析(非必须)
gtid-mode = on
enforce-gtid-consistency = true		//
log-slave-updates = 1				//使得更新的数据写进二进制日志中
log-bin = mysql-bin					//开启中继日志
relay-log = relay-log				//开启二进制日志
read_only = ON						//启用只读属性
relay_log_purge = 0					//是否自动清空不再需要中继日志
log_error = /data/mysql/error.log

[root@slave1 ~]# systemctl restart mysql.server
[root@slave2 ~]# vim /etc/my.cnf
[client]
port	= 3306
socket	= /data/mysql/mysql.sock

[mysql]
prompt = (\\u@\\h) [\d] >\\
no_auto_rehash

[mysqld]
user	= mysql
port	= 3306
server_id = 3						//复制集群中的各节点的id均必须唯一
basedir	= /usr/local/mysql
datadir	= /data/mysql
socket	= /data/mysql/mysql.sock
character_set_server = utf8mb4
skip_name_resolve					//关闭名称解析(非必须)
gtid-mode = on
enforce-gtid-consistency = true		//
log-slave-updates = 1				//使得更新的数据写进二进制日志中
log-bin = mysql-bin					//开启中继日志
relay-log = relay-log				//开启二进制日志
read_only = ON						//启用只读属性
relay_log_purge = 0					//是否自动清空不再需要中继日志
log_error = /data/mysql/error.log
[root@slave2 ~]# systemctl restart mysql.server
3.1.4 配置一主多从复制架构
下面只会给出命令。
master 节点上:
(root@localhost) [(none)]>grant replication slave,replication client on *.* to 'slave'@'172.16.90.%' identified by 'ABCabc123!';
Query OK, 0 rows affected, 1 warning (0.01 sec)

(root@localhost) [(none)]>show master status;
+------------------+----------+--------------+------------------+------------------------------------------+
| File             | Position | Binlog_Do_DB | Binlog_Ignore_DB | Executed_Gtid_Set                        |
+------------------+----------+--------------+------------------+------------------------------------------+
| mysql-bin.000002 |      712 |              |                  | ea5a4ad7-4ccb-11ec-94a8-286ed4893b3e:1-2 |
+------------------+----------+--------------+------------------+------------------------------------------+
1 row in set (0.00 sec)
slave 节点上:
(root@localhost) [(none)]>change master to
    -> master_user='slave',
    -> master_password='ABCabc123!',
    -> master_host='172.16.90.212',
    -> master_auto_position=1;
Query OK, 0 rows affected, 2 warnings (0.01 sec)

(root@localhost) [(none)]>start slave;
Query OK, 0 rows affected (0.00 sec)

(root@localhost) [(none)]>show slave status \G
*************************** 1. row ***************************
               Slave_IO_State: Waiting for master to send event
                  Master_Host: 172.16.90.212
                  Master_User: slave
                  Master_Port: 3306
                Connect_Retry: 60
              Master_Log_File: mysql-bin.000002
          Read_Master_Log_Pos: 712
               Relay_Log_File: relay-log.000002
                Relay_Log_Pos: 925
        Relay_Master_Log_File: mysql-bin.000002
             Slave_IO_Running: Yes
            Slave_SQL_Running: Yes
...
3.2 安装配置MHA
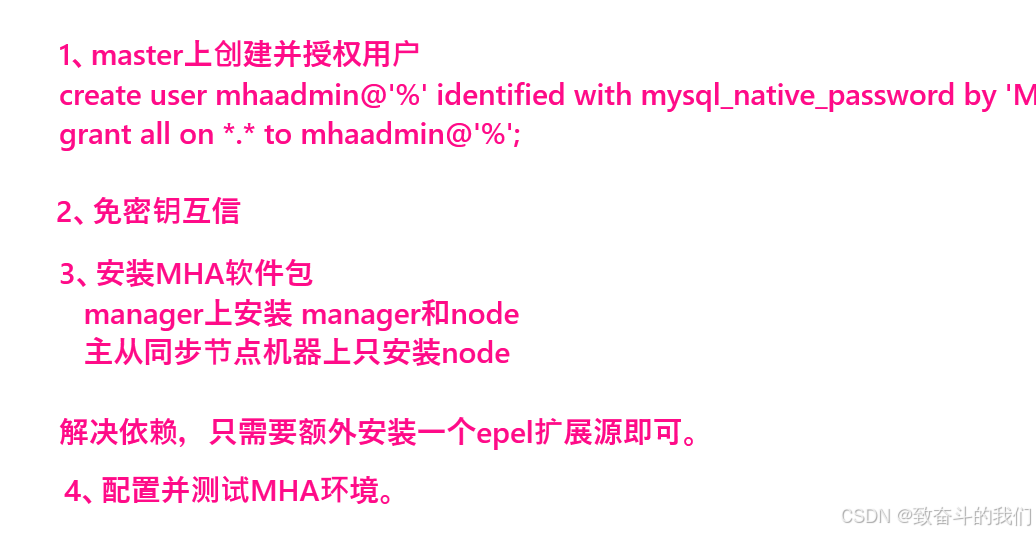
3.2.1 在 master 上进行授权
在所有 Mysql 节点授权拥有管理权限的用户可在本地网络中有其他节点上远程访问。 当然, 此时仅需要且只能在 master 节点运行类似如下 SQL 语句即可。
(root@localhost) [(none)]> grant all on *.* to 'mhaadmin'@'172.16.90.%' identified by 'Mha@123';
Query OK, 0 rows affected, 1 warning (0.00 sec)
3.2.2 准备 ssh 互通环境
MHA集群中的各节点彼此之间均需要基于ssh互信通信,以实现远程控制及数据管理功能。
[root@all ~]# ssh-keygen -f ~/.ssh/id_rsa -P '' -q
[root@all ~]# ssh-copy-id node1

所有节点都生成密钥对,然后拷贝到管理节点,最后管理节点的authorized_keys分发到其他节点
[root@node1 ~]# cat ~/.ssh/authorized_keys
ssh-rsa AAAAB3NzaC1yc2EAAAADAQABAAABAQDN0CAV4pyxzBTev1ooGEp8DCr9RjQYvXwMga79zpLqdWu3sqWu8s5+QM6ylZ127cU66f5aYM/aNW6fujViI40ILOzD1GNGsWGcFCmGd0Do5hCs/rNf+4+FvanCOWGTkr/px15akaLI3YApX4e7qjPwVO2UEEnEXGB/9cGMzN000Nl8EZMq6S+DWZ4W2uap0K+xyznHy1SadjV4bDAaQtAWks8HYWSSQLWHn20LCc66FMVXeanZOd3wc4KgI2tA/3tfNbSnYUhX6+Yu3D8FAqdBdgD0QfKfROSDcwf3qZA9VQsYn6FZ//IFYx95KI/pDMmUD0Fe7ARlhv/Mc0dw9gGf root@node3.kongd.com
ssh-rsa AAAAB3NzaC1yc2EAAAADAQABAAABAQC0ujR4l0Y1XsBRtTCKxViXDs7kF7ephdaW0ovMFMLsFq6WsffrW3aiJyTvDIN6+7WSuuCVsVuxT1GLyWzYgnYnAa6bEYRuBK39idGiVCSdTJ/i3wY0XCiFXSmL2UiW4nBQQQUQd/xtu/PAHFNJ1WUT+DNxUz5pwfP6hYTN5xJ0YDqS2nmAkrP/9Elgb75yGOKIvCpyCZPWzGsAclmr6aw2WngAHoBtKgMP3mYOdTMaF/xQLK7W0n7QB0jaY9culCPKfFkxcHEiDJRxyHPz0SIFvGXxoJ4fHXO41p8nBipIXXOM3QMO8P8s6BM1g+MW9uvEgVi4Gk15jXtyYMnZNbL7 root@node1
ssh-rsa AAAAB3NzaC1yc2EAAAADAQABAAABAQCvRsXlBbUuZDzoeBJ4qYkH+avwDjH3qkgUbHjKcxXolvtScShy4rH2xFdCVcwCltb8HeV1P3O1+f5HCHiCzNxQgrDW/pFmCJmtLojVVijZvpYrtRWlRUZtUOnau438q+WgxJED7RJc2J6Sah+3pxVGuK5AcQhX94VVbl45ZvOvqQd9AoYtyJwepp+B6BcscMPr6xuJhtgQPIPBFzwiqyQ7MWITirZqQvlK0rYw30VYuo3znh1PnmH8BHIm1Z0RPueCNZLnzTyu3+ZrUODcEqipWVemhntGMkadABEiBikmlqJpNPdqlg8uzdmwN4zoP4z05sEptfcN4kNg0/ejy9Tf root@node2.kongd.com
ssh-rsa AAAAB3NzaC1yc2EAAAADAQABAAABAQCyf81Si+QgwEXektvtqxloYI46QtTe3xxRv4cU6hy3AbqJobgk3+d9mrxUkQxtvUA+BfPTQOBAMXYCVJIOSDMMZnkjbHRN3rNsTzoGZ91V8L5rVDwOPjSZC+GZB+8p8EHOtd7ofYcnzp/rBGoBmNo2AC3HAyZp5ZRmxE4/jayVy6XgYVPGSuSitBqWRiKxNLJfbYgpHdXjUhWVA02u9iR9RD+4i7Qy0hYaf3Cv5hEiZwUxnxbmIuVGDuoJAIOEUSK5g9hdcOKxCTuz3mA02bocVKRouIVIK12PQo/t9n8Q5MEQgGVMGQrz0eSxLzLYwJdJuq5pN3K5uYFuslUnDXRJ root@node4.kongd.com

[root@node1 ~]# scp ~/.ssh/authorized_keys node2:~/.ssh/
root@node2's password:
authorized_keys                                                                                                    100% 1598     3.4MB/s   00:00
[root@node1 ~]# scp ~/.ssh/authorized_keys node3:~/.ssh/
root@node3's password:
authorized_keys                                                                                                    100% 1598     2.9MB/s   00:00
[root@node1 ~]# scp ~/.ssh/authorized_keys node4:~/.ssh/
root@node4's password:
authorized_keys                                                                                                    100% 1598     2.9MB/s   00:00

验证:所有节点验证
[root@node4 ~]# for i in node{1..4};do ssh $i hostname;done
node1.kongd.com
node2.kongd.com
node3.kongd.com
node4.kongd.com
3.2.3 安装 MHA 包
安装包下载地址:
mha官网:https://code.google.com/archive/p/mysql-master-ha/github下载地址
https://github.com/yoshinorim/mha4mysql-manager/releases/tag/v0.58
https://github.com/yoshinorim/mha4mysql-node/releases/tag/v0.58
[root@node1 ~]# wget -c https://github.com/yoshinorim/mha4mysql-manager/releases/download/v0.58/mha4mysql-manager-0.58-0.el7.centos.noarch.rpm
[root@node1 ~]# wget -c https://github.com/yoshinorim/mha4mysql-node/releases/download/v0.58/mha4mysql-node-0.58-0.el7.centos.noarch.rpm在本步骤中, Manager节点需要另外多安装一个包。具体需要安装的内容如下:
- MHA Manager服务器需要安装manager和node
- MHA的Node依赖于perl-DBD-MySQL,所以配置epel源。
[root@node1 ~]# wget -O /etc/yum.repos.d/epel.repo http://mirrors.aliyun.com/repo/epel-7.repo
[root@node1 ~]# yum install mha4mysql-*.rpm
其他三条服务器上安装mha4mysql-node。
[root@node2-4 ~]# yum install mha4mysql-node-0.58-0.el7.centos.noarch.rpm -y3.2.4 初始化 MHA ,进行配置
Manager 节点需要为每个监控的 master/slave 集群提供一个专用的配置文件,而所有的 master/slave 集群也可共享全局配置。全局配置文件默认为/etc/masterha_default.cnf,其为可选配置。如果仅监控一组 master/slave 集群,也可直接通过 application 的配置来提供各服务器的默认配置信息。而每个 application 的配置文件路径为自定义。具体操作见下一步骤。
3.2.5 定义 MHA 管理配置文件
为MHA专门创建一个管理用户, 方便以后使用, 在mysql的主节点上, 三个节点自动同步:
创建配置文件目录
mkdir /etc/mha
创建日志目录
mkdir -p /var/log/mha/app1
vim /etc/mha/app1.cnf
配置文件内容如下;
[server default] 			//适用于server1,2,3个server的配置
user=mhaadmin 				//mha管理用户
password=Mha@123 			//mha管理密码
manager_workdir=/var/log/mha/app1 		//mha_master自己的工作路径
manager_log=/var/log/mha/app1/manager.log 	// mha_master自己的日志文件
ssh_user=root 				// 基于ssh的密钥认证
repl_user=slave				//数据库用户名
repl_password=ABCabc123!	//数据库密码
ping_interval=1 			//ping间隔时长
[server1] 					//节点2
hostname=172.16.90.212	 	//节点2主机地址
ssh_port=22 				//节点2的ssh端口
candidate_master=1 			//将来可不可以成为master候选节点/主节点
[server2]
hostname=172.16.90.213
ssh_port=22
candidate_master=1
[server3]
hostname=172.16.90.214
ssh_port=22
candidate_master=1
3.2.6 对四个节点进行检测
1)检测各节点间 ssh 互信通信配置是否 ok
我们在 Manager 机器上输入下述命令来检测:
[root@node1 ~]# masterha_check_ssh --conf=/etc/mha/app1.cnf
Wed Nov 24 11:36:56 2021 - [warning] Global configuration file /etc/masterha_default.cnf not found. Skipping.
Wed Nov 24 11:36:56 2021 - [info] Reading application default configuration from /etc/mha/app1.cnf..
Wed Nov 24 11:36:56 2021 - [info] Reading server configuration from /etc/mha/app1.cnf..
Wed Nov 24 11:36:56 2021 - [info] Starting SSH connection tests..
Wed Nov 24 11:36:57 2021 - [debug]
Wed Nov 24 11:36:56 2021 - [debug]  Connecting via SSH from root@172.16.90.212(172.16.90.212:22) to root@172.16.90.213(172.16.90.213:22)..
Wed Nov 24 11:36:56 2021 - [debug]   ok.
Wed Nov 24 11:36:56 2021 - [debug]  Connecting via SSH from root@172.16.90.212(172.16.90.212:22) to root@172.16.90.214(172.16.90.214:22)..
Wed Nov 24 11:36:56 2021 - [debug]   ok.
Wed Nov 24 11:36:57 2021 - [debug]
Wed Nov 24 11:36:56 2021 - [debug]  Connecting via SSH from root@172.16.90.213(172.16.90.213:22) to root@172.16.90.212(172.16.90.212:22)..
Wed Nov 24 11:36:56 2021 - [debug]   ok.
Wed Nov 24 11:36:56 2021 - [debug]  Connecting via SSH from root@172.16.90.213(172.16.90.213:22) to root@172.16.90.214(172.16.90.214:22)..
Wed Nov 24 11:36:57 2021 - [debug]   ok.
Wed Nov 24 11:36:58 2021 - [debug]
Wed Nov 24 11:36:57 2021 - [debug]  Connecting via SSH from root@172.16.90.214(172.16.90.214:22) to root@172.16.90.212(172.16.90.212:22)..
Wed Nov 24 11:36:57 2021 - [debug]   ok.
Wed Nov 24 11:36:57 2021 - [debug]  Connecting via SSH from root@172.16.90.214(172.16.90.214:22) to root@172.16.90.213(172.16.90.213:22)..
Wed Nov 24 11:36:57 2021 - [debug]   ok.
Wed Nov 24 11:36:58 2021 - [info] All SSH connection tests passed successfully.
2)检查管理的MySQL复制集群的连接配置参数是否OK
[root@node1 ~]# masterha_check_repl --conf=/etc/mha/app1.cnf
...
Wed Nov 24 11:37:55 2021 - [info] Got exit code 0 (Not master dead).

MySQL Replication Health is OK.
3.3 启动 MHA
我们在 manager 节点上执行以下命令来启动 MHA:
[root@node1 ~]# nohup masterha_manager --conf=/etc/mha/app1.cnf --remove_dead_master_conf --ignore_last_failover < /dev/null > /var/log/mha/app1/manager.log 2>&1 &
[1] 11457
启动成功以后,我们来查看一下 master 节点的状态:
[root@node1 ~]# masterha_check_status --conf=/etc/mha/app1.cnf
app1 (pid:11457) is running(0:PING_OK), master:172.16.90.212
查看监控日志命令如下:
[root@node1 ~]# tail -f /var/log/mha/app1/manager.log
172.16.90.212(172.16.90.212:3306) (current master)
 +--172.16.90.213(172.16.90.213:3306)
 +--172.16.90.214(172.16.90.214:3306)

Wed Nov 24 11:45:30 2021 - [warning] master_ip_failover_script is not defined.
Wed Nov 24 11:45:30 2021 - [warning] shutdown_script is not defined.
Wed Nov 24 11:45:30 2021 - [info] Set master ping interval 1 seconds.
Wed Nov 24 11:45:30 2021 - [warning] secondary_check_script is not defined. It is highly recommended setting it to check master reachability from two or more routes.
Wed Nov 24 11:45:30 2021 - [info] Starting ping health check on 172.16.90.212(172.16.90.212:3306)..
Wed Nov 24 11:45:30 2021 - [info] Ping(SELECT) succeeded, waiting until MySQL doesn't respond..
开发启动服务脚本
[root@node1 ~]# vim /etc/init.d/masterha_managerd
#!/bin/bash
# chkconfig: 35 80 20
# description: MHA management script.

STARTEXEC="/usr/bin/masterha_manager --conf"
STOPEXEC="/usr/bin/masterha_stop --conf"
CONF="/etc/mha/app1.cnf"
process_count=`ps -ef |grep -w masterha_manager|grep -v grep|wc -l`
PARAMS="--ignore_last_failover"

case "$1" in
  start)
      if [ $process_count -gt 1 ]
      then
              echo "masterha_manager exists, process is already running"
      else
              echo "Starting Masterha Manager"
              $STARTEXEC $CONF $PARAMS < /dev/null > /var/log/mha/app1/manager.log 2>&1 &
      fi
      ;;
  stop)
      if [ $process_count -eq 0 ]
      then
              echo "Masterha Manager does not exist, process is not running"
      else
              echo "Stopping ..."
              $STOPEXEC $CONF
              while(true)
              do
                  process_count=`ps -ef |grep -w masterha_manager|grep -v grep|wc -l`
                  if [ $process_count -gt 0 ]
                      then
                           sleep 1
                      else
                           break
                  fi
              done
              echo "Master Manager stopped"
      fi
      ;;
  *)
      echo "Please use start or stop as first argument"
      ;;
esac
[root@node1 ~]# chmod +x /etc/init.d/masterha_managerd
[root@node1 ~]# chkconfig --add masterha_managerd
[root@node1 ~]# chkconfig masterha_managerd on
测试服务脚本:
[root@node1 ~]# systemctl start masterha_managerd
[root@node1 ~]# systemctl status masterha_managerd
● masterha_managerd.service - SYSV: MHA management script.
   Loaded: loaded (/etc/rc.d/init.d/masterha_managerd; bad; vendor preset: disabled)
   Active: active (running) since Wed 2021-11-24 15:22:55 CST; 9s ago
     Docs: man:systemd-sysv-generator(8)
  Process: 25727 ExecStart=/etc/rc.d/init.d/masterha_managerd start (code=exited, status=0/SUCCESS)
   CGroup: /system.slice/masterha_managerd.service
           └─25733 perl /usr/bin/masterha_manager --conf /etc/mha/app1.cnf --ignore_last_failover

Nov 24 15:22:54 node1.kongd.com systemd[1]: Starting SYSV: MHA management script....
Nov 24 15:22:55 node1.kongd.com masterha_managerd[25727]: Starting Masterha Manager
Nov 24 15:22:55 node1.kongd.com systemd[1]: Started SYSV: MHA management script..
[root@node1 ~]# ps -ef | grep -w masterha_manager
root      25733      1  0 15:22 ?        00:00:00 perl /usr/bin/masterha_manager --conf /etc/mha/app1.cnf --ignore_last_failover
root      25800   1169  0 15:23 pts/0    00:00:00 grep --color=auto -w masterha_manager

[root@node1 ~]# systemctl stop masterha_managerd
[root@node1 ~]# ps -ef | grep -w masterha_manager
root      25856   1169  0 15:24 pts/0    00:00:00 grep --color=auto -w masterha_manager
3.4 配置VIP
- vip配置可以采用两种方式,一种通过keepalived的方式管理虚拟ip的浮动;
- 另外一种通过脚本方式启动虚拟ip的方式 (即不需要keepalived或者heartbeat类似的软件).
- 为了防止脑裂发生,推荐生产环境采用脚本的方式来管理虚拟ip,而不是使用keepalived来完成。
1、编写脚本
[root@node1 ~]# vim /usr/local/bin/master_ip_failover
#!/usr/bin/env perl

use strict;
use warnings FATAL => 'all';

use Getopt::Long;

my (
    $command,          $ssh_user,        $orig_master_host, $orig_master_ip,
    $orig_master_port, $new_master_host, $new_master_ip,    $new_master_port
);

my $vip = '172.16.90.210/24';
my $key = '1';
my $ssh_start_vip = "/sbin/ifconfig eth0:$key $vip";
my $ssh_stop_vip = "/sbin/ifconfig eth0:$key down";

GetOptions(
    'command=s'          => \$command,
    'ssh_user=s'         => \$ssh_user,
    'orig_master_host=s' => \$orig_master_host,
    'orig_master_ip=s'   => \$orig_master_ip,
    'orig_master_port=i' => \$orig_master_port,
    'new_master_host=s'  => \$new_master_host,
    'new_master_ip=s'    => \$new_master_ip,
    'new_master_port=i'  => \$new_master_port,
);

exit &main();

sub main {

    print "\n\nIN SCRIPT TEST====$ssh_stop_vip==$ssh_start_vip===\n\n";

    if ( $command eq "stop" || $command eq "stopssh" ) {

        my $exit_code = 1;
        eval {
            print "Disabling the VIP on old master: $orig_master_host \n";
            &stop_vip();
            $exit_code = 0;
        };
        if ($@) {
            warn "Got Error: $@\n";
            exit $exit_code;
        }
        exit $exit_code;
    }
    elsif ( $command eq "start" ) {

        my $exit_code = 10;
        eval {
            print "Enabling the VIP - $vip on the new master - $new_master_host \n";
            &start_vip();
            $exit_code = 0;
        };
        if ($@) {
            warn $@;
            exit $exit_code;
        }
        exit $exit_code;
    }
    elsif ( $command eq "status" ) {
        print "Checking the Status of the script.. OK \n";
        exit 0;
    }
    else {
        &usage();
        exit 1;
    }
}

sub start_vip() {
    `ssh $ssh_user\@$new_master_host \" $ssh_start_vip \"`;
}
sub stop_vip() {
     return 0  unless  ($ssh_user);
    `ssh $ssh_user\@$orig_master_host \" $ssh_stop_vip \"`;
}

sub usage {
    print
    "Usage: master_ip_failover --command=start|stop|stopssh|status --orig_master_host=host --orig_master_ip=ip --orig_master_port=port --new_master_host=host --new_master_ip=ip --new_master_port=port\n";
}

[root@node1 ~]# chmod +x /usr/local/bin/master_ip_failover
2、更改manager配置文件
[root@node1 ~]# vim /etc/mha/app1.cnf
[server default]
添加:
master_ip_failover_script=/usr/local/bin/master_ip_failover
3、主库上,手工生成第一个vip地址
[root@node2 ~]# ifconfig eth0:1 172.16.90.210/24
注意:第一次需要在主库上手动配置vip
[root@node2 ~]# ifconfig -a |grep -A 2 "eth0:1"
eth0:1: flags=4163<UP,BROADCAST,RUNNING,MULTICAST>  mtu 1500
        inet 172.16.90.210  netmask 255.255.255.0  broadcast 172.16.90.255
        ether 28:6e:d4:89:3b:3e  txqueuelen 1000  (Ethernet)
4、重启MHA
[root@node1 ~]# systemctl restart masterha_managerd3.5 邮件提醒
3.5.1 开发send_report脚本
[root@node1 ~]# cat /usr/local/bin/send_report
#!/usr/bin/perl

#  Copyright (C) 2011 DeNA Co.,Ltd.
#
#  This program is free software; you can redistribute it and/or modify
#  it under the terms of the GNU General Public License as published by
#  the Free Software Foundation; either version 2 of the License, or
#  (at your option) any later version.
#
#  This program is distributed in the hope that it will be useful,
#  but WITHOUT ANY WARRANTY; without even the implied warranty of
#  MERCHANTABILITY or FITNESS FOR A PARTICULAR PURPOSE.  See the
#  GNU General Public License for more details.
#
#  You should have received a copy of the GNU General Public License
#   along with this program; if not, write to the Free Software
#  Foundation, Inc.,
#  51 Franklin Street, Fifth Floor, Boston, MA  02110-1301  USA

## Note: This is a sample script and is not complete. Modify the script based on your environment.

use strict;
use warnings FATAL => 'all';
use Mail::Sender;
use Getopt::Long;

#new_master_host and new_slave_hosts are set only when recovering master succeeded
my ( $dead_master_host, $new_master_host, $new_slave_hosts, $subject, $body );

my $smtp='smtp.163.com';  # 这里的smtp可以查看要使用的邮箱的smtp值, 或者百度
my $mail_from='from@163.com';  # 填写邮箱
my $mail_user='from@163.com';  # 填写邮箱
my $mail_pass='password';  # 注意这里的密码是邮箱开启smtp服务时设定的密码, 不是邮箱的登陆密码
#my $mail_to=['to1@qq.com','to2@qq.com'];
my $mail_to='to@qq.com';  # 接受邮件的邮箱

GetOptions(
  'orig_master_host=s' => \$dead_master_host,
  'new_master_host=s'  => \$new_master_host,
  'new_slave_hosts=s'  => \$new_slave_hosts,
  'subject=s'          => \$subject,
  'body=s'             => \$body,
);

# Do whatever you want here
mailToContacts($smtp,$mail_from,$mail_user,$mail_pass,$mail_to,$subject,$body);

sub mailToContacts {
    my ($smtp, $mail_from, $mail_user, $mail_pass, $mail_to, $subject, $msg ) = @_;
    open my $DEBUG, ">/var/log/mha/app1/mail.log"  # 这里的路径需要修改,改成一个真是存在的路径即可
        or die "Can't open the debug    file:$!\n";
    my $sender = new Mail::Sender {
        ctype        => 'text/plain;charset=utf-8',
        encoding    => 'utf-8',
        smtp        => $smtp,
        from        => $mail_from,
        auth        => 'LOGIN',
        TLS_allowed    => '0',
        authid        => $mail_user,
        authpwd        => $mail_pass,
        to        => $mail_to,
        subject        => $subject,
        debug        => $DEBUG
    };
    $sender->MailMsg(
        {
            msg => $msg,
            debug => $DEBUG
        }
    ) or print $Mail::Sender::Error;
    return 1;
}

exit 0;

[root@node1 ~]# chmod +x /usr/local/bin/send_report
[root@node1 ~]# touch /var/log/mha/app1/mail.log
3.5.2 更改manager配置文件
[root@node1 ~]# vim /etc/mha/app1.cnf
[server default]
report_script=/usr/local/bin/send_report

重启mha
[root@node1 ~]# systemctl restart masterha_managerd
3.6 测试 MHA 故障转移
3.6.1 在 master 节点关闭 mysql 服务,模拟主节点数据崩溃
[root@node2 ~]# systemctl stop mysqld.service3.6.2 在 manger 节点查看日志
我们来查看日志:
[root@node1 ~]# tail -1 /var/log/mha/app1/manager.log
Master failover to 172.16.90.213(172.16.90.213:3306) completed successfully.
检查VIP
[root@node3 ~]# ifconfig -a |grep -A 2 "eth0:1"
eth0:1: flags=4163<UP,BROADCAST,RUNNING,MULTICAST>  mtu 1500
        inet 172.16.90.210  netmask 255.255.255.0  broadcast 172.16.90.255
        ether 28:6e:d4:89:3b:3e  txqueuelen 1000  (Ethernet)
查看邮件
[root@node1 ~]# tail /var/log/mha/app1/mail.log
<< 172.16.90.213(172.16.90.213:3306): OK: Applying all logs succeeded.
<< 172.16.90.213(172.16.90.213:3306): OK: Activated master IP address.
<< 172.16.90.214(172.16.90.214:3306): OK: Slave started, replicating from 172.16.90.213(172.16.90.213:3306)
<< 172.16.90.213(172.16.90.213:3306): Resetting slave info succeeded.
<< Master failover to 172.16.90.213(172.16.90.213:3306) completed successfully.
<<
<< .
>> 250 Mail OK queued as smtp8,DMCowAAndWpIQJ9h+4uNCg--.40441S2 1637826635
<< QUIT
>> 221 Bye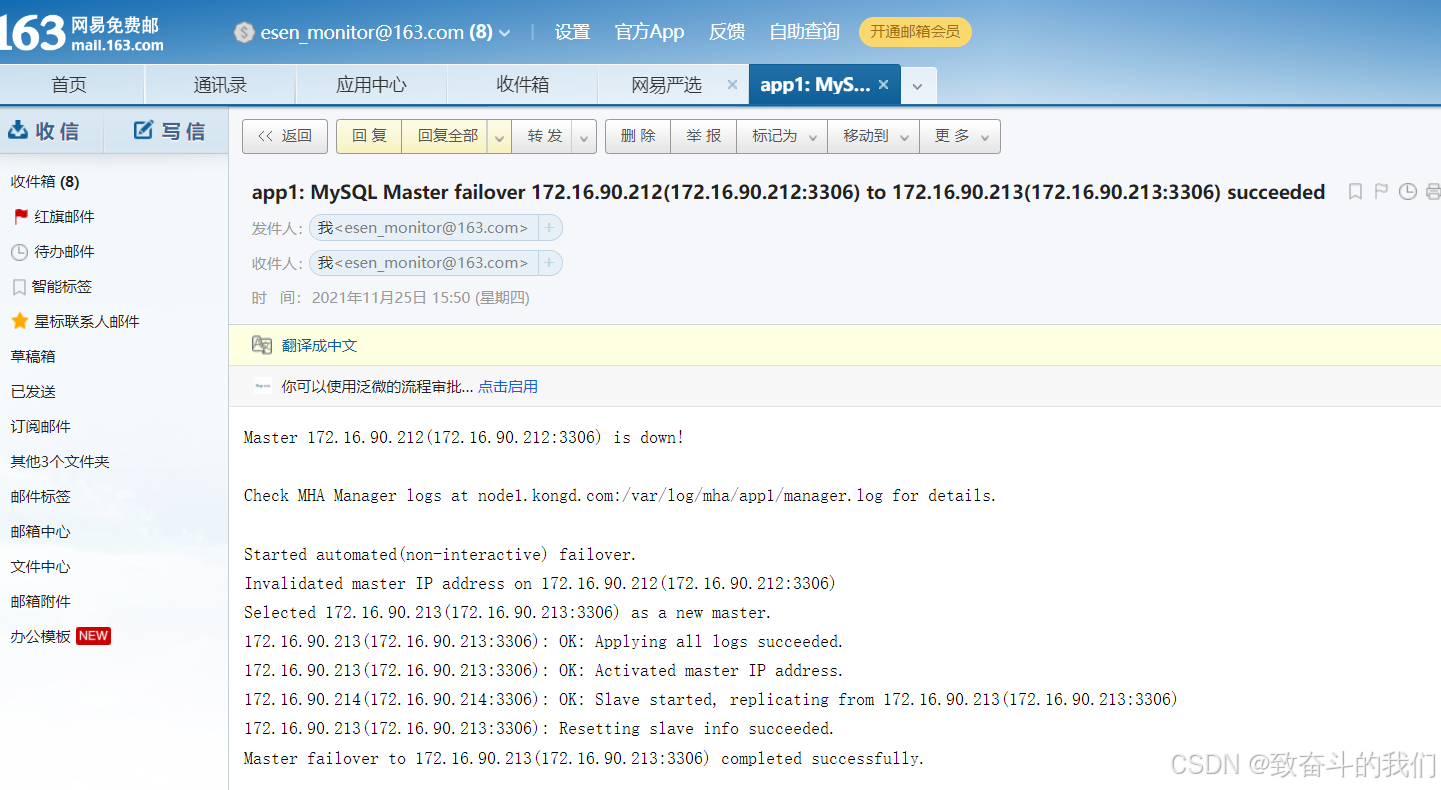
表示 manager 检测到172.16.90.212节点故障, 而后自动执行故障转移, 将172.16.90.213提升为主节点。
注意,故障转移完成后, manager将会自动停止, 此时使用 masterha_check_status 命令检测将会遇到错误提示, 如下所示:
[root@node1 ~]# masterha_check_status -conf=/etc/mha/app1.cnf
app1 is stopped(2:NOT_RUNNING).
3.7 提供新的从节点以修复复制集群
原有 master 节点故障后,需要重新准备好一个新的 MySQL 节点。基于来自于master 节点的备份恢复数据后,将其配置为新的 master 的从节点即可。
注意,新加入的节点如果为新增节点,其 IP 地址要配置为原来 master 节点的 IP,否则,还需要修改 mha.cnf 中相应的 ip 地址。随后再次启动 manager ,并再次检测其状态。
[root@node2 ~]# systemctl start mysql.service

(root@localhost) [(none)]> change master to
    -> master_user='slave',
    -> master_password='ABCabc123!',
    -> master_host='172.16.90.213',
    -> master_auto_position=1;
Query OK, 0 rows affected, 2 warnings (0.00 sec)

(root@localhost) [(none)]> start slave;
Query OK, 0 rows affected (0.01 sec)

(root@localhost) [(none)]> show slave status \G
...
             Slave_IO_Running: Yes
            Slave_SQL_Running: Yes
3.8 新节点提供后再次执行检查操作
添加配置:
[root@node1 ~]# vim /etc/mha/app1.cnf
[server1]
hostname=172.16.90.212
ssh_port=22
candidate_master=1

[root@node1 ~]# systemctl restart masterha_managerd
[root@node1 ~]# masterha_check_status -conf=/etc/mha/app1.cnf
app1 (pid:26445) is running(0:PING_OK), master:172.16.90.213


 2537
2537

 被折叠的 条评论
为什么被折叠?
被折叠的 条评论
为什么被折叠?
 到【灌水乐园】发言


