


使用docker快速安装Oracle11gR2
0. 前言
最近在学习使用Oracle, 在自己安装的过程中, 尝试了各种方式安装Oracle, 经过各种平台和安装方式的尝试, 最终还是认为使用docker安装Oracle最为快捷方便, 现将整体的安装过程整理出来, 与大家一起学习 !
我使用的安装环境是Linux : CentOS 7 x86_64系统
由于安装过程中需要从网络上下载docker 和 Oracle11g的安装镜像, 所以务必保证网络的畅通。
1. 安装及配置docker
1.1 先升级一下自己的CentOS7系统
yum -y update
yum -y upgrade
1.2 卸载旧版的docker 及其相关的依赖
sudo yum remove docker docker-common container-selinux docker-selinux docker-engine
1.2 更新yum
yum update
1.4 安装 yum-utils,它提供了 yum-config-manager,可用来管理yum源
sudo yum install -y yum-utils
1.5 添加yum源
sudo yum-config-manager --add-repo http://mirrors.aliyun.com/docker-ce/linux/centos/docker-ce.repo
1.6 更新索引
注意更新索引的时候,centos7和centos8有所不同
CentOS7
sudo yum makecache fast
CentOS8
sudo yum makecache
docker有两种版本,一种是企业版ee需要付费使用,另一种是社区版ce,免费使用, 在学习过程中, 我们使用的是免费的社区ce版本!
1.7 安装 docker-ce
sudo yum install -y docker-ce
注意: 如果你的系统是CentOS8, 需要先下载如下依赖
-
- 获取rpm
wget https://download.docker.com/linux/centos/7/x86_64/edge/Packages/containerd.io-1.2.6-3.3.el7.x86_64.rpm
-
- 安装
yum -y install containerd.io-1.2.6-3.3.el7.x86_64.rpm
-
- 安装docker-ce
sudo yum install -y docker-ce
1.8 启动 docker
sudo systemctl start docker
1.9 设置 docker 开机自启
sudo systemctl enable docker
1.10 验证是否安装成功
sudo docker info
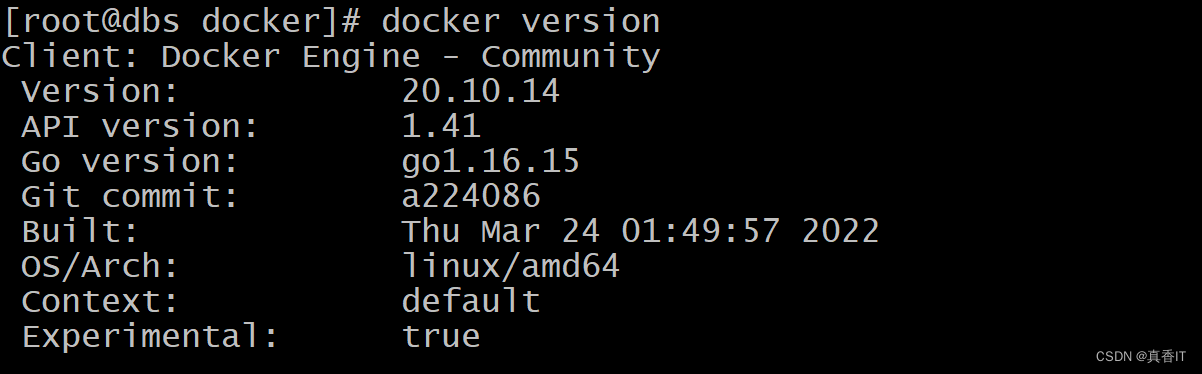
1.11 查看docker版本号
docker version
1.12 更新docker组件
1)安装epel源
yum install -y epel-release
2)安装docker-compose
yum install -y docker-compose
1.13 配置国内的docker仓库镜像地址(下载时稳定,下载速度快)
在/etc/docker 目录下 创建daemon.json 文件
cd /etc/docker
vim /etc/docker/daemon.json
添加的配置内容如下
{
"registry-mirrors": ["https://registry.docker.cn.com"]
}
1.14 重启一下docker服务, 使用镜像地址生效
systemctl restart docker
到此为止docker安装完毕 !
2. 使用docker下载Oracle11g安装包镜像
docker pull registry.cn-hangzhou.aliyuncs.com/helowin/oracle_11g
注意: Oracle11g的镜像近3个G, 且如果网络中断的不支持断点续传, 但是会自动重头下载, 请务必保务必保持网络通畅 !
3. 使用安装运行Oracle11g
3.1 启动oracle容器
docker run -d -p 1521:1521 --name oracle11g registry.cn-hangzhou.aliyuncs.com/helowin/oracle_11g
3.2 登陆oracle容器
docker exec -it oracle11g bash #进入容器
su root
password: helowin
4. 配置Oracle11g
4.1 配置oracle容器
直接将下述内容粘贴至命令行中
cat > /etc/profile.d/ora.sh << EOF
export ORACLE_HOME=/home/oracle/app/oracle/product/11.2.0/dbhome_2
export ORACLE_SID=helowin
export PATH=\$ORACLE_HOME/bin:\$PATH
EOF
4.2 刷新使用配置立即生效
source /etc/profile.d/ora.sh
4.3 为sqlplus命令创建执行的快捷方式
ln -s $ORACLE_HOME/bin/sqlplus /usr/bin
4.4 切换到oracle用户
su - oracle
4.5 以sysdba的身份登录oracle
sqlplus /nolog
conn /as sysdba
4.6 解锁oracle中的scott用户
alter user scott account unlock;
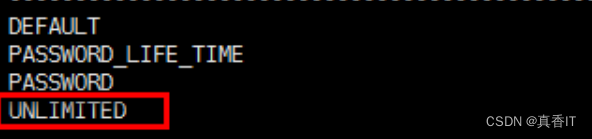
4.7 更改用户的密码更新策略过期世间
默认是180天, 当前环境中的scott的密码是tiger早已过期, 如果不修改后续连接时会报[99999][28001] ORA-28001: the password has expired. 密码过期的错误!
查看当前的过期时长 :180天
select * from dba_profiles where profile='DEFAULT' and resource_name='PASSWORD_LIFE_TIME';

修改
alter profile default limit password_life_time unlimited;
再次查看过期时长, 现在为永不失效
select * from dba_profiles where profile='DEFAULT' and resource_name='PASSWORD_LIFE_TIME';
4.8 为scott用户设置密码
alter user scott identified by tiger
到此为止, oracle配置完成 !
5. 使用远程工具连接Oracle11g
以datagrip/idea的数据库工具为例, 其他工具也一样!
连接名:oracle11-scott 自己随便起
连接类型:Basic 或者 thin
主机名或IP地址:192.168.xxx.xxx 你安装oracle服务的主机地址
端口:1521
服务名/SID:helowin
用户名:scott
密码:tiger

欢迎大家留言一起讨论学习!


 806
806


 被折叠的 条评论
为什么被折叠?
被折叠的 条评论
为什么被折叠?
 到【灌水乐园】发言


