新建工程步骤
1 、打开Eclipse
2 、新建一个java工程,包
3 、增加buildpath
4 、新建测试类,继成UiAutomatorTestCase
5 、编写用例,方法名必须test开头
6 、编译与运行
UiAutomatorView 用于查看当前界面的布局与控件信息
工具目录:位于sdk目录下的tools文件夹中的UiAutomatorView.bat
编译与运行测试代码:
1.创建build文件
android create uitest-project -n <jar name> -t 1 -p <workspace path>
2.修改build文件
进入工作空间,打开build.xml文件,将第二行的help修改为build
3.开始编译
ant –buildfile <build.xml 文件路径>
4.push文件
adb push <path_to_output_jar> /data/local/tmp/
5.运行测试
adb shell uiautomator runtest <jar name>-c <包名>.<类名>[#test name]
以上编译与运行测试代码,很麻烦,而且效率很底,不建议使用
快速调试
命令调试繁琐效率低下;
将调试步骤转换成脚步或者java代码;
命令调试繁琐效率低下;
将调试步骤转换成脚步或者java代码;
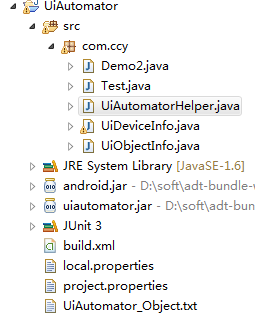
测试文件目录如下
UiAutomatorHelper.java文件贴在工程里(否则就要用命令调试,很麻烦)
package com.ccy;

import java.io.BufferedReader;
import java.io.BufferedWriter;
import java.io.File;
import java.io.FileInputStream;
import java.io.FileNotFoundException;
import java.io.FileOutputStream;
import java.io.FileWriter;
import java.io.IOException;
import java.io.InputStream;
import java.io.InputStreamReader;
import java.io.OutputStreamWriter;

public class UiAutomatorHelper {

	// 以下参数需要配置,用例集id,用例id,安卓id
	private static String android_id = "3";
	private static String jar_name = "";
	private static String test_class = "";
	private static String test_name = "";

	// 工作空间不需要配置,自动获取工作空间目录
	private static String workspace_path;

    public static void main(String[] args) {

	}
	public UiAutomatorHelper() {
		workspace_path = getWorkSpase();
		System.out.println("---工作空间:\t\n" + getWorkSpase());
	}

	/**
	 * 需求:UI工程调试构造器,输入jar包名,包名,类名,用例名
	 * @param jarName
	 * @param testClass
	 * @param testName
	 * @param androidId
	 */
	public UiAutomatorHelper(String jarName, String testClass, String testName,
			String androidId) {
		System.out.println("-----------start--uiautomator--debug-------------");
		workspace_path = getWorkSpase();
		System.out.println("----工作空间:\t\n" + getWorkSpase());

		jar_name = jarName;
		test_class = testClass;
		test_name = testName;
		android_id = androidId;
		runUiautomator();
		System.out.println("*******************");
		System.out.println("---FINISH DEBUG----");
		System.out.println("*******************");
	}
	// 运行步骤
	private void runUiautomator() {
		creatBuildXml();
		modfileBuild();
		buildWithAnt();
		if (System.getProperty("os.name").equals("Linux")) {
			pushTestJar(workspace_path + "/bin/" + jar_name + ".jar");
		}else{
		pushTestJar(workspace_path + "\\bin\\" + jar_name + ".jar");
		}

		if (test_name.equals("")) {
			runTest(jar_name, test_class);
			return;
		}
		runTest(jar_name, test_class + "#" + test_name);
	}


	// 1--判断是否有build
	public boolean isBuild() {
		File buildFile = new File("build.xml");
		if (buildFile.exists()) {
			return true;
		}
		// 创建build.xml
		execCmd("cmd /c android create uitest-project -n " + jar_name + " -t "
				+ android_id + " -p " + workspace_path);
		return false;
	}

	// 创建build.xml
	public void creatBuildXml() {
		execCmd("cmd /c android create uitest-project -n " + jar_name + " -t "
				+ android_id + " -p " + "\""+workspace_path+ "\"");
	}

	// 2---修改build
	public void modfileBuild() {
		StringBuffer stringBuffer = new StringBuffer();
		try {
			File file = new File("build.xml");
			if (file.isFile() && file.exists()) { // 判断文件是否存在
				InputStreamReader read = new InputStreamReader(
						new FileInputStream(file));
				BufferedReader bufferedReader = new BufferedReader(read);
				String lineTxt = null;
				while ((lineTxt = bufferedReader.readLine()) != null) {
					if (lineTxt.matches(".*help.*")) {
						lineTxt = lineTxt.replaceAll("help", "build");
						// System.out.println("修改后: " + lineTxt);
					}
					stringBuffer = stringBuffer.append(lineTxt + "\t\n");
				}
				read.close();
			} else {
				System.out.println("找不到指定的文件");
			}
		} catch (Exception e) {
			System.out.println("读取文件内容出错");
			e.printStackTrace();
		}

		System.out.println("-----------------------");

		// 修改后写回去
		writerText("build.xml", new String(stringBuffer));
		System.out.println("--------修改build完成---------");
	}


	// 3---ant 执行build
	public void buildWithAnt() {
		if (System.getProperty("os.name").equals("Linux")) {
			execCmd("ant");
			return;
		}
		execCmd("cmd /c ant");
	}

	// 4---push jar
	public void pushTestJar(String localPath) {
		localPath="\""+localPath+"\"";
		System.out.println("----jar包路径: "+localPath);
		String pushCmd = "adb push " + localPath + " /data/local/tmp/";
		System.out.println("----" + pushCmd);
		execCmd(pushCmd);
	}

	// 运行测试
	public void runTest(String jarName, String testName) {
		String runCmd = "adb shell uiautomator runtest ";
		String testCmd = jarName + ".jar " + "--nohup -c " + testName;
		System.out.println("----runTest:  " + runCmd + testCmd);
		execCmd(runCmd + testCmd);
	}

	public String getWorkSpase() {
		File directory = new File("");
		String abPath = directory.getAbsolutePath();
		return abPath;
	}

	/**
	 * 需求:执行cmd命令,且输出信息到控制台
	 * @param cmd
	 */
	public void execCmd(String cmd) {
		System.out.println("----execCmd:  " + cmd);
		try {
			Process p = Runtime.getRuntime().exec(cmd);
			//正确输出流
			InputStream input = p.getInputStream();
			BufferedReader reader = new BufferedReader(new InputStreamReader(
					input));
			String line = "";
			while ((line = reader.readLine()) != null) {
				System.out.println(line);
                saveToFile(line, "runlog.log", false);
			}
			//错误输出流
			InputStream errorInput = p.getErrorStream();
			BufferedReader errorReader = new BufferedReader(new InputStreamReader(
					errorInput));
			String eline = "";
			while ((eline = errorReader.readLine()) != null) {
				System.out.println(eline);
                saveToFile(eline, "runlog.log", false);
			}
		} catch (IOException e) {
			e.printStackTrace();
		}
	}
	/**
	 * 需求:写如内容到指定的文件中
	 *
	 * @param path
	 *            文件的路径
	 * @param content
	 *            写入文件的内容
	 */
	public void writerText(String path, String content) {

		File dirFile = new File(path);

		if (!dirFile.exists()) {
			dirFile.mkdir();
		}

		try {
			// new FileWriter(path + "t.txt", true) 这里加入true 可以不覆盖原有TXT文件内容 续写
			BufferedWriter bw1 = new BufferedWriter(new FileWriter(path));
			bw1.write(content);
			bw1.flush();
			bw1.close();
		} catch (IOException e) {
			e.printStackTrace();
		}
	}

    public void saveToFile(String text,String path,boolean isClose) {
    	File file=new File("runlog.log");
		BufferedWriter bf=null;
		try {
		    FileOutputStream outputStream=new FileOutputStream(file,true);
		    OutputStreamWriter outWriter=new OutputStreamWriter(outputStream);
		    bf=new BufferedWriter(outWriter);
			bf.append(text);
			bf.newLine();
			bf.flush();

			if(isClose){
				bf.close();
			}
		} catch (FileNotFoundException e1) {
			e1.printStackTrace();
		} catch (IOException e) {
			e.printStackTrace();
		}


	}


}package com.ccy;
import android.bluetooth.BluetoothClass.Device;
import android.graphics.Rect;
import android.view.KeyEvent;
import com.android.uiautomator.core.UiDevice;
import com.android.uiautomator.core.UiObject;
import com.android.uiautomator.core.UiObjectNotFoundException;
import com.android.uiautomator.core.UiSelector;
import com.android.uiautomator.testrunner.UiAutomatorTestCase;
/**
* UiDevice 代表设备状态, 可以获得设备的不同属性如屏幕旋转方向,屏幕大小等。 还可以执行设备级的操作,如强制横竖屏,按压屏幕与按压各种按键等。
*
* @author amy
*/
public class UiDeviceInfo extends UiAutomatorTestCase {
public void testDevice() {
// UiDevice.getInstance().pressHome();
// //会出现空指针异常
// getUiDevice().pressHome();
Demo2 demo2 = new Demo2();
demo2.press();
}
public static void main(String[] args) {
String jarName, testClass, testName, androidId;
jarName = "UiDeviceInfo";
testClass = "com.ccy.UiDeviceInfo";
testName = "testDevice";
androidId = "1";
new UiAutomatorHelper(jarName, testClass, testName, androidId);
}
public void testPress() {
UiDevice.getInstance().pressHome();
System.err.println("已点完!");
}
/**
* 键盘映射码 1.KeyEvent 按键事件 2.META Key 辅助功能键:ALT SHIFT Caps_Lock
*/
public void testKeyCode() {
// 点击小写的abc
UiDevice.getInstance().pressKeyCode(KeyEvent.KEYCODE_A);
UiDevice.getInstance().pressKeyCode(KeyEvent.KEYCODE_B);
UiDevice.getInstance().pressKeyCode(KeyEvent.KEYCODE_C);
// 大写的ABC
UiDevice.getInstance().pressKeyCode(KeyEvent.KEYCODE_A, 1);
UiDevice.getInstance().pressKeyCode(KeyEvent.KEYCODE_B, 1);
UiDevice.getInstance().pressKeyCode(KeyEvent.KEYCODE_C, 1);
}
/**
* 获取坐标与坐标点击
*/
public void testClick() {
// 根据坐标点击
// UiDevice.getInstance().click(255, 300);
// 获取屏的高度
int height = UiDevice.getInstance().getDisplayHeight();
// 获取屏的宽度
int width = UiDevice.getInstance().getDisplayWidth();
// 点击屏的中点
UiDevice.getInstance().click(width / 2, height / 2);
}
/**
* 获取矩形区域
* @throws UiObjectNotFoundException
*/
public void testRect() throws UiObjectNotFoundException {
UiObject tianqi=new UiObject(new UiSelector().index(2));
Rect r = tianqi.getBounds();
int left = r.left;
int top = r.top;
int right = r.right;
int bottom = r.bottom;
System.err.println("["+left+","+top+"]");
System.err.println("["+right+","+bottom+"]");
}
}
注意:要连手机或模拟器,这里要运行哪个方法,就把
testName = "testDevice";里改一下函数名后继还在整理中。。。


 963
963

 被折叠的 条评论
为什么被折叠?


