


重点标识
代理工厂内部,AOP的使用!
源码分析
我们知道,使用代理工厂,就能直接由工厂来帮我们进行代理,那代理工厂内部又是什么样子的呢,我们来看一下:
ProxyFactory#getProxy(),进入方法内部,我们可以看到如下:
	public Object getProxy() {
		return createAopProxy().getProxy();
	}
createAopProxy,顾名思义,就是创建一个AOP代理,看到这里,那大家就很清楚了,又和前面呼应上了,AOP的底层就是动态代理。
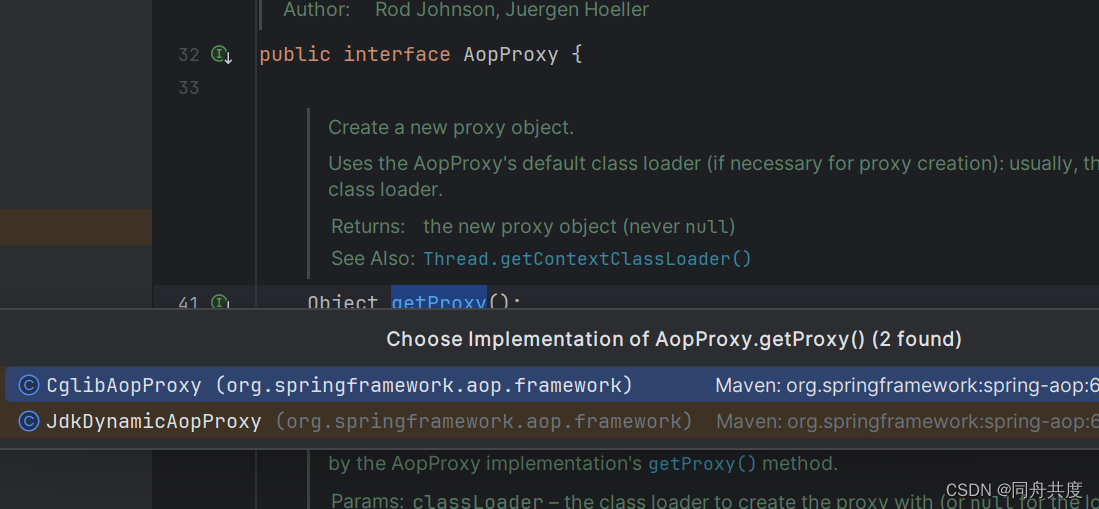
我们进入getProxy()方法中,就到了AopProxy代理的接口,在这里,我们可以看到getProxy()的实现类,如下。
就两个,jdk和Cglib代理方法。
回到之前的createAopProxy,什么情况下,系统会采用Cglib动态代理,又是什么情况下,使用Jdk动态代理呢,在这个方法给了我们答案。
	@Override
	public AopProxy createAopProxy(AdvisedSupport config) throws AopConfigException {
	     //这里大概解释一下,先判断有没有开isOptimize,也就是优化
	     //然后看他是不是一个代理带,最后再看他是不是接口,只要满足其中一条,就会进入这个按断,去走Cglib动态代理,否则直接就是Jdk动态代理了
		if (config.isOptimize() || config.isProxyTargetClass() || hasNoUserSuppliedProxyInterfaces(config)) {
			Class<?> targetClass = config.getTargetClass();
			if (targetClass == null) {
				throw new AopConfigException("TargetSource cannot determine target class: " +
						"Either an interface or a target is required for proxy creation.");
			}
			//是不是接口,有没有代理类
			if (targetClass.isInterface() || Proxy.isProxyClass(targetClass) || ClassUtils.isLambdaClass(targetClass)) {
				return new JdkDynamicAopProxy(config);
			}
			return new ObjenesisCglibAopProxy(config);
		}
		else {
			return new JdkDynamicAopProxy(config);
		}
	}
好了,上面已经捋顺了AOP底层动态代理的源码,接下来,我们就来看一下,AOP到底是怎么使用的。
AOP的使用
AOP中有五种通知,
前置通知,目标方法执行之前通知。
后置通知,目标方法执行后通知
返回通知,有返回值后通知,这里注意,void也算。
异常通知,出现异常,进行通知。
环绕通知,包含前面四个,看例子理解。
XML配置AOP
和之前一样,准备一个计算接口,一个计算实现类,简单点。
public interface ICalculator {
    int add(int a,int b);
    }
    public class ICalculatorImpl implements ICalculator{
    @Override
    public int add(int a, int b) {
        return a+b;
    }
}
然后,再定义通知类,注解很详细,就不多说了。
public class LogAdvice {


    /**
     * 前置通知
     * @param joinPoint
     */
    public void before(JoinPoint joinPoint){

        System.out.println(joinPoint.getSignature().getName()+"方法开始执行了!");

    }

    /**
     *
     * 后置通知
     * @param joinPoint
     */

    public void after(JoinPoint joinPoint){

        System.out.println(joinPoint.getSignature().getName()+"方法执行结束了!");

    }

    /**
     * 返回通知
     * 知道目标方法的返回值
     * @param joinPoint
     * @param o 目标方法的返回值,这里注意,只有跟目标方法的返回值类型匹配的时候,
     *          才会拿到值,我这里拦截到所有
     */
    public void afterReturning(JoinPoint joinPoint,Object o){

        System.out.println(joinPoint.getSignature().getName()+"方法返回"+o);

    }

    /**
     * 异常通知
     * 抛出异常,会触发
     *
     * @param joinPoint
     * @param o  这里注意,异常参数要对应上
     */
    public void afterThrow(JoinPoint joinPoint,Throwable o){

        System.out.println(joinPoint.getSignature().getName()+"方法执行抛出"+o.getMessage());

    }

    /**
     *
     * 环绕通知
     */
    public Object around(ProceedingJoinPoint pjp){
        //前置通知
        Object proceed;
        try {
            proceed = pjp.proceed();
        } catch (Throwable e) {
            //异常通知
            throw new RuntimeException(e);
        }

        //后置通知
        System.out.println("环绕通知-后置"+pjp.getTarget().toString());
          return proceed;
    }
}
最后,则在xml中进行配置,如下
   <bean class="org.tongzhou.ICalculatorImpl" id="iCalculator"/>


        <bean class="org.tongzhou.LogAdvice" id="advice"/>
    <!--        注册切面,切点和通知-->
        <aop:config>
    <!--        id配置切点,切点可以配置多个,expression 表达式配置拦截规则-->
    <!--        int  返回类型 可以用*代表任意类型  地址不指定方法名,则可以用*代表这个类下所有的方法,
                参数不知道的情况下,可以用..代替,表示任意参数-->
            <aop:pointcut id="pc1" expression="execution(int org.tongzhou.ICalculatorImpl.add(int,int))"/>
    <!--       指定通知类-->
            <aop:aspect ref="advice">
                <aop:before method="before" pointcut-ref="pc1"/>
                <aop:after method="after" pointcut-ref="pc1"/>
                <aop:after-returning method="afterReturning" returning="o" pointcut-ref="pc1"/>
                <aop:after-throwing method="afterThrow" throwing="o" pointcut-ref="pc1"/>
                <aop:around method="around" pointcut-ref="pc1"/>

            </aop:aspect>
        </aop:config>
调用,看看效果:
    public static void main(String[] args) {
        ClassPathXmlApplicationContext classPathXmlApplicationContext = new ClassPathXmlApplicationContext("applicationContext.xml");

        //这里注意,要用ICalculator接口获取,因为我们在xml中配置了aop,实现类就被动态代理了,所以在Spring容器中的就是一个代理类,和前面那篇一样,不大理解的可以对照前面那篇一起看。
        ICalculator bean = classPathXmlApplicationContext.getBean(ICalculator.class);
        bean.add(2,3);
    }
纯Java配置AOP
大概解释一下,@ComponentScan,进行包扫描,将Bean注册到Spring容器中去。
@Configuration
@ComponentScan
public class JavaConfig {
}
@Component
public class ICalculatorImpl implements ICalculator{
    @Override
    public int add(int a, int b) {
        return a+b;
    }
}
//注册到spring容器中
@Component
//切面
@Aspect
//开启动态代理
@EnableAspectJAutoProxy
public class LogAdvisor {

    //顶一个切点,拦截这个类下的所有方法,任意参数,任意类型的返回值
    @Pointcut("execution(* org.tongzhou.ICalculatorImpl.*(..))")
    public void pc1(){

    }
    /**
     * 前置通知
     * @param joinPoint
     */
    @Before("pc1()")
    public void before(JoinPoint joinPoint){

        System.out.println(joinPoint.getSignature().getName()+"方法开始执行了!");

    }

    /**
     *
     * 后置通知
     * @param joinPoint
     */
    @After("pc1()")
    public void after(JoinPoint joinPoint){

        System.out.println(joinPoint.getSignature().getName()+"方法执行结束了!");

    }

    /**
     * 返回通知
     * 知道目标方法的返回值
     * @param joinPoint
     * @param o 目标方法的返回值,这里注意,只有跟目标方法的返回值类型匹配的时候,
     *          才会拿到值,我这里拦截到所有
     */
    @AfterReturning(value = "pc1()",returning = "o")
    public void afterReturning(JoinPoint joinPoint,Object o){

        System.out.println(joinPoint.getSignature().getName()+"方法返回"+o);

    }

    /**
     * 异常通知
     * 抛出异常,会触发
     *
     * @param joinPoint
     * @param o  这里注意,异常参数要对应上
     */
    @AfterThrowing(value = "pc1()",throwing = "o")
    public void afterThrow(JoinPoint joinPoint,Throwable o){

        System.out.println(joinPoint.getSignature().getName()+"方法执行抛出"+o.getMessage());

    }

    /**
     *
     * 环绕通知
     */
    @Around(value = "pc1()")
    public Object around(ProceedingJoinPoint pjp){
        //前置通知
        Object proceed;
        try {
            proceed = pjp.proceed();
        } catch (Throwable e) {
            //异常通知
            throw new RuntimeException(e);
        }

        //后置通知
        System.out.println("环绕通知-后置"+pjp.getTarget().toString());
          return proceed;
    }
}
运行看一下:这里注意,这边使用的是Jdk动态代理,如果想强行让他使用Cglib动态代理,则@EnableAspectJAutoProxy(proxyTargetClass = true)就可以了。
    public static void main(String[] args) {
        AnnotationConfigApplicationContext annotationConfigApplicationContext = new AnnotationConfigApplicationContext(JavaConfig.class);

        ICalculator bean = annotationConfigApplicationContext.getBean(ICalculator.class);
        bean.add(2,3);
    }
XML+Java注解配置AOP
Java配置不动,采用xml进行包扫描,非常不建议,没啥意义,了解下就行。
<context:component-scan base-package="org.tongzhou"/>
结语
每天努力一点点,就会成长一点点。


 938
938


 被折叠的 条评论
为什么被折叠?
被折叠的 条评论
为什么被折叠?
 到【灌水乐园】发言


