


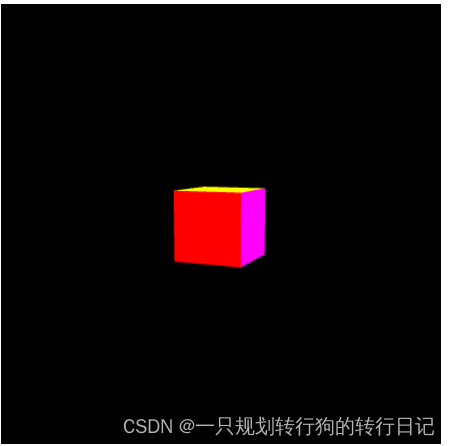
效果
原理
结合透视矩阵和视觉矩阵进行绘制
知识点
01透视矩阵
透视矩阵将视图空间中的坐标转换为裁剪空间中的坐标,使得更远的物体看起来更小。
function perspectiveMatrix(fov, aspect, near, far) {
  const f = 1.0 / Math.tan(fov / 2);
  const nf = 1 / (near - far);

  return new Float32Array([
    f / aspect, 0, 0, 0,
    0, f, 0, 0,
    0, 0, (far + near) * nf, -1,
    0, 0, (2 * far * near) * nf, 0
  ]);
}
参数解释
函数 perspectiveMatrix 创建并返回一个透视投影矩阵,用于3D图形的透视投影。以下是每个参数的详细说明:
-
fov(Field of View, 视野):- 视野角度,即观察者在垂直方向上能够看到的视角。通常以弧度表示,角度单位可以通过
Math.PI / 180转换为弧度。 - 例如,
45 * Math.PI / 180表示45度的视角。
- 视野角度,即观察者在垂直方向上能够看到的视角。通常以弧度表示,角度单位可以通过
-
aspect(Aspect Ratio, 纵横比):- 视图的宽高比,即视图的宽度除以高度。它决定了横向和纵向的缩放比例。
- 例如,如果视口的宽度是800像素,高度是600像素,则
aspect= 800 / 600 = 4 / 3。
-
near(Near Clipping Plane, 近裁剪平面):- 近裁剪平面的距离,即从观察者到最近可见物体的距离。该值必须大于0。
- 例如,设置为0.1表示从0.1单位距离开始可见物体。
-
far(Far Clipping Plane, 远裁剪平面):- 远裁剪平面的距离,即从观察者到最远可见物体的距离。该值必须大于
near值。 - 例如,设置为100.0表示到100单位距离结束可见物体。
- 远裁剪平面的距离,即从观察者到最远可见物体的距离。该值必须大于
02视图矩阵
视图矩阵将世界空间中的坐标转换为视图空间中的坐标,表示相机的视点。
function lookAtMatrix(eye, center, up) {
  const zAxis = normalize(subtractVectors(eye, center));
  const xAxis = normalize(cross(up, zAxis));
  const yAxis = normalize(cross(zAxis, xAxis));

  return new Float32Array([
    xAxis[0], yAxis[0], zAxis[0], 0,
    xAxis[1], yAxis[1], zAxis[1], 0,
    xAxis[2], yAxis[2], zAxis[2], 0,
    -dot(xAxis, eye), -dot(yAxis, eye), -dot(zAxis, eye), 1
  ]);
}

function normalize(v) {
  const length = Math.sqrt(v[0] * v[0] + v[1] * v[1] + v[2] * v[2]);
  return [v[0] / length, v[1] / length, v[2] / length];
}

function subtractVectors(a, b) {
  return [a[0] - b[0], a[1] - b[1], a[2] - b[2]];
}

function cross(a, b) {
  return [
    a[1] * b[2] - a[2] * b[1],
    a[2] * b[0] - a[0] * b[2],
    a[0] * b[1] - a[1] * b[0]
  ];
}

function dot(a, b) {
  return a[0] * b[0] + a[1] * b[1] + a[2] * b[2];
}
参数解释
函数 lookAtMatrix 用于生成一个视图矩阵,用于将场景从世界空间转换到观察者空间。它通常用于实现相机的视图转换,使得相机看向特定的方向。这个函数的参数如下:
-
eye:- 相机的位置,表示观察者所在的点。
- 例如
[1, 1, 1]表示相机位于 (1, 1, 1) 的位置。
-
center:- 视点,表示相机所看向的目标点。
- 例如
[0, 0, 0]表示相机看向 (0, 0, 0) 的位置。
-
up:- 上方向向量,表示哪一个方向是相机的“上”方向。通常为
[0, 1, 0],表示正Y方向。
- 上方向向量,表示哪一个方向是相机的“上”方向。通常为
函数 lookAtMatrix 用于生成一个视图矩阵,用于将场景从世界空间转换到观察者空间。它通常用于实现相机的视图转换,使得相机看向特定的方向。这个函数的参数如下:

eye:

相机的位置,表示观察者所在的点。
例如 [1, 1, 1] 表示相机位于 (1, 1, 1) 的位置。
center:

视点,表示相机所看向的目标点。
例如 [0, 0, 0] 表示相机看向 (0, 0, 0) 的位置。
up:

上方向向量,表示哪一个方向是相机的“上”方向。通常为 [0, 1, 0],表示正Y方向。
逻辑
设置透视矩阵和视觉矩阵
代码
<!DOCTYPE html>
<html lang="en">
  <head>
    <meta charset="UTF-8" />
    <meta name="viewport" content="width=device-width, initial-scale=1.0" />
    <title>立方体绘制</title>
    <style>
      * {
        margin: 0;
        padding: 0;
      }
      canvas {
        margin: 50px auto 0;
        display: block;
        background: yellow;
      }
    </style>
    <script src="test.js"></script>
  </head>
  <body>
    <canvas id="canvas" width="400" height="400"></canvas>
    <script>
      // 获取
      const canvas = document.getElementById('canvas')
      const gl = canvas.getContext('webgl')
      // 定义片源着色器和顶点着色器
      const vsSource = `
        attribute vec4 apos;
        attribute vec4 acolor;
        varying vec4 vcolor;
        uniform mat4 u_projectionMatrix;
      uniform mat4 u_viewMatrix;
        void main() {
          gl_Position =u_projectionMatrix * u_viewMatrix * apos;
          vcolor = acolor;
        }
      `
      const fsSource = `
        precision mediump float;
        varying vec4 vcolor;
        void main() {
          gl_FragColor = vcolor;
        }
      `
      //   初始化webgl
      const program = initShader(gl, vsSource, fsSource)
      gl.useProgram(program)
      // 获取 uniform 位置
      const u_projectionMatrixLocation = gl.getUniformLocation(program, 'u_projectionMatrix')
      const u_viewMatrixLocation = gl.getUniformLocation(program, 'u_viewMatrix')
      // 创建透视矩阵和视图矩阵
      const fov = Math.PI / 4 // 45度视角
      const aspect = canvas.width / canvas.height
      const near = 0.1
      const far = 10.0
      // lookAtMatrix 函数通过计算相机的位置、目标点和上方向,生成一个视图矩阵
      const projectionMatrix = perspectiveMatrix(fov, aspect, near, far)
      const viewMatrix = lookAtMatrix([3, 1, 7], [0, 0, 0], [0, 1, 0])
      function lookAtMatrix(eye, center, up) {
        const zAxis = normalize(subtractVectors(eye, center))
        const xAxis = normalize(cross(up, zAxis))
        const yAxis = normalize(cross(zAxis, xAxis))

        return new Float32Array([
          xAxis[0],
          yAxis[0],
          zAxis[0],
          0,
          xAxis[1],
          yAxis[1],
          zAxis[1],
          0,
          xAxis[2],
          yAxis[2],
          zAxis[2],
          0,
          -dot(xAxis, eye),
          -dot(yAxis, eye),
          -dot(zAxis, eye),
          1
        ])
      }

      function normalize(v) {
        const length = Math.sqrt(v[0] * v[0] + v[1] * v[1] + v[2] * v[2])
        return [v[0] / length, v[1] / length, v[2] / length]
      }

      function subtractVectors(a, b) {
        return [a[0] - b[0], a[1] - b[1], a[2] - b[2]]
      }

      function cross(a, b) {
        return [a[1] * b[2] - a[2] * b[1], a[2] * b[0] - a[0] * b[2], a[0] * b[1] - a[1] * b[0]]
      }

      function dot(a, b) {
        return a[0] * b[0] + a[1] * b[1] + a[2] * b[2]
      }

      function perspectiveMatrix(fov, aspect, near, far) {
        const f = 1.0 / Math.tan(fov / 2)
        const nf = 1 / (near - far)

        return new Float32Array([f / aspect, 0, 0, 0, 0, f, 0, 0, 0, 0, (far + near) * nf, -1, 0, 0, 2 * far * near * nf, 0])
      }

      // 设置投影矩阵和视图矩阵
      gl.uniformMatrix4fv(u_projectionMatrixLocation, false, projectionMatrix)
      gl.uniformMatrix4fv(u_viewMatrixLocation, false, viewMatrix)
      // 创建缓存区
      function initBuffer(gl, program) {
        const aposLocation = gl.getAttribLocation(program, 'apos')
        const acolorLocation = gl.getAttribLocation(program, 'acolor')
        const verticesColors = new Float32Array([
          // 前面 (红色)
          -0.5,
          -0.5,
          0.5,
          1,
          0,
          0,
          1, // 左下
          0.5,
          -0.5,
          0.5,
          1,
          0,
          0,
          1, // 右下
          0.5,
          0.5,
          0.5,
          1,
          0,
          0,
          1, // 右上
          -0.5,
          0.5,
          0.5,
          1,
          0,
          0,
          1, // 左上

          // 后面 (绿色)
          -0.5,
          0.5,
          -0.5,
          0,
          1,
          0,
          1, // 左上
          -0.5,
          -0.5,
          -0.5,
          0,
          1,
          0,
          1, // 左下
          0.5,
          -0.5,
          -0.5,
          0,
          1,
          0,
          1, // 右下
          0.5,
          0.5,
          -0.5,
          0,
          1,
          0,
          1, // 右上

          // 左面 (蓝色)
          -0.5,
          -0.5,
          -0.5,
          0,
          0,
          1,
          1, // 后下
          -0.5,
          0.5,
          -0.5,
          0,
          0,
          1,
          1, // 后上
          -0.5,
          0.5,
          0.5,
          0,
          0,
          1,
          1, // 前上
          -0.5,
          -0.5,
          0.5,
          0,
          0,
          1,
          1, // 前下

          // 右面 (洋红色)
          0.5,
          -0.5,
          -0.5,
          1,
          0,
          1,
          1, // 后下
          0.5,
          0.5,
          -0.5,
          1,
          0,
          1,
          1, // 后上
          0.5,
          0.5,
          0.5,
          1,
          0,
          1,
          1, // 前上
          0.5,
          -0.5,
          0.5,
          1,
          0,
          1,
          1, // 前下

          // 顶面 (黄色)
          -0.5,
          0.5,
          0.5,
          1,
          1,
          0,
          1, // 前左
          0.5,
          0.5,
          0.5,
          1,
          1,
          0,
          1, // 前右
          0.5,
          0.5,
          -0.5,
          1,
          1,
          0,
          1, // 后右
          -0.5,
          0.5,
          -0.5,
          1,
          1,
          0,
          1, // 后左

          // 底面 (青色)
          -0.5,
          -0.5,
          0.5,
          0,
          1,
          1,
          1, // 前左
          0.5,
          -0.5,
          0.5,
          0,
          1,
          1,
          1, // 前右
          0.5,
          -0.5,
          -0.5,
          0,
          1,
          1,
          1, // 后右
          -0.5,
          -0.5,
          -0.5,
          0,
          1,
          1,
          1 // 后左
        ])

        const indices = new Uint16Array([
          // 前面
          0, 1, 2, 0, 2, 3,
          // 后面
          4, 5, 6, 4, 6, 7,
          // 左面
          8, 9, 10, 8, 10, 11,
          // 右面
          12, 13, 14, 12, 14, 15,
          // 顶面
          16, 17, 18, 16, 18, 19,
          // 底面
          20, 21, 22, 20, 22, 23
        ])

        const vertexColorBuffer = gl.createBuffer()
        gl.bindBuffer(gl.ARRAY_BUFFER, vertexColorBuffer)
        gl.bufferData(gl.ARRAY_BUFFER, verticesColors, gl.STATIC_DRAW)

        const indexBuffer = gl.createBuffer()
        gl.bindBuffer(gl.ELEMENT_ARRAY_BUFFER, indexBuffer)
        gl.bufferData(gl.ELEMENT_ARRAY_BUFFER, indices, gl.STATIC_DRAW)

        const FSIZE = verticesColors.BYTES_PER_ELEMENT
        // 启用顶点属性并指向顶点缓冲区中的数据
        gl.vertexAttribPointer(aposLocation, 3, gl.FLOAT, false, FSIZE * 7, 0)
        gl.enableVertexAttribArray(aposLocation)

        gl.vertexAttribPointer(acolorLocation, 4, gl.FLOAT, false, FSIZE * 7, FSIZE * 3)
        gl.enableVertexAttribArray(acolorLocation)
      }
      initBuffer(gl, program)
      // 启用深度测试
      // 清除缓冲区时同时清除颜色缓冲区和深度缓冲区:
      gl.enable(gl.DEPTH_TEST)
      gl.clearColor(0, 0, 0, 1)
      gl.clear(gl.COLOR_BUFFER_BIT | gl.DEPTH_BUFFER_BIT)
      gl.drawElements(gl.TRIANGLES, 36, gl.UNSIGNED_SHORT, 0)
    </script>
  </body>
</html>


 357
357


 被折叠的 条评论
为什么被折叠?
被折叠的 条评论
为什么被折叠?
 到【灌水乐园】发言


