


前言
webgl的知识储备了这么多,从现在开始将会正式进入立方体的绘制,本文介绍如何在webgl中绘制一个三维立方体。
创建透视投影场景
基于前面两篇文章的讲解,首先创建一个透视投影的三维世界
这里视图矩阵和模型矩阵我们采用webgl的内置默认,只设置透视投影矩阵和视图矩阵
/** @type {HTMLCanvasElement} */
		//------------------------------------------------------创建画布
		// 获取canvas元素对象
		let canvas = document.getElementById('canvas');
		let ctx = document.getElementById('canvas')

		// 获取webgl绘图上下文
		const gl = canvas.getContext('webgl');
		if (!gl) {
			throw new Error('WebGL not supported');
		}

		canvas.width = 500;
		canvas.height = 500;
		gl.viewport(0, 0, canvas.width, canvas.height)

		// 设置背景色
		gl.clearColor(0.0, 0.0, 0.0, 1.0)
		gl.enable(gl.DEPTH_TEST);
		// 清空缓冲区
		gl.clear(gl.COLOR_BUFFER_BIT | gl.DEPTH_BUFFER_BIT)

		const vertex = `
			attribute vec4 aPosition;
			uniform mat4 uPerspectiveMatrix;
			uniform mat4 uViewMatrix;
			attribute vec4 aColor;
			varying vec4 v_Color;
			void main() {
				gl_Position =  uPerspectiveMatrix  * uViewMatrix *   aPosition ;
				v_Color = aColor;
			}
		`
		const fragment = `
			precision highp float;
			varying vec4 v_Color;
			void main(){
				gl_FragColor = v_Color;
			}
		`

		// 创建program
		const program = initShader(gl, vertex, fragment)
		// 获取attribute变量的数据存储位置
		const aPosition = gl.getAttribLocation(program, 'aPosition');
		const aColor = gl.getAttribLocation(program, 'aColor');
		// 获取uniform变量的数据存储位置
		const uPerspectiveMatrix = gl.getUniformLocation(program, 'uPerspectiveMatrix');
		const uViewMatrix = gl.getUniformLocation(program, 'uViewMatrix');
		// 创建缓冲区对象
		const buffer = gl.createBuffer();
		// 绑定缓冲区对象
		gl.bindBuffer(gl.ARRAY_BUFFER, buffer);
		// 传入的数据
		const vertices = new Float32Array([
			// Z 为 -0.5的黄色三角形
			0.2, 0.3, -0.5, 1.0, 0.4, 0.4,
			-0.3, -0.7, -0.5, 1.0, 1.0, 0.4,
			0.7, -0.7, -0.5, 1.0, 1.0, 0.4,
			// Z 为 -0.4的绿色三角形
			0.0, 0.5, -0.4, 0.4, 1.0, 0.4,
			-0.5, -0.5, -0.4, 0.4, 1.0, 0.4,
			0.5, -0.5, -0.4, 1.0, 0.4, 0.4,
			// Z 为 -0.5的蓝色三角形
			0.4, 0.7, -0.6, -0.4, 0.4, 1.4,
			-0.1, -0.3, -0.6, 0.4, 0.4, 1.0,
			0.9, -0.3, -0.6, 1.0, 0.4, 0.4,
		])

		const BYTES = vertices.BYTES_PER_ELEMENT;
		// 开辟空间并写入数据
		gl.bufferData(gl.ARRAY_BUFFER, vertices, gl.STATIC_DRAW)
		// 缓冲区对象分配给attribute变量
		gl.vertexAttribPointer(aPosition, 3, gl.FLOAT, false, 6 * BYTES, 0)
		gl.vertexAttribPointer(aColor, 3, gl.FLOAT, false, 6 * BYTES, 3 * BYTES)
		// 开启attribue变量
		gl.enableVertexAttribArray(aPosition)
		gl.enableVertexAttribArray(aColor)

		const perspectiveMatrix = createPerspective(150, ctx.width / ctx.height, 1, 100)
		gl.uniformMatrix4fv(uPerspectiveMatrix, false, perspectiveMatrix)

		const viewMatrix = createViewMatrix(
			new Float32Array([0.0, -0.1, 0.2]), // 视点位置
			new Float32Array([0.0, 0.0, 0.0]), // 目标点位置
			new Float32Array([0.0, 0.6, 0.0]), // 上方向
		)
		gl.uniformMatrix4fv(uViewMatrix, false, viewMatrix)

		// 开始绘制
		gl.drawArrays(gl.TRIANGLES, 0, 9)
// 透视投影矩阵
function createPerspective(fov, aspect, near, far) {
    fov = fov * Math.PI / 180;
    return new Float32Array([
      1/(aspect*Math.tan(fov / 2)), 0, 0, 0,
      0,                  1/(Math.tan(fov/2)),          0,  0,
      0,       0,         -(far+near)/(far-near),        -(2*far*near)/(far-near),
      0,       0,         -1 ,                          0,
    ])
  }
效果如下,三个大小一样,位置不同的三角形,经过透视投影后,根据 近大远小 原则显示在屏幕上

绘制立方体
下面将绘制这样一个立方体
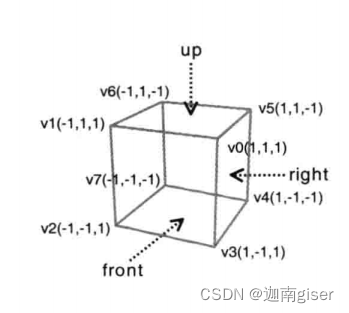
⭐ 思考:如果采用drawArray方法进行绘制,会有什么不便,该如何解决?
使用drawArray方法进行绘制的话,每个面都需要两个三角形组成,需要6个顶点坐标;立方体共六个面,因此需要定义36个顶点。但实际上这些顶点被大量重复定义了,因为立方体总共只用了八个顶点而已。因此,我们采用drawElements,采用索引绘制。
根据坐标内插颜色
		/** @type {HTMLCanvasElement} */
		//------------------------------------------------------创建画布
		// 获取canvas元素对象
		let canvas = document.getElementById('canvas');
		let ctx = document.getElementById('canvas')

		// 获取webgl绘图上下文
		const gl = canvas.getContext('webgl');
		if (!gl) {
			throw new Error('WebGL not supported');
		}

		canvas.width = 500;
		canvas.height = 500;
		gl.viewport(0, 0, canvas.width, canvas.height)

		// 设置背景色
		gl.clearColor(0.0, 0.0, 0.0, 1.0)
		gl.enable(gl.DEPTH_TEST);
		// 清空缓冲区
		gl.clear(gl.COLOR_BUFFER_BIT | gl.DEPTH_BUFFER_BIT)

		const vertex = `
			attribute vec4 aPosition;
			uniform mat4 uPerspectiveMatrix;
			uniform mat4 uViewMatrix;
			attribute vec4 aColor;
			varying vec4 v_Color;
			void main() {
				gl_Position = uPerspectiveMatrix  * uViewMatrix *   aPosition ;
				v_Color = aPosition;
			}
		`
		const fragment = `
			precision highp float;
			varying vec4 v_Color;
			void main(){
				gl_FragColor = v_Color;
			}
		`

		// 创建program
		const program = initShader(gl, vertex, fragment)
		// 获取attribute变量的数据存储位置
		const aPosition = gl.getAttribLocation(program, 'aPosition');
		const aColor = gl.getAttribLocation(program, 'aColor');
		// 获取uniform变量的数据存储位置
		const uPerspectiveMatrix = gl.getUniformLocation(program, 'uPerspectiveMatrix');
		const uViewMatrix = gl.getUniformLocation(program, 'uViewMatrix');

		// 创建顶点缓冲区对象
		const vertices = new Float32Array([
			1, 1, 1, // V0
			-1, 1, 1, // V1
			-1, -1, 1, // V2
			1, -1, 1, // V3
			1, -1, -1, // V4
			1, 1, -1, // V5
			-1, 1, -1, // V6
			-1, -1, -1, // V7
		])
		const buffer = gl.createBuffer();
		gl.bindBuffer(gl.ARRAY_BUFFER, buffer);
		const BYTES = vertices.BYTES_PER_ELEMENT;
		gl.bufferData(gl.ARRAY_BUFFER, vertices, gl.STATIC_DRAW)
		gl.vertexAttribPointer(aPosition, 3, gl.FLOAT, false, 0, 0)
		gl.enableVertexAttribArray(aPosition)

		// 创建索引缓冲区对象

		const index = new Uint8Array([
			0, 1, 2, 0, 2, 3,    // 前
			0, 3, 4, 0, 4, 5,    // 右
			0, 5, 6, 0, 6, 1,    // 上
			1, 6, 7, 1, 7, 2,    // 左
			7, 4, 3, 7, 3, 2,    // 下
			4, 7, 6, 4, 6, 5     // 后
		]);
		const indexBuffer = gl.createBuffer();
		gl.bindBuffer(gl.ELEMENT_ARRAY_BUFFER, indexBuffer);
		gl.bufferData(gl.ELEMENT_ARRAY_BUFFER, index, gl.STATIC_DRAW)
		const viewMatrix = createViewMatrix(
			new Float32Array([5.0,5.0, 5.0]), // 视点位置
			new Float32Array([0.0, 0.0, 0.0]), // 目标点位置
			new Float32Array([0.0, 1.0, 0.0]), // 上方向
		)
		const perspectiveMatrix = createPerspective(30, ctx.width / ctx.height, 1, 100)
		gl.uniformMatrix4fv(uPerspectiveMatrix,  false, perspectiveMatrix, )
		gl.uniformMatrix4fv(uViewMatrix,  false, viewMatrix, )
		// 开始绘制
		gl.drawElements(gl.TRIANGLES, index.length, gl.UNSIGNED_BYTE, 0)
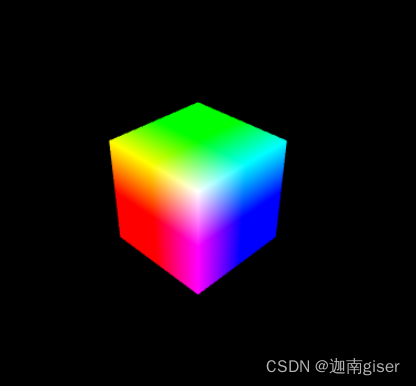
效果如下,一个根据顶点坐标内插颜色的立方体就这么形成了
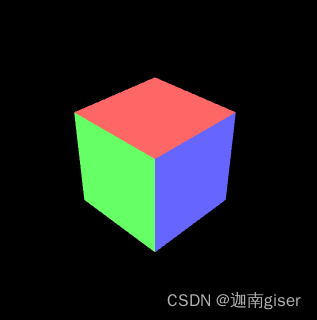
每个面单独赋色
为了给每个面赋予不同的颜色,需要给每个面的四个顶点单独建立缓冲区并赋予颜色
let canvas = document.getElementById('canvas');
		let ctx = document.getElementById('canvas')

		// 获取webgl绘图上下文
		const gl = canvas.getContext('webgl');
		if (!gl) {
			throw new Error('WebGL not supported');
		}

		canvas.width = 500;
		canvas.height = 500;
		gl.viewport(0, 0, canvas.width, canvas.height)

		// 设置背景色
		gl.clearColor(0.0, 0.0, 0.0, 1.0)
		gl.enable(gl.DEPTH_TEST);
		// 清空缓冲区
		gl.clear(gl.COLOR_BUFFER_BIT | gl.DEPTH_BUFFER_BIT)

		const vertex = `
			attribute vec4 aPosition;
			uniform mat4 uPerspectiveMatrix;
			uniform mat4 uViewMatrix;
			attribute vec4 aColor;
			varying vec4 v_Color;
			void main() {
				gl_Position = uPerspectiveMatrix  * uViewMatrix *   aPosition ;
				v_Color = aColor;
			}
		`
		const fragment = `
			precision highp float;
			varying vec4 v_Color;
			void main(){
				gl_FragColor = v_Color;
			}
		`

		// 创建program
		const program = initShader(gl, vertex, fragment)
		// 获取attribute变量的数据存储位置
		const aPosition = gl.getAttribLocation(program, 'aPosition');
		const aColor = gl.getAttribLocation(program, 'aColor');
		// 获取uniform变量的数据存储位置
		const uPerspectiveMatrix = gl.getUniformLocation(program, 'uPerspectiveMatrix');
		const uViewMatrix = gl.getUniformLocation(program, 'uViewMatrix');

		// 创建顶点缓冲区对象
		const vertices = new Float32Array([
			1, 1, 1, -1, 1, 1, -1, -1, 1, 1, -1, 1, // 前面

			1, 1, 1, 1, -1, 1, 1, -1, -1, 1, 1, -1, // 右面

			1, 1, 1, 1, 1, -1, -1, 1, -1, -1, 1, 1, // 上面

			-1, 1, 1, -1, 1, -1, -1, -1, -1, -1, -1, 1, // 左面

			-1, -1, 1, 1, -1, 1, 1, -1, -1, -1, -1, -1, // 下面

			1, -1, -1, 1, 1, -1, -1, 1, -1, -1, -1, -1 // 后面
		])
		const buffer = gl.createBuffer();
		gl.bindBuffer(gl.ARRAY_BUFFER, buffer);
		const BYTES = vertices.BYTES_PER_ELEMENT;
		gl.bufferData(gl.ARRAY_BUFFER, vertices, gl.STATIC_DRAW)
		gl.vertexAttribPointer(aPosition, 3, gl.FLOAT, false, 0, 0)
		gl.enableVertexAttribArray(aPosition)

		// 创建颜色缓冲区对象
		const colors = new Float32Array([
			0.4, 0.4, 1.0, 0.4, 0.4, 1.0, 0.4, 0.4, 1.0, 0.4, 0.4, 1.0,
			0.4, 1.0, 0.4, 0.4, 1.0, 0.4, 0.4, 1.0, 0.4, 0.4, 1.0, 0.4,
			1.0, 0.4, 0.4, 1.0, 0.4, 0.4, 1.0, 0.4, 0.4, 1.0, 0.4, 0.4,
			1.0, 1.0, 0.4, 1.0, 1.0, 0.4, 1.0, 1.0, 0.4, 1.0, 1.0, 0.4,
			1.0, 0.0, 1.0, 1.0, 0.0, 1.0, 1.0, 0.0, 1.0, 1.0, 0.0, 1.0,
			0.0, 1.0, 1.0, 0.0, 1.0, 1.0, 0.0, 1.0, 1.0, 0.0, 1.0, 1.0,
		])

		const colorBuffer = gl.createBuffer();
		gl.bindBuffer(gl.ARRAY_BUFFER, colorBuffer);
		gl.bufferData(gl.ARRAY_BUFFER, colors, gl.STATIC_DRAW);
		gl.vertexAttribPointer(aColor, 3, gl.FLOAT, false, 0, 0);
		gl.enableVertexAttribArray(aColor)

		// 创建索引缓冲区对象
		const index = new Uint8Array([
			0, 1, 2, 0, 2, 3,      // 前
			4, 5, 6, 4, 6, 7,      // 右
			8, 9, 10, 8, 10, 11,   // 上
			12, 13, 14, 12, 14, 15,// 左
			16, 17, 18, 16, 18, 19,// 下
			20, 21, 22, 20, 22, 23,// 后
		])

		const indexBuffer = gl.createBuffer();
		gl.bindBuffer(gl.ELEMENT_ARRAY_BUFFER, indexBuffer);
		gl.bufferData(gl.ELEMENT_ARRAY_BUFFER, index, gl.STATIC_DRAW)
		const viewMatrix = createViewMatrix(
			new Float32Array([5.0, 5.0, 5.0]), // 视点位置
			new Float32Array([0.0, 0.0, 0.0]), // 目标点位置
			new Float32Array([0.0, 1.0, 0.0]), // 上方向
		)
		const perspectiveMatrix = createPerspective(30, ctx.width / ctx.height, 1, 100)
		gl.uniformMatrix4fv(uPerspectiveMatrix, false, perspectiveMatrix,)
		gl.uniformMatrix4fv(uViewMatrix, false, viewMatrix,)
		// 开始绘制
		gl.drawElements(gl.TRIANGLES, index.length, gl.UNSIGNED_BYTE, 0)
总结
创建透视投影场景
绘制立方体
-
根据坐标内插颜色
-
每个面单独赋色


 663
663


 被折叠的 条评论
为什么被折叠?
被折叠的 条评论
为什么被折叠?
 到【灌水乐园】发言


