


1、maven依赖来源:
pom.xml如果使用官网的,依赖的包是从官网下载的;如果公司或者自己定制的maven仓库,可以使用自己的pom.xml,包从自己的仓库下载,往往这些是经过定制或者改造过的,符合自己的使用规范。
settings文件导入:点击Eclipse的菜单:windows->perferences->搜索setting
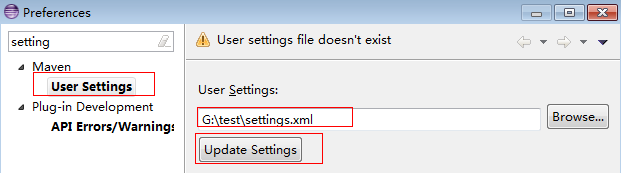
1)配置完成:菜单project-clean
2)工程右键-Maven-update project
2、工程建立步骤:
1)点击Eclipse的菜单:File->New->Other->Maven 选择 Maven Project 点击Next
参考:https://blog.csdn.net/u010086122/article/details/81563420 二. 创建Maven项目
工程目录:

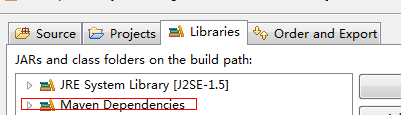
右键项目-build path-config build path下可以配置几个项目

看到路径到src/main/java层,scheduled.test是包名,否则路径设置不对包名是从src开始。
2)添加到pom.xml中springboot依赖下载spring包,参考:https://blog.csdn.net/u010086122/article/details/81563420 四. 编写Hello World 1. 配置pom
添加之后会下载依赖的包。
3、几种定时任务的实现方式:
1)Timer:直接参考:https://blog.csdn.net/wqh8522/article/details/79224290
2)Spring注解@Scheduled注解配置定时任务:
在pom中添加依赖:
<dependencies>
  <dependency>
    <groupId>org.springframework.boot</groupId>
    <artifactId>spring-boot-starter-web</artifactId>
  </dependency>
  <dependency>
    <groupId>org.springframework.boot</groupId>
    <artifactId>spring-boot-starter</artifactId>
  </dependency>
  <dependency>
    <groupId>org.projectlombok</groupId>
    <artifactId>lombok</artifactId>
    <optional>true</optional>
  </dependency>
  <dependency>
    <groupId>org.springframework.boot</groupId>
    <artifactId>spring-boot-starter-test</artifactId>
    <scope>test</scope>
  </dependency>
  <!--spring.factories不全报错 -->
  <dependency>
	<groupId>org.springframework.boot</groupId>
	<artifactId>spring-boot-autoconfigure</artifactId>
	<version>1.5.4.RELEASE</version>
</dependency>
</dependencies>
3)实例
ScheduledService.Java
package scheduled.test;

import org.springframework.boot.SpringApplication;
import org.springframework.boot.autoconfigure.SpringBootApplication;
import org.springframework.scheduling.annotation.EnableScheduling;
import org.springframework.boot.builder.SpringApplicationBuilder;
/*

 * 主类

 */
@SpringBootApplication
@EnableScheduling
public class ScheduledService
{
    public static void main(String[] args)
    {
        SpringApplication.run(ScheduledService.class, args);//占用端口
        //new SpringApplicationBuilder().sources(Application.class).web(false).run(args);//不占用端口启动
    }
}
ScheduledTasks.java
package scheduled.test;


import org.springframework.context.annotation.Configuration;
import org.springframework.scheduling.annotation.EnableScheduling;
import org.springframework.scheduling.annotation.Scheduled;
import org.springframework.stereotype.Component;

@Component
@Configuration      //1.主要用于标记配置类,兼备Component的效果。
@EnableScheduling   // 2.开启定时任务
public class ScheduledTasks {
    @Scheduled(cron = "0/5 * * * * *")
    public void scheduled(){
        System.out.println("111111111");
        //log.info("=====>>>>>使用cron  {}",System.currentTimeMillis());
    }


    @Scheduled(fixedRate = 7000)
    public void scheduled1() {
        System.out.println("22222222");
        //log.info("=====>>>>>使用fixedRate{}", System.currentTimeMillis());
    }


    @Scheduled(fixedDelay = 5000)
    public void scheduled2() {
        System.out.println("26666662");
       //log.info("=====>>>>>fixedDelay{}",System.currentTimeMillis());
    }
}
启动验证:主类中右键-run as-java application 就启动起来了

报错:如果端口冲突8080被占,可以通过@Configuration注解来完成修改
https://blog.csdn.net/wsh900221/article/details/80521313
不占用端口启动:https://www.cnblogs.com/wujf/p/9458742.html
参考:
https://www.cnblogs.com/zy-l/p/9178704.html
https://www.jianshu.com/p/b6809b5a0c26
spring boot自动配置spring-boot-autoconfigure
在使用spring-boot-starter-web时只需要在pom.xml配置文件内添加依赖就可以了。
自定义starter并且通过spring-boot-autoconfigure完成自动化配置。
SpringBoot自动配置原理:
https://www.cnblogs.com/leihuazhe/p/7743479.html
https://blog.csdn.net/weixin_34208283/article/details/88323605
打jar包之后java -jar执行报错:
报错问题No auto configuration classes found in META-INF/spring.factories. If you are using a custom pack原因spring.factories中没有自动配置的内容
https://blog.csdn.net/trisonlu123/article/details/80070596
pom.xml增加依赖:版本号要一致
<dependencies>
     <dependency>
          <groupId>org.springframework.boot</groupId>
          <artifactId>spring-boot-autoconfigure</artifactId>
          <version>1.5.4.RELEASE</version>
     </dependency>
</dependencies>
https://segmentfault.com/a/1190000011433487
mvn打包可执行可依赖的jar包:https://blog.csdn.net/chenxy02/article/details/80189833 (pom.xml指定main方法) mvn install mvn clean


 676
676


 被折叠的 条评论
为什么被折叠?
被折叠的 条评论
为什么被折叠?
 到【灌水乐园】发言


