


springboot发送邮件
中国加油,武汉加油!
篇幅较长,配合右边目录观看
项目准备
- 创建springboot项目springboot-email
- 导入Web的springWeb依赖和Lombox依赖和Thymeleaf依赖
- 导入依赖
<dependency>
    <groupId>org.springframework.boot</groupId>
    <artifactId>spring-boot-starter-mail</artifactId>
</dependency>
1. 案例(发送简单的文本邮件)
1.1 配置相关参数
spring.mail.host=smtp.qq.com
spring.mail.username=1196557363@qq.com
spring.mail.password=
spring.mail.default-encoding=UTF-8
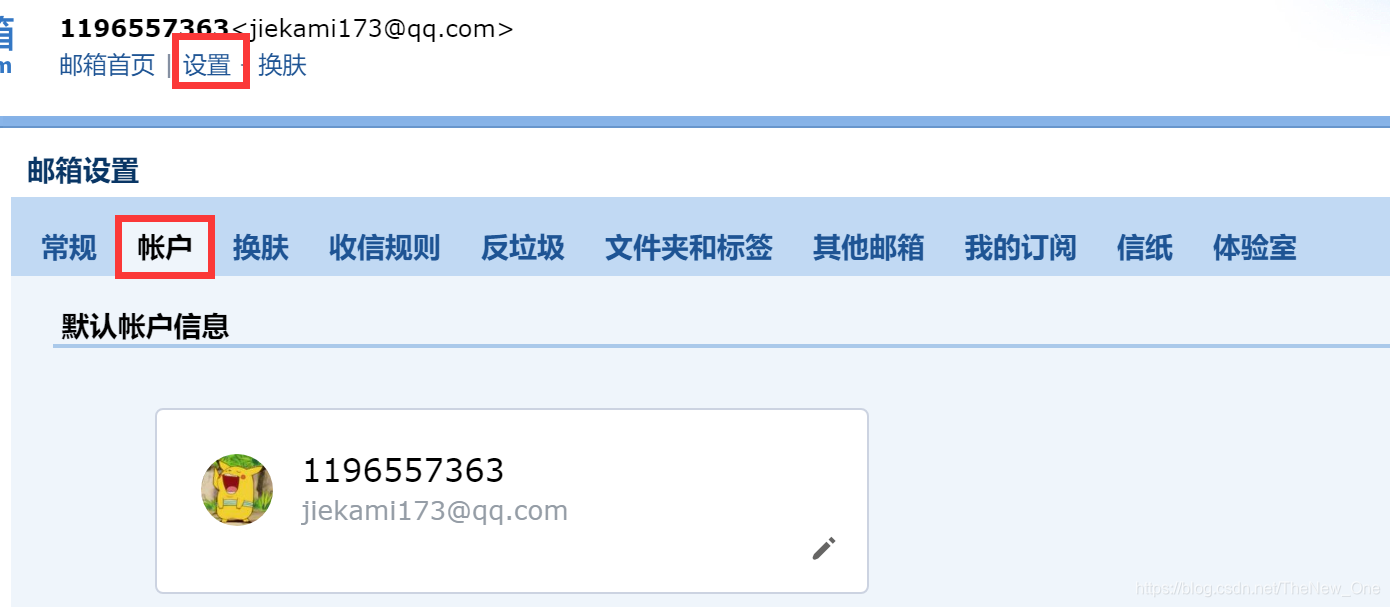
password是授权码,可在QQ邮箱设置里面生成

1.2 定义一个Mail对象
package com.wpj.pojo;

import lombok.AllArgsConstructor;
import lombok.Data;
import lombok.NoArgsConstructor;

@Data
@NoArgsConstructor
@AllArgsConstructor
public class Mail {
    private String to;
    private String subject;
    private String text;
}
1.3 定义完成发送邮件的Service
package com.wpj.service;

import org.springframework.beans.factory.annotation.Autowired;
import org.springframework.beans.factory.annotation.Value;
import org.springframework.mail.SimpleMailMessage;
import org.springframework.mail.javamail.JavaMailSender;
import org.springframework.stereotype.Service;

@Service
public class MailService {

    @Value("${spring.mail.username}")
    private String from;

    @Autowired
    private JavaMailSender javaMailSender;

    public void sendSimpleMail(Mail mail) {
        SimpleMailMessage message = new SimpleMailMessage();
        message.setTo(mail.getTo());
        message.setSubject(mail.getSubject());
        message.setText(mail.getText());
        message.setFrom(from);

        javaMailSender.send(message);
    }
}
1.4 新建一个发送邮件的页面
<!DOCTYPE html>
<html lang="en" xmlns:th="http://www.thymeleaf.org">
<head>
    <meta charset="UTF-8">
    <title>Title</title>
    <base th:href="${#request.getContextPath()+'/'}">
</head>
<body>

    <form action="/sendMail" method="post">
        发给谁:<input type="text" name="to"><br />
        主题: <input type="text" name="subject"><br />
        内容: <input type="text" name="text"><br />
        <input type="submit" value="发送">
    </form>
</body>
</html>
1.5 定义一个Controller
package com.wpj.controller;

import com.wpj.pojo.Mail;
import com.wpj.service.MailService;
import org.springframework.beans.factory.annotation.Autowired;
import org.springframework.stereotype.Controller;
import org.springframework.web.bind.annotation.RequestMapping;
import org.springframework.web.bind.annotation.ResponseBody;

@Controller
public class MailController {

    @Autowired
    private MailService mailService;

    @RequestMapping("/sendMail")
    @ResponseBody
    public String sendMail(Mail mail){
        mailService.sendSimpleMail(mail);
        return "发送成功";
    }
}
1.6 启动主启动类
package com.wpj;

import org.springframework.boot.SpringApplication;
import org.springframework.boot.autoconfigure.SpringBootApplication;

@SpringBootApplication
public class EmailApplication {

    public static void main(String[] args) {
        SpringApplication.run(EmailApplication.class, args);
    }

}
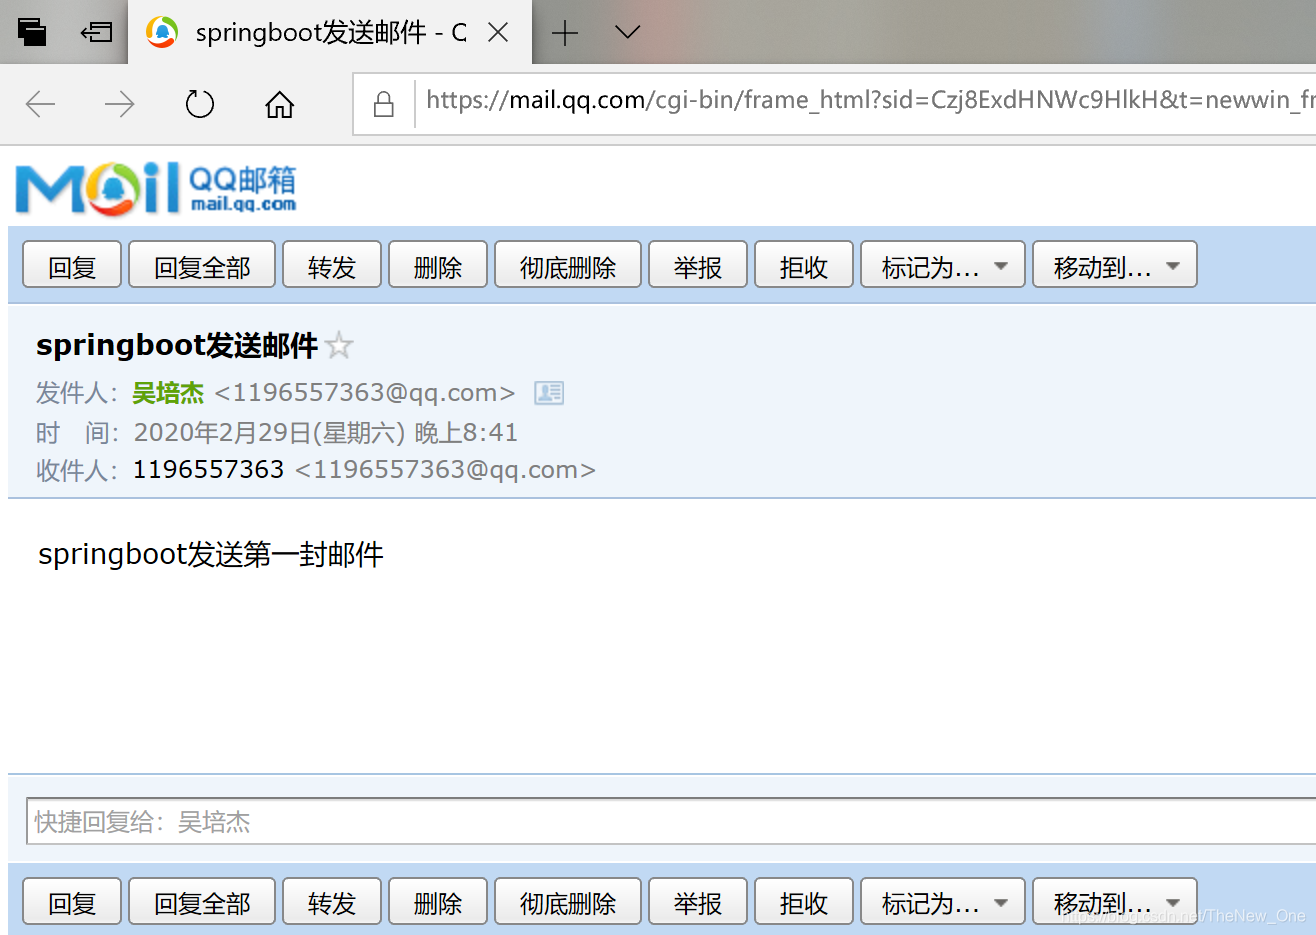
1.7 发送测试
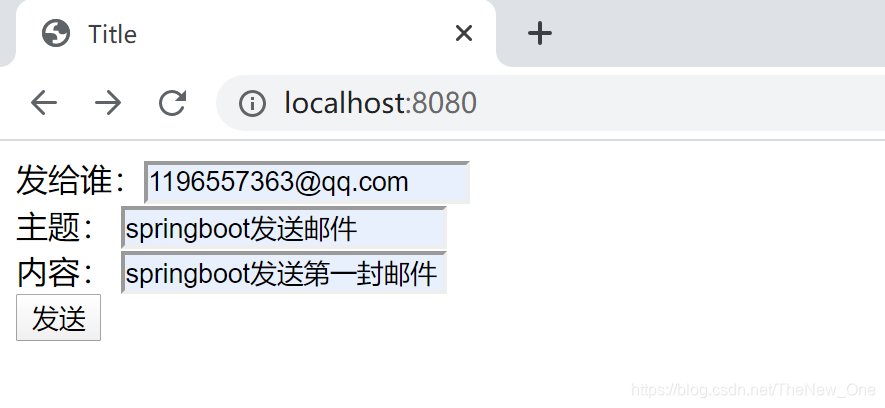

=
2. 发送HTML邮件
2.1 MailService添加发送HTML邮件的方法
/**
 * 发送HTML邮件
 * @param mail
 * @throws MessagingException
 */
public void sendHtmlMail(Mail mail) throws MessagingException {
    MimeMessage message = javaMailSender.createMimeMessage();
    MimeMessageHelper mimeMessageHelper = new MimeMessageHelper(message,true);
    mimeMessageHelper.setTo(mail.getTo());
    mimeMessageHelper.setSubject(mail.getSubject());
    String text = "<html>\n"+
            "<body>\n"+
            "<h1>"+mail.getText()+"</h1>\n"+
            "</body>\n" +
            "</html>\n";
    mimeMessageHelper.setText(text, true);
    mimeMessageHelper.setFrom(from);
    javaMailSender.send(message);

}
2.2 MailController添加方法
@RequestMapping("/sendHtmlMail")
@ResponseBody
public String sendHtmlMail(Mail mail) throws MessagingException {
    mailService.sendHtmlMail(mail);
    return "发送Html邮件成功";
}
2.3 页面添加请求到Controller的表单
发送HTML邮件
<form action="/sendHtmlMail" method="post">
    发给谁:<input type="text" name="to"><br />
    主题: <input type="text" name="subject"><br />
    内容: <input type="text" name="text"><br />
    <input type="submit" value="发送">
</form>
2.4 启动主启动类发送测试


3. 发送附件邮件
3.1 Mail对象添加属性

3.1 MailService添加发送附件邮件的方法
因为技术问题,一直获取不到文件的真实路径,导致上传的文件用不到,在代码里面暂时写死,往后再改
/**
 * 发送附件邮件
 * @param mail
 */
public void sendAttachmentsMail(Mail mail) throws MessagingException {
    MimeMessage message = javaMailSender.createMimeMessage();
    MimeMessageHelper mimeMessageHelper = new MimeMessageHelper(message,true);
    mimeMessageHelper.setTo(mail.getTo());
    mimeMessageHelper.setSubject(mail.getSubject());
    mimeMessageHelper.setText(mail.getText());
    mimeMessageHelper.setFrom(from);

            FileSystemResource file = new FileSystemResource(new File("C:\\Users\\11965\\Desktop\\1.jpg"));
    String fileName = file.getFilename();
    mimeMessageHelper.addAttachment(fileName,file);

    javaMailSender.send(message);

}
3.2 MailController添加方法
@RequestMapping("/sendAttachmentsMail")
    @ResponseBody
    public String sendAttachmentsMail(Mail mail) throws MessagingException {
        mailService.sendAttachmentsMail(mail);
        return "发送附件邮件成功";
    }
3.3 页面添加请求到Controller的表单
发送附件邮件
<form action="/sendAttachmentsMail" method="post">
    发给谁:<input type="text" name="to"><br />
    主题: <input type="text" name="subject"><br />
    内容: <input type="text" name="text"><br />
    附件: <input type="file" name="filePath"><br />
    <input type="submit" value="发送" >
</form>
3.4 启动主启动类发送测试
因为技术问题,一直获取不到文件的真实路径,导致上传的文件用不到,在代码里面暂时写死,往后再改


4 图片邮件
4.1 Mail对象添加属性

4.2 MailService添加发送图片邮件的方法
/**
 * 发送图片邮件
 * @param mail
 */
public void sendInlineMail(Mail mail) throws MessagingException {
    System.err.println(mail);
    MimeMessage message = javaMailSender.createMimeMessage();
    MimeMessageHelper mimeMessageHelper = new MimeMessageHelper(message,true);
    mimeMessageHelper.setTo(mail.getTo());
    mimeMessageHelper.setSubject(mail.getSubject());
    String text = "<html>\n"+
            "<body>\n"+
            "<img src=\'cid:"+mail.getId()+"\'></img>"+
            "</body>\n" +
            "</html>";
    mimeMessageHelper.setText(text,true);
    mimeMessageHelper.setFrom(from);

    FileSystemResource image = new FileSystemResource(new File("C:\\Users\\11965\\Desktop\\1.jpg"));
    mimeMessageHelper.addInline(mail.getId(), image);

    javaMailSender.send(message);

}
4.3 MailController添加方法
@RequestMapping("/sendInlineMail")
@ResponseBody
 public String sendInlineMail(Mail mail) throws MessagingException {
     mail.setId("001");
     mailService.sendInlineMail(mail);
     return "发送图片邮件成功";
 }
4.4 页面添加请求到Controller的表单
发送图片邮件
<form action="/sendInlineMail" method="post">
    发给谁:<input type="text" name="to"><br />
    主题: <input type="text" name="subject"><br />
    内容: <input type="text" name="text"><br />
    图片: <input type="file" name="imagePath"><br />
    <input type="submit" value="发送" >
</form>
4.5 启动主启动类发送测试


4.6 ps
因为技术问题 导致文件路径写死
发送多张图片可以通过传多个id和图片实现

5 模板邮件
5.1 创建模板页面emailTemplate.html
<!DOCTYPE html>
<html lang="en" xmlns:th="http://www.thymeleaf.org">
<head>
    <meta charset="UTF-8" />
    <title>邮件模板</title>
    <base th:href="${#request.getContextPath()+'/'}">
</head>
<body>
    Hello 模板Email,点击下面链接完成注册
    <a href="#" th:href="@{https://blog.csdn.net/TheNew_One/article/details/104580364}">激活账号</a>
</body>
</html>
5.2 MailService添加发送模板邮件的方法
@Autowired
private TemplateEngine templateEngine;

public void sendTemplateMail(Mail mail) throws MessagingException {
    Context context = new Context();
    String emailContext = templateEngine.process("emailTemplate",context);
    mail.setText(emailContext);
    sendHtmlMail(mail);
}
5.3 MailController添加方法
@RequestMapping("/sendTemplateMail")
@ResponseBody
public String sendTemplateMail(Mail mail) throws MessagingException {
    mailService.sendTemplateMail(mail);
    return "发送模板邮件成功";
}
5.4 页面添加请求到Controller的表单
发送模板邮件
    <form action="/sendTemplateMail" method="post">
        发给谁:<input type="text" name="to"><br />
        主题: <input type="text" name="subject"><br />
        <input type="submit" value="发送" >
    </form>
5.5 启动主启动类发送测试


 1054
1054


 被折叠的 条评论
为什么被折叠?
被折叠的 条评论
为什么被折叠?
 到【灌水乐园】发言


