


本文转自公众号 TCTP。
我行在 2018 年开始了基于 ARM 服务器平台的尝试,当前 TDSQL 的冷备数据全部保存在基于 ARM 服务器搭建的 CEPH 存储集群上,运行稳定。在今年贸易战的大背景下,我们数据库团队也尝试将各个数据库产品放到 ARM 平台上去编译并运行起来,为我行在基础架构层面的进一步国产化打下基础。
我们这次首先针对我行引入的 NewSQL 数据库 TiDB,在我行实验室的 ARM 平台上进行了编译和测试,预计会将整个测试流程和相关测试结论,整理为三篇技术文章分享出来,分别是:
(一)《TiDB 集群 在 arm 平台编译、安装与部署》
(二)《sysbench 测试下 arm 平台 cpu /内存/磁盘的能力》
(三)《 TiDB 在 arm 与 x86 平台的性能测试对比》
此次是系列文章的第一篇。
一、环境准备
PingCAP 提供了 TiDB-Ansible 部署方案,可以使用 Ansible 快速方便地部署一个完整的 TiDB 集群,而 TiDB-Ansible release-3.0 版本依赖 Ansible 2.4.2 及以上版本(Ansible>=2.4.2,最好是 2.7.11 版本),另外依赖 Python 模块:jinja2 >= 2.9.6 和 jmespath >= 0.9.0,而且内部的数据库服务器与外网一般是隔离的,所以只能选择离线安装:
1、机器准备 可以连接外网的 ARM 服务器一台 部署目标机器三台、部署中控机一台
| 安装包 | 功能 | 下载方式 |
| Ansible | PingCAP 提供了 TiDB-Ansible 部署方案,可以使用 Ansible 快速方便地部署一个完整的 TiDB 集群 | 在能联网的 ARM64 服务器使用 sudo yum install--downloadonly --downloaddir=./ansible ansible 命令来得到安装 ansible 的依赖 rpm 包 |
| python2-jinja2-2.10-2.el7.noarch.rpm | python 依赖包 | 网络下载 |
| python2-babel-2.7.0-1.fc31.noarch.rpm | python 依赖包 | 网络下载 |
| python2-markupsafe-1.0-1.fc29.aarch64.rpm | python 依赖包 | 网络下载 |
| python2-jmespath-0.9.0-1.el7.noarch.rpm | python 依赖包 | 网络下载 |
| python2-pip-8.1.2-8.el7.noarch.rpm | pip 安装包 | 网络下载 |
| mariadb-5.5.60-1.el7_5.aarch64.rpm | 安装 mysql 客户端 | 网络下载 |
| epel-release-7-11.noarch.rpm | 安装扩展 epel 包 | 网络下载 |
| sshpass-1.06-1.el7.aarch64.rpm | 中控机 SSH 组件 | 网络下载 |
[root@ip-localhost ansible]# cd ansible_pkg/
[root@ip-localhost ansible_pkg]# rpm -Uvh *.rpm --nodeps --force
warning: libyaml-0.1.4-11.el7_0.aarch64.rpm: Header V3 RSA/SHA256 Signature, key ID fd431d51: NOKEY
warning: python2-babel-2.7.0-1.fc31.noarch.rpm: Header V3 RSA/SHA256 Signature, key ID 3c3359c4: NOKEY
warning: python2-markupsafe-1.0-1.fc29.aarch64.rpm: Header V3 RSA/SHA256 Signature, key ID 429476b4: NOKEY
Preparing...                          ################################# [100%]
Updating / installing...
  1:python2-pyasn1-0.1.9-7.el7       ################################# [ 5%]
  2:sshpass-1.06-1.el7               ################################# [ 10%]
  3:python-ply-3.4-11.el7            ################################# [ 14%]
  4:python-pycparser-2.14-1.el7      ################################# [ 19%]
  5:python-cffi-1.6.0-5.el7          ################################# [ 24%]
  6:python-idna-2.4-1.el7            ################################# [ 29%]
  7:python-httplib2-0.9.2-0.2.el7    ################################# [ 33%]
  8:python-enum34-1.0.4-1.el7        ################################# [ 38%]
  9:python2-cryptography-1.7.2-2.el7 ################################# [ 43%]
 10:python-paramiko-2.1.1-9.el7      ################################# [ 48%]
 11:python2-pytz-2018.9-1.fc31       ################################# [ 52%]
 12:python2-babel-2.7.0-1.fc31       ################################# [ 57%]
 13:python2-markupsafe-1.0-1.fc29    ################################# [ 62%]
 14:python2-jinja2-2.10-2.el7        ################################# [ 67%]
 15:python2-jmespath-0.9.0-1.el7     ################################# [ 71%]
 16:libyaml-0.1.4-11.el7_0           ################################# [ 76%]
 17:PyYAML-3.10-11.el7               ################################# [ 81%]
 18:ansible-2.8.2-1.el7              ################################# [ 86%]
 19:python2-pip-8.1.2-8.el7          ################################# [ 90%]
 20:mariadb-1:5.5.60-1.el7_5         ################################# [ 95%]
21:epel-release-7-11 ################################# [100%][root@ip-localhost ansible]# ansible --version
ansible 2.8.2
config file = /etc/ansible/ansible.cfg
configured module search path = [u'/root/.ansible/plugins/modules', u'/usr/share/ansible/plugins/modules']
ansible python module location = /usr/lib/python2.7/site-packages/ansible
executable location = /bin/ansible
python version = 2.7.5 (default, Oct 31 2018, 18:48:32) [GCC 4.8.5 20150623 (Red Hat 4.8.5-36)][root@ip-localhost ansible]# pip show jinja2
Metadata-Version: 1.1
Name: Jinja2
Version: 2.10
Summary: A small but fast and easy to use stand-alone template engine written in pure python.
Home-page: http://jinja.pocoo.org/
Author: Armin Ronacher
Author-email: armin.ronacher@active-4.com
License: BSD
Location: /usr/lib/python2.7/site-packages
Requires: MarkupSafe
Classifiers:
Development Status :: 5 - Production/Stable
Environment :: Web Environment
Intended Audience :: Developers
License :: OSI Approved :: BSD License
Operating System :: OS Independent
Programming Language :: Python
Programming Language :: Python :: 2
Programming Language :: Python :: 2.6
Programming Language :: Python :: 2.7
Programming Language :: Python :: 3
Programming Language :: Python :: 3.3
Programming Language :: Python :: 3.4
Programming Language :: Python :: 3.5
Programming Language :: Python :: 3.6
Topic :: Internet :: WWW/HTTP :: Dynamic Content
Topic :: Software Development :: Libraries :: Python Modules
Topic :: Text Processing :: Markup :: HTML
Entry-points:
[babel.extractors]
jinja2 = jinja2.ext:babel_extract[i18n][root@ip-localhost ansible]# pip show jmespath
Metadata-Version: 1.1
Name: jmespath
Version: 0.9.0
Summary: JSON Matching Expressions
Home-page: https://github.com/jmespath/jmespath.py
Author: James Saryerwinnie
Author-email: js@jamesls.com
License: UNKNOWN
Location: /usr/lib/python2.7/site-packages
Requires:
Classifiers:
Development Status :: 5 - Production/Stable
Intended Audience :: Developers
Natural Language :: English
License :: OSI Approved :: MIT License
Programming Language :: Python
Programming Language :: Python :: 2.6
Programming Language :: Python :: 2.7
Programming Language :: Python :: 3
Programming Language :: Python :: 3.3
Programming Language :: Python :: 3.4二、编译 TiDB arm 版本
TiDB 包括三大组件 PD、TiKV Server 和 TiDB Server,还包括其他周边组件,比如 Pump、Prometheus、Alertmanager、Node_exporter、Blackbox_exporter、Pushgateway 和 Grafana,所以需要把这些组件都统一编译成 ARM 版本,而且要和官方版本对齐。
1、编译脚本示例
#!/bin/bash
# Soft Version
# TiDN Core
tidb_version=release-3.0
# TiDB Tools
tispark_version=master
dm_version=master
# Monitor
prometheus_version=v2.8.1
alertmanager_version=v0.17.0
node_exporter_version=v0.17.0
# blackbox_exporter_version=v0.12.0
#v0.12.0 meets some wrong
blackbox_exporter_version=master
pushgateway_version=v0.7.0
grafana_version=6.1.6

# Soft Dir
declare -A soft_srcs

soft_srcs=(
# ["tidb"]="$tidb_version https://github.com/pingcap/tidb.git"
# ["pd"]="$tidb_version https://github.com/pingcap/pd.git"
# ["tikv"]="$tidb_version https://github.com/tikv/tikv.git"
#   ["tispark"]="$tidb_version https://github.com/pingcap/tispark"
  ["tidb-binlog"]="$tidb_version https://github.com/pingcap/tidb-binlog"
["dm"]="$dm_version https://github.com/pingcap/dm"
["prometheus"]="$prometheus_version https://github.com/prometheus/prometheus.git"
["alertmanager"]="$alertmanager_version https://github.com/prometheus/alertmanager.git"
["node_exporter"]="$node_exporter_version https://github.com/prometheus/node_exporter.git"
["blackbox_version"]="$blackbox_exporter_version https://github.com/prometheus/blackbox_exporter.git"
["pushgateway"]="$pushgateway_version https://github.com/prometheus/pushgateway.git"
# ["grafana"]="$grafana_version https://github.com/grafana/grafana.git"
)

# Dir
ROOT=$PWD/build
target=$ROOT/bin
rm -rf $ROOT
mkdir -p $target

sudo yum install -y gcc gcc-c++ wget git zlib-devel

cd $ROOT
# Go
if which go >/dev/null; then
   echo "go installed, skip"
else
   wget https://dl.google.com/go/go1.12.6.linux-arm64.tar.gz
   sudo tar -C /usr/local -xzf go1.12.6.linux-arm64.tar.gz
   echo "export GOPATH=$ROOT/go" >> ~/.bashrc
   echo 'export PATH=$PATH:/usr/local/go/bin:$GOPATH/bin' >> ~/.bashrc
   source ~/.bashrc
fi

# Rust
if which rustc >/dev/null; then
   echo "rust installed, skip"
else
   curl https://sh.rustup.rs -sSf | sh -s -- -y
   source $HOME/.cargo/env
fi

# Install cmake3
if which cmake3 >/dev/null; then
   echo "cmake3 installed, skip"
else
   wget http://dl.fedoraproject.org/pub/epel/epel-release-latest-7.noarch.rpm

   sudo rpm -ivh epel-release-latest-7.noarch.rpm
   sudo yum install -y epel-release
   sudo yum install -y cmake3

   sudo ln -s /usr/bin/cmake3 /usr/bin/cmake
fi

# Install Java
if which java >/dev/null;then
echo "java installed, skip"
else
ce $ROOT
wget --no-cookies --no-check-certificate --header "Cookie: gpw_e24=http%3A%2F%2Fwww.oracle.com%2F; oraclelicense=accept-securebackup-cookie" "http://download.oracle.com/otn-pub/java/jdk/8u141-b15/336fa29ff2bb4ef291e347e091f7f4a7/jdk-8u141-linux-arm64-vfp-hflt.tar.gz"
sudo tar -C /usr/local -xzf jdk-8u141-linux-arm64-vfp-hflt.tar.gz
echo 'export JAVA_HOME=/usr/local/jdk1.8.0_141' >> ~/.bashrc
echo 'export JRE_HOME=/user/local/jdk1.8.0_141/jre' >> ~/.bashrc
echo 'export PATH=$PATH:$JAVA_HOME/bin:$JRE_HOME/bin' >> ~/.bashrc
fi


# Install maven
if which mvn >/dev/null;then
echo "maven installed, skip"
else
wget https://mirrors.tuna.tsinghua.edu.cn/apache/maven/maven-3/3.6.1/binaries/apache-maven-3.6.1-bin.tar.gz
sudo tar -C /usr/local -xzf apache-maven-3.6.1-bin.tar.gz
echo 'export PATH=$PATH:/usr/local/apache-maven-3.6.1/bin' >> ~/.bashrc
source ~/.bashrc
fi


# # RocksDB gflags
# git clone https://github.com/gflags/gflags.git
# cd gflags
# git checkout v2.0
# ./configure --build=aarch64-unknown-linux-gnu && make && sudo make install
# cd $ROOT

# Build Monitor
for soft in $(echo ${!soft_srcs[*]})
do
soft_src=${soft_srcs[$soft]}
cd $ROOT
git clone -b $soft_src
cd $soft
make build
if [ -d bin ];then
cp bin/* $target
else
cp $soft $target
fi
cd $ROOT
echo "`date +'%F %T'`: Build Soft $soft done ."
done

# Download Grafana
cd $ROOT
wget https://dl.grafana.com/oss/release/grafana-${grafana_version}.linux-arm64.tar.gz
tar -zxvf grafana-${grafana_version}.linux-arm64.tar.gz

cp grafana-${grafana_version}/bin/* bin/

# Build TiDB
cd $ROOT
git clone -b $tidb_version https://github.com/pingcap/tidb
cd tidb
make
cp bin/* $target
# Build PD
cd $ROOT
git clone -b $tidb_version https://github.com/pingcap/pd
cd pd
make
cp bin/* $target

# Build TiKV
cd $ROOT
git clone -b $tidb_version https://github.com/tikv/tikv.git
cd tikv
ROCKSDB_SYS_SSE=0 make release
cp target/release/tikv-*  $target

# Build tispark
cd $ROOT
git clone -b $tispark_version https://github.com/pingcap/tispark
cd tispark
mvn clean install -Dmaven.test.skip=true -P spark-2.3[root@ip-localhost bin]# ll
total 1492252
-rwxr-xr-x 1 tidb tidb 25880636 Jul 25 16:21 alertmanager
-rwxr-xr-x 1 tidb tidb 41476026 Jul 25 16:21 arbiter
-rwxr-xr-x 1 tidb tidb 23086365 Jul 25 16:21 binlogctl
-rwxr-xr-x 1 root root 16725668 Jul 25 16:48 blackbox_exporter
-rwxr-xr-x 1 tidb tidb 42190443 Jul 25 16:21 dmctl
-rwxr-xr-x 1 tidb tidb 42643818 Jul 25 16:21 dm-master
-rwxr-xr-x 1 tidb tidb 41231475 Jul 25 16:21 dm-tracer
-rwxr-xr-x 1 tidb tidb 45855210 Jul 25 16:21 dm-worker
-rwxr-xr-x 1 tidb tidb 45378703 Jul 25 16:21 drainer
-rwxr-xr-x 1 tidb tidb 20578913 Jul 25 16:21 grafana-cli
-rw-r--r-- 1 tidb tidb 33 Jul 25 16:21 grafana-cli.md5
-rwxr-xr-x 1 tidb tidb 41749049 Jul 25 16:21 grafana-server
-rw-r--r-- 1 tidb tidb 33 Jul 25 16:21 grafana-server.md5
-rwxr-xr-x 1 tidb tidb 15884939 Jul 25 16:21 node_exporter
-rwxr-xr-x 1 tidb tidb 27341094 Jul 25 16:21 pd-ctl
-rwxr-xr-x 1 tidb tidb 16345055 Jul 25 16:21 pd-recover
-rwxr-xr-x 1 tidb tidb 36866195 Jul 25 16:21 pd-server
-rwxr-xr-x 1 tidb tidb 16394398 Jul 25 16:21 pd-tso-bench
-rwxr-xr-x 1 tidb tidb 68935640 Jul 25 16:21 prometheus
-rwxr-xr-x 1 tidb tidb 32089280 Jul 25 16:21 pump
-rwxr-xr-x 1 tidb tidb 14439632 Jul 25 16:21 pushgateway
-rwxr-xr-x 1 tidb tidb 39814928 Jul 25 16:21 reparo
-rwxr-xr-x 1 tidb tidb 8280869 Jul 25 16:21 shadow
-rwxr-xr-x 1 tidb tidb 67211621 Jul 25 16:21 tidb-server
-rwxr-xr-x 1 tidb tidb 197494880 Jul 25 16:21 tikv-ctl
-rw-r--r-- 1 tidb tidb 20985 Jul 25 16:21 tikv-ctl.d
-rwxr-xr-x 1 tidb tidb 207880328 Jul 25 16:21 tikv-importer
-rw-r--r-- 1 tidb tidb 20995 Jul 25 16:21 tikv-importer.d
-rwxr-xr-x 1 tidb tidb 355234696 Jul 25 16:21 tikv-server
-rw-r--r-- 1 tidb tidb 20991 Jul 25 16:21 tikv-server.d
-rw-r--r-- 1 tidb tidb 32650300 Jul 25 16:59 tispark-SNAPSHOT-jar-with-dependencies.jar三、安装 TiDB
根据 PingCAP 官网的离线 TiDB-Ansible 部署方案(https://pingcap.com/docs-cn/v3.0/how-to/deploy/orchestrated/offline-ansible/),完成以下初始化工作:
在中控机上创建 tidb 用户,并生成 ssh key
在下载机上下载 TiDB-Ansible 及 TiDB 安装包,但下载机不需要安装 ansible,具体操作如下:
- 在中控机上配置部署机器 ssh 互信及 sudo 规则
- 在部署目标机器上安装 NTP 服务
- 在部署目标机器上配置 CPUfreq 调节器模式
- 在部署目标机器上添加数据盘 ext4 文件系统挂载参数
2、部署任务
## TiDB Cluster Part
[tidb_servers]
TiDB-1 ansible_host=127.0.0.1  deploy_dir=/tidb/deploy_tidb/tidb tidb_port=5000 tidb_status_port=10089 labels="host=ip-1"
TiDB-2 ansible_host=127.0.0.2  deploy_dir=/tidb/deploy_tidb/tidb tidb_port=5000 tidb_status_port=10089 labels="host=ip-2"
TiDB-3 ansible_host=127.0.0.3  deploy_dir=/tidb/deploy_tidb/tidb tidb_port=5000 tidb_status_port=10089 labels="host=ip-3"


[tikv_servers]
TiKV1-1 ansible_host=127.0.0.1 deploy_dir=/tidb/deploy_tidb/tikv1 tikv_port=20891  tikv_status_port=20181  labels="host=TiKV1-1"

TiKV2-1 ansible_host=127.0.0.2 deploy_dir=/tidb/deploy_tidb/tikv1 tikv_port=20891  tikv_status_port=20181  labels="host=TiKV2-1"

TiKV3-1 ansible_host=127.0.0.3 deploy_dir=/tidb/deploy_tidb/tikv1 tikv_port=20891  tikv_status_port=20181  labels="host=TiKV3-1"


[pd_servers]
PD01 ansible_host=127.0.0.1  deploy_dir=/tidb/deploy_tidb/pd pd_client_port=2589 pd_peer_port=2590 labels="host=ip-1"
PD02 ansible_host=127.0.0.2  deploy_dir=/tidb/deploy_tidb/pd pd_client_port=2589 pd_peer_port=2590 labels="host=ip-2"
PD03 ansible_host=127.0.0.3  deploy_dir=/tidb/deploy_tidb/pd pd_client_port=2589 pd_peer_port=2590 labels="host=ip-3"


[spark_master]

[spark_slaves]

[lightning_server]

[importer_server]

## Monitoring Part
# prometheus and pushgateway servers
[monitoring_servers]
#prometheus89 ansible_host=127.0.0.1 prometheus_port=7098 pushgateway_port=7099 labels="host=ip-127.0.0.1"
127.0.0.1

[grafana_servers]
#grafanaleifu89 ansible_host=127.0.0.1 grafana_port=7002 grafana_collector_port=7088 labels="host=ip-127.0.0.1"
127.0.0.1

# node_exporter and blackbox_exporter servers
[monitored_servers]
nodeblack1  ansible_host=127.0.0.1        node_exporter_port=7102 blackbox_exporter_port=7117 labels="host=ip-1"
nodeblack2  ansible_host=127.0.0.2        node_exporter_port=7102 blackbox_exporter_port=7117 labels="host=ip-2"
nodeblack3  ansible_host=127.0.0.3        node_exporter_port=7102 blackbox_exporter_port=7117 labels="host=ip-3"


[alertmanager_servers]
127.0.0.1

[kafka_exporter_servers]

## Binlog Part
[pump_servers]
pump1 ansible_host=127.0.0.1  deploy_dir=/tidb/deploy_tidb/pump pump_port=8290
pump2 ansible_host=127.0.0.2  deploy_dir=/tidb/deploy_tidb/pump pump_port=8290
pump3 ansible_host=127.0.0.3  deploy_dir=/tidb/deploy_tidb/pump pump_port=8290

[drainer_servers]

## Group variables
[pd_servers:vars]
location_labels = ["host"]

## Global variables
[all:vars]
deploy_dir = /tidb/deploy_tidb

## Connection
# ssh via normal user
ansible_user = tidb

cluster_name = test-cluster-30-ga

tidb_version = v3.0.0

# process supervision, [systemd, supervise]
process_supervision = systemd

timezone = Asia/Shanghai

enable_firewalld = False
# check NTP service
enable_ntpd = True
set_hostname = True

## binlog trigger
enable_binlog = True

# kafka cluster address for monitoring, example:
# kafka_addrs = "192.168.0.11:9092,192.168.0.12:9092,192.168.0.13:9092"
kafka_addrs = ""

# zookeeper address of kafka cluster for monitoring, example:
# zookeeper_addrs = "192.168.0.11:2181,192.168.0.12:2181,192.168.0.13:2181"
zookeeper_addrs = ""

# enable TLS authentication in the TiDB cluster
enable_tls = False

# KV mode
deploy_without_tidb = False

# wait for region replication complete before start tidb-server.
wait_replication = True

# Optional: Set if you already have a alertmanager server.
# Format: alertmanager_host:alertmanager_port
alertmanager_target = ""

grafana_admin_user = "admin"
grafana_admin_password = "admin"


### Collect diagnosis
collect_log_recent_hours = 2

enable_bandwidth_limit = True
# default: 10Mb/s, unit: Kbit/s
collect_bandwidth_limit = 10000
ansible-playbook bootstrap.ymlansible-playbook deploy.ymlansible-playbook start.yml四、验证并使用
1、连接 TiDB
[root@ip-localhost ~]# mysql -uroot -h127.0.0.1 -P5000
Welcome to the MariaDB monitor. Commands end with ; or \g.
Your MySQL connection id is 207
Server version: 5.7.25-TiDB-v3.0.1-36-g709ee4f-dirty MySQL Community Server (Apache License 2.0)

Copyright (c) 2000, 2018, Oracle, MariaDB Corporation Ab and others.

Type 'help;' or '\h' for help. Type '\c' to clear the current input statement.

MySQL [(none)]> select tidb_version();
+----------------------------------------------------------------------------------------------------------------------------------------------------------------------------------------------------------------------------------------------------------------------------------------------------------------------------------------+
| tidb_version()                                                                                                                                                                                                                                                                                                                         |
+----------------------------------------------------------------------------------------------------------------------------------------------------------------------------------------------------------------------------------------------------------------------------------------------------------------------------------------+
| Release Version: v3.0.1-36-g709ee4f-dirty
Git Commit Hash: 709ee4f5c1cd08b43da651c32f78c1032a397c84
Git Branch: release-3.0
UTC Build Time: 2019-07-25 06:26:30
GoVersion: go version go1.12.6 linux/arm64
Race Enabled: false
TiKV Min Version: 2.1.0-alpha.1-ff3dd160846b7d1aed9079c389fc188f7f5ea13e
Check Table Before Drop: false |
+----------------------------------------------------------------------------------------------------------------------------------------------------------------------------------------------------------------------------------------------------------------------------------------------------------------------------------------+
1 row in set (0.00 sec)

MySQL [(none)]> create database db_arm;
uQuery OK, 0 rows affected (1.02 sec)

MySQL [(none)]> use db_arm
Database changed
MySQL [db_arm]> create table tb_arm(i int);
Query OK, 0 rows affected (0.51 sec)

MySQL [db_arm]> insert into tb_arm values(1);
Query OK, 1 row affected (0.02 sec)

MySQL [db_arm]> select * from tb_arm;
+------+
| i   |
+------+
|    1 |
+------+
1 row in set (0.00 sec)
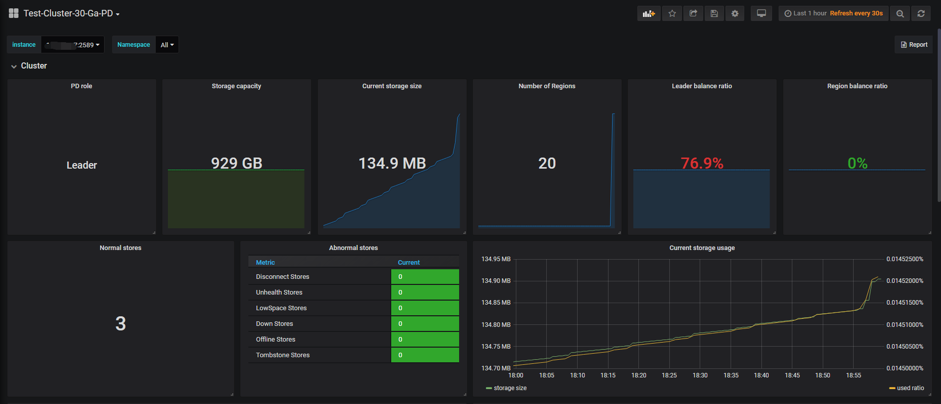
MySQL [db_arm]>TiDB 自带的监控展示平台 grafana:
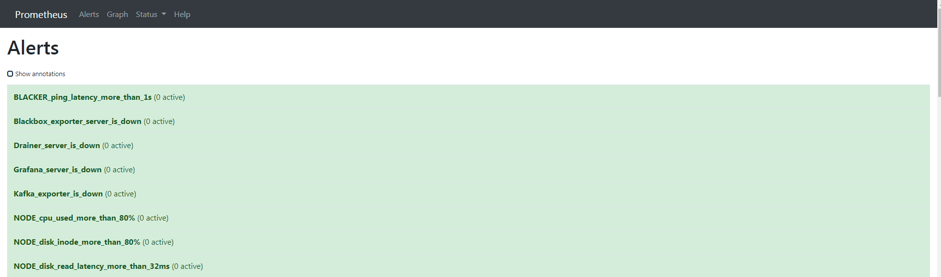
 TiDB 自带的告警平台 prometheus:
五、计划
?本文转载自公众号 TCTP,点击【阅读原文】查看原版文章


 477
477


 被折叠的 条评论
为什么被折叠?
被折叠的 条评论
为什么被折叠?
 到【灌水乐园】发言


