


1、应用与数据服务拆分
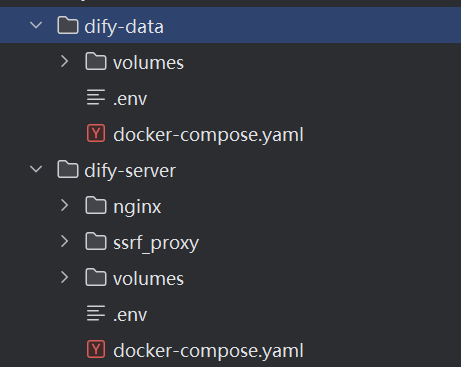
将dify拆分为数据存储、服务端两部分。dify数据存储包含dify业务库postgres、知识库向量数据库weaviate、缓存redis、文件存储minio四个服务。dify服务端包含api、worker、web、sandbox、plugin_daemon、ssrf_proxy、nginx七个服务,其中api与worker使用同一镜像。数据存储与服务端可分不同服务器部署,数据服务也可自行做集群。项目结构如下:
2、dify数据存储部署
在线环境直接启动,离线环境先下载相关镜像,导入离线服务器再部署。
2.1、配置
.env如下:
# ------------------------------
# Environment Variables for API service & worker
# ------------------------------

# ------------------------------
# Common Variables
# ------------------------------

# The backend URL of the console API,
# used to concatenate the authorization callback.
# If empty, it is the same domain.
# Example: https://api.console.dify.ai
CONSOLE_API_URL=

# The front-end URL of the console web,
# used to concatenate some front-end addresses and for CORS configuration use.
# If empty, it is the same domain.
# Example: https://console.dify.ai
CONSOLE_WEB_URL=

# Service API Url,
# used to display Service API Base Url to the front-end.
# If empty, it is the same domain.
# Example: https://api.dify.ai
SERVICE_API_URL=

# WebApp API backend Url,
# used to declare the back-end URL for the front-end API.
# If empty, it is the same domain.
# Example: https://api.app.dify.ai
APP_API_URL=

# WebApp Url,
# used to display WebAPP API Base Url to the front-end.
# If empty, it is the same domain.
# Example: https://app.dify.ai
APP_WEB_URL=

# File preview or download Url prefix.
# used to display File preview or download Url to the front-end or as Multi-model inputs;
# Url is signed and has expiration time.
FILES_URL=

# ------------------------------
# Server Configuration
# ------------------------------

# The log level for the application.
# Supported values are `DEBUG`, `INFO`, `WARNING`, `ERROR`, `CRITICAL`
LOG_LEVEL=INFO
# Log file path
LOG_FILE=/app/logs/server.log
# Log file max size, the unit is MB
LOG_FILE_MAX_SIZE=20
# Log file max backup count
LOG_FILE_BACKUP_COUNT=5
# Log dateformat
LOG_DATEFORMAT=%Y-%m-%d %H:%M:%S
# Log Timezone
LOG_TZ=UTC

# Debug mode, default is false.
# It is recommended to turn on this configuration for local development
# to prevent some problems caused by monkey patch.
DEBUG=false

# Flask debug mode, it can output trace information at the interface when turned on,
# which is convenient for debugging.
FLASK_DEBUG=false

# A secretkey that is used for securely signing the session cookie
# and encrypting sensitive information on the database.
# You can generate a strong key using `openssl rand -base64 42`.
SECRET_KEY=sk-9f73s3ljTXVcMT3Blb3ljTqtsKiGHXVcMT3BlbkFJLK7U

# Password for admin user initialization.
# If left unset, admin user will not be prompted for a password
# when creating the initial admin account.
# The length of the password cannot exceed 30 charactors.
INIT_PASSWORD=

# Deployment environment.
# Supported values are `PRODUCTION`, `TESTING`. Default is `PRODUCTION`.
# Testing environment. There will be a distinct color label on the front-end page,
# indicating that this environment is a testing environment.
DEPLOY_ENV=PRODUCTION

# Whether to enable the version check policy.
# If set to empty, https://updates.dify.ai will be called for version check.
CHECK_UPDATE_URL=https://updates.dify.ai

# Used to change the OpenAI base address, default is https://api.openai.com/v1.
# When OpenAI cannot be accessed in China, replace it with a domestic mirror address,
# or when a local model provides OpenAI compatible API, it can be replaced.
OPENAI_API_BASE=https://api.openai.com/v1

# When enabled, migrations will be executed prior to application startup
# and the application will start after the migrations have completed.
MIGRATION_ENABLED=true

# File Access Time specifies a time interval in seconds for the file to be accessed.
# The default value is 300 seconds.
FILES_ACCESS_TIMEOUT=300

# Access token expiration time in minutes
ACCESS_TOKEN_EXPIRE_MINUTES=1440

# Refresh token expiration time in days
REFRESH_TOKEN_EXPIRE_DAYS=30

# The maximum number of active requests for the application, where 0 means unlimited, should be a non-negative integer.
APP_MAX_ACTIVE_REQUESTS=0
APP_MAX_EXECUTION_TIME=1200

# ------------------------------
# Container Startup Related Configuration
# Only effective when starting with docker image or docker-compose.
# ------------------------------

# API service binding address, default: 0.0.0.0, i.e., all addresses can be accessed.
DIFY_BIND_ADDRESS=0.0.0.0

# API service binding port number, default 5001.
DIFY_PORT=5001

# The number of API server workers, i.e., the number of workers.
# Formula: number of cpu cores x 2 + 1 for sync, 1 for Gevent
# Reference: https://docs.gunicorn.org/en/stable/design.html#how-many-workers
SERVER_WORKER_AMOUNT=1

# Defaults to gevent. If using windows, it can be switched to sync or solo.
SERVER_WORKER_CLASS=gevent

# Default number of worker connections, the default is 10.
SERVER_WORKER_CONNECTIONS=10

# Similar to SERVER_WORKER_CLASS.
# If using windows, it can be switched to sync or solo.
CELERY_WORKER_CLASS=

# Request handling timeout. The default is 200,
# it is recommended to set it to 360 to support a longer sse connection time.
GUNICORN_TIMEOUT=360

# The number of Celery workers. The default is 1, and can be set as needed.
CELERY_WORKER_AMOUNT=

# Flag indicating whether to enable autoscaling of Celery workers.
#
# Autoscaling is useful when tasks are CPU intensive and can be dynamically
# allocated and deallocated based on the workload.
#
# When autoscaling is enabled, the maximum and minimum number of workers can
# be specified. The autoscaling algorithm will dynamically adjust the number
# of workers within the specified range.
#
# Default is false (i.e., autoscaling is disabled).
#
# Example:
# CELERY_AUTO_SCALE=true
CELERY_AUTO_SCALE=false

# The maximum number of Celery workers that can be autoscaled.
# This is optional and only used when autoscaling is enabled.
# Default is not set.
CELERY_MAX_WORKERS=

# The minimum number of Celery workers that can be autoscaled.
# This is optional and only used when autoscaling is enabled.
# Default is not set.
CELERY_MIN_WORKERS=

# API Tool configuration
API_TOOL_DEFAULT_CONNECT_TIMEOUT=10
API_TOOL_DEFAULT_READ_TIMEOUT=60

# -------------------------------
# Datasource Configuration
# --------------------------------
ENABLE_WEBSITE_JINAREADER=true
ENABLE_WEBSITE_FIRECRAWL=true
ENABLE_WEBSITE_WATERCRAWL=true


# ------------------------------
# Database Configuration
# The database uses PostgreSQL. Please use the public schema.
# It is consistent with the configuration in the 'db' service below.
# ------------------------------

DB_USERNAME=postgres
DB_PASSWORD=2Pal6HPNiyx2
DB_HOST=10.10.10.10
DB_PORT=5432
DB_DATABASE=dify
# The size of the database connection pool.
# The default is 30 connections, which can be appropriately increased.
SQLALCHEMY_POOL_SIZE=30
# Database connection pool recycling time, the default is 3600 seconds.
SQLALCHEMY_POOL_RECYCLE=3600
# Whether to print SQL, default is false.
SQLALCHEMY_ECHO=false

# Maximum number of connections to the database
# Default is 100
#
# Reference: https://www.postgresql.org/docs/current/runtime-config-connection.html#GUC-MAX-CONNECTIONS
POSTGRES_MAX_CONNECTIONS=100

# Sets the amount of shared memory used for postgres's shared buffers.
# Default is 128MB
# Recommended value: 25% of available memory
# Reference: https://www.postgresql.org/docs/current/runtime-config-resource.html#GUC-SHARED-BUFFERS
POSTGRES_SHARED_BUFFERS=128MB

# Sets the amount of memory used by each database worker for working space.
# Default is 4MB
#
# Reference: https://www.postgresql.org/docs/current/runtime-config-resource.html#GUC-WORK-MEM
POSTGRES_WORK_MEM=4MB

# Sets the amount of memory reserved for maintenance activities.
# Default is 64MB
#
# Reference: https://www.postgresql.org/docs/current/runtime-config-resource.html#GUC-MAINTENANCE-WORK-MEM
POSTGRES_MAINTENANCE_WORK_MEM=64MB

# Sets the planner's assumption about the effective cache size.
# Default is 4096MB
#
# Reference: https://www.postgresql.org/docs/current/runtime-config-query.html#GUC-EFFECTIVE-CACHE-SIZE
POSTGRES_EFFECTIVE_CACHE_SIZE=4096MB

# ------------------------------
# Redis Configuration
# This Redis configuration is used for caching and for pub/sub during conversation.
# ------------------------------

REDIS_HOST=10.10.10.10
REDIS_PORT=6379
REDIS_USERNAME=
REDIS_PASSWORD=2Pal6HPNiyx2
REDIS_USE_SSL=false
REDIS_DB=0

# Whether to use Redis Sentinel mode.
# If set to true, the application will automatically discover and connect to the master node through Sentinel.
REDIS_USE_SENTINEL=false

# List of Redis Sentinel nodes. If Sentinel mode is enabled, provide at least one Sentinel IP and port.
# Format: `<sentinel1_ip>:<sentinel1_port>,<sentinel2_ip>:<sentinel2_port>,<sentinel3_ip>:<sentinel3_port>`
REDIS_SENTINELS=
REDIS_SENTINEL_SERVICE_NAME=
REDIS_SENTINEL_USERNAME=
REDIS_SENTINEL_PASSWORD=
REDIS_SENTINEL_SOCKET_TIMEOUT=0.1

# List of Redis Cluster nodes. If Cluster mode is enabled, provide at least one Cluster IP and port.
# Format: `<Cluster1_ip>:<Cluster1_port>,<Cluster2_ip>:<Cluster2_port>,<Cluster3_ip>:<Cluster3_port>`
REDIS_USE_CLUSTERS=false
REDIS_CLUSTERS=
REDIS_CLUSTERS_PASSWORD=

# ------------------------------
# Celery Configuration
# ------------------------------

# Use redis as the broker, and redis db 1 for celery broker.
# Format as follows: `redis://<redis_username>:<redis_password>@<redis_host>:<redis_port>/<redis_database>`
# Example: redis://:2Pal6HPNiyx2@redis:6379/1
# If use Redis Sentinel, format as follows: `sentinel://<sentinel_username>:<sentinel_password>@<sentinel_host>:<sentinel_port>/<redis_database>`
# Example: sentinel://localhost:26379/1;sentinel://localhost:26380/1;sentinel://localhost:26381/1
CELERY_BROKER_URL=redis://:2Pal6HPNiyx2@10.10.10.10:6379/1
BROKER_USE_SSL=false

# If you are using Redis Sentinel for high availability, configure the following settings.
CELERY_USE_SENTINEL=false
CELERY_SENTINEL_MASTER_NAME=
CELERY_SENTINEL_SOCKET_TIMEOUT=0.1

# ------------------------------
# CORS Configuration
# Used to set the front-end cross-domain access policy.
# ------------------------------

# Specifies the allowed origins for cross-origin requests to the Web API,
# e.g. https://dify.app or * for all origins.
WEB_API_CORS_ALLOW_ORIGINS=*

# Specifies the allowed origins for cross-origin requests to the console API,
# e.g. https://cloud.dify.ai or * for all origins.
CONSOLE_CORS_ALLOW_ORIGINS=*

# ------------------------------
# File Storage Configuration
# ------------------------------

# The type of storage to use for storing user files.
STORAGE_TYPE=s3

# Apache OpenDAL Configuration
# The configuration for OpenDAL consists of the following format: OPENDAL_<SCHEME_NAME>_<CONFIG_NAME>.
# You can find all the service configurations (CONFIG_NAME) in the repository at: https://github.com/apache/opendal/tree/main/core/src/services.
# Dify will scan configurations starting with OPENDAL_<SCHEME_NAME> and automatically apply them.
# The scheme name for the OpenDAL storage.
OPENDAL_SCHEME=fs
# Configurations for OpenDAL Local File System.
OPENDAL_FS_ROOT=storage

# S3 Configuration
#
S3_ENDPOINT=http://10.10.10.10:9000
S3_REGION=
S3_BUCKET_NAME=difyai
S3_ACCESS_KEY=JAt0CAvmvu2uGpNOPv3p
S3_SECRET_KEY=uPZoVvH0gryFa53VCLWRCSZ7xgC3LIYklAWyxSoe
# Whether to use AWS managed IAM roles for authenticating with the S3 service.
# If set to false, the access key and secret key must be provided.
S3_USE_AWS_MANAGED_IAM=false

# Azure Blob Configuration
#
AZURE_BLOB_ACCOUNT_NAME=difyai
AZURE_BLOB_ACCOUNT_KEY=difyai
AZURE_BLOB_CONTAINER_NAME=difyai-container
AZURE_BLOB_ACCOUNT_URL=https://<your_account_name>.blob.core.windows.net

# Google Storage Configuration
#
GOOGLE_STORAGE_BUCKET_NAME=your-bucket-name
GOOGLE_STORAGE_SERVICE_ACCOUNT_JSON_BASE64=

# The Alibaba Cloud OSS configurations,
#
ALIYUN_OSS_BUCKET_NAME=your-bucket-name
ALIYUN_OSS_ACCESS_KEY=your-access-key
ALIYUN_OSS_SECRET_KEY=your-secret-key
ALIYUN_OSS_ENDPOINT=https://oss-ap-southeast-1-internal.aliyuncs.com
ALIYUN_OSS_REGION=ap-southeast-1
ALIYUN_OSS_AUTH_VERSION=v4
# Don't start with '/'. OSS doesn't support leading slash in object names.
ALIYUN_OSS_PATH=your-path

# Tencent COS Configuration
#
TENCENT_COS_BUCKET_NAME=your-bucket-name
TENCENT_COS_SECRET_KEY=your-secret-key
TENCENT_COS_SECRET_ID=your-secret-id
TENCENT_COS_REGION=your-region
TENCENT_COS_SCHEME=your-scheme

# Oracle Storage Configuration
#
OCI_ENDPOINT=https://objectstorage.us-ashburn-1.oraclecloud.com
OCI_BUCKET_NAME=your-bucket-name
OCI_ACCESS_KEY=your-access-key
OCI_SECRET_KEY=your-secret-key
OCI_REGION=us-ashburn-1

# Huawei OBS Configuration
#
HUAWEI_OBS_BUCKET_NAME=your-bucket-name
HUAWEI_OBS_SECRET_KEY=your-secret-key
HUAWEI_OBS_ACCESS_KEY=your-access-key
HUAWEI_OBS_SERVER=your-server-url

# Volcengine TOS Configuration
#
VOLCENGINE_TOS_BUCKET_NAME=your-bucket-name
VOLCENGINE_TOS_SECRET_KEY=your-secret-key
VOLCENGINE_TOS_ACCESS_KEY=your-access-key
VOLCENGINE_TOS_ENDPOINT=your-server-url
VOLCENGINE_TOS_REGION=your-region

# Baidu OBS Storage Configuration
#
BAIDU_OBS_BUCKET_NAME=your-bucket-name
BAIDU_OBS_SECRET_KEY=your-secret-key
BAIDU_OBS_ACCESS_KEY=your-access-key
BAIDU_OBS_ENDPOINT=your-server-url

# Supabase Storage Configuration
#
SUPABASE_BUCKET_NAME=your-bucket-name
SUPABASE_API_KEY=your-access-key
SUPABASE_URL=your-server-url

# ------------------------------
# Vector Database Configuration
# ------------------------------

# The type of vector store to use.
# Supported values are `weaviate`, `qdrant`, `milvus`, `myscale`, `relyt`, `pgvector`, `pgvecto-rs`, `chroma`, `opensearch`, `tidb_vector`, `oracle`, `tencent`, `elasticsearch`, `elasticsearch-ja`, `analyticdb`, `couchbase`, `vikingdb`, `oceanbase`.
VECTOR_STORE=weaviate

# The Weaviate endpoint URL. Only available when VECTOR_STORE is `weaviate`.
WEAVIATE_ENDPOINT=http://10.10.10.10:8080
WEAVIATE_API_KEY=WVF5YThaHlkYwhGUSmCRgsX3tD5ngdN8pkih

# The Qdrant endpoint URL. Only available when VECTOR_STORE is `qdrant`.
QDRANT_URL=http://qdrant:6333
QDRANT_API_KEY=2Pal6HPNiyx2
QDRANT_CLIENT_TIMEOUT=20
QDRANT_GRPC_ENABLED=false
QDRANT_GRPC_PORT=6334

# Milvus configuration. Only available when VECTOR_STORE is `milvus`.
# The milvus uri.
MILVUS_URI=http://host.docker.internal:19530
MILVUS_DATABASE=
MILVUS_TOKEN=
MILVUS_USER=
MILVUS_PASSWORD=
MILVUS_ENABLE_HYBRID_SEARCH=False
MILVUS_ANALYZER_PARAMS=

# MyScale configuration, only available when VECTOR_STORE is `myscale`
# For multi-language support, please set MYSCALE_FTS_PARAMS with referring to:
# https://myscale.com/docs/en/text-search/#understanding-fts-index-parameters
MYSCALE_HOST=myscale
MYSCALE_PORT=8123
MYSCALE_USER=default
MYSCALE_PASSWORD=
MYSCALE_DATABASE=dify
MYSCALE_FTS_PARAMS=

# Couchbase configurations, only available when VECTOR_STORE is `couchbase`
# The connection string must include hostname defined in the docker-compose file (couchbase-server in this case)
COUCHBASE_CONNECTION_STRING=couchbase://couchbase-server
COUCHBASE_USER=Administrator
COUCHBASE_PASSWORD=password
COUCHBASE_BUCKET_NAME=Embeddings
COUCHBASE_SCOPE_NAME=_default

# pgvector configurations, only available when VECTOR_STORE is `pgvector`
PGVECTOR_HOST=pgvector
PGVECTOR_PORT=5432
PGVECTOR_USER=postgres
PGVECTOR_PASSWORD=2Pal6HPNiyx2
PGVECTOR_DATABASE=dify
PGVECTOR_MIN_CONNECTION=1
PGVECTOR_MAX_CONNECTIO
最低0.47元/天 解锁文章


 2653
2653

 被折叠的 条评论
为什么被折叠?
被折叠的 条评论
为什么被折叠?
 到【灌水乐园】发言


