


Android使用MQTT订阅及发布消息((二)兼容Android12 封装Mqtt客户端service)
关于
本篇主要讲如何适配Android 12下的封装mqtt操作service,如果再看本篇之前你还不了解什么是MQTT以及如何上手操作Android与mqtt服务通信的话可以先看这一篇Android使用MQTT订阅及发布消息((一)初步了解Mqtt以及实现Android操作mqtt服务)
首先看一下我的项目的build配置
  compileSdk 32

    defaultConfig {
        applicationId "com.tobeyr1.app"
        minSdk 23
        targetSdk 32
        versionCode 1
        versionName "1.0"

        testInstrumentationRunner "androidx.test.runner.AndroidJUnitRunner"
    }
为什么Android 11 还可以使用eclipse提供的service,Android12就不行了呢,相信有跟着第一篇教程的朋友运行在Android12上会有paddingIntent的报错提示。这涉及到了Android12的行为变更,详情可以参考google开发文档

好了,到这里,我们就来讲下适配Android12的办法。
Android 12操作mqtt
修改配置
添加eclipse提供的mqtt引用到build中:
implementation 'org.eclipse.paho:org.eclipse.paho.client.mqttv3:1.2.5'
记得在Androidmanifest上面添加Internet权限
<uses-permission android:name="android.permission.INTERNET" />
新增MqttService.kt类
第一步,定义变量
class MqttService {

private val TAG = "MqttService"
//连接mqtt服务的url与认证账号
private var hostName : String = "tcp://broker.emqx.io:1883"

private var cUsername : String = "tobeyr1"

private var cPassword: CharArray = "1234".toCharArray()
//mqttClient
private var mqttClient: IMqttAsyncClient? = null
}
第二步,单例mqttservice
 companion object{
        @Volatile private var mqttService :MqttService? = null
        fun init():MqttService = mqttService?: synchronized(this){
            mqttService?: MqttService()
        }
    }
第三步,初始化mqttClient
 @Synchronized
   fun connectToBroker(host:String){
        this.hostName = host
        //配置mqttclient
        mqttClient = buildMqttClient()
        try {
            val options = MqttConnectOptions()
            options.apply {
                userName = cUsername
                this.password = cPassword
            }
            //设置遗愿
            setWill(options)
            options.apply {
                connectionTimeout = 12
                this.keepAliveInterval = 0
                this.isAutomaticReconnect = false
                this.isCleanSession = true
            }

            val token = mqttClient!!.connect(options)
            token.waitForCompletion()
        }catch (e: MqttException){
            if (e.reasonCode != 32100) {
                // Client is not already connected
                Log.d(TAG,"Releasing connectinglock")
                throw MqttConnectionException(e)
            }
        }
   }

    private fun buildMqttClient():IMqttAsyncClient{
        val clientId = "mqttad_"+"test"
        val mqttClient = MqttAsyncClient(hostName,clientId,MemoryPersistence(),TimerPingSender(),null,AndroidHighResolutionTimer())
        mqttClient.setCallback(mqttCallback)
        return mqttClient
    }
定义内部类
 //不是inner class
internal class AlreadyConnectingToBrokerException : Exception()
internal class MqttConnectionException(e: java.lang.Exception?) : java.lang.Exception(e)
设置遗愿
    private fun setWill(m: MqttConnectOptions) {
        try {
            val lwt = JSONObject()
            lwt.put("_type", "lwt")
            lwt.put(
                "tst",
                TimeUnit.MILLISECONDS.toSeconds(System.currentTimeMillis())
                    .toInt()
            )
            m.setWill("beijing", lwt.toString().toByteArray(), 2, true)
        } catch (ignored: JSONException) {
        } catch (e: IllegalArgumentException) {
            throw e
        }
    }
定义HighResolutionTimer
class AndroidHighResolutionTimer : HighResolutionTimer {
    override fun nanoTime(): Long = SystemClock.elapsedRealtimeNanos()
}
定义连接回调mqttCallback
 private val mqttCallback  = object : MqttCallbackExtended {
        override fun connectionLost(cause: Throwable?) {
            Log.d(TAG,"Connect Lost",cause)
        }

        override fun messageArrived(topic: String?, message: MqttMessage?) {}

        override fun deliveryComplete(token: IMqttDeliveryToken?) {}

        override fun connectComplete(reconnect: Boolean, serverURI: String?) {
             //连接成功
            Log.d(TAG,"Connect Complete. Reconnected: %s, serverUri:%s $reconnect $serverURI")
        }

    }
封装disconnected(断开)
    fun disconnect(){
      try {
            if (mqttClient?.isConnected == true){
                mqttClient!!.disconnect().waitForCompletion()
            }
        }catch (e: MqttException){
           throw MqttConnectionException(e)
        }
    }
封装subscribe(订阅)方法
定义typealias
typealias MessageReceive = (message:String) -> Unit
private var rMessage : MessageReceive? = null
 fun subscribe(topics:Array<String>, qos: IntArray){
        checkIsLost()
        mqttClient!!.subscribe(topics,qos)
    }

    fun subscribe(topic:String,qos: Int){
        checkIsLost()
        mqttClient!!.subscribe(topic,qos,null,object : IMqttActionListener{
            override fun onSuccess(asyncActionToken: IMqttToken?) {
                Log.d(TAG, "Subscribed to $topic")
            }

            override fun onFailure(asyncActionToken: IMqttToken?, exception: Throwable?) {
                Log.d(TAG, "Failed to subscribe $topic")
            }
        }
        ) { _, message ->
            Log.d(TAG,message.toString())
            rMessage?.invoke(message.toString())

        }
    }
  private fun checkIsLost() {
        try {
            connectToBroker(this.hostName)
        }catch (e: MqttConnectionException){
            throw AlreadyConnectingToBrokerException()
        }catch (e:FileAlreadyExistsException){
            throw AlreadyConnectingToBrokerException()
        }
    }
获取订阅收到的消息
  fun getMessage(message:MessageReceive){
        this.rMessage = message
    }
封装unsubsubscribe(取消订阅)方法
  fun unSubscribe(topic: String){
        if (!isConnected()){
            return
        }
        mqttClient!!.unsubscribe(topic,null,object :IMqttActionListener{
            override fun onSuccess(asyncActionToken: IMqttToken?) {
                Log.d(TAG, "Unsubscribed to $topic")
            }

            override fun onFailure(asyncActionToken: IMqttToken?, exception: Throwable?) {
                Log.d(TAG, "Failed to unsubscribe $topic",exception)
            }
        })
    }
 fun isConnected():Boolean = mqttClient !=null && mqttClient!!.isConnected
封装publish(发布)方法
    fun publish(topic: String,msg:String,qos: Int = 1,retained: Boolean = false){
        checkIsLost()
        val message = MqttMessage()
        message.apply {
            payload = msg.toByteArray()
            this.qos = qos
            isRetained = retained
        }
        mqttClient!!.publish(topic,message,null,object :IMqttActionListener{
            override fun onSuccess(asyncActionToken: IMqttToken?) {
                Log.d(TAG, "$msg published to $topic")
            }

            override fun onFailure(asyncActionToken: IMqttToken?, exception: Throwable?) {
                Log.d(TAG, "Failed to publish $msg to $topic",exception)
            }

        })
    }
使用mqttService
修改mainActivity类:
var mqttService: MqttService? = null
override fun onCreate(savedInstanceState: Bundle?) {
        super.onCreate(savedInstanceState)
        binding = ActivityMainBinding.inflate(layoutInflater)
        setContentView(binding.root)
        mqttService = MqttService.init()
        mqttService?.getMessage {
           //拿到订阅的主题的返回消息
            Log.d(TAG,it)
        }
  }
连接mqtt:
  private fun connectMqtt(){
           mqttService?.let {
                if (!it.isConnected()){
                    mqttService?.connectToBroker("tcp://pc1c6e1c.cn-shenzhen.emqx.cloud:11838")
                }
            }
    }
操作mqttClient:
    private fun subscribe(topic:String,qos: Int){
        mqttService?.subscribe(topic, qos)
    }

    private fun subscribe(topics:Array<String>, qos: IntArray){
        mqttService?.subscribe(topics, qos)
    }

    private fun unSubscribe(topic: String){
        mqttService?.unSubscribe(topic)
    }

    private fun publish(topic: String,msg:String,qos: Int = 1,retained: Boolean = false){
        mqttService?.publish(topic, msg, qos, retained)
    }
使用
首先看一下MainActivity页面的布局效果:

布局代码
<?xml version="1.0" encoding="utf-8"?>
<androidx.constraintlayout.widget.ConstraintLayout xmlns:android="http://schemas.android.com/apk/res/android"
    xmlns:app="http://schemas.android.com/apk/res-auto"
    xmlns:tools="http://schemas.android.com/tools"
    android:layout_width="match_parent"
    android:layout_height="match_parent"
    tools:context=".MainActivity">

    <TextView
        android:id="@+id/tv_status"
        android:layout_width="wrap_content"
        android:layout_height="wrap_content"
        android:textColor="@color/black"
        app:layout_constraintTop_toTopOf="parent"
        android:textSize="16sp"
        app:layout_constraintStart_toStartOf="parent"
        app:layout_constraintEnd_toEndOf="parent"/>

    <EditText
        android:visibility="gone"
        android:id="@+id/ed_client_id"
        android:layout_width="match_parent"
        android:hint="请输入客户端clientid"
        android:layout_height="wrap_content"
        app:layout_constraintTop_toBottomOf="@id/tv_status"/>
    <Button
        android:id="@+id/bt_connect"
        android:layout_width="0dp"
        android:layout_marginStart="12dp"
        android:layout_height="wrap_content"
        app:layout_constraintTop_toBottomOf="@id/ed_client_id"
        app:layout_constraintEnd_toStartOf="@id/bt_disconnected"
        android:text="Connected"
        app:layout_constraintStart_toStartOf="parent"/>
    <Button
        android:id="@+id/bt_disconnected"
        android:layout_width="0dp"
        android:layout_height="wrap_content"
        android:text="disconnected"
        app:layout_constraintEnd_toEndOf="parent"
        app:layout_constraintStart_toEndOf="@id/bt_connect"
        android:layout_marginStart="20dp"
        android:layout_marginEnd="12dp"
        app:layout_constraintTop_toBottomOf="@id/ed_client_id"/>

    <EditText
        android:id="@+id/ed_subscribe_topic"
        android:layout_width="match_parent"
        android:layout_height="wrap_content"
        android:hint="请输入订阅主题"
        app:layout_constraintTop_toBottomOf="@id/bt_connect"/>
   <Button
       android:id="@+id/bt_subscribe"
       android:layout_width="0dp"
       android:layout_height="wrap_content"
       android:text="subscribe"
       app:layout_constraintStart_toStartOf="parent"
       android:layout_marginStart="12dp"
       app:layout_constraintEnd_toStartOf="@id/bt_unsubscribe"
       app:layout_constraintTop_toBottomOf="@id/ed_subscribe_topic"/>
    <Button
        android:id="@+id/bt_unsubscribe"
        android:layout_width="0dp"
        android:layout_height="wrap_content"
        android:text="unsubscribe"
        app:layout_constraintTop_toBottomOf="@id/ed_subscribe_topic"
        app:layout_constraintEnd_toEndOf="parent"
        app:layout_constraintStart_toEndOf="@id/bt_subscribe"
        android:layout_marginEnd="12dp"
        android:layout_marginStart="20dp"/>

    <TextView
        android:id="@+id/tv_received_message"
        android:layout_width="wrap_content"
        android:layout_height="wrap_content"
        app:layout_constraintTop_toBottomOf="@id/bt_subscribe"
        app:layout_constraintStart_toStartOf="parent"
        app:layout_constraintEnd_toEndOf="parent"/>

    <EditText
        android:id="@+id/ed_publish_theme"
        android:layout_width="match_parent"
        android:layout_height="wrap_content"
        android:hint="请输入要发布的主题"
        app:layout_constraintTop_toBottomOf="@id/tv_received_message"/>
    <EditText
        android:id="@+id/ed_publish_message"
        android:layout_width="match_parent"
        android:layout_height="wrap_content"
        android:hint="请输入要发送的信息"
        app:layout_constraintTop_toBottomOf="@id/ed_publish_theme"/>

    <Button
        android:id="@+id/bt_send_message"
        android:layout_width="wrap_content"
        android:layout_height="wrap_content"
        android:text="publish"
        app:layout_constraintTop_toBottomOf="@id/ed_publish_message"
        app:layout_constraintStart_toStartOf="parent"
        app:layout_constraintEnd_toEndOf="parent"/>

</androidx.constraintlayout.widget.ConstraintLayout>
主界面代码
 private val TAG = MainActivity::class.java.simpleName
 private lateinit var binding: ActivityMainBinding
 private var mqttService: MqttService? = null

   override fun onCreate(savedInstanceState: Bundle?) {
        super.onCreate(savedInstanceState)
        binding = ActivityMainBinding.inflate(layoutInflater)
        setContentView(binding.root)
        mqttService = MqttService.init()
        binding.tvStatus.text = Build.VERSION.SDK_INT.toString() //显示当前手机Android版本
        binding.btConnect.setOnClickListener {
            mqttService?.connectToBroker("tcp://pc1c6e1c.cn-shenzhen.emqx.cloud:11838")
        }
        binding.btDisconnected.setOnClickListener {
            mqttService?.disconnect()
        }
        binding.btSubscribe.setOnClickListener {
            if (binding.edSubscribeTopic.text.toString().isNotEmpty()){
                mqttService?.subscribe(binding.edSubscribeTopic.text.toString(),1)
            }

        }
        binding.btSendMessage.setOnClickListener {
            if (binding.edPublishMessage.text.toString().isNotEmpty() && binding.edPublishTheme.text.toString().isNotEmpty()){
                mqttService?.publish(binding.edPublishTheme.text.toString(),binding.edPublishMessage.text.toString(),retained = false)
            }
        }
        binding.btUnsubscribe.setOnClickListener {
            if (binding.edSubscribeTopic.text.toString().isNotEmpty()){
                mqttService?.unSubscribe(binding.edSubscribeTopic.text.toString())
            }
        }


    }
然后我们运行项目,打开EMQX后台,打开监控,查看我们启动连接的时候是否可以在后台被查看到:

然后我们输入订阅主题beijing,然后点击订阅按钮:

可以在控制台看到新增的订阅:

接下来我们可以使用两台手机或者一个EMQ提供的mqttx软件来连接一下mqtt,连接方式与Android手机一样:

然后我们刷新一下emq后台监控如下:

可以看到也连接成功了,然后我们在mqttx控制台里面输入要发布的主题beijing和消息:

然后我们就可以在Android界面上收到订阅的消息,控制台里面也可以看到:

然后我们可以取消订阅,调用unsubscribe按钮:

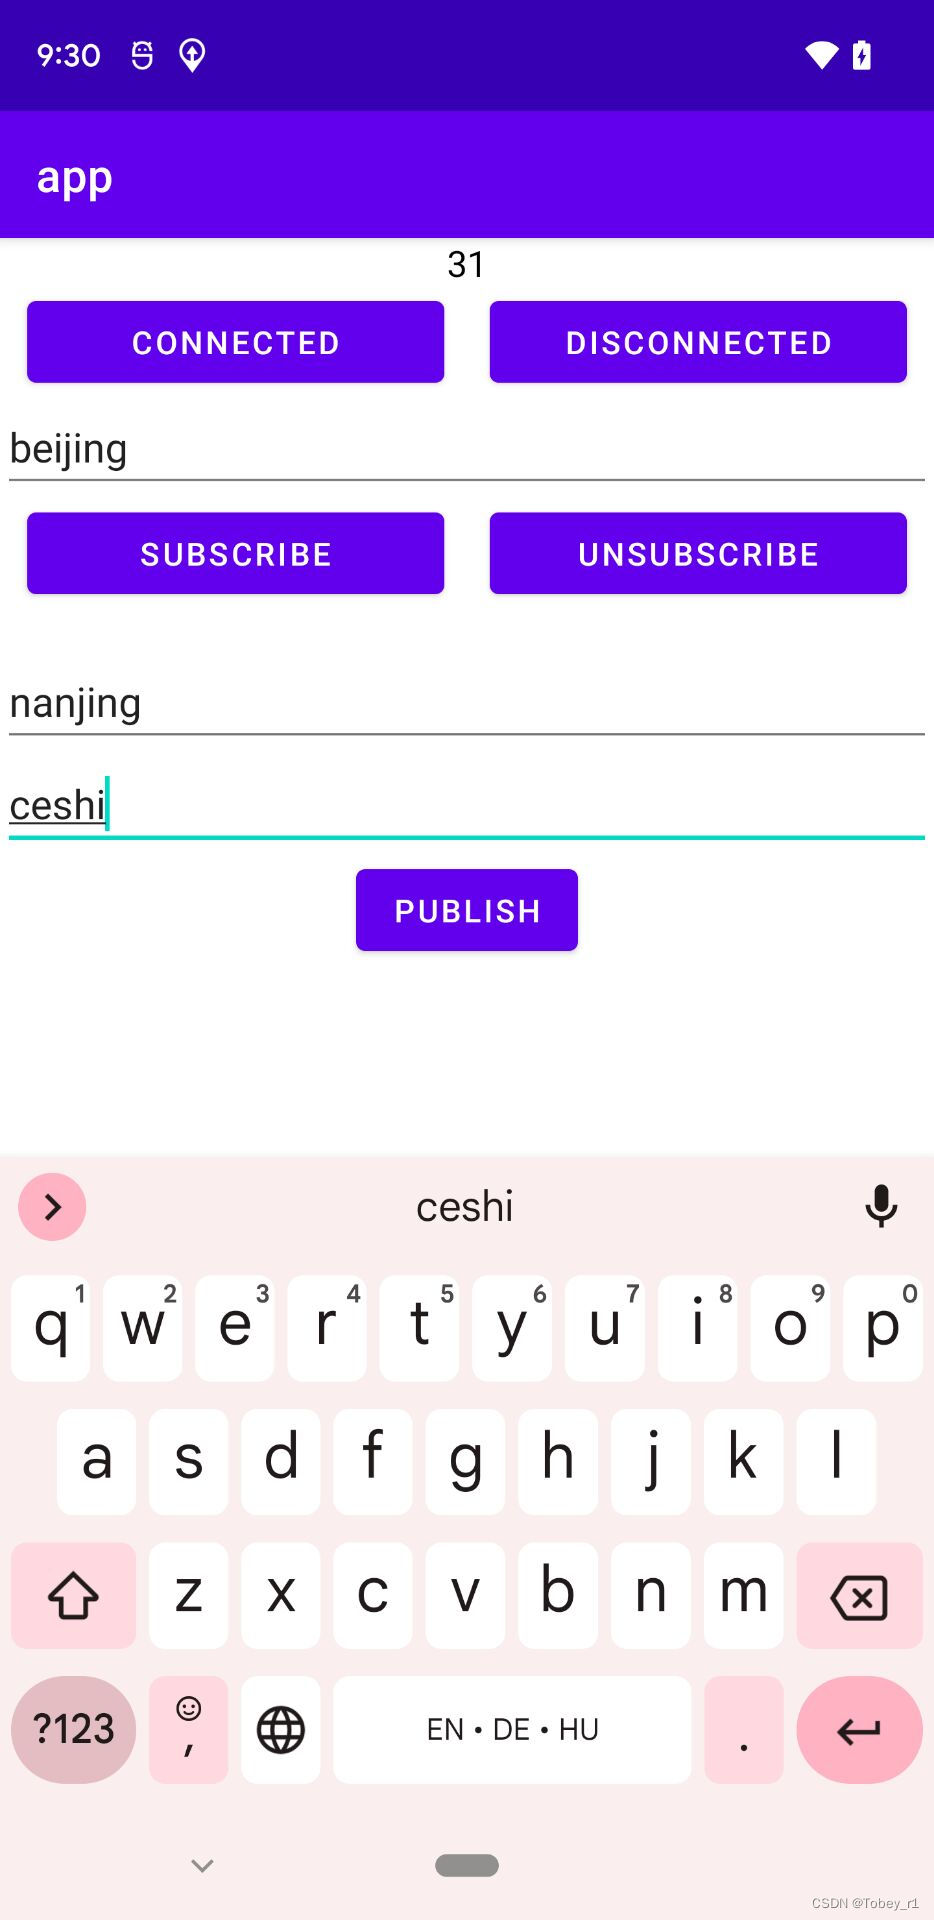
接下来,我们在输入框里面输入一个nanjing当作我们要发布的主题,消息呢就输入ceshi:
然后我们在mqttx上面添加一个nanjing的订阅:

然后我们在手机上点击publis按钮,查看mqttx控制台:

消息发布成功,最后我们调用disconnected按钮断开与mqtt服务的连接:

Android连接mqtt实现及订阅和发布功能就完成了,后续进一步封装改进就有时间在进行说明把,本篇文章到此就结束了,有问题欢迎批评指教,觉得不错的也请点个赞,谢谢。


 750
750

 被折叠的 条评论
为什么被折叠?
被折叠的 条评论
为什么被折叠?
 到【灌水乐园】发言


