


文章目录
Graphics的方法
AddMetafileComment添加注释
原型:
public void AddMetafileComment (byte[] data);
作用:向当前图元(Metafile)文件添加注释。只对图元文件有效。
// 创建新的Graphics对象并获取其句柄
Graphics newGraphics = this.CreateGraphics();
IntPtr hdc = newGraphics.GetHdc();

// 创建新的图元文件
Metafile metaFile1 = new Metafile("SampMeta.emf", hdc);

// 从图元文件创建Graphics对象
Graphics metaGraphics = Graphics.FromImage(metaFile1);

// 绘制一个矩形
metaGraphics.DrawRectangle(new Pen(Color.Black, 5), 0, 0, 100, 100);

// 添加注释
byte[] metaComment = { (byte)'T', (byte)'e', (byte)'s', (byte)'t' };
metaGraphics.AddMetafileComment(metaComment);

metaGraphics.Dispose();

metaFile1.Dispose();

newGraphics.ReleaseHdc(hdc);

newGraphics.Dispose();

// 打开一个图元文件
Metafile metaFile2 = new Metafile("SampMeta.emf");

// 将图元文件内容绘制到当前Graphics上
e.Graphics.DrawImage(metaFile2, new Point(0, 0));

metaFile2.Dispose();
创建一个新的图元件,保存后,打开并绘制。目前没看出有啥作用,在图像文件中嵌入一些信息?可还没找到读取的方法。
BeginContainer和EndContainer新建、还原图形容器
原型:
public System.Drawing.Drawing2D.GraphicsContainer BeginContainer ();
public System.Drawing.Drawing2D.GraphicsContainer BeginContainer (System.Drawing.Rectangle dstrect, System.Drawing.Rectangle srcrect, System.Drawing.GraphicsUnit unit);
public System.Drawing.Drawing2D.GraphicsContainer BeginContainer (System.Drawing.RectangleF dstrect, System.Drawing.RectangleF srcrect, System.Drawing.GraphicsUnit unit);
public void EndContainer (System.Drawing.Drawing2D.GraphicsContainer container);
作用:保存图形容器及其当前状态,再打开并使用新的图形容器。
可定义源矩形与目标矩形来生成新的图形容器,实现坐标变换。
关闭当前图形容器并改得到通过调用BeginContainer()方法保存的状态。
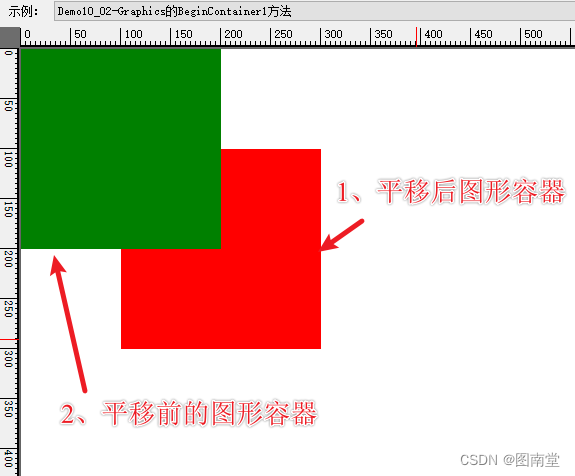
不指定指定源与目标矩形
//将当前状态保存到containerState,并打开一个新的图形容器
GraphicsContainer containerState = e.Graphics.BeginContainer();

// 在新图形容器来执行平移
e.Graphics.TranslateTransform(100.0F, 100.0F);

// 填充一个红色矩形
e.Graphics.FillRectangle(new SolidBrush(Color.Red), 0, 0, 200, 200);

// 还原图形容器状态(还原到未平移前的状态)
e.Graphics.EndContainer(containerState);

// Fill untransformed rectangle with green.
e.Graphics.FillRectangle(new SolidBrush(Color.Green), 0, 0, 200, 200);
1、保存原图形容器
2、在新的图形容器内到平移变换
3、绘制一个矩形
4、还原图形容器
5、再绘制一个与前面坐标一致(世界坐标)的矩形
注意结果位置的不同
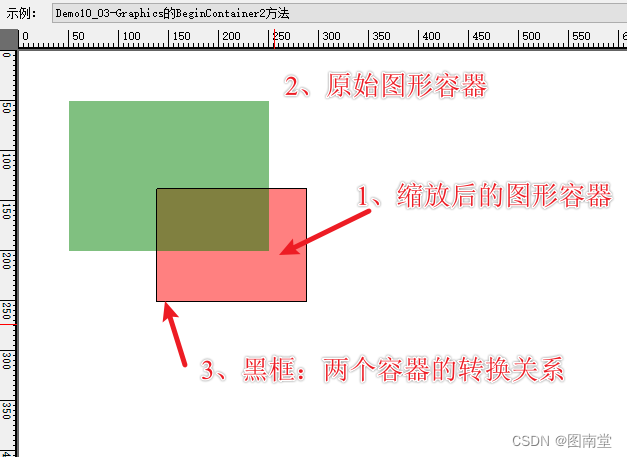
指定源与目标矩形
// 定义源矩形和目标矩形,
RectangleF srcRect = new RectangleF(0, 0, 200, 200);
RectangleF destRect = new RectangleF(100, 100, 150, 150);

// 保存,并打开一个变换后图形容器
GraphicsContainer containerState = e.Graphics.BeginContainer(
    destRect, srcRect,
    GraphicsUnit.Pixel);

//定义一个矩形,注意两个图形容器绘制时的区别
var rect = new RectangleF(50, 50, 200, 150);
//在变换后的容器内填充矩形
e.Graphics.FillRectangle(new SolidBrush(Color.FromArgb(127, Color.Red)), rect.X, rect.Y, rect.Width, rect.Height);

e.Graphics.EndContainer(containerState);

// 在未变换的容器内填充矩形
e.Graphics.FillRectangle(new SolidBrush(Color.FromArgb(127, Color.Green)), rect.X, rect.Y, rect.Width, rect.Height);

var wScale = destRect.Width / srcRect.Width;
var hScale = destRect.Height / srcRect.Height;
//在未变换的容器内绘制一个矩形,使其与变换的填充矩形重叠,注意计算方法
e.Graphics.DrawRectangle(Pens.Black, destRect.X + (rect.X - srcRect.X) * wScale,
                                  destRect.Y + (rect.Y - srcRect.Y) * hScale,
                                  rect.Width * wScale,
                                  rect.Height * hScale);
1、定义两个矩形用于新图形容器的目标与源矩形
2、使用上面两个矩形,打开一个新的图形容器
3、填充一个矩形
4、还原图形容器
5、使用世界坐标相同的矩形,在原图形容器里填充一个矩形
6、在原图形里计算一个与变换后图形容器中一样大小的矩形(注意计算方法)
Clear清空并填充指定颜色
原型:
public void Clear (System.Drawing.Color color);
作用:清空整个绘图表面并用指定颜色填充为背景色。
CopyFromScreen
原型:
public void CopyFromScreen (System.Drawing.Point upperLeftSource, System.Drawing.Point upperLeftDestination, System.Drawing.Size blockRegionSize);
public void CopyFromScreen (System.Drawing.Point upperLeftSource, System.Drawing.Point upperLeftDestination, System.Drawing.Size blockRegionSize, System.Drawing.CopyPixelOperation copyPixelOperation);
public void CopyFromScreen (int sourceX, int sourceY, int destinationX, int destinationY, System.Drawing.Size blockRegionSize);
作用:从屏幕复制(截图)
截图
int drawCount = 1;
[System.ComponentModel.Description("Graphics的CopyFromScreen1方法")]
public void Demo10_05(PaintEventArgs e)
{
    var srcPt = this.Location;
    e.Graphics.DrawString($"{drawCount}", new Font("宋体", 18), Brushes.Red, new Point(20, 20));
    //桌面左上角(100,100)位置开始,复制(截图一个200 x 200)的图像,绘制在(50,50)的起点位置
    e.Graphics.CopyFromScreen(srcPt, new Point(50, 50),
        new Size(200, 200));
    drawCount++;
}
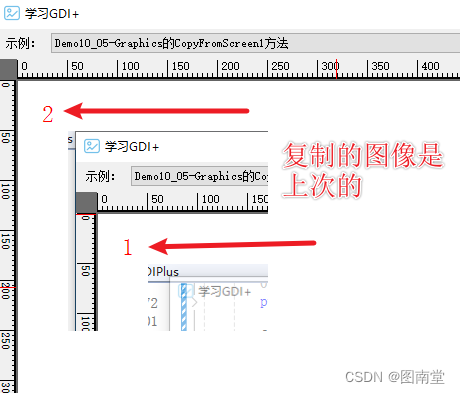
截图然后绘制到当前Graphics中,注意,如果开启DoubleBuffer复制的图像是上一次的。如果没有开启,则复制的图像是当前绘制的。
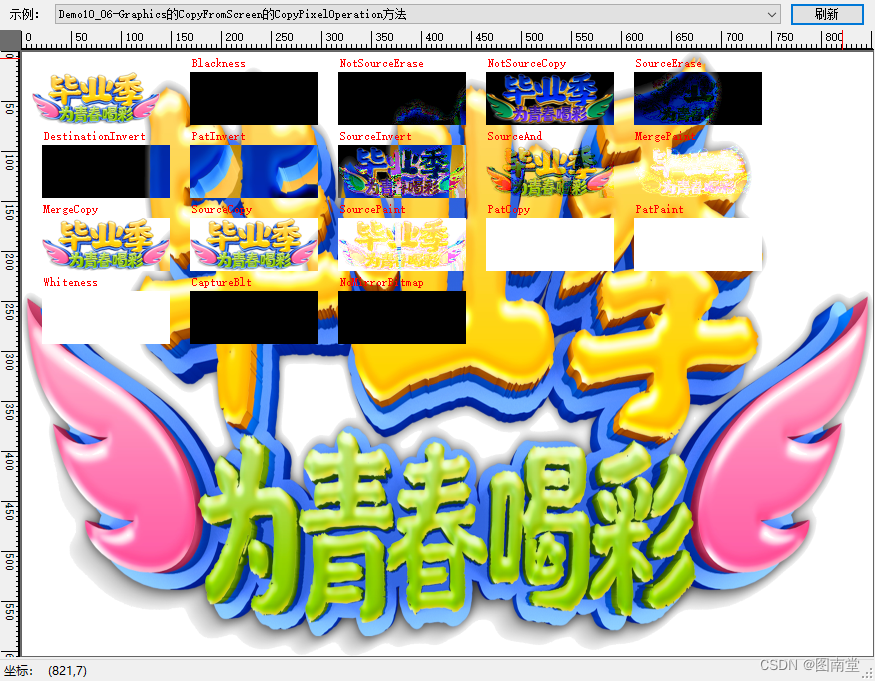
CopyPixelOperation
确定复制像素操作中的源颜色如何与目标颜色组合以产生最终颜色。
private Image TransparentBmp;

[System.ComponentModel.Description("Graphics的CopyFromScreen的CopyPixelOperation方法")]
public void Demo10_06(PaintEventArgs e)
{
    var srcX = this.Location.X + 40;//
    var srcY = this.Location.Y + 103;//
    var values = Enum.GetValues(typeof(CopyPixelOperation)) as CopyPixelOperation[];

    if (TransparentBmp == null)
    {
        TransparentBmp = new Bitmap("transparent.png");
    }
    var dstSize = new Size(128, (int)(128f * TransparentBmp.Height / TransparentBmp.Width));
    e.Graphics.DrawImage(TransparentBmp, e.Graphics.ClipBounds);
    e.Graphics.DrawImage(TransparentBmp, 10, 20, dstSize.Width, dstSize.Height);

    var colCount = 5;

    for (int i = 0; i < values.Length; i++)
    {
        var val = values[i];
        e.Graphics.DrawString($"{val}", Font, Brushes.Red, new Point(20 + ((i + 1) % colCount) * (dstSize.Width + 20),
                                                                      5 + ((i + 1) / colCount) * (dstSize.Height + 20)));
        var dstX = 20 + ((i + 1) % colCount) * (dstSize.Width + 20);
        var dstY = 20 + ((i + 1) / colCount) * (dstSize.Height + 20);
        //e.Graphics.DrawImage(TransparentBmp, dstX, dstY , dstSize.Width, dstSize.Height);
        e.Graphics.CopyFromScreen(srcX, srcY, dstX, dstY, dstSize, val);
    }
}
绘制一个背景再左上角绘制一个透明图,用CopyFromScreen截取透明图位置,用不的CopyPixelOperation值绘制结果。
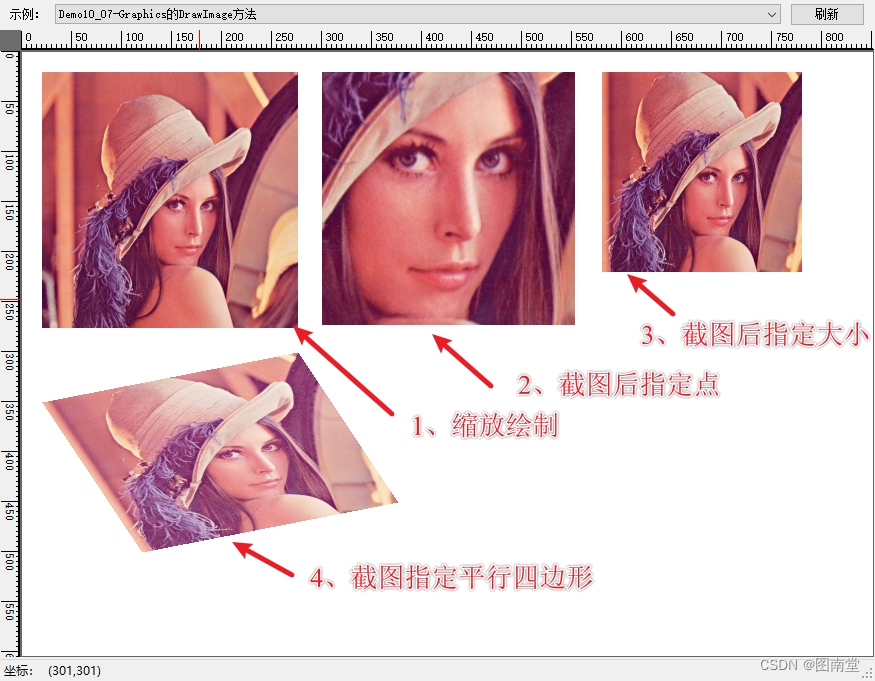
DrawImage绘制图像
原型:
//截取源图绘制到指定点
public void DrawImage (System.Drawing.Image image, float x, float y, System.Drawing.RectangleF srcRect, System.Drawing.GraphicsUnit srcUnit);

//截取源图,以指定大小矩形绘制
public void DrawImage (System.Drawing.Image image, System.Drawing.RectangleF destRect, System.Drawing.RectangleF srcRect, System.Drawing.GraphicsUnit srcUnit);

//截取源图,绘制到指定位置平行四边形,并应用图像属性
public void DrawImage (System.Drawing.Image image, System.Drawing.PointF[] destPoints, System.Drawing.RectangleF srcRect, System.Drawing.GraphicsUnit srcUnit, System.Drawing.Imaging.ImageAttributes imageAttr);
        private Image LenaBmp;
        [System.ComponentModel.Description("Graphics的DrawImage方法")]
        public void Demo10_07(PaintEventArgs e)
        {
            if (LenaBmp == null)
            {
                LenaBmp = new Bitmap("lena.jpg");
            }

            var dstSize = new Size(256, 256);
            var space = 20;

            //缩小后绘制原图
            e.Graphics.DrawImage(LenaBmp, space, space, dstSize.Width, dstSize.Height);

            //注意,这里截取的原图是192X192,但绘制的是256*256 退即 192/72*96
            e.Graphics.DrawImage(LenaBmp, 300, space, new Rectangle(200, 200, 192, 192), GraphicsUnit.Pixel);

            var srcRect = new RectangleF(50, 50, LenaBmp.Width - 100, LenaBmp.Height - 100);
            var dstRect = new RectangleF(580, space, 200, 200);
            //截取部分源图像,绘制到目标矩形上(大小可缩放)
            e.Graphics.DrawImage(LenaBmp, dstRect,srcRect , GraphicsUnit.Pixel);

            //目标平行四边形的左上、右上、左下三个顶点
            var dstPts = new PointF[] { new PointF(20, 350), new PointF(276, 300), new PointF(120, 500)};

            // Create image attributes and set large gamma.
            ImageAttributes imageAttr = new ImageAttributes();
            imageAttr.SetGamma(0.6f);//调整Gamma值

            //截取原图,绘制成指定平行四边形
            e.Graphics.DrawImage(LenaBmp, dstPts, srcRect, GraphicsUnit.Pixel, imageAttr);
        }
1、绘制缩小后的图像
2、截取原图像绘制到指定点(注意绘制的大小与截取图像的大小不一致问题)
3、截取原图后,换指定大小绘制
4、截取原图后,绘制成平行四边形
DrawImage的Graphics+DrawImageAbort回调
原型:
public void DrawImage (System.Drawing.Image image, System.Drawing.Rectangle destRect, int srcX, int srcY, int srcWidth, int srcHeight, System.Drawing.GraphicsUnit srcUnit, System.Drawing.Imaging.ImageAttributes imageAttrs, System.Drawing.Graphics.DrawImageAbort callback, IntPtr callbackData);
作用:指定绘制目标矩形,源图像矩形,图像属性(可为Null),绘制回调函数,回调参数。
该方法支持中途取消绘制图像(如超出绘制区域,可不绘制)。
//是否要中途取消绘制
private bool canCancel = false;
[System.ComponentModel.Description("Graphics的DrawImage方法DrawImageAbort")]
public void Demo10_08(PaintEventArgs e)
{
    if (LenaBmp == null)
    {
        LenaBmp = new Bitmap("lena.jpg");
    }
    var sw = Stopwatch.StartNew();
    canCancel = !canCancel;
    //如果canCancel为false,则绘制501次,否则,只绘制最后一次
    for (int index= 500;index>=0;index--)
    {
        // 定义回调函数
        Graphics.DrawImageAbort callback = new Graphics.DrawImageAbort(DrawImageCallback);

        // 创建回调数据结构
        var callbackData = new CallbackData { Index = index,Cancel = canCancel};

        IntPtr callbackDataPtr = Marshal.AllocHGlobal(Marshal.SizeOf(callbackData));
        // 将结构复制到非托管内存
        Marshal.StructureToPtr(callbackData, callbackDataPtr, false);

        try
        {
            // 绘制图像,使用回调函数和回调参数
            e.Graphics.DrawImage(LenaBmp, new Rectangle(10, 50, LenaBmp.Width, LenaBmp.Height),
                                           0, 0, LenaBmp.Width, LenaBmp.Height, GraphicsUnit.Pixel,
                                           null, callback, callbackDataPtr);
        }
        catch { }
        finally
        {
            //gcHandle.Free(); // 释放 GCHandle
            // 释放非托管内存
            Marshal.FreeHGlobal(callbackDataPtr);
        }

    }
    sw.Stop();
    e.Graphics.DrawString($"是否取消:{canCancel},耗时:{sw.ElapsedMilliseconds}ms", Font, Brushes.Red, new PointF(20, 20));
}
// 回调函数定义
private bool DrawImageCallback(IntPtr callbackDataPtr)
{
    var callbackData = Marshal.PtrToStructure(callbackDataPtr, typeof(CallbackData)) as CallbackData;
    if (callbackData == null) return false;//继续绘制
    if (callbackData.Index != 0)
    {
        return callbackData.Cancel;//取消绘制
    }
    return false;
}

// 定义回调数据结构
[StructLayout(LayoutKind.Sequential)]
public class CallbackData
{
    public int Index;
    public bool Cancel=true;
}
模拟中途取消与不取消绘制时的耗时差异。

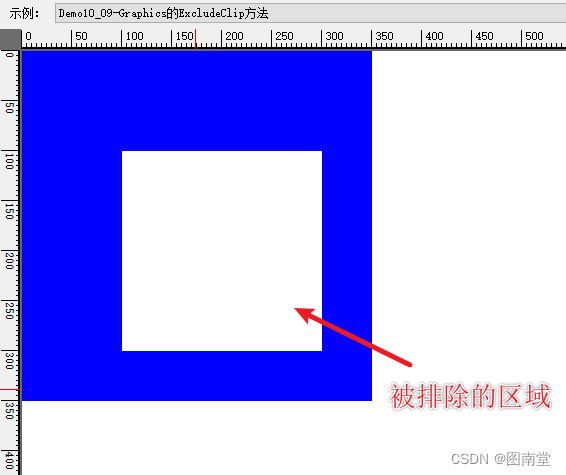
ExcludeClip排除裁切区域
原型:
public void ExcludeClip (System.Drawing.Region region);
public void ExcludeClip (System.Drawing.Rectangle rect);
作用:定义一个区域不属于裁切区域
//创建一个矩形区域
Rectangle excludeRect = new Rectangle(100, 100, 200, 200);

// 创建一个裁切排除区域
Region excludeRegion = new Region(excludeRect);

// 设置排除区域
e.Graphics.ExcludeClip(excludeRegion);

// 填充一个大矩形,以观察排除区域
e.Graphics.FillRectangle(new SolidBrush(Color.Blue), 0, 0, 350, 350);
定义排除区域,再填充一个大矩形,以观察效果。


 956
956

 被折叠的 条评论
为什么被折叠?
被折叠的 条评论
为什么被折叠?
 到【灌水乐园】发言


