


如果大家之前看过我写的文章 “开始使用Elasticsearch (3)”,在文章的最后部分写了有关于 analyzer 的有关介绍。在这里,我必须指出的是,analyzer 只作用于text 类型的字段,而对于 keyword 类型的字段,它将不被分析和分词。keyword 字段被用于精确匹配及聚合。
在今天的文章中,我们来进一步了解 analyzer。 analyzer 执行将输入字符流分解为token的过程,它一般发生在两个场合:
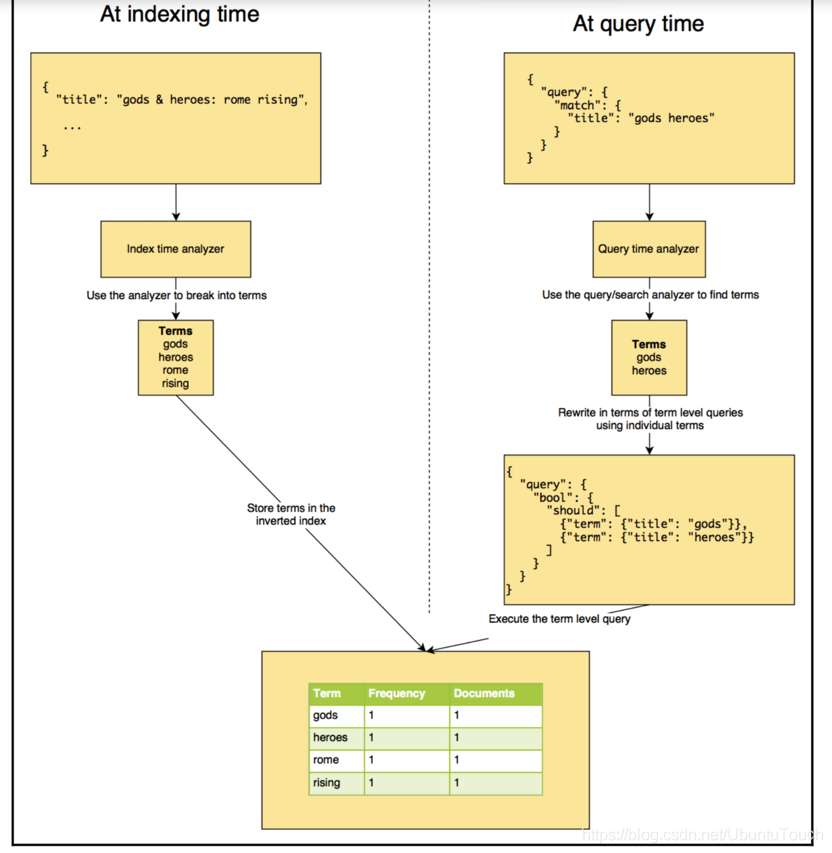
- 在 indexing 的时候,也即在建立索引的时候
- 在 searching 的时候,也即在搜索时,分析需要搜索的词语
什么是 analysis?
分析是 Elasticsearch 在文档发送之前对文档正文执行的过程,以添加到反向索引中(inverted index)。 在将文档添加到索引之前,Elasticsearch 会为每个分析的字段执行许多步骤:
-
Character filtering (字符过滤器): 使用字符过滤器转换字符
-
Breaking text into tokens (把文字转化为标记): 将文本分成一组一个或多个标记
-
Token filtering:使用标记过滤器转换每个标记
-
Token indexing:把这些标记存于索引中
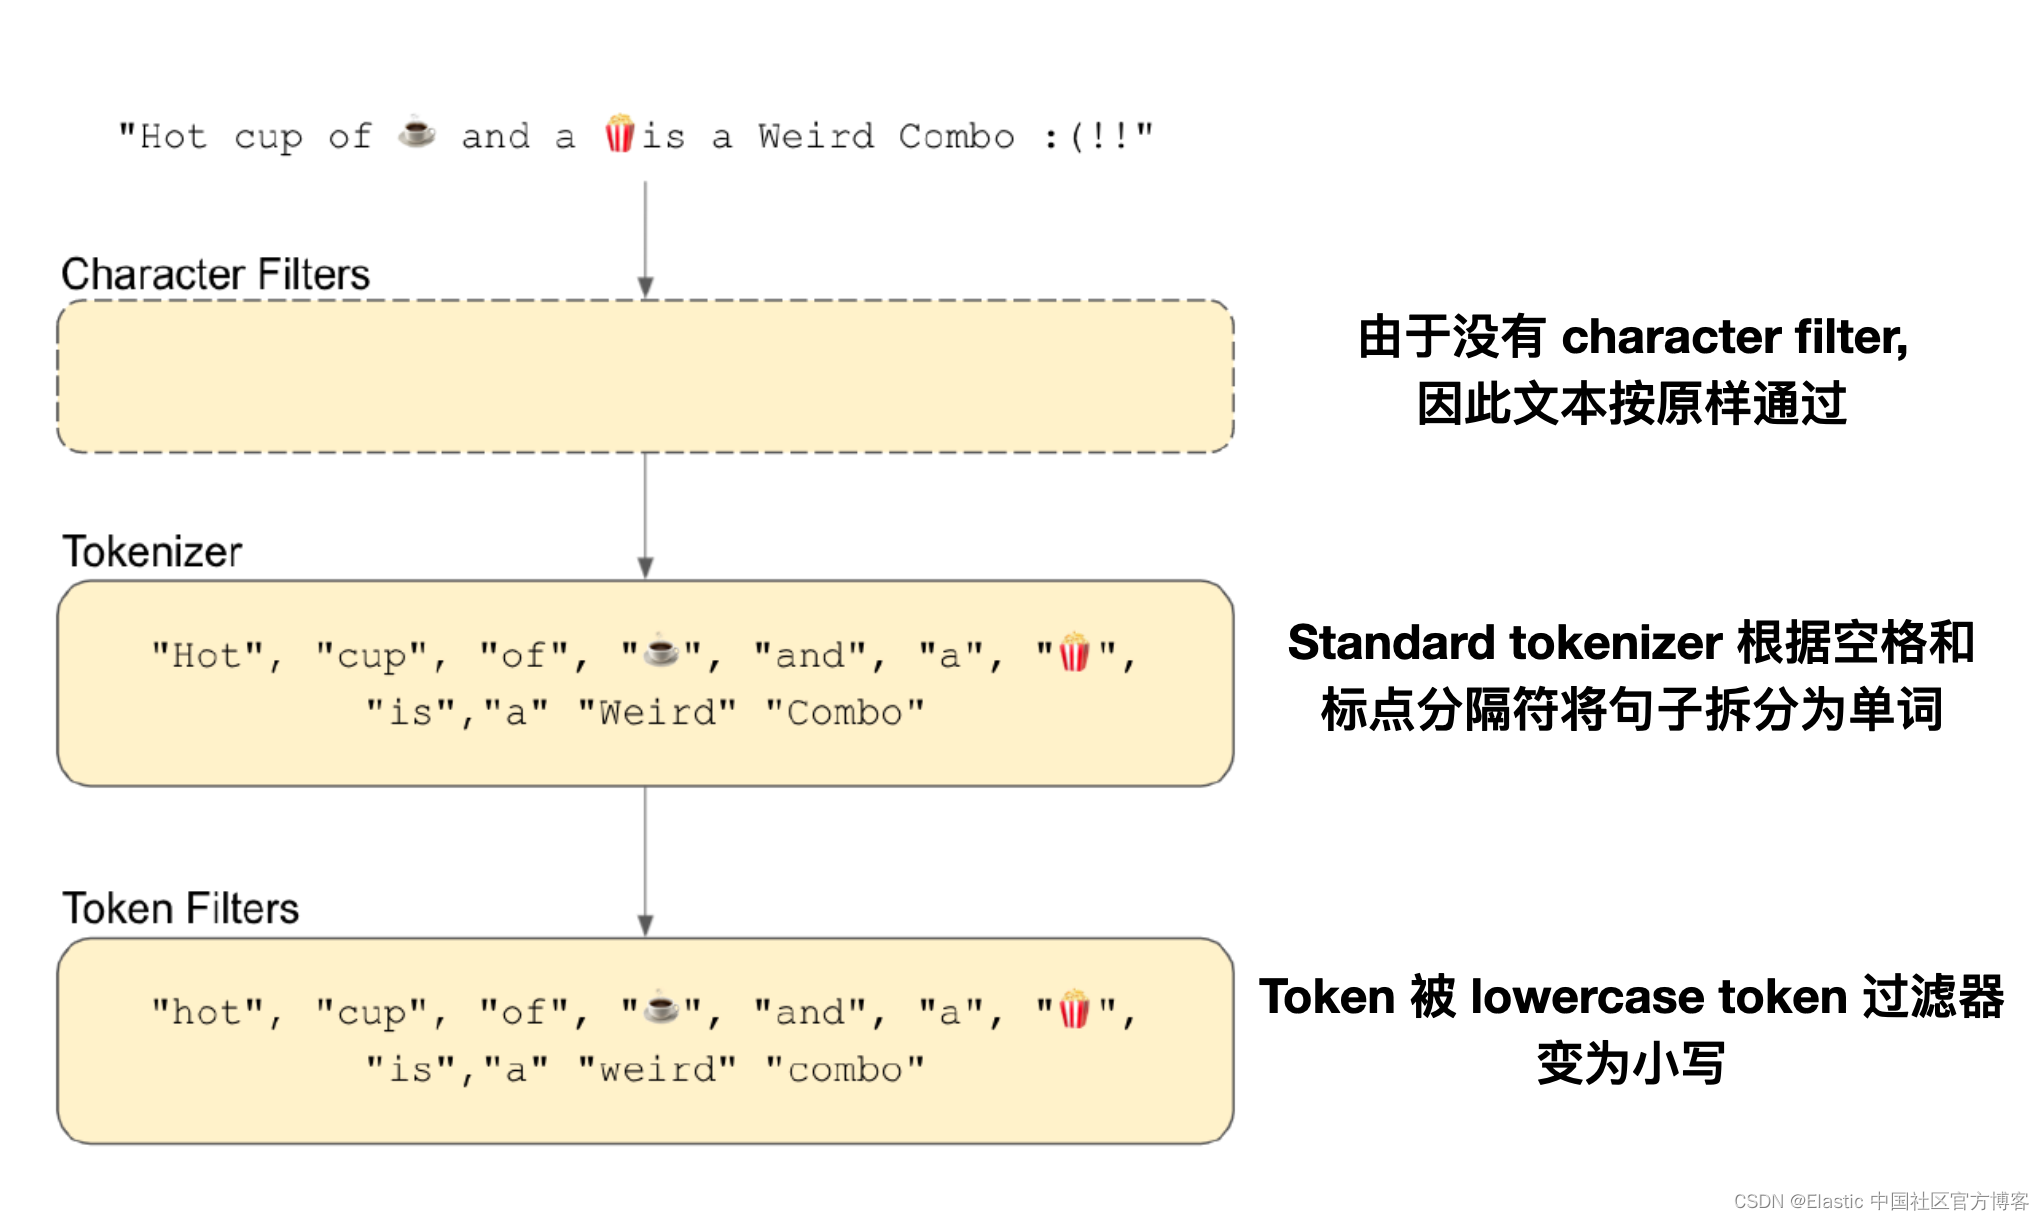
接下来我们将更详细地讨论每个步骤,但首先让我们看一下图表中总结的整个过程。 图5.1显示了 “share your experience with NoSql & big data technologies" 为分析的标记:share, your, experience, with, nosql, big, data,tools 及 technologies。
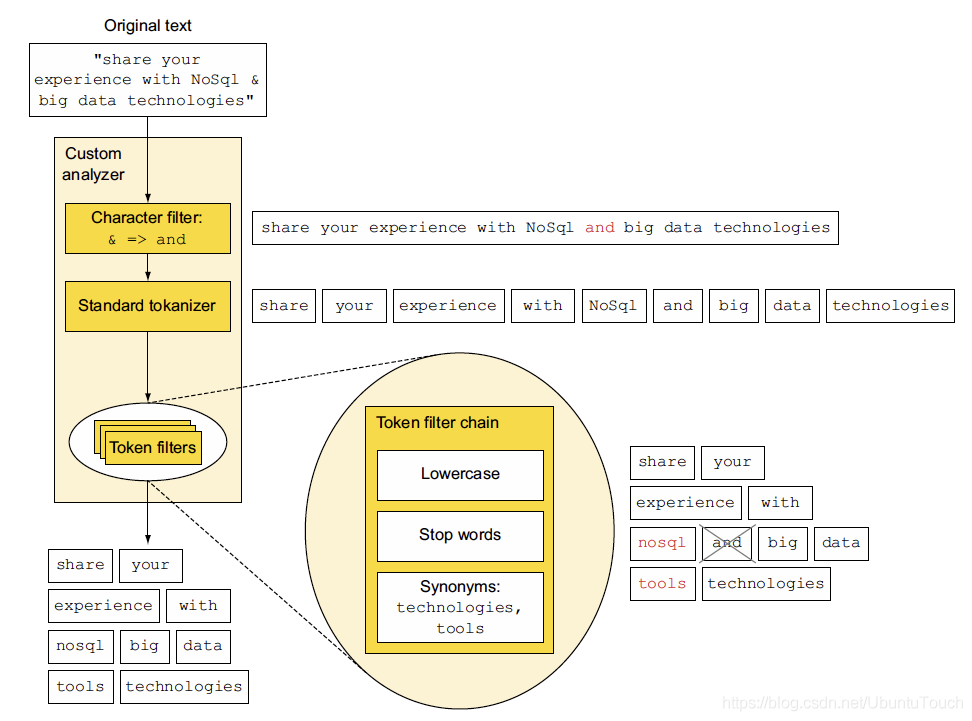
上面所展示的是一个由 character 过滤器,标准的 tokenizer 及 Token filter 组成的定制 analyzer。上面的这个图非常好,它很简洁地描述一个 analyzer 的基本组成部分,以及每个部分所需要表述的东西。
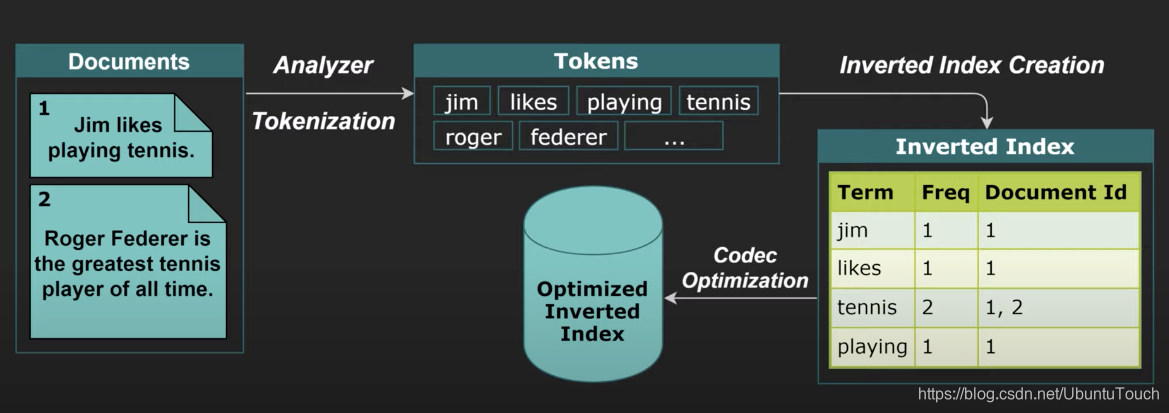
经过 analyzer 处理过后的文档最终以 Inverted Index 的形式保存于 Elasticsearch 中:
每当一个文档被 ingest 节点纳入,它需要经历如下的步骤,才能最终把文档写入到 Elasticsearch的 数据库中:
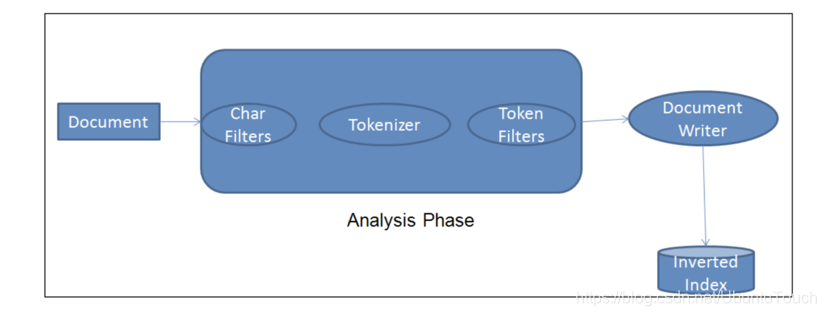
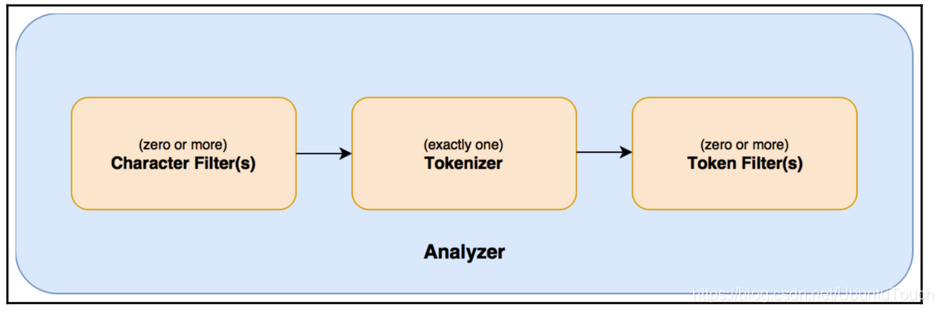
上面中间的那部分就叫做 analyzer,即分析器。它有三个部分组成:Char Filters, Tokenizer 及 Token Filter。它们的作用分别如下:
- Char Filter: 字符过滤器的工作是执行清除任务,例如剥离 HTML 标记,还有上面的把 “&” 转换为 “and” 字符串
- Tokenizer: 下一步是将文本拆分为称为标记的术语。 这是由 tokenizer 完成的。 可以基于任何规则(例如空格)来完成拆分。 有关 tokenizer 的更多详细信息,请访问以下URL:https://www.elastic.co/guide/en/elasticsearch/reference/current/analysis-tokenizers.html。
- Token filter: 一旦创建了 token,它们就会被传递给 token filter,这些过滤器会对 token 进行规范化。 Token filter 可以更改 token,删除术语或向 token 添加术语。

一个 analyzer 有且只有一个 tokenizer,有0个或一个以上的 char filter 及 token filter。
Elasticsearch 已经提供了比较丰富的开箱即用 analyzer。我们可以自己创建自己的 token analyzer,甚至可以利用已经有的 char filter,tokenizer 及 token filter 来重新组合成一个新的 analyzer,并可以对文档中的每一个字段分别定义自己的 analyzer。如果大家对 analyzer 比较感兴趣的话,请参阅我们的网址 Built-in analyzer reference | Elasticsearch Guide [8.5] | Elastic。
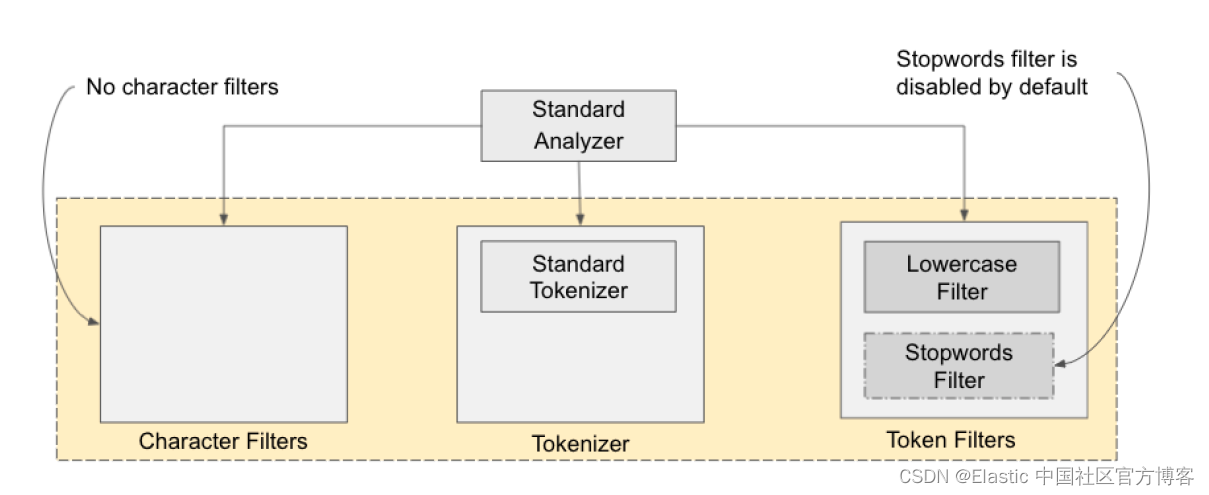
在默认的情况下,standard analyzer 是 Elasticsearch 的缺省分析器:
- 没有 Char Filter
- 使用 standard tokonizer
- 把字符串变为小写,同时有选择地删除一些 stop words 等。默认的情况下 stop words 为 _none_,也即不过滤任何 stop words。

我们以一个简单的例子来说明 standard analyzer 是如果工作的:
在默认的情况下,standard 分词器中的 stopwords filter 是禁用的。我们可以使用如下的方法来进行启动:
PUT my_index_with_stopwords
{
  "settings": {
    "analysis": {
      "analyzer": {
      "standard_with_stopwords":{
      "type":"standard",
      "stopwords":"_english_"
      }
      }
    }
  }
}
在上面,我们通过设置 stopwords 的方法启动了 stop filter。我们可以使用如下的测试命令来测试一下:
POST my_index_with_stopwords/_analyze
{
  "text": "This is a wonderful experience and I think it is the best solution",
  "analyzer": "standard_with_stopwords"
}
上面的命令的结果为:
{
  "tokens": [
    {
      "token": "wonderful",
      "start_offset": 10,
      "end_offset": 19,
      "type": "<ALPHANUM>",
      "position": 3
    },
    {
      "token": "experience",
      "start_offset": 20,
      "end_offset": 30,
      "type": "<ALPHANUM>",
      "position": 4
    },
    {
      "token": "i",
      "start_offset": 35,
      "end_offset": 36,
      "type": "<ALPHANUM>",
      "position": 6
    },
    {
      "token": "think",
      "start_offset": 37,
      "end_offset": 42,
      "type": "<ALPHANUM>",
      "position": 7
    },
    {
      "token": "best",
      "start_offset": 53,
      "end_offset": 57,
      "type": "<ALPHANUM>",
      "position": 11
    },
    {
      "token": "solution",
      "start_offset": 58,
      "end_offset": 66,
      "type": "<ALPHANUM>",
      "position": 12
    }
  ]
}
很显然,this is the 等这些常见的词不见了。我们很容易和如下的命令的结果来进行比较:
POST _analyze
{
"text": "This is a wonderful experience and I think it is the best solution",
"analyzer": "standard"
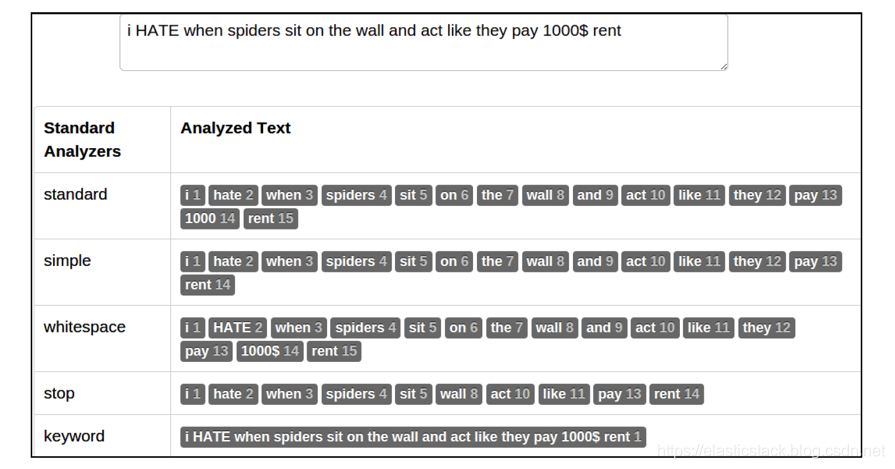
}下图说明了不同的分析器如何拆分 token 以及有多少 token 它们为相同的文本流生成的 token:
在这里,我想指出的是针对英文或其它西方文字 stemming filter。它的意思是找出相应词的词源:
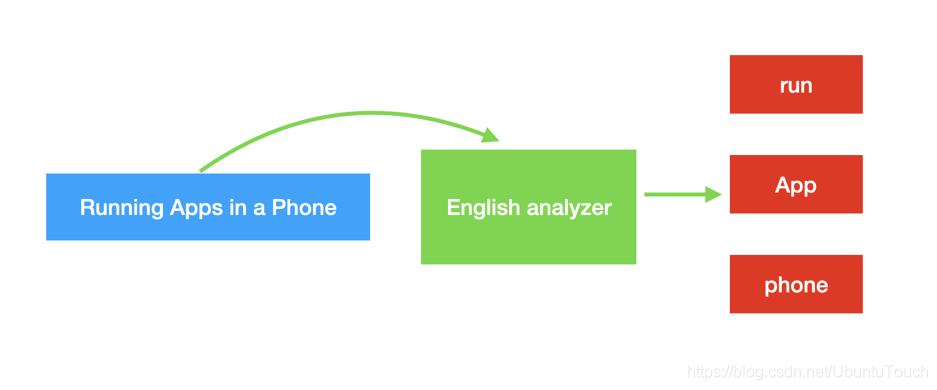
在上面 Tunning 的词源是 tune,而 Apps 的词源是 app。如下的 english analyzer 调用将使用 stemmer 过虑器从而返回这些词的词源:
GET _analyze
{
  "analyzer": "english",
  "text": "Running Apps in a Phone"
}
将返回如下的结果:
{
  "tokens" : [
    {
      "token" : "run",
      "start_offset" : 0,
      "end_offset" : 7,
      "type" : "<ALPHANUM>",
      "position" : 0
    },
    {
      "token" : "app",
      "start_offset" : 8,
      "end_offset" : 12,
      "type" : "<ALPHANUM>",
      "position" : 1
    },
    {
      "token" : "phone",
      "start_offset" : 18,
      "end_offset" : 23,
      "type" : "<ALPHANUM>",
      "position" : 4
    }
  ]
}
总体说来一个 analyzer 可以分为如下的几个部分:
- 0个或1个以上的 character filter
- 1个 tokenizer
- 0个或1个以上的 token filter
Analyze API
GET /_analyze
POST /_analyze
GET /<index>/_analyze
POST /<index>/_analyze
使用 _analyze API 来测试 analyzer 如何解析我们的字符串的,比如:
GET /_analyze
{
  "analyzer": "standard",
  "text": "Quick Brown Foxes!"
}
返回结果:
  "tokens" : [
    {
      "token" : "quick",
      "start_offset" : 0,
      "end_offset" : 5,
      "type" : "<ALPHANUM>",
      "position" : 0
    },
    {
      "token" : "brown",
      "start_offset" : 6,
      "end_offset" : 11,
      "type" : "<ALPHANUM>",
      "position" : 1
    },
    {
      "token" : "foxes",
      "start_offset" : 12,
      "end_offset" : 17,
      "type" : "<ALPHANUM>",
      "position" : 2
    }
  ]
}
在这里我们使用了 standard 分析器,它把我们的字符串分解为三个 token,并显示它们分别的位置信息。
Multi-field 字符字段
我们可以针对这个使用多个不同的 anaylzer 来提高我们的搜索:使用不同的分析器来分析同样的一个字符串,用不同的方式。我们可以使用现有的分析器俩设置一个定制的分析器。比如我们定义如下的一个 mapping:
PUT multifield
{
  "mappings": {
    "properties": {
      "content": {
        "type": "text",
        "analyzer": "standard",
        "fields": {
          "english": {
            "type": "text",
            "analyzer": "english"
          }
        }
      }
    }
  }
}
在这里我们定义了一个叫做 multi-field 的索引,我们可以对这个索引进行分析。我们对整个 field 定义了一个 standard 分析器,同时为叫做 english 的字段定义了一个 english 的分析器,这样有利于我们删除一些 stop words 及运用一些同根词。我们首先来为 multi-field 来建立一个文档:
PUT multifield/_doc/1
{
  "content": "We are excited to introduce the world to X-Pack"
}
那么我们可以通过如下的方法来进行搜索:
GET /multifield/_search
{
  "query": {
    "match": {
      "content": "the"
    }
  }
}
我们可以看到搜索的结果:
{
  "took" : 0,
  "timed_out" : false,
  "_shards" : {
    "total" : 1,
    "successful" : 1,
    "skipped" : 0,
    "failed" : 0
  },
  "hits" : {
    "total" : {
      "value" : 1,
      "relation" : "eq"
    },
    "max_score" : 0.2876821,
    "hits" : [
      {
        "_index" : "multifield",
        "_type" : "_doc",
        "_id" : "1",
        "_score" : 0.2876821,
        "_source" : {
          "content" : "We are excited to introduce the world to X-Pack"
        }
      }
    ]
  }
}
我们可以看到搜寻的结果,但是如果我们使用如下的方法:
GET /multifield/_search
{
  "query": {
    "match": {
      "content.english": "the"
    }
  }
}
我们啥也看不到,这是因为 “the” 在 english analyzer 里 “the” 被认为是 stop word,而被忽略。
如何定义一个定制的分析器
在这里我们主要运用现有的 plugin 来完成定制的分析器。对于需要开发自己的 plugin 的需求,不在这篇文章的范围。
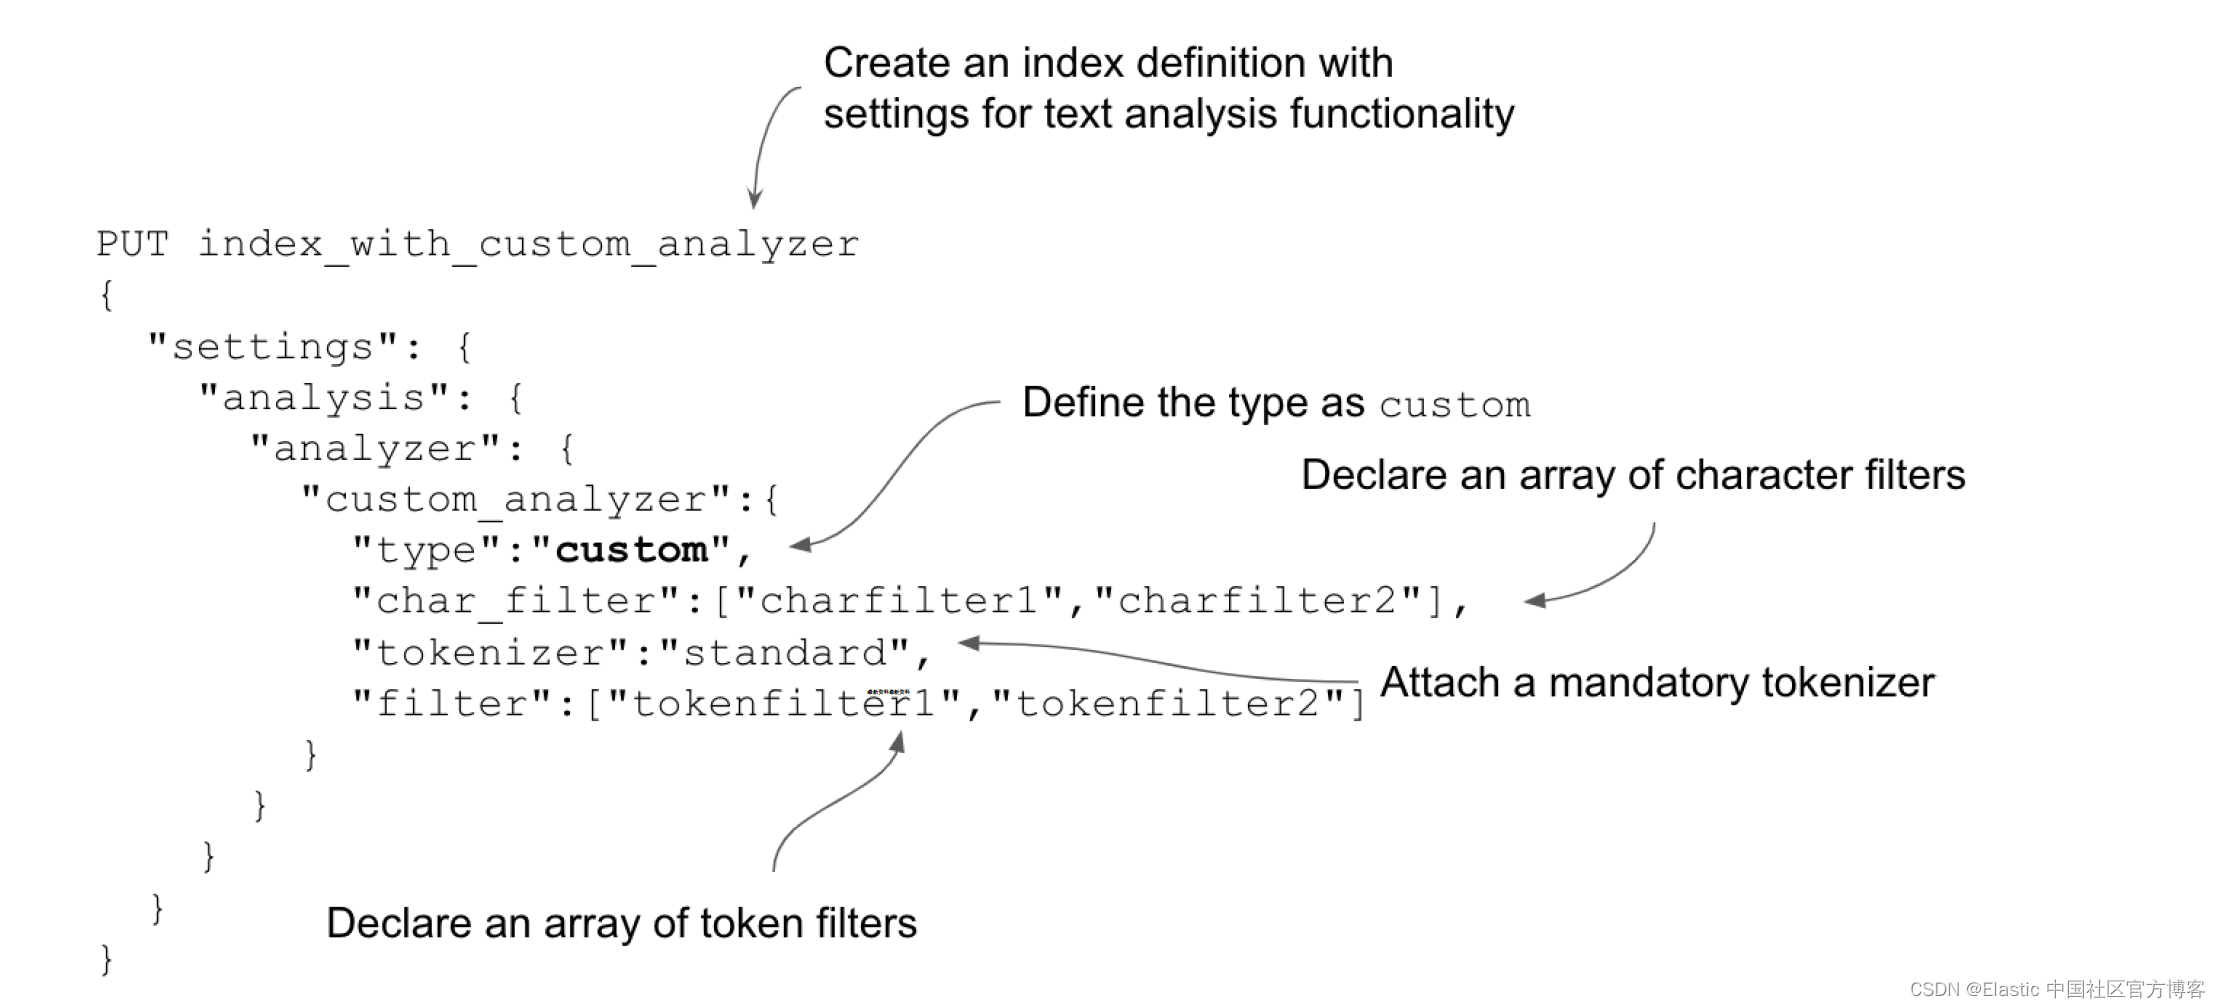
Elasticsearch 在分析器方面提供了很大的灵活性:如果现成的分析器不适合你,你可以创建自己的自定义分析器。 这些自定义分析器可以是来自大量 Elasticsearch 组件库的现有组件的混合搭配。实践是在创建具有所需过滤器和标记器的索引时在设置中定义自定义分析器。 我们可以提供任意数量的字符和标记过滤器,但只有一个标记器,如下图所示。
假如我们有一下的一个句子:
GET _analyze
{
  "text": "I am so excited to go to the x-game",
  "analyzer": "standard"
}
我们可以看到这样的结果:
    {
      "token" : "x",
      "start_offset" : 29,
      "end_offset" : 30,
      "type" : "<ALPHANUM>",
      "position" : 8
    },
    {
      "token" : "game",
      "start_offset" : 31,
      "end_offset" : 37,
      "type" : "<ALPHANUM>",
      "position" : 9
    }
x-game 在这里被分为两个 token:x 及 game。如果我们想把 x-game 当做一个该怎么办呢?我们可以通过设置特有的 mapping 来实现,比如我们有一个叫做 blog 的索引:
PUT blogs
{
  "settings": {
    "analysis": {
      "char_filter": {
        "xgame_filter": {
          "type": "mapping",
          "mappings": [
            "X-Game => XGame"
          ]
        }
      },
      "analyzer": {
        "my_content_analyzer": {
          "type": "custom",
          "char_filter": [
            "xgame_filter"
          ],
          "tokenizer": "standard",
          "filter": [
            "lowercase"
          ]
        }
      }
    }
  },
  "mappings": {
    "properties": {
      "content": {
        "type": "text",
        "analyzer": "my_content_analyzer"
      }
    }
  }
}
大家请注意在 settings 里的 “analysis” 部分,我们定义了一个称之为 xgame_filter 的 char_filter,它可以帮我们把 “x-game” 转化为 “XGame”。紧接着,我们利用 xgame_filter 定义了一个叫做 “my_content_analyzer”。它是一个定制的类型。我们定义它的char_filter, tokenizer 及 filter。现在我们可以利用我们刚才定义 my_content_analyzer 来分析我们的字符串。我们在 mappings 里可以看到:
  "mappings": {
    "properties": {
      "content": {
        "type": "text",
        "analyzer": "my_content_analyzer"
      }
    }
  }
在这里,我们使用了刚才在 analysis 里定义的 my_content_analyzer 分析器。我们可以通过如下的方法来测试它是否工作:
POST blogs/_analyze
{
  "text": "I am so excited to go to the X-Game",
  "analyzer": "my_content_analyzer"
}
我们可以看到如下的结果:
{
  "tokens" : [
    {
      "token" : "i",
      "start_offset" : 0,
      "end_offset" : 1,
      "type" : "<ALPHANUM>",
      "position" : 0
    },
    {
      "token" : "am",
      "start_offset" : 2,
      "end_offset" : 4,
      "type" : "<ALPHANUM>",
      "position" : 1
    },
    {
      "token" : "so",
      "start_offset" : 5,
      "end_offset" : 7,
      "type" : "<ALPHANUM>",
      "position" : 2
    },
    {
      "token" : "excited",
      "start_offset" : 8,
      "end_offset" : 15,
      "type" : "<ALPHANUM>",
      "position" : 3
    },
    {
      "token" : "to",
      "start_offset" : 16,
      "end_offset" : 18,
      "type" : "<ALPHANUM>",
      "position" : 4
    },
    {
      "token" : "go",
      "start_offset" : 19,
      "end_offset" : 21,
      "type" : "<ALPHANUM>",
      "position" : 5
    },
    {
      "token" : "to",
      "start_offset" : 22,
      "end_offset" : 24,
      "type" : "<ALPHANUM>",
      "position" : 6
    },
    {
      "token" : "the",
      "start_offset" : 25,
      "end_offset" : 28,
      "type" : "<ALPHANUM>",
      "position" : 7
    },
    {
      "token" : "xgame",
      "start_offset" : 29,
      "end_offset" : 35,
      "type" : "<ALPHANUM>",
      "position" : 8
    }
  ]
}
在这里,我们可以看到 “xgame” 这个 token。我们还可以提供一个包含映射的文件,而不是在定义中指定它们。 下面清单演示了一个字符过滤器,它带有从外部文件 mapping_sample.txt 加载的映射。 该文件必须存在于 Elasticsearch 的配置目录 (<INSTALL_DIR/elasticsearch/config) 中,或者使用其所在位置的绝对路径输入。
$ pwd
/Users/liuxg/elastic/elasticsearch-8.4.3/config
$ cat mapping_sample.txt
X-Game => XGame
DELETE blogs
PUT blogs
{
"settings": {
"analysis": {
"char_filter": {
"xgame_filter": {
"type": "mapping",
"mappings_path": "mapping_sample.txt"
}
},
"analyzer": {
"my_content_analyzer": {
"type": "custom",
"char_filter": [
"xgame_filter"
],
"tokenizer": "standard",
"filter": [
"lowercase"
]
}
}
}
},
"mappings": {
"properties": {
"content": {
"type": "text",
"analyzer": "my_content_analyzer"
}
}
}
}我们重新使用上面的例子来验证:
POST blogs/_analyze
{
  "text": "I am so excited to go to the X-Game",
  "analyzer": "my_content_analyzer"
}
我们可以看到和上面一模一样的结果。
从上面的返回的结果来看,我们还是可以看到 “the”,“to” 这样的 token。如果我们想去掉这些 token 的话,我们可以做做如下的设置:
DELETE blogs

PUT blogs
{
  "settings": {
    "analysis": {
      "char_filter": {
        "xschool_filter": {
          "type": "mapping",
          "mappings": [
            "X-Game => XGame"
          ]
        }
      },
      "analyzer": {
        "my_content_analyzer": {
          "type": "custom",
          "char_filter": [
            "xschool_filter"
          ],
          "tokenizer": "standard",
          "filter": [
            "lowercase",
            "my_stop"
          ]
        }
      },
      "filter": {
        "my_stop": {
          "type": "stop",
          "stopwords": ["so", "to", "the"]
        }
      }
    }
  },
  "mappings": {
    "properties": {
      "content": {
        "type": "text",
        "analyzer": "my_content_analyzer"
      }
    }
  }
}
在这里,我们重新加入了一个叫做 my_stop 的过滤器:
      "filter": {
        "my_stop": {
          "type": "stop",
          "stopwords": ["so", "to", "the"]
        }
      }
我们在我们自己定制的分析器中也加入了 my_stop。重新运行我们的分析:
POST blogs/_analyze
{
  "text": "I am so excited to go to the X-Game",
  "analyzer": "my_content_analyzer"
}
在上面我们把 so, to 及 the 作为 stop words 去掉了。重新运行我们的分析:
POST blogs/_analyze
{
  "text": "I am so excited to go to the X-Game",
  "analyzer": "my_content_analyzer"
}
显示的结果为:
{
  "tokens" : [
    {
      "token" : "i",
      "start_offset" : 0,
      "end_offset" : 1,
      "type" : "<ALPHANUM>",
      "position" : 0
    },
    {
      "token" : "am",
      "start_offset" : 2,
      "end_offset" : 4,
      "type" : "<ALPHANUM>",
      "position" : 1
    },
    {
      "token" : "excited",
      "start_offset" : 8,
      "end_offset" : 15,
      "type" : "<ALPHANUM>",
      "position" : 3
    },
    {
      "token" : "go",
      "start_offset" : 19,
      "end_offset" : 21,
      "type" : "<ALPHANUM>",
      "position" : 5
    },
    {
      "token" : "xgame",
      "start_offset" : 29,
      "end_offset" : 35,
      "type" : "<ALPHANUM>",
      "position" : 8
    }
  ]
}
我们可以看到 so, the 及 to 都被过滤掉了。
在上面,我们把 stop words 都添加到设置中的列表中。在实际的使用中,这个可能并不现实,特别是针对有很长的 stop words 的列表而言。我们更倾向于把这个列表写入到一个文件中去。 比如,我们创建一个叫做 stopwords.txt 的文件:
$ pwd
/Users/liuxg/elastic/elasticsearch-8.4.3/config
$ cat stopwords.txt
so
the
to
我们重新书写上面的代码:
DELETE blogs

PUT blogs
{
  "settings": {
    "analysis": {
      "char_filter": {
        "xschool_filter": {
          "type": "mapping",
          "mappings": [
            "X-Game => XGame"
          ]
        }
      },
      "analyzer": {
        "my_content_analyzer": {
          "type": "custom",
          "char_filter": [
            "xschool_filter"
          ],
          "tokenizer": "standard",
          "filter": [
            "lowercase",
            "my_stop"
          ]
        }
      },
      "filter": {
        "my_stop": {
          "type": "stop",
          "ignore_case": "true",
           "stopwords_path": "stopwords.txt"
        }
      }
    }
  },
  "mappings": {
    "properties": {
      "content": {
        "type": "text",
        "analyzer": "my_content_analyzer"
      }
    }
  }
}
在上面,我们使用 stopwords_path 来定义 stop words 文件的路径。我们使用如下的命令来进行展示:
POST blogs/_analyze
{
  "text": "I am so excited to go to the X-Game",
  "analyzer": "my_content_analyzer"
}
我们将会看到和上面一样的结果。
Filters 的顺序也很重要
我们来试一下下面的一个例子:
GET _analyze
{
  "tokenizer": "whitespace",
  "filter": [
    "lowercase",
    "stop"
  ],
  "text": "To Be Or Not To Be"
}
在这里我们先进行 lowercase 的过滤器,先变成小写字母,再进行 stop 过滤器,那么返回的结果是[],也即没有。
相反,如果我们使用如下的顺序:
GET _analyze
{
  "tokenizer": "whitespace",
  "filter": [
    "stop",
    "lowercase"
  ],
  "text": "To Be Or Not To Be"
}
这里先进行 stop 过滤器,因为这里的词有些是大写字母,所以不被认为是 stop 词,那么没有被过滤掉。之后进行 lowercase,显示的结果是 to, be, or, not, to, be 这些 token。
search_analyzer
也许大家已经看出来了,每当一个文档在被录入到 Elasticsearch中 时,需要一个叫做 index 的过程。在 index 的过程中,它会为该字符串进行分词,并最终形成一个一个的 token,并存于数据库。但是,每当我们搜索一个字符串时,在搜索时,我们同样也要对该字符串进行分词,也会建立token。当然这些token不会被存放于数据库中。
比如:
GET /chinese/_search
{
  "query": {
    "match": {
      "content": "Happy a birthday"
    }
  }
}
对于这个搜索来说,我们在默认的情况下,会把 "Happy a birthday" 使用同样的 analyzer 进行分词。如果我们的 analyzer 里含有stop 过滤器,它极有可能把字母 “a” 过滤掉,那么直剩下 “happy” 及 “birthday” 这两个词,而 “a” 将不进入搜索之中。
在实际的使用中,我们也可以通过如下的方法对搜索进行制定具体的 search_analyzer。
PUT blogs
{
  "settings": {
    "analysis": {
      "char_filter": {
        "xschool_filter": {
          "type": "mapping",
          "mappings": [
            "X-School => XSchool"
          ]
        }
      },
      "analyzer": {
        "my_content_analyzer": {
          "type": "custom",
          "char_filter": [
            "xschool_filter"
          ],
          "tokenizer": "standard",
          "filter": [
            "lowercase",
            "my_stop"
          ]
        }
      },
      "filter": {
        "my_stop": {
          "type": "stop",
          "stopwords": ["so", "to", "the"]
        }
      }
    }
  },
  "mappings": {
    "properties": {
      "content": {
        "type": "text",
        "analyzer": "my_content_analyzer",
        "search_analyzer": "standard"
      }
    }
  }
}
在上面,我们可以看到,我们分别定义了不用的 analyzer:在录入文档时,我们使用了 my_content_analyzer 分析器,而在搜索时,我们使用了 standard 分析器。
为索引设置默认分词器
我们还可以在索引级别设置我们选择的默认分析器,以下代码清单演示了这一点:
PUT authors_with_default_analyzer
{
  "settings": {
    "analysis": {
      "analyzer": {
        "default":{
        "type":"keyword"
        }
      }
    }
  }
}
在默认的情况下,索引里的字段是安装 standard 分词器进行分词的。在上面,我们设置了索取的默认分词器为 keyword。我们尝试使用如下的代码进行测试:
POST authors_with_default_analyzer/_analyze
{
  "text": "John Doe"
}
上面的命令返回的结果为:
{
  "tokens": [
    {
      "token": "John Doe",
      "start_offset": 0,
      "end_offset": 8,
      "type": "word",
      "position": 0
    }
  ]
}
如上所示,我们只看到一个 token,这是因为它的默认分词器是 keyword 而不是 standard。
我们甚至可以定义默认的 search analyzer:
PUT authors_index_with_default_analyzer
{
  "settings": {
    "analysis": {
      "analyzer": {
        "default_search":{
        "type":"simple"
        },
        "default":{
        "type":"standard"
        }
      }
    }
  }
}
内置分析器参考
Elasticsearch 附带了广泛的内置分析器,无需进一步配置即可用于任何索引:
Standard Analyzer
标准分析器按照 Unicode 文本分割算法的定义,将文本划分为单词边界上的术语。它删除了大多数标点符号、小写术语,并支持删除停用词。
Simple Analyzer
只要遇到一个不是字母的字符及分词,简单的分析器就会将文本分成术语。它小写所有术语。它是一个比较简单的分词器,没有 char filter 及 token filter:
例子:
POST _analyze
{
  "text": [
    "Lukša's K8s in Action"
  ],
  "analyzer": "simple"
}
结果:["lukša","s","k","s","in","action"]。以非字母的字符来进行划分。
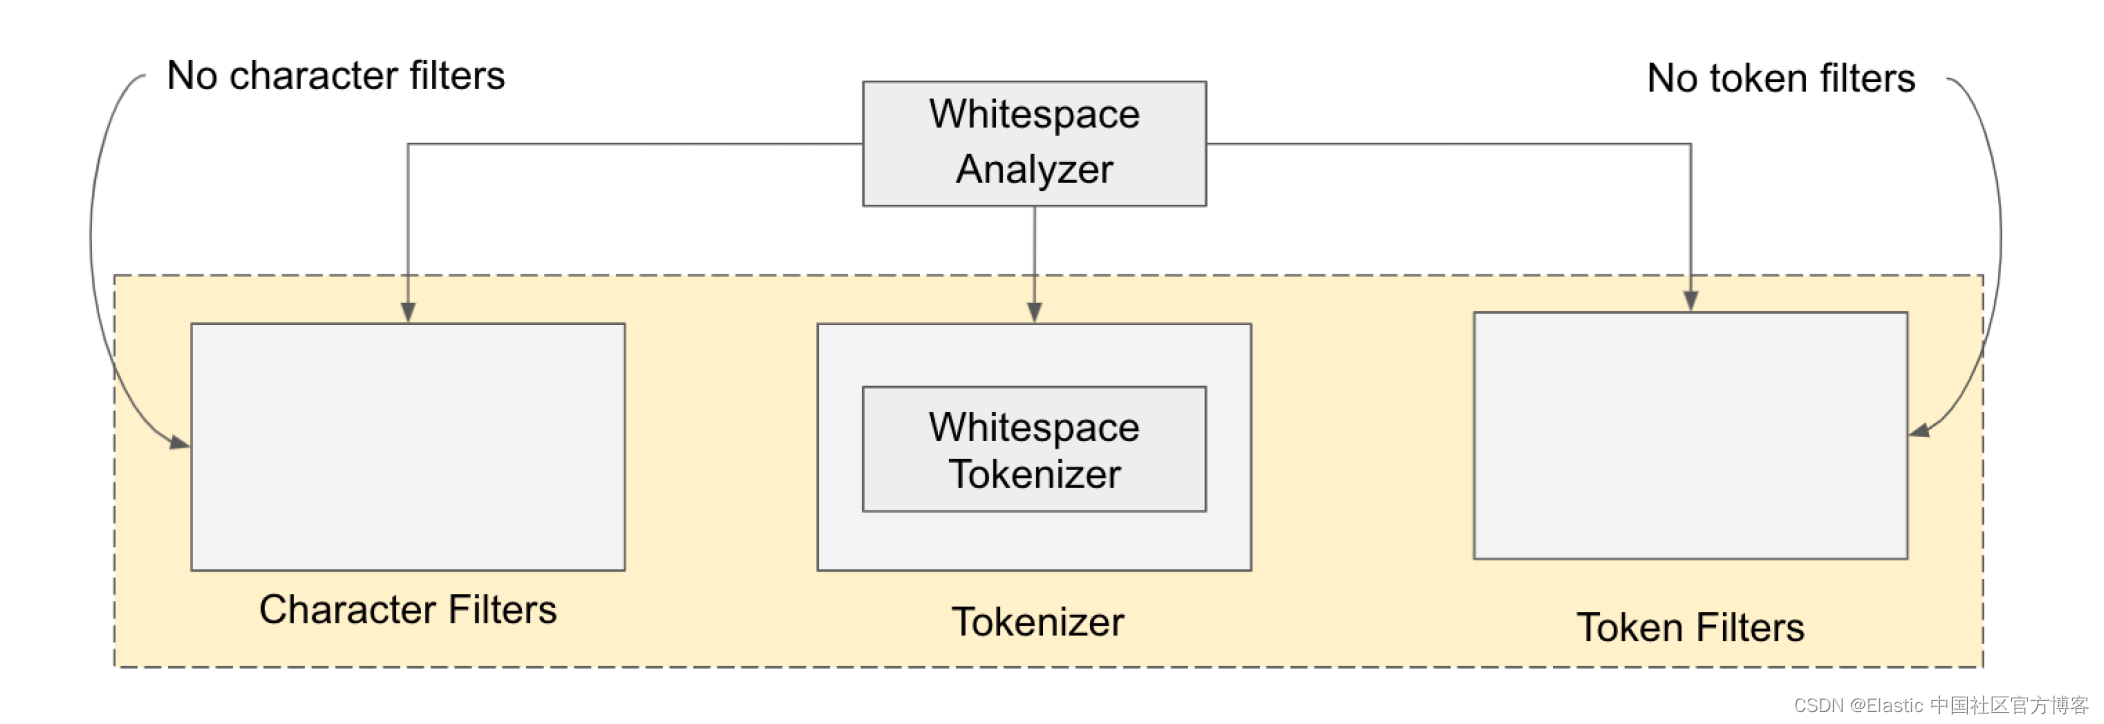
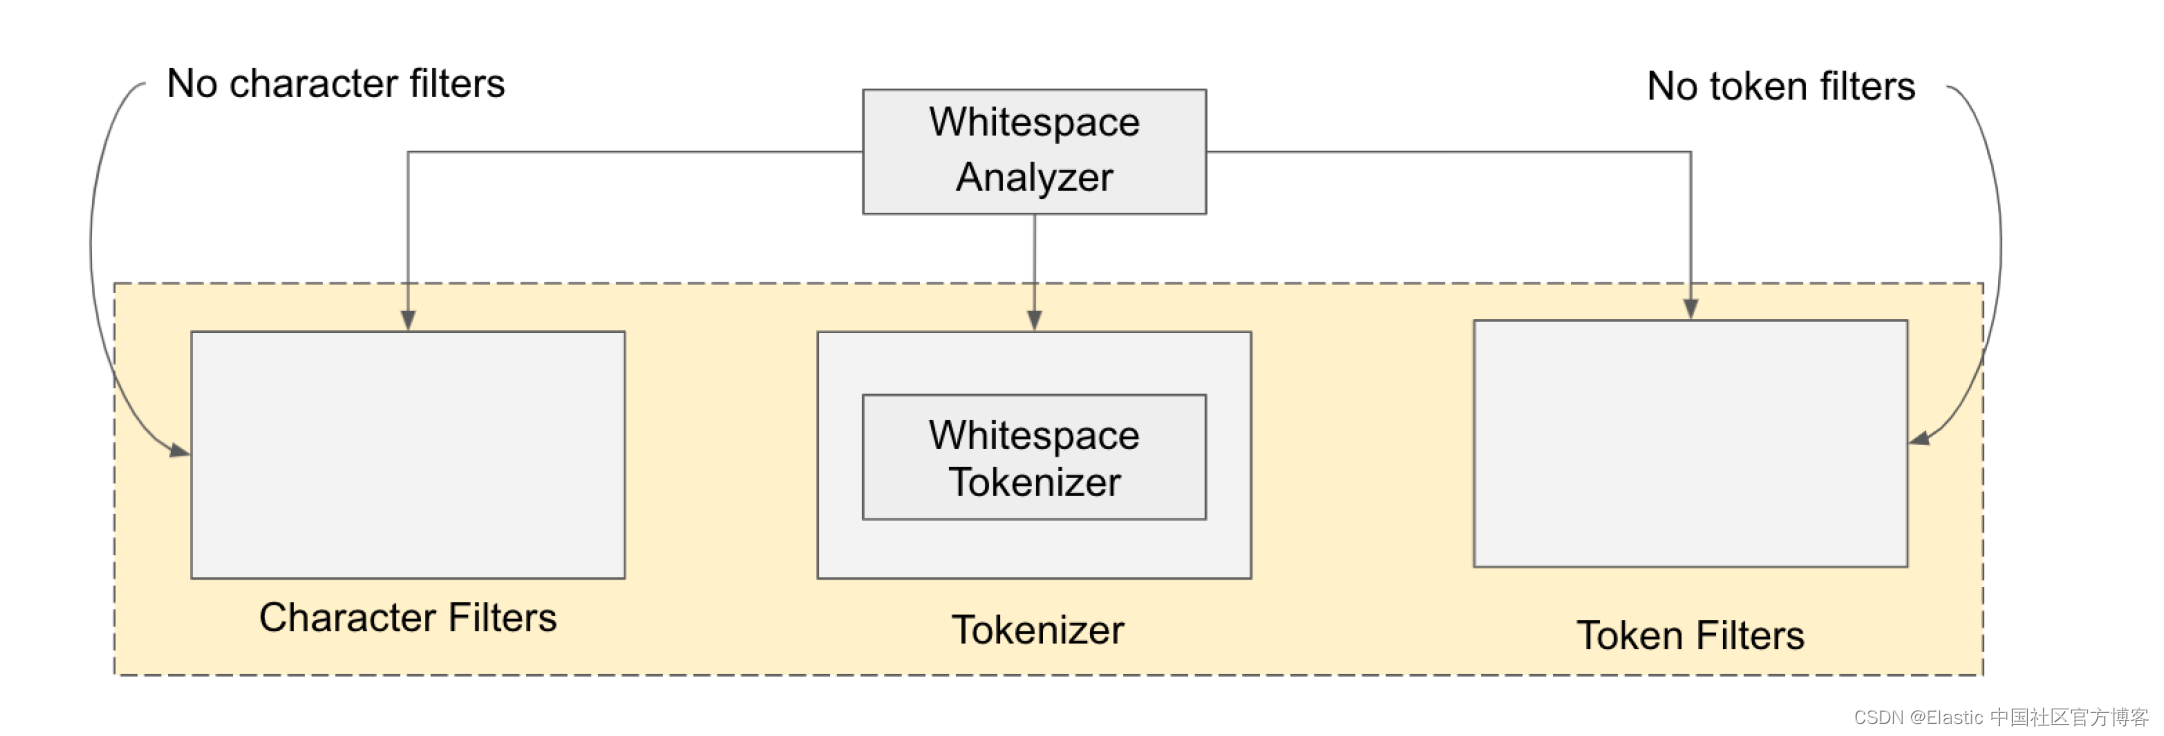
Whitespace Analyzer
每当遇到任何空白字符时,空白分析器都会将文本划分为术语。它不使用小写术语。
例子:
POST _analyze
{
  "text": "I like Beijing, China",
  "analyzer": "whitespace"
}
结果:[I, like, Beijing, China]
Stop Analyzer
停止分析器就像简单的分析器,但也支持去除停用词。
Keyword Analyzer
关键字分析器是一个 “noop” 分析器,它接受给定的任何文本并输出与单个术语完全相同的文本。
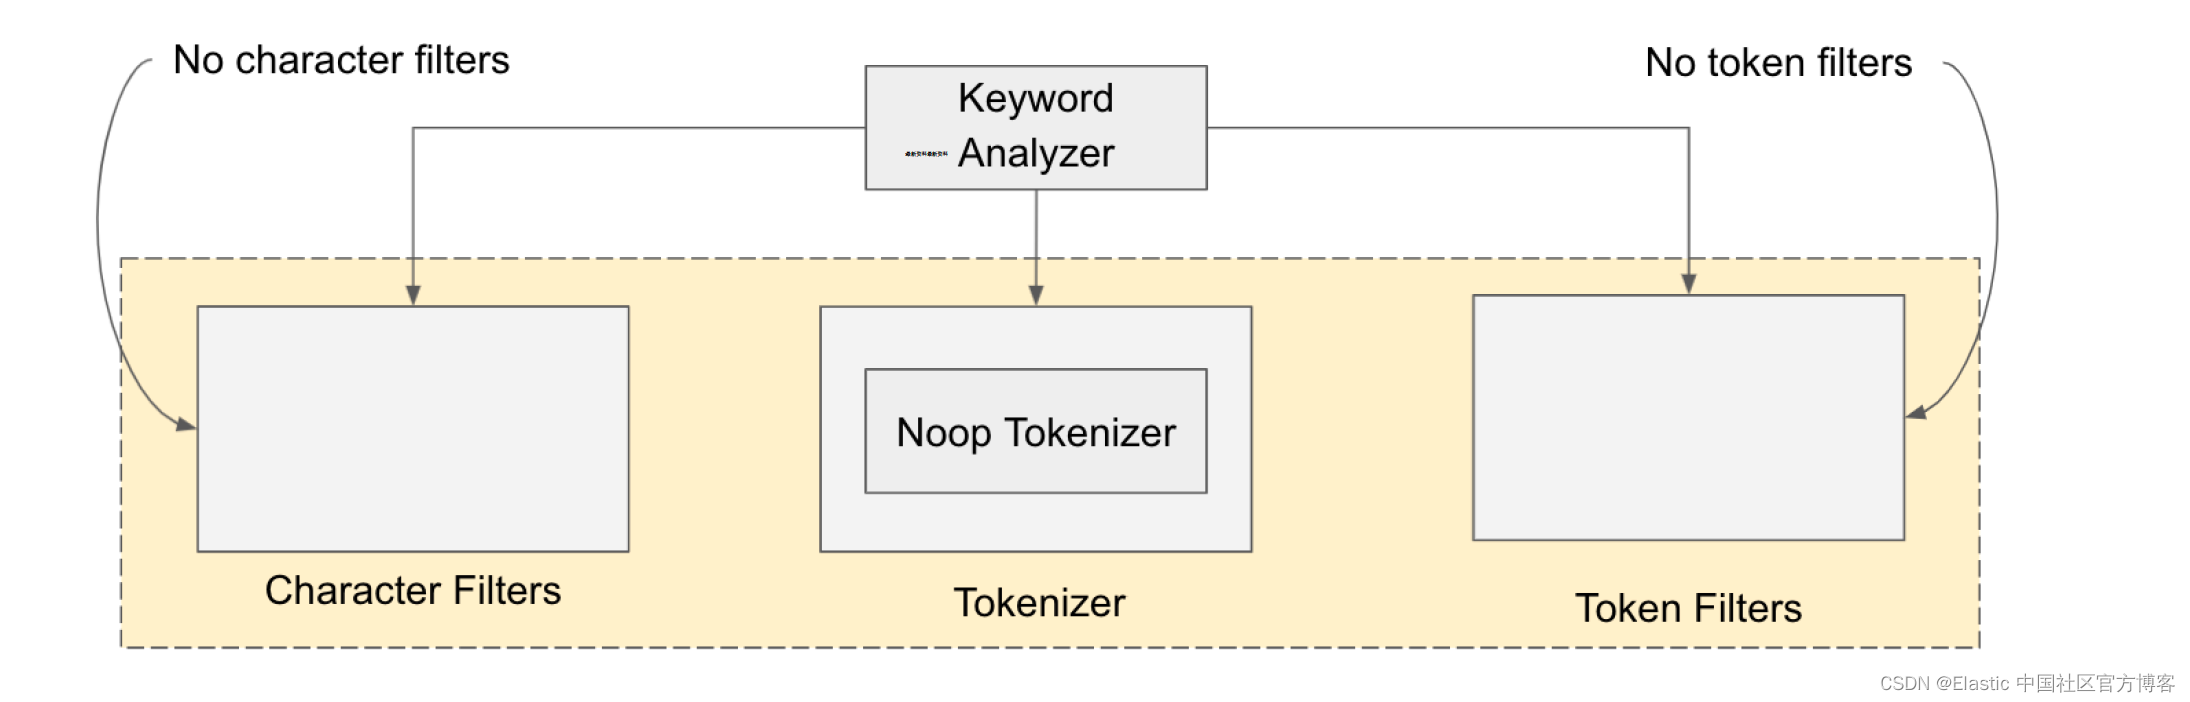
例子:
POST _analyze
{
  "text": "This Xiaoguo from Elastic",
  "analyzer": "keyword"
}
上面的命令将生成有且只有一个 token:
{
  "tokens": [
    {
      "token": "This Xiaoguo from Elastic",
      "start_offset": 0,
      "end_offset": 25,
      "type": "word",
      "position": 0
    }
  ]
}
Pattern Analyzer
模式分析器使用正则表达式将文本拆分为术语。它支持小写和停用词。有时,我们可能希望根据特定模式对文本进行标记和分析(例如,删除电话号码的前 n 个数字或从卡号中删除每四位数字的破折号等)。 Elasticsearch 专门为此目的提供了一个模式分析器。
默认模式分析器基于非单词字符将句子拆分为标记。 此模式在内部表示为 \W+。 下图所示,模式标记器以及小写和停止过滤器构成了模式分析器:
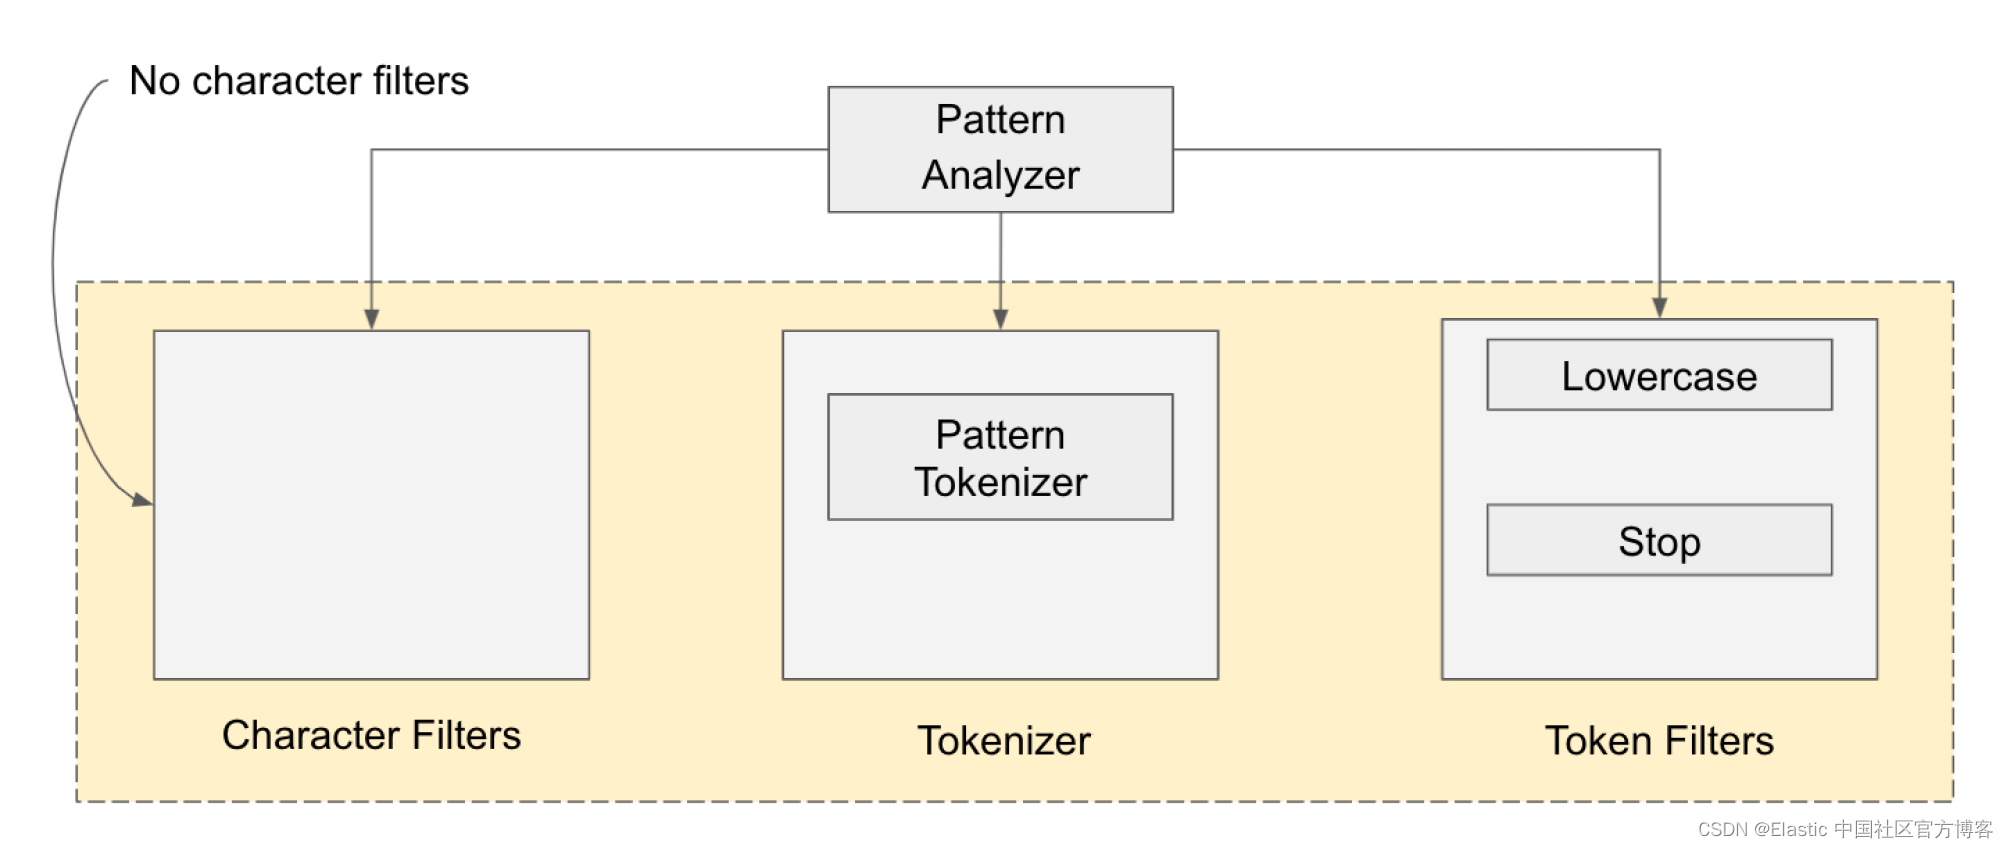
由于默认(标准)分析器仅适用于非字母分隔符,因此对于任何其他模式,我们需要通过提供所需模式来配置分析器。 模式是配置分析器时作为字符串提供的正则表达式。 这些模式使用 Java 正则表达式。
假设我们有一个电子商务支付授权应用程序,并且实际上正在接收来自各方的支付授权请求。 提供 16 位长卡号,格式为 1234-5678-9000-0000。 我们想在破折号 (-) 上标记此卡数据并分别提取四个标记。 我们可以通过创建一个模式来实现,该模式根据破折号分隔符将字段拆分为标记。
要配置模式分析器,我们必须通过在设置对象中将 pattern_analyzer 设置为分析器来创建索引。 以下清单显示了实际配置。
PUT index_with_dash_pattern_analyzer
{
  "settings": {
    "analysis": {
      "analyzer": {
        "pattern_analyzer": {
        "type": "pattern",
        "pattern": "[-]",
        "lowercase": true
        }
      }
    }
  }
}
在代码中,我们使用一些模式分析器设置创建一个索引。 pattern 属性表示正则表达式,它遵循 Java 的正则表达式语法。 在这种情况下,我们将破折号设置为分隔符,因此文本在遇到该字符时会被标记。 现在我们已经创建了索引,让我们将这个分析器付诸行动,如下面的清单所示。
POST index_with_dash_pattern_analyzer/_analyze
{
  "text": "1234-5678-9000-0000",
  "analyzer": "pattern_analyzer"
}
返回:
{
  "tokens": [
    {
      "token": "1234",
      "start_offset": 0,
      "end_offset": 4,
      "type": "word",
      "position": 0
    },
    {
      "token": "5678",
      "start_offset": 5,
      "end_offset": 9,
      "type": "word",
      "position": 1
    },
    {
      "token": "9000",
      "start_offset": 10,
      "end_offset": 14,
      "type": "word",
      "position": 2
    },
    {
      "token": "0000",
      "start_offset": 15,
      "end_offset": 19,
      "type": "word",
      "position": 3
    }
  ]
}
Language Analyzers
Elasticsearch 提供了许多特定于语言的分析器。Elasticsearch 提供了一长串适用于大多数语言的语言分析器。 此外,你可以配置这些开箱即用的语言分析器以添加停用词过滤器,这样你就不会索引该语言的不必要(或常见)词。
分析器列表为阿拉伯语、亚美尼亚语、巴斯克语、孟加拉语、保加利亚语、加泰罗尼亚语、捷克语、荷兰语、英语、芬兰语、法语、加利西亚语、德语、印地语、匈牙利语、印度尼西亚语、爱尔兰语、意大利语、拉脱维亚语、立陶宛语、挪威语、葡萄牙语、罗马尼亚语、俄语、索拉尼语、西班牙语、瑞典语和土耳其语。 下面的代码清单演示了两种(英语、德语)语言分析器的运行情况。
POST _analyze
{
  "text": "She sells sea shells",
  "analyzer": "english"
}
POST _analyze
{
"text": "Guten Morgen",
"analyzer": "german"
}我们可以为语言分析器配置一些额外的参数,以提供我们自己的 stop words 列表或要求分析器排除词干提取操作。 例如,英语分析器使用的停止标记过滤器将少数单词归类为停止词。 我们可以根据自己的方便覆盖此列表。 假设我们只想覆盖 a、an、the、and 和 but。 在这种情况下,我们可以配置我们的停用词,如下面的清单所示。
PUT index_with_custom_english_analyzer
{
  "settings": {
    "analysis": {
      "analyzer": {
        "index_with_custom_english_analyzer": {
          "type": "english",
          "stopwords": [
            "a",
            "an",
            "is",
            "and",
            "for"
          ]
        }
      }
    }
  }
}
我们可以使用如下的例子来展示如何使用这个定制的分词器:
POST index_with_custom_english_analyzer/_analyze
{
  "text": "A dog is for a life",
  "analyzer": "index_with_custom_english_analyzer"
}
结果:
{
  "tokens": [
    {
      "token": "dog",
      "start_offset": 2,
      "end_offset": 5,
      "type": "<ALPHANUM>",
      "position": 1
    },
    {
      "token": "life",
      "start_offset": 15,
      "end_offset": 19,
      "type": "<ALPHANUM>",
      "position": 5
    }
  ]
}
此代码仅输出两个标记:dog 和 life。 单词 a、is 和 for 被删除,因为它们与我们之前指定的停用词匹配。
Fingerprint Analyzer
指纹分析仪是一种专业分析仪,可创建可用于重复检测的指纹。指纹分析器删除重复的单词、扩展字符,并按字母顺序对单词进行排序以创建单个 token。 它由一个标准标记器和四个标记过滤器组成:指纹、小写、停用词和 ASCII 折叠过滤器。 下图以图形方式显示了这一点。
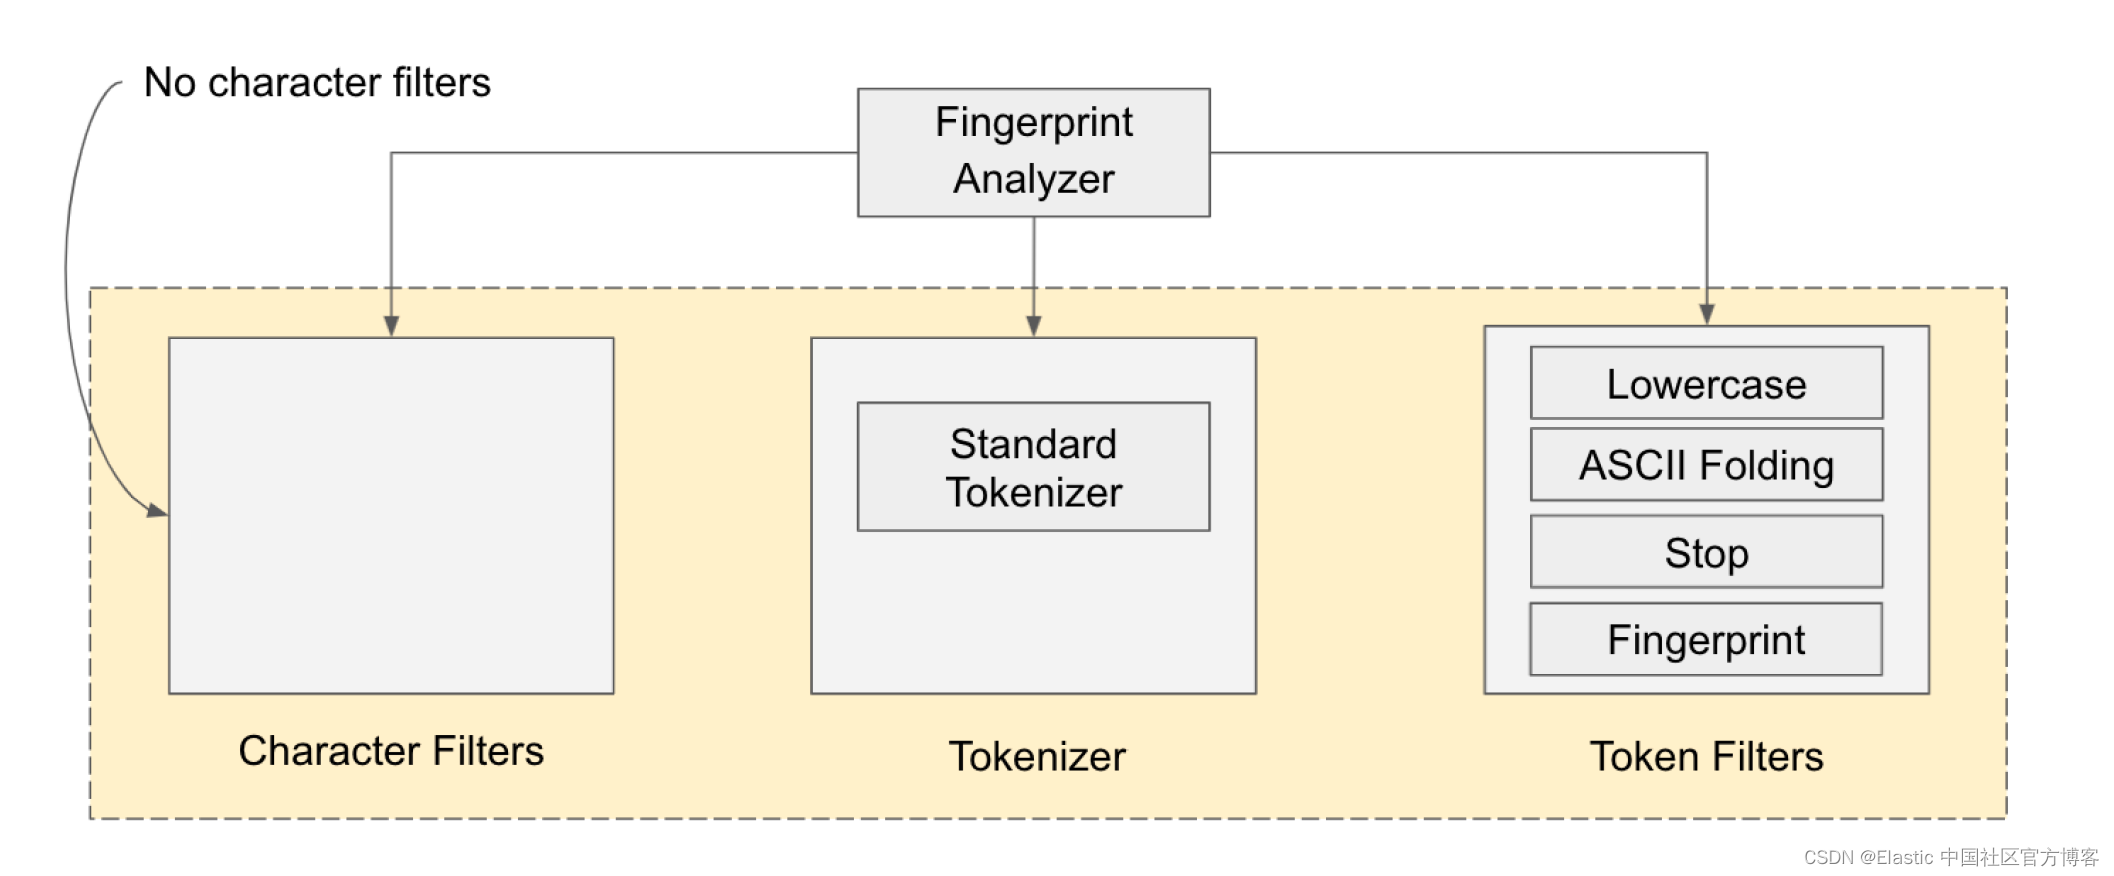
例子:
POST _analyze
{
  "text": "A dosa is a thin pancake or crepe originating from South India. It is made from a fermented batter consisting of lentils and rice.",
  "analyzer": "fingerprint"
}
上面输出的结果为:
{
  "tokens": [
    {
      "token": "a and batter consisting crepe dosa fermented from india is it lentils made of or originating pancake rice south thin",
      "start_offset": 0,
      "end_offset": 130,
      "type": "fingerprint",
      "position": 0
    }
  ]
}
当你仔细查看响应时,你会发现输出仅由一个 token 组成。 单词被小写和排序,重复的单词(“a”、“of”、“from”)在将单词集转换为单个标记之前也被删除。
如果大家想更多了解如何对中文进行分词,请参阅我的另外两篇文章 “Elasticsearch:IK中文分词器” 和 “Elasticsearch:Pinyin 分词器”。
参考:
【1】Controlling Analysis | Elasticsearch: The Definitive Guide [2.x] | Elastic


 864
864

 被折叠的 条评论
为什么被折叠?
被折叠的 条评论
为什么被折叠?
 到【灌水乐园】发言


