


这篇文章是 “Elastic:如何使用 Ansible自动化部署 Elastic Stack (一)” 的续篇。在上一篇文章中,我们对 Ansible 部署工具有所了解,并部署了一个简单的 Webserver。在今天的这篇文章中,我们来介绍如何部署 Elastic Stack。
你可以在地址找到源码:https://github.com/liu-xiao-guo/elk-ansible
部署 Elasticsearch
如果你之前还从来没有在 Linux 机器上手动部署过 Elasticsearch,那么我建议你阅读我之前的文章 “如何在 AWS 上一步一步地安装 Elastic Stack”。在那篇文章中,有详细地描述如何一步一步地在 Ubuntu 机器上安装 Elasticsearch。在今天的练习中,我们将一步一步地按照那里面的步骤来进行安装。
我们仿照在第一篇文章中部署 Webserver 的例子来进行部署。
添加 elastic repo
$ pwd
/Users/liuxg/ansible/elasticsearch
$ cd roles
$ ansible-galaxy init add-elastic-repo
通过上面的命令,我们就创建了一个叫做 add-elastic-repo 的角色:
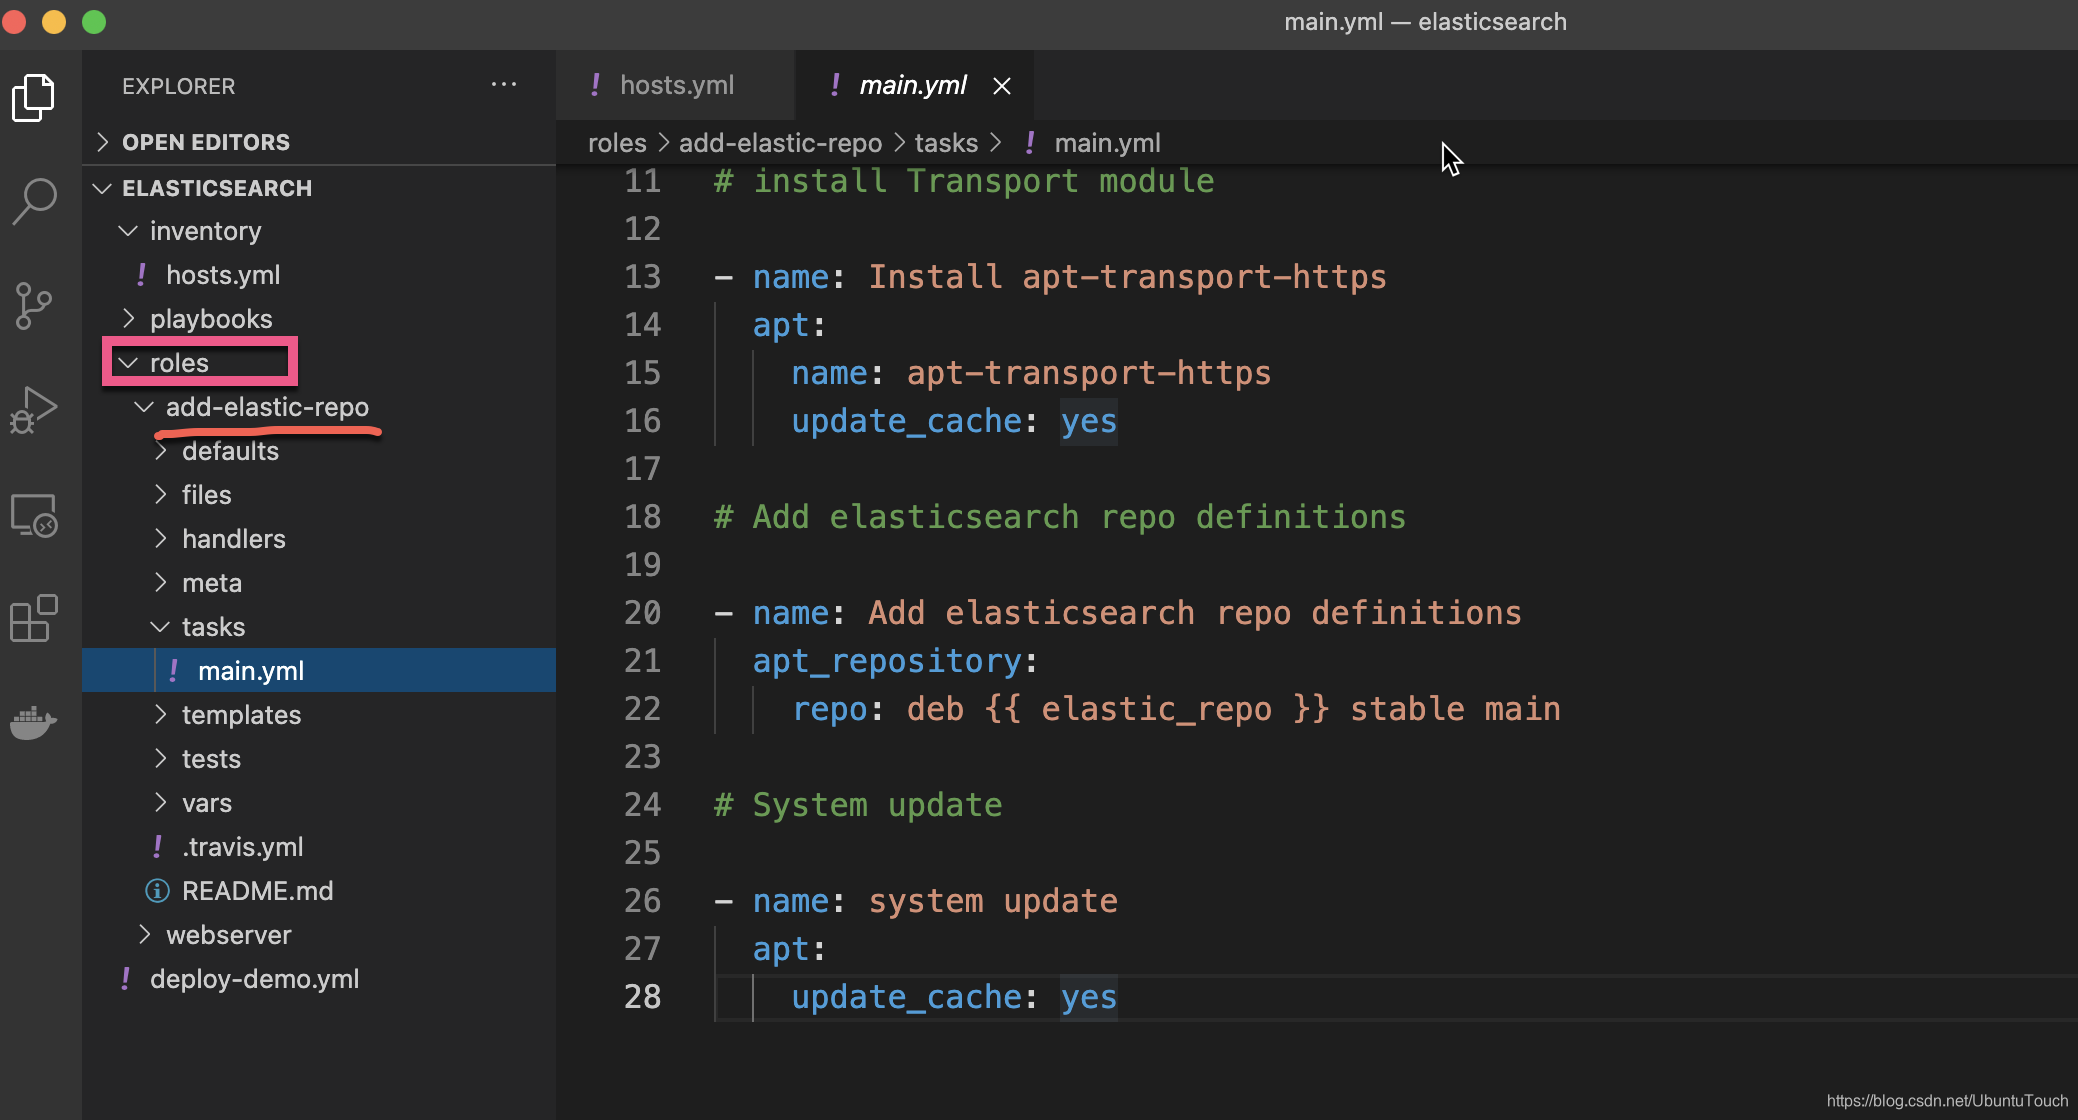
我们在 tasks 子目录修改已经被创建的 main.yml 文件,并把如下的内容输入进去:
tasks/main.yml
---
# tasks file for add-elastic-repo

# Add elasticsearch PSK

- name: add elasticsearch public signing key
  apt_key:
    url: "{{ elastic_psk_url }}"
    state: present

# install Transport module

- name: Install apt-transport-https
  apt:
    name: apt-transport-https
    update_cache: yes

# Add elasticsearch repo definitions

- name: Add elasticsearch repo definitions
  apt_repository:
    repo: deb {{ elastic_repo }} stable main

# System update

- name: system update
  apt:
    update_cache: yes
在上面,我们引入了两个变量 elastic_psk_url 及 elastic_repo。这两个变量可能依赖于部署的版本不同而不同以及 signing key 的位置改变而改变。这些变量可以被定义在 defaults 目录下的 main.yml 文件中:

在上面,我们把如下的内容写入到 main.yml 中去:
defaults/main.yml
---
# defaults file for add-elastic-repo

elastic_psk_url: https://artifacts.elastic.co/GPG-KEY-elasticsearch
elastic_repo: https://artifacts.elastic.co/packages/7.x/apt
为了能够完成部署,我们在 playbooks 下创建一个叫做 deploy-demo.yml 的文件:
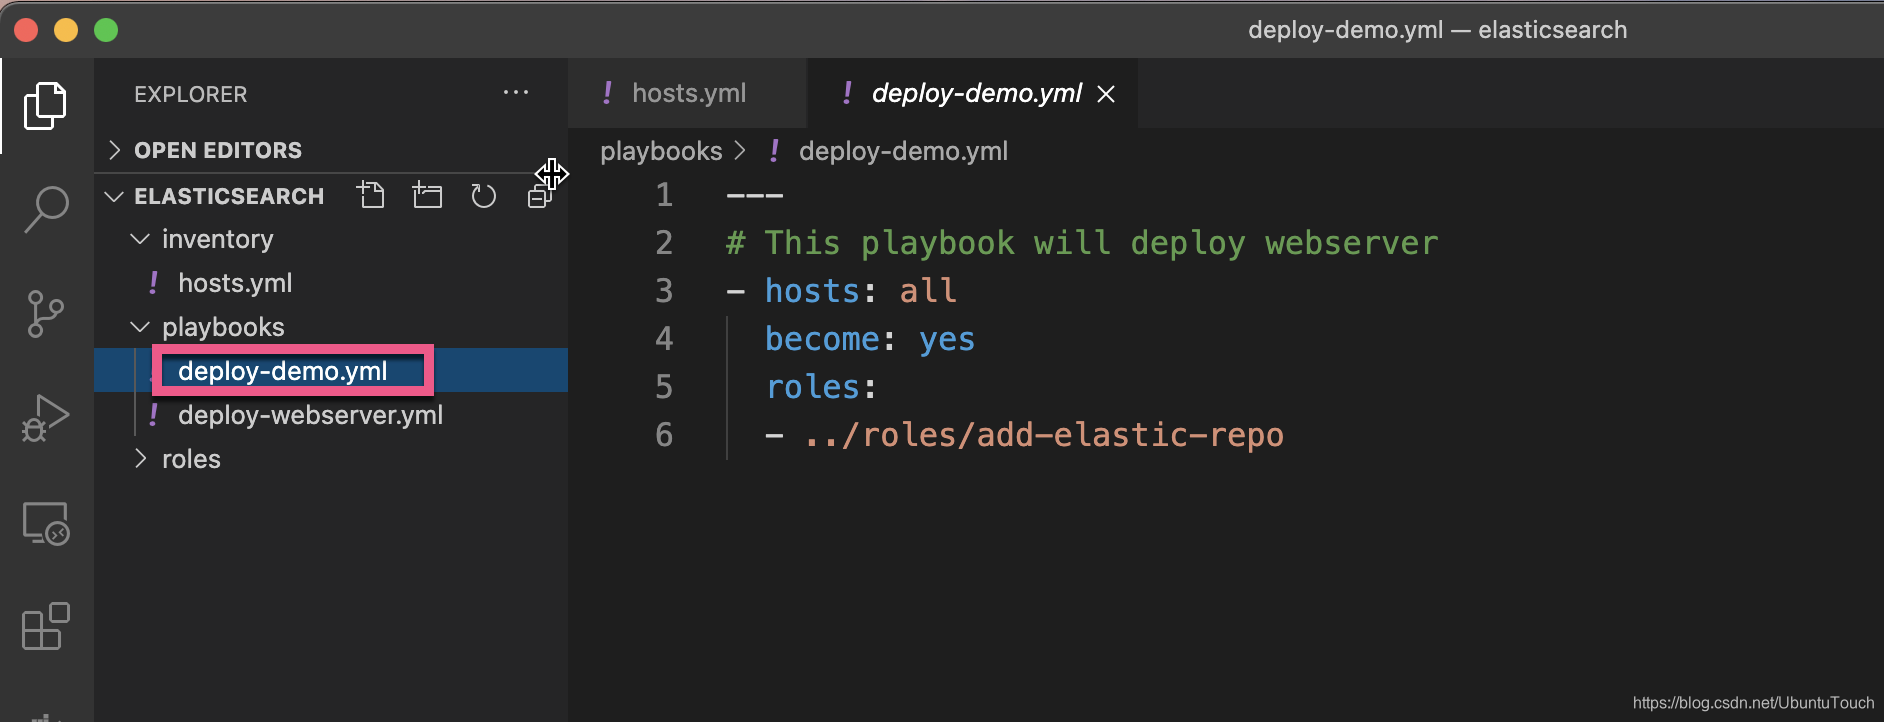
我们把如下的内容输入到 deploy-demo.yml 的文件中:
palybooks/deploy-demo.yml
---
# This playbook will deploy webserver
- hosts: all
  become: yes
  roles:
  - ../roles/add-elastic-repo
这样我们的配置就已经完成了。从上面我们可以看出来这个部署将安装到所有的机器上 all。all 是在我们的 hosts.yml 文件中定义的。我们可以使用如下的命令来进行部署:
$ pwd
/Users/liuxg/ansible/elasticsearch
$ ansible-playbook -K -i inventory/hosts.yml playbooks/deploy-demo.yml
上面的命令执行的结果是:
$ pwd
/Users/liuxg/ansible/elasticsearch
$ ansible-playbook -K -i inventory/hosts.yml playbooks/deploy-demo.yml
BECOME password:

PLAY [all] *********************************************************************

TASK [Gathering Facts] *********************************************************
ok: [192.168.0.4]

TASK [../roles/add-elastic-repo : add elasticsearch public signing key] ********
ok: [192.168.0.4]

TASK [../roles/add-elastic-repo : Install apt-transport-https] *****************
ok: [192.168.0.4]

TASK [../roles/add-elastic-repo : Add elasticsearch repo definitions] **********
ok: [192.168.0.4]

TASK [../roles/add-elastic-repo : system update] *******************************
changed: [192.168.0.4]

PLAY RECAP *********************************************************************
192.168.0.4                : ok=5    changed=1    unreachable=0    failed=0    skipped=0    rescued=0    ignored=0
从上面的结果我们可以看出来安装是成功的。
安装 Elasticsearch
如法炮制,我们先在 roles 下创建一个叫做 elasticsearch 的 role:
$ pwd
/Users/liuxg/ansible/elasticsearch/roles
$ ansible-galaxy init elasticsearch
- Role elasticsearch was created successfully
如果你从来还没有安装过 Elasticsearch,那么我建议你先去阅读我之前的文章 “Elastic:菜鸟上手指南” 去阅读文章 “如何在 Linux,MacOS 及 Windows 上进行安装 Elasticsearch”。我们可以把 Elasticsearch 安装于一个本地目录中,并在它的安装目录 config 下找到 elasticsearch.yml 文件。我们把这个 elasticsearch.yml 文件拷贝到如下的 templates 目录中:
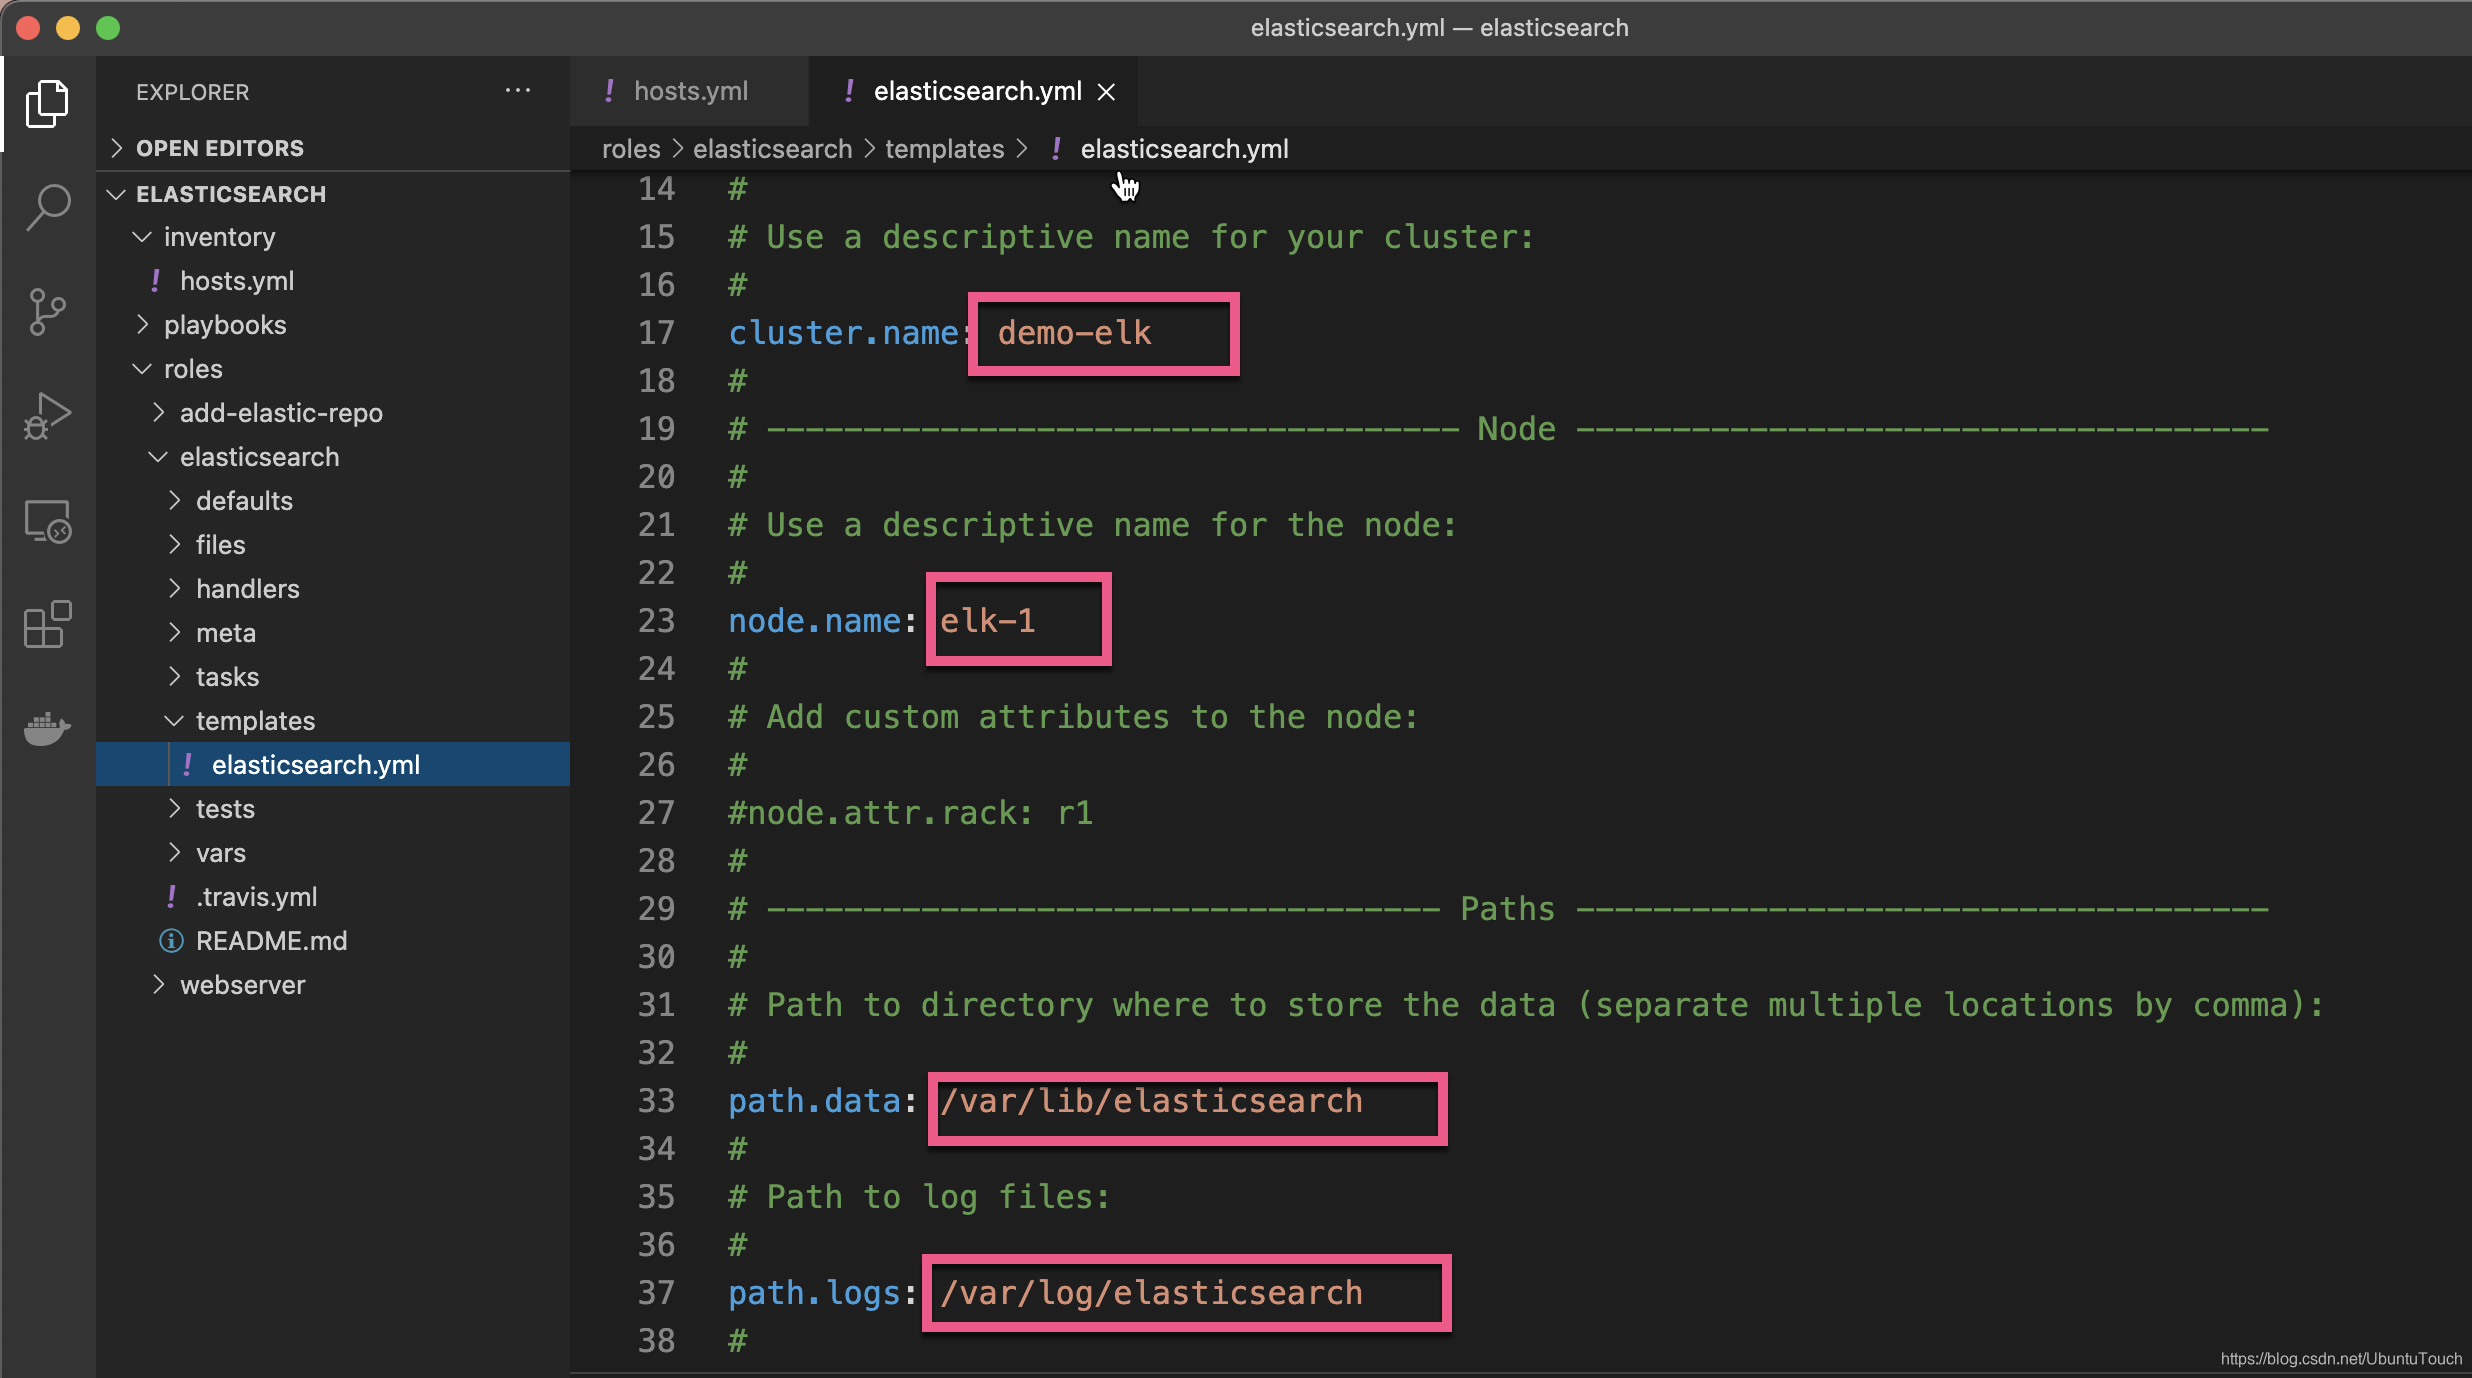
上面的 elastcsearch.yml 的内容如下:
templates/elasticsearch.yml
# ======================== Elasticsearch Configuration =========================
#
# NOTE: Elasticsearch comes with reasonable defaults for most settings.
#       Before you set out to tweak and tune the configuration, make sure you
#       understand what are you trying to accomplish and the consequences.
#
# The primary way of configuring a node is via this file. This template lists
# the most important settings you may want to configure for a production cluster.
#
# Please consult the documentation for further information on configuration options:
# https://www.elastic.co/guide/en/elasticsearch/reference/index.html
#
# ---------------------------------- Cluster -----------------------------------
#
# Use a descriptive name for your cluster:
#
cluster.name: demo-elk
#
# ------------------------------------ Node ------------------------------------
#
# Use a descriptive name for the node:
#
node.name: elk-1
#
# Add custom attributes to the node:
#
#node.attr.rack: r1
#
# ----------------------------------- Paths ------------------------------------
#
# Path to directory where to store the data (separate multiple locations by comma):
#
path.data: /var/lib/elasticsearch
#
# Path to log files:
#
path.logs: /var/log/elasticsearch
#
# ----------------------------------- Memory -----------------------------------
#
# Lock the memory on startup:
#
#bootstrap.memory_lock: true
#
# Make sure that the heap size is set to about half the memory available
# on the system and that the owner of the process is allowed to use this
# limit.
#
# Elasticsearch performs poorly when the system is swapping the memory.
#
# ---------------------------------- Network -----------------------------------
#
# Set the bind address to a specific IP (IPv4 or IPv6):
#
network.host: 0.0.0.0
#
# Set a custom port for HTTP:
#
http.port: 9200
#
# For more information, consult the network module documentation.
#
# --------------------------------- Discovery ----------------------------------
#
# Pass an initial list of hosts to perform discovery when this node is started:
# The default list of hosts is ["127.0.0.1", "[::1]"]
#
#discovery.seed_hosts: ["host1", "host2"]
#
# Bootstrap the cluster using an initial set of master-eligible nodes:
#
#cluster.initial_master_nodes: ["node-1", "node-2"]
#
# For more information, consult the discovery and cluster formation module documentation.
#
# ---------------------------------- Gateway -----------------------------------
#
# Block initial recovery after a full cluster restart until N nodes are started:
#
#gateway.recover_after_nodes: 3
#
# For more information, consult the gateway module documentation.
#
# ---------------------------------- Various -----------------------------------
#
# Require explicit names when deleting indices:
#
#action.destructive_requires_name: true
discovery.type: single-node
如上所示,所有在 elasticsearch.yml 文件中的定义都是固定的。在实际的部署中,我们希望这些是可以变化。依据不同的部署分别进行配置。为此,我们在 defaults/mail.yml 中分别为它们定义一个变量:
defaults/maim.yml
---
# defaults file for elasticsearch

cluster_name: demo-elk
node_name: elk-1

path_data: /var/lib/elasticsearch
path_logs: /var/log/elasticsearch

network_host: 0.0.0.0
http_port: 9200

discovery_type: single-node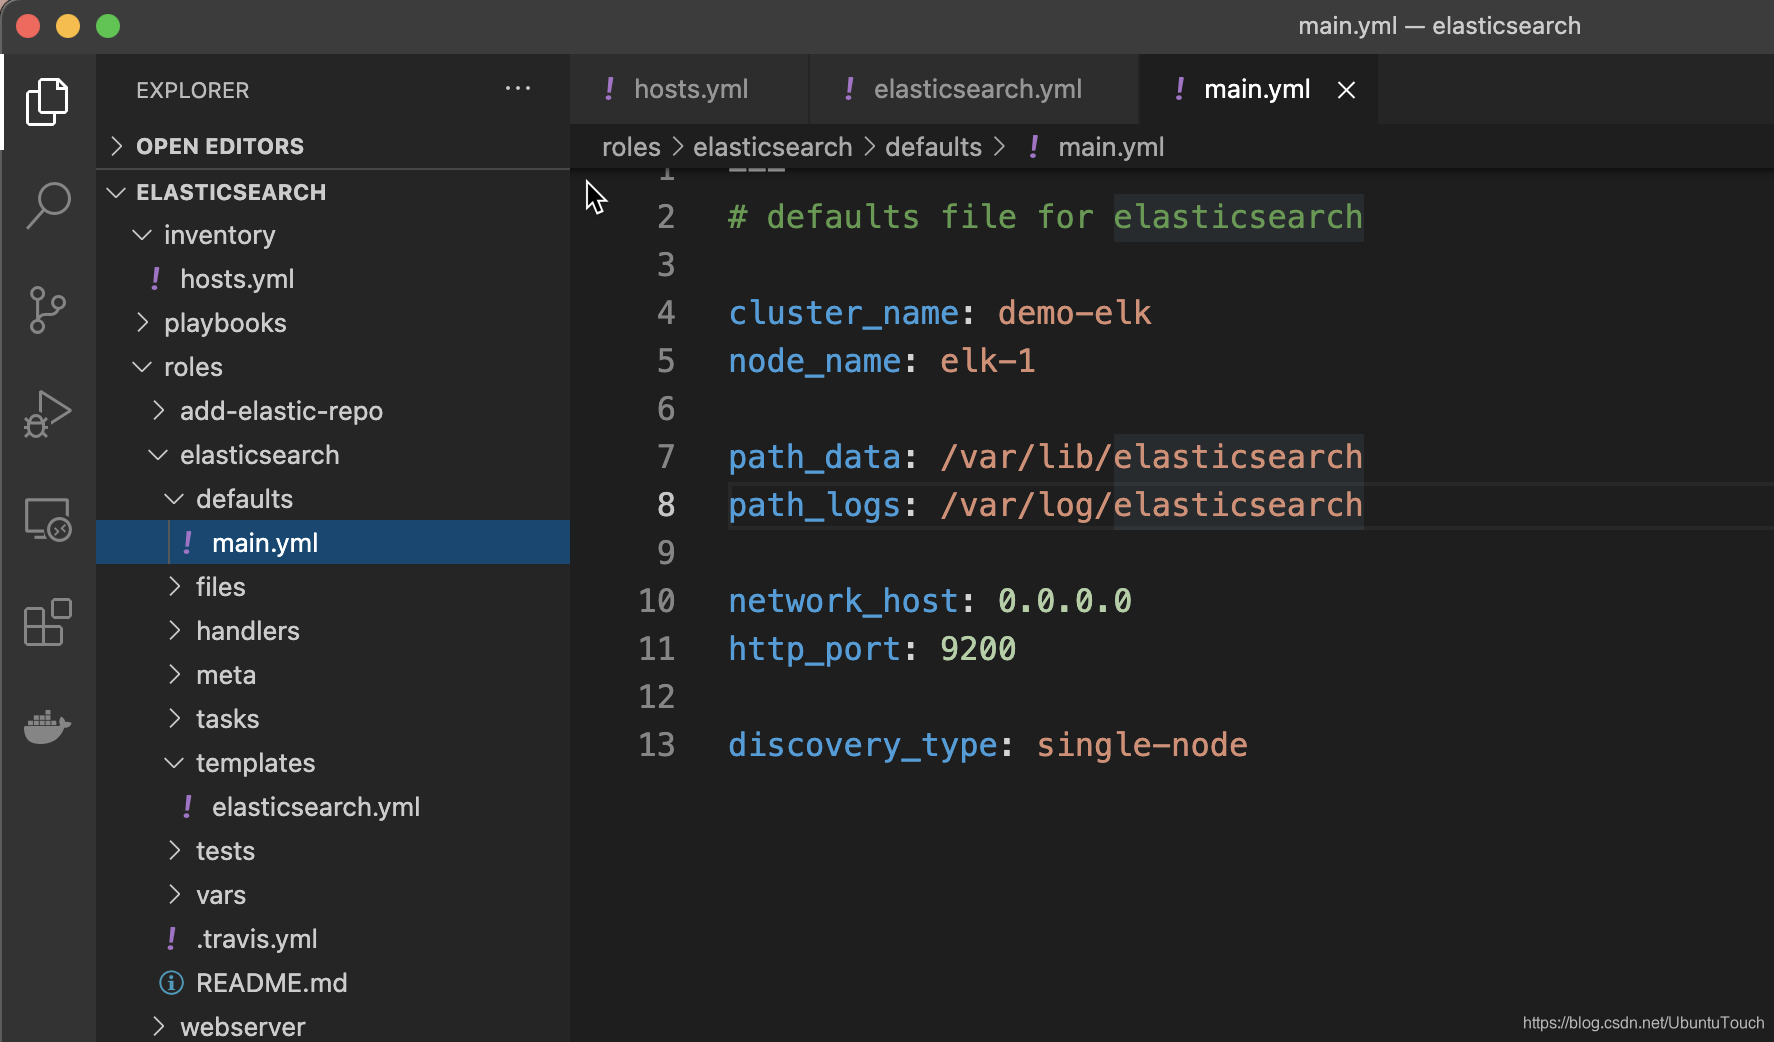
由于这些变量的引入,我们修改我们的 elasticsearch.yml 文件如下:
templates/elasticsearch.yml
# ======================== Elasticsearch Configuration =========================
#
# NOTE: Elasticsearch comes with reasonable defaults for most settings.
#       Before you set out to tweak and tune the configuration, make sure you
#       understand what are you trying to accomplish and the consequences.
#
# The primary way of configuring a node is via this file. This template lists
# the most important settings you may want to configure for a production cluster.
#
# Please consult the documentation for further information on configuration options:
# https://www.elastic.co/guide/en/elasticsearch/reference/index.html
#
# ---------------------------------- Cluster -----------------------------------
#
# Use a descriptive name for your cluster:
#
cluster.name: {{ cluster_name }}
#
# ------------------------------------ Node ------------------------------------
#
# Use a descriptive name for the node:
#
node.name: {{ node_name }}
#
# Add custom attributes to the node:
#
#node.attr.rack: r1
#
# ----------------------------------- Paths ------------------------------------
#
# Path to directory where to store the data (separate multiple locations by comma):
#
path.data: {{ path_data }}
#
# Path to log files:
#
path.logs: {{ path_logs }}
#
# ----------------------------------- Memory -----------------------------------
#
# Lock the memory on startup:
#
#bootstrap.memory_lock: true
#
# Make sure that the heap size is set to about half the memory available
# on the system and that the owner of the process is allowed to use this
# limit.
#
# Elasticsearch performs poorly when the system is swapping the memory.
#
# ---------------------------------- Network -----------------------------------
#
# Set the bind address to a specific IP (IPv4 or IPv6):
#
network.host: {{ network_host }}
#
# Set a custom port for HTTP:
#
http.port: {{ http_port }}
#
# For more information, consult the network module documentation.
#
# --------------------------------- Discovery ----------------------------------
#
# Pass an initial list of hosts to perform discovery when this node is started:
# The default list of hosts is ["127.0.0.1", "[::1]"]
#
#discovery.seed_hosts: ["host1", "host2"]
#
# Bootstrap the cluster using an initial set of master-eligible nodes:
#
#cluster.initial_master_nodes: ["node-1", "node-2"]
#
# For more information, consult the discovery and cluster formation module documentation.
#
# ---------------------------------- Gateway -----------------------------------
#
# Block initial recovery after a full cluster restart until N nodes are started:
#
#gateway.recover_after_nodes: 3
#
# For more information, consult the gateway module documentation.
#
# ---------------------------------- Various -----------------------------------
#
# Require explicit names when deleting indices:
#
#action.destructive_requires_name: true
discovery.type: {{ discovery_type }}
我们接下来修改 tasks/main.yml 文件:
tasks/main.yml
---
# tasks file for elasticsearch

# Installing Elasticsearch
- name: Installing Elasticsearch
  apt:
   name: elasticsearch

# Replce default elasticsearch.yml
- name: Replace default elasticsearch.yml
  template:
    src: elasticsearch.yml
    dest: /etc/elasticsearch/elasticsearch.yml


# Start Elasticsearch service
- name:
  service:
   name: elasticsearch
   state: started
   enabled: yes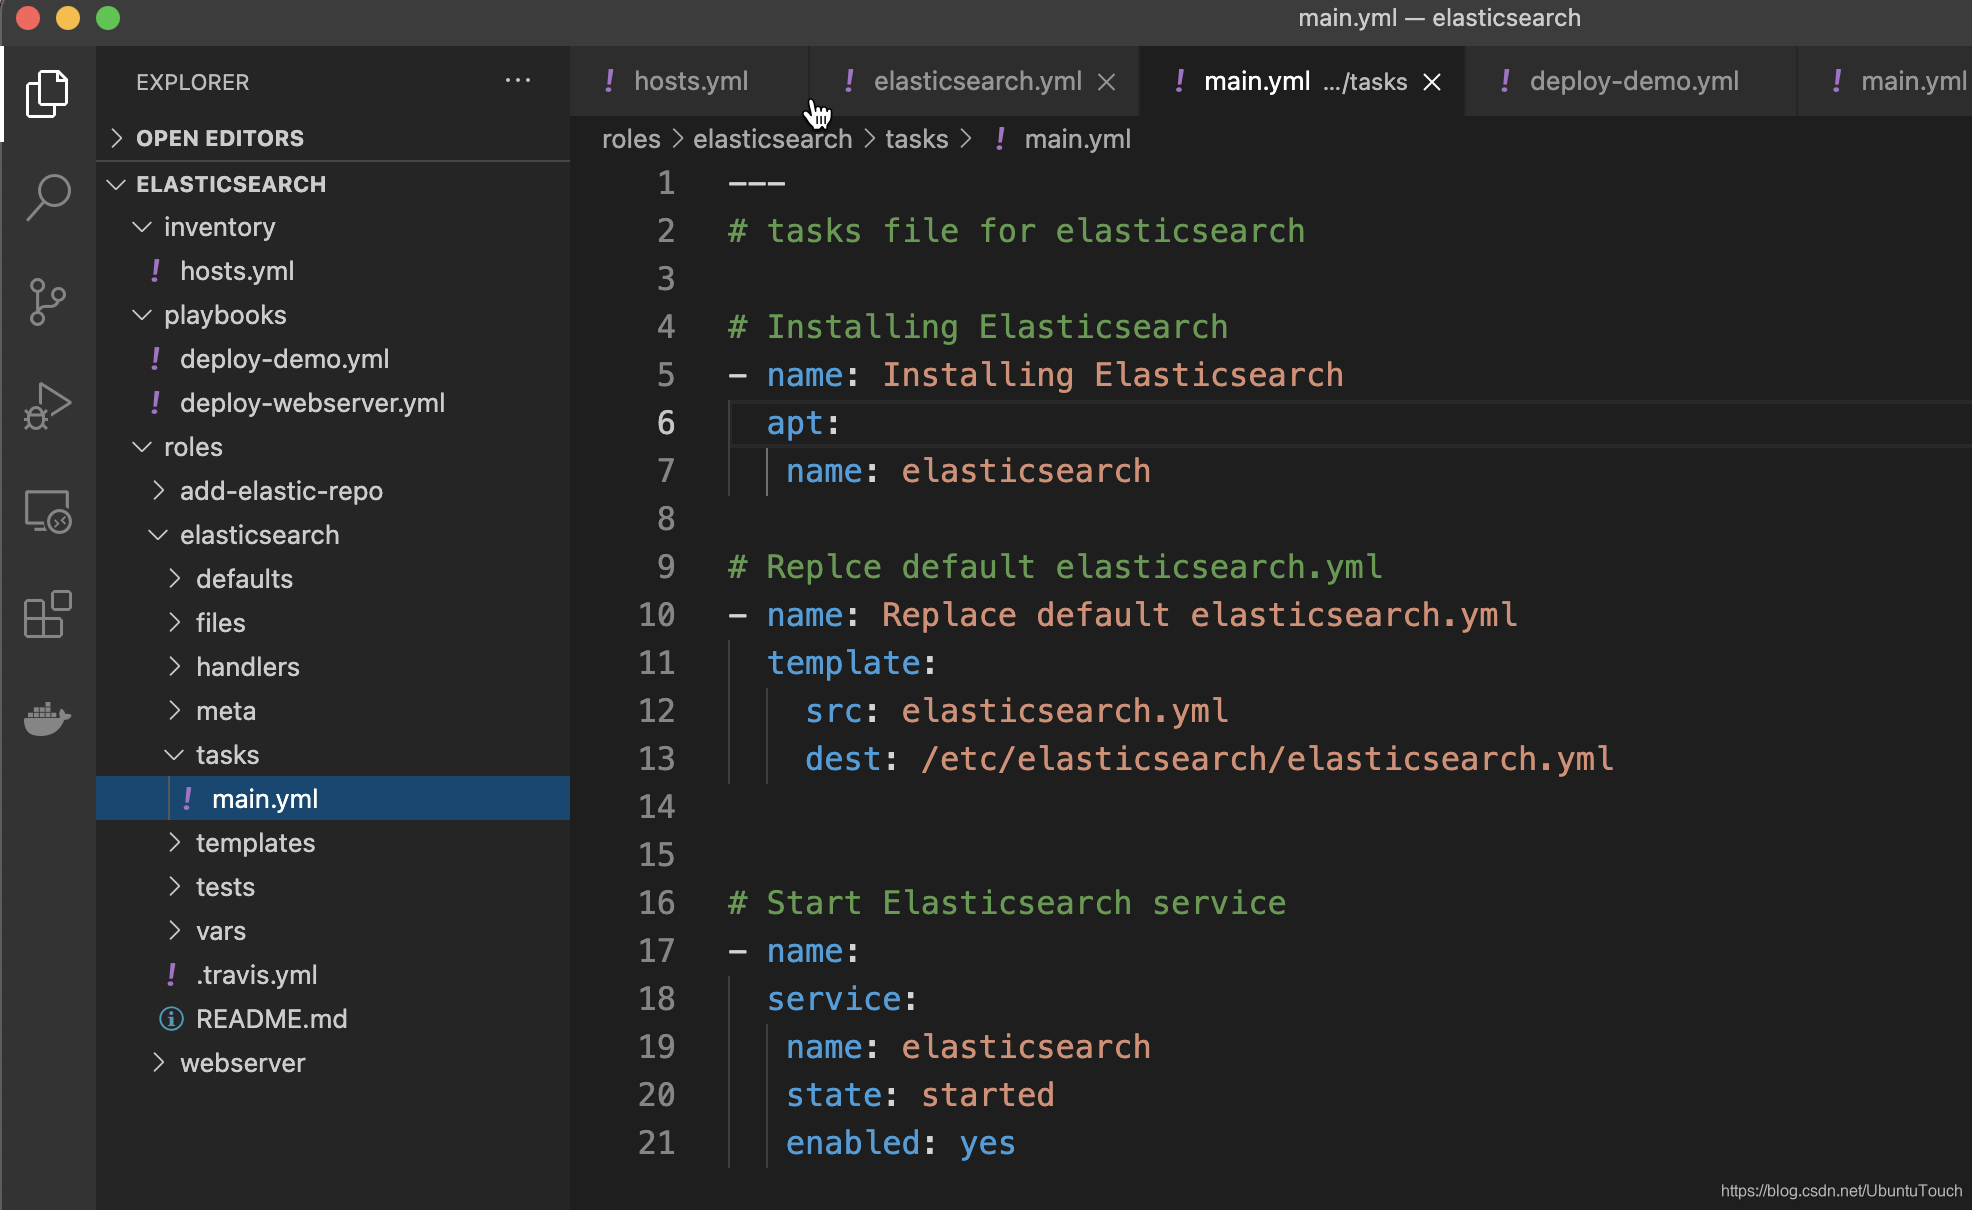
对于中国区域的很多开发者来说,安装一个 elasticsearch 可能会需要很长的时间来进行下载。你需要耐心!一种方法是你可以预先下载好的 deb 文件并放入到指定的目录来进行安装。这个依赖于你自己的网路情况。下面的例子展示如何下载一个 deb 安装包并安装:
 - name: Download Elastic Deb Package
      get_url:
        url: https://artifacts.elastic.co/downloads/elasticsearch/elasticsearch-7.10.1-amd64.deb
        dest: /tmp

 - name: Install Elastic Deb Package
      become: yes
      apt:
        deb: /tmp/elasticsearch-7.8.1-amd64.deb
我们接下来修改 deploy-demo.yml 文件:
playbooks/deploy-demo.yml
---
# This playbook will deploy webserver
- hosts: all
  become: yes
  roles:
  - ../roles/add-elastic-repo

# This playbook will deploy ELK stack
- hosts: elk
  become: yes
  roles:
  - ../roles/elasticsearch
我们把 Elasticsearch 部署到 elk 所定义的服务器上。好了,到目前为止,基本上我们的配置已经完成。我们接下来使用如下的命令来进行部署:
ansible-playbook -K -i inventory/hosts.yml playbooks/deploy-demo.yml上面的命令所生成的结果为:
$ pwd
/Users/liuxg/ansible/elasticsearch
$ ansible-playbook -K -i inventory/hosts.yml playbooks/deploy-demo.yml
BECOME password:

PLAY [all] *********************************************************************

TASK [Gathering Facts] *********************************************************
ok: [192.168.0.4]

TASK [../roles/add-elastic-repo : add elasticsearch public signing key] ********
ok: [192.168.0.4]

TASK [../roles/add-elastic-repo : Install apt-transport-https] *****************
ok: [192.168.0.4]

TASK [../roles/add-elastic-repo : Add elasticsearch repo definitions] **********
ok: [192.168.0.4]

TASK [../roles/add-elastic-repo : system update] *******************************
changed: [192.168.0.4]

PLAY [elk] *********************************************************************

TASK [Gathering Facts] *********************************************************
ok: [192.168.0.4]

TASK [../roles/elasticsearch : Installing Elasticsearch] ***********************
ok: [192.168.0.4]

TASK [../roles/elasticsearch : Replace default elasticsearch.yml] **************
changed: [192.168.0.4]

TASK [../roles/elasticsearch : service] ****************************************
changed: [192.168.0.4]

PLAY RECAP *********************************************************************
192.168.0.4                : ok=9    changed=3    unreachable=0    failed=0    skipped=0    rescued=0    ignored=0
从上面的输出中,我们可以看出来我们的部署是成功的。我们可以在 Ubuntu OS 的机器上运行如下的命令来查看 Elasticsearch 服务是否已经启动:
service elasticsearch status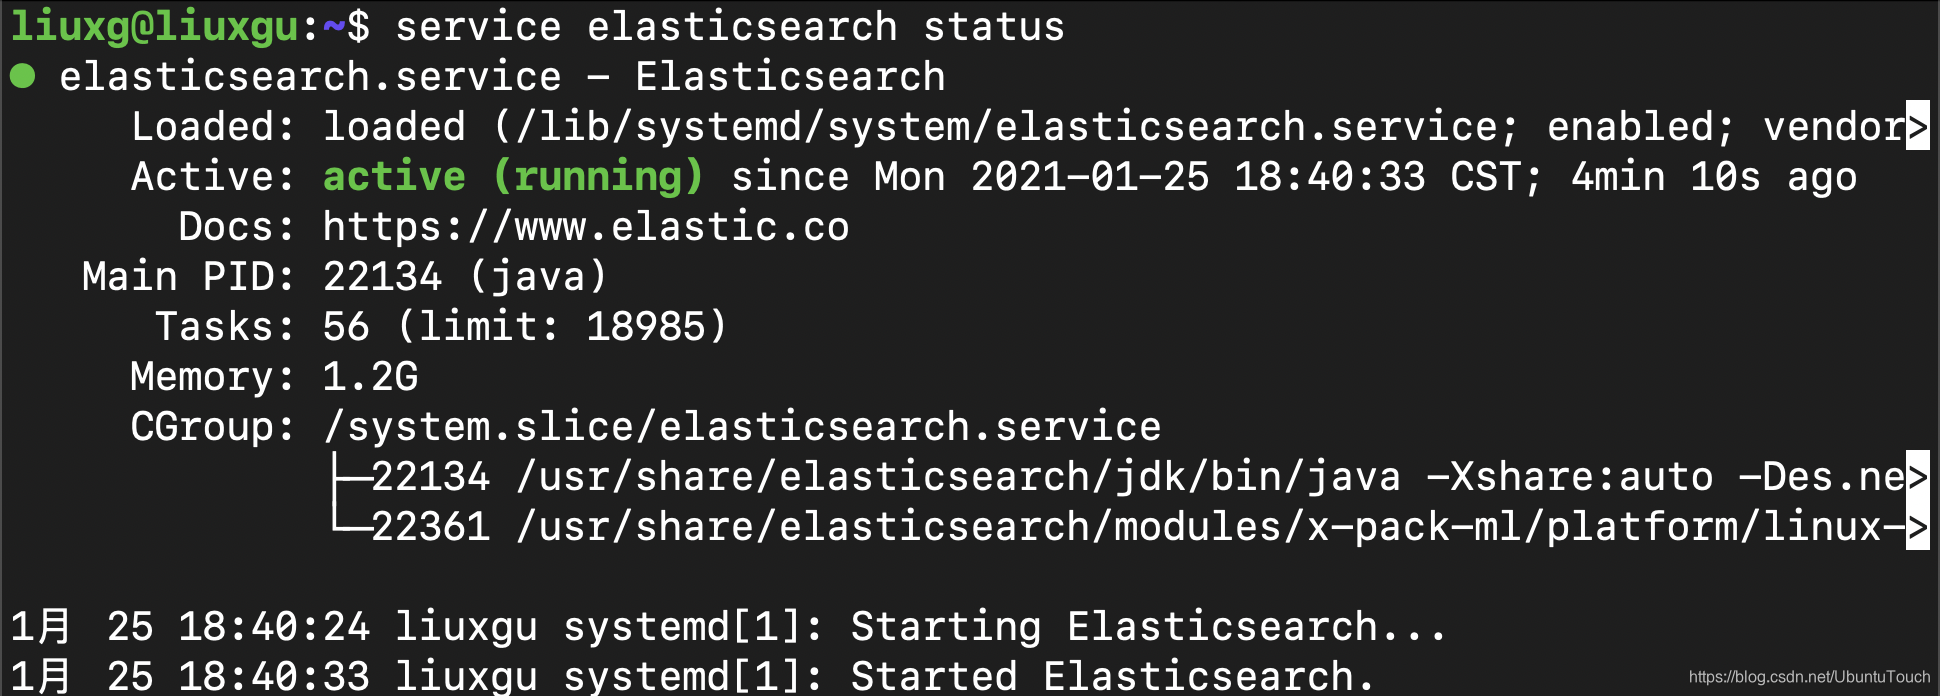
我们现在通过如下的命令来检查部署是否成功:
curl -XGET "http://ubuntu:9200"上面的命令的输出为:
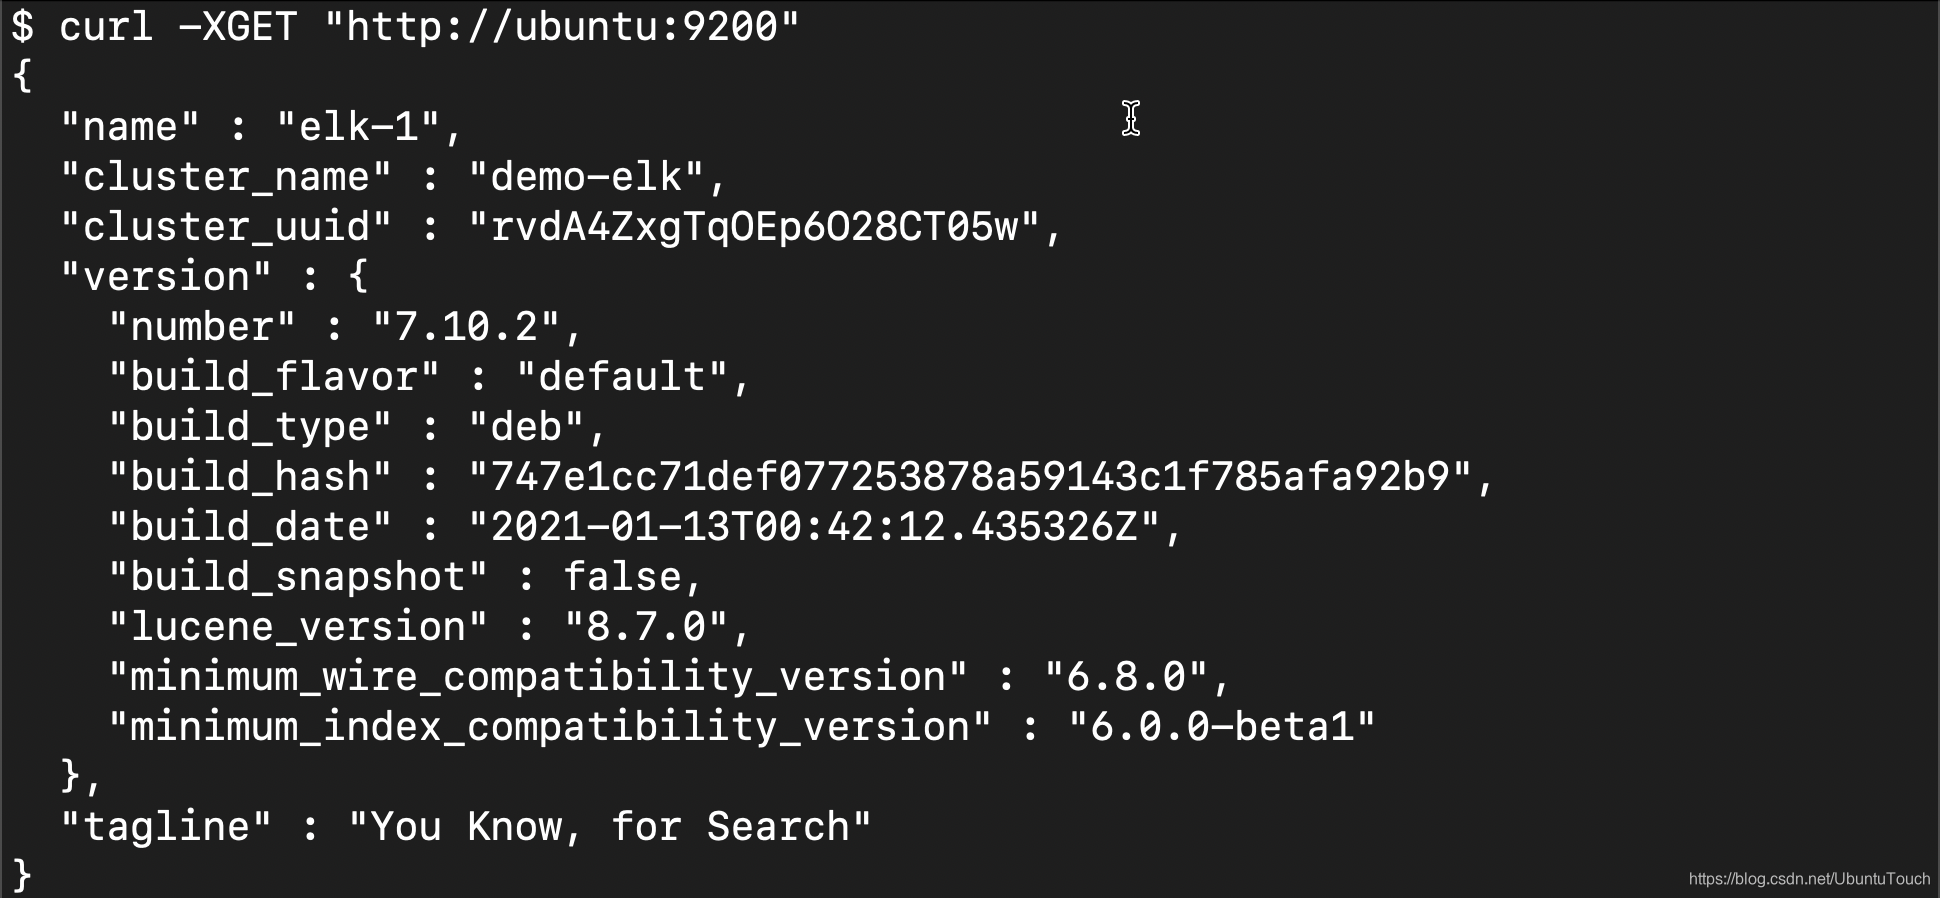
从上面,我们可以看出来我们的 Elasticsearch 的部署是成功的。
参考:
【1】https://linuxize.com/post/how-to-install-elasticsearch-on-ubuntu-20-04/


 1600
1600

 被折叠的 条评论
为什么被折叠?
被折叠的 条评论
为什么被折叠?
 到【灌水乐园】发言


