


作者:来自 Elastic Han Xiang Choong
了解如何使用 Elastic 的 LLM Inference API 处理职位描述,并运行双重混合搜索来找到最适合你简历的职位。
在本文中,我们将介绍以下主题:
- 使用 Elastic Web Crawler 抓取职位列表并将其索引到 Elastic Cloud。感谢我的同事 Jeff Vestal 向我展示如何操作!
- 使用 Elastic Azure OpenAI Inference Endpoint 作为摄取管道的一部分,使用 GPT-4o 处理职位列表。
- 使用 semantic_text 工作流嵌入简历并处理输出。
- 执行双层混合搜索,根据你的简历找到最合适的工作。
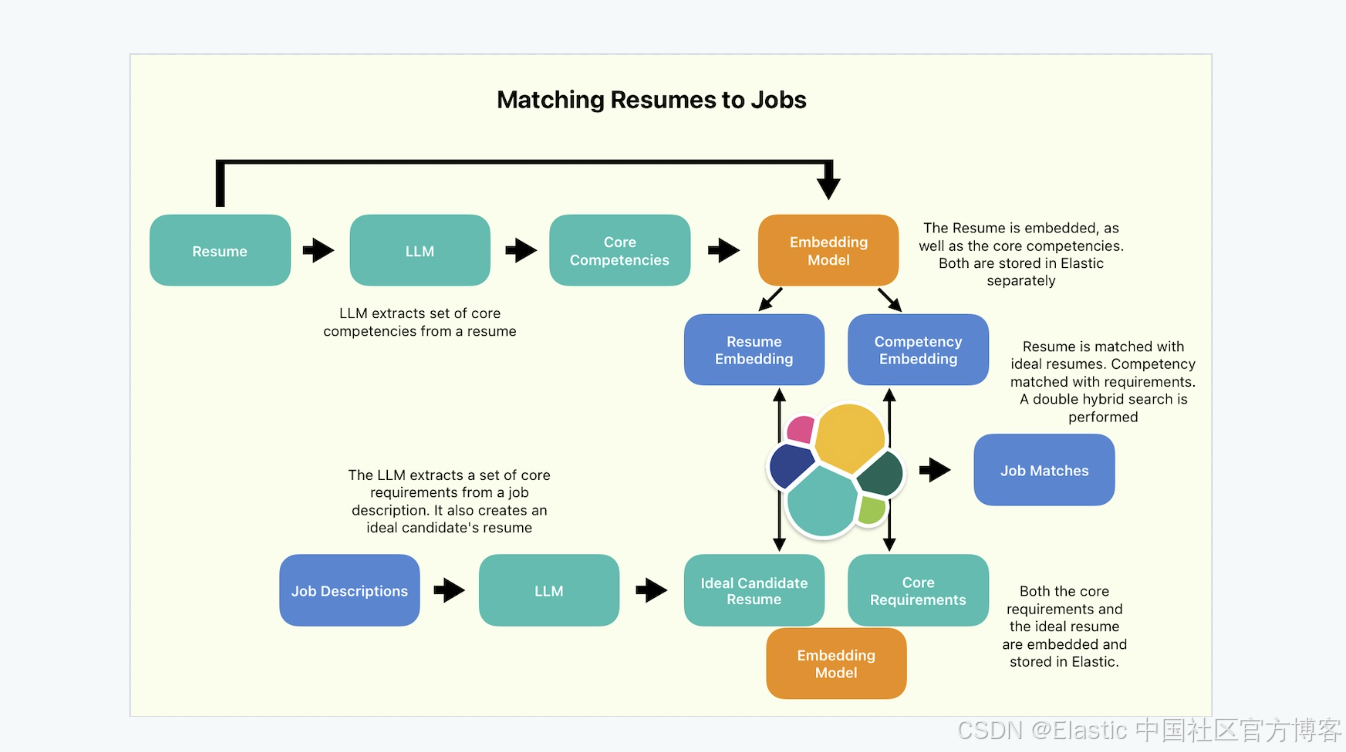
理论用例
以下是用例的想法。假设我是 Elastic 等公司的人力资源部门,我有几个职位空缺和一个人才库。我可能想通过自动将人才库中的简历与可用的职位空缺进行匹配来使我的工作更轻松。我使用 Elastic 平台实现了这一点,并将我的旧简历放入其中。
这些职位空缺显然与我的简历最相关:
Top 3 Jobs for Han

Job Title:
Principal Technical Marketing Engineer, Search

Description:
Drive technical go-to-market strategies for Elasticsearch
and generative AI, create and maintain demo environments, develop
content and training for field teams, influence product roadmaps, and
represent Elastic at industry events.
--------------------------
Job Title:
Search - Search Inference - Software Engineer II

Description:
As a Software Engineer II on the Search Inference team
at Elastic, you will develop and enhance search workflows by integrating
performant, scalable, and cost-efficient machine learning model inference
into Elasticsearch and Kibana, collaborating in a remote-first,
cross-functional team environment.
--------------------------
Job Title:
Search - Extract and Transform - Software Engineer II

Description:
As a Software Engineer II on the Search Extract and Transform team,
you will enhance search components, collaborate on scalable and
secure solutions, and optimize performance indicators while
contributing to Elasticsearch, Kibana, and other connectors.
--------------------------
你知道吗,这些都是意想不到的好选择。第一个选择听起来与我过去几个月所做的事情非常相似(实际上有点怪异),而第二个和第三个选择可能源于我的简历中塞满了搜索和机器学习用例。
让我们深入了解一下这是如何做到的!
先决条件
你需要一个 Elastic Cloud 部署和一个 Azure OpenAI 部署才能继续使用本笔记本。有关更多详细信息,请参阅此 readme。如果你在个人计算机上继续操作,请确保在继续操作之前安装了 docker 桌面!
如果你使用的是 Linux 系统,则安装成功后你可能会看到以下内容:
View build details: docker-desktop://dashboard/build/desktop-linux/desktop-linux/icqfo62fhdfinlgz3swcrd8p8

What's Next?
  1. Sign in to your Docker account → docker login
  2. View a summary of image vulnerabilities and recommendations → docker scout quickview
2db5e5e71b10f1cd772864c039661dfb4eadb3d116b0e95145c918b52e900a90
抓取 Elastic 的职位列表
首先要做的是安装 Elastic 爬虫。创建一个新的项目文件夹,进入其中,然后运行以下命令来克隆 repo、构建 docker 镜像并运行它。
git clone https://github.com/elastic/crawler.git
cd crawler
docker build -t crawler-image . && docker run -i -d --name crawler crawler-image
完成后,转到 crawler/config/ 并创建一个名为 elastic-job.yml 的新文件。粘贴以下代码片段,并填写你的 Elastic Cloud 端点和 API 密钥。如果你愿意,可以更改 output_index 设置。这是存储抓取的 Web 内容的索引。我已将其设置为 elastic-job。
domains:
  - url: https://jobs.elastic.co
    seed_urls:
      - https://jobs.elastic.co/jobs/department/customer-success-group
      - https://jobs.elastic.co/jobs/department/engineering
      - https://jobs.elastic.co/jobs/department/finance-it-operations
      - https://jobs.elastic.co/jobs/department/human-resources
      - https://jobs.elastic.co/jobs/department/legal
      - https://jobs.elastic.co/jobs/department/marketing
      - https://jobs.elastic.co/jobs/department/sales-field-operations
    crawl_rules:
      - policy: allow
        type: begins
        pattern: /jobs/
output_sink: elasticsearch
output_index: elastic-job
max_crawl_depth: 2
elasticsearch:
  host: <YOUR ELASTIC CLOUD ENDPOINT>
  port: "9243"
  api_key: <YOUR ELASTIC CLOUD API KEY>
  bulk_api:
    max_items: 5
现在将 elastic-job.yml 复制到你的 docker 容器中。
cd crawler
docker cp config/elastic-job.yml crawler:/app/config/elastic-job-finder.yml
验证域名(我们的网络爬虫的目标):
docker exec -it crawler bin/crawler validate config/elastic-job.yml你应该会收到以下消息:
Domain https://jobs.elastic.co is valid这样,我们就可以开始了。开始爬行!
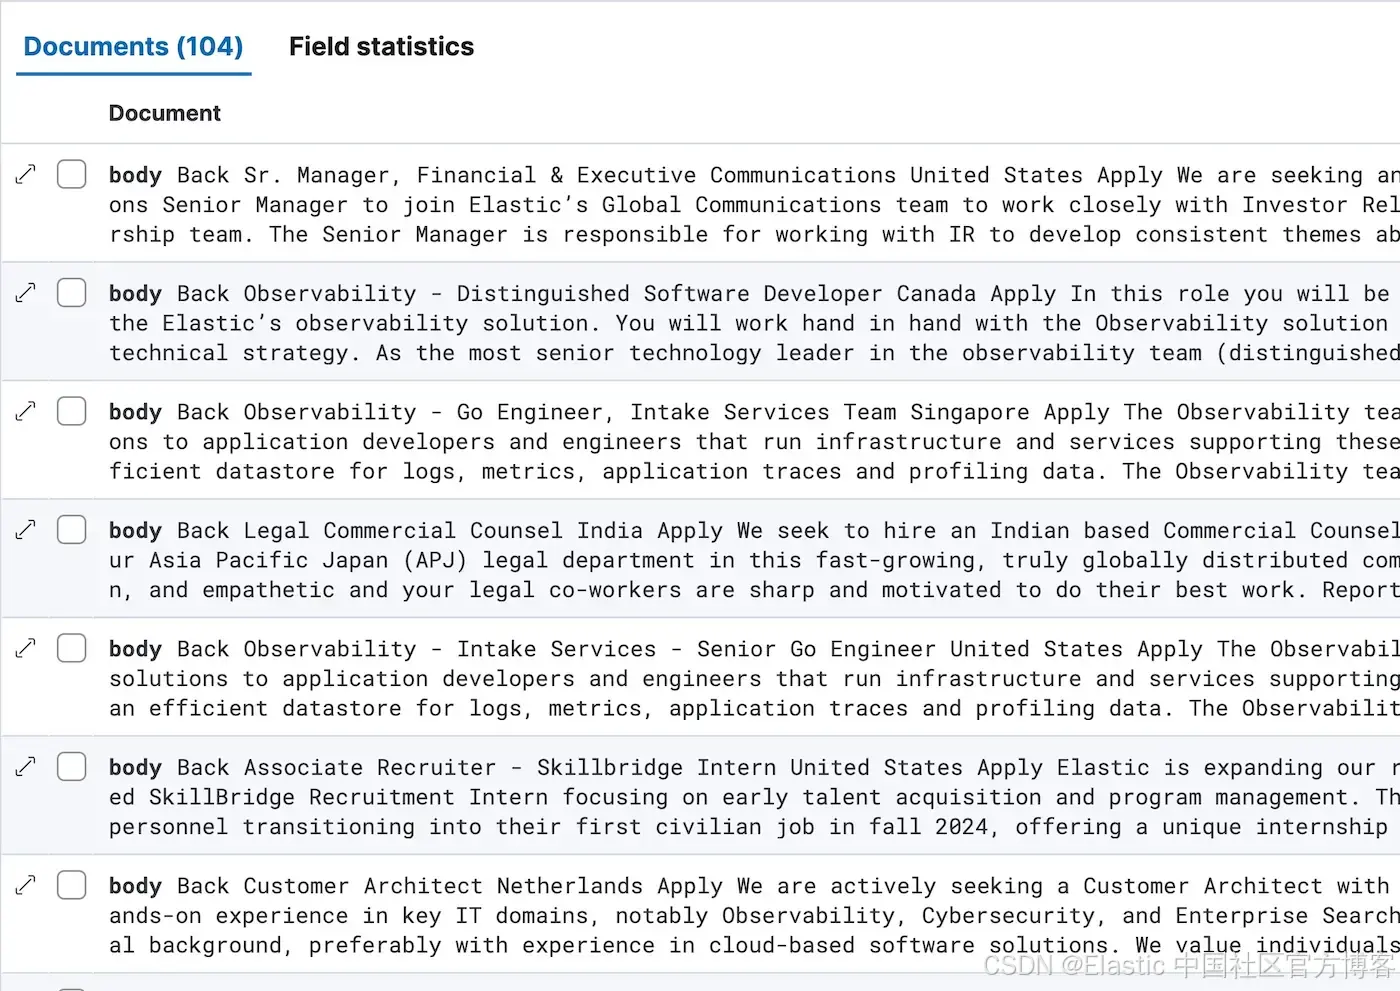
docker exec -it crawler bin/crawler crawl config/elastic-job.yml如果一切顺利,你应该会在 Kibana 上的 elastic-job 索引中看到 104 个职位描述。太棒了!
处理职位空缺
现在我们已经将职位空缺编入索引,是时候将它们处理成更有用的形式了。打开你的 Kibana 控制台,并为你的 Azure OpenAI LLM 创建推理端点。
PUT _inference/completion/azure_openai_gpt4o_completion
{
    "service": "azureopenai",
    "service_settings": {
        "api_key": <YOUR AZURE OPENAI API KEY>,
        "resource_name": <YOUR AZURE OPENAI RESOURCE NAME>,
        "deployment_id": <YOUR AZURE OPENAI DEPLOYMENT ID>,
        "api_version": "2024-06-01"
    }
}
我们可以利用这个推理端点来创建包含 LLM 处理步骤的提取管道。现在让我们定义该管道:
PUT _ingest/pipeline/llm_gpt4o_job_processing
{
  "processors": [
    {
      "script": {
        "source": """
        ctx.requirements_prompt = 'Extract all key requirements from the job description as a list of bulleted points. Do not return notes or commentary. Do not return any text that is not a key requirement. Be as complete and comprehensive as possible: ' + ctx.body
        """
      }
    },
    {
      "inference": {
        "model_id": "azure_openai_gpt4o_completion",
        "input_output": {
          "input_field": "requirements_prompt",
          "output_field": "requirements"
        }
      }
    },
    {
      "remove": {
        "field": "requirements_prompt"
      }
    },
    {
      "script": {
        "source": """
        ctx.ideal_resume_prompt = 'Write the resume of the ideal candidate for this job role. Be concise and avoid fluff. Focus on skills and work experiences that closely align with what the job description is asking for: ' + ctx.body
        """
      }
    },
    {
      "inference": {
        "model_id": "azure_openai_gpt4o_completion",
        "input_output": {
          "input_field": "ideal_resume_prompt",
          "output_field": "ideal_resume"
        }
      }
    },
    {
      "remove": {
        "field": "ideal_resume_prompt"
      }
    },
    {
      "script": {
        "source": """
        ctx.descriptor_prompt = 'Describe the job role in no more than 1 sentence. Be concise and efficient, focusing on maximum information density: ' + ctx.body
        """
      }
    },
    {
      "inference": {
        "model_id": "azure_openai_gpt4o_completion",
        "input_output": {
          "input_field": "descriptor_prompt",
          "output_field": "descriptor"
        }
      }
    },
    {
      "remove": {
        "field": "descriptor_prompt"
      }
    }
  ]
}
我们正在使用 LLM 为我们的数据创建三个新字段。
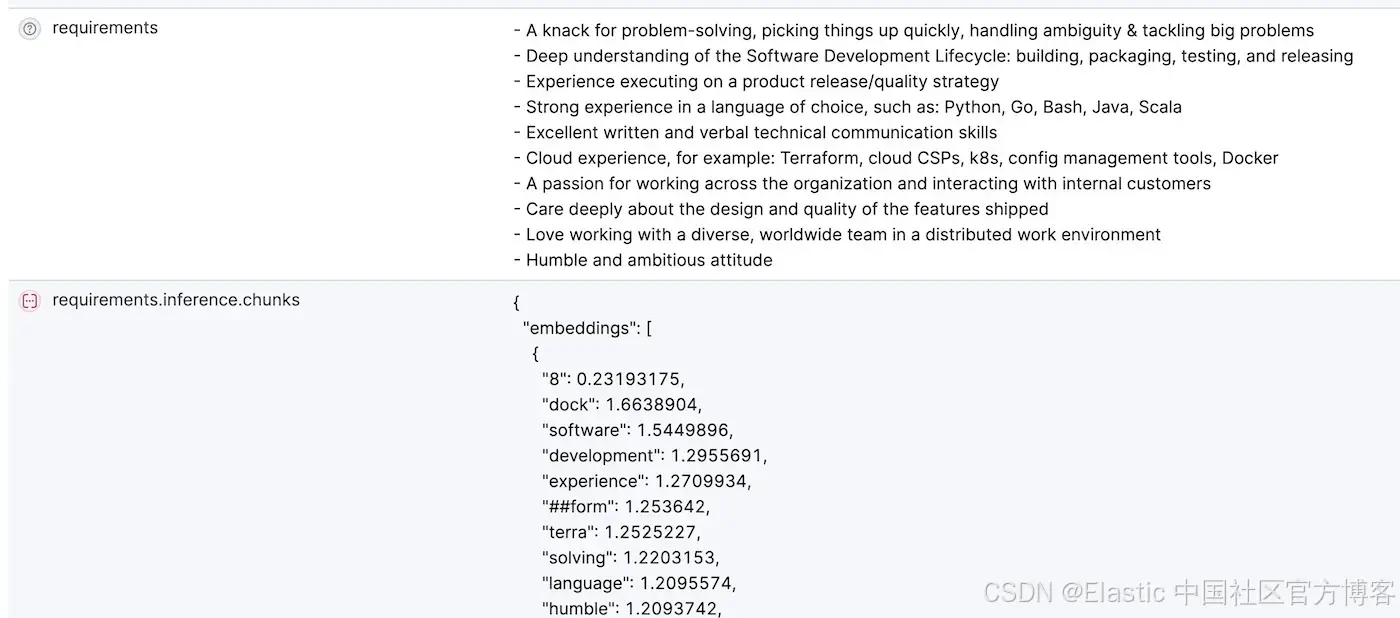
- 要求:这是对相关职位的核心能力和要求的文本描述。我们将对其进行分块和嵌入。稍后,我们作为输入传递的简历将被处理成一组核心能力(core competencies)。这些核心能力将与此字段匹配。
- 理想简历:这是该职位假设的 “理想候选人” 的简历。我们也将对其进行分块和嵌入。我们传递的简历将与此理想简历匹配。
- 描述符:这是对职位及其内容的一句话描述。这将使我们能够在稍后快速解释搜索结果。
每个 LLM 处理步骤都有三个部分:
- 脚本(script)处理器将使用存储在正文字段中的职位描述构建提示。提示将存储在其自己的字段中。
- 推理(inference)处理器将在提示上运行 LLM,并将输出存储在另一个字段中。
- 删除(remove)处理器,一旦 LLM 推理结束,它将删除提示字段。
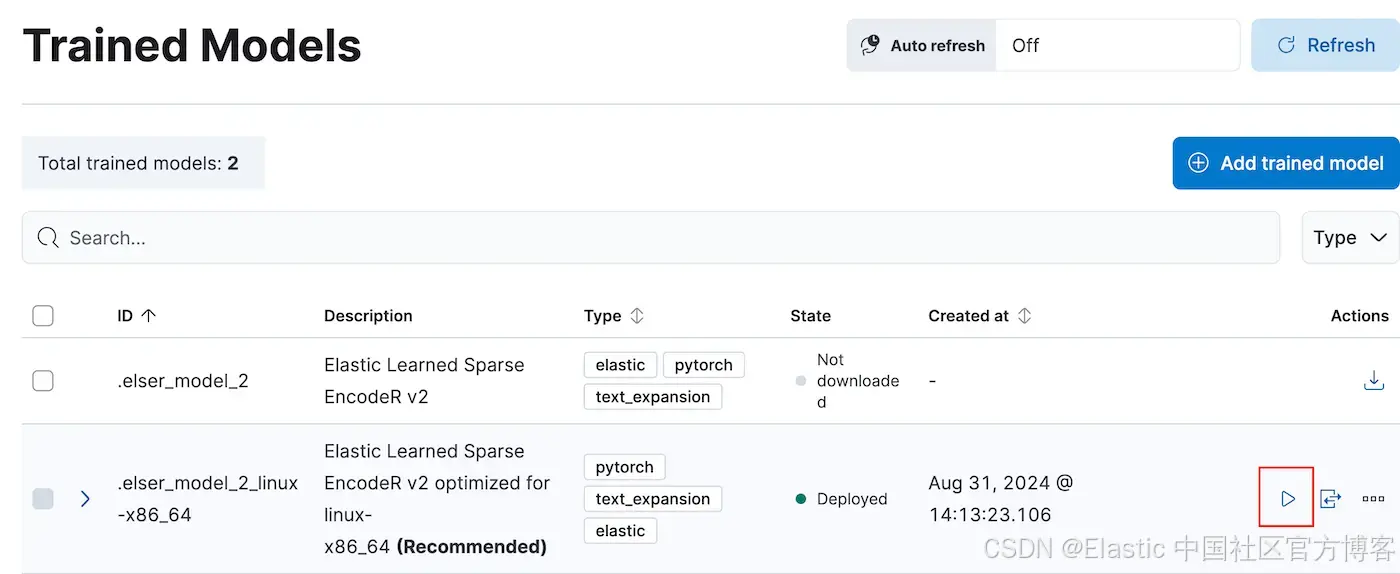
一旦我们定义了处理器,我们就需要一个嵌入模型。导航到 Analytics -> Machine Learning -> Trained Models,然后单击三角形部署按钮部署 elser_model_2_linux-x86_64。
模型部署完成后,运行以下命令创建名为 elser_v2 的推理端点:
PUT _inference/sparse_embedding/elser_v2
{
  "service": "elser",
  "service_settings": {
    "num_allocations": 1,
    "num_threads": 4
  }
}
部署嵌入模型后,让我们定义一个名为 elastic-job-requirements-semantic 的新索引。我们将对 requirements 和 ideal_resume 字段进行分块和嵌入,因此将它们设置为 semantic_text 并将 inference_id 设置为 elser_v2。
PUT elastic-job-requirements-semantic
{
  "mappings": {
    "properties": {
      "requirements": {
        "type": "semantic_text",
        "inference_id": "elser_v2"
      },
      "ideal_resume": {
        "type": "semantic_text",
        "inference_id": "elser_v2"
      }
    }
  }
}
设置完成后,让我们运行重新索引(reindex)操作来处理我们的职位描述并在 elastic-job-requirements-semantic 中索引结果。通过将大小设置为 4,我们确保每次处理 4 个文档的批次,这在 LLM API 因任何原因失败时为我们提供了一定的安全性:
POST _reindex?slices=auto&wait_for_completion=false
{
  "source": {
    "index": "elastic-jobs",
    "size": 4
  },
  "dest": {
    "index": "elastic-job-requirements-semantic",
    "pipeline": "llm_gpt4o_job_processing"
  }
}
执行重新索引,并观察处理后的文档如何填满 elastic-job-requirements-semantic 索引!
控制台将为你提供一个 task_id,你可以使用以下命令检查重新索引的状态:
GET _tasks/EUgmrdCKS2aAVZC-Km_mVg:26927998一旦工作完成,我们就可以进行最后一步!
设置简历搜索
在这一步,我们将转到 Python 环境。在你的项目目录中,创建一个 .env 文件并使用以下值填充它:
ELASTIC_ENDPOINT=<YOUR ELASTIC ENDPOINT>
ELASTIC_API_KEY=<YOUR ELASTIC API KEY>
ELASTIC_INDEX_NAME=<YOUR ELASTIC INDEX NAME>
AZURE_OPENAI_KEY_1=<AZURE OPEN AI API KEY>
AZURE_OPENAI_KEY_2=<AZURE OPEN AI API KEY>
AZURE_OPENAI_REGION=<AZURE OPEN AI API REGION>
AZURE_OPENAI_ENDPOINT=<AZURE OPEN AI API ENDPOINT>
现在将你的简历添加到目录中。 .pdf 文件效果最好。由于我害羞,我不会在这里发布我的简历。
运行以下命令安装依赖项(Elasticsearch 和 OpenAI):
pip install elasticsearch==8.14.0 openai==1.35.13 llama-index==0.10.55并创建一个包含两个类的python脚本:LlamaIndexProcessor 调用 SimpleDirectoryReader 来加载本地文档,AzureOpenAIClient 提供了一种方便的方法来调用gpt-4o。
import traceback
import uuid
import os
from elasticsearch import Elasticsearch, helpers
from openai import AzureOpenAI
from dotenv import load_dotenv
from llama_index.core import SimpleDirectoryReader
import pickle
load_dotenv()
'''
Load a pdf documnent using LlamaIndex's SimpleDirectoryReader
'''
class LlamaIndexProcessor:
    def __init__(self):
        pass

    def load_documents(self, directory_path):
        '''
        Load all documents in directory
        '''
        reader = SimpleDirectoryReader(input_dir=directory_path)
        return reader.load_data()
    def load_document(self, filepath):
        return SimpleDirectoryReader(input_files=[filepath]).load_data()

'''
Azure OpenAI LLM Class
'''
class AzureOpenAIClient:
    def __init__(self):
        self.client = AzureOpenAI(
            api_key=os.environ.get("AZURE_OPENAI_KEY_1"),
            api_version="2024-06-01",
            azure_endpoint=os.environ.get("AZURE_OPENAI_ENDPOINT")
        )
    def generate(self, prompt, model="gpt-4o", system_prompt=""):
        response = self.client.chat.completions.create(
            model=model,
            messages=[
                {"role": "system", "content": system_prompt},
                {"role": "user", "content": prompt}
            ],
            max_tokens=4096
        )
        return response.choices[0].message.content

LLM = AzureOpenAIClient()
llamaindex_processor=LlamaIndexProcessor()
现在是时候搜索工作了!运行此代码以加载你的简历:
documents=llamaindex_processor.load_document('resume.pdf')
resume=documents[0].to_dict()['text']
让我们通过以下提示(prompt)来生成你的简历的核心竞争力:
competencies_prompt='''
Analyze the given resume and extract key skills, competencies, and qualifications. Generalize and categorize the information into broad, widely applicable terms. Present each item on a new line without numbering or bullets.

Avoid quoting directly from the resume. Instead, distill the information into generalized, transferable skills and competencies. Focus on:

General industry segments or fit
Technical skills and areas of expertise
Soft skills and interpersonal abilities
Professional competencies and responsibilities
Industry-specific knowledge
Educational background and qualifications
Types of relevant experience
Omit any explanatory text, categorization labels, or additional commentary. Each line should contain a single, distinct generalized skill or competency derived from the resume content.
'''

competencies=LLM.generate(resume, system_prompt=competencies_prompt)
对于我的简历来说,这是生成的能力块:
Machine learning engineering
Full-stack development
AI systems design and deployment
Team leadership
Productivity solutions
AI integration with developer tools
Real-time code analysis and generation
AI customer service solutions
...
...
现在,初始化 Python Elasticsearch 客户端:
try:
    es_endpoint = os.environ.get("ELASTIC_ENDPOINT")
    es_client = Elasticsearch(
        es_endpoint,
        api_key=os.environ.get("ELASTIC_API_KEY")
    )
except Exception as e:
    es_client = None
让我们定义一个查询!
寻找工作
现在是时候使用双重混合搜索了(double hybrid search) - 我称之为双重,因为我们将分别在不同的字段上进行两次混合搜索:
es_query={
  "retriever": {
    "rrf": {
      "rank_window_size":20,
      "retrievers": [
        {
          "standard": {
            "query": {
              "nested": {
                "path": "requirements.inference.chunks",
                "query": {
                  "sparse_vector": {
                    "inference_id": "elser_v2",
                    "field": "requirements.inference.chunks.embeddings",
                    "query": competencies
                  }
                },
                "inner_hits": {
                  "size": 2,
                  "name": "requirements.body",
                  "_source": [
                    "requirements.inference.chunks.text"
                  ]
                }
              }
            }
          }
        },
        {
          "standard": {
            "query": {
              "nested": {
                "path": "ideal_resume.inference.chunks",
                "query": {
                  "sparse_vector": {
                    "inference_id": "elser_v2",
                    "field": "ideal_resume.inference.chunks.embeddings",
                    "query": resume
                  }
                },
                "inner_hits": {
                  "size": 2,
                  "name": "ideal_resume.body",
                  "_source": [
                    "ideal_resume.inference.chunks.text"
                  ]
                }
              }
            }
          }
        }
      ]
    }
  },
  "size": 20
}
有两个 rrf.retriever 组件。第一个将 competencies 进行嵌入生成并对 requirements 字段进行混合搜索。第二个将resume 本身进行嵌入生成,并对 ideal_resume 字段进行混合搜索。运行搜索,让我们看看我们得到了什么!
search_results = es_client.search(index="elastic-job-requirements-semantic", body=es_query)

total_hits = search_results['hits']['total']['value']

for hit in search_results['hits']['hits']:
    print(f"Job Title: {hit['_source']['title']}")
    print(f"Description: {hit['_source']['descriptor']}")
    print('--------------------------')
结果在文章开头,所以在这里复制它可能有点奇怪。
这样,我们就完成了!
准备好自己尝试一下了吗?开始免费试用。
想要获得 Elastic 认证吗?了解下一次 Elasticsearch 工程师培训何时举行!
原文:Using Openwebcrawler, LLMs, and semantic_text for resume & job search in Elastic 8.15 — Search Labs


 1545
1545

 被折叠的 条评论
为什么被折叠?
被折叠的 条评论
为什么被折叠?
 到【灌水乐园】发言


