


需求:6只AI摄像头和1台服务器网络状态监控
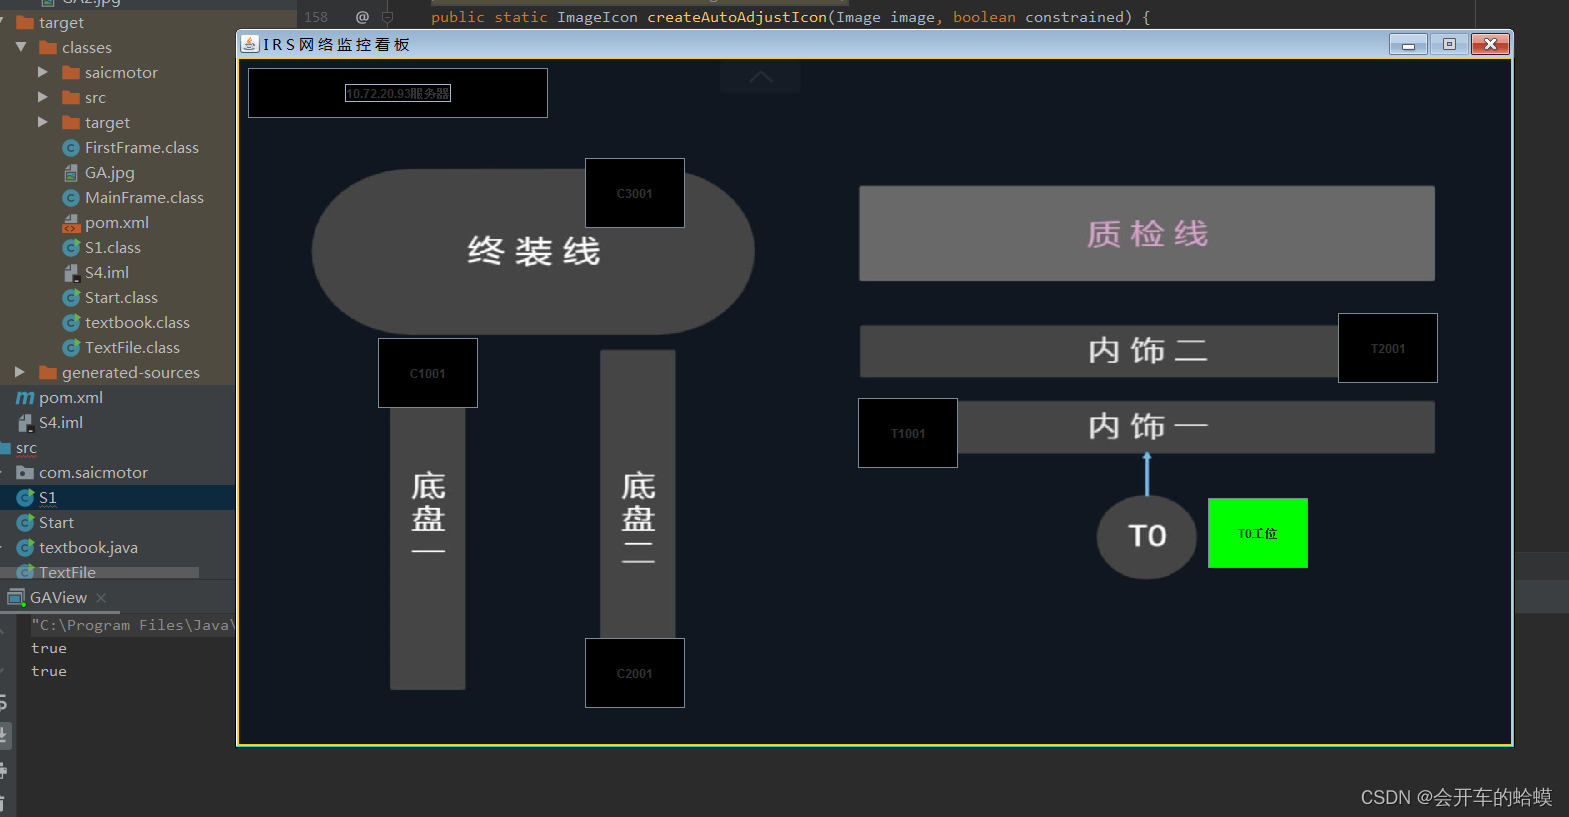
效果图如上,原本是自适应的背景图,但是单Ping IP的几个按钮,要随着窗体大小而计算坐标,太繁琐。就索性把窗体直接框死,添加背景图的时候遇到 ImageIO.read 为null的报错,百度一天包括图片格式是否是webp格式等等都试过了,还是不对。最后我一个.net C#的同学跟我说src前加个“/”或者“./”试试;
还真是因为路径的问题,怪自己太菜;
可运行的路径:没错,我将图片直接放在了src目录下,但是从来没在src前加“/”
报错:URL imageUrl = GAView.class.getResource("src/123.jpg");可运行:URL imageUrl = GAView.class.getResource("/src/123.jpg");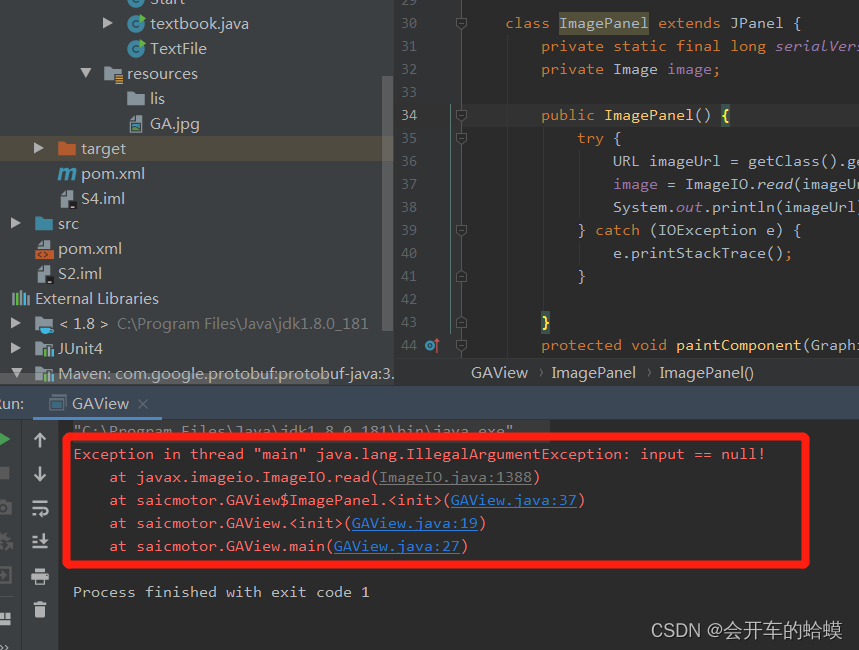
因为这个问题耽误了很多时间。
下面直接把代码附上:
package saicmotor;

import javafx.scene.layout.Region;

import java.awt.*;
import java.awt.event.ActionEvent;
import java.awt.event.ActionListener;
import java.awt.image.BufferedImage;
import java.io.IOException;
import java.net.InetAddress;
import java.net.URL;
import javax.imageio.ImageIO;
import javax.swing.*;

import javax.swing.border.LineBorder;

/**Title: Demo.java
 * 示例代码
 *
 * @author Run
 * @date  2023-05-24 */
public class GAView{
    private static BufferedImage image;
    private static JButton button;
    private static JButton button1;
    private static Timer timer;

    public static void main(String args[]){
        SwingUtilities.invokeLater( () ->{
            //运行示例代码
            AutoAdjustIconDemo();
        });
    }

    /**图像自适应组件大小
     * @date  2023-05-24 */
    public static void AutoAdjustIconDemo() {
        JFrame frame=new JFrame("I R S 网 络 监 控 看 板");
        JPanel panel=new JPanel((new GridLayout(1, 1, 10, 10)));
        frame.setResizable(false);//是否可改变窗体大小
        panel.setOpaque(false);
        //导入图片
        button = new JButton("T0工位");
        button1 = new JButton("T1001");
//        JButton souBtnT0 = new JButton("T0工位");
//        JButton souBtnT1 = new JButton("T1001");
        JButton souBtnT2 = new JButton("T2001");
        JButton souBtnC1 = new JButton("C1001");
        JButton souBtnC2 = new JButton("C2001");
        JButton souBtnC3 = new JButton("C3001");
        JButton souBtnIRS = new JButton("10.72.20.93服务器");
        button.setBounds(970, 440, 100, 70);
        button1.setBounds(620, 340, 100, 70);
        souBtnT2.setBounds(1100, 255, 100, 70);
        souBtnC1.setBounds(140, 280, 100, 70);
        souBtnC2.setBounds(347, 580, 100, 70);
        souBtnC3.setBounds(347, 100, 100, 70);
        souBtnIRS.setBounds(10, 10, 300, 50);
        button.setBackground(Color.BLACK);
        button1.setBackground(Color.BLACK);
        souBtnT2.setBackground(Color.BLACK);
        souBtnC1.setBackground(Color.BLACK);
        souBtnC2.setBackground(Color.BLACK);
        souBtnC3.setBackground(Color.BLACK);
        souBtnIRS.setBackground(Color.BLACK);
        button.addActionListener(new ActionListener() {
            @Override
            public void actionPerformed(ActionEvent e) {
                ping();
            }
        });
        // 创建一个每隔5秒钟执行一次的Timer
        timer = new Timer(5000, new ActionListener() {
            @Override
            public void actionPerformed(ActionEvent e) {
                ping();
            }
        });
        timer.start();
        try {
            URL imageUrl = GAView.class.getResource("/src/123.jpg");
            image = ImageIO.read(imageUrl);
        } catch (IOException e) {
            e.printStackTrace();
        }
        //等比例JLabel
//        JLabel ratioLabel = new JLabel();
//        ratioLabel.setIcon(SwingUtil.createAutoAdjustIcon(image, true));
//        ratioLabel.setBorder(new LineBorder(Color.RED));
//        ratioLabel.setAlignmentX(0.5F);
//        ratioLabel.setAlignmentY(0.5F);
        //不等比例JLabel
        JLabel filledLabel = new JLabel();
        filledLabel.setIcon(SwingUtil.createAutoAdjustIcon(image, false));
        filledLabel.setBorder(new LineBorder(Color.ORANGE));


        //常规样式JLabel
//        JLabel normalLabel = new JLabel();
//        normalLabel.setIcon(new ImageIcon(image));
//        normalLabel.setBorder(new LineBorder(Color.BLUE));
        //JPanel内容
//        panel.add(ratioLabel);
        panel.add(filledLabel);
//        panel.add(normalLabel);
        //JFrame内容
        frame.getContentPane().add(panel);
        frame.setSize(1280,720);
        filledLabel.add(button);
        filledLabel.add(button1);
        filledLabel.add(souBtnT2);
        filledLabel.add(souBtnC1);
        filledLabel.add(souBtnC2);
        filledLabel.add(souBtnC3);
        filledLabel.add(souBtnIRS);
        //JFrame属性
        frame.setDefaultCloseOperation(WindowConstants.EXIT_ON_CLOSE);
        frame.setLocationRelativeTo(null);
        frame.setVisible(true);
    }
    private static void ping(){
        try {
            // 使用InetAddress类的isReachable方法来判断IP地址是否连通
            InetAddress address = InetAddress.getByName("需要单ping的ID");
            boolean reachable = address.isReachable(5000);
            // 根据Ping结果设置按钮颜色
            if (reachable) {
                button.setBackground(Color.GREEN);
                System.out.println(reachable);
            } else {
                button.setBackground(Color.RED);
                System.out.println(reachable);
            }
        } catch (Exception e) {
            e.printStackTrace();

        }
    }


}


//
/**Swing工具类
 *
 * @author Run
 * @date  2023-05-24 */
class SwingUtil {

    /**创建一个可以自适应组件大小的ImageIcon对象
     * @param image 从<code> Image </code>对象来创建ImageIcon
     * @param constrained 是否等比例缩放 。当为<code> true </code>时,可通过
     *      {@link javax.swing.JComponent#setAlignmentX(float)}和
     *      {@link javax.swing.JComponent#setAlignmentY(float)}方法设置组件对齐方式。
     * @date  2023-05-24 */
    public static ImageIcon createAutoAdjustIcon(Image image, boolean constrained) {
        ImageIcon icon = new ImageIcon(image) {
            @Override
            public synchronized void paintIcon(java.awt.Component cmp, Graphics g, int x, int y) {
                //初始化参数
                Point startPoint = new Point(0, 0);//默认绘制起点
                Dimension cmpSize = cmp.getSize();//获取组件大小
                Dimension imgSize = new Dimension(getIconWidth(), getIconHeight());//获取图像大小

                //计算绘制起点和区域
                if(constrained) {//等比例缩放
                    //计算图像宽高比例
                    double ratio = 1.0*imgSize.width/imgSize.height;
                    //计算等比例缩放后的区域大小
                    imgSize.width = (int) Math.min(cmpSize.width, ratio*cmpSize.height);
                    imgSize.height = (int) (imgSize.width/ratio);
//                    计算绘制起点
                    startPoint.x = (int)
                            (cmp.getAlignmentX()*(cmpSize.width - imgSize.width));
                    startPoint.y = (int)
                            (cmp.getAlignmentY()*(cmpSize.height - imgSize.height));
                } else {//完全填充
                    imgSize = cmpSize;
                }

                //根据起点和区域大小进行绘制
                if(getImageObserver() == null) {
                    g.drawImage(getImage(), startPoint.x, startPoint.y,
                            imgSize.width, imgSize.height, cmp);
                } else {
                    g.drawImage(getImage(), startPoint.x, startPoint.y,
                            imgSize.width, imgSize.height, getImageObserver());
                }
            };
        };
        return icon;
    }

    /**创建一个可以自适应组件大小的Icon对象
     * @param filename 指定文件名或者路径的字符串
     * @param constrained 是否等比例缩放。当为<code> true </code>时,可通过
     *      {@link javax.swing.JComponent#setAlignmentX(float)}和
     *      {@link javax.swing.JComponent#setAlignmentY(float)}方法设置组件对齐方式。
     * @date  2023-05-24 */
    public static ImageIcon createAutoAdjustIcon(String filename, boolean constrained) {
        return createAutoAdjustIcon(new ImageIcon(filename).getImage(), constrained);
    }

    /**创建一个可以自适应组件大小的ImageIcon对象
     * @param url 从指定的<code> URL </code>对象来创建ImageIcon
     * @param constrained 是否等比例缩放 。当为<code> true </code>时,可通过
     *      {@link javax.swing.JComponent#setAlignmentX(float)}和
     *      {@link javax.swing.JComponent#setAlignmentY(float)}方法设置组件对齐方式。
     * @date  2023-05-24 */
    public static ImageIcon createAutoAdjustIcon(URL url, boolean constrained) {
        return createAutoAdjustIcon(new ImageIcon(url).getImage(), constrained);
    }

}
运行效果如最上面那张图一样,还有还几个工位的AI摄像头IP都需要Ping监控;批量pin的方式还没写,目前有些思路,用for循环和list数组循环遍历,之前在控制台上写过;
一共7个按钮,目前只实现了一个;
背景图片自适应的布局方式有三种,我用了其中一种,并将窗口写死;
如果各位有兴趣,可看下这位兄弟写的自适应方式,很全面;
作为一名运维人员,监控网络和服务器监控状态的工具有很多,北塔、zabbix、潘多拉等等;这个AI摄像头识别汽车过点用的,是公司的前两年的项目,但一直拖着得不到正确实施应用,现在要求我们自主开发个监控和AI的识别率;一步一个脚印来吧。。。。


 3678
3678


 被折叠的 条评论
为什么被折叠?
被折叠的 条评论
为什么被折叠?
 到【灌水乐园】发言


