


RedHat6 集群Fence
实验目的:
掌握集群Fence理论和配置
Fence概念:
在HA集群坏境中,备份服务器B通过心跳线来发送数据包来看服务器A是否还活着,主服务器A接收了大量的客户端访问请求,服务器A的CPU负载达到100%响应不过来了,资源已经耗尽,没有办法回复服务器B数据包(回复数据包会延迟),这时服务器B认为服务器A已经挂了,于是备份服务器B把资源夺过来,自己做主服务器,过了一段时间服务器A响应过来了,服务器A觉得自己是老大,服务器B觉得自己也是老大,他们两个就挣着抢夺资源,集群资源被多个节点占有,两个服务器同时向资源写数据,破坏了资源的安全性和一致性,这种情况的发生叫做“脑裂”。服务器A负载过重,响应不过来了,有了Fence机制,Fence会自动的把服务器A给Fence掉,阻止了“脑裂"的发生
Fence分类:
硬件Fence:电源Fence,通过关掉电源来踢掉坏的服务器
软件Fence:Fence卡(智能卡),通过线缆、软件来踢掉坏的服务器
实际坏境中,Fence卡连接的都是专线,使用专用的Fence网卡,不会占用数据传输线路,这样,更能保证稳定及可靠性。
Fence卡的IP网络和集群网络是相互依存的
实验步骤:
由于实际情况的限制,没有真实的Fence卡,所用我们用fence服务来虚拟出Fence卡
在iscsi服务器上安装fence服务,把iscsi服务器当成fence卡
安装fence卡,你只需要安装fence-virtd-libvirt.x86_64和fence-virtd-multicast.x86_64这两个软件就可以了
[root@node1 ~]# yum list | grep fence
Repository ResilientStorage is listed morethan once in the configuration
Repository ScalableFileSystem is listedmore than once in the configuration
fence-agents.x86_64 3.1.5-10.el6 @Cluster
fence-virt.x86_64 0.2.3-5.el6 @Cluster
fence-virtd.x86_64 0.2.3-5.el6 base
fence-virtd-checkpoint.x86_64 0.2.3-5.el6 Cluster
fence-virtd-libvirt.x86_64 0.2.3-5.el6 base
fence-virtd-libvirt-qpid.x86_64 0.2.3-5.el6 optional
fence-virtd-multicast.x86_64 0.2.3-5.el6 base
fence-virtd-serial.x86_64 0.2.3-5.el6 base
[root@node1 ~]# yum -y install fence-virtd-libvirt.x86_64 fence-virtd-multicast.x86_64
[root@desktop24 ~]# mkdir /etc/cluster
[root@desktop24 ~]# cd /etc/cluster
[root@desktop24 cluster]# dd if=/dev/random of=/etc/cluster/fence_xvm.key bs=4k count=1 创建fence卡的key文件,让节点服务器和Fence卡相互认识
0+1 records in
0+1 records out
73 bytes (73 B) copied, 0.000315063 s, 232kB/s
random:为随机数字生成器,生成的东西是唯一的
fence_xvm.key:Fence卡的key文件,名字别改,fence_xvm是fence卡的一种类型
把fence的key文件分发给各个节点服务器
[root@desktop24cluster]#scp/etc/cluster/fence_xvm.key 172.17.0.1:/etc/cluster/fence_xvm.key
root@172.17.0.1's password:
fence_xvm.key 100% 73 0.1KB/s 00:00
[root@desktop24 cluster]# scp /etc/cluster/fence_xvm.key 172.17.0.2:/etc/cluster/fence_xvm.key
root@172.17.0.2's password:
fence_xvm.key 100% 73 0.1KB/s 00:00
对fence服务的配置文件/etc/fence_virt.conf做配置策略:
[root@desktop24 cluster]# fence_virtd -c
Module search path[/usr/lib64/fence-virt]:
//模块搜索路径,回车使用默认的
Available backends:
libvirt 0.1
Available listeners:
multicast 1.1
Listener modules are responsible foraccepting requests
from fencing clients.
Listener module [multicast]:
//监听组播模块,回车选择默认
The multicast listener module is designedfor use environments
where the guests and hosts may communicateover a network using
multicast.
The multicast address is the address that aclient will use to
send fencing requests to fence_virtd.
Multicast IP Address[225.0.0.12]:
组播IP地址选择,回车选择默认的225.0.0.12
Using ipv4 as family.
Multicast IP Port [1229]:
//组播IP端口选择,回车选择默认的1229
Setting a preferred interface causes fence_virtdto listen only
on that interface. Normally, it listens on all interfaces.
In environments where the virtual machinesare using the host
machine as a gateway, this *must* be set(typically to virbr0).
Set to 'none' for no interface.
Interface [none]: private
//Fence卡使用那个接口来和集群网络来通讯(fence卡的专用接口和集群网络在同一网段)
The key file is the shared key informationwhich is used to
authenticate fencing requests. The contents of this file must
be distributed to each physical host andvirtual machine within
a cluster.
Key File[/etc/cluster/fence_xvm.key]:
//是否是对/etc/cluster/fence_xvm.key这个文件做策略,回车选择默认的
Backend modules are responsible for routingrequests to
the appropriate hypervisor or managementlayer.
Backend module [checkpoint]:libvirt
//模块基于那个协议,填写libvirt
The libvirt backend module is designed forsingle desktops or
servers. Do not use in environments where virtual machines
may be migrated between hosts.
Libvirt URI [qemu:///system]:
Configuration complete.
=== Begin Configuration ===
backends {
libvirt{
uri= "qemu:///system";
}
}
listeners {
multicast{
interface= "eth0";
port= "1229";
family= "ipv4";
address= "225.0.0.12";
key_file= "/etc/cluster/fence_xvm.key";
}
}
fence_virtd {
module_path= "/usr/lib64/fence-virt";
backend= "libvirt";
listener= "multicast";
}
=== End Configuration ===
Replace /etc/fence_virt.confwith the above [y/N]? y
//输入y保存配置
启动fence服务:
[root@desktop24 cluster]# /etc/init.d/fence_virtd restart
Stopping fence_virtd: [FAILED]
Starting fence_virtd: [ OK ]
[root@desktop24 cluster]# chkconfig fence_virtd on
把fence卡加入到集群:
Fence Dervices中点击add来添加fence卡(虚拟的)

打开【Select a fence device】选择【Fence virt(Multicast Mode)】,名字写这个Fence卡名字
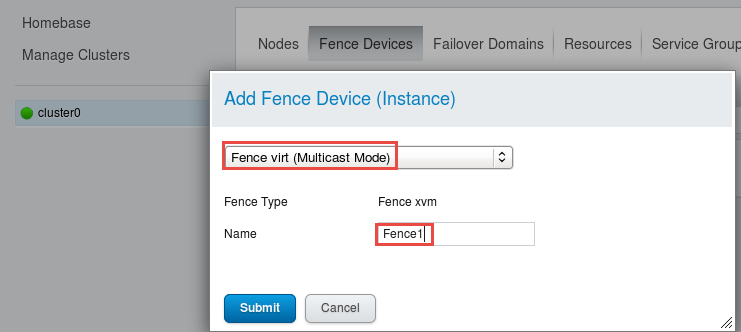
虚拟的Fence设备添加完成后,界面如下:

把Fence卡添加到各个节点中去:
添加fence卡到Node1中:
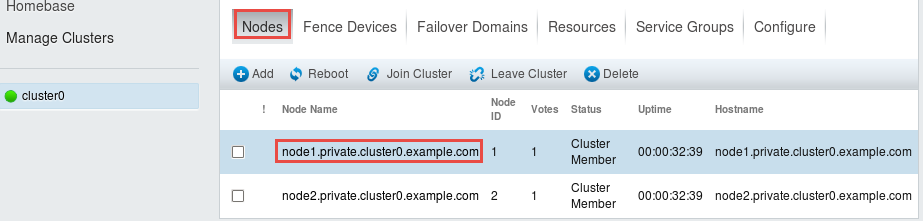
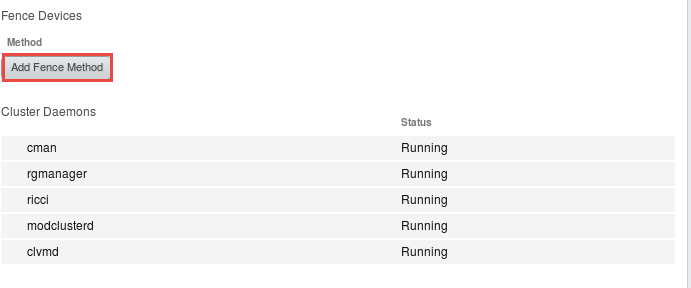
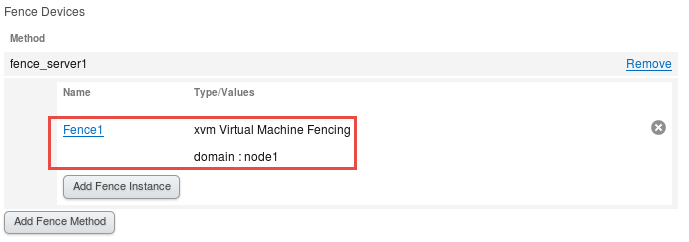
选择【Node】,然后点击Node1节点的界面,找到下图位置添加Fence
取名根据自己需要,只要能识别即可

然后点击【Add Fence Instance】,添加Fence实咧
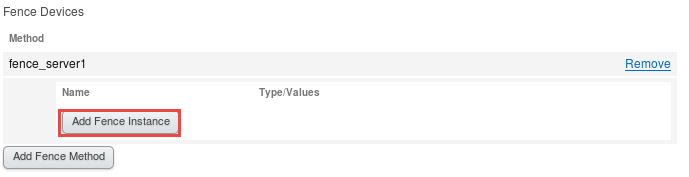
选择Fence1这个Fence卡,这里的domain指的的是node1.private.cluster0.example.com中的node1

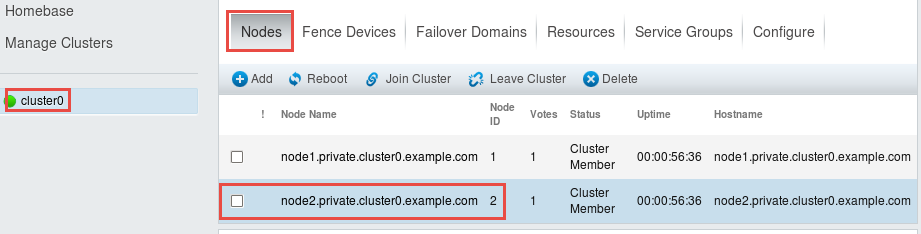
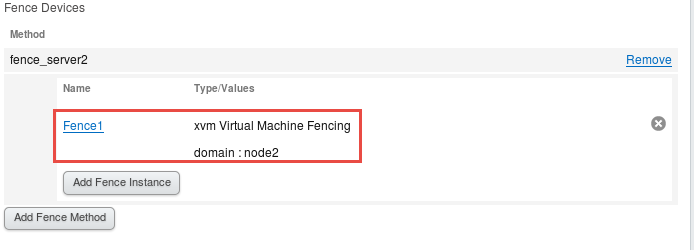
添加Fence卡到Node2中:
把界面换到节点2中
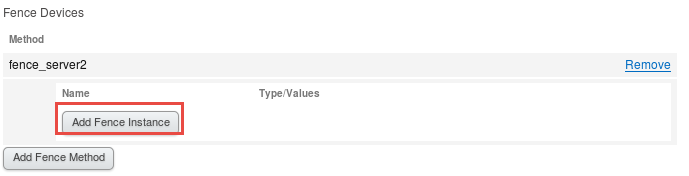
找到下图位置,点击【Add Fence Method】

给Fence Method起名字

点击【Add Fence Instance】
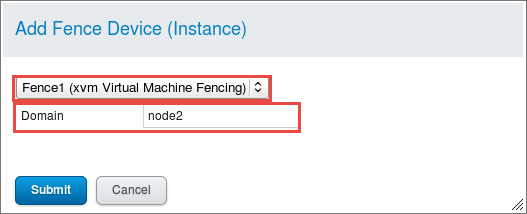
选择Fence1这个Fence卡,这里的domain指的的是node2.private.cluster0.example.com中的node2
手动fence剔除:
[root@node2 ~]# fence_node node1
fence node1 success
实验效果:node1会重启两次


 2182
2182

 被折叠的 条评论
为什么被折叠?
被折叠的 条评论
为什么被折叠?
 到【灌水乐园】发言


