


| 环境 | IP | 主机名 |
|---|---|---|
| 主数据库 | 192.168.32.128 | WJX |
| 从数据库 | 192.168.32.134 | WJX2 |
1 监控主从状态
1.1 部署agent
[root@WJX2 ~]# wget https://cdn.zabbix.com/zabbix/sources/stable/5.0/zabbix-5.0.2.tar.gz
[root@WJX2 ~]# tar xf zabbix-5.0.2.tar.gz
[root@WJX2 ~]# cd zabbix-5.0.2
[root@WJX2 zabbix-5.0.2]# ./configure --enable-agent
[root@WJX2 zabbix-5.0.2]# make install

[root@WJX2 etc]# useradd -r -M -s /sbin/nologin zabbix

[root@WJX2 zabbix-5.0.2]# cd /usr/local/etc/
[root@WJX2 etc]# vim zabbix_agentd.conf
...
Server=192.168.32.133
...
ServerActive=192.168.32.133
...
Hostname=002


[root@WJX2 ~]# zabbix_agentd
[root@WJX2 ~]# systemctl stop firewalld
[root@WJX2 ~]# systemctl disable firewalld
[root@WJX2 ~]# ss -antl
State      Recv-Q Send-Q Local Address:Port               Peer Address:Port
LISTEN     0      128            *:10050                      *:*
LISTEN     0      128            *:22                         *:*
LISTEN     0      100    127.0.0.1:25                         *:*
LISTEN     0      32            :::21                        :::*
LISTEN     0      128           :::22                        :::*
LISTEN     0      100          ::1:25                        :::*
1.2 部署 MySQL环境
配置主数据库
[root@WJX ~]# yum -y install mariadb*
[root@WJX ~]# systemctl enable --now mariadb

#在主数据库里创建一个同步账号授权给从数据库使用
[root@WJX ~]# mysql
Welcome to the MariaDB monitor.  Commands end with ; or \g.
Your MariaDB connection id is 2
Server version: 5.5.65-MariaDB MariaDB Server

Copyright (c) 2000, 2018, Oracle, MariaDB Corporation Ab and others.

Type 'help;' or '\h' for help. Type '\c' to clear the current input statement.

MariaDB [(none)]> create user 'repl'@'192.168.32.134' identified by 'repl123';
Query OK, 0 rows affected (0.00 sec)

MariaDB [(none)]> grant replication slave on *.* to 'repl'@'192.168.32.134';
Query OK, 0 rows affected (0.00 sec)

MariaDB [(none)]> flush privileges;
Query OK, 0 rows affected (0.00 sec)

MariaDB [(none)]> exit
Bye

[root@WJX ~]# vim /etc/my.cnf
log-bin = mysql_bin
server-id = 10

[root@WJX ~]# systemctl restart mariadb

#查看主库的状态
[root@WJX ~]# mysql
...
MariaDB [(none)]> show master status;
+------------------+----------+--------------+------------------+
| File             | Position | Binlog_Do_DB | Binlog_Ignore_DB |
+------------------+----------+--------------+------------------+
| mysql_bin.000001 |      245 |              |                  |
+------------------+----------+--------------+------------------+
1 row in set (0.00 sec)
配置从数据库
[root@WJX2 ~]# yum -y install mariadb*
[root@WJX2 ~]# vim /etc/my.cnf
server-id = 20
relay-log = myrelay_log
[root@WJX2 ~]# systemctl enable --now mariadb

[root@WJX2 ~]# mysql
...
MariaDB [(none)]> change master to \
    -> master_host='192.168.32.128',
    -> master_user='repl',
    -> master_password='repl123',
    -> master_log_file='mysql_bin.000001',
    -> master_log_pos=245;
Query OK, 0 rows affected (0.00 sec)

MariaDB [(none)]> start slave;
Query OK, 0 rows affected (0.00 sec)
MariaDB [(none)]> show slave status\G
*************************** 1. row ***************************
               Slave_IO_State: Waiting for master to send event
                  Master_Host: 192.168.32.128
                  Master_User: repl
                  Master_Port: 3306
                Connect_Retry: 60
              Master_Log_File: mysql_bin.000001
          Read_Master_Log_Pos: 245
               Relay_Log_File: myrelay_log.000002
                Relay_Log_Pos: 529
        Relay_Master_Log_File: mysql_bin.000001
             Slave_IO_Running: Yes
            Slave_SQL_Running: Yes
              Replicate_Do_DB:
          Replicate_Ignore_DB:
           Replicate_Do_Table:
       Replicate_Ignore_Table:
      Replicate_Wild_Do_Table:
  Replicate_Wild_Ignore_Table:
                   Last_Errno: 0
                   Last_Error:
                 Skip_Counter: 0
          Exec_Master_Log_Pos: 245
              Relay_Log_Space: 819
              Until_Condition: None
               Until_Log_File:
                Until_Log_Pos: 0
           Master_SSL_Allowed: No
           Master_SSL_CA_File:
           Master_SSL_CA_Path:
              Master_SSL_Cert:
            Master_SSL_Cipher:
               Master_SSL_Key:
        Seconds_Behind_Master: 0
Master_SSL_Verify_Server_Cert: No
                Last_IO_Errno: 0
                Last_IO_Error:
               Last_SQL_Errno: 0
               Last_SQL_Error:
  Replicate_Ignore_Server_Ids:
             Master_Server_Id: 10
1 row in set (0.00 sec)
1.3 监控mysql主从
1.3.1 编写脚本
[root@WJX2 ~]# mkdir -p /scripts/zabbix
[root@WJX2 ~]# vim /scripts/zabbix/check_replication.sh
#!/bin/bash

mysql_status=$(mysql -uroot -e 'show slave status\G' 2>/dev/null|grep 'Slave.*Running'|grep -c 'Yes')

if [ $mysql_status -ne 2 ];then
    echo '1'
else
    echo '0'
fi

[root@WJX2 ~]# vim /usr/local/etc/zabbix_agentd.conf
...
UnsafeUserParameters=1
...
UserParameter=check_replication,/bin/bash /scripts/zabbix/check_replication.sh
...

[root@WJX2 ~]# pkill zabbix
[root@WJX2 ~]# zabbix_agentd
1.3.2 添加主机加入主机组
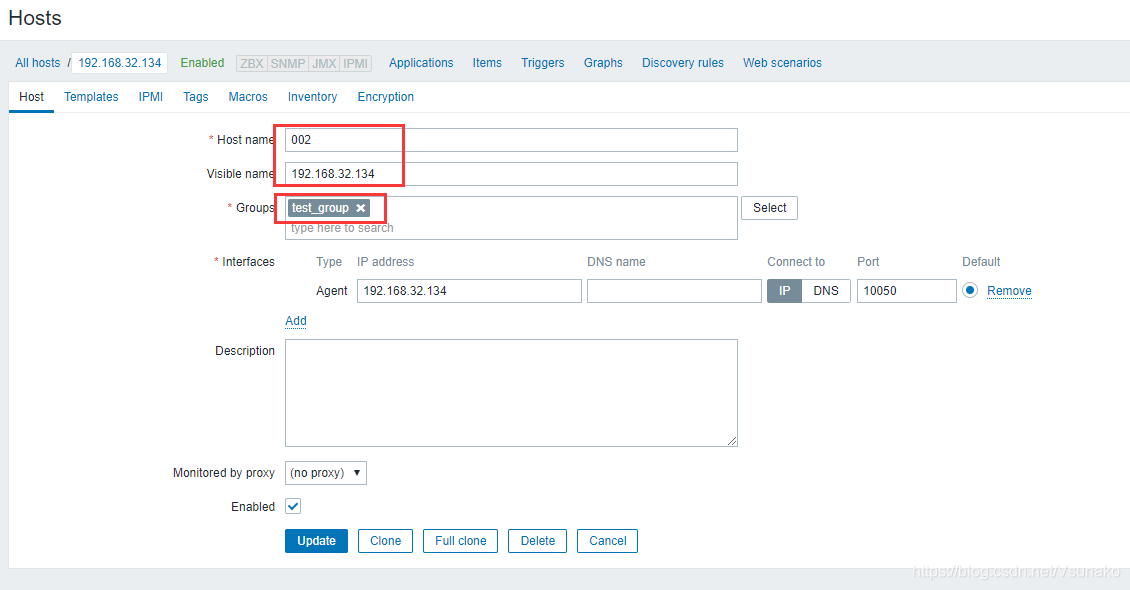
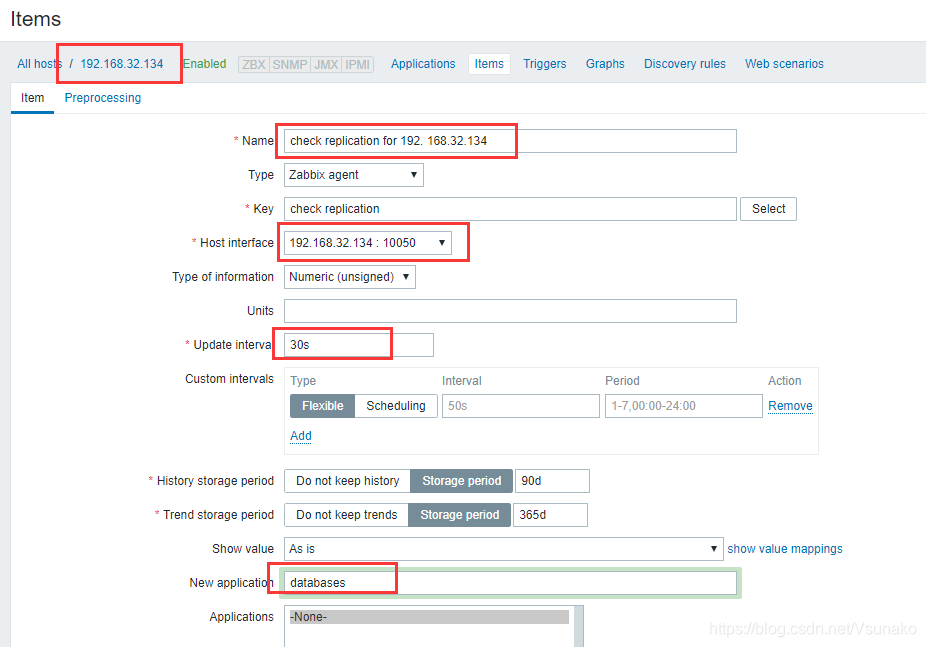
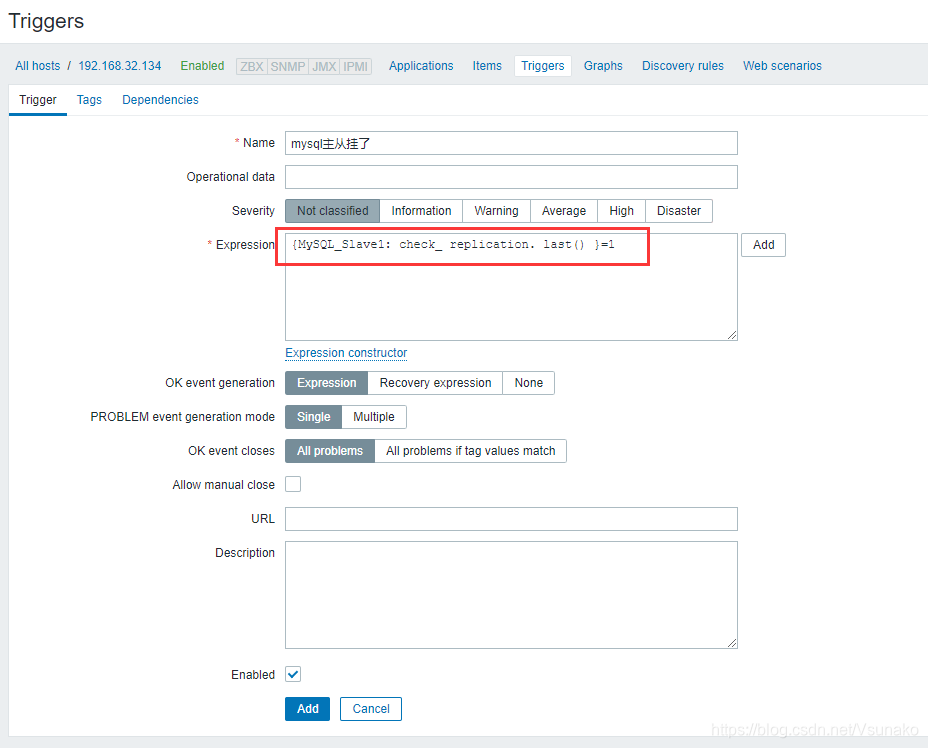
1.3.3 创建监控项及触发器
1.4 触发
[root@WJX2 ~ ]# systemctl stop mariadb

2 监控主从延迟
2.1 配置脚本
[root@WJX2 ~]# vim /scripts/zabbix/delay_replication.sh
#!/bin/bash

delay_value=$(mysql -uroot -e 'show slave status\G' 2>/dev/null|grep 'Seconds_Behind_Master'|awk -F'[: ]+' '{print $3}')
echo $delay_value

[root@WJX2 ~]# vim /usr/local/etc/zabbix_agentd.conf
...
UserParameter=delay_replication,/bin/bash /scripts/zabbix/delay_replication.sh
...

[root@WJX2 ~]# pkill zabbix
[root@WJX2 ~]# zabbix_agentd
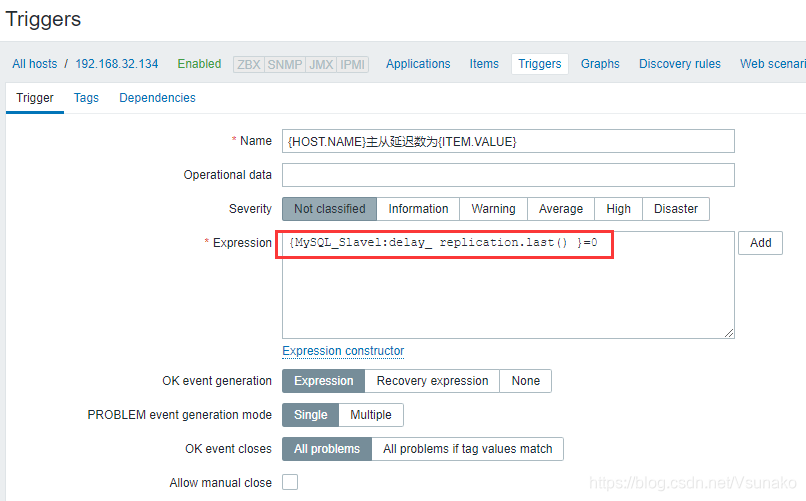
2.2 添加监控和触发器

2.3 触发验证


 1664
1664


 被折叠的 条评论
为什么被折叠?
被折叠的 条评论
为什么被折叠?
 到【灌水乐园】发言


