


一,概述
private final Channel parent; //父类channel(如传输通道的父通道就是 acceptor通道)
private final ChannelId id;  //全局唯一id
private final Unsafe unsafe;     //联系nio channel
private final DefaultChannelPipeline pipeline;  //一条通道有一条流水线
private final VoidChannelPromise unsafeVoidPromise = new VoidChannelPromise(this, false);
private final CloseFuture closeFuture = new CloseFuture(this); //关闭回调

private volatile SocketAddress localAddress; //本地地址
private volatile SocketAddress remoteAddress; //远程连接地址
private volatile EventLoop eventLoop;  //当前channel注册的readtor反应器
private volatile boolean registered; //是否注册
再看其子类AbstractNioChannel的字段
private final SelectableChannel ch; //实现了nio channel,保存子类创建的nio channel
protected final int readInterestOp; //代表jdk selectionKey的op_read
volatile SelectionKey selectionKey; //channel注册到selector返回的key
boolean readPending;
// 表示连接操作结果
private ChannelPromise connectPromise;
private ScheduledFuture<?> connectTimeoutFuture;
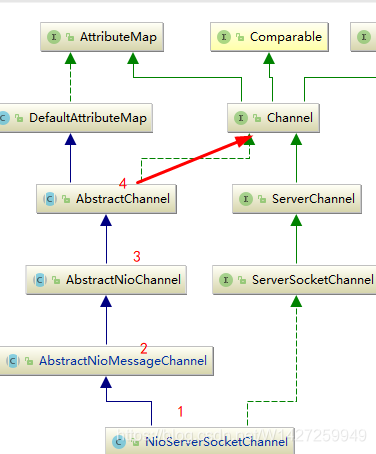
private SocketAddress requestedRemoteAddress;后面的两个子类:AbstractNioMessageChannel,NioServerSocketChannel,就没有什么字段了。因为客户端的NioSocketChannel就是从第三层开始分化的,也就是说,前面两层抽象类是共有的!

二,源码分析
1.初始化过程
回到上一节bootStrap,它的启动,主要是通过b.bind()方法进入,调用init()方法,将我们通过b.channel(NioServerSocketChannel.class)通过channelFactory反射实例化。具体源码,可以看我上一节的博文。
它调用的是NioServerSocketChannel的无参构造方法进行实例化,所以我们的入口也就在无参构造方法
public NioServerSocketChannel() {
    this(newSocket(DEFAULT_SELECTOR_PROVIDER)); //【入】
}
对于NioServerSocketChannel存在三个构造方法,前两个区别就是有没有参数provider,最后都会流入第三个构造方法,我们这里先看如何newSocket的
//deaault_selector_provider
private static final SelectorProvider DEFAULT_SELECTOR_PROVIDER = SelectorProvider.provider();
//newSocket 创建nio 的serverSocketChannelImpl
private static ServerSocketChannel newSocket(SelectorProvider provider) {
    try {
        return provider.openServerSocketChannel(); //创建,返回ServerSocketChannelImpl
    ...
}
得到的结果,作为参数传入第三个构造方法,重点就是super上面三个父类的,而config是NioServerSocketChannel的内部类,相当于Pojo,保存了重要字段,便于暴露自己的配置。
public NioServerSocketChannel(ServerSocketChannel channel) {
    super(null, channel, SelectionKey.OP_ACCEPT);   //父类初始化,一长串
    config = new NioServerSocketChannelConfig(this, javaChannel().socket());  //封装自己,便于暴露 (内部类)
}
我们跟着super()走,注意这里传入了nio的channel,和accept事件。来到第三层,简单,直接调用第二层的构造方法
protected AbstractNioMessageChannel(Channel parent, SelectableChannel ch, int readInterestOp) {
    super(parent, ch, readInterestOp);
}
来到第二层,这里是server,client公用层了,AbstractNioChannel
protected AbstractNioChannel(Channel parent, SelectableChannel ch, int readInterestOp) {
    super(parent);
    this.ch = ch;  //保存 nio channel
    this.readInterestOp = readInterestOp; //保存注册事件
    try {
        ch.configureBlocking(false);  //阻塞配置 非阻塞
   ...
}
来到顶层AbstractChannel,注意,传入的参数为Null,因为这里是第一个channel,用来接收连接事件的
protected AbstractChannel(Channel parent) {
    this.parent = parent;
    id = newId();   //创建全局唯一id
    unsafe = newUnsafe();  //实例化unsafe
    pipeline = newChannelPipeline(); //实例化pipline
}
对于newId()就不叙述了,newUnsafe()是由第三层子类实现的,对于pipline初始化也比较简单,直接new一个默认的
protected AbstractNioUnsafe newUnsafe() {
    return new NioMessageUnsafe();  //注意该类 是第三层的内部类,继承了AbstractNioUnsafe
}
protected DefaultChannelPipeline newChannelPipeline() {
    return new DefaultChannelPipeline(this);       //具体的内容,下一节再分析
}
时序图:

初始化完成。
2.调用过程
bootStrap.bind()过程中调用doBind()方法,里面第一个方法InitAndRegister(),调用了
ChannelFuture regFuture = config().group().register(channel); //注册channel跟着该代码,深入,找到了Group父类中的register()方法,位于SingleThreadEventLoop
public ChannelFuture register(final ChannelPromise promise) {
    ObjectUtil.checkNotNull(promise, "promise");
    //【入】 AbstractChannel
    promise.channel().unsafe().register(this, promise);  //调用channel内部的safe 进行register,自然就跳转道了channel
    return promise;
}
所以,这里跳转到了AbstractChannel内部类AbstractUnsafe类,register0()方法中
private void register0(ChannelPromise promise) {
    try {
        boolean firstRegistration = neverRegistered;
        doRegister(); //由第二层子类 实现
回到了我们的channel,调用AbstractNioChannel重写的doRegister()方法
protected void doRegister() throws Exception {
    boolean selected = false;
    for (;;) {
        try {
            selectionKey = javaChannel().register(eventLoop().unwrappedSelector(), 0, this);  //把自己注册到selector中
            return;
        } catch (CancelledKeyException e) {
          ...
}
进入register(),来到AbstractSelectableChannel类中,这里就是Nio的内容了,
public final SelectionKey register(Selector sel, int ops, Object att){
    synchronized (regLock) {
...检测
        if (k != null) {
            k.interestOps(ops);
            k.attach(att);
        }
        if (k == null) {
            // New registration  //注册
            synchronized (keyLock) {
                if (!isOpen())
                    throw new ClosedChannelException();
                k = ((AbstractSelector)sel).register(this, ops, att); //【入】
                addKey(k);
            }
        }
        return k;
    }
}
nio,selectorImpl中注册,返回SelectionKey
protected final SelectionKey register(AbstractSelectableChannel var1, int var2, Object var3) {
...
        SelectionKeyImpl var4 = new SelectionKeyImpl((SelChImpl)var1, this);
        var4.attach(var3);
        Set var5 = this.publicKeys;
        synchronized(this.publicKeys) {
            this.implRegister(var4);
        }
        var4.interestOps(var2);
        return var4;
    }
}
到现在,我们就把nio的channel注册到了EventLoop的selector中,
现在回到AbstractUnsafe.register0()的后半部分代码,前半部分就是doRegister()的调用,现在注册成功,
pipeline.invokeHandlerAddedIfNeeded();  //

safeSetSuccess(promise);
//向管道发送 注册事件
pipeline.fireChannelRegistered();
// Only fire a channelActive if the channel has never been registered. This prevents firing
// multiple channel actives if the channel is deregistered and re-registered.
if (isActive()) { //如果管道可用
    if (firstRegistration) { //向管道发送channel可用事件
        pipeline.fireChannelActive();
    } else if (config().isAutoRead()) {
        // This channel was registered before and autoRead() is set. This means we need to begin read
        // again so that we process inbound data.
        //
        // See https://github.com/netty/netty/issues/4805
        beginRead();
    }
}
register0()方法,后半部分,主要就是调用pipline的管理方法,这里我们在channelPipline章节再叙述。
回到AbstractBootStrap,我们注册完毕之后,回调用doBind0()方法
final ChannelFuture regFuture = initAndRegister(); //第一步,【入】
final Channel channel = regFuture.channel();
...
if (regFuture.isDone()) {//进了
    // At this point we know that the registration was complete and successful.
    ChannelPromise promise = channel.newPromise();
    doBind0(regFuture, channel, localAddress, promise);  //【入】
    return promise;
进入doBind0()
private static void doBind0(
       .....
    channel.eventLoop().execute(new Runnable() {
        @Override
        public void run() {
            if (regFuture.isSuccess()) { //调用AbstractChannel方法
                channel.bind(localAddress, promise).addListener(ChannelFutureListener.CLOSE_ON_FAILURE);
            } else {
                promise.setFailure(regFuture.cause());
            }
        }
    });
}
在AbstractChannel.bind()方法中,又调用pipline.bind()方法,这里就不追加了
public ChannelFuture bind(SocketAddress localAddress, ChannelPromise promise) {
    return pipeline.bind(localAddress, promise);
}
现在,channel正式注册完毕,可以进行事件处理了!
3.事件处理
read()事件,我们的AbstractChannel把read委托给了pipline,
public Channel read() {
    pipeline.read();
    return this;
}
然后你一顿追踪,回发现pipline把read()委托给了unsafe实现的
直接来到第三层类AbstractNioMessageChannel的内部类NioMessageUnsafe.read()方法
public void read() {
    assert eventLoop().inEventLoop();
    final ChannelConfig config = config();
    //获取channel对应的channelPipline
    final ChannelPipeline pipeline = pipeline();
    final RecvByteBufAllocator.Handle allocHandle = unsafe().recvBufAllocHandle();
    allocHandle.reset(config);

    boolean closed = false;
    Throwable exception = null;
    try {
        try {
            do { //将数据读到readBuf中,返回读取到的字节数
                int localRead = doReadMessages(readBuf);  //【读取】将数据放入ByteBuf
                if (localRead == 0) {
                    break;
                }
                if (localRead < 0) {
                    closed = true;
                    break;
                }

                allocHandle.incMessagesRead(localRead);
            } while (allocHandle.continueReading());
        } catch (Throwable t) {
            exception = t;
        }
        //获取读到的ByteBuf数量,并通过循环将这些ByteBuf传递给ChannelInboundHandler
        int size = readBuf.size();
        for (int i = 0; i < size; i ++) {
            readPending = false;
            pipeline.fireChannelRead(readBuf.get(i));
        } //清除读取到的ByteBuf,
        readBuf.clear();
        allocHandle.readComplete();
        pipeline.fireChannelReadComplete();
...close
    } finally { //再次检测这个事件有没有从事件集中移除
        if (!readPending && !config.isAutoRead()) {
            removeReadOp();
        }
    }
}
具体操作
protected int doReadMessages(List<Object> buf) throws Exception {
    SocketChannel ch = SocketUtils.accept(javaChannel());
    try {
        if (ch != null) {
            buf.add(new NioSocketChannel(this, ch));
            return 1;
        }
    } catch (Throwable t) {
       ...
}
}
这里是把客户端封装成了NioSocketChannel,交给pipline进行处理。
参考:https://www.cnblogs.com/jtlgb/p/10494731.html (前部分详细)
https://www.jianshu.com/p/a1f4f5494a52 (bind()部分详细)


 443
443

 被折叠的 条评论
为什么被折叠?
被折叠的 条评论
为什么被折叠?
 到【灌水乐园】发言


