


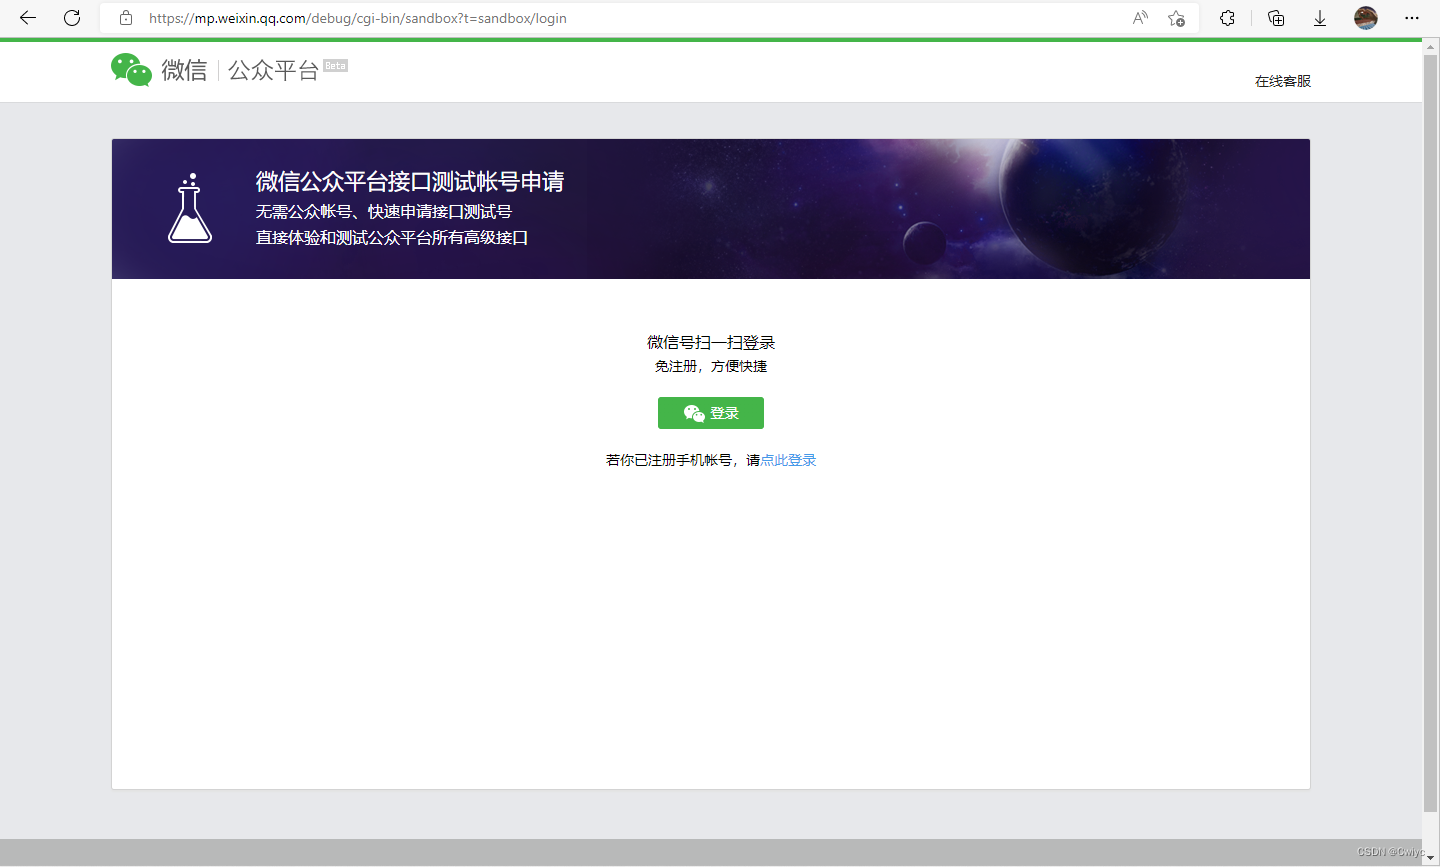
一、申请微信公众号测试号
https://mp.weixin.qq.com/debug/cgi-bin/sandboxinfo?action=showinfo&t=sandbox/index
微信扫码登录:
二、让目标扫码关注公众号

三、新增模板
这一步可以自由发挥,这里我只弄了一个天气的api,其他的api网上都有。。。
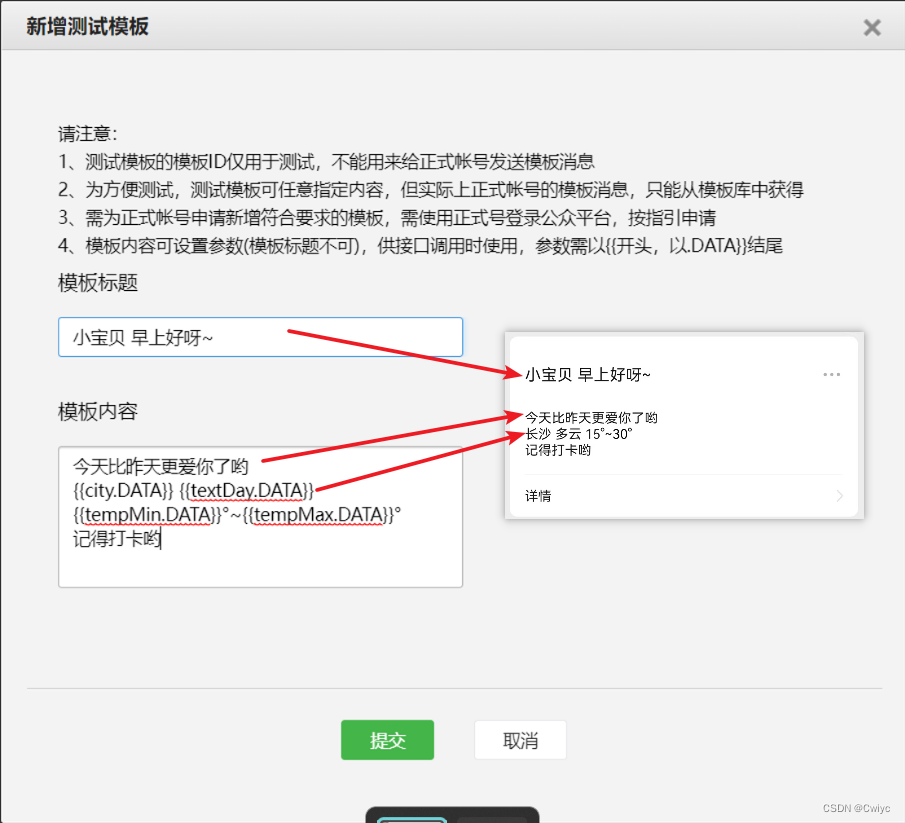
这个是我的模板
Hi早上好
{{city.DATA}} {{textDay.DATA}}
{{tempMin.DATA}}°~{{tempMax.DATA}}°
记得打卡
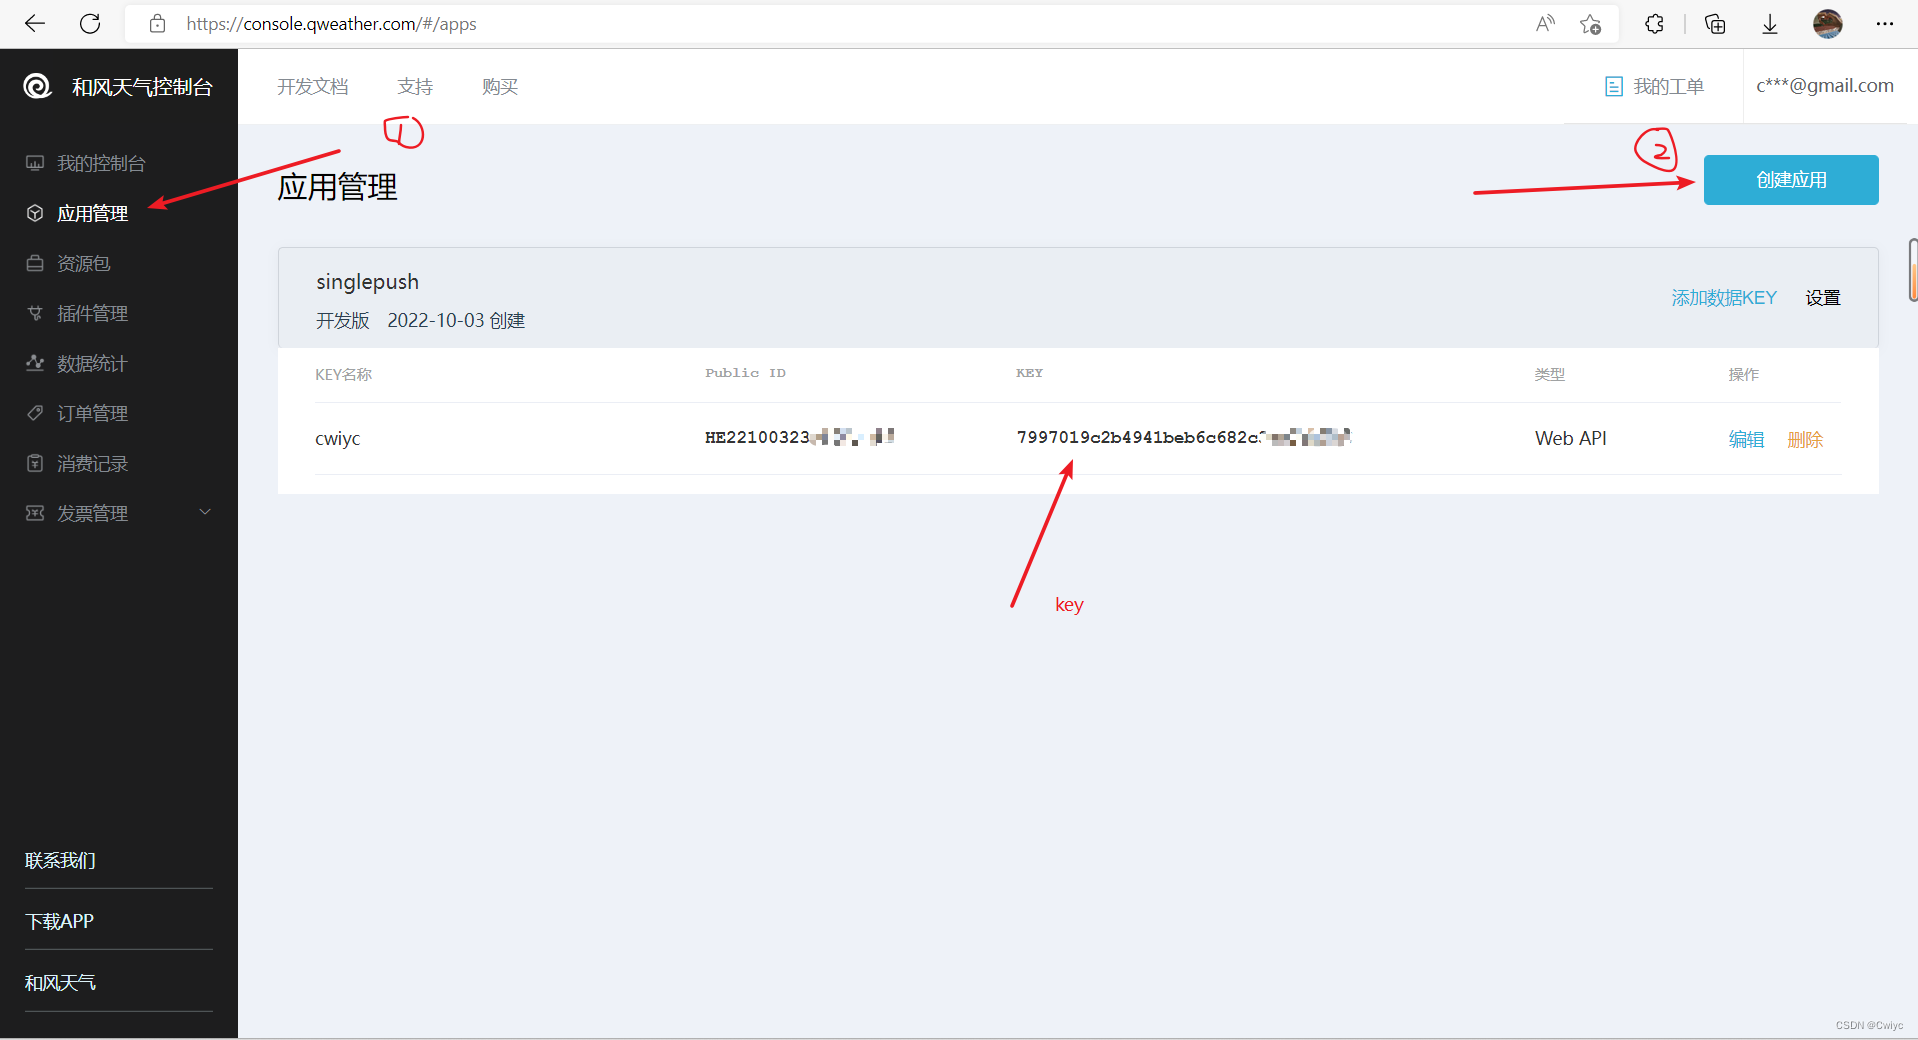
想要获得天气信息,需要调用天气的接口
这里推荐 和风天气
- 注册登录
- 应用管理->创建应用->得到key
- 城市代码查询
https://github.com/qwd/LocationList/blob/master/China-City-List-latest.csv,可以按住Ctrl+F查找 - 开发版的天气api为
https://devapi.qweather.com/v7/weather/3d?location=这里填城市代码&key=刚刚得到的key,下面给一个长沙天心区的例子
https://devapi.qweather.com/v7/weather/3d?location=101250108&key=7997019c2b4941beb6c682c3ca
四、使用leancloud部署云函数
- 进入leancloud官网注册登录
- 控制台->创建应用
- 进入该应用->云函数->部署
1.简单版(在线部署)
可实现所有功能,非常简单
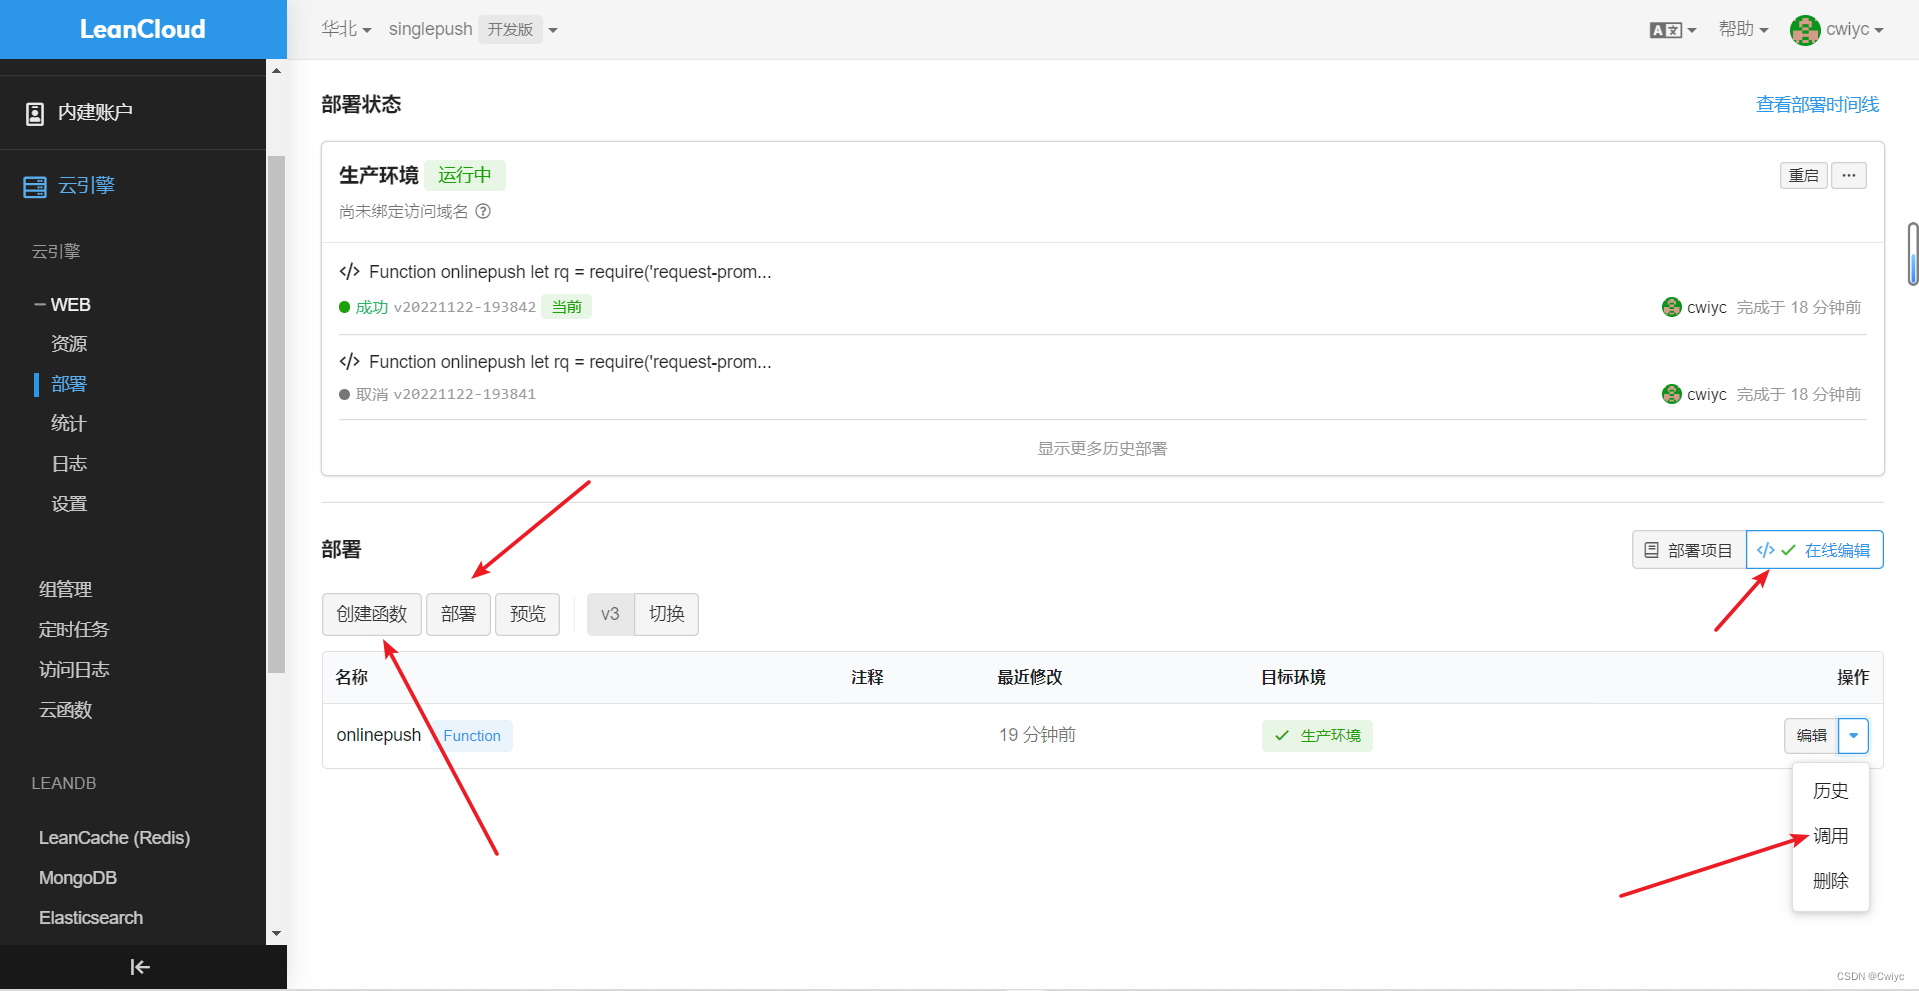
4.在线编辑->创建函数
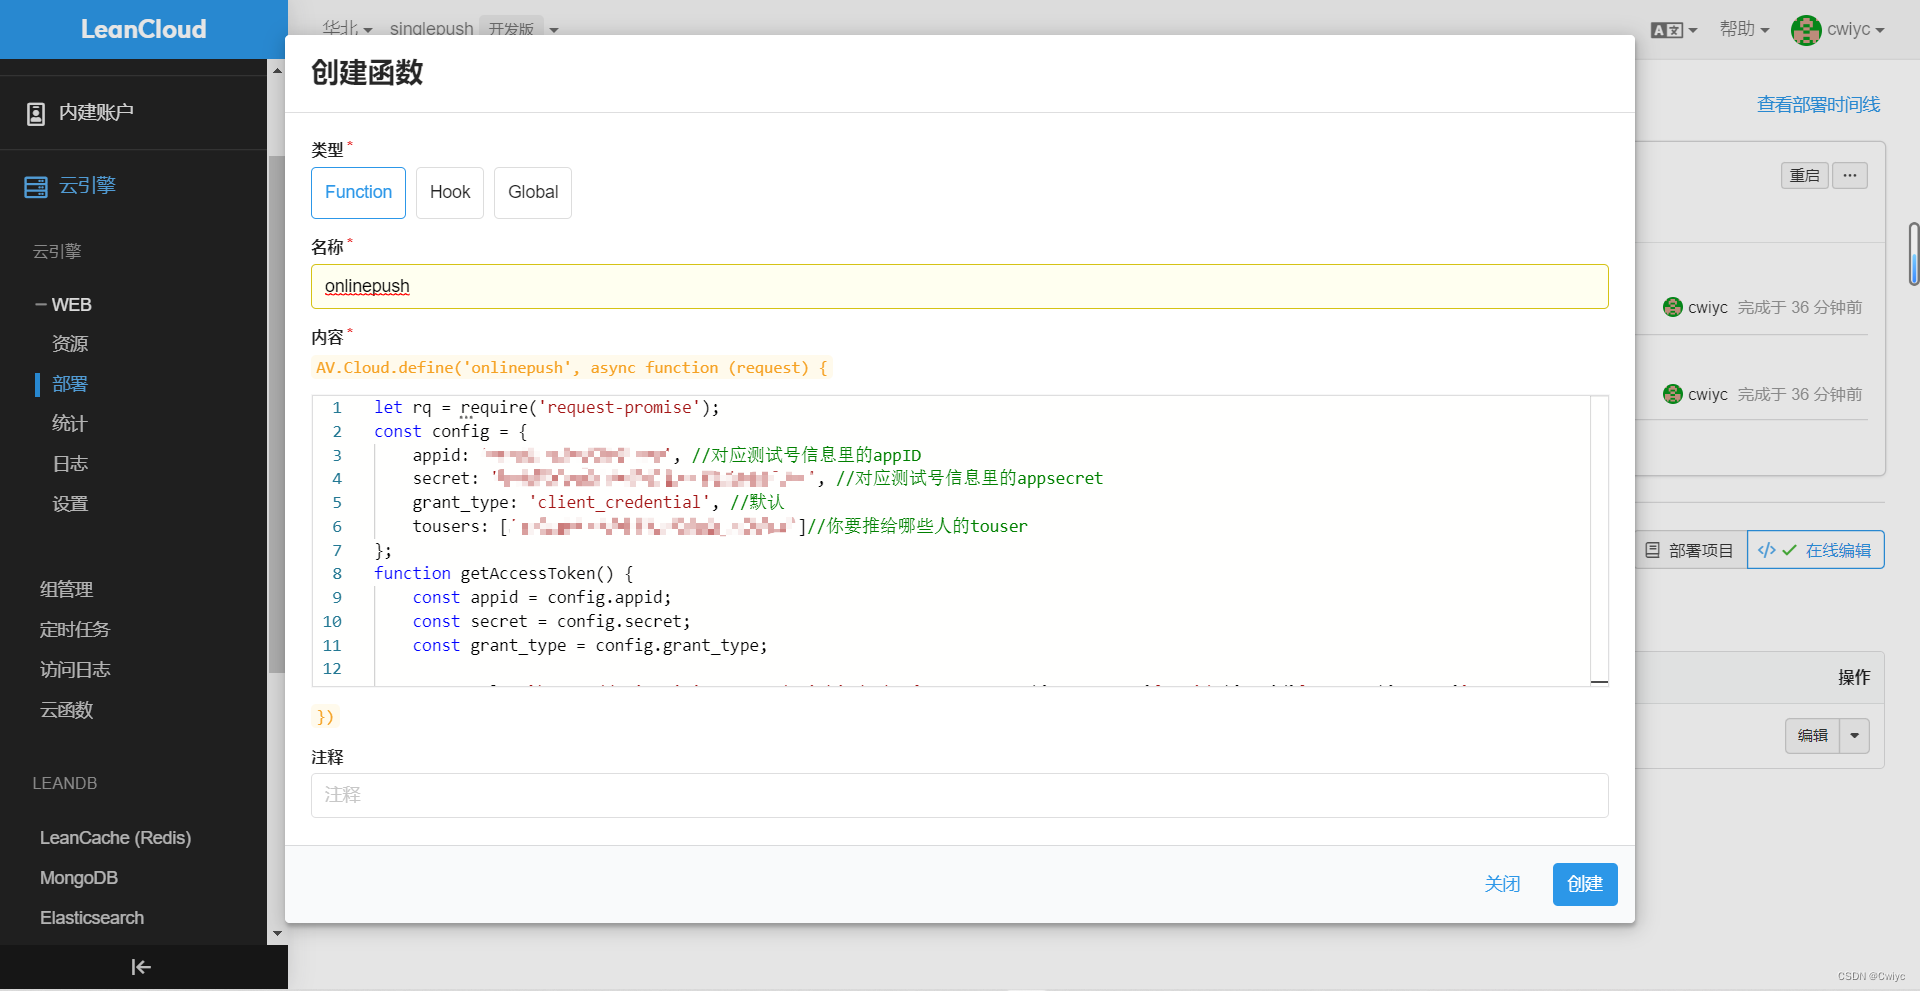
点击创建函数会出来如上图框框,随便取个名称,然后将以下内容粘上去
注意,标有****************的都是自己要改的
let rq = require('request-promise');
const config = {
    appid: '****************', //对应测试号信息里的appID
    secret: '****************', //对应测试号信息里的appsecret
    grant_type: 'client_credential', //默认
   tousers: ['****************', '****************']//你要推给哪些人的touser,有几个填几个
};
function getAccessToken() {
    const appid = config.appid;
    const secret = config.secret;
    const grant_type = config.grant_type;

    const url = `https://api.weixin.qq.com/cgi-bin/token?grant_type=${grant_type}&appid=${appid}&secret=${secret}`;
    rq(url).then(res => {
        getWeather(JSON.parse(res).access_token)
    }).catch(err => {
        console.log('获取access_token失败,请检查appid和secret', err)
    })
}

function getWeather(access_token) {
    let options = {
    	//刚刚和风天气的api
        uri: 'https://devapi.qweather.com/v7/weather/3d?location=********&key=***********************',
        gzip: true
    }
    rq(options).then(
        (res) => {
        	//获取access_token成功后调用发送模板消息的方法
            sendTemplateMsg(access_token, JSON.parse(res).daily[0]);
        }).catch(err => {
            console.log('获取天气api失败', err)
        })
}

function sendTemplateMsg(access_token, res) {
    const url = `https://api.weixin.qq.com/cgi-bin/message/template/send?access_token=${access_token}`; //发送模板消息的接口
    const requestData = { //发送模板消息的数据
      	touser: '',//扫过码的人,这里不用填
      	template_id: '************************',//消息的模板id
      	url: 'http://weixin.qq.com/download',
      	topcolor:'#1ce9e7',//标题颜色
      	//!!!!!!!!!!!!!!
      	//请注意!模板上面的··.DATA对应的就是下面的值,
      	//!!!!!!!!!!!!!!
        data: {
            city: {
                value: '长沙',
                color: '#91d1f4'
            },
            textDay: {
                value: res.textDay,
                color: '#47ed52'
            },
            tempMin: {
                value: res.tempMin,
                color: '#2ed2ea'
            },
            tempMax: {
                value: res.tempMax,
                color: '#e02d16'
            }
        }
    };
    config.tousers.forEach(item => {
        requestData.touser = item
        let options = {
            method: 'POST',
            uri: url,
            body:JSON.stringify(requestData)
        };
        rq(options).then(res => {
            console.log('模板消息推送成功',res)
        }).catch(err => {
            console.log('模板消息推送失败', err)
        })
    })
}
await getAccessToken()
return "推送成功,如果没收到推送请打开日志查看问题"
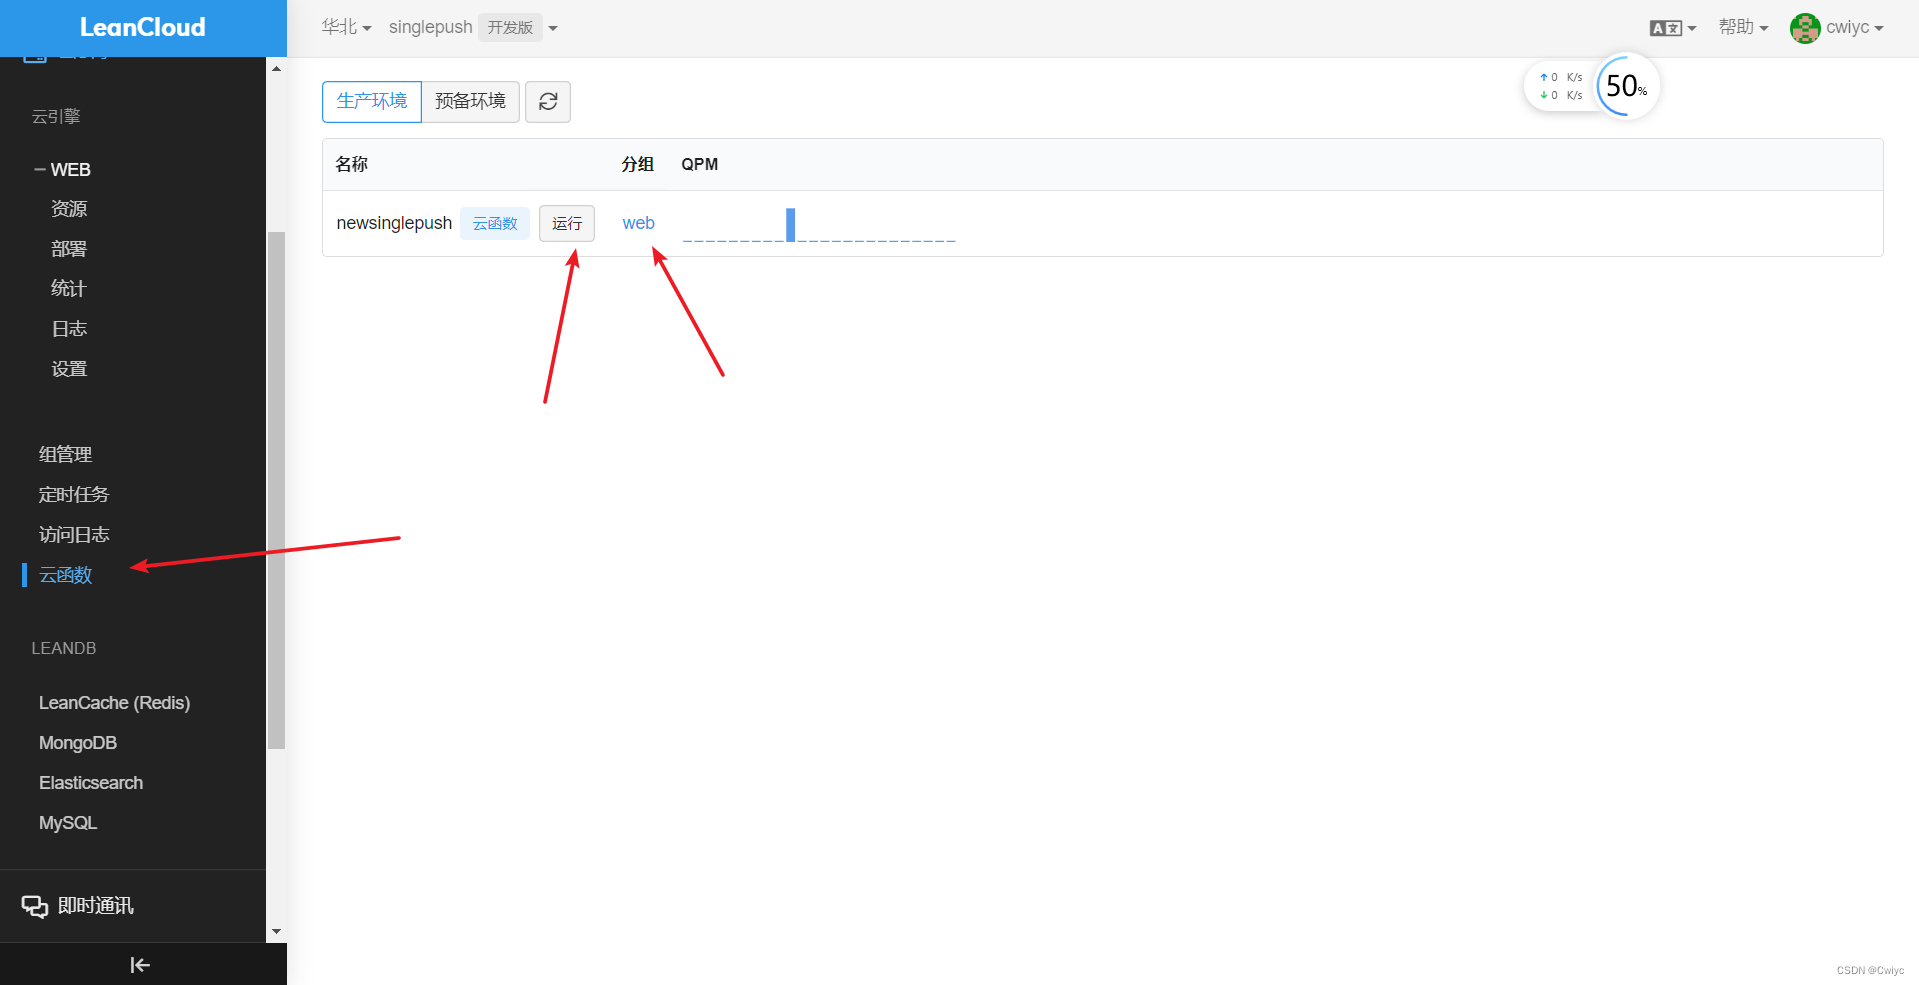
5.创建->部署->调用
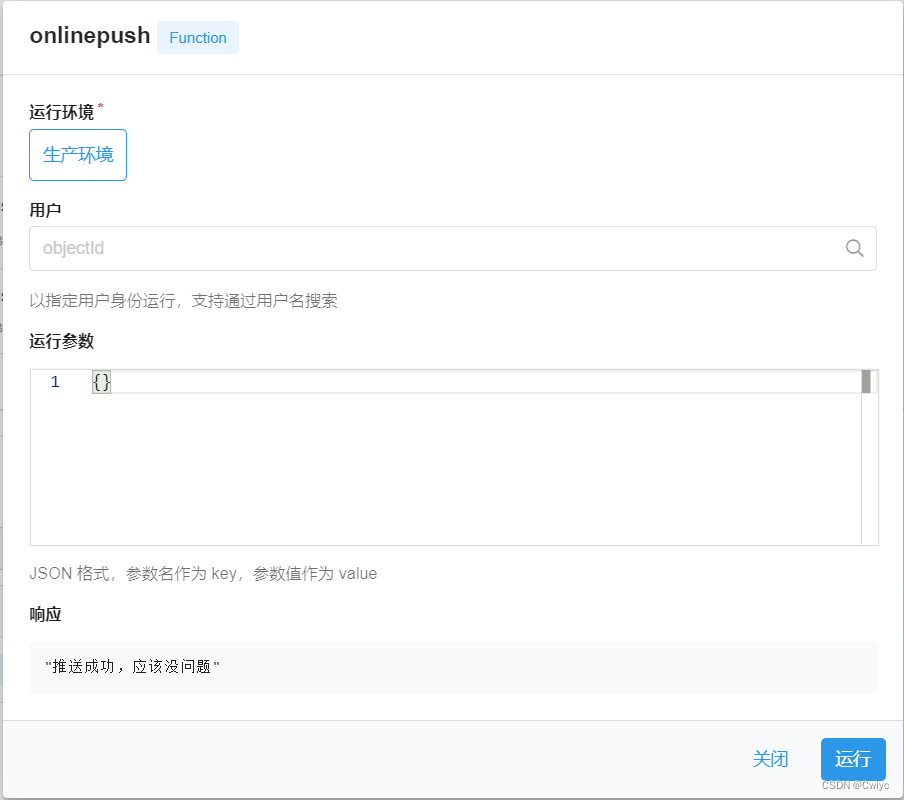
可以点击运行看微信是否能接收得到推送,如果可以则进行下一步,不可以的话就是出问题了,可以上网搜搜解决,也可以来问我…
2.复杂版(本地部署)
之前对leancloud不够了解,所以采用的这个方法,后来发现在线部署内置了request-promise包,所以最好用上面那个简单方法!
!!!前提是得有node环境!!!

4. 安装与登录命令行工具选择对应版本,现在一般电脑都是64位的选这个,下载完成点击安装就可以了。
5. 随便在哪创建一个文件夹作为项目的目录,在该目录下终端输入
//先登录
lean login --region cn-n1
//创建新项目
lean new 项目名称  		//比如lean new singlepush
//选择nodejs express

- 你就会得到一个
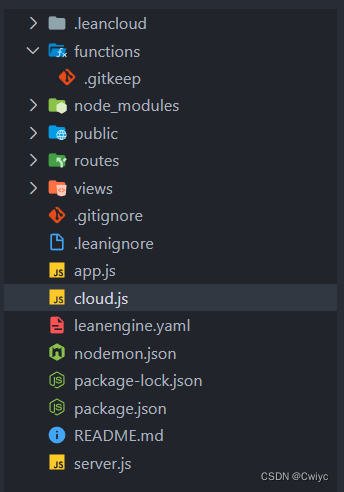
- 将cloud.js里的内容替换成如下
注意,标有*****的都是自己要改的
const AV = require('leanengine')
const fs = require('fs')
const path = require('path')
const axios = require('axios')

const config = {
  appid: '***********', //对应测试号信息里的appID
  secret: '****************', //对应测试号信息里的appsecret
  grant_type: 'client_credential', //默认
  tousers:['****************','****************']//你要推给哪些人的touser,有几个填几个
};

/**
 * Loads all cloud functions under the `functions` directory.
 */
fs.readdirSync(path.join(__dirname, 'functions')).forEach(file => {
  require(path.join(__dirname, 'functions', file))
})

/**
 * A simple cloud function.
 */
AV.Cloud.define('singlepush', function () {
  (function getAccessToken() {
    const appid = config.appid;
    const secret = config.secret;
    const grant_type = config.grant_type;

    const url = `https://api.weixin.qq.com/cgi-bin/token?grant_type=${grant_type}&appid=${appid}&secret=${secret}`;

    axios.get(url).then(res => {
      if (res.status === 200) {
        getWeather(res.data.access_token)
      } else {
        throw '获取access_token失败,请检查appid和secret'
      }
    }).catch(err => {
      console.log(err)
    })
  })()
	return "推送成功,应该没问题"
  function getWeather(access_token) {
  	//刚刚和风天气的api
    axios.get('https://devapi.qweather.com/v7/weather/3d?location=********&key=***********************').then((res, res2) => {
      sendTemplateMsg(access_token, res.data.daily[0]); //获取access_token成功后调用发送模板消息的方法
    })
  }

  function sendTemplateMsg(access_token, res) {
    const url = `https://api.weixin.qq.com/cgi-bin/message/template/send?access_token=${access_token}`; //发送模板消息的接口
    const requestData = { //发送模板消息的数据
      touser: '',//扫过码的人,这里不用填
      template_id: '************',//消息的模板id
      url: 'http://weixin.qq.com/download',
      topcolor:'#1ce9e7',//标题颜色
      //!!!!!!!!!!!!!!
      //请注意!模板上面的··.DATA对应的就是下面的值,
      //!!!!!!!!!!!!!!
      data: {
        city: {
          value: '长沙',
          color: 'ea2eb7' //设置字体颜色
        },
        textDay: {//晴/多云
          value: res.textDay,
          color: '#91d1f4'
        },
        tempMin: {//最低温
          value: res.tempMin,
          color: '#2ed2ea'
        },
        tempMax: {//最高温
          value: res.tempMax,
          color: '#e02d16'
        }
      }
    };
    config.tousers.forEach(item => {
      requestData.touser = item
      axios.post(url, requestData).then(res => {
        if (res.status === 200) {
          console.log('模板消息推送成功');
        } else {
          throw '模板消息推送失败'
        }
      }).catch(err => {
        console.log(err)
      })
    })
  }
})
- 在项目根目录下终端中输入
npm install
npm install axios@^0.27.2
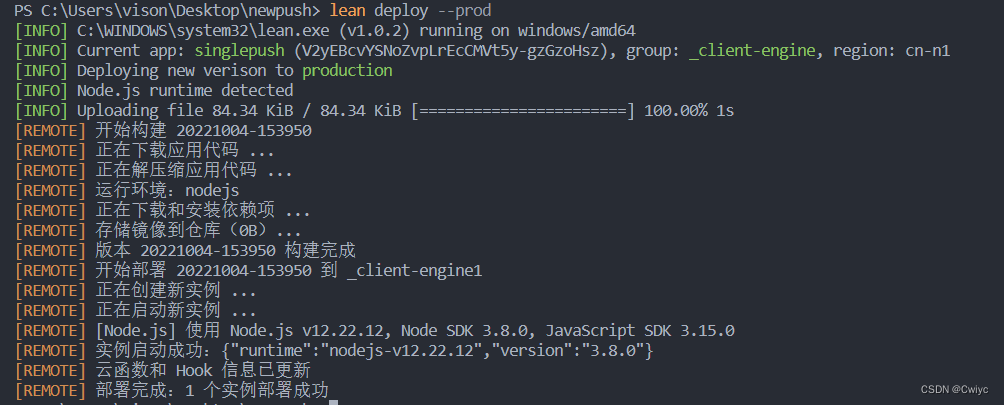
- 开始部署
lean deploy --prod
- 下面是部署成功
- 成功之后应该会有
可以点击运行看微信是否能接收得到推送,如果可以则进行下一步,不可以的话就是出问题了,可以上网搜搜解决,也可以来问我…
五、创建定时任务
创建定时任务,这样可以每天可以定时推送
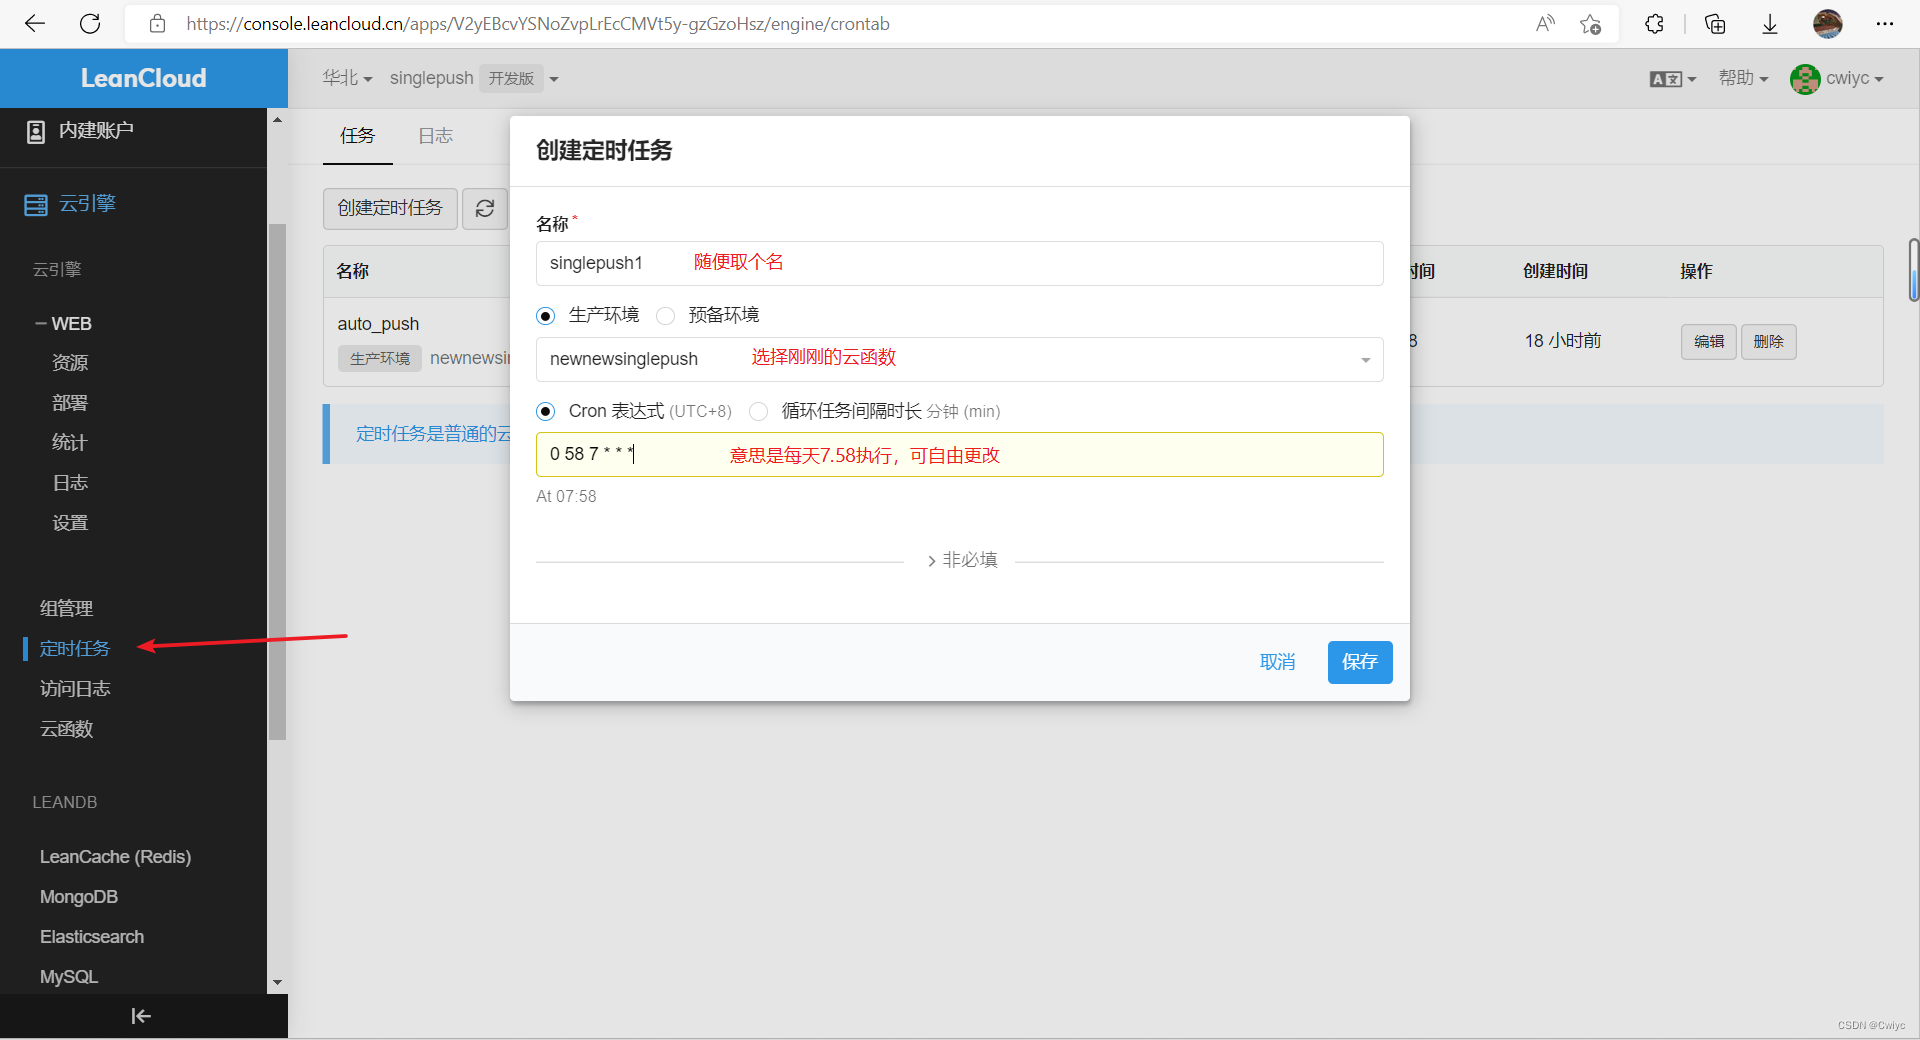
可以先弄一个和现在时间相近的测试一下,没问题就弄正式的
至此,大功告成


 1210
1210

 被折叠的 条评论
为什么被折叠?
被折叠的 条评论
为什么被折叠?
 到【灌水乐园】发言


