


连续截取PC上特定窗口的图像并通过网络发送到另一台显示器,该显示器接收并显示。
转发: RP2040-ETH-DVI-ZERO: AnyView ( HDMI Mode )
项目介绍

我基于RP2040-ETH-DVI-ZERO开发了一个新的应用程序AnyView,这个应用程序可以通过网络将PC屏幕图像传输到另一台显示器上并显示。
这个应用程序包含两部分:
第一部分是运行在PC上的Python程序,它创建一个半透明窗口,用鼠标长按窗口可以改变窗口的位置,启动后不断对窗口进行截图,并通过网络将截图发送到RP2040-ETH-DVI-ZERO;
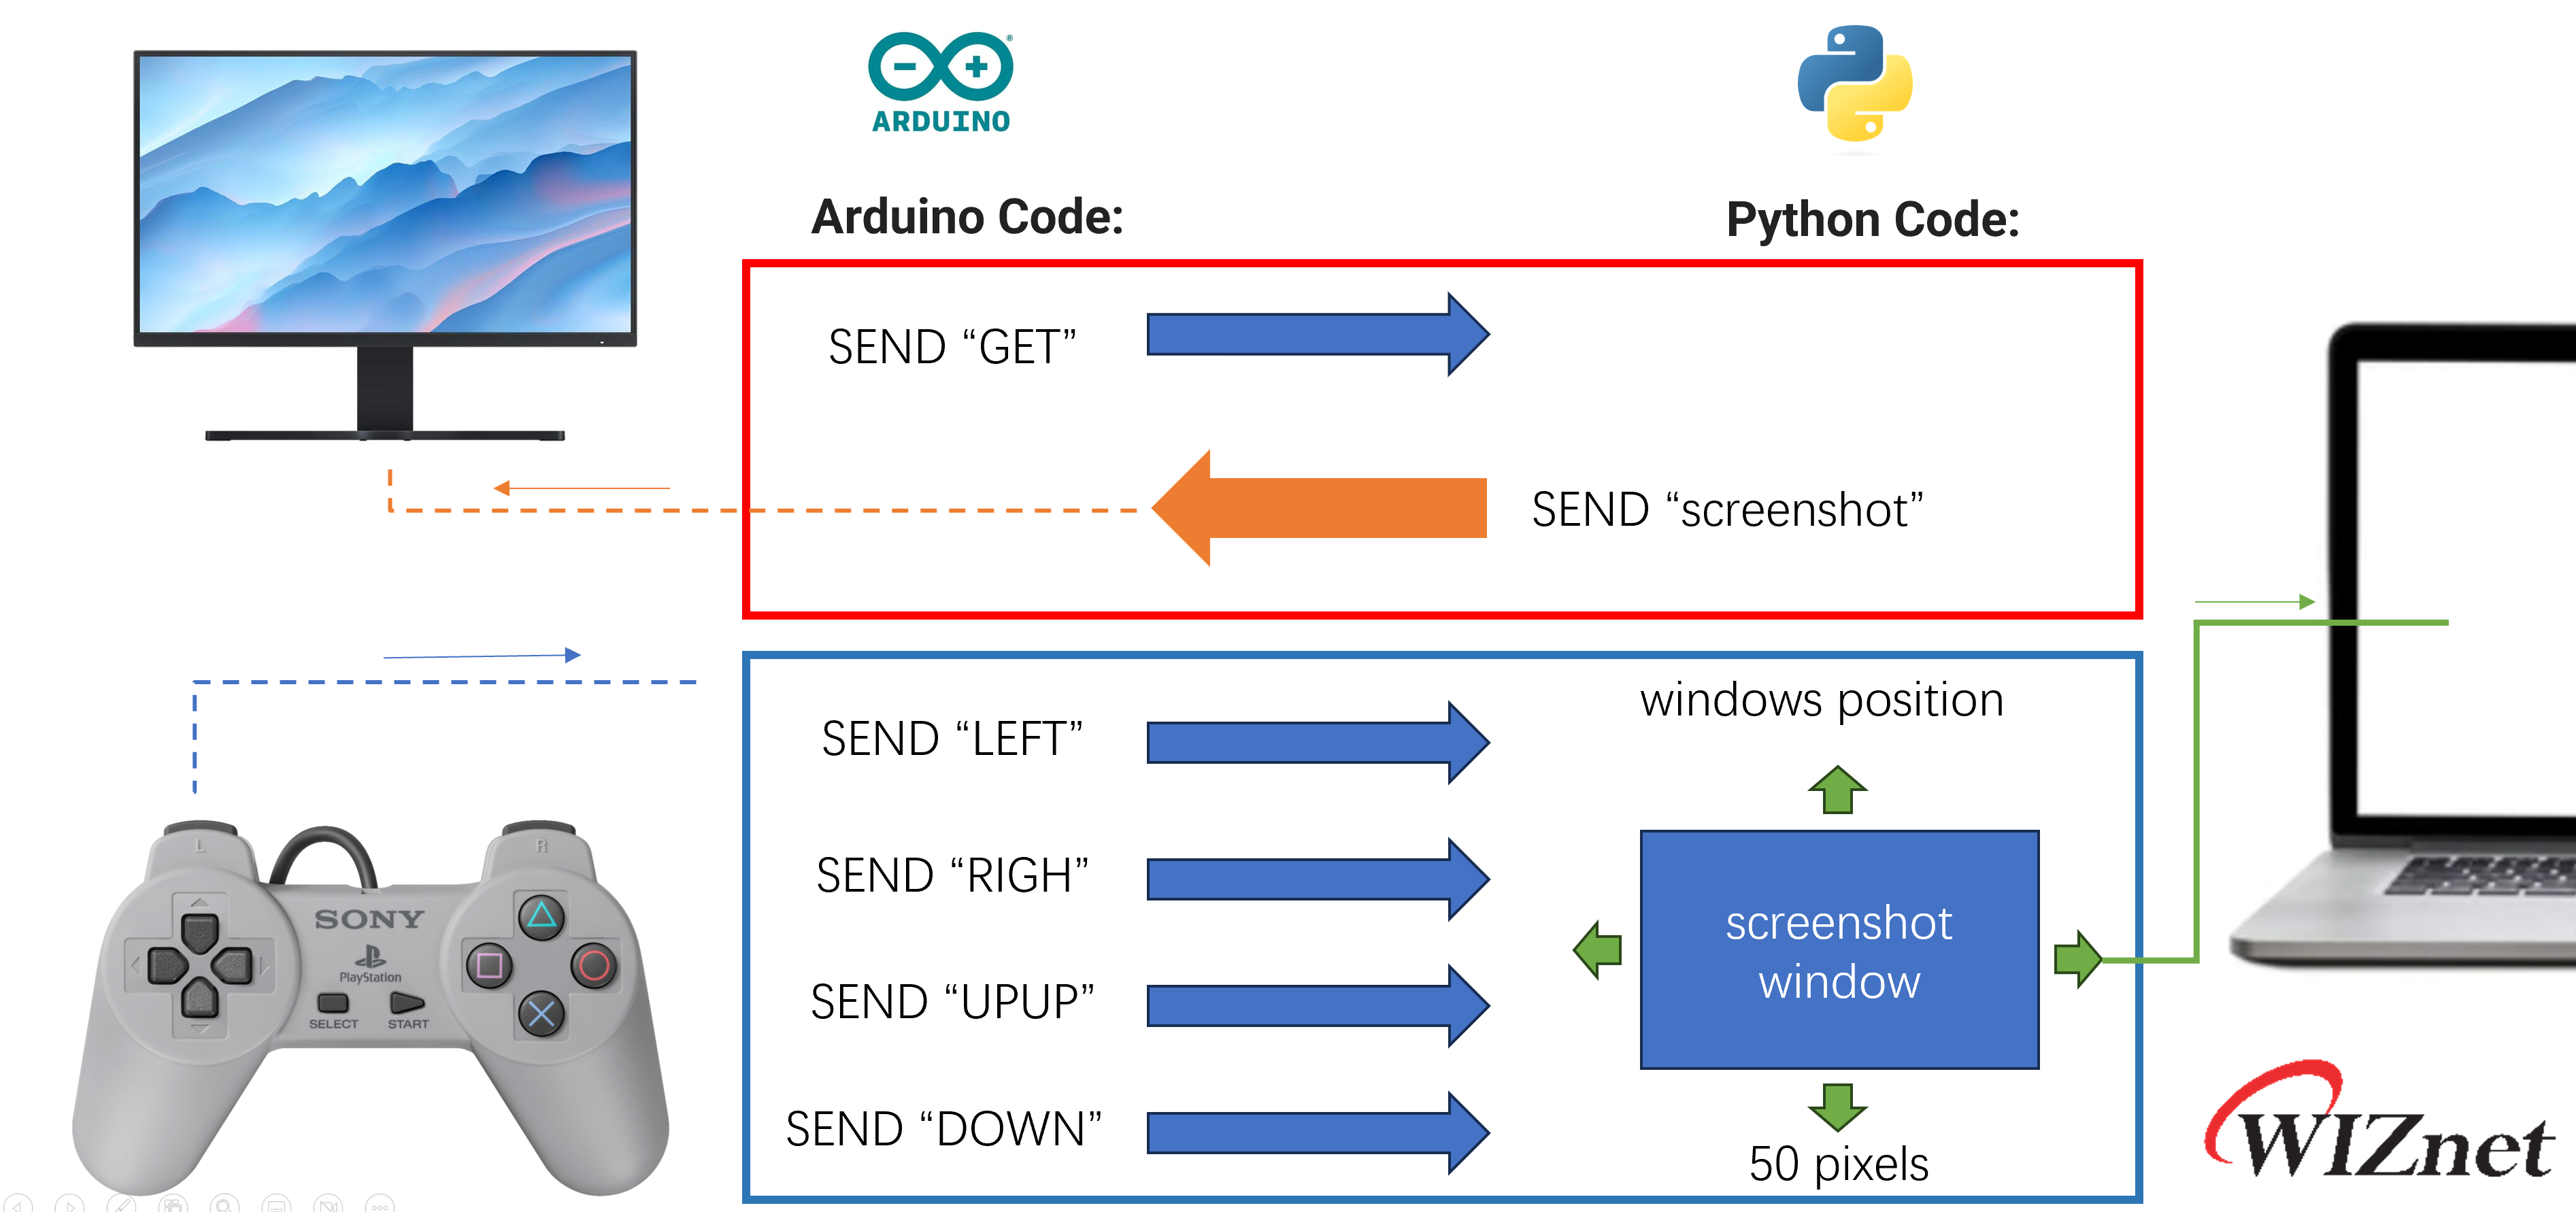
第二部分是RP2040-ETH-DVI-ZERO的代码,它收到截图后,通过HDMI接口将截图显示在显示器上;并将游戏控制器连接到USB OTG接口,以控制截图窗口在PC上的位置。
工作流程:
Demo Video:
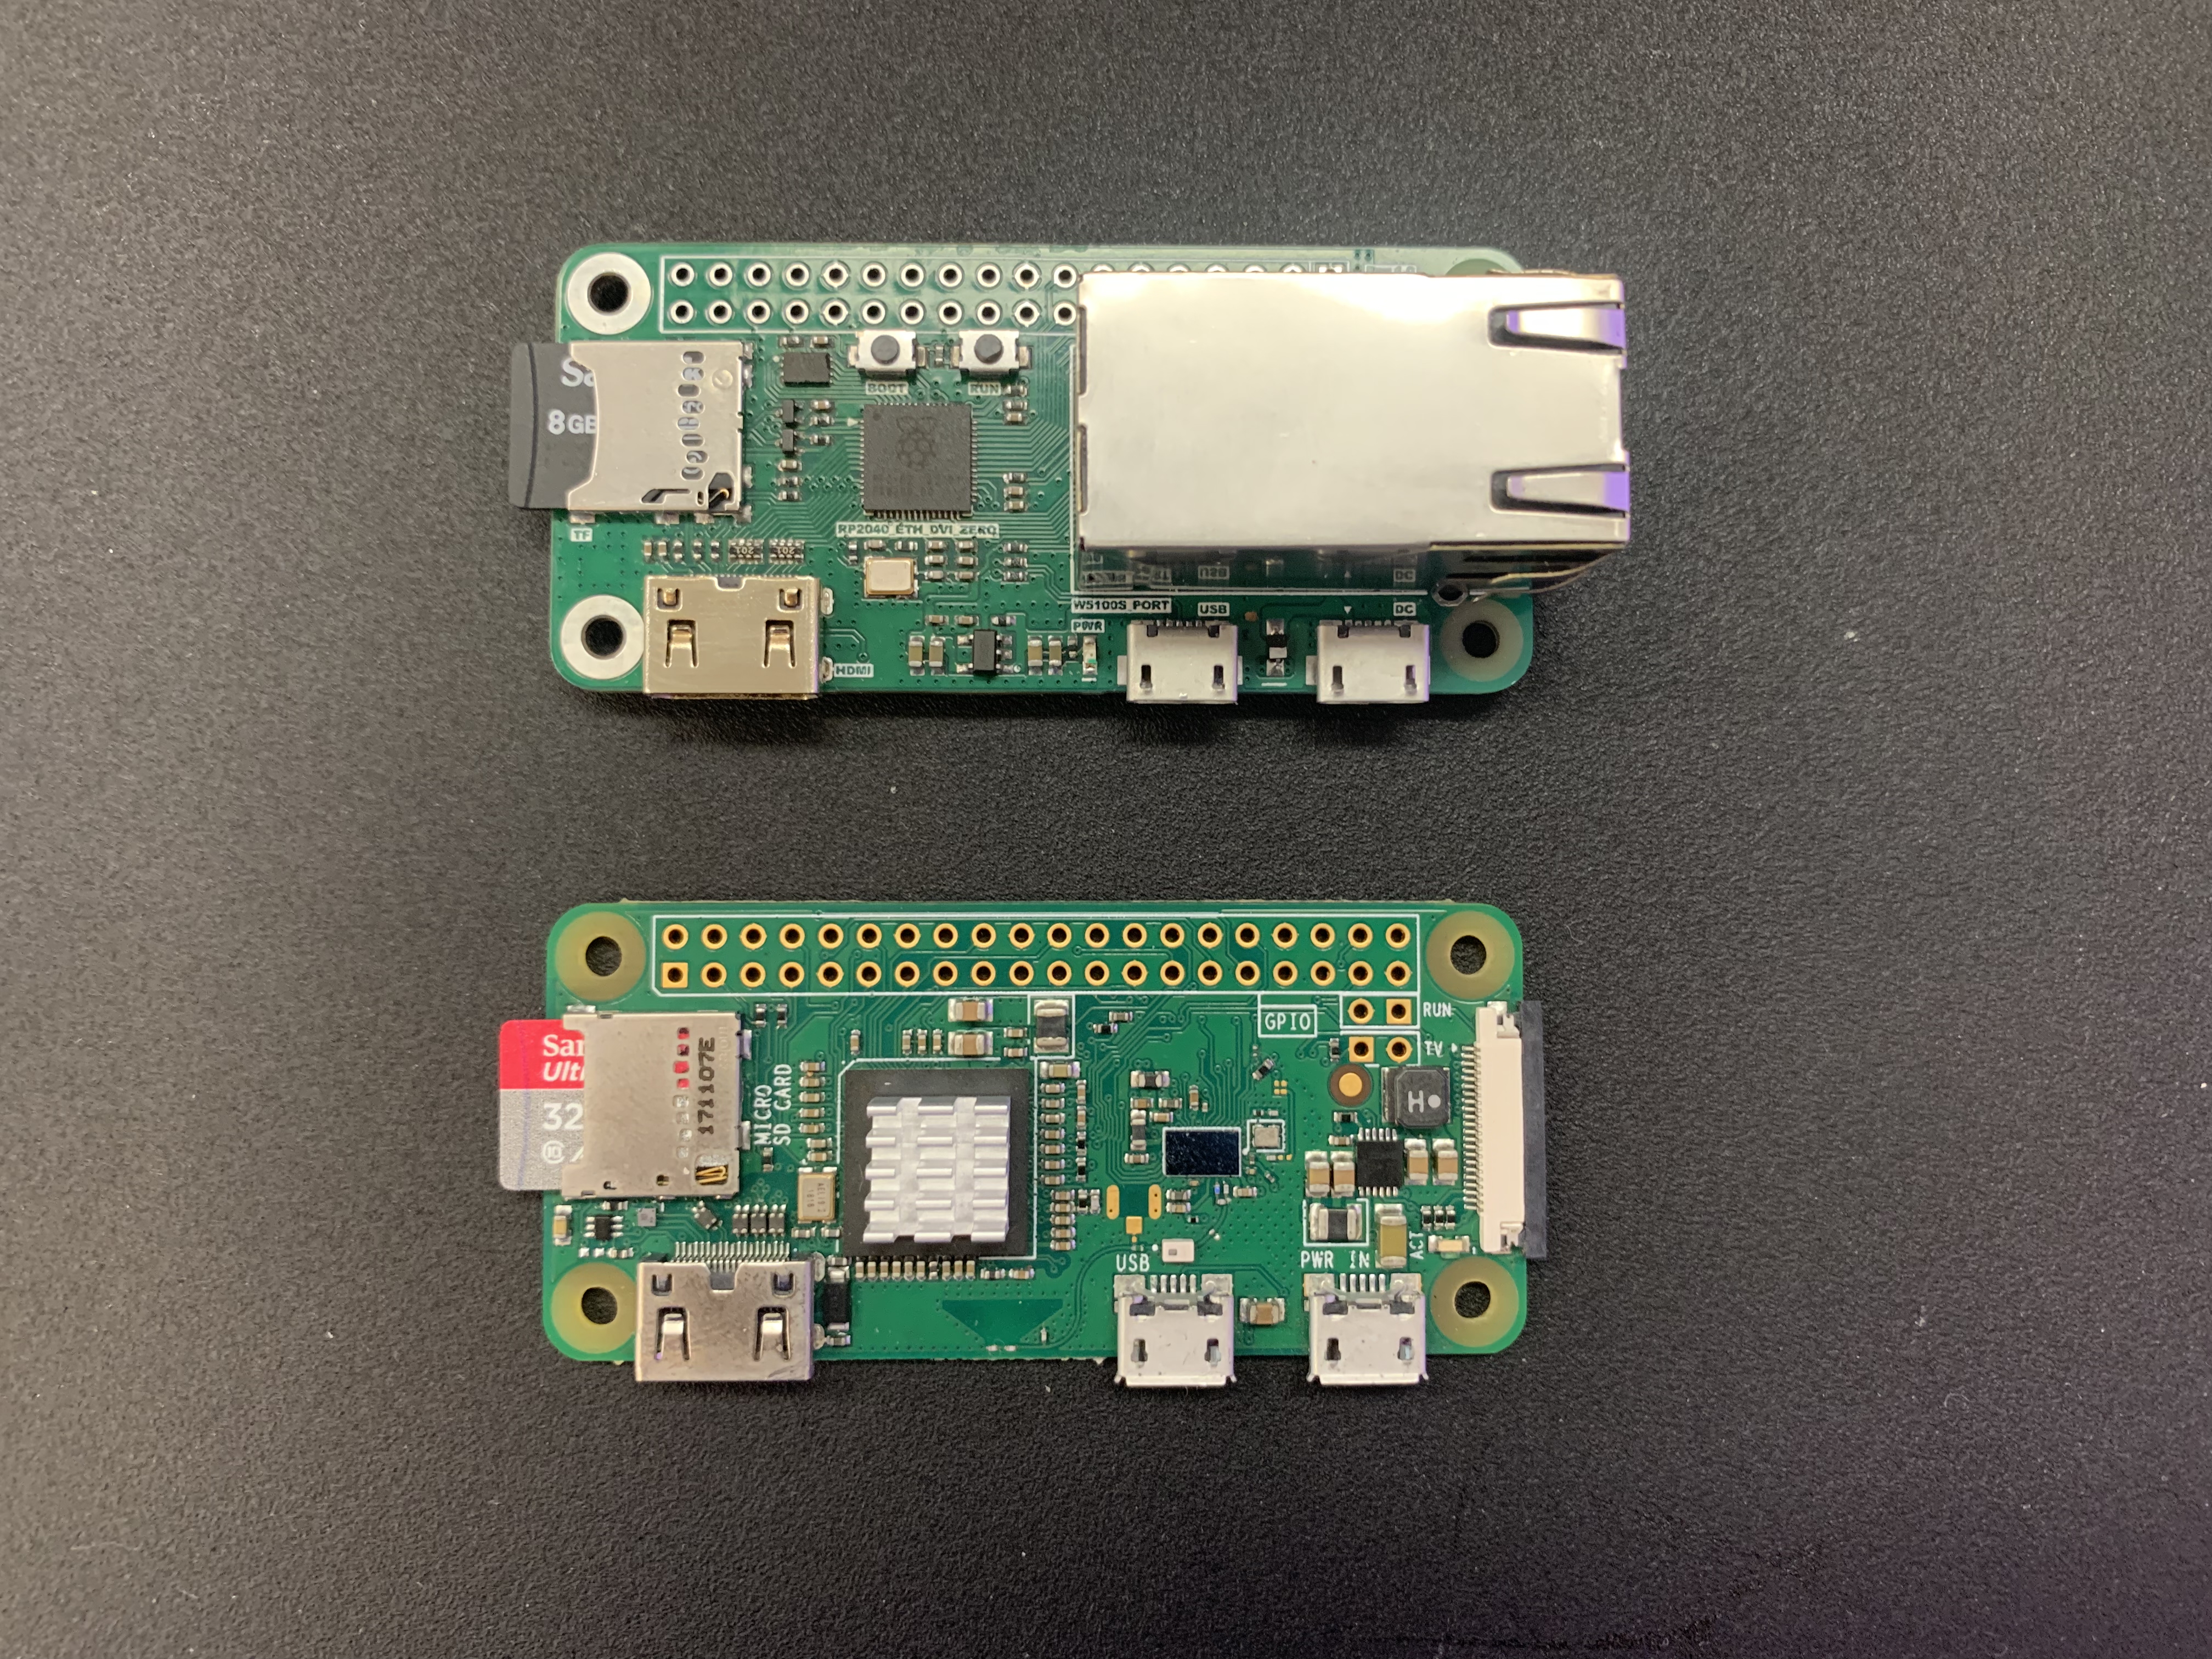
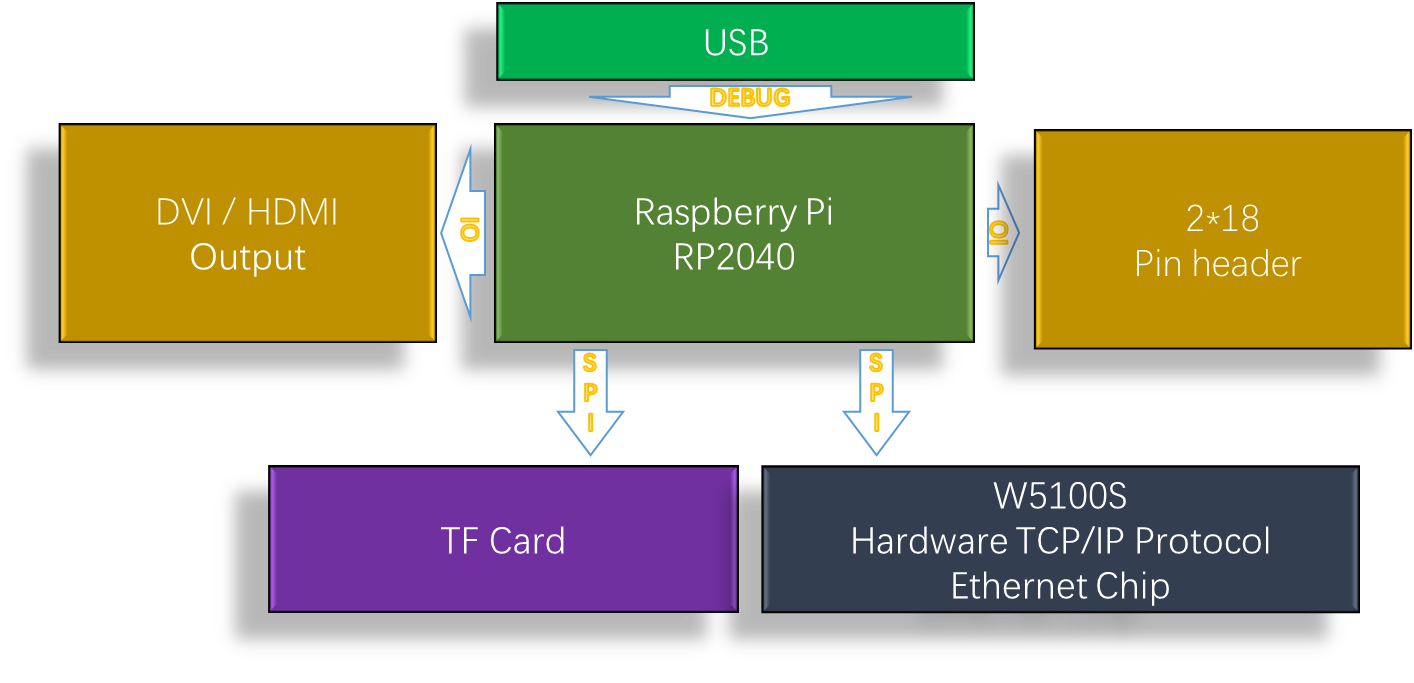
本项目基于RP2040-ETH-DVI-ZERO进行开发,RP2040-ETH-DVI-ZERO是一块采用Raspberry Pi RP2040作为MCU的开发板,带有DVI接口、TF插槽和W5100S-PORT。
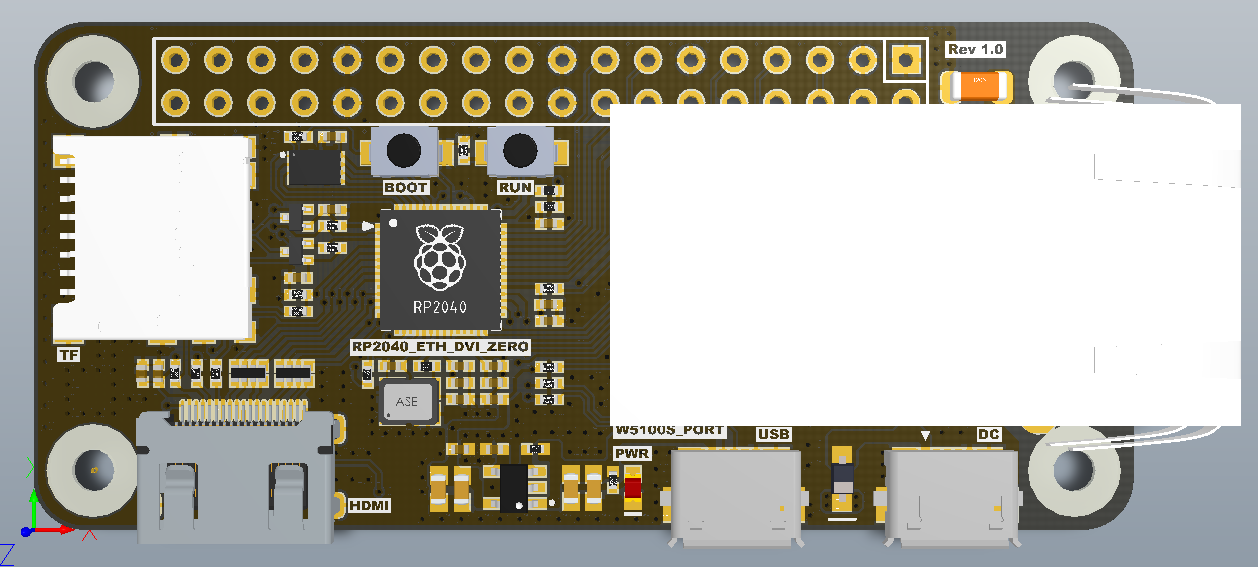
RP2040-ETH-DVI-ZERO 至 Rev1.0 顶视图:
RP2040-ETH-DVI-ZERO 至 Rev1.0 返回查看:
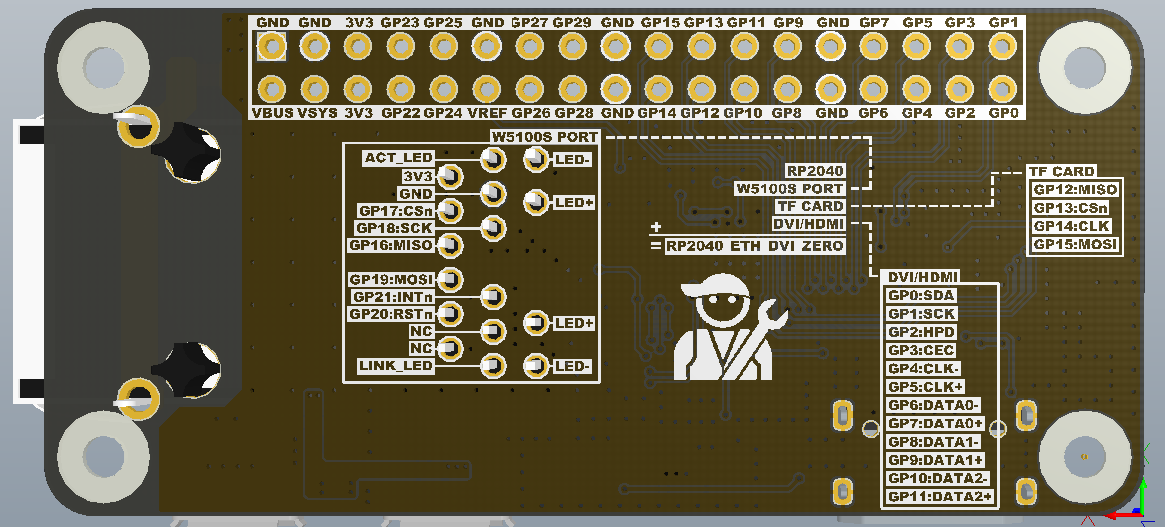
PCB背面的丝印上显示了所有接口使用的GPIO,开发时不用看原理图就能确定GPIO编号。
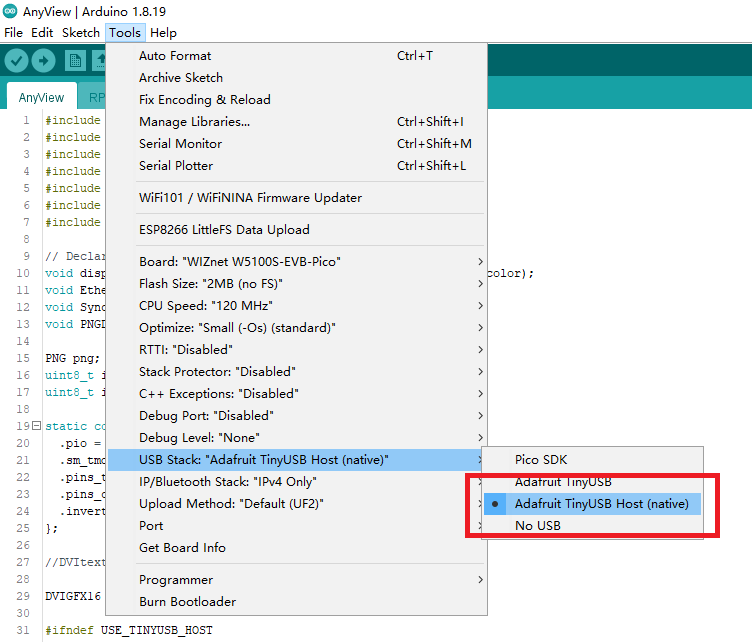
最初尝试使用树莓派RP2040的PIO实现USB OTG功能,可惜PIO模式OTG功能和DVI接口不能同时共存,最后只能通过RP2040原有的USB Host(native)接口来实现USB OTG。感谢HisashiKato,在他的开源项目中找到了实现USB OTG和DVI共存的灵感。
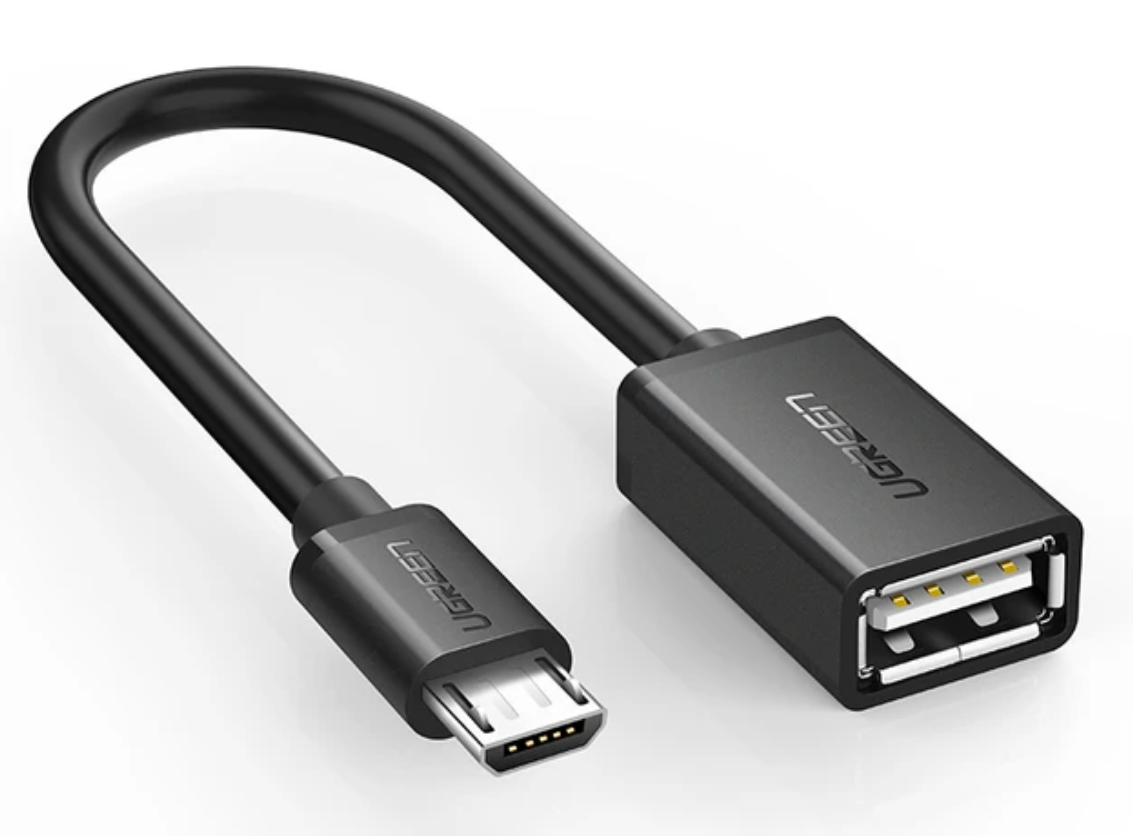
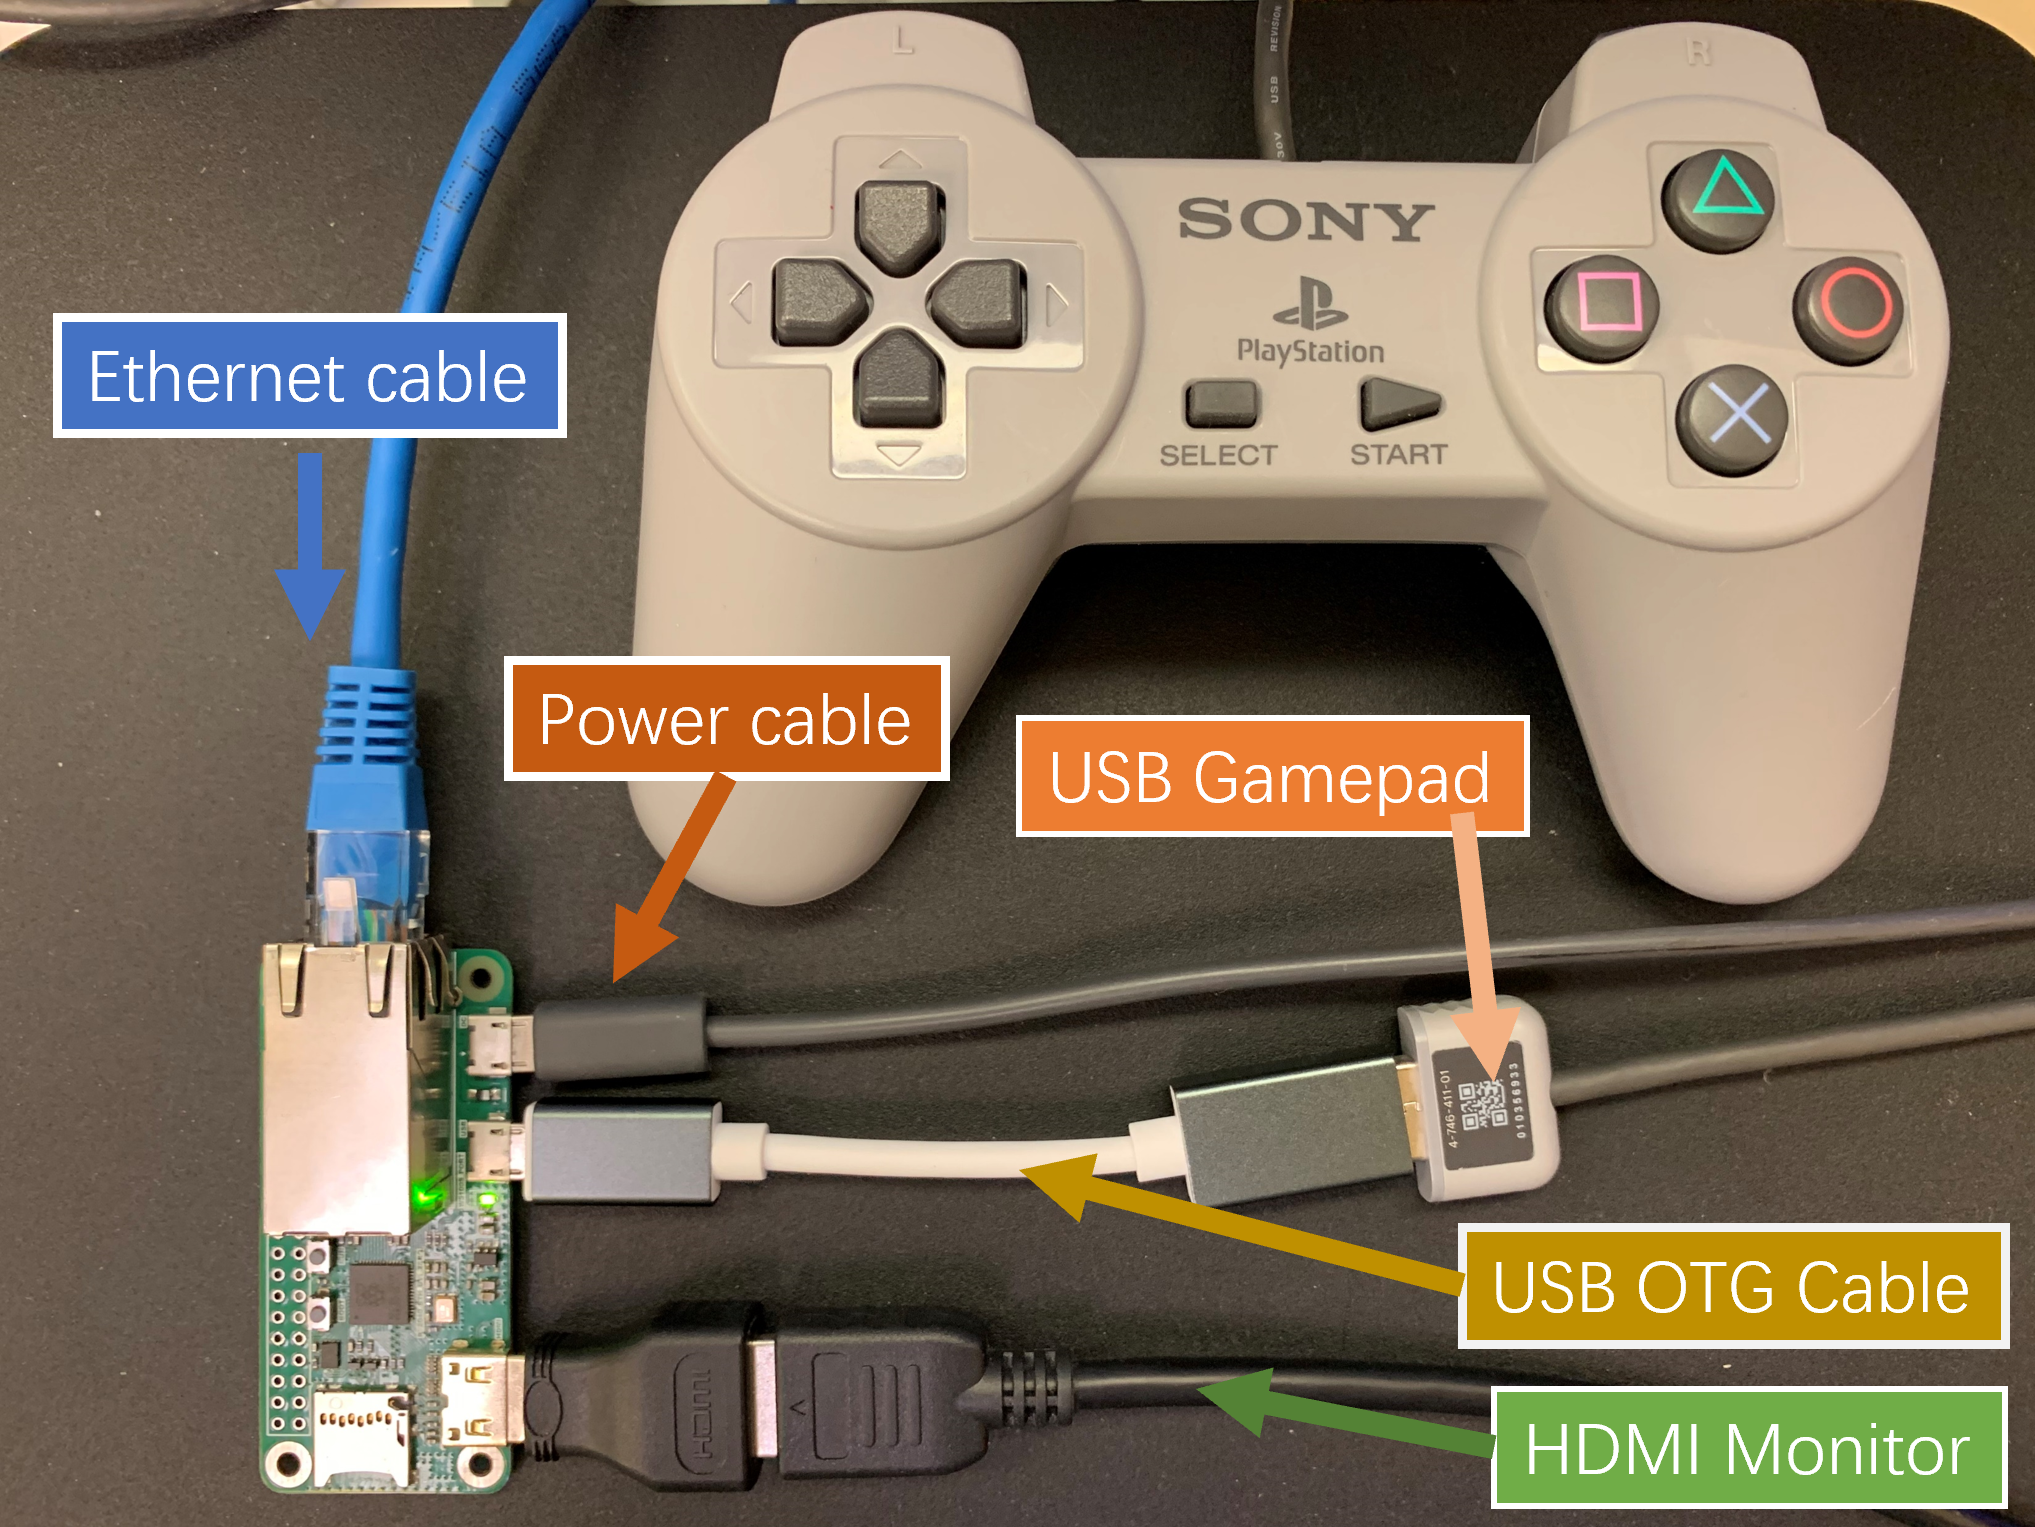
USB OTG 可以通过上述连接线将 USB 设备连接到 RP2040-ETH-DVI-ZERO 的 Micro USB 口。
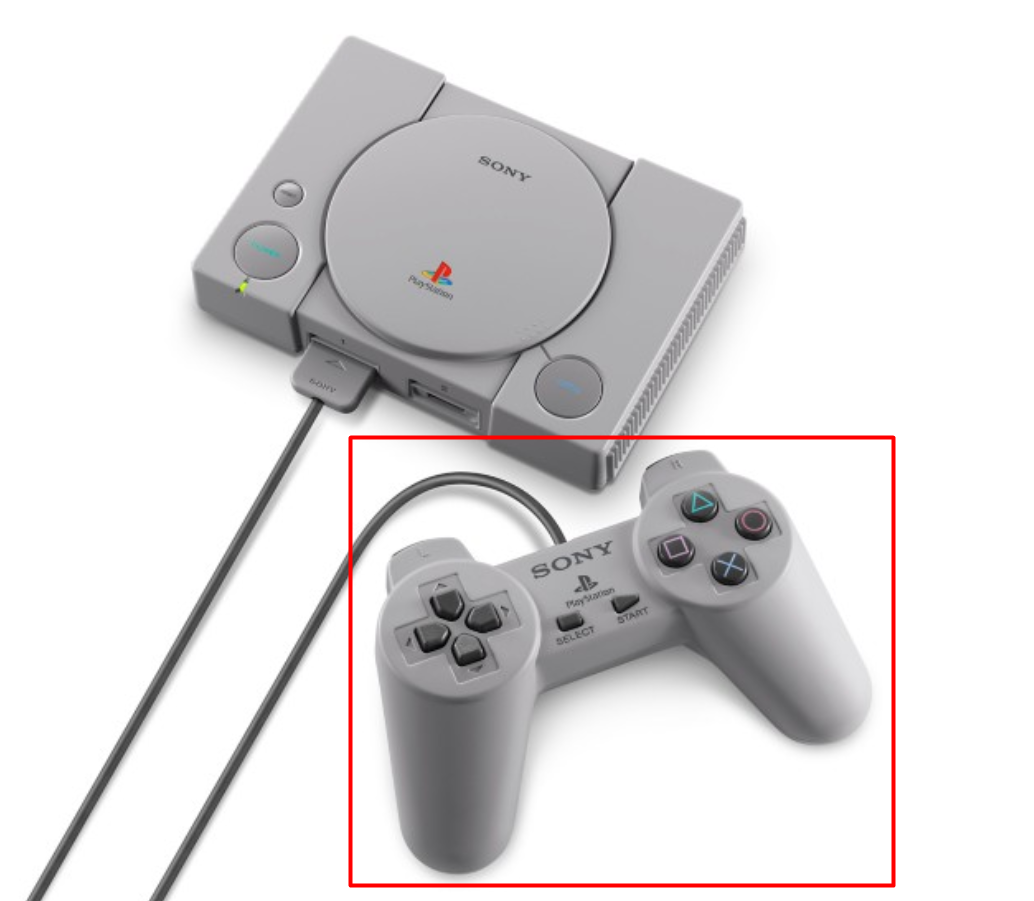
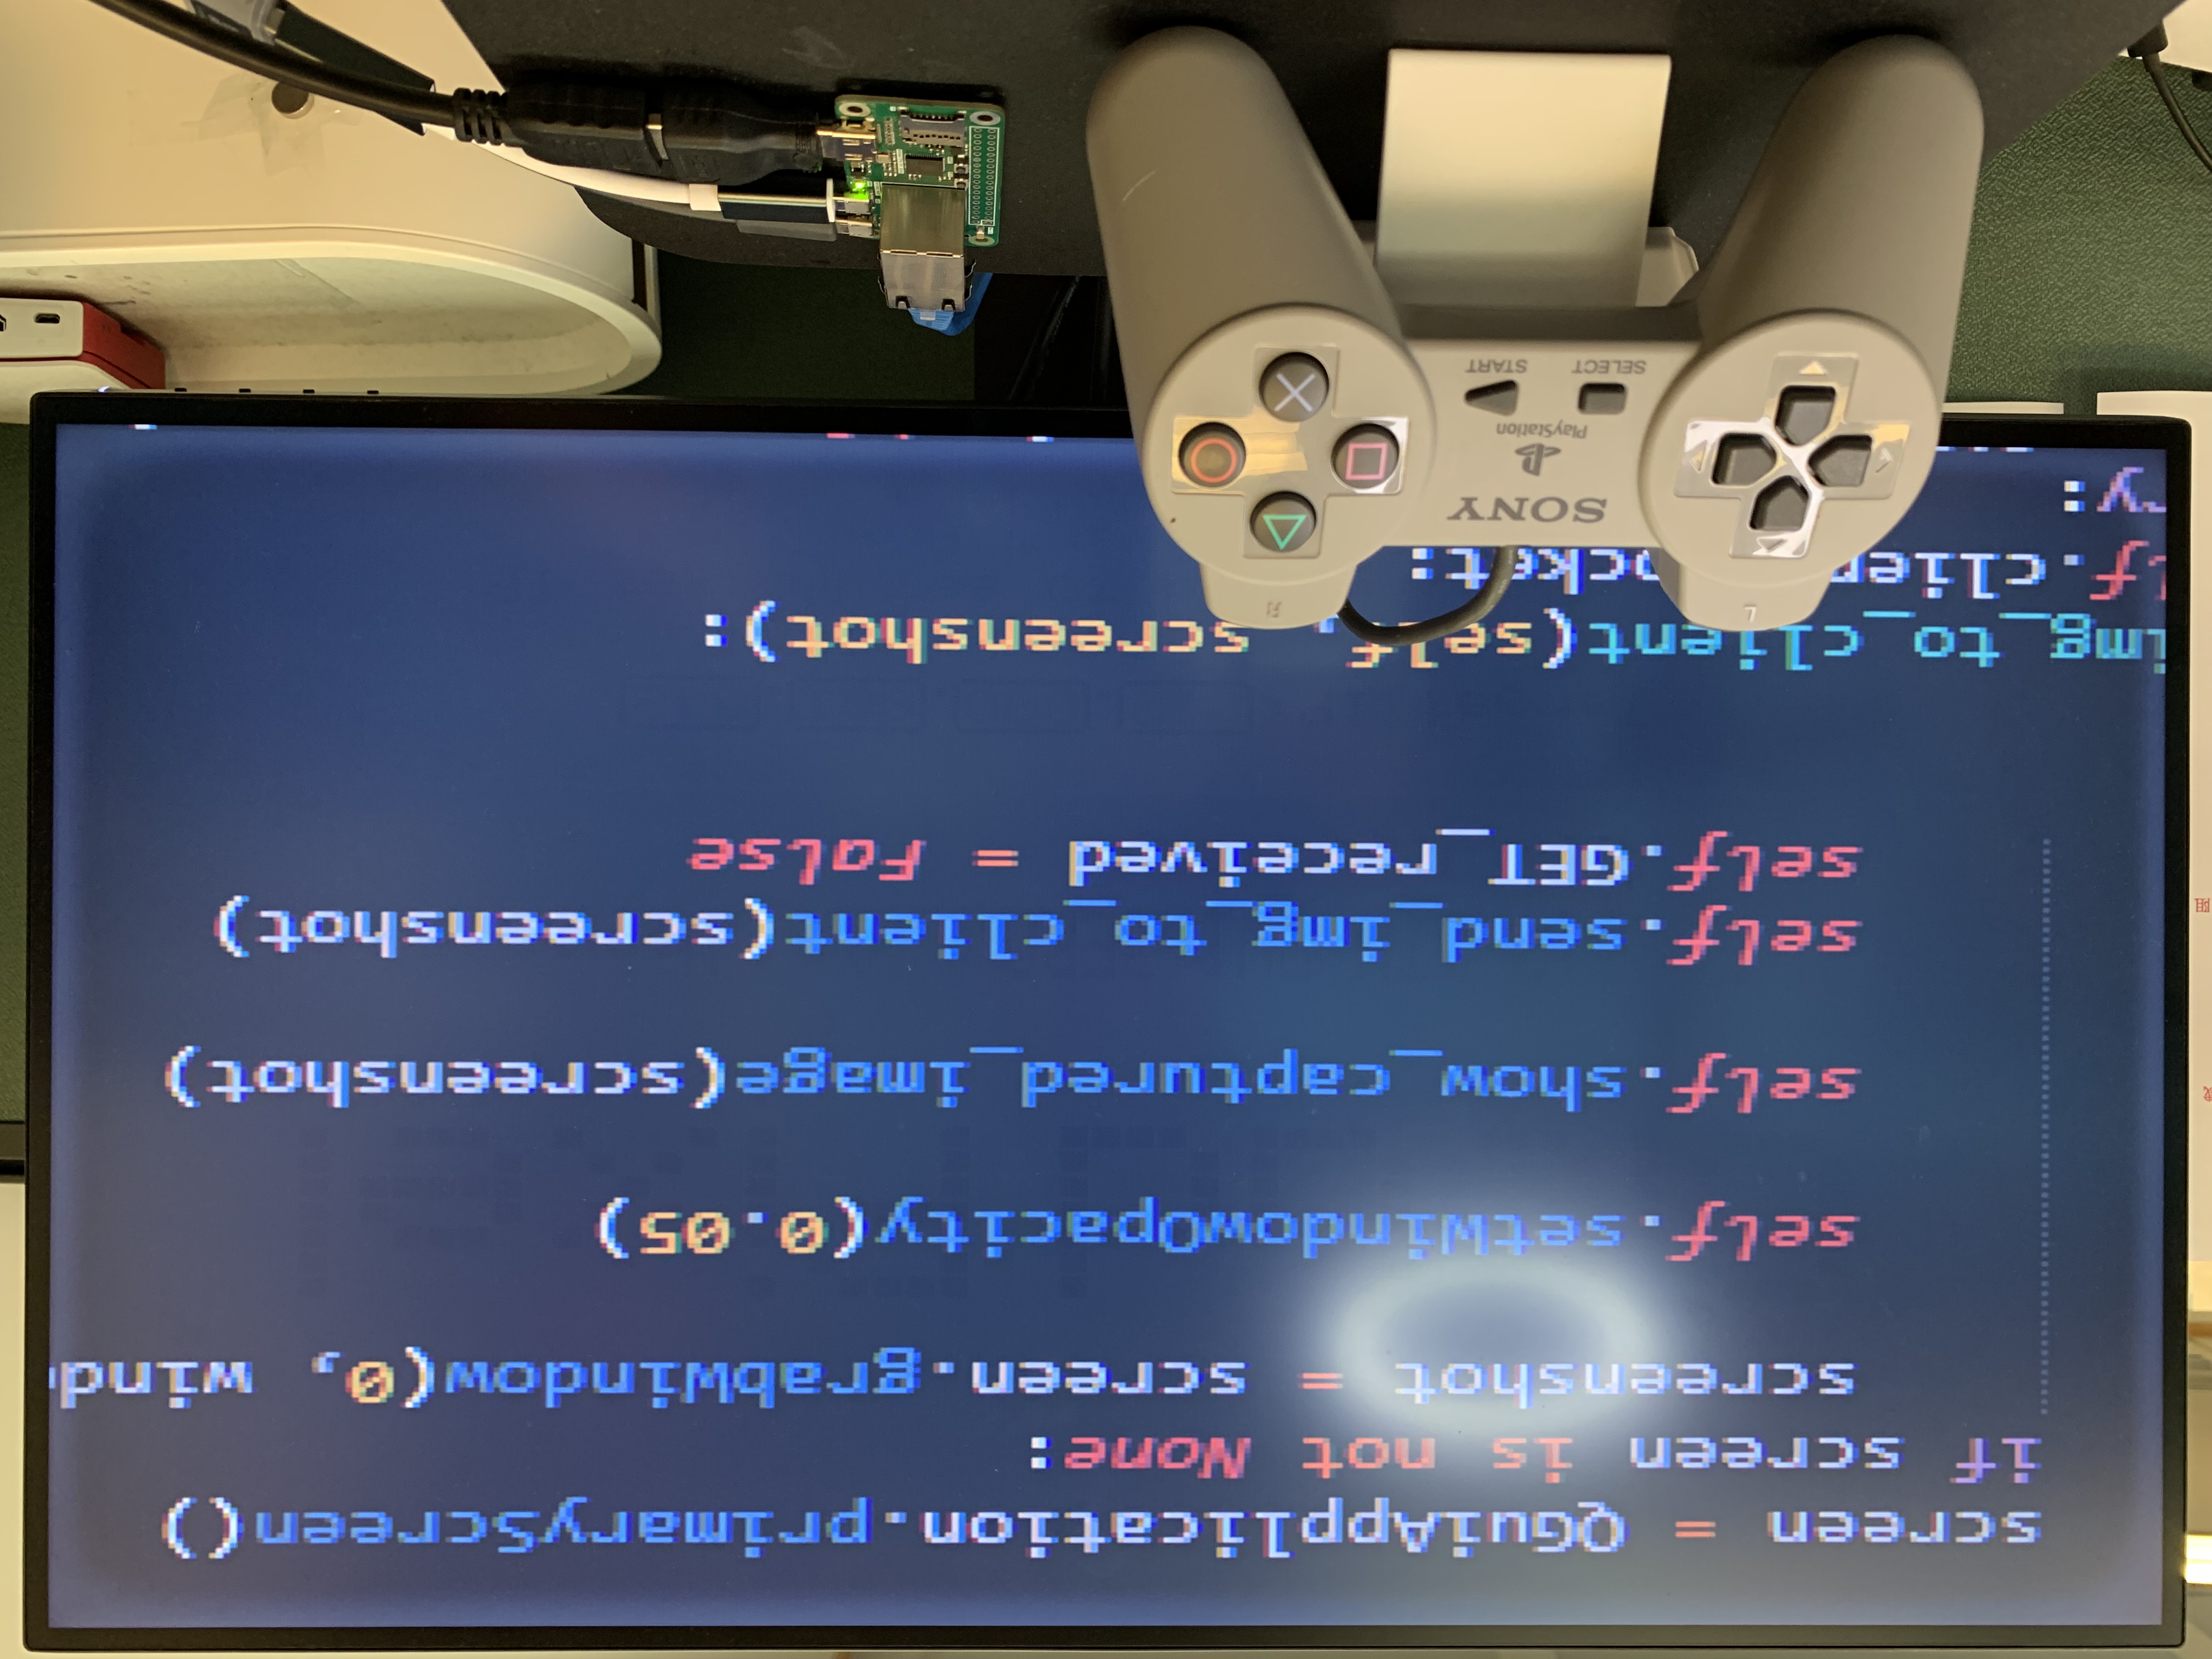
我用的是SONY 2018年推出的PS Classic(PS Mini)上的USB接口游戏控制器,此游戏控制器作为USB HID输入设备,通过方向键来控制和改变PC端的截图窗口的位置。
电缆连接:
Arduino代码:
//Supports the DVI output by RP2040
#include <PicoDVI.h>
//Support USB Host interface
#include <Adafruit_TinyUSB.h>
//Support W5100S-PORT
#include <Ethernet.h>
//Arduino graphics library
#include <Arduino_GFX_Library.h>
//Storage running parameters
#include <EEPROM.h>
// PNG Decoder library
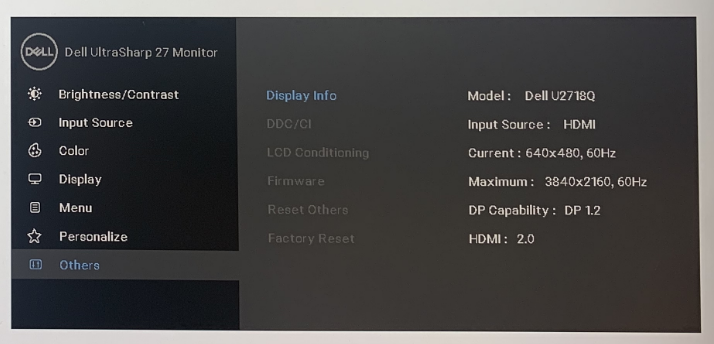
#include <PNGdec.h> #include <PicoDVI.h> 该库创造性地利用了树莓派独有的PIO,实现了DVI输出,可以生成320*240分辨率的图像,并扩展为640*480(60Hz)输出到显示器
这是DVI接口的定义部分。
static const struct dvi_serialiser_cfg rp2040_dvi_zero_cfg = {
  .pio = DVI_DEFAULT_PIO_INST,
  .sm_tmds = {0, 1, 2},
  .pins_tmds = {6, 8, 10},
  .pins_clk = 4,
  .invert_diffpairs = true
};


DVIGFX16 display(DVI_RES_320x240p60, rp2040_dvi_zero_cfg);
RP2040-ETH-DVI-ZERO相对于其他的RP2040 DVI开发板来说,其独特之处在于增加了一个以太网模块W5100S-PORT,这是我在W5100S基础上开发的以太网模块,在非常小的Size内实现了以太网的所有电路。
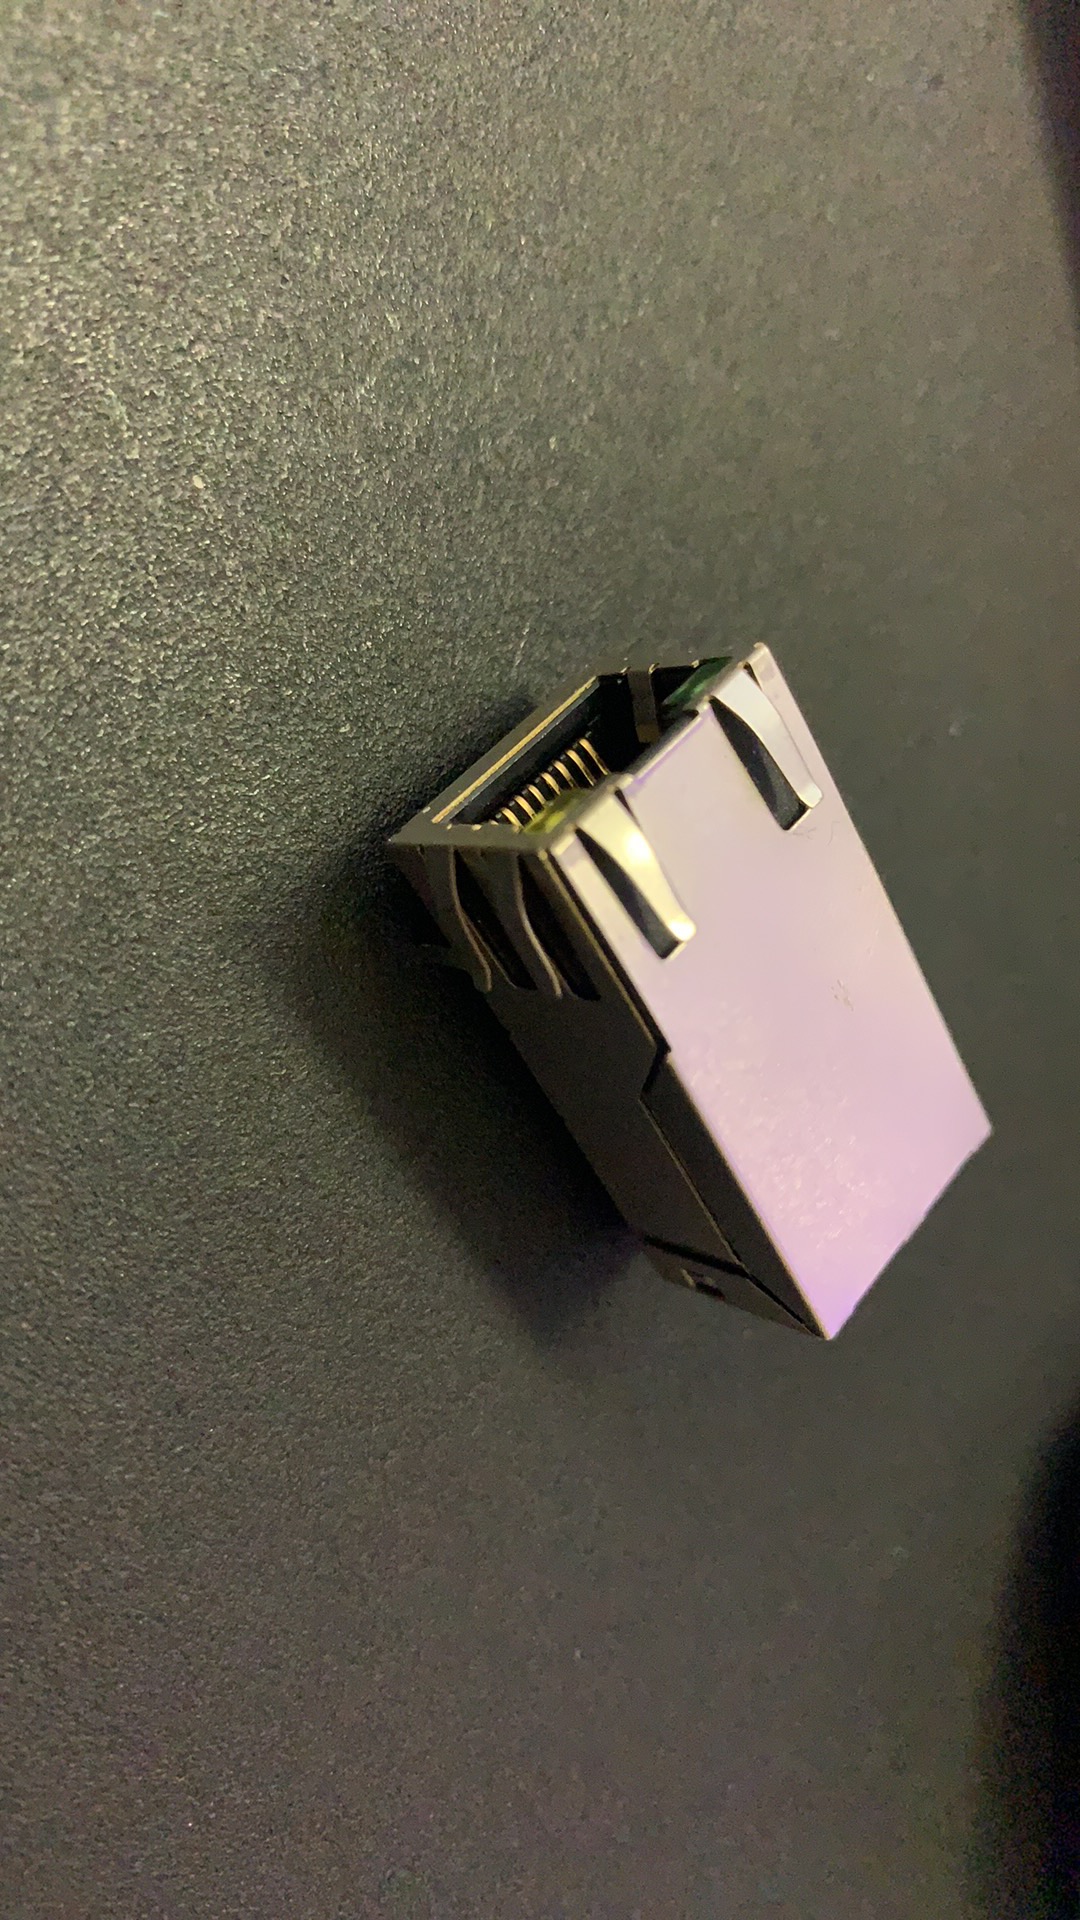
我对 W5100S 部分使用与 W5100S_EVB_PICO 相同的引脚设计,因此我可以使用 W5100S_EVB_PICO 的所有参考代码。
void setup() {
  if (!display.begin()) {
    pinMode(LED_BUILTIN, OUTPUT);
    for (;;) digitalWrite(LED_BUILTIN, (millis() / 500) & 1);
  }
  USBHost.begin(0);
  // USB Host is executed by timer interrupt.
  add_repeating_timer_us( KBD_INT_TIME/*us*/, timer_callback, NULL, &rtimer );
  display_Cloud_Pixel_Icon(170,80,BLACK);
  Ethernet_check();
  EEPROM.begin(8);
  Sync_With_eeprom(0);
}
在Ethernet_check函数中我处理了网线没插好的异常情况。
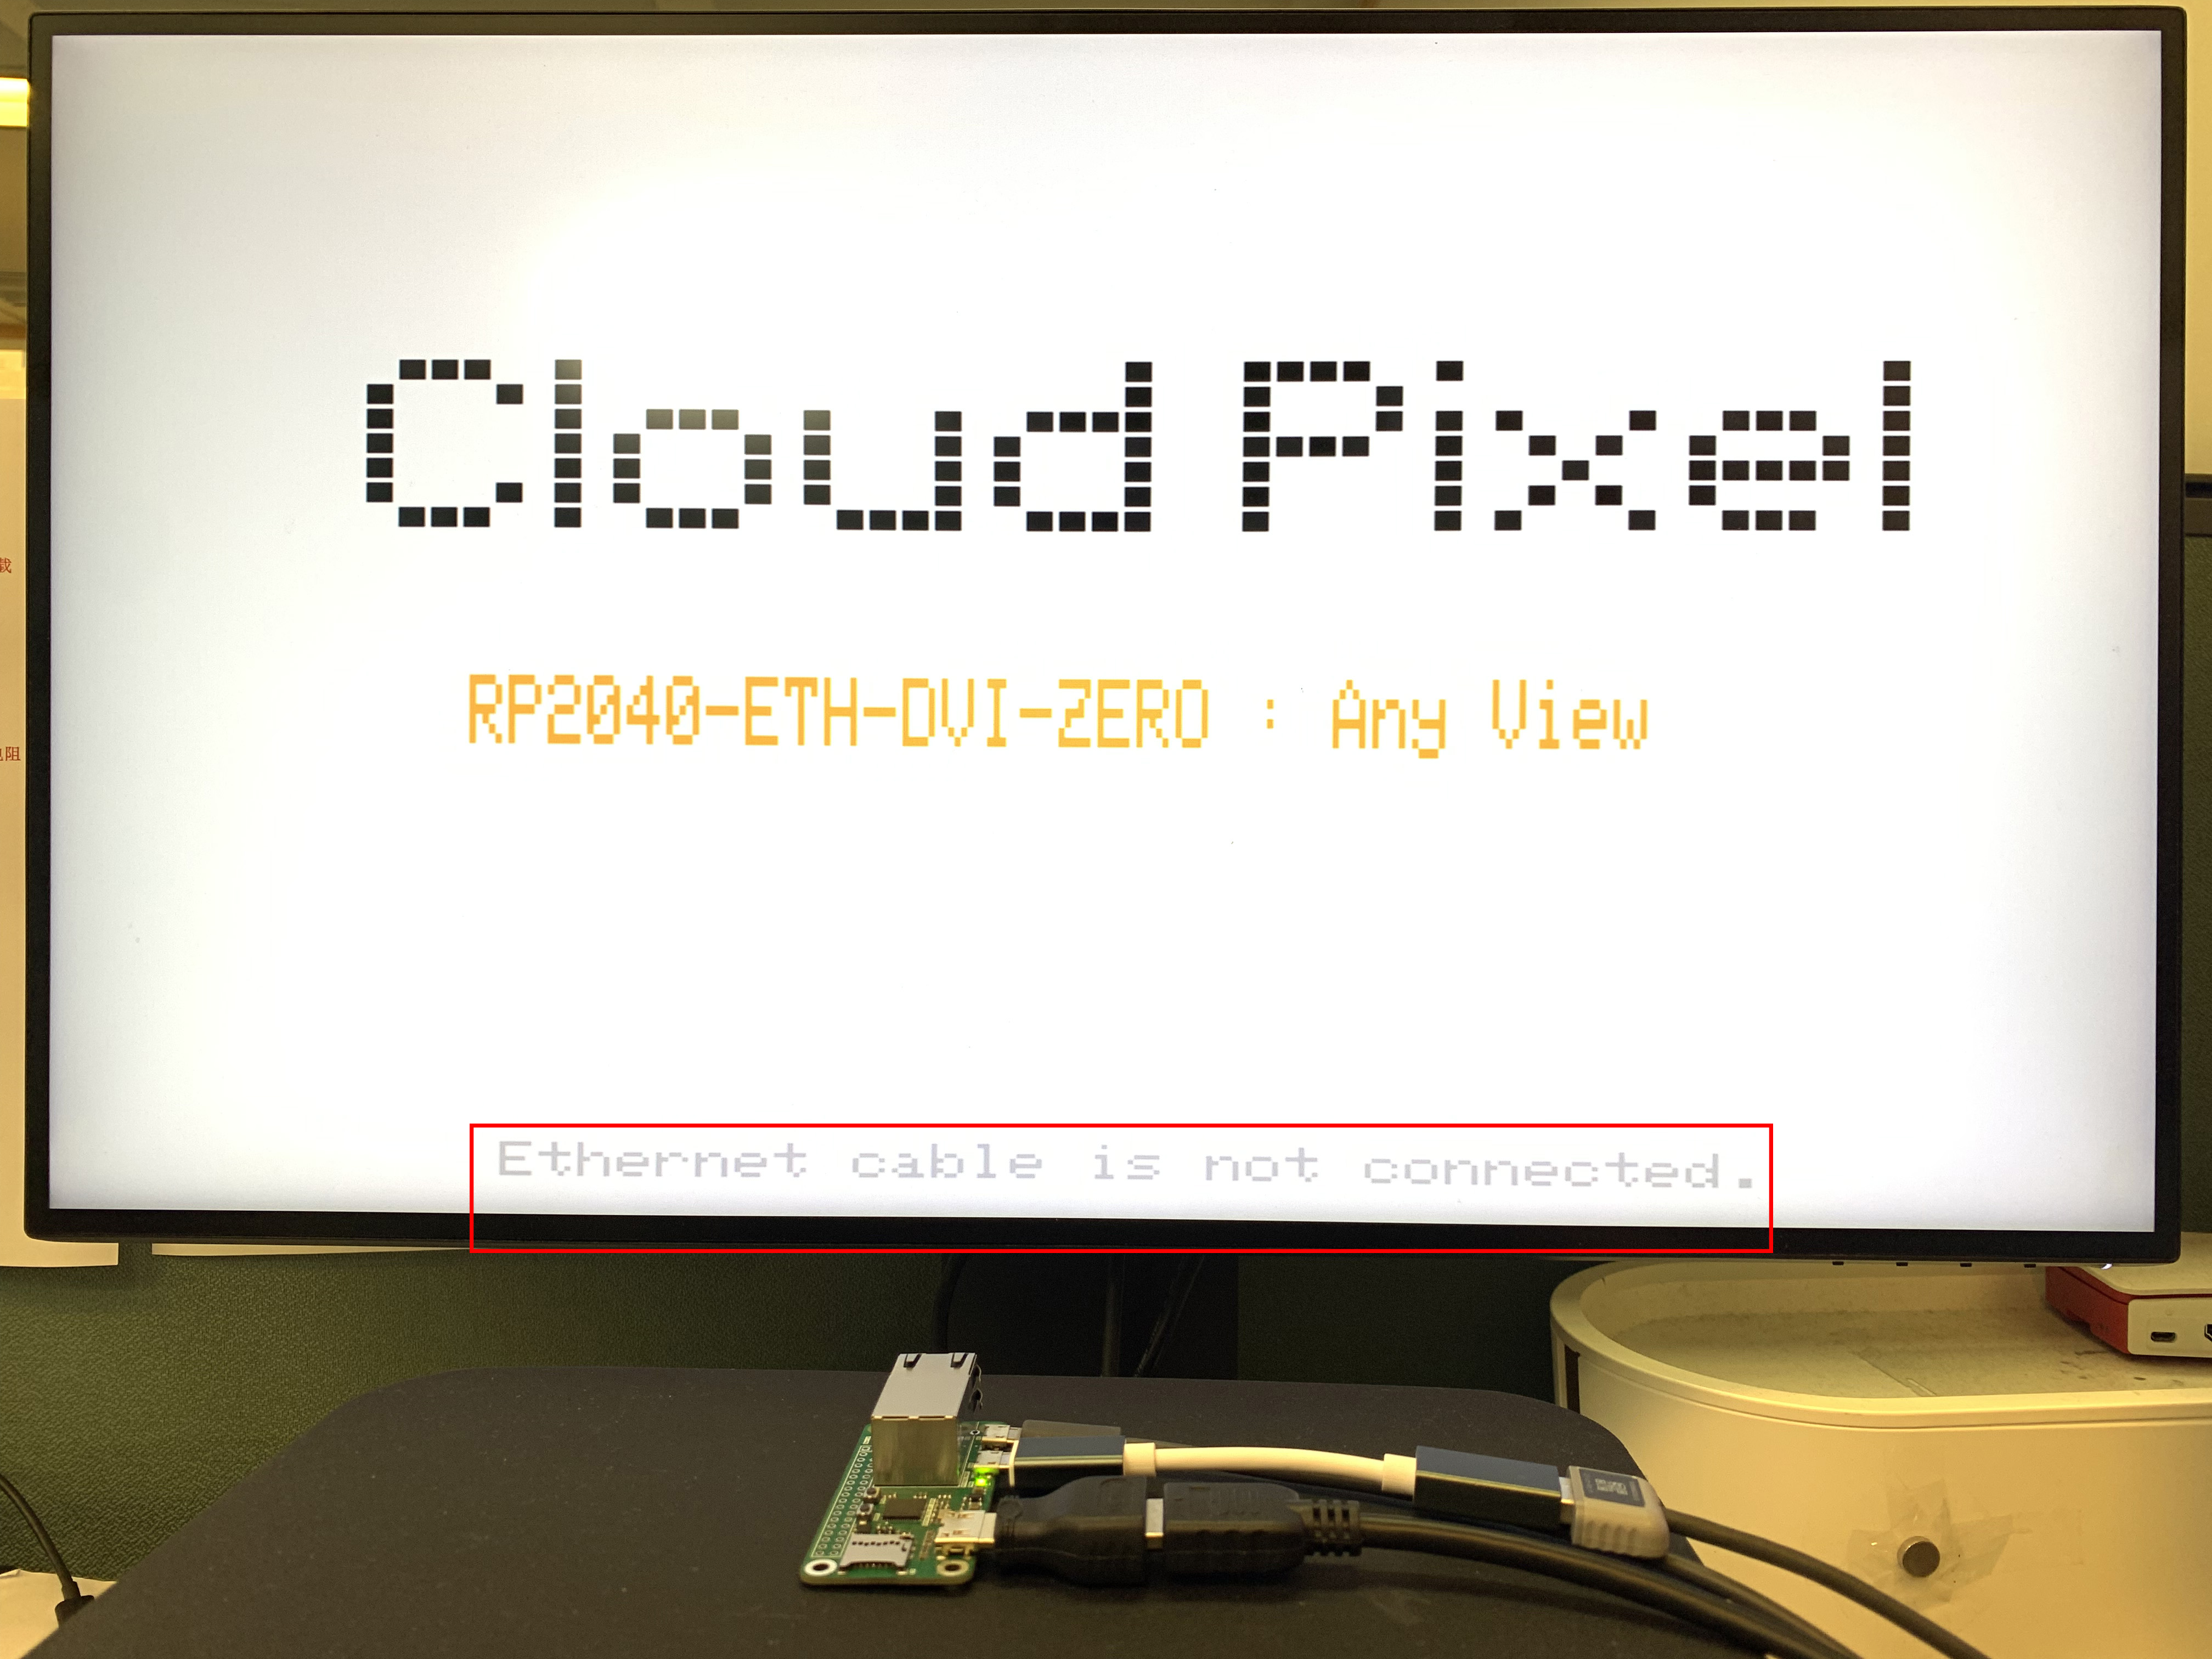
void Ethernet_check(void)
{
Ethernet.init(17);
while (Ethernet.linkStatus() == LinkOFF) {
display.setCursor(70, 225);
display.setTextSize(1);
display.setTextColor(LIGHTGREY);
display.print("Ethernet cable is not connected.");
delay(500);
display.setCursor(70, 225);
display.setTextSize(1);
display.setTextColor(WHITE);
display.print("Ethernet cable is not connected.");
delay(200);
}
Ethernet.begin(mac);
display.setTextColor(LIGHTGREY);
display.setTextSize(1);
display.setCursor(120, 225);
display.print("IP:");
display.print(Ethernet.localIP());
display.print(Ethernet.localIP()[4]);
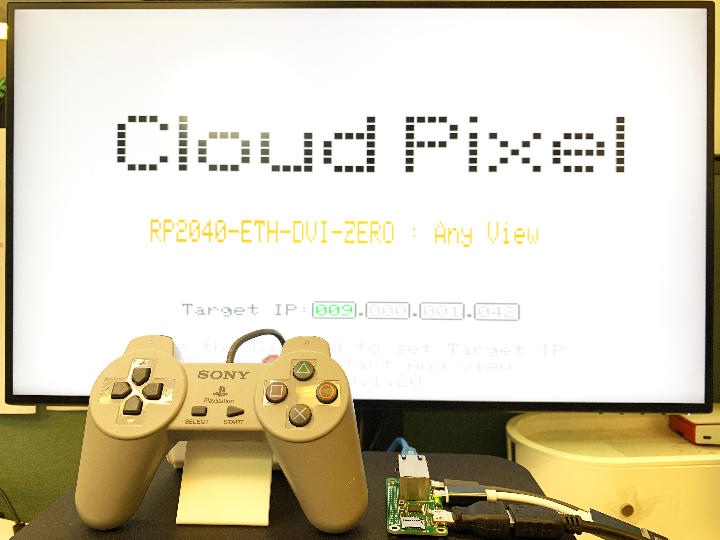
}获取IP地址后,显示在屏幕底部。
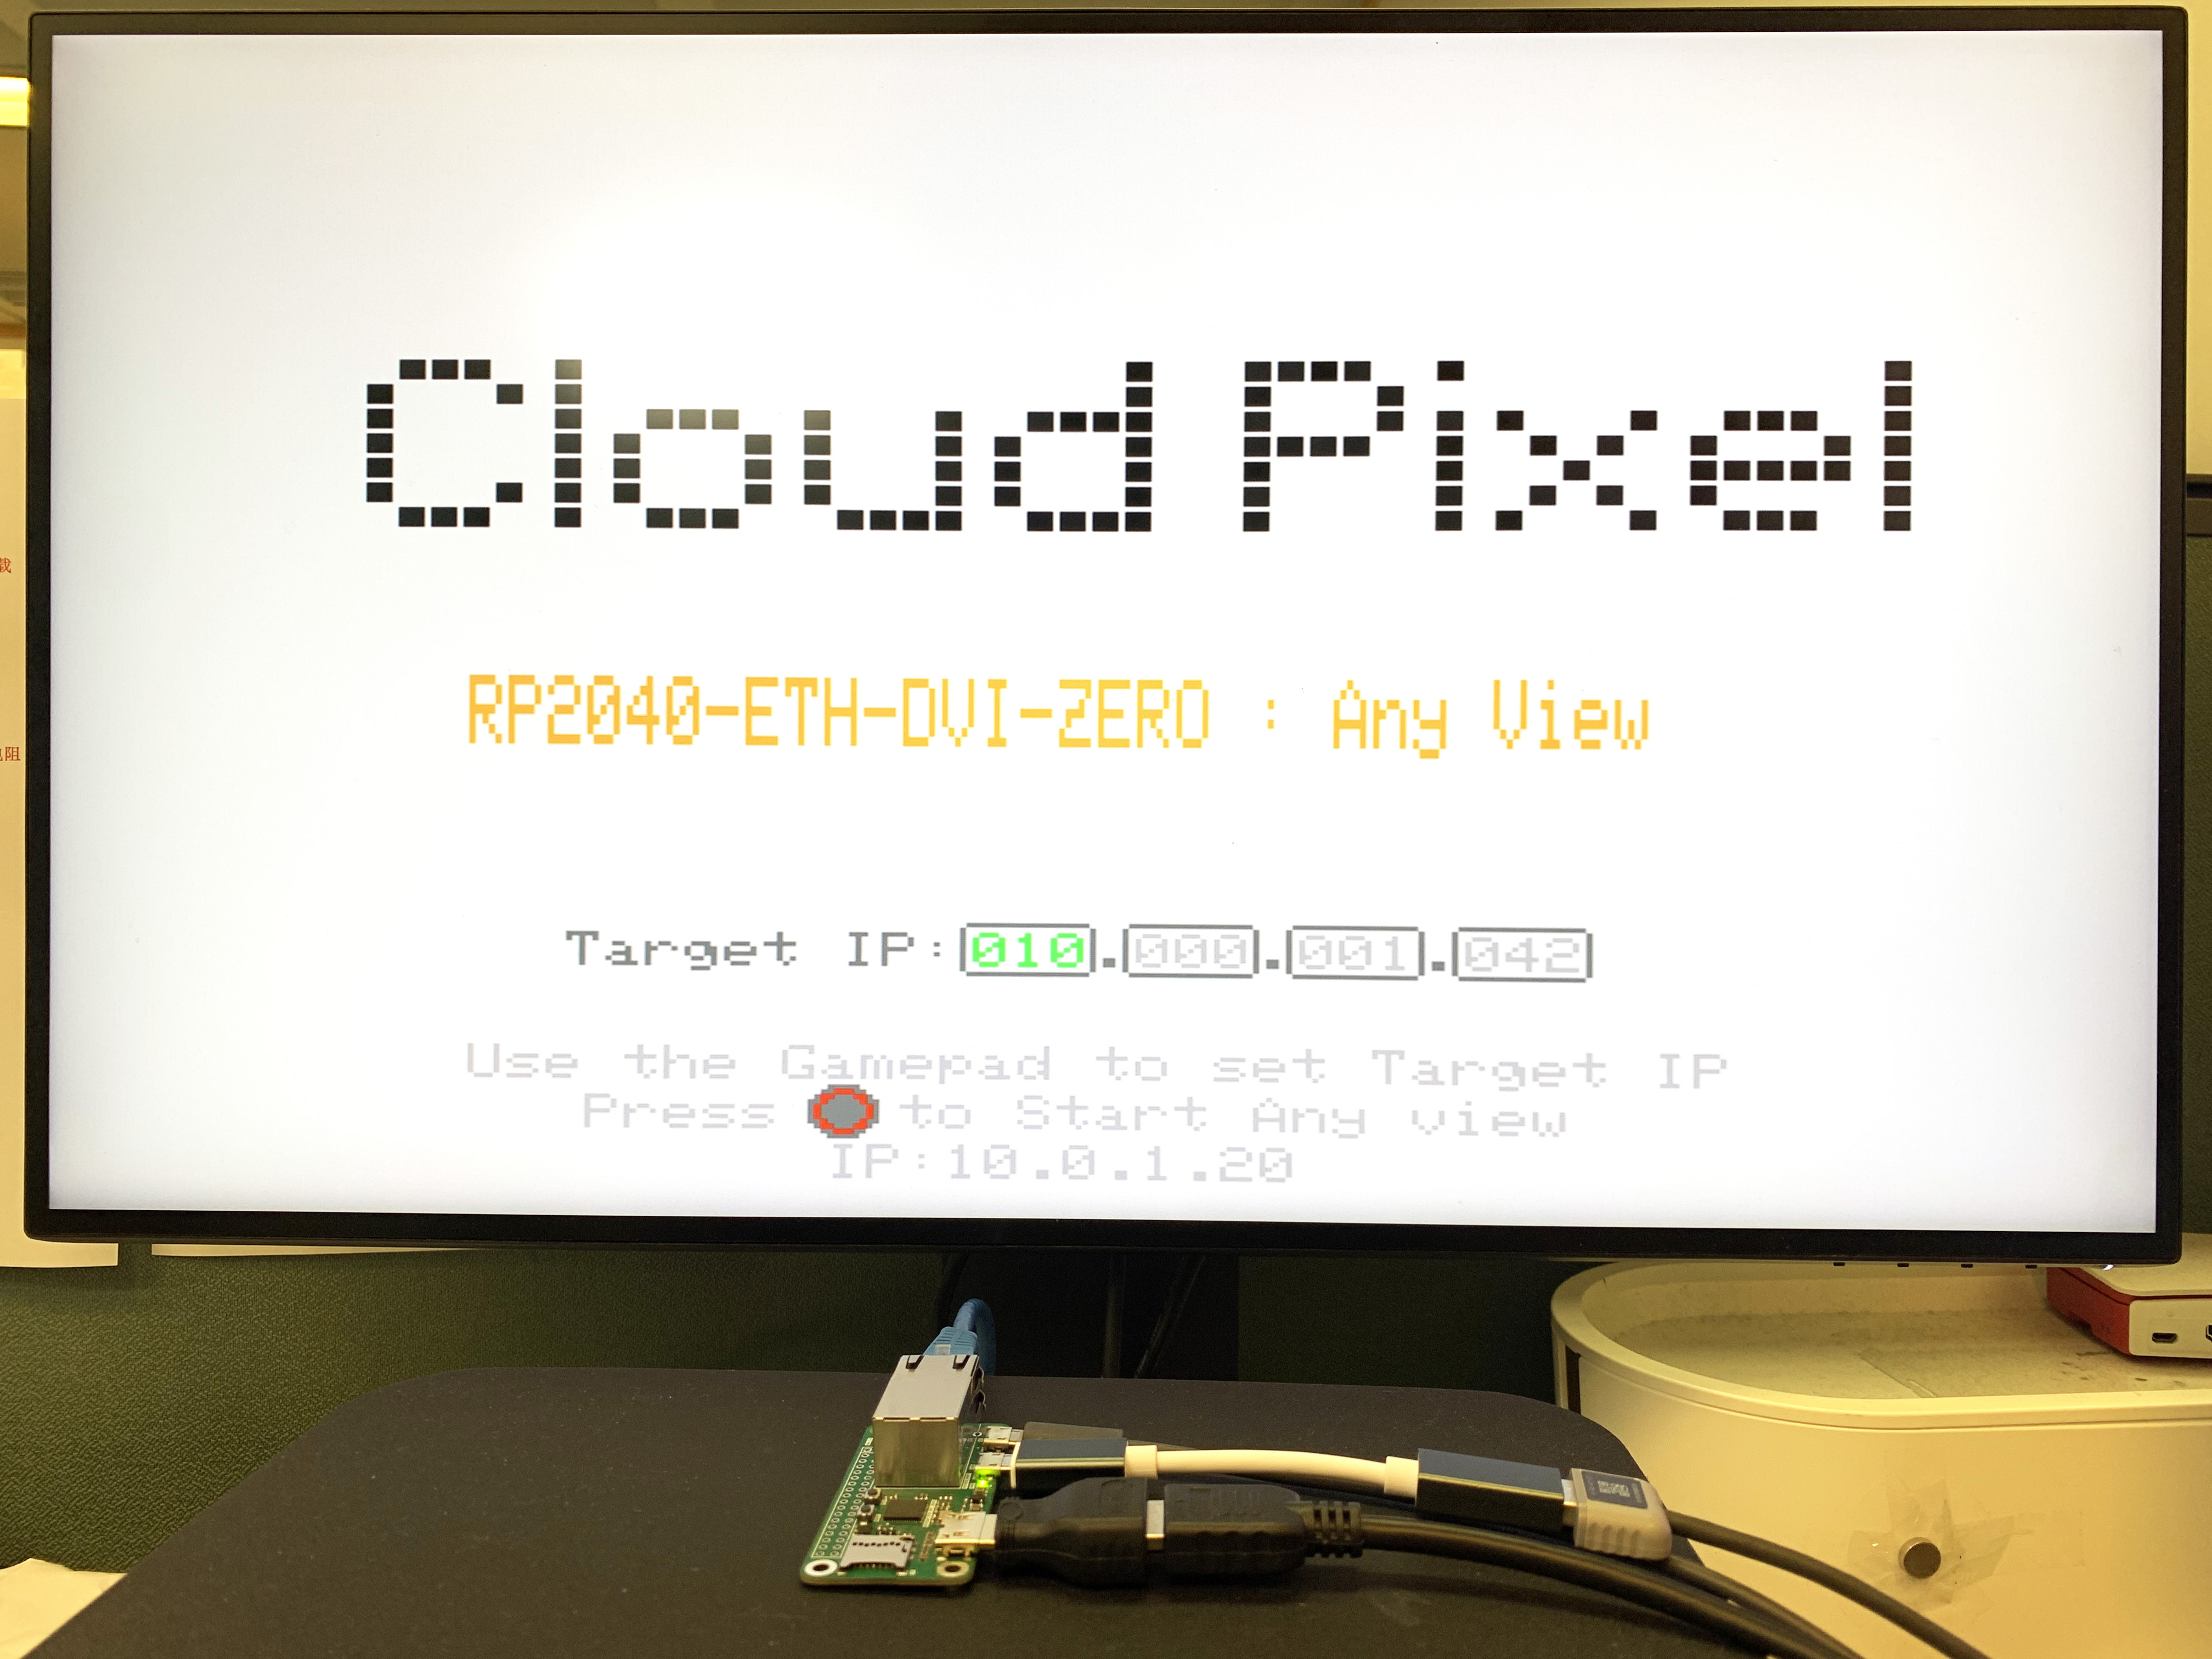
在这个显示画面中,可以用游戏控制器控制“目标IP”的输入,左右方向键选择需要更改IP地址的位置,上下方向键改变IP值的大小。设置完成后,按游戏控制器的“圆圈”键即可启动Any view的应用。
    case show_first_screen:
    {
      display_Cloud_Pixel_Icon(170,80,BLACK);
      display.setTextColor(LIGHTGREY);
      display.setTextSize(1);
      display.setCursor(65, 205);
      display.print("Use the Gamepad to set Target IP");
      display.setCursor(83, 215);
      display.print("Press   to Start Any view");
      display.fillCircle(122,218,5,DARKGREY);
      display.drawCircle(122,218,4,0xf920);
      display.setCursor(120, 225);
      display.print("IP:");
      display.print(Ethernet.localIP());
      display.setTextColor(DARKGREY);
      display.setTextSize(1);
      display.setCursor(80, 182);
      display.print("Target IP:");
      for(uint8_t n = 0; n <4; n++)
      {
        display.drawRoundRect(140+n*25,180,21,11,2,DARKGREY);
        display.setTextColor(LIGHTGREY);
        display.setTextSize(1);
        display.setCursor(140+n*25+2, 182);
        display.printf("%03d",Dest_ip[n]);
        display.setTextColor(DARKGREY);
        if(n<3)
        {
          display.setCursor(140+n*25+20, 182);
          display.print(".");
        }
      }
      currentState = show_set_screen;
    }
    break;
在状态机的show_set_screen中设置Target IP:
    case show_set_screen:
    {
      display.setTextColor(GREEN);
      display.setTextSize(1);
      display.setCursor(140+Dest_ip_num*25+2, 182);
      display.printf("%03d",Dest_ip[Dest_ip_num]);
      if(key_Right)
      {
        key_Right = 0;
        display.setTextColor(LIGHTGREY);
        display.setTextSize(1);
        display.setCursor(140+Dest_ip_num*25+2, 182);
        display.printf("%03d",Dest_ip[Dest_ip_num]);
        if(Dest_ip_num <3)
        {
          Dest_ip_num ++;
        }else{
          Dest_ip_num = 0;
        }
        delay(300);
        key_Right = 0;
      }
      if(key_Left)
      {
        display.setTextColor(LIGHTGREY);
        display.setTextSize(1);
        display.setCursor(140+Dest_ip_num*25+2, 182);
        display.printf("%03d",Dest_ip[Dest_ip_num]);
        if(Dest_ip_num >0)
        {
          Dest_ip_num --;
        }else{
          Dest_ip_num = 3;
        }
        delay(300);
        key_Left = 0;
      }
      if(key_Up)
      {
        display.setTextColor(WHITE);
        display.setTextSize(1);
        display.setCursor(140+Dest_ip_num*25+2, 182);
        display.printf("%03d",Dest_ip[Dest_ip_num]);
        if(Dest_ip[Dest_ip_num]<255)
        {
          Dest_ip[Dest_ip_num]++;
        }
        delay(300);
        key_Up = 0;
      }
      if(key_Down)
      {
        display.setTextColor(WHITE);
        display.setTextSize(1);
        display.setCursor(140+Dest_ip_num*25+2, 182);
        display.printf("%03d",Dest_ip[Dest_ip_num]);
        if(Dest_ip[Dest_ip_num]>0)
        {
          Dest_ip[Dest_ip_num]--;
        }
        delay(300);
        key_Down = 0;
      }
      if(key_Circle)
      {
        Sync_With_eeprom(1);
        currentState = Connect_Dest_ip;
        delay(300);
        key_Circle = 0;
      }
    }
    break;
此时会通过“Sync_With_eeprom”函数保存到虚拟EEPROM中。当后面的参数为0时,读取eeprom中的值;为1时,写入新的值;为2时,清除所有参数值。
void Sync_With_eeprom(uint8_t i)
{
  int addr = 0;
  if(i == 0)
  {
    if(EEPROM.read(0))
    {
      for(uint8_t n = 0; n<4; n++)
      {
        Dest_ip[n] = EEPROM.read(n+1);
      }
    }
  }else if(i == 1){
    EEPROM.write(addr,1);
    for(uint8_t n = 0; n<4; n++)
    {
      EEPROM.write(n+1, Dest_ip[n]);
    }
    EEPROM.commit();
  }
  else if(i == 2)
  {
    for(int i =0; i< 4; i++){
      EEPROM.write(i,0x00);
    }
    EEPROM.commit();
  }
}
在设置界面设置好Target IP后,按下游戏手柄上的“圆圈”键,开始以客户端身份连接“Target IP”服务器。随后RP2040会向服务器发送“GETT”消息,获取新的截图。获取步骤是先获取PC响应消息的四个字节长度,然后根据这个长度,我请求接收RP2040 RAM中的缓存,然后紧接着接收截图图像。在Python程序中,我将截图图像压缩成PNG图片,接收完成后,调用PNG图片解码函数进行解码,并显示在屏幕上。
// Function to draw pixels to the display
void PNGDraw(PNGDRAW *pDraw)
{
  uint16_t usPixels[320];
  uint8_t usMask[320];
  png.getLineAsRGB565(pDraw, usPixels, PNG_RGB565_LITTLE_ENDIAN, 0x00000000);
  png.getAlphaMask(pDraw, usMask, 1);
  display.drawRGBBitmap(image_x, image_y + pDraw->y, usPixels, usMask, pDraw->iWidth,1);
}
你也可以使用USB游戏控制器来控制PC上截图窗口的位置,按左箭头键,窗口会向左移动50像素,按右箭头键,窗口会向右移动50像素,按上箭头键,窗口向上移动50像素,按下箭头键,窗口向下移动50像素,按“十字”键停止截图。
PC端Python:
我正在学习 Python 编程,但目前只能进行简单的修改,还无法独立开发 Python 代码。幸好有了 ChatGPT 的帮助,一切都变得方便多了。
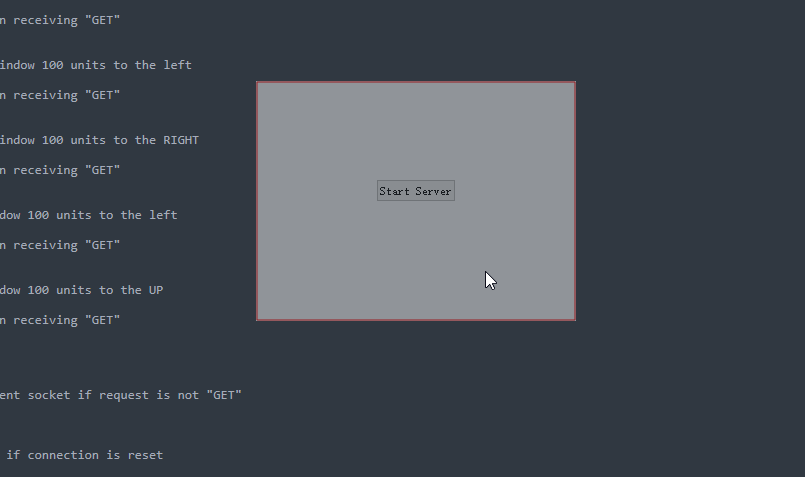
Python代码运行后,屏幕上会显示一个320*240像素的半透明窗口,可以长按鼠标左键移动窗口位置。
当鼠标不在这个窗口上时,为了减少对我们正常使用PC的干扰,我将窗口设置为近乎透明。
当鼠标位于该窗口上时:
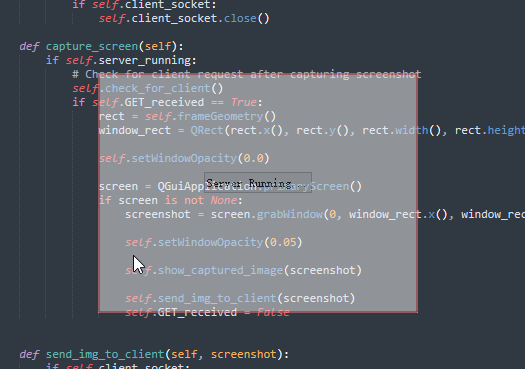
点击窗口中间的“Start Server”,建立TCP服务器监听。等待RP2040-ETH-DVI-ZERO建立通信链路。
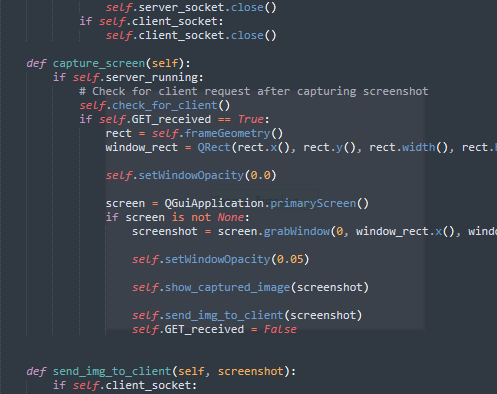
这是Python代码的控制部分,接收W5100S-PORT消息并进行任务处理。
    def check_for_client(self):
        if self.server_socket:
            try:
                self.server_socket.settimeout(0.2)  # Set a short timeout to keep the main loop responsive
                if self.client_socket is None:
                    self.client_socket, client_address = self.server_socket.accept()
                    print(f"Connection from {client_address}")
                else:
                    request = self.client_socket.recv(1024).decode()
                    print(request)
                    if request.strip() == "GETT":
                        print("GETT")
                        self.GET_received = True  # Set the flag upon receiving "GET"
                    elif request.strip() == "LEFT":
                        print("LEFT")
                        self.move(self.x() - 50, self.y())  # Move window 100 units to the left
                        time.sleep(0.1)
                        self.GET_received = True  # Set the flag upon receiving "GET"
                    elif request.strip() == "RIGH":
                        print("RIGHT")
                        self.move(self.x() + 50, self.y())  # Move window 100 units to the RIGHT
                        time.sleep(0.1)
                        self.GET_received = True  # Set the flag upon receiving "GET"
                    elif request.strip() == "UPUP":
                        print("UP")
                        self.move(self.x(), self.y()-50)  # Move window 100 units to the left
                        time.sleep(0.1)
                        self.GET_received = True  # Set the flag upon receiving "GET"
                    elif request.strip() == "DOWN":
                        print("DOWN")
                        self.move(self.x(), self.y()+50)  # Move window 100 units to the UP
                        time.sleep(0.1)
                        self.GET_received = True  # Set the flag upon receiving "GET"
                    else:
                        print(request.strip())
                    # else:
                        # self.client_socket.close()
                        # self.client_socket = None  # Reset the client socket if request is not "GET"
            except socket.timeout:
                pass
            except ConnectionResetError:
                self.client_socket = None  # Reset the client socket if connection is reset
这是截图图像==>PNG压缩==>TCP通信的处理流程。
    def send_img_to_client(self, screenshot):
        if self.client_socket:
            try:
                filename = f"capture_{self.capture_count}.png"
                screenshot.save(filename, "PNG", 50)
                # self.capture_count += 1

                with open(filename, 'rb') as image_file:
                    image_data = image_file.read()
                    image_size = len(image_data)
                    size_bytes = image_size.to_bytes(4, 'big')
                    self.client_socket.sendall(size_bytes)  # Send image size
                    time.sleep(0.1)
                    self.client_socket.sendall(image_data)  # Send image data
                print("Image sent to client.")
            except socket.timeout:
                pass
完毕。


 110
110

 被折叠的 条评论
为什么被折叠?
被折叠的 条评论
为什么被折叠?
 到【灌水乐园】发言


