


一、默认支持的参数类型
1. 需求
打开商品编辑页面,展示商品信息。
2. 需求分析
编辑商品信息,首先要显示商品详情
需要根据商品id查询商品信息,然后展示到页面。
请求的url:/itemEdit.action
参数:id(商品id)
响应结果:商品编辑页面,展示商品详细信息。
3. ItemService接口
编写ItemService接口如下图:

4. ItemServiceImpl实现类
@Override
public Item queryItemById(int id) {
        Item item = this.itemMapper.selectByPrimaryKey(id);
	return item;
}
5. temController
页面点击修改按钮,发起请求:http://127.0.0.1:8080/springmvc-web/itemEdit.action?id=1
需要从请求的参数中把请求的id取出来。Id包含在Request对象中。可以从Request对象中取id。
想获得Request对象只需要在Controller方法的形参中添加一个参数即可。Springmvc框架会自动把Request对象传递给方法。
代码实现:
// 根据id查询商品
@RequestMapping("/itemEdit")
public ModelAndView queryItemById(HttpServletRequest request) {
	// 从request中获取请求参数
	String strId = request.getParameter("id");
	Integer id = Integer.valueOf(strId);

	// 根据id查询商品数据
	Item item = this.itemService.queryItemById(id);

	// 把结果传递给页面
	ModelAndView modelAndView = new ModelAndView();
	// 把商品数据放在模型中
	modelAndView.addObject("item", item);
	// 设置逻辑视图
	modelAndView.setViewName("itemEdit");

	return modelAndView;
}二、默认支持的参数类型
处理器形参中添加如下类型的参数处理适配器会默认识别并进行赋值。
1. HttpServletRequest
通过request对象获取请求信息
2. HttpServletResponse
通过response处理响应信息
3. HttpSession
通过session对象得到session中存放的对象
三、 Model/ModelMap
1. Model
除了ModelAndView以外,还可以使用Model来向页面传递数据,Model是一个接口,在参数里直接声明model即可。
如果使用Model则可以不使用ModelAndView对象,Model对象可以向页面传递数据,View对象则可以使用String返回值替代。
不管是Model还是ModelAndView,其本质都是使用Request对象向jsp传递数据。
代码实现:
//根据id查询商品,使用Model
@RequestMapping("/itemEdit")
public String queryItemById(HttpServletRequest request, Model model) {
	// 从request中获取请求参数
	String strId = request.getParameter("id");
	Integer id = Integer.valueOf(strId);

	// 根据id查询商品数据
	Item item = this.itemService.queryItemById(id);

	// 把结果传递给页面
	// ModelAndView modelAndView = new ModelAndView();
	// 把商品数据放在模型中
	// modelAndView.addObject("item", item);
	// 设置逻辑视图
	// modelAndView.setViewName("itemEdit");

	// 把商品数据放在模型中
	model.addAttribute("item", item);

	return "itemEdit";
}
2. ModelMap
ModelMap是Model接口的实现类,也可以通过ModelMap向页面传递数据使用Model和ModelMap的效果一样,如果直接使用Model,Springmvc会实例化ModelMap。
代码实现:
//根据id查询商品,使用ModelMap
@RequestMapping("/itemEdit")
public String queryItemById(HttpServletRequest request, ModelMap model) {
	// 从request中获取请求参数
	String strId = request.getParameter("id");
	Integer id = Integer.valueOf(strId);

	// 根据id查询商品数据
	Item item = this.itemService.queryItemById(id);

	// 把结果传递给页面
	// ModelAndView modelAndView = new ModelAndView();
	// 把商品数据放在模型中
	// modelAndView.addObject("item", item);
	// 设置逻辑视图
	// modelAndView.setViewName("itemEdit");

	// 把商品数据放在模型中
	model.addAttribute("item", item);

	return "itemEdit";
}
四、 绑定简单类型
当请求的参数名称和处理器形参名称一致时会将请求参数与形参进行绑定。这样,从Request取参数的方法就可以进一步简化。
//根据id查询商品,绑定简单数据类型
@RequestMapping("/itemEdit")
public String queryItemById(int id, ModelMap model) {
	// 根据id查询商品数据
	Item item = this.itemService.queryItemById(id);

	// 把商品数据放在模型中
	model.addAttribute("item", item);

	return "itemEdit";
}
1. 支持的数据类型
参数类型 推荐使用包装数据类型,因为基础数据类型不可以为null整形:Integer、int
字符串:String
单精度:Float、float
双精度:Double、double
布尔型:Boolean、boolean
说明:对于布尔类型的参数,请求的参数值为true或false。或者1或0
请求url:
http://localhost:8080/xxx.action?id=2& status=false
处理器方法:
public String editItem(Model model,Integer id, Boolean status)
2. @RequestParam
使用@RequestParam常用于处理简单类型的绑定。
value:参数名字,即入参的请求参数名字,如value=“itemId”表示请求的参数区中的名字为itemId的参数的值将传入
required:是否必须,默认是true,表示请求中一定要有相应的参数,否则将报错TTP Status 400 - Required Integer parameter 'XXXX' is not present
defaultValue:默认值,表示如果请求中没有同名参数时的默认值
定义如下:
@RequestMapping("/itemEdit")
public String queryItemById(@RequestParam(value = "itemId", required = true, defaultValue = "1") Integer id,
		ModelMap modelMap) {
	// 根据id查询商品数据
	Item item = this.itemService.queryItemById(id);

	// 把商品数据放在模型中
	modelMap.addAttribute("item", item);

	return "itemEdit";
}
五、 绑定pojo类型
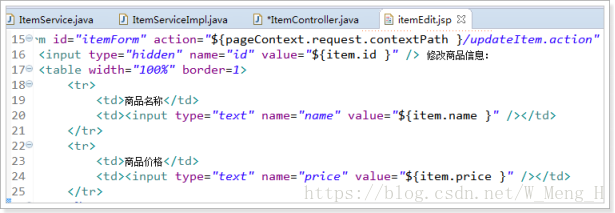
1. 使用pojo接收表单数据
如果提交的参数很多,或者提交的表单中的内容很多的时候,可以使用简单类型接受数据,也可以使用pojo接收数据。
要求:pojo对象中的属性名和表单中input的name属性一致。
页面定义如下图:
Pojo如下图:
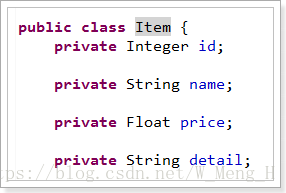
请求的参数名称和pojo的属性名称一致,会自动将请求参数赋值给pojo的属性。
2. ItemController
//更新商品,绑定pojo类型
@RequestMapping("/updateItem")
public String updateItem(Item item) {
	// 调用服务更新商品
	this.itemService.updateItemById(item);

	// 返回逻辑视图
	return "success";
}注意:提交的表单中不要有日期类型的数据,否则会报400错误。如果想提交日期类型的数据需要用到后面的自定义参数绑定的内容。
3. 解决post乱码问题
提交发现,保存成功,但是保存的是乱码
在web.xml中加入:
<!-- 解决post乱码问题 -->
<filter>
	<filter-name>encoding</filter-name>
	<filter-class>org.springframework.web.filter.CharacterEncodingFilter</filter-class>
	<!-- 设置编码参是UTF8 -->
	<init-param>
		<param-name>encoding</param-name>
		<param-value>UTF-8</param-value>
	</init-param>
</filter>
<filter-mapping>
	<filter-name>encoding</filter-name>
	<url-pattern>/*</url-pattern>
</filter-mapping>以上可以解决post请求乱码问题。
对于get请求中文参数出现乱码解决方法有两个:修改tomcat配置文件添加编码与工程编码一致,如下:
<Connector URIEncoding="utf-8" connectionTimeout="20000" port="8080" protocol="HTTP/1.1" redirectPort="8443"/>另外一种方法对参数进行重新编码:
String userName new
String(request.getParamter("userName").getBytes("ISO8859-1"),"utf-8")ISO8859-1是tomcat默认编码,需要将tomcat编码后的内容按utf-8编码
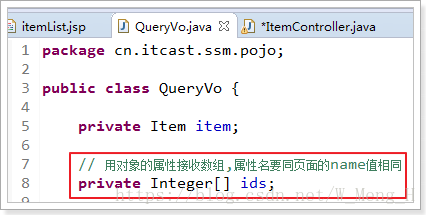
六、 绑定包装pojo
包装对象定义如下:
public class QueryVo {
	private Item item;
        set/get...
}
页面定义如下图:
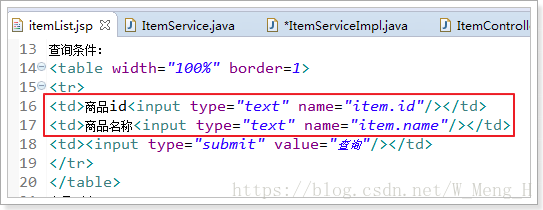
接收查询条件:
// 绑定包装数据类型
@RequestMapping("/queryItem")
public String queryItem(QueryVo queryVo) {
	System.out.println(queryVo.getItem().getId());
	System.out.println(queryVo.getItem().getName());
        return "success";
}
七、 自定义参数绑定
1. 需求
在商品修改页面可以修改商品的生产日期,并且根据业务需求自定义日期格式。
2. 需求分析
由于日期数据有很多种格式,springmvc没办法把字符串转换成日期类型。所以需要自定义参数绑定。
前端控制器接收到请求后,找到注解形式的处理器适配器,对RequestMapping标记的方法进行适配,并对方法中的形参进行参数绑定。可以在springmvc处理器适配器上自定义转换器Converter进行参数绑定。
一般使用<mvc:annotation-driven/>注解驱动加载处理器适配器,可以在此标签上进行配置。
如下图修改itemEdit.jsp页面,显示时间:
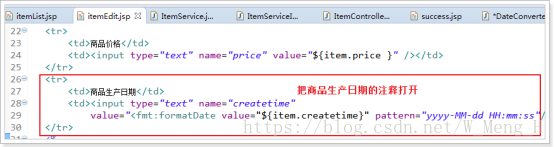
3. 自定义Converter
//Converter<S, T>
//S:source,需要转换的源的类型
//T:target,需要转换的目标类型
public class DateConverter implements Converter<String, Date> {
	@Override
	public Date convert(String source) {
		try {
			// 把字符串转换为日期类型
			SimpleDateFormat simpleDateFormat = new SimpleDateFormat("yyy-MM-dd HH:mm:ss");
			Date date = simpleDateFormat.parse(source);

			return date;
		} catch (ParseException e) {
			// TODO Auto-generated catch block
			e.printStackTrace();
		}
		// 如果转换异常则返回空
		return null;
	}
}
4. 配置Converter
我们同时可以配置多个的转换器。类似usb设备,可以接入多个usb设备。
<!-- 配置注解驱动 -->
<!-- 如果配置此标签,可以不用配置... -->
<mvc:annotation-driven conversion-service="conversionService" />

<!-- 转换器配置 -->
<bean id="conversionService" class="org.springframework.format.support.FormattingConversionServiceFactoryBean">
	<property name="converters">
		<set>
			<bean class="cn.itcast.springmvc.converter.DateConverter" />
		</set>
	</property>
</bean>八、绑定数组
1. 需求
在商品列表页面选中多个商品,然后删除。
2. 需求分析
功能要求商品列表页面中的每个商品前有一个checkbok,选中多个商品后点击删除按钮把商品id传递给Controller,根据商品id删除商品信息。可以获取id的数组
3. Jsp修改
修改itemList.jsp页面,增加多选框,提交url是queryItem.action
<form action="${pageContext.request.contextPath }/queryItem.action" method="post">
查询条件:
<table width="100%" border=1>
<tr>
<td>商品id<input type="text" name="item.id" /></td>
<td>商品名称<input type="text" name="item.name" /></td>
<td><input type="submit" value="查询"/></td>
</tr>
</table>
商品列表:
<table width="100%" border=1>
<tr>
	<td>选择</td>
	<td>商品名称</td>
	<td>商品价格</td>
	<td>生产日期</td>
	<td>商品描述</td>
	<td>操作</td>
</tr>
<c:forEach items="${itemList }" var="item">
<tr>
	<td><input type="checkbox" name="ids" value="${item.id}"/></td>
	<td>${item.name }</td>
	<td>${item.price }</td>
	<td><fmt:formatDate value="${item.createtime}" pattern="yyyy-MM-dd HH:mm:ss"/></td>
	<td>${item.detail }</td>

	<td><a href="${pageContext.request.contextPath }/itemEdit.action?id=${item.id}">修改</a></td>

</tr>
</c:forEach>

</table>
</form>本身属于一个form表单,提交url是queryItem.action
4. Controller
Controller方法中可以用String[]接收,或者pojo的String[]属性接收。两种方式任选其一即可。
定义QueryVo,如下图:
ItemController修改queryItem方法:
//包装类型 绑定数组类型,可以使用两种方式,pojo的属性接收,和直接接收
@RequestMapping("queryItem")
public String queryItem(QueryVo queryVo, Integer[] ids) {

	System.out.println(queryVo.getItem().getId());
	System.out.println(queryVo.getItem().getName());

	System.out.println(queryVo.getIds().length);
	System.out.println(ids.length);

	return "success";
}
九、 将表单的数据绑定到List
1. 需求
实现商品数据的批量修改。
2. 开发分析
开发分析
1. 在商品列表页面中可以对商品信息进行修改。
2. 可以批量提交修改后的商品数据。
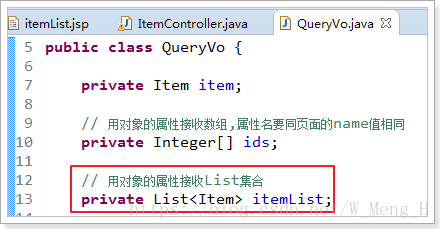
3. 定义pojo
List中存放对象,并将定义的List放在包装类QueryVo中
使用包装pojo对象接收,如下图:
4. Jsp改造
name属性必须是list属性名+下标+元素属性。
Jsp做如下改造:
<c:forEach items="${itemList }" var="item" varStatus="s">
<tr>
	<td><input type="checkbox" name="ids" value="${item.id}"/></td>
	<td>
		<input type="hidden" name="itemList[${s.index}].id" value="${item.id }"/>
		<input type="text" name="itemList[${s.index}].name" value="${item.name }"/>
	</td>
	<td><input type="text" name="itemList[${s.index}].price" value="${item.price }"/></td>
	<td><input type="text" name="itemList[${s.index}].createtime" value="<fmt:formatDate value="${item.createtime}" pattern="yyyy-MM-dd HH:mm:ss"/>"/></td>
	<td><input type="text" name="itemList[${s.index}].detail" value="${item.detail }"/></td>

	<td><a href="${pageContext.request.contextPath }/itemEdit.action?id=${item.id}">修改</a></td>

</tr>
</c:forEach>${status.first} 判断当前项是否为集合中的第一项,返回值为true或false
${status.last} 判断当前项是否为集合中的最
varStatus属性常用参数总结下:
${status.index} 输出行号,从0开始。
${status.count} 输出行号,从1开始。
${status.后一项,返回值为true或false
begin、end、step分别表示:起始序号,结束序号,跳跃步伐。
注意:接收List类型的数据必须是pojo的属性,如果方法的形参为ArrayList类型无法正确接收到数据。


 1296
1296

 被折叠的 条评论
为什么被折叠?
被折叠的 条评论
为什么被折叠?
 到【灌水乐园】发言


