


1,springboot自动装配原理
1.1, springboot自动包扫描
Spring Boot的自动装配实际上是从META-INF/spring.factories文件中获取到对应的需要进行自动装配的类,并生成相应的Bean对象,然后将它们交给Spring容器进行管理.
springboot默认扫描的包是哪些? 主类所在的包以及子包。---为什么是这样? 能不能认为改动?一定在主类上的@SpringBootApplication上.


 public void registerBeanDefinitions(AnnotationMetadata metadata, BeanDefinitionRegistry registry) {
            //注册扫描的包---getPackageNames得到要扫描的包名。--默认为主类所在的包
            AutoConfigurationPackages.register(registry, (String[])(new AutoConfigurationPackages.PackageImports(metadata)).getPackageNames().toArray(new String[0]));
        }
我们可以在主类上使用@ComponentScan来修改默认的包扫描
@ComponentScan(basePackages = {"com.ykq.aaa"}) //那么就不会使用默认的包扫描路径了

1,2 ,自动装配原理
springboot 有没有注册DispatcherServlet. 为何能找到controller层。
<!--注册DispatchServlet-->
<servlet>
 <servlet-name>springmvc</servlet-name>
 <servlet-class>org.springframework.web.servlet.DispatcherServlet</servlet-class>
 <!--如果没有指定参数默认解析WEB-INF/servlerName-servlet.xml-->
 <init-param>
   <param-name>contextConfigLocation</param-name>
   <param-value>classpath*:spring.xml</param-value>
 </init-param>
</servlet>
<servlet-mapping>
 <servlet-name>springmvc</servlet-name>
 <url-pattern>/</url-pattern>
</servlet-mapping>
springboot帮你完成自动装配

protected AutoConfigurationImportSelector.AutoConfigurationEntry getAutoConfigurationEntry(AnnotationMetadata annotationMetadata) {
        if (!this.isEnabled(annotationMetadata)) {
            return EMPTY_ENTRY;
        } else {
            AnnotationAttributes attributes = this.getAttributes(annotationMetadata);
            List<String> configurations = this.getCandidateConfigurations(annotationMetadata, attributes);
            configurations = this.removeDuplicates(configurations);
            Set<String> exclusions = this.getExclusions(annotationMetadata, attributes);
            this.checkExcludedClasses(configurations, exclusions);
            configurations.removeAll(exclusions);
            configurations = this.getConfigurationClassFilter().filter(configurations);
            this.fireAutoConfigurationImportEvents(configurations, exclusions);
            return new AutoConfigurationImportSelector.AutoConfigurationEntry(configurations, exclusions);
        }
    }
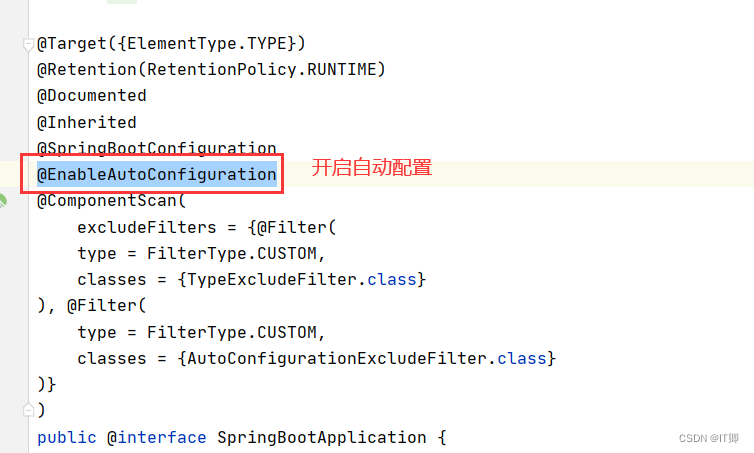
 当主函数运行时会加载一个使用@SpringBootApplication注释的类,@SpringbootApplication它是一个复合组件。其中@EnableAutoConfiguration它是开启自动配置的核心注解,该注解也是一个复合组件,其中@Import({AutoConfigurationImportSelector.class}) ,该注解需要导入一个AutoConfigurationImportSelector类,该类会加载你需要的自动装配类,而这些自动装配类会完成响应的自动装配功能。
2. springboot整合第三方框架
2.1 springboot整合mybatis
(1)依赖
<!--mysql的驱动-->
        <dependency>
            <groupId>mysql</groupId>
            <artifactId>mysql-connector-java</artifactId>
        </dependency>
        <!--mybatis启动依赖:DataSourceAutoConfiguration:读取application配置文件中以spring.datasource -->
        <dependency>
            <groupId>org.mybatis.spring.boot</groupId>
            <artifactId>mybatis-spring-boot-starter</artifactId>
            <version>2.1.2</version>
        </dependency>
(2)配置文件
#数据源信息
spring.datasource.driver-class-name=com.mysql.cj.jdbc.Driver
# characterEncoding防止您添加到数据的数据出现乱码。
spring.datasource.url=jdbc:mysql://localhost:3306/qy165?serverTimezone=Asia/Shanghai&characterEncoding=UTF8
spring.datasource.username=root
spring.datasource.password=root

#指定mybatis映射文件的路径 classpath编译后的路径
mybatis.mapper-locations=classpath:mapper/*.xml
#控制台打印sql日志
mybatis.configuration.log-impl=org.apache.ibatis.logging.stdout.StdOutImpl
(3)创建实体类和dao接口
@Data
public class Dept {
    private Integer id;
    private String name;
    private String loc;
}
public interface DeptDao {
public List<Dept> findAll();
}(4)在主启动类上添加
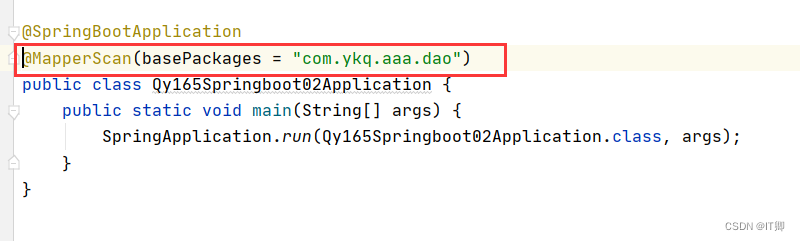
(5)测试
@SpringBootTest(classes = Qy165Springboot02Application.class)
//springboot提供了单元测试
class Qy165Springboot02ApplicationTests {
    @Autowired
    private DeptDao deptDao; //无法注入DeptDao的对象。为什么无法注入?[spring容器中没有dao接口的代理实现类]
    @Test
    void contextLoads() {
        deptDao.findAll().stream().forEach(System.out::println);
    }

}
3. springboot整合pageHelper
3.1springboot整合pageHelper
  <!--pageHelper-->
        <dependency>
            <groupId>com.github.pagehelper</groupId>
            <artifactId>pagehelper-spring-boot-starter</artifactId>
            <version>1.4.6</version>
        </dependency>
代码:
@Test
    void contextLoads() {
        PageHelper.startPage(2,3);
        List<Dept> all = deptDao.findAll();
        //把查询的结果封装到PageInfo中
        PageInfo<Dept> pageInfo=new PageInfo<>(all);
        System.out.println("总页数:"+pageInfo.getPages());
        System.out.println("总条数:"+pageInfo.getTotal());
        System.out.println("当前页的记录:");
        List<Dept> list = pageInfo.getList();
        list.stream().forEach(System.out::println);
    }


 2618
2618


 被折叠的 条评论
为什么被折叠?
被折叠的 条评论
为什么被折叠?
 到【灌水乐园】发言


