


目录
一、文档说明
使用一台操作系统为CentOS7的虚拟机安装部署数据库PostgreSQL, 启动并初始化PostgreSQL后作为数据库服务端;再使用另一台操作系统为Ubuntu16的虚拟机作为客户端通过Python访问服务端的数据库服务。
二、操作系统版本查询与yum源配置
>服务端
1) 操作系统版本及网络地址查询

2) yum源配
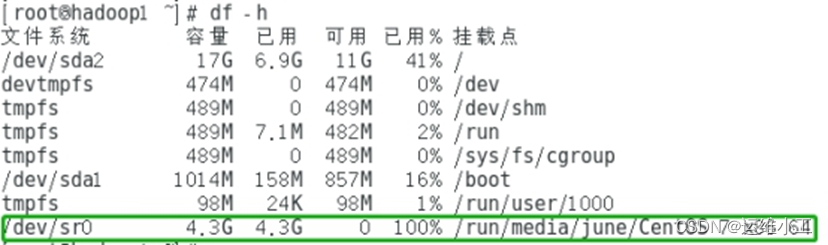
1.在虚拟机设置中选择CD/DVD,使用ISO映象文件![]()
,系统启动后光驱设备会自动挂载,如下图所示。如果系统版本不支持光驱设备自动挂载,则需手动挂载,操作如下:
①查找光驱文件: /dev/cdrom
注:由于本系统做了软连接,所以/dev/cdrom与/dev/sr0所用光驱文件一致。![]()
②建立光驱挂载文件夹: mkdir /mnt/centos
③将光驱文件挂载至已建光驱文件夹:mount /dev/cdrom /mnt/centos

2.本地拷贝保留CentOS7镜像文件并配置本地yum源
[root@hadoop1 ~]# mkdir /mnt/centos7
[root@hadoop1 ~]# cd /run/media/june/CentOS\ 7\ x86_64/
[root@hadoop1 ~]# cp -r * /mnt/centos7/
[root@hadoop1 ~]# cd /etc/yum.repos.d/
[root@hadoop1 ~]# touch CentOS-Local.repo
在/etc/yum.repos.d/目录下新建一个文件CentOS-Local.repo并配置如下,baseurl为本地保留的镜像文件地址,enabled=1表示启用该yum源

[root@hadoop1 ~]# yum list 查看软件包列表
注:使用yum help学习yum命令和参数设置,所有安装记录日志保留在/etc/yum.conf指定的logfile=/var/log/yum.log文件中。
>客户端
操作系统版本及网络地址查询

三、PostgreSQL检查与卸载
1) PostgreSQL检查
当前系统使用Postgresql服务器版本与psql版本不一致,如下图所示,Postgresql服务器使用9.5版本,而系统默认psql为9.2版本

该问题解决办法如下:
① 通过find / -name psql 查找系统所有psql版本配置路径
② 重命名当前psql为psql9.2后建立一个软连接使当前psql配置路径指向pgsql-9.5对应的psql
![]()
③ 再次检查psql版本和postgres服务,如图psql版本与postgresql服务器版本一致

2) Postgresql卸载
①删除postgresql所有相关软件包yum remove postgre*,包括postgresql9.5版本和postgresql9.2版本,已删除的软件包信息写入日志/var/log/yum.log

②删除相关目录文件, 安装目录文件/usr/pgsql*与数据目录文var/lib/psql

③删除postgresql相关用户组和用户

四、PostgreSQL10 Yum安装与部署
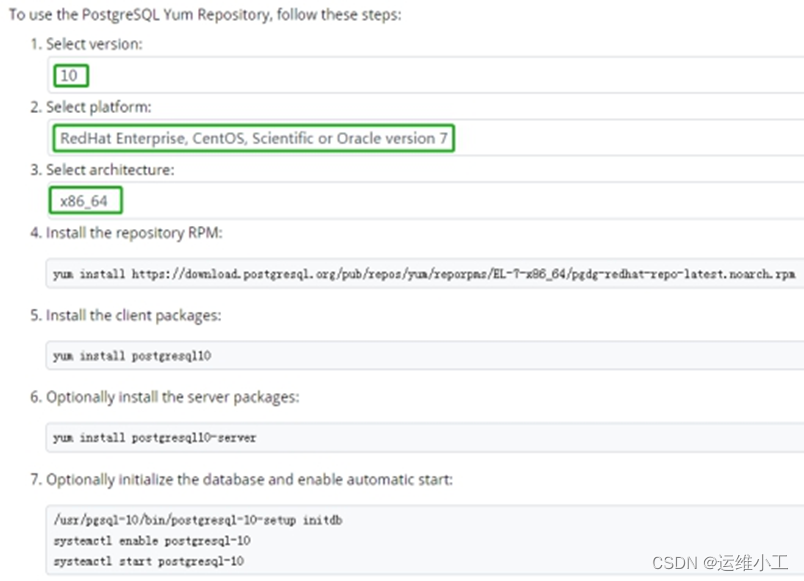
1) 登录 PostgreSQL: Linux downloads (Red Hat family)
2) 选择PostgreSQL版本为10,平台操作系统为CentOS7,x86架构为64位,根据官网建议安装最新系统仓库RPM包,客户端软件包和服务端软件包
[root@hadoop1 ~]# yum install Index of /pub/repos/yum/
reporpms/EL-7-x86_64/pgdg-redhat-repo-latest.noarch.rpm
[root@hadoop1 ~]# yum install postgresql10
[root@hadoop1 ~]# yum install postgresql10-server
安装完毕后即可查看当前版本为PostgreSQL10.11

3) 初始化数据库
![]()
数据库初始化会在/var/lib/pgsql目录下创建名称为10的文件夹,10为数据库版本号,该文件夹中有data文件夹;默认会创建一个名为postgres的系统用户,可以通过passwd命令修改其密码
4) 设置开机自启
[root@hadoop1 ~]# systemctl enable postgresql-10.service
5) 启动数据库服务,查看数据库服务
[root@hadoop1 ~]# systemctl start postgresql-10.service
[root@hadoop1 ~]# systemctl status postgresql-10.service

6) 检查数据库服务的进程与端口
ps -ef | grep postgres
netstat -anp | grep 5432

五、启动并测试数据库
1) 开启远程访问
vi /var/lib/pgsql/10/data/postgresql.conf
修改#listen_addresses = 'localhost' 为 listen_addresses='*'
当然,此处‘*’也可以改为任何你想开放的服务器IP
2) 信任远程连接
vi /var/lib/pgsql/10/data/pg_hba.conf
修改IPv4 本地连接地址127.0.0.1/32为0.0.0.0/0,对应连接方式改为md5验证方式

3) 打开防火墙
CentOS 防火墙中内置了PostgreSQL服务,根据/usr/lib/firewalld/services/postgresql.xml配置文件提示,需放开防火墙端口5432/tcp,开放postgres服务,执行如下:
systemctl status firewalld
firewall-cmd --permanent --add-port=5432/tcp
firewall-cmd --reload 重载防火墙
firewall-cmd --list-all 查看防火墙
4) 重启PostgreSQL服务
systemctl restart postgresql-10.service
5) 连接默认的postgres数据库并修改用户名为postgres的密码

6) 创建并测试数据库
首先创建一个新用户shu赋予其超级用户权限并更改其口令,再创建数据库shudb使shu能操作该数据库
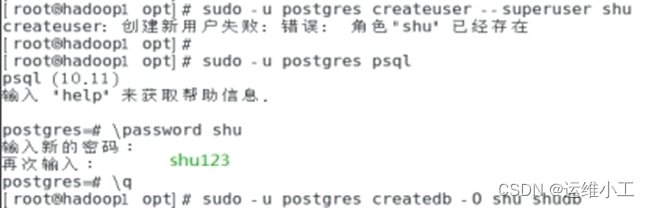
用户shu登录数据库shudb,创建mytable表并测试基础sql功能

六、配置虚拟机网络
1) CentOS与Ubuntu虚拟机网络连接模式都设置为桥接模式
首先作为数据库服务端的虚拟机CentOS7与作为数据库客户端的虚拟机Ubuntu16都需要采用桥接的网络连接方式,在虚拟机启动前选择虚拟机--设置--网络适配器--网络连接并勾选桥接模式,确认后再启动虚拟机

虚拟机三种网络连接模式的区别:(自己的理解,可能不准确~)
①桥接模式:直接连接物理网络,虚拟机网络使用与主机网络(192.168.124.7/24)同网段的IP地址,并且通过自己的IP地址访问外网
②NAT模式:用于共享主机的IP地址,虚拟机的网络使用主机网络的一个子网IP地址,能够访问外网,但是通过主机的IP地址访问外网
③仅主机模式:与主机共享的专用网络,不能访问外网


Win7主机网络:IPv4 192.168.124.7/24

>服务端
CentOS7.4网络: IPv4 192.168.124.49/24

>客户端
Ubuntu16.4 网络:IPv4 192.168.124.50/24

2) 将作为数据库服务器的CentOS网络改为静态网络地址
先将网卡ens33断开,修改配置文件ifcfg-ens33,保存修改内容后再连接网卡ens33,最后重启一下网络即可

注:重启网络的命令建议使用service network restart
当前使用网卡ens33的配置文件:/etc/sysconfig/network-scripts/ifcfg-ens33
原动态IP配置如下

修改为静态IP后配置如下

3) 测试网络
Ping外网能通,如百度首页IP 180.101.49.12 但执行yum install postgresql10-devel报错

检查yum源配置无误后清理yum缓存再重新创建元数据缓存yum clean all
yum makecache,继续报错如下
![]()
根据网友建议修改文件/etc/resolv.conf,新增两个域名服务地址,并将该地址加入当前使用网卡ens33的配置文件
[root@hadoop1 ~]# vi /etc/resolv.conf
![]()
[root@hadoop1 ~]# ifdown ens33
[root@hadoop1 ~]# vi /etc/sysconfig/network-scripts/ifcfg-ens33
[root@hadoop1 ~]# ifup ens33
[root@hadoop1 ~]# service network restart
![]()
/etc/sysconfig/network-scripts/ifcfg-ens33最新配置信息如下所示,新增DNS1=8.8.8.8与DNS2=8.8.4.4

最后能正确执行以下yum命令,不提示错误
建议安装postgresql10-contrib与postgresql10-devel
yum makecache
yum install postgresql10-contrib
yum install postgresql10-devel

七、Python安装
1) CentOS7安装Python 2.7.5
①获取安装包
由于虚拟机的网络采用桥接模式,所以直接可以使用curl或者wget命令获得外网资源,如setuptools与pip安装包。如果本地有安装包,那借用ftp或者filezilla等文件传输工具上传即可,建议使用tar.gz类型安装包,如图pip-1.5.4.tar.gz与setuptools-2.0.tar.gz

②安装setuptools
[root@hadoop1 opt]# sudo tar -zxvf setuptools-2.0.tar.gz -C /opt
[root@hadoop1 opt]# cd setuptools-2.0/
[root@hadoop1 opt]# python setup.py build
[root@hadoop1 opt]# python setup.py install
③安装pip
[root@hadoop1 opt]# tar -xzvf pip-1.5.4.tar.gz –C /opt
[root@hadoop1 opt]# cd pip-1.5.4
[root@hadoop1 opt]# python setup.py install
[root@hadoop1 opt]# python -V
Python 2.7.5
④安装所需的python包,比如访问postgreSQL数据库需要的psycopg2
[root@hadoop1 pip-1.5.4]#pip install psycopg2
[root@hadoop1 pip-1.5.4]# find / -name psycopg2
/usr/lib64/python2.7/site-packages/psycopg2
2) Ubuntu16安装Python 2.7.5
root@ubuntu:~# sudo apt-get install python
root@ubuntu:~# sudo apt-get install libpq-dev python-dev
root@ubuntu:~# sudo apt-get install python-pip
root@ubuntu:~# pip install psycopg2
八、远程访问服务端数据库服务
1) Ubuntu虚拟机远程访问数据库服务
将服务器上的python连接数据库的脚本上传到客户端,上传成功后修改脚本的host地址,将之前本地访问时设置的127.0.0.1改为服务器端的虚拟机地址192.168.124.49
root@ubuntu:~# scp root@192.168.124.49:/opt/postgresqlConnect.py /opt/
root@ubuntu:~# vi /opt/postgresqlConnect.py

Python 安装psycopg2后即可运行该数据库访问脚本,成功获取远程数据库服务

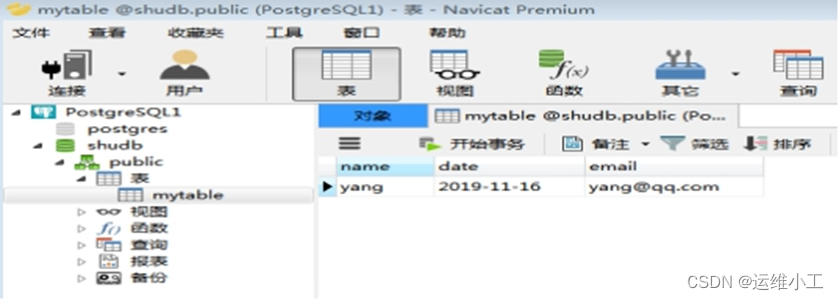
2) 主机远程访问PostgreSQL数据库服务
检查服务器上postgres服务已开启,主机通过Navicat成功远程访问服务器上的数据库服务,如图所示

九、PostgreSQL11 源码安装与部署
使用源码安装PG11.5
postgresql源码安装 - monkey6 - 博客园


安装依赖包
yum install -y perl-ExtUtils-Embed readline-devel zlib-devel pam-devel libxml2-devel libxslt-devel openldap-devel python-devel gcc-c++ openssl-devel cmake
安装配置
./configure --prefix=/usr/local/pgsql-11.5 --with-wal-segsize=512 --with-wal-blocksize=16 --with-pgport=5432 --with-segsize=1 --with-blocksize=8 --with-libedit-preferred --with-perl --with-openssl --with-libxml --with-libxslt --enable-thread-safety --enable-nls=en_US.UTF-8
编译 make
安装 make install
[root@node7 opt]# useradd postgres
[root@node7 opt]# mkdir pgdata
[root@node7 opt]# chown -R postgres:postgres pgdata/
[root@node7 local]# ln -sf /usr/local/pgsql-11.5/ /usr/local/pgsql
[root@node7 local]# su - postgres
[postgres@node7 ~]$ . ~/.bashrc
export PGDATA=/opt/pgdata
export PGHOME=/usr/local/pgsql
export LD_LIBRARY_PATH=$LD_LIBRARY_PATH:$PGHOME/lib
export PATH=$PATH:$PGHOME/bin
[postgres@node7 ~]$ initdb
[postgres@node7 ~]$ pg_ctl -D /opt/pgdata -l logfile start
waiting for server to start.... done
server started
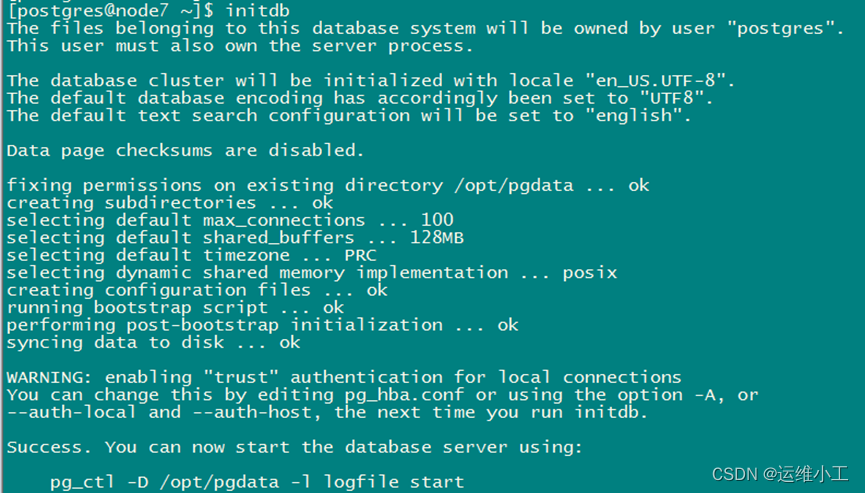

PostgreSQL数据库创建一个postgres用户作为数据库的管理员,密码随机,所以需要修改密码,方式如下:

十、Windows安装PostgreSQL13
1.下载与安装pg
Download PostgreSQL 下载pg
PostgreSQL10.5安装详细步骤(Win10)_DrugAI的博客-CSDN博客_postgresql win10 安装 安装pg
2.设置环境变量
PG_HOME D:\BASKET\postgresql13
PGDATA %PG_HOME%\data
path %PG_HOME%\bin
3.注册windows服务
pg_ctl.exe register -N "postgres" -D "D:\BASKET\postgresql-13.0.1\data"
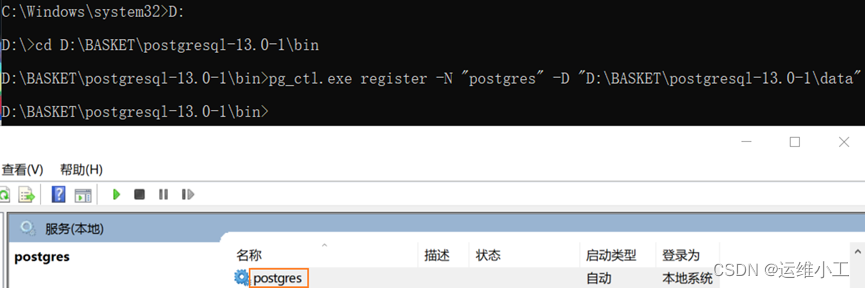
删除系统服务
sc delete 服务名

重新注册,正确安装成功后,pg服务会自动在系统服务中进行注册。
pg_ctl.exe register -N "postgres" -D "D:\BASKET\postgresql13\data" ——无需执行

4. navicat连接pg数据库测试
数据库: postgres
用户名:postgres
密码:postgres

5. pgAdmin
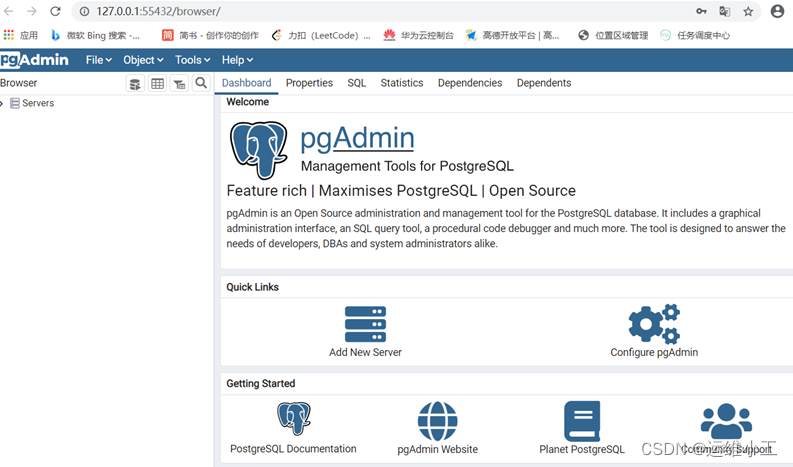
请参考文档:http://t.csdn.cn/EL6mP
十二、POSTGRES自动化安装脚本
###采用源码包安装postgres###
############################
#!/bin/bash

if [ $(id -u) != "0" ]; then
    echo "Error: You must be root to run this script, please use root to install"
    exit 1
fi

echo "Please download the version of postgres from https://www.postgresql.org/ftp/source/"
## Update below messages about where you get the package and where you want to install
dir_package='/md5'
install_package=${dir_package}'/postgresql-11.5.tar.gz'
package_version='postgresql-11.5'
## create user mysql and paths /md5/postgres and /md5/postgres/pgdata
useradd postgres
mkdir -p /md5/postgres
mkdir -p /md5/postgres/pgdata
pg_home='/md5/postgres'
pg_data='/md5/postgres/pgdata'

## The default linux system version is Redhat/CentOS7
clear
echo "=========================================================================="
echo "A tool to auto-compile & install $package_version on Redhat/CentOS7 Linux "
echo "=========================================================================="


## 1. preparations for postgres installation
echo ">>Step1: postgres安装准备中..."
echo ">>Step1-1: install the packages depeneded on"
##如果没有root权限,可以跳过以下依赖包的安装,如果后续安装报错再手动添加相关依赖包
##yum install -y perl-ExtUtils-Embed readline-devel zlib-devel pam-devel libxml2-devel libxslt-devel openldap-devel  python-devel gcc-c++ openssl-devel cmake

echo ">>Step1-2: decompress the install package"
package_tar_name=${install_package##*/}
package_name=${package_tar_name%%.tar*}
## decompress the install package
tar zxvf $package_tar_name -C ${dir_package}/


## assign the port for postgres installation
read -p "Tell me a viable port you'd like to install postgres (the default port is 5432):" port
if [ ! ${port} ];then
  mport=5432
elif [ !`${port} -eq 5432` ];then
  mport=${port}
fi
echo "The port="${mport}

## 2. start postgres installation
echo ">>Step2: 开始安装$package_version"
echo "We are about to install $package_version, please wait..."
echo ">>Step2-1: 配置(--prefix——指定安装目录,--with-pgport——指定启动端口)"
cd ${dir_package}/${package_name}/
./configure --prefix=${pg_home} --with-pgport=${mport}
echo ">>Step2-2: 编译与安装"
make && make install

## 3. initial and start postgres
echo ">>Step3: postgres的初始化与启动"
chown -R postgres:postgres ${pg_home}
echo ">>Step3-1: postgres初始化"
su - postgres -s /bin/bash -c "${pg_home}/bin/initdb -D ${pg_data}"
echo ">>Step3-2: 启动postgres"
su - postgres -s /bin/bash -c "${pg_home}/bin/pg_ctl -D ${pg_data} -l logfile start"
if [ `ps -ef | grep postgres | grep -v grep | wc -l` -eq 0 ]
   then
      echo "Postgres started failed"
   else
      echo "Postgres started successfully"
fi

## 4. 设置环境变量使用psql连接数据库
## echo `export PGHOME=${pg_home}` >> /home/postgres/.bashrc
## echo `export PGDATA=${pg_data}` >> /home/postgres/.bashrc
## echo `export PATH=$PATH:${PGHOME}/bin` >> /home/postgres/.bashrc
## source /home/postgres/.bashrc

## su - postgres
## psql --help
## psql -h localhost -U postgres
## postgres=# alter user postgres with password 'postgres';
## postgres=# \q

## 5. 打开防火墙端口
##  systemctl status firewalld
##  firewall-cmd --permanent --add-port=5432/tcp
##  firewall-cmd --reload 重载防火墙
##  firewall-cmd --list-all 查看防火墙

##6. pg扩展插件安装
##cd  ${dir_package}/${package_version}/contrib/
##make && make install
##安装完成后可以在${pg_home}/share/extension/ 目录下查看到

##7. 修改pg用户密码  —— 即使设置了密码,选择带密码的连接方式时不输入或者输错密码也可以正常连接上的,这个为啥?
##[postgres@centos7-min7 contrib]$ psql -W
##Password:
##psql (11.5)
##Type "help" for help.

##postgres=# \password
##Enter new password:   123456
##Enter it again:
1.导出导入PG数据表
sudo su - postgres
pg导出数据库testdata以st开头的表
pg_dump -U postgres -t 'st*' testdata > st.sql
pg导出数据库testdata不以st开头的表
pg_dump -U postgres -T 'st*' testdata > no_st.sql
只导出表结构,不导数据
pg_dump -U postgres -t -s 'st*00' testdata > st00.sql
导入pg文件
psql -d testdata -U postgres -f st.sql > st.log
truncate table 表名;
select * from pg_database where datname='testdata';
2.删除带有特定标识的表
psql -d 'testdata' -c "select distinct(table_name) from information_schema.columns where table_name LIKE '%202001%';" > /home/postgres/temp.txt
cat /home/postgres/temp.txt | while read line
do
psql -d 'testdata' -c "drop table $line;"
done
3.复制PG数据
[root@node8 data]# cat copy_pg_data.sh
#!/bin/bash
filename=table_list.txt
psql -d testdata -U postgres -c "\d"|awk '{print $3}'|grep 20200402 > table_list.txt
for line in `cat ./${filename}`
do
new_name=${line/20200402/20200430}
table_name=${new_name%_*}
file_date=${new_name##*_}
#echo ${new_name} ${file_date} ${table_name}
psql -d testdata -U postgres -c "drop table if exists ${new_name};create table if not exists ${new_name} partition of ${table_name} for values in ('${file_date}');"
#echo "create table if not exists ${new_name} partition of ${table_name} for values in ('${file_date}');" >> create.log
psql -d testdata -U postgres -c "\copy ${line} to ${new_name}.data"
sed -i "s/20200402/20200430/g" ${new_name}.data
psql -d testdata -U postgres -c "\copy ${new_name} from ${new_name}.data"
#echo "success ${new_name}" >> success.log
done
rm -rf *.data
4.检查PG中是否有空表
#!/bin/bash
##get tables list from db
db="postgres"
/usr/pgsql-10/bin/psql -h 192.168.20.71 -p 5432 -U postgres -d ${db} -c "\d" >tablesName.txt
num=`cat tablesName.txt | awk '{if($3!="") print $3}' | wc -l`
numm=$(($num-2))
echo "database num="$numm
rm -rf tablesWithCounter.txt
for((n=3;n<=$num;n++))
do
table=`cat tablesName.txt | awk '{if($3!="") print $3}' | sed -n $n'p'`
echo $table >> tablesWithCounter.txt
#/usr/pgsql-10/bin/psql -h 192.168.20.71 -p 5432 -U postgres -d ${db} -c "if (select count(*) as counter from $table ==0) then select $table from pg_tables" >>tablesWithCouter.txt
/usr/pgsql-10/bin/psql -h 192.168.20.71 -p 5432 -U postgres -d ${db} -c "select count(*) as counter from $table" >> tablesWithCounter.txt
done
tableindex=0
cat tablesWithCounter.txt | while read line
do
((tableindex=$tableindex+1))
#tbname="$line" |cut -c 1-2
if [[ "$line" == "da"* ]]
then
tbname=$line
#echo $tableindex+"@"+$tbname
index1=$tableindex
fi
if [[ "$line" == "0" ]]
then
tbnull=$line
#echo $tableindex+"@"+$tbnull
index2=$tableindex
if [[ (($index2-$index1==3)) ]]
then
echo $tbname $tbnull
fi
fi
done
5.PG导入数据表到GreenPlum
#!/bin/bash
##/usr/pgsql-10/bin/postmaster -D /var/lib/pgsql/10/data/
#pg导入数据表到gp
#/usr/pgsql-10/bin/pg_dump -h 192.168.20.71 -p 5432 -U postgres -C -E UTF-8 -t datatest -d postgres | psql -h 192.168.20.73 -p 5432 -U postgres -d postgres
#/usr/pgsql-10/bin/psql -h 192.168.20.71 -p 5432 -U postgres -d postgres -c "select * from datatest" > temp.txt
##get tables list from db
db="postgres"
/usr/pgsql-10/bin/psql -h 192.168.20.71 -p 5432 -U postgres -d ${db} -c "\d" >temp.txt
num=`cat temp.txt | awk '{if($3!="") print $3}' | wc -l`
numm=$(($num-2))
echo "database num="$numm
for((n=3;n<=$num;n++))
do
table=`cat temp.txt | awk '{if($3!="") print $3}' | sed -n $n'p'`
echo $table
/usr/pgsql-10/bin/pg_dump -h 192.168.20.71 -p 5432 -U postgres -C -E UTF-8 -t ${table} -d postgres | psql -h 192.168.20.73 -p 5432 -U postgres -d postgres
done
6.新增数据库用户
[postgres@hjr26 opt]$ psql -d postgres
postgres=# create user work superuser password 'xxxxx';
[postgres@hjr26 opt]$ psql -d postgres -U work
postgres=# create database testdata;
postgres=# \l
postgres=# \du
postgres=# \c testdata
You are now connected to database "testdata" as user "work".
testdata=# \d
Did not find any relations.
7.修改数据表所有者
publicbigdata=# alter table channel_cell owner to work;
ALTER TABLE
publicbigdata=# \d
List of relations
Schema | Name | Type | Owner
--------+---------------------+-------+----------
public | channel_cell | table | work


 847
847


 被折叠的 条评论
为什么被折叠?
被折叠的 条评论
为什么被折叠?
 到【灌水乐园】发言


