


软件平台windows、Linux、Ros等环境vs2017编译遇到的报错汇总(持续更新)
- 1. vs2017 error MSB6006: “cmd.exe”已退出,代码为 3编译报错
- 2. VS包含QT头文件路径出错
- 3. windwos xcpopy 缺失拷贝源文件编译报错
- 4. LNK1112: 模块计算机类型“x86”与目标计算机类型“x64”冲突错误
- 5. vs2017+qt5.12 "未将对象应用设置到对象的实例问题"报错
- 6. vs2017-QT5.12.6 自动更新关闭
- 7. VS2017插件VA破解安装
- 8. warning MSB8027警告
- 9. c1xx : fatal error C1083: 无法打开源文件: “;”: No such file or directory
- 10. 文件共享不安全,所以你不能连接到文件共享
- 11. error C4996: 'fopen' This function or variable may be unsafe. Consider using fopen_s instead
- 12. warning C4819: Unicode 格式以防止数据丢失 的警告
- 13. warning: ‘char* strncpy(char*, const char*, size_t)’ specified bound depends on the length of the source argument [-Wstringop-overflow=]
- 14. shell脚本[ ]首尾未留有空格导致的编译报错
- 15. 启动电力项目debug调试时,找不到vcruntime140_1d.dll报错
- 16. 电力项目udp发包报错
- 17. vs2017环境编译vtk8.2.0报错 E2512错误
- 18. vs2017环境sdk层面编译和qt gui层面编译会出现耗时翻倍的情况
- 19. error C4996: 'itoa': The POSIX name for this item is deprecated. Instead, use the ISO C and C++ conformant name: _itoa. See online help for details.
- 20. 如何查看.so和可执行文件是debug编译还是release编译的
- 22. 查看库的搜索路径和可执行文件依赖的库
- 23. 编译时没有设置可执行文件的库路径,在执行时也没有制定LD_LIBRARY_PATH导致加载so库报错
- 24. 如果在不同的SO中存在相同的函数名,那么如何处理?
- 25. c1xx : fatal error C1083: 无法打开源文件: “..\..\..\Src\SoftPlatform\Ui\TitleWindow\System\Configuration\Network\MultiMachineConfig\MultiMachineConfig.cpp
- 26. error C4996: This function or variable may be unsafe
- 27. /usr/bin/ld: skipping incompatible ../lib/libgpsdk.a when searching for
- 28. error MSB8020: 无法找到 v142 的生成工具(平台工具集 =“v142”)。若要使用 v142 生成工具进行生成,请安装 v142 生成工具。
- 29. fatal error LNK1107: 文件无效或损坏: 无法在 0x320 处读取
- 30. 1>CVTRES : fatal error CVT1100: 资源重复。类型: MANIFEST,名称: 1,语言: 0x0409 1>LINK : fatal error LNK1123: 转换到 COFF 期间失败: 文件无效或损坏。
- 30. arm-hisiv500-linux-g++ Common/GpCommon.cpp:37:12: 错误: ‘stoull’不是‘std’的成员 return std::stoull(stid); // arm-hisiv500-linux-g++
- 31. geniusclient_zh.ts文件tr字符串显示无效问题
- 32. warning C4819: The file contains a character that cannot be represented in the current code page (936). Save the file in Unicode format to prevent data loss
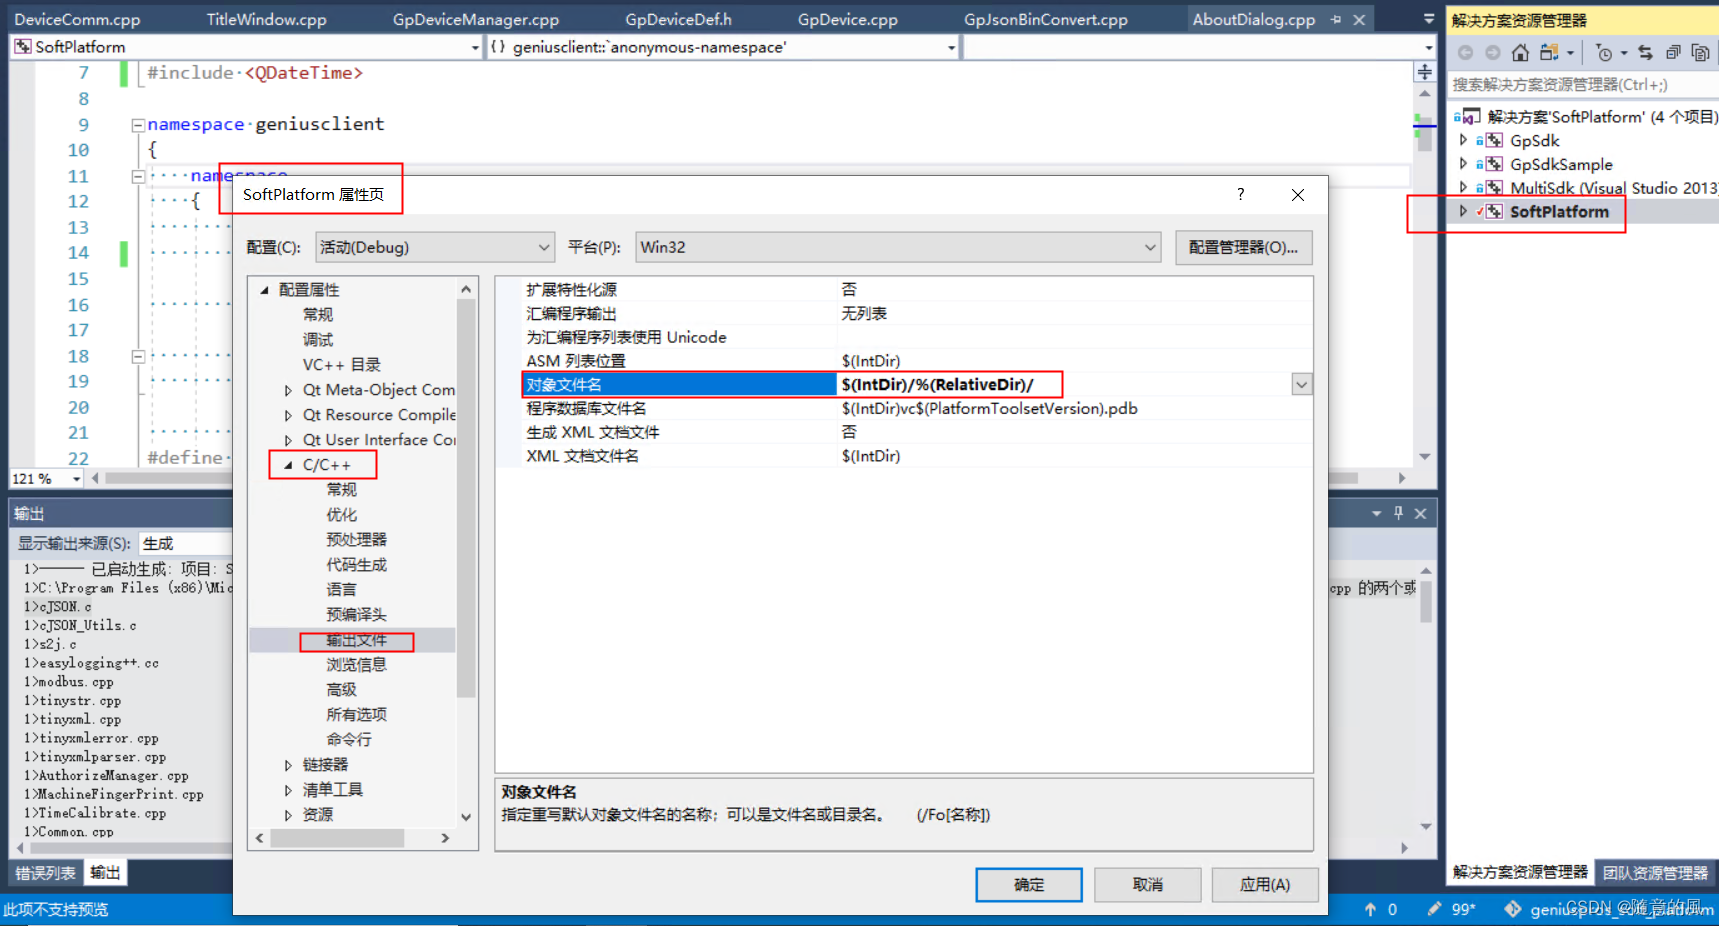
- 33. vs工程继承配置
- 34. error C2220: 警告被视为错误 - 没有生成“object”文件
- 35、error : There's no Qt version assigned to project SoftPlatform.vcxproj for configuration Debug/Win32
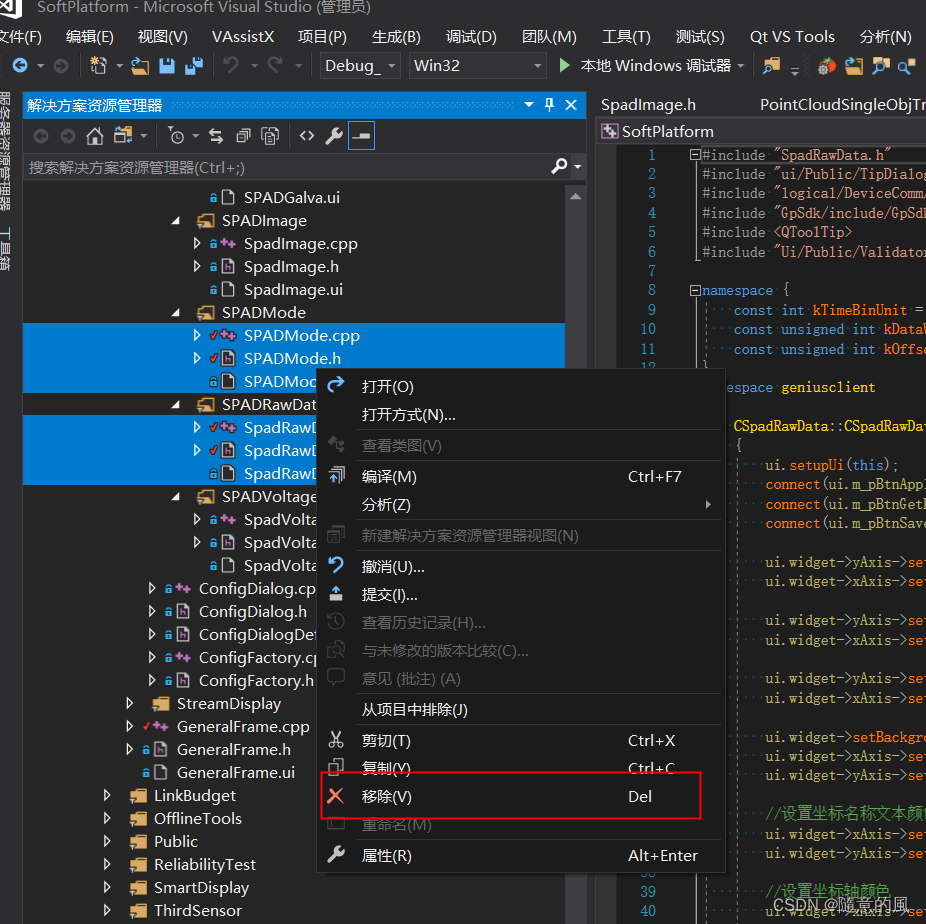
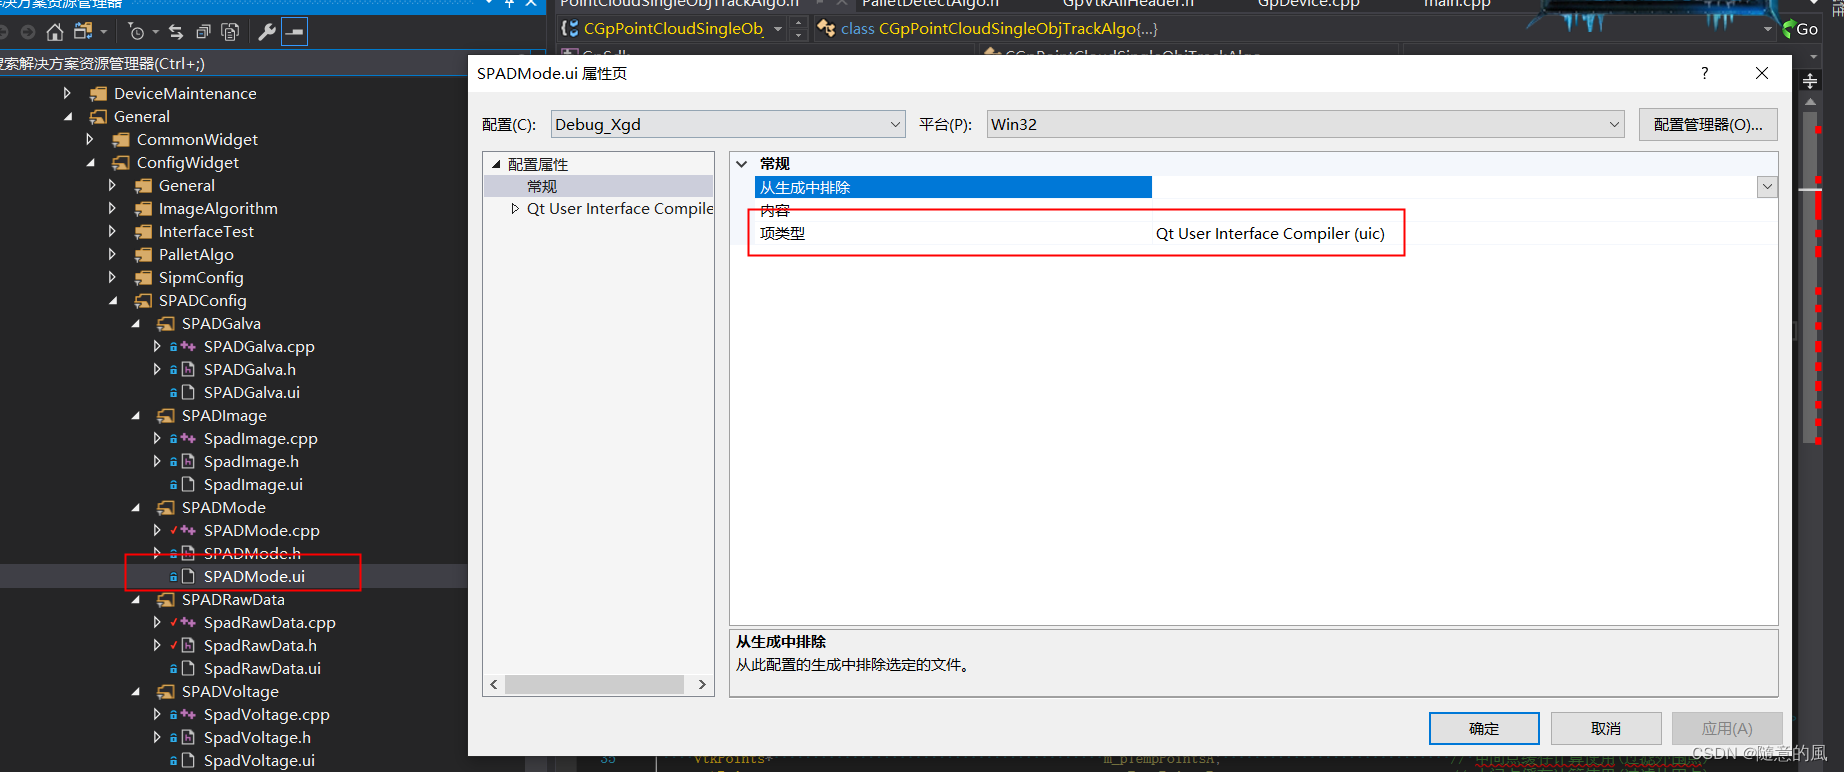
- 36. ADMode.obj : error LNK2001: 无法解析的外部符号 "public: virtual struct QMetaObject const * __thiscall geniusc
- 37. 编译报错vs fatal error C1083: 无法打开CMultiMachineConfig.cpp源文件,原因“目录太长”
- 38.vs2017生成过程中提示“c1xx : fatal error C1083: 无法打开源文件: “;”: No such file or directory”
- 39 vscode 编译c文件报错,warning: implicit declaration of function 'PQW2IJK' [-Wimplicit-function-declaration]
- 40 vscode 编译console窗口中文乱码
- 41、vscode gcc其他c文件未编译问题
- 42 、Visual Studio 2017无法打开源文件“stdio.h“问题
1. vs2017 error MSB6006: “cmd.exe”已退出,代码为 3编译报错
1.1 解决方案
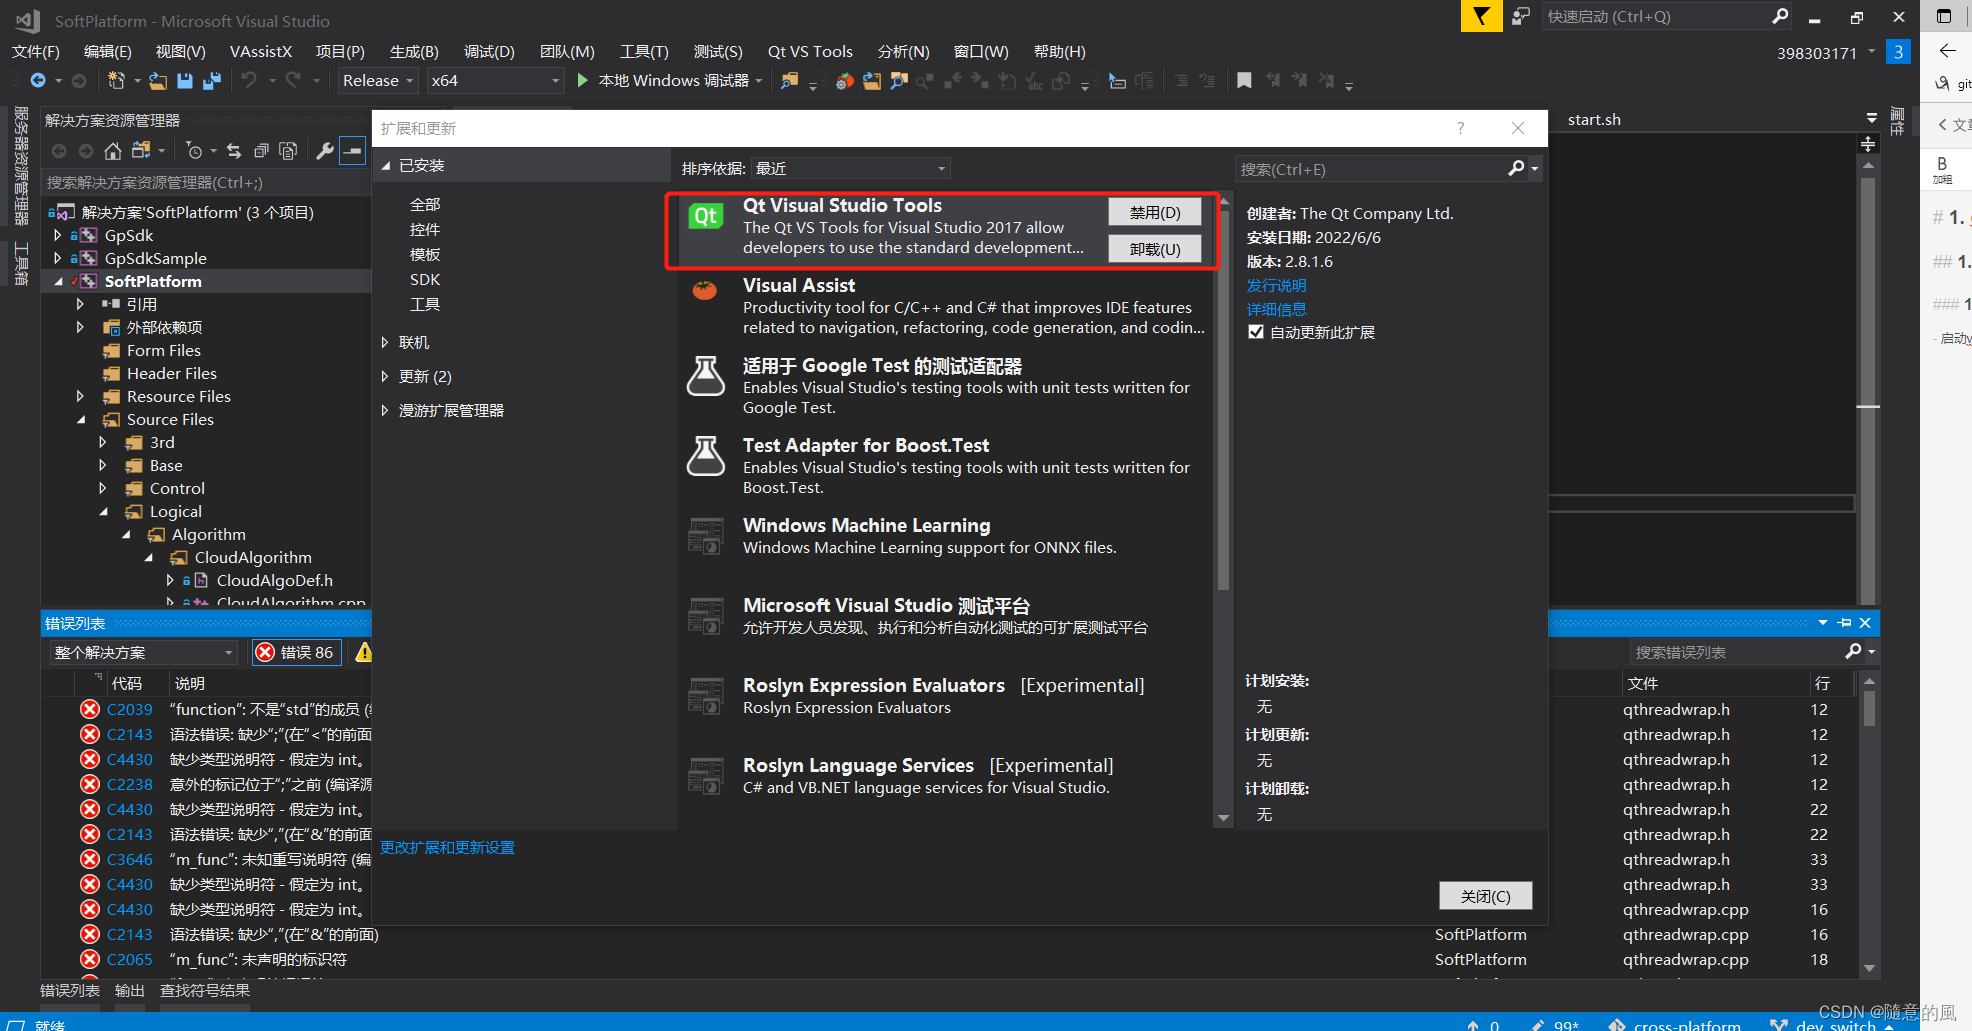
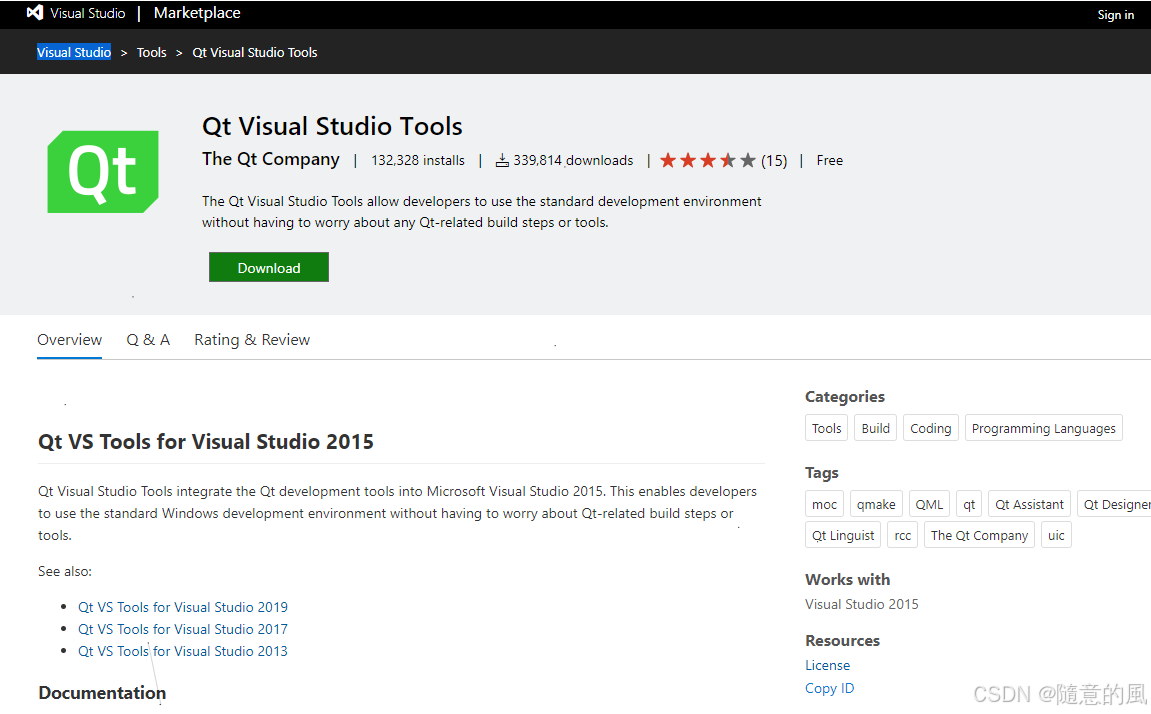
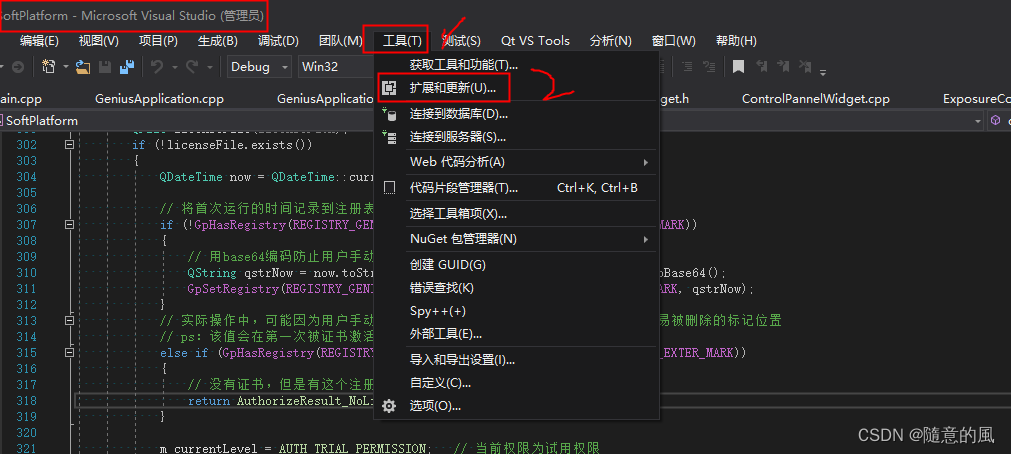
1.1.1 安装QT VS Tools插件
- 启动vs2017,打开工程sln文件,找到工具(T)->扩展和更新(U)->QT Visual Studio Tools->下载->下载好后关闭VS2017->执行modify
1.1.2 设置QT Version
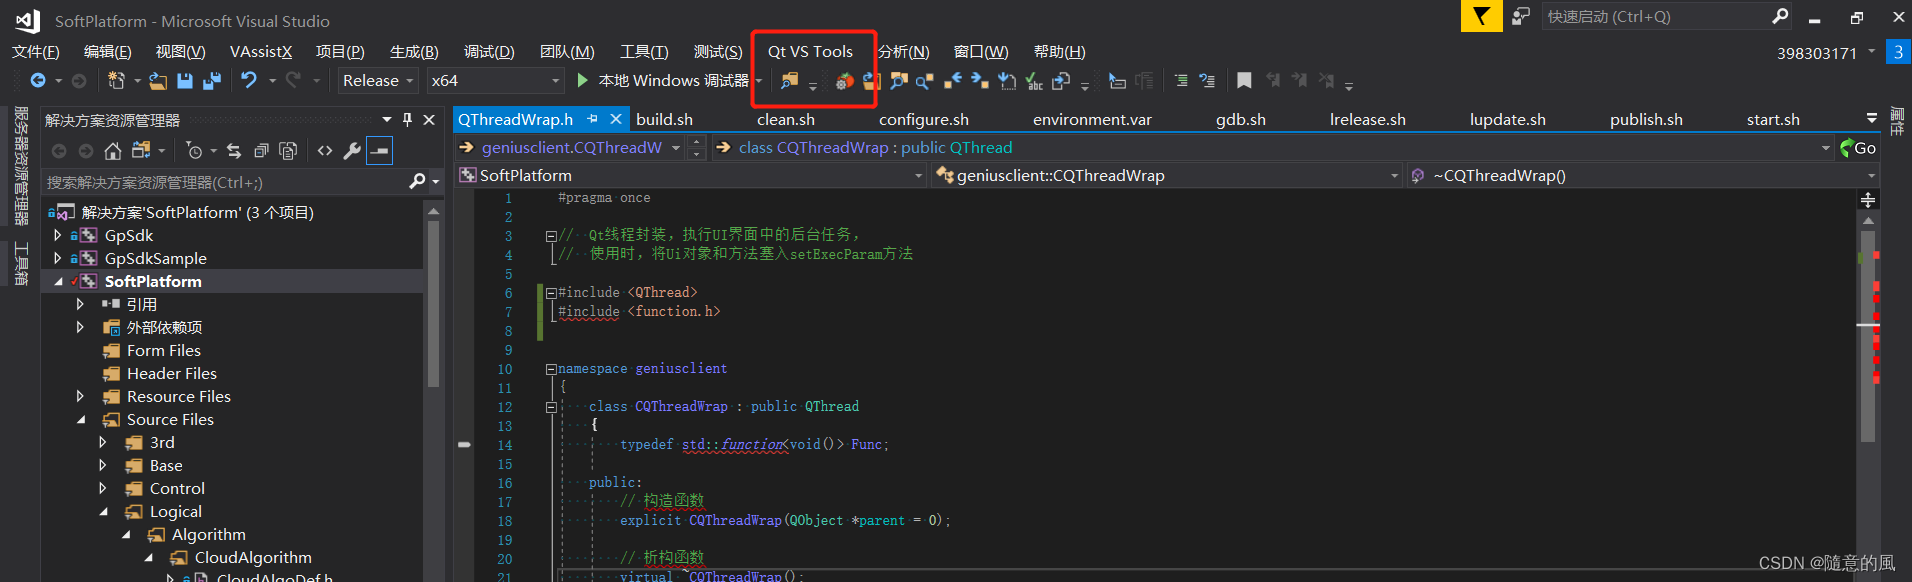
- 删除工程中的
SoftPlatform.vcxproj.user文件,目录在D:\GuangPoWork\17 CodeRepository\CMO01\cross-platform\Project\Vs2017\SoftPlatform,重新打开工程文件,工具栏位新增QT VS Tools选型,图示界面如下图:
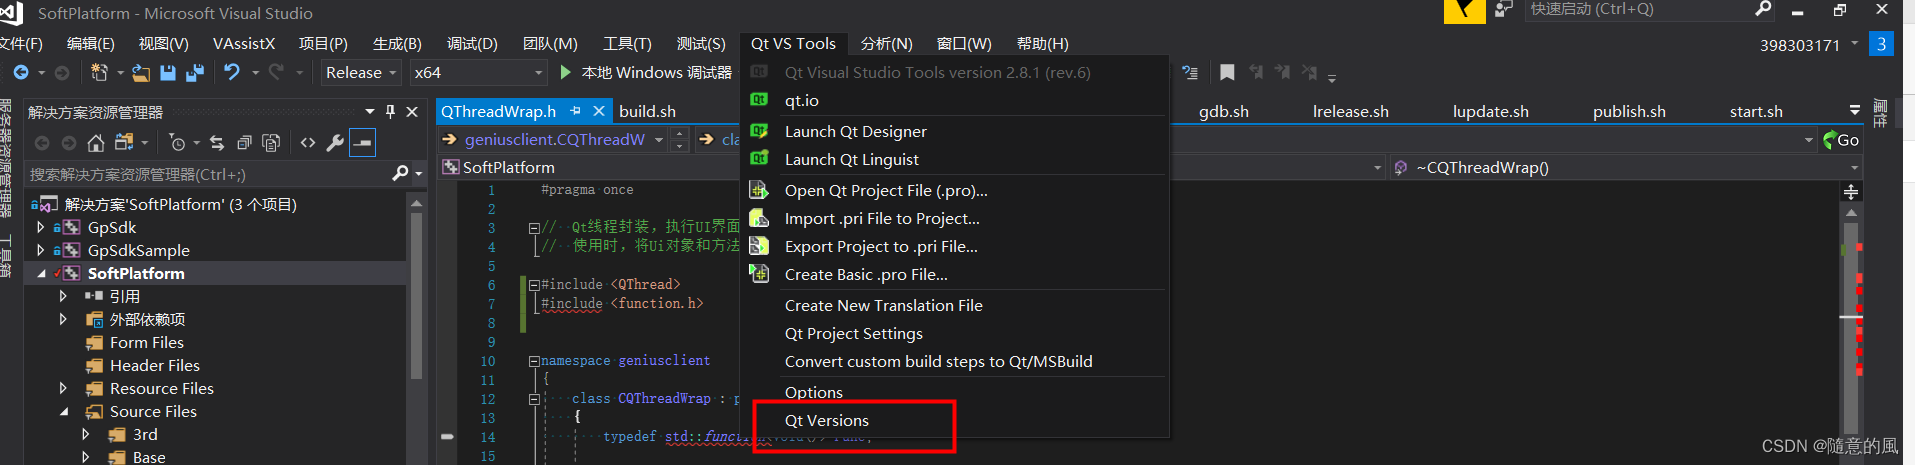
- 点击
QT VS Tools选项->QT Version选项
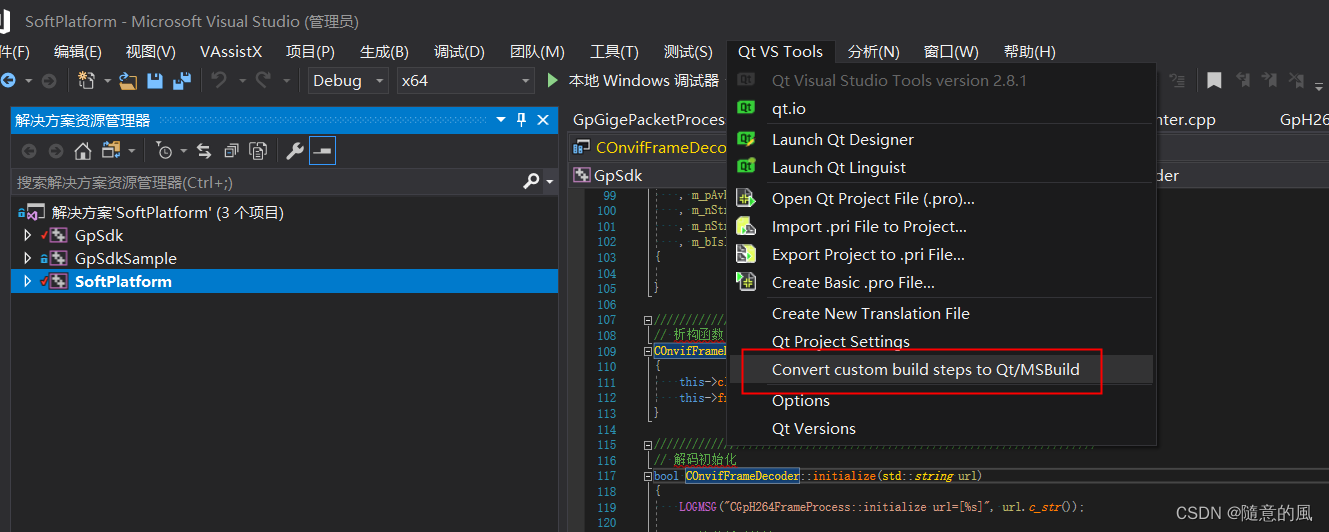
1.2 解决方案2
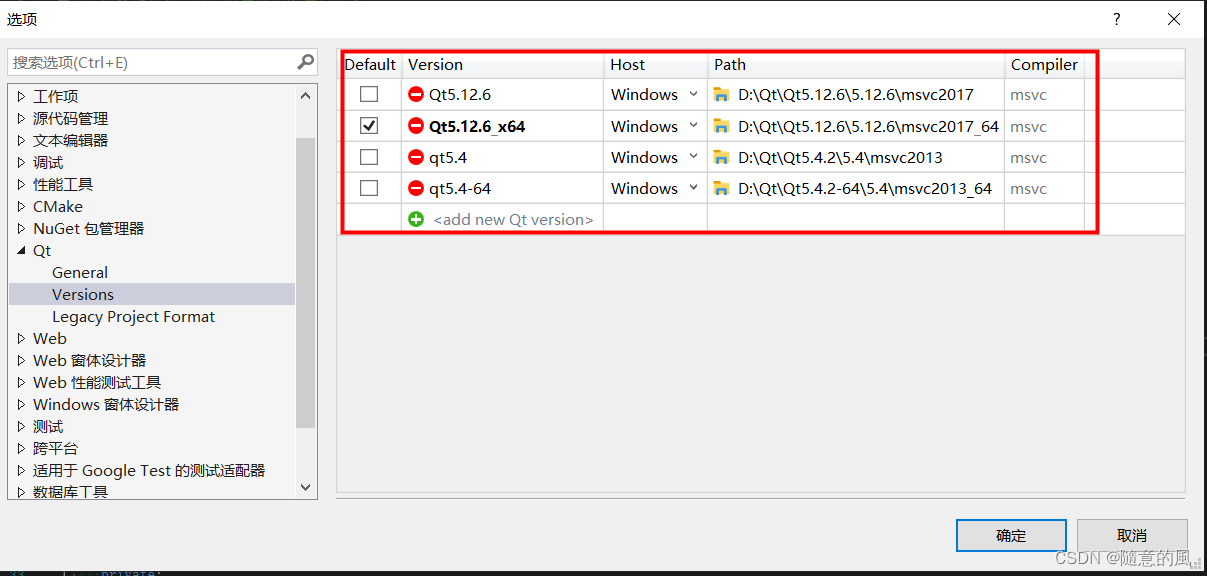
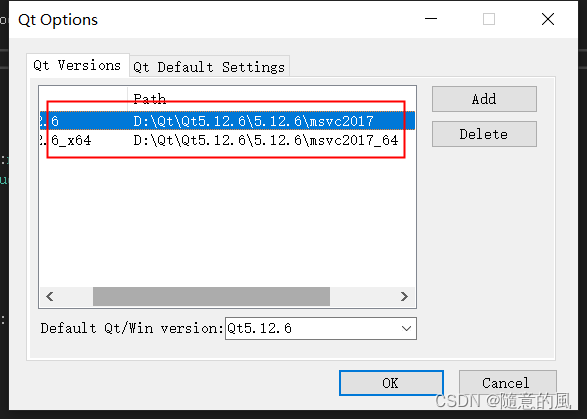
1. 需要在VS上安装QT插件,然后点击QT VS Tools的Qt Options去配置你的QT编译版本
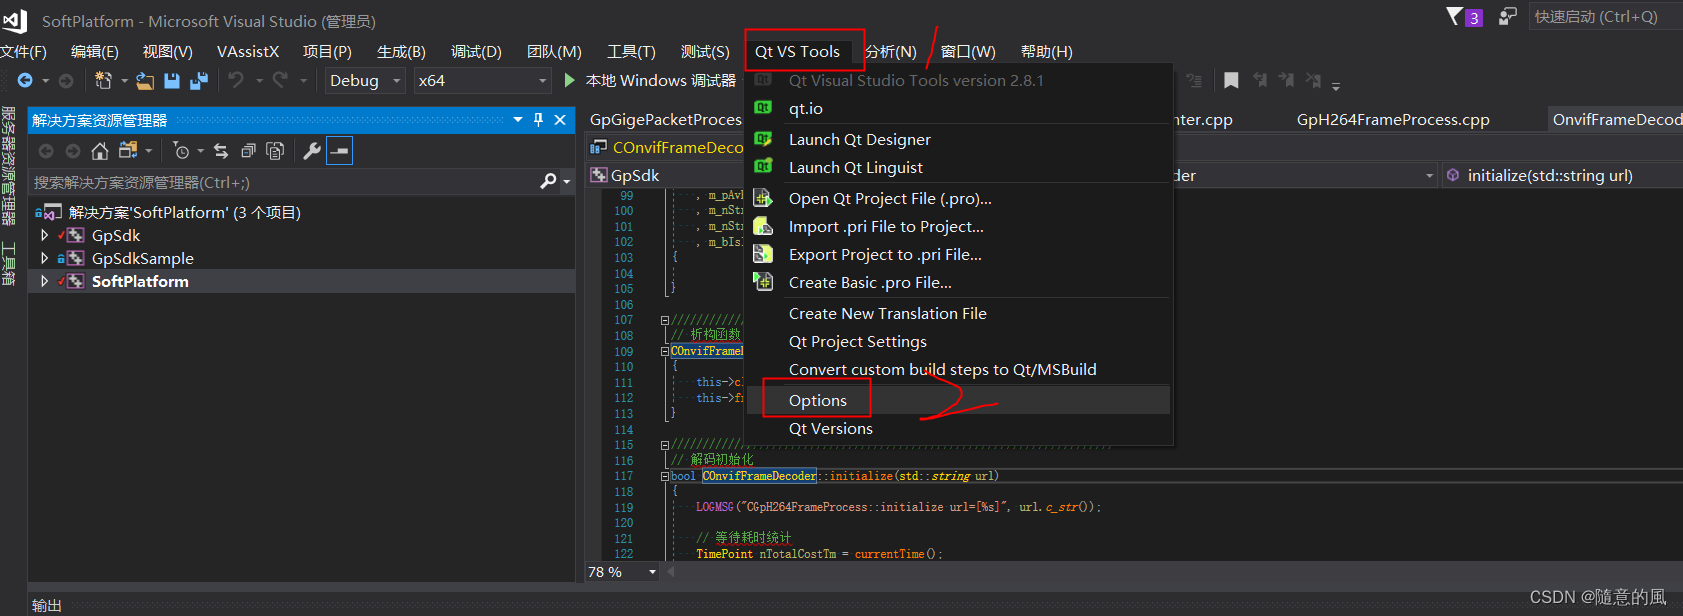
2. 点击ADD选择你的编译版本,如msvc2017,msvc2017_64,msvc2019等。如果已经配置过了可以忽略这一步,选择正确的版本

3. 点击下图位置的选项,然后弹出个窗口点是,最后就可以编译通过了
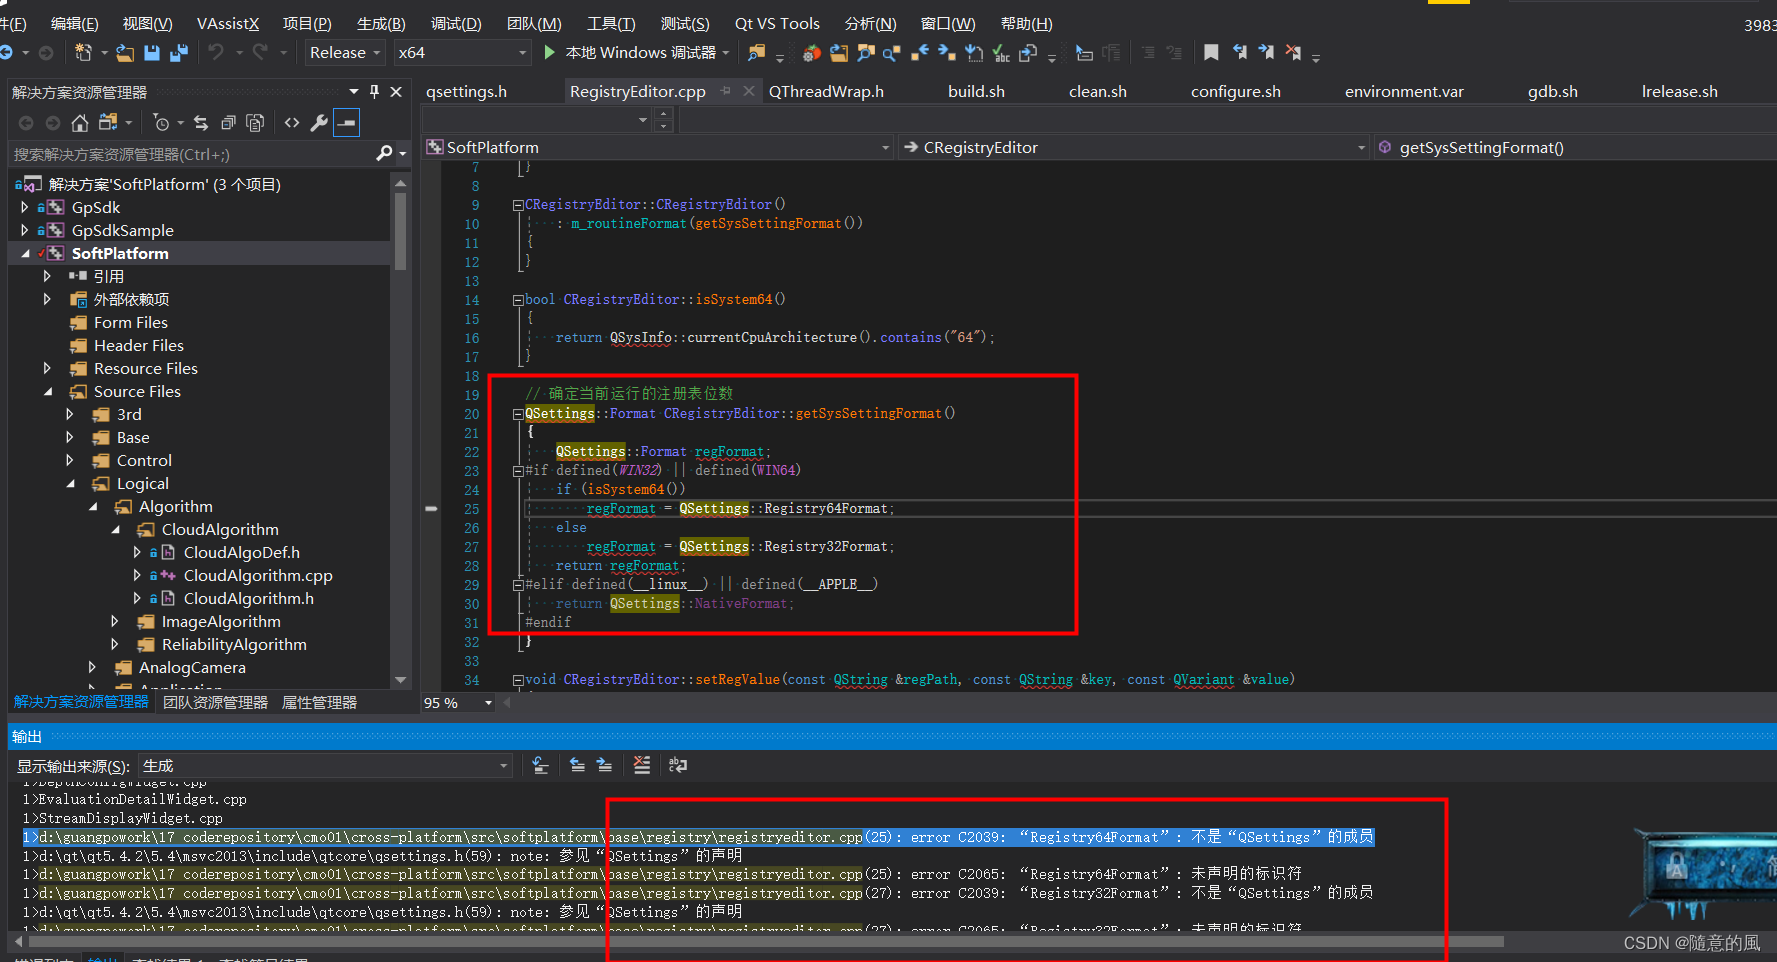
2. VS包含QT头文件路径出错
-
报错信息如下:
-
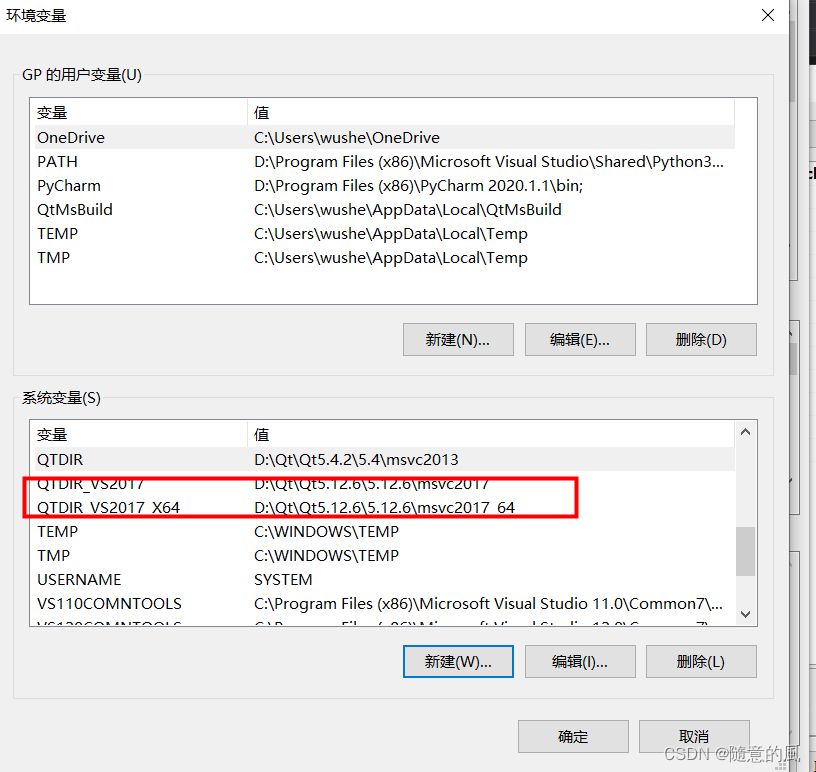
问题描述:用vs2017编译却设置了qt_vs2013
★★★★※※※ 解决方案 ※※※★★★★ -
找到
项目->C/C++等如图

-
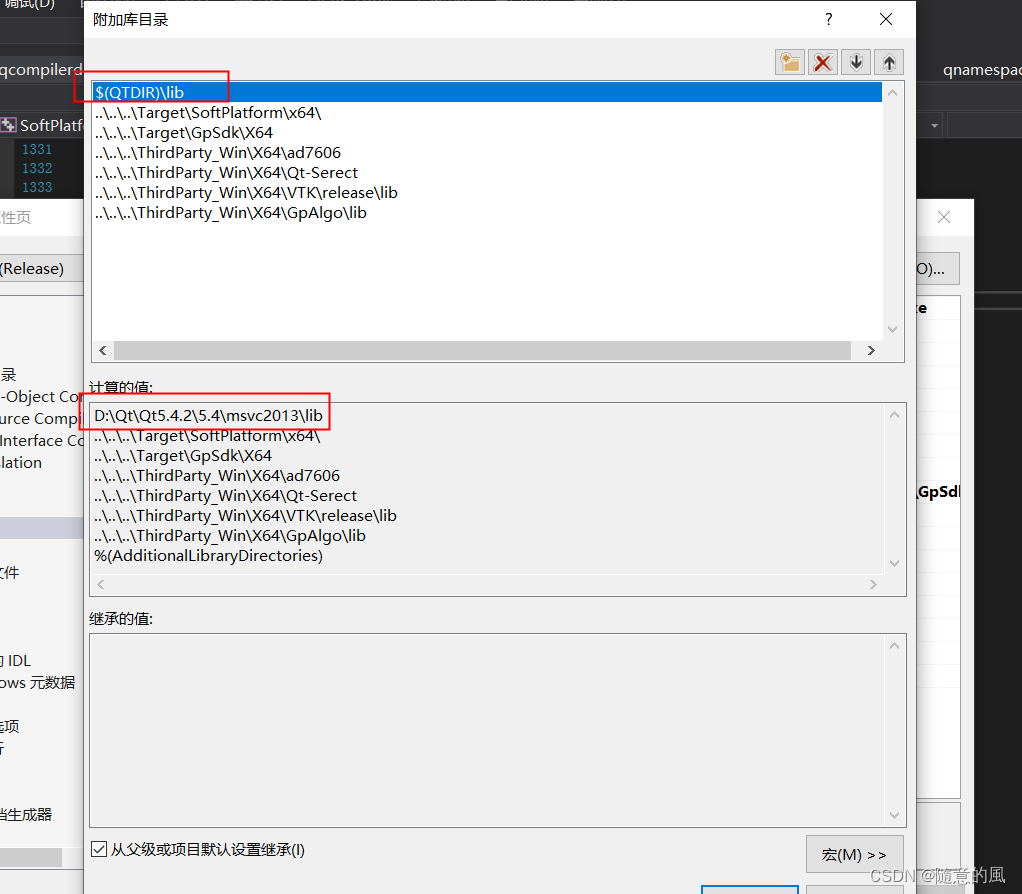
QTDIR环境变量设置错误了:
D:\Qt\Qt5.4.2\5.4\msvc2013,因为我使用的是vs2017编辑器

-
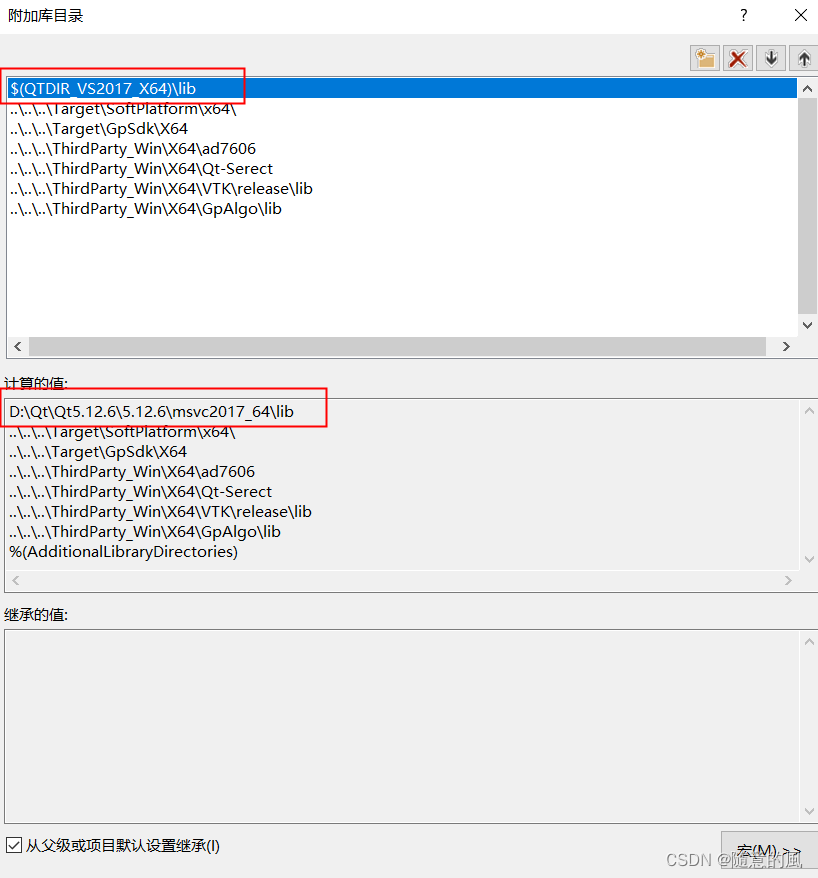
系统增加2个QT的VS2017环境变量配置,如图所示:
-
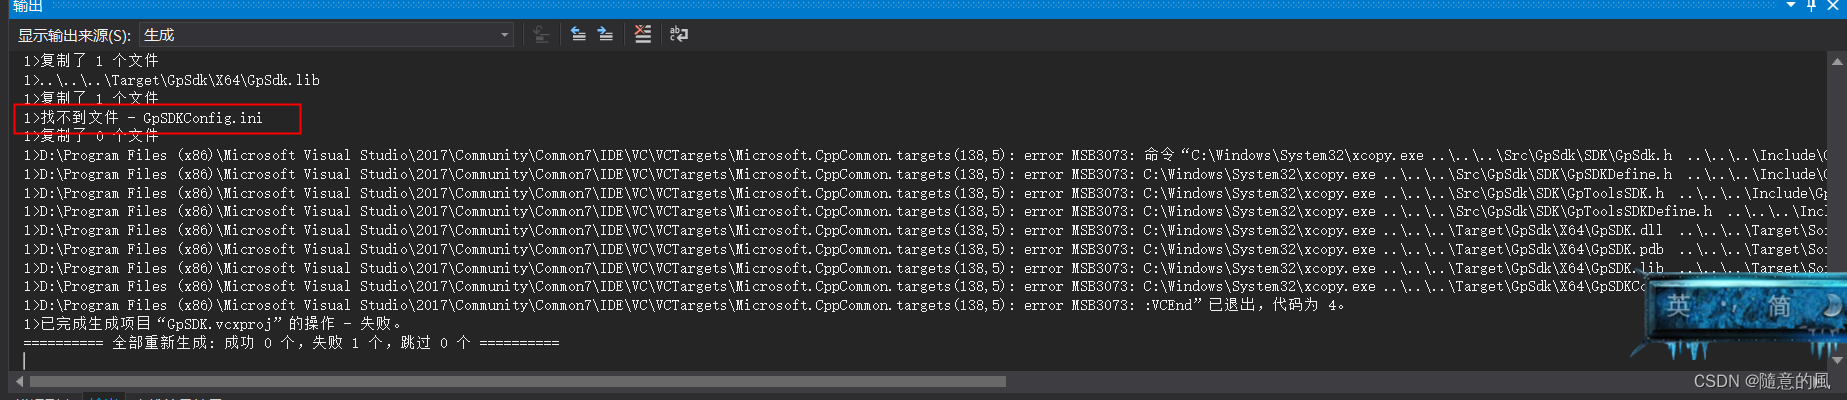
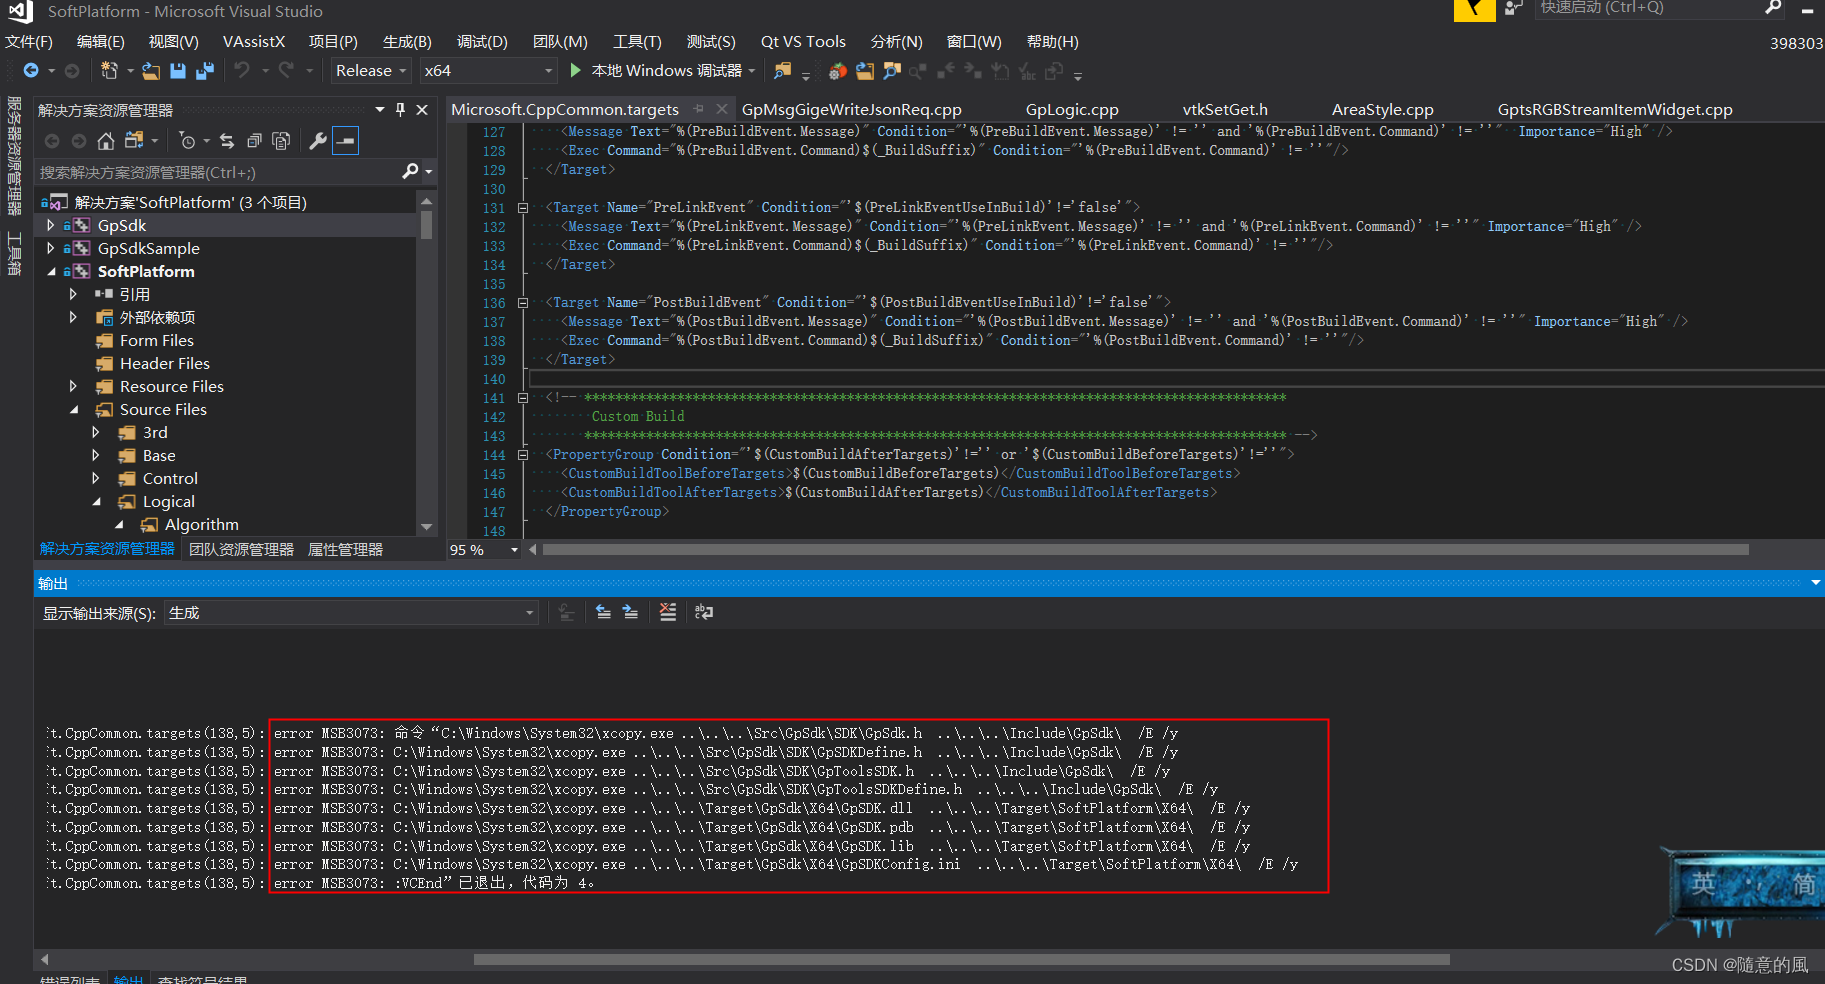
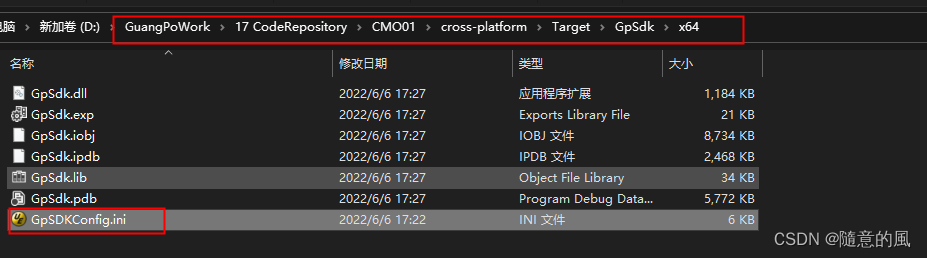
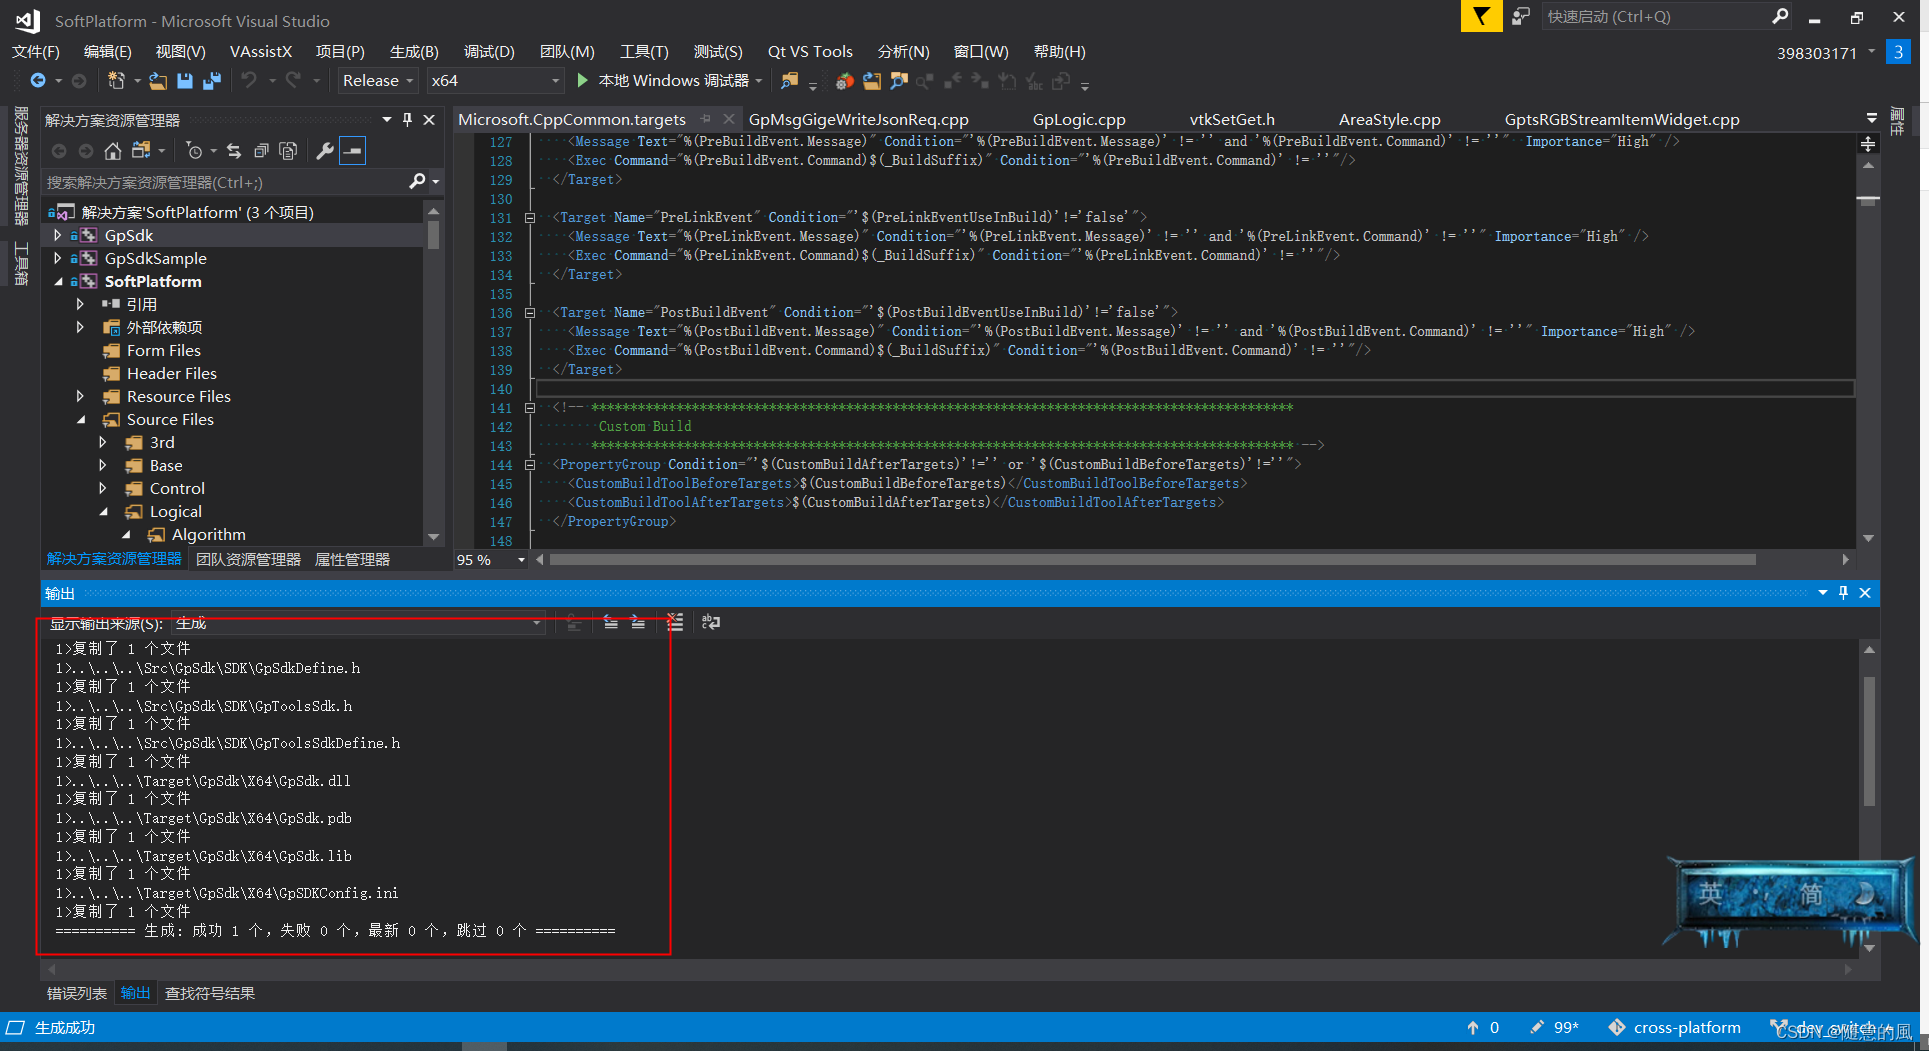
3. windwos xcpopy 缺失拷贝源文件编译报错
★★★★※※※ 解决方案 ※※※★★★★
- 复制对应的GpSDKConfig.ini到对应目录,让xcopy执行不再报错,执行成功。
4. LNK1112: 模块计算机类型“x86”与目标计算机类型“x64”冲突错误
1>------ 已启动生成: 项目: SoftPlatform, 配置: Release x64 ------
1>Qt5Core.lib(Qt5Core.dll) : fatal error LNK1112: 模块计算机类型“x86”与目标计算机类型“x64”冲突
1>已完成生成项目“SoftPlatform.vcxproj”的操作 - 失败。
========== 生成: 成功 0 个,失败 1 个,最新 0 个,跳过 0 个 ==========
如图所示:

★★★★※※※ 解决方案 ※※※★★★★
- 附加库路径目录设置错误:
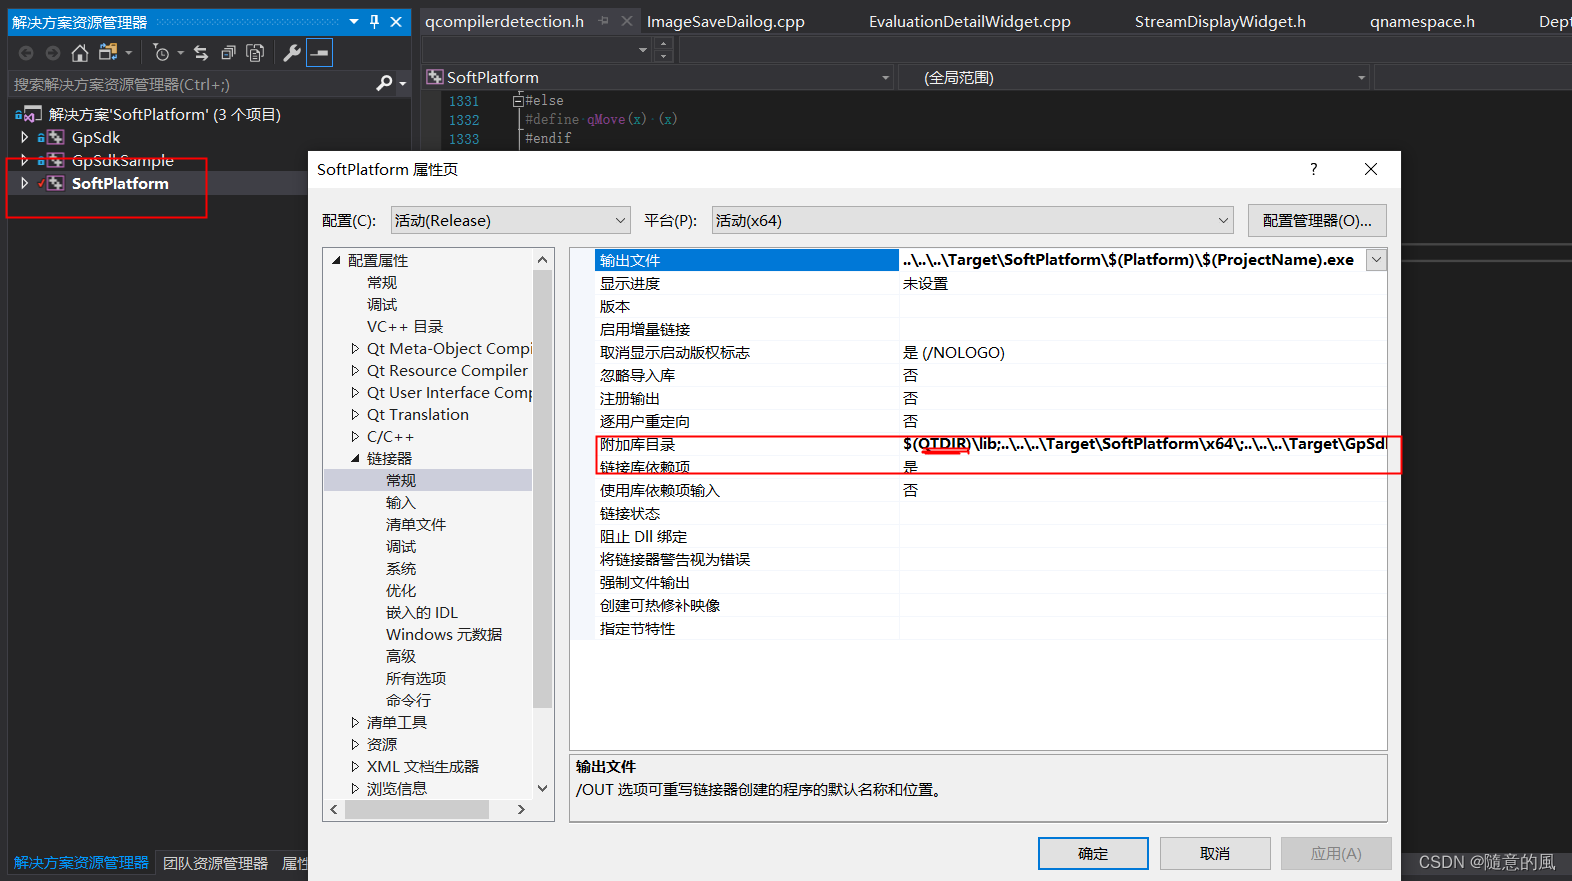
- 修改为以下X64目录
5. vs2017+qt5.12 "未将对象应用设置到对象的实例问题"报错
★★★★※※※ 解决方案 ※※※★★★★
-
在配置了电力项目(使用的QT)不同的位数版本:
-
点击SoftPlatform工程属性选择"qt project setting"时
-
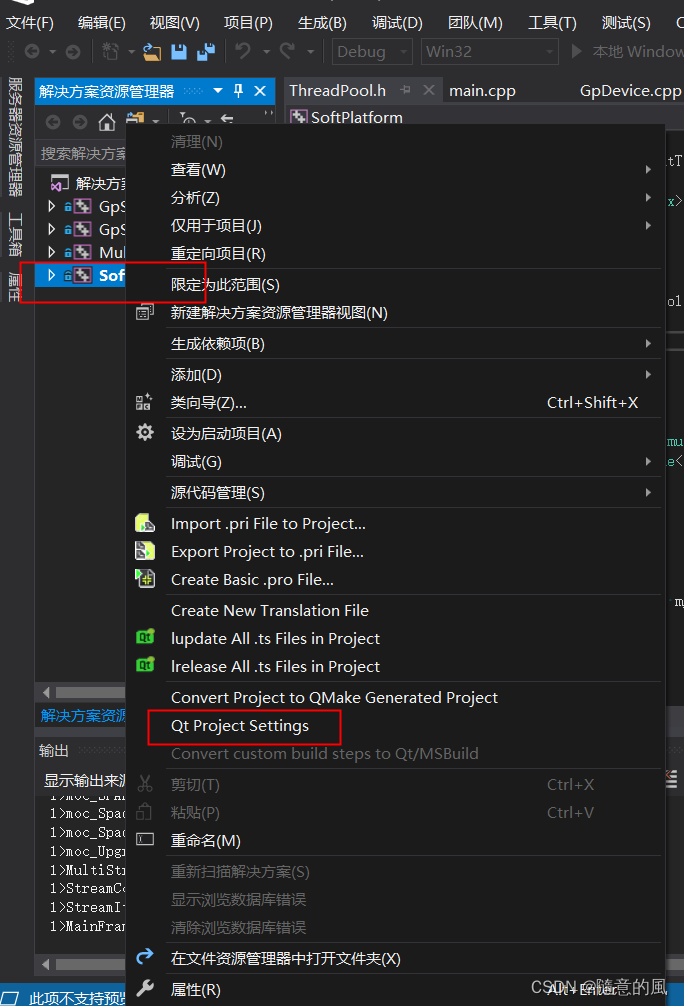
-
总是会提示下面错误:
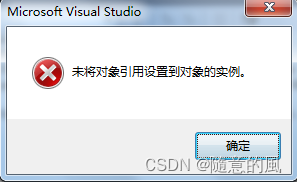
- 经上网查询终于得到完美解决:
- 查看.
qmake.stash文件如下:
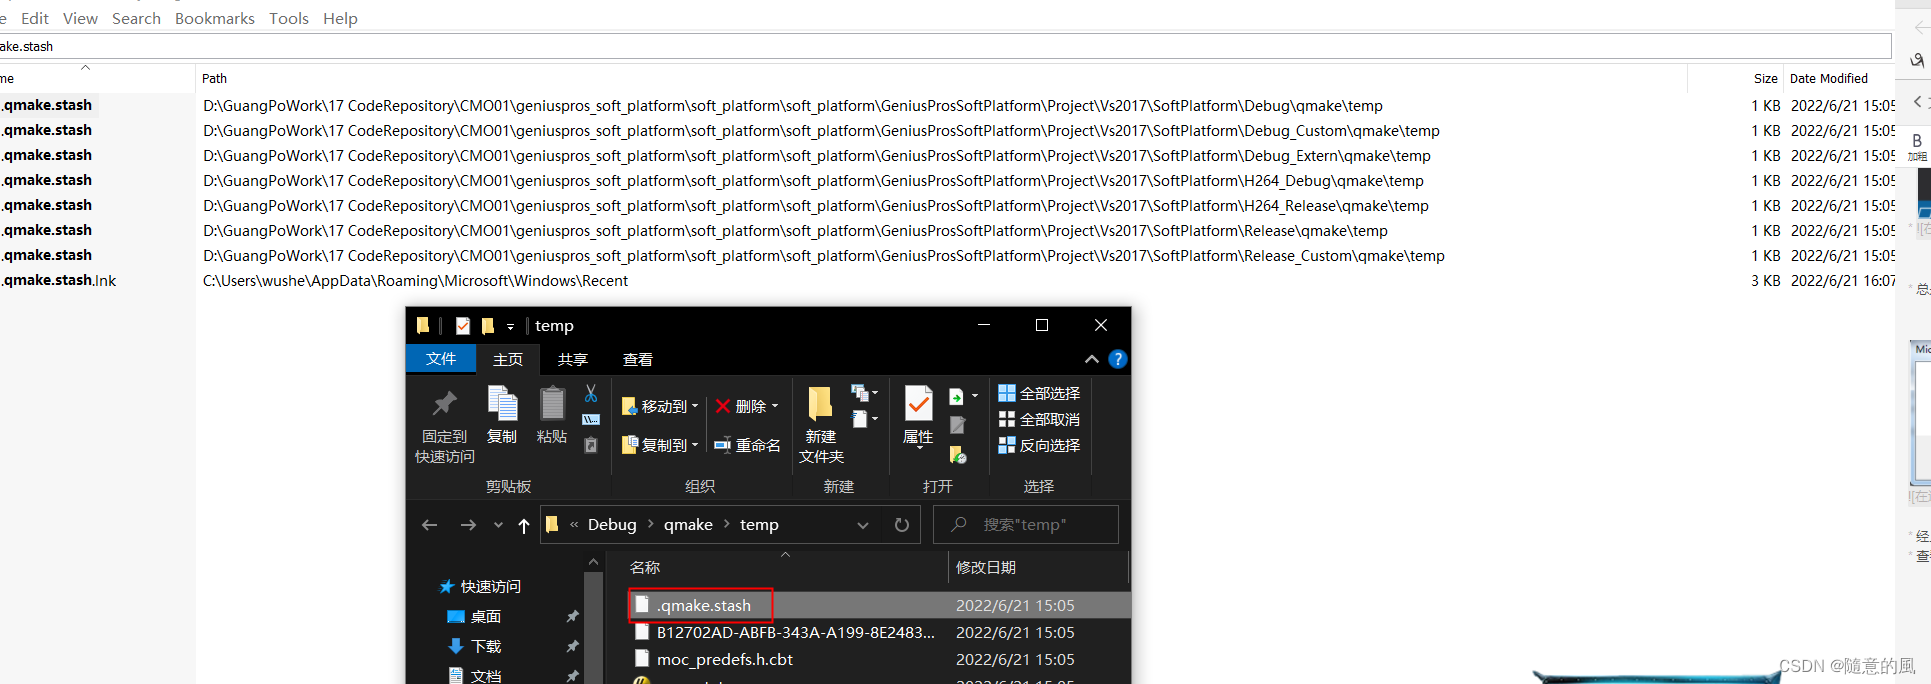
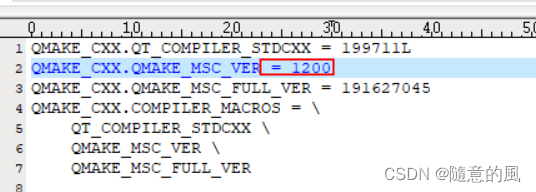
QMAKE_CXX.QMAKE_MSC_VER = 1200这个配置是问题的根源。 - 在安装"qt-vsaddin-msvc2017-2.2.2.vsix"插件的时候会在
“C:\Users\xxxx\AppData\Local\Microsoft\VisualStudio”目录下创建2个15.0_***文件夹,如图示:(可以进行清理,也可以不清理)
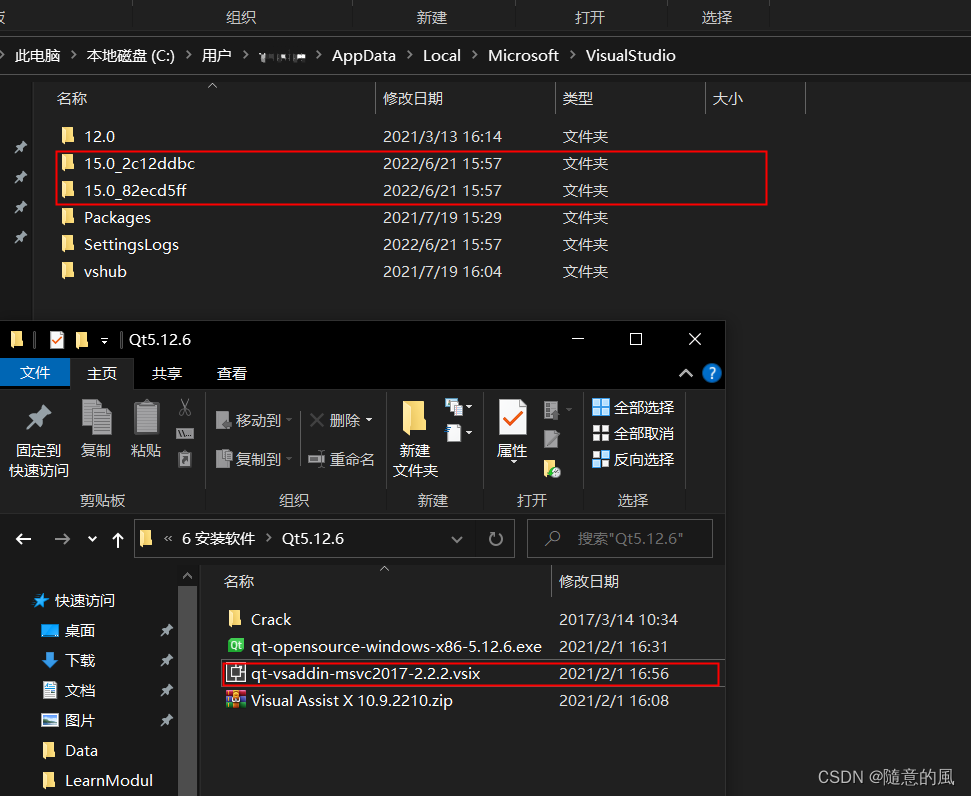
- 找到Qt安装路径是:D:\Qt\Qt5.12.6\5.12.6\msvc2017\mkspecs\common\msvc-version.conf文件中添加
QMAKE_MSC_VER = 1910即可根据自己的编译环境修改,我的是编译环境为:msvc2017_64,文件中添加 QMAKE_MSC_VER = 1910 即可。
MSVC_VER = 8.0 //原有的内容
COMPAT_MKSPEC = win32-msvc2005 //原有的内容
QMAKE_MSC_VER = 1910 //我添加的内容 - 如果还是无法成功打开pro文件,可能还需要添加系统环境变量。
QTDIR = C:\Qt\Qt5.12.0\5.12.0\msvc2017_64
QMAKESPEC = C:\Qt\Qt5.12.0\5.12.0\msvc2017_64\mkspecs\win32-msvc
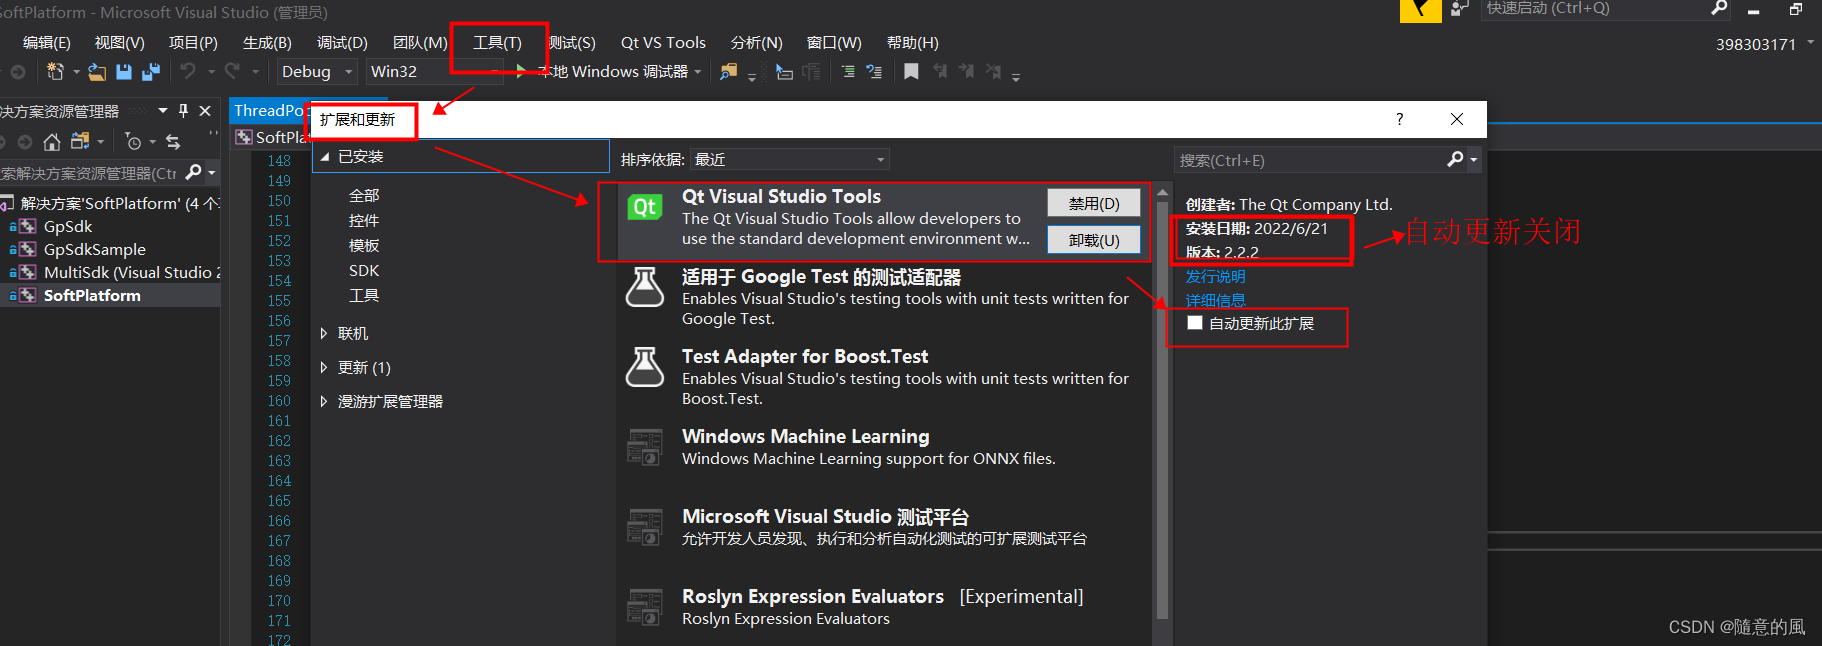
以为6点的自动更新,导致了我们的配置文件被还原回去了 QMAKE_MSC_VER =1200,直接关闭自动更新吧。
或者重新安装2.8版本插件,之前的卸载掉
6. vs2017-QT5.12.6 自动更新关闭
★★★★※※※ 解决方案 ※※※★★★★
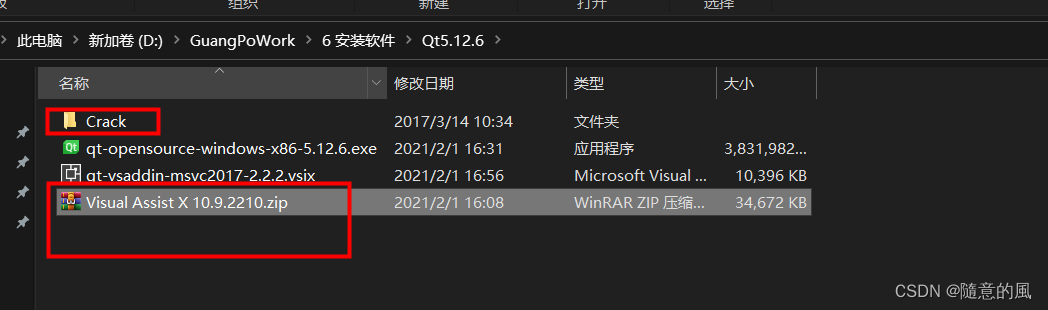
7. VS2017插件VA破解安装
★★★★※※※ 解决方案 ※※※★★★★
- 安装Visual Assist X 10.9.22 安装程序后,找到对应目录进行DLL覆盖

8. warning MSB8027警告
== 名为 moc_UpgradeProfessionWidget.cpp 的两个或更多文件将生成到同一位置的输出。这会导致错误的生成结果。 调用的文件是 GeneratedFiles\Debug\moc_UpgradeProfessionWidget.cpp, GeneratedFiles\Debug\moc_UpgradeProfessionWidget.cpp。==
★★★★※※※ 解决方案 ※※※★★★★
9. c1xx : fatal error C1083: 无法打开源文件: “;”: No such file or directory
★★★★※※※ 解决方案 ※※※★★★★
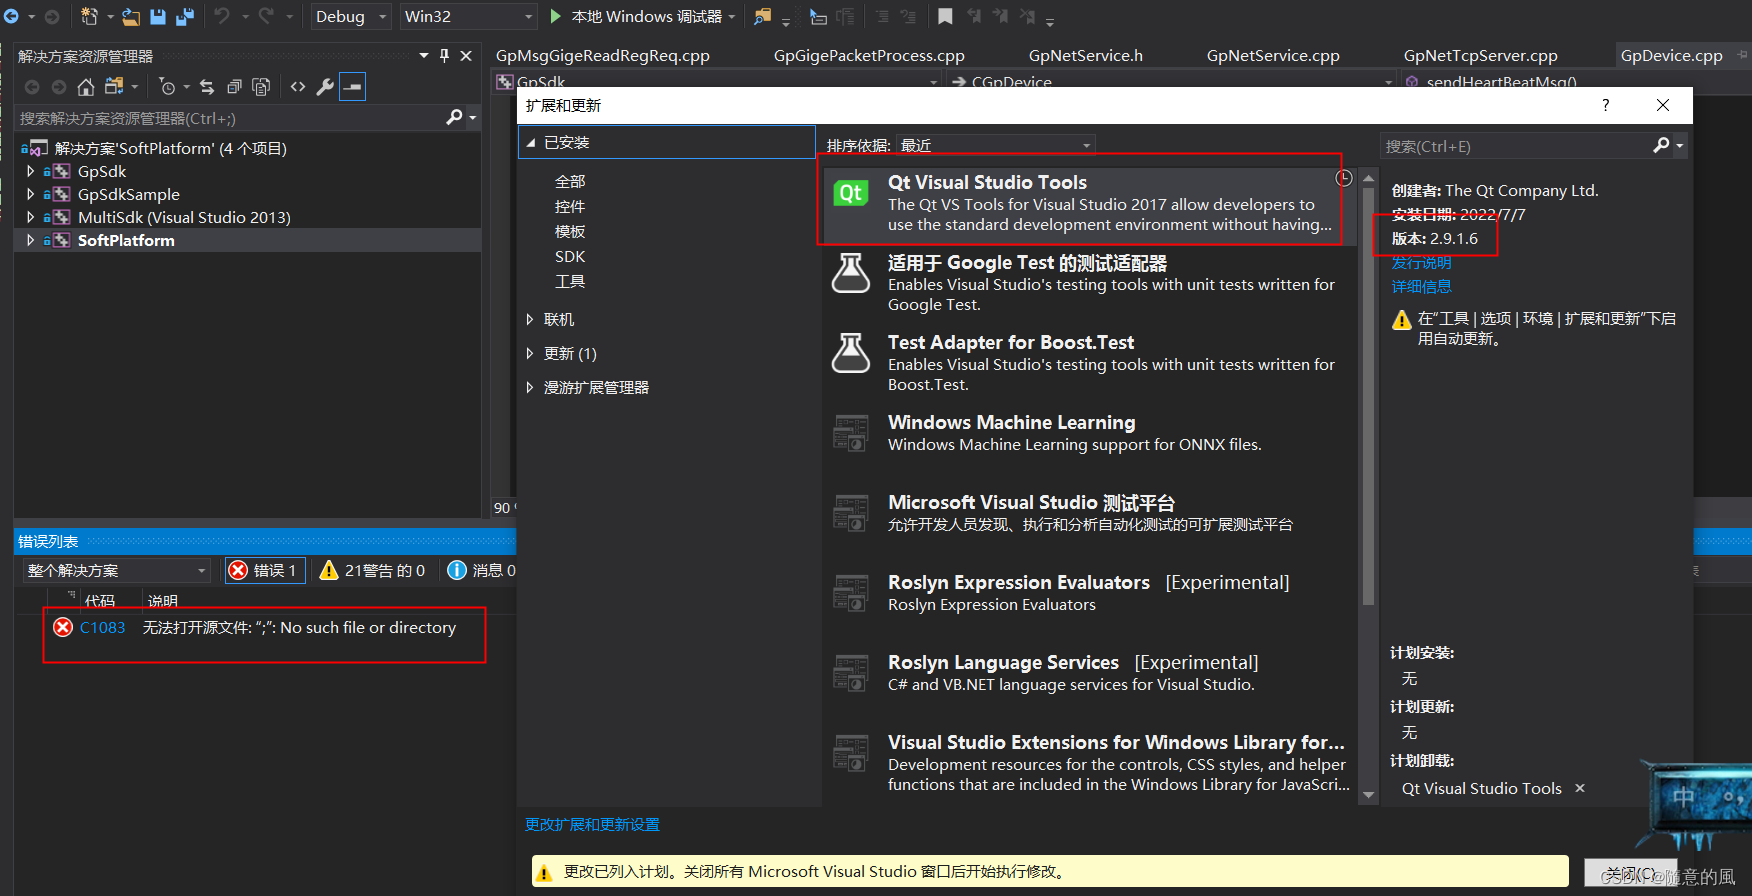
1、 卸载qt 2.9 插件
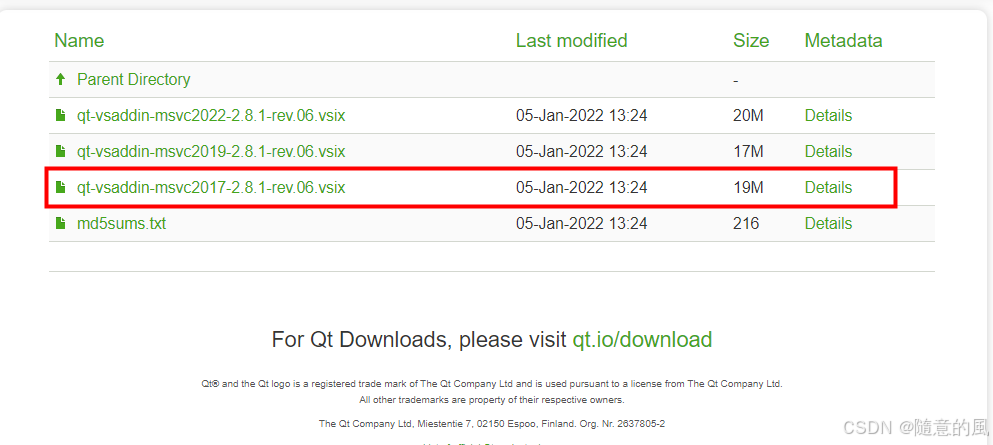
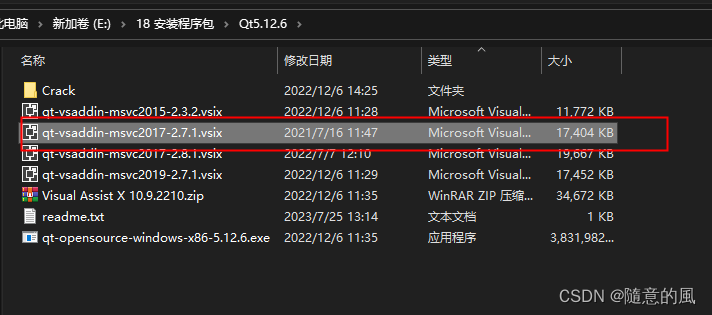
2、安装qt-vsaddin-msvc2017-2.8.1.vsix
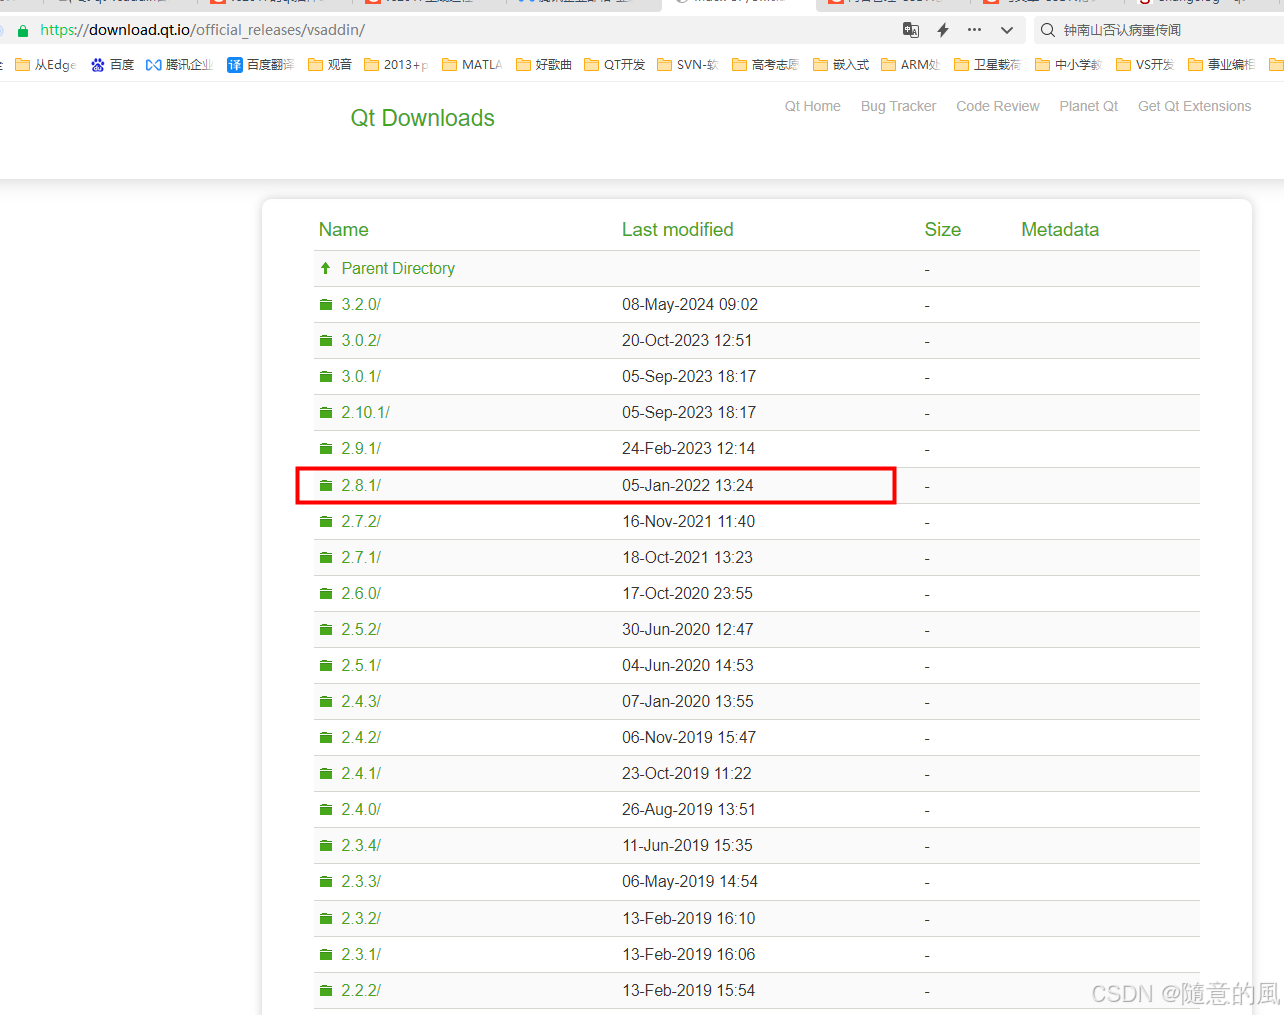
Qt qt-vsaddin各版本下载及安装方法
1.qt-vsaddin下载
1.1 QT官网下载
https://download.qt.io/official_releases/vsaddin/
- 1.2. Visuall Studio官网下载
https://marketplace.visualstudio.com/items?itemName=TheQtCompany.QtVisualStudioTools2015&ssr=false#overview
- 2.安装
如果下载的是exe,则直接双击就可以安装了,安装前确保qt和vs都已经安装完成。如果下载的是“.vsix”文件,则要通过命令行安装,找到VS安装目录下的VSIXInstaller.exe所在目录,如:C:\Program Files (x86)\Microsoft Visual Studio 14.0\Common7\IDE\VSIXInstaller.exe - cmd命令窗口切换到这个路径下,然后执行“
VSIXInstaller.exe + .vsix文件绝对路径”并按回车,就可以执行安装了,另外在VS Extension Manager(工具 - >扩展管理器)中应该也可以安装
10. 文件共享不安全,所以你不能连接到文件共享
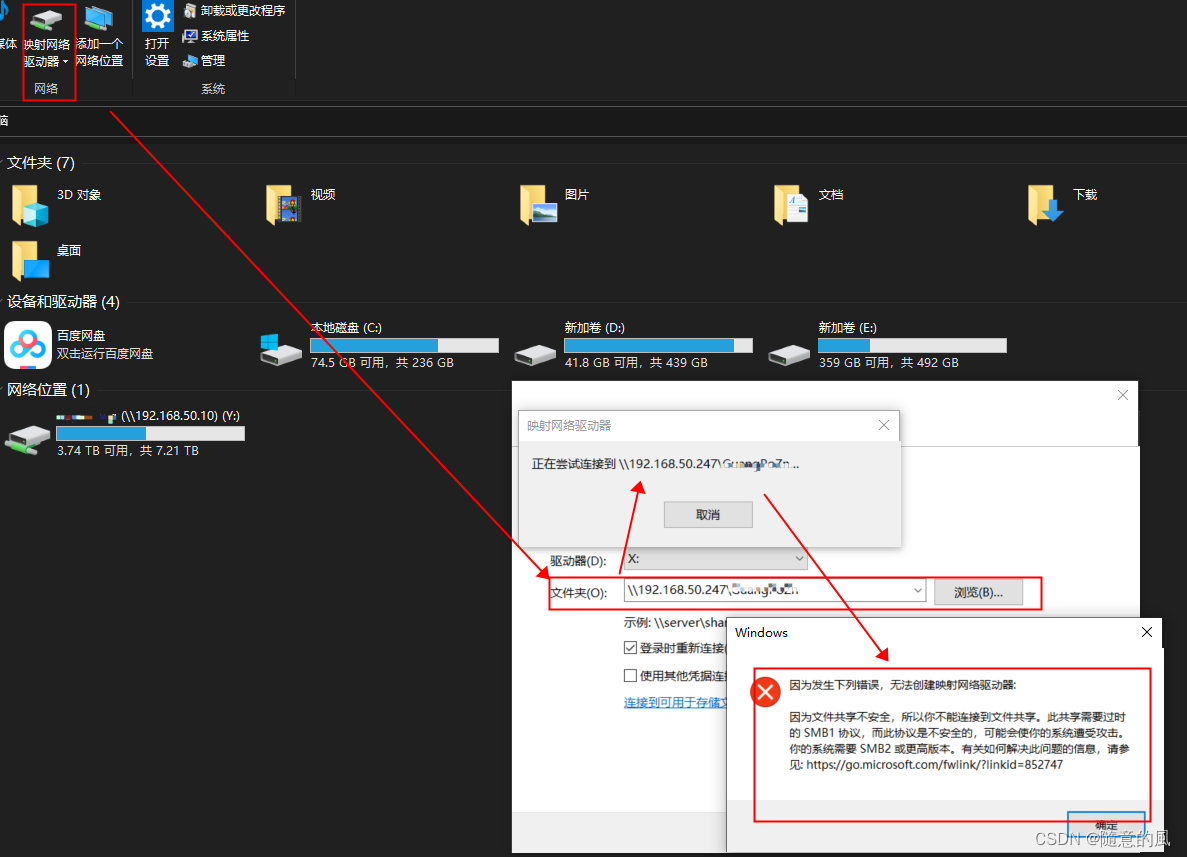
★★★★※※※ 解决方案 ※※※★★★★
-
1、打开win10设置
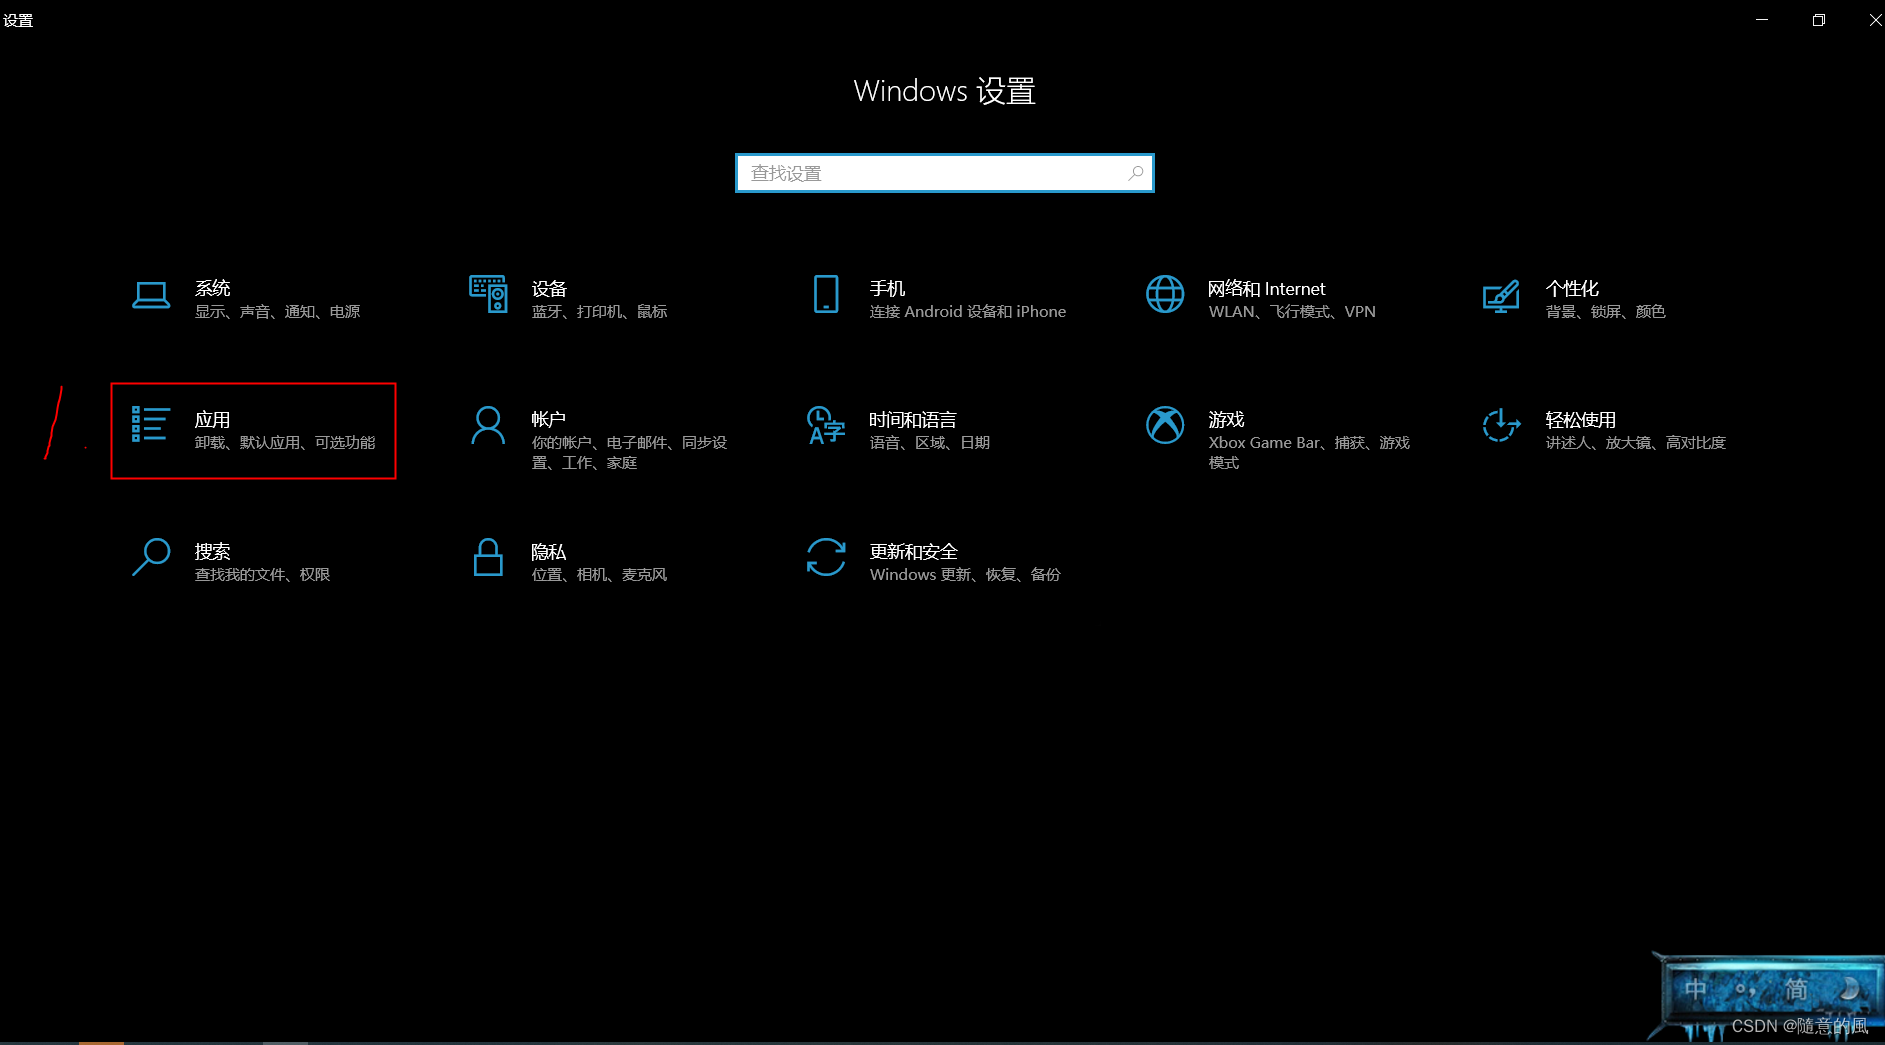
-
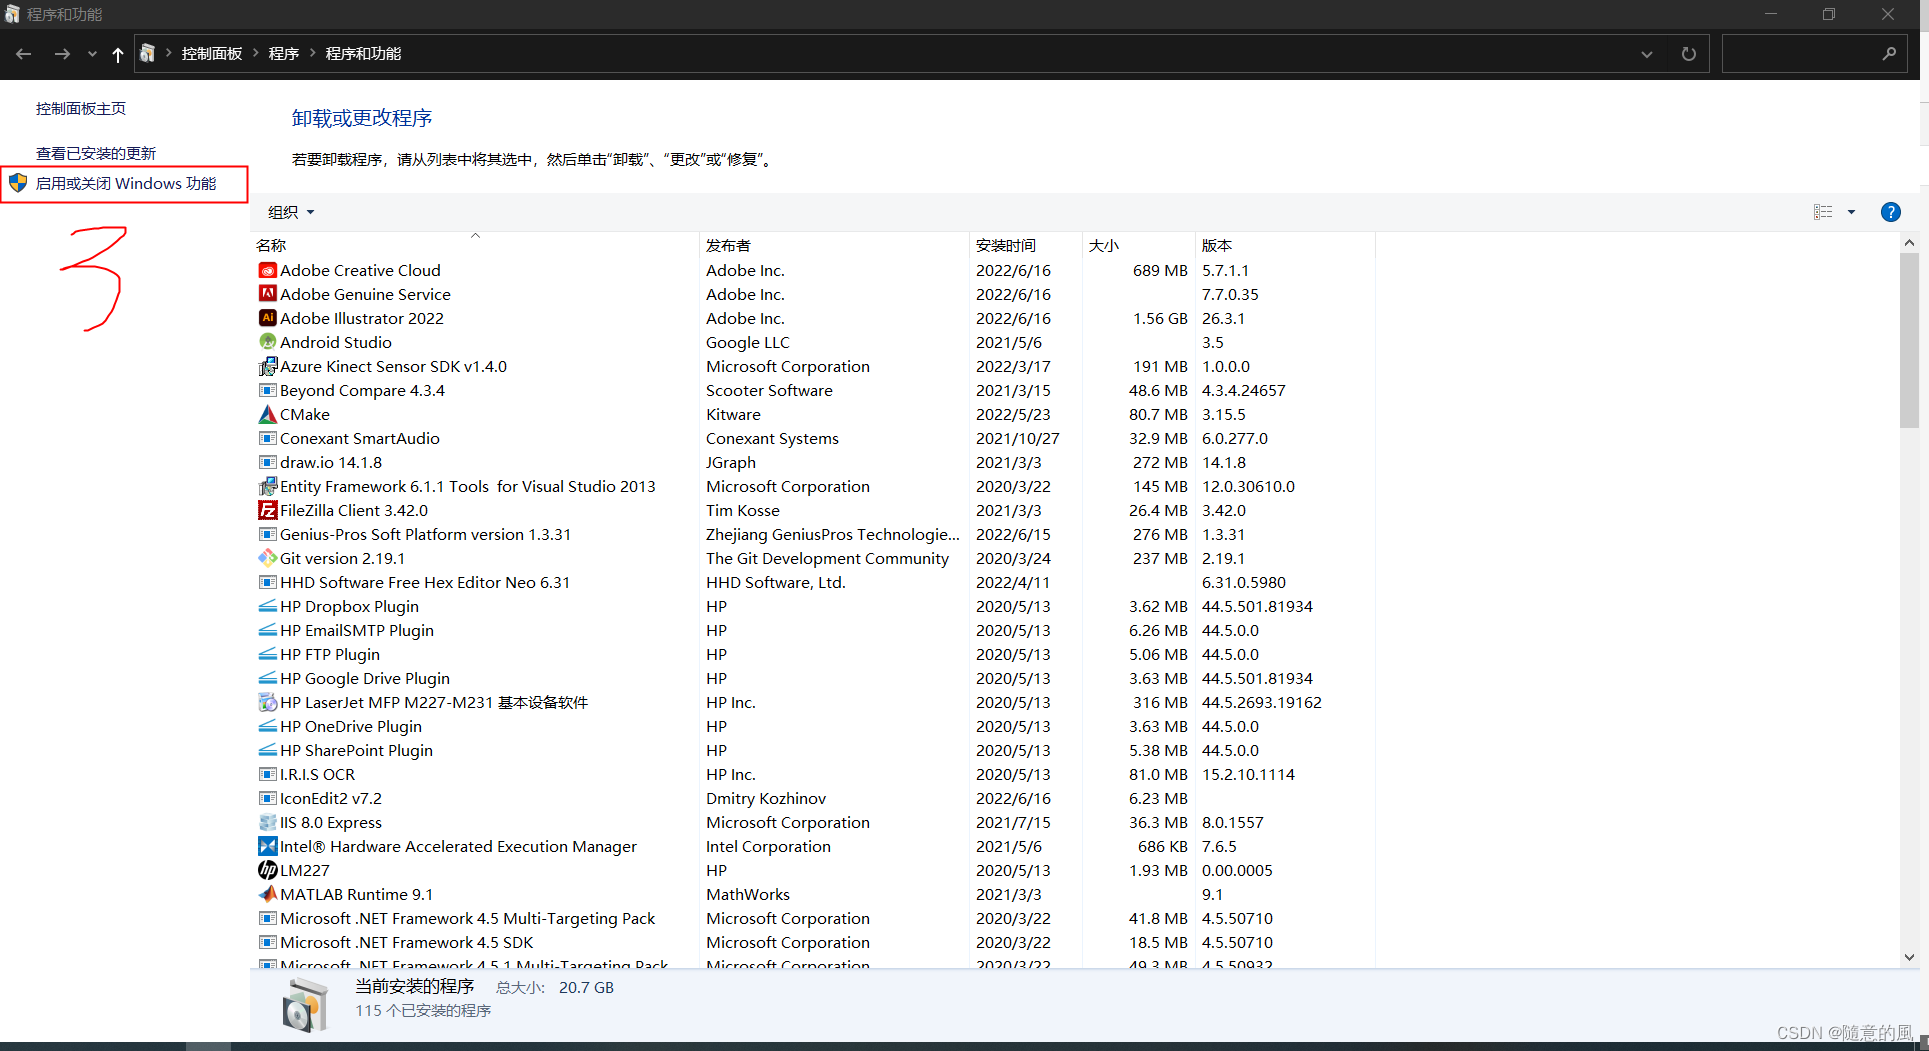
2、打开程序与功能
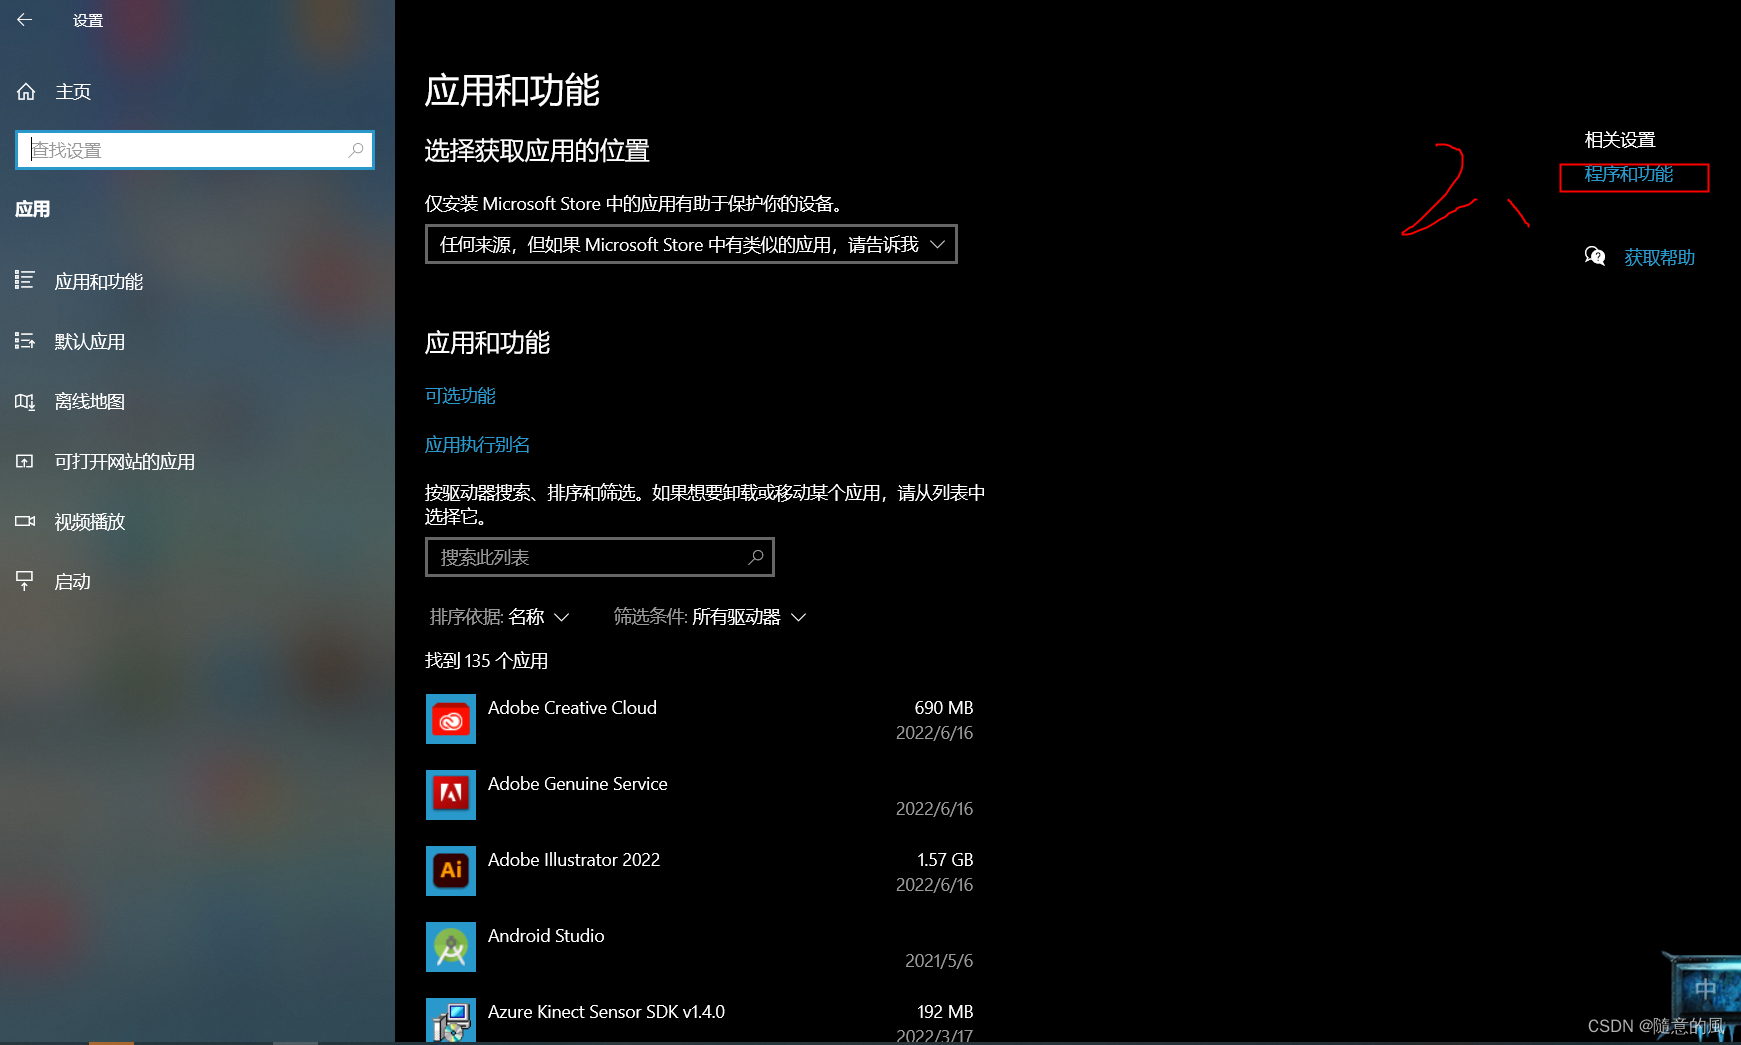
-
3、 打开启用或关闭windows功能
-
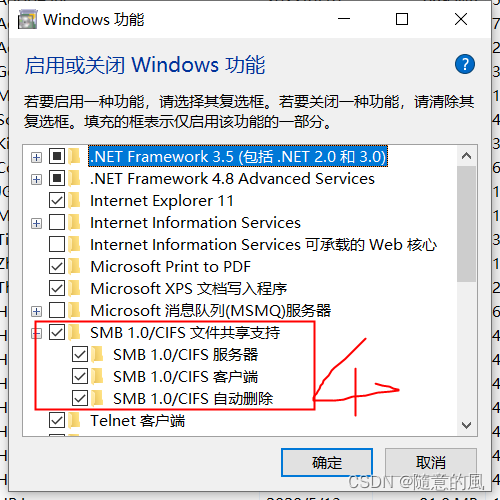
4、 勾选SMB 1.0 /CIFS文件共享支持
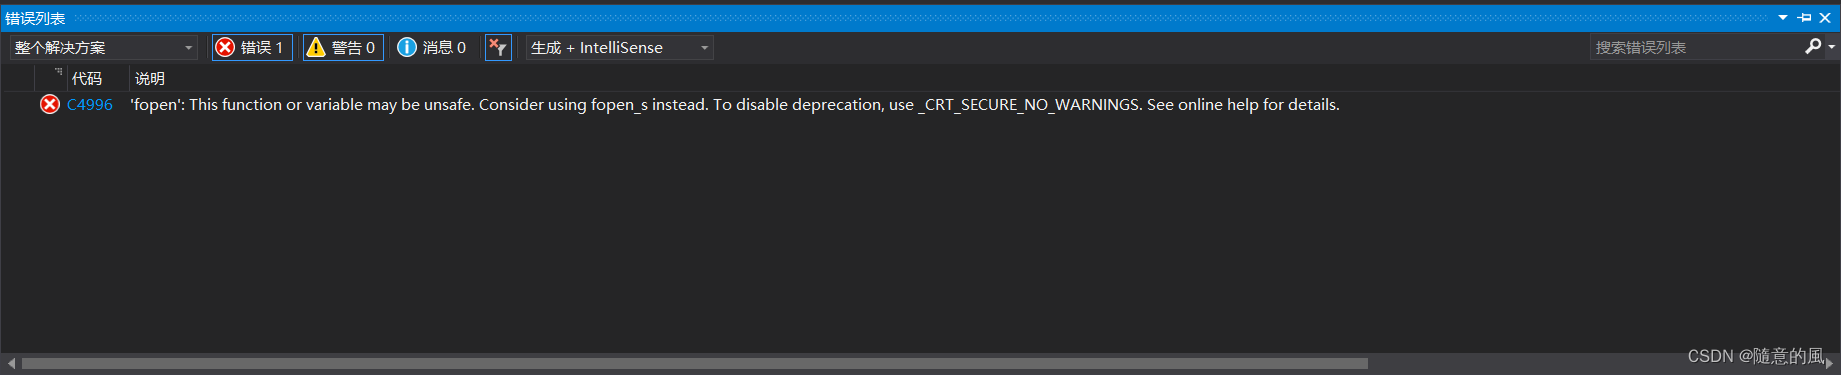
11. error C4996: ‘fopen’ This function or variable may be unsafe. Consider using fopen_s instead
- 1>d:\testcode\windows系统\yuy2convertrgb24\yuy2convertrgb24.cpp(69): error C4996: ‘fopen’: This function or variable may be unsafe. Consider using fopen_s instead. To disable deprecation, use _CRT_SECURE_NO_WARNINGS. See online help for details.
1>d:\windows kits\10\include\10.0.17763.0\ucrt\stdio.h(208): note: 参见“fopen”的声明
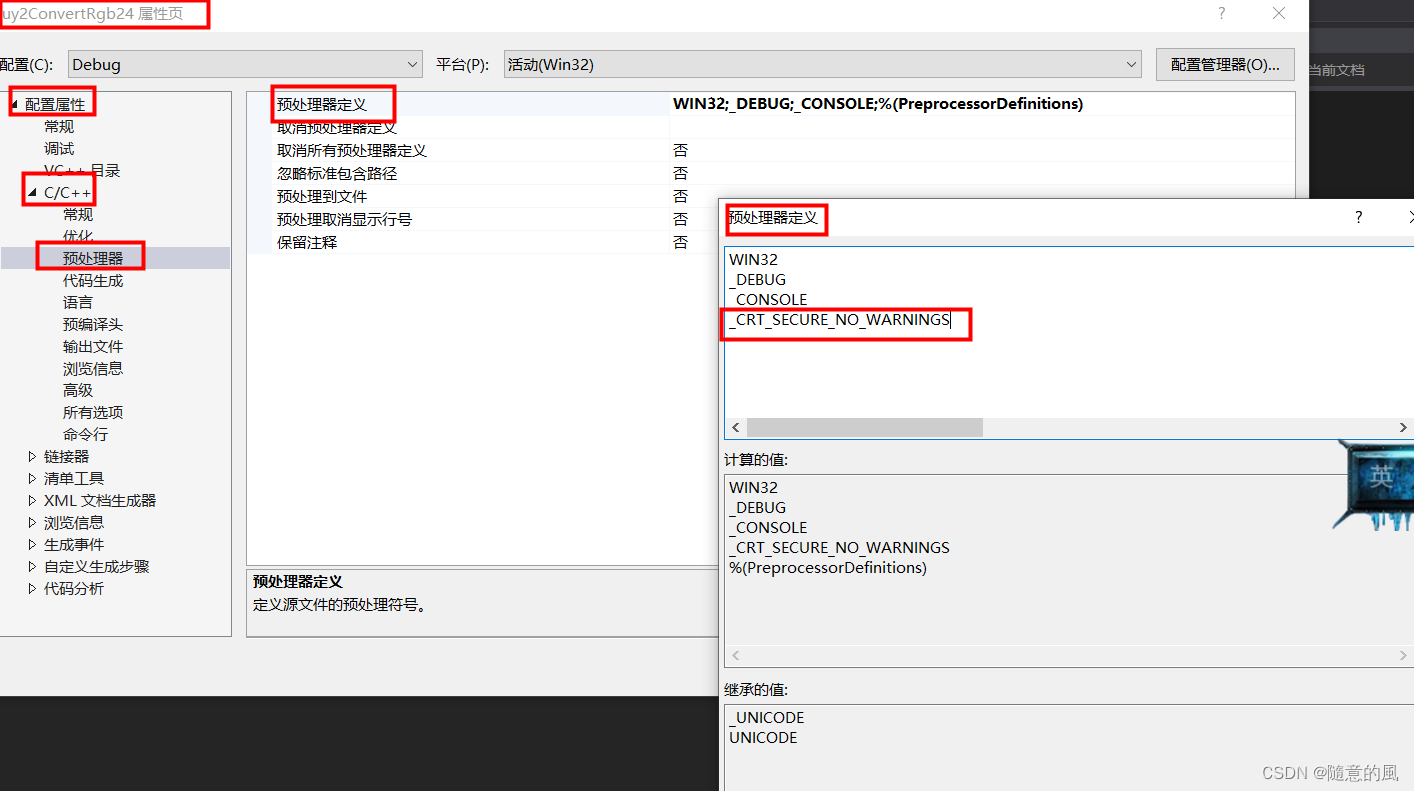
- 解决方案如图:
12. warning C4819: Unicode 格式以防止数据丢失 的警告
- VS项目经常会出现 warning C4819: 该文件包含不能在当前代码页(936)中表示的字符。请将该文件保存为 Unicode 格式以防止数据丢失 的警告,虽然不影响程序的正常运行,但是我们还是要学会消除这个问题:网上的方法很多是如下4种;
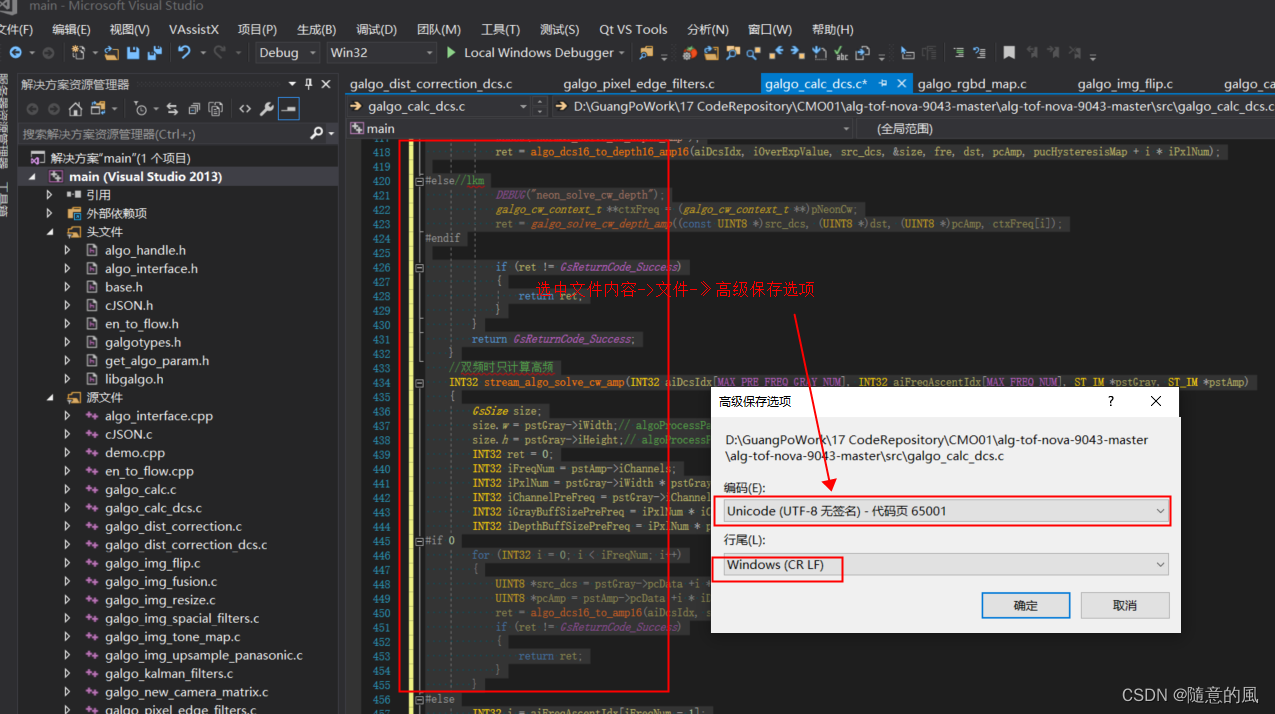
- 1. 转换Code文件为Unicode格式;
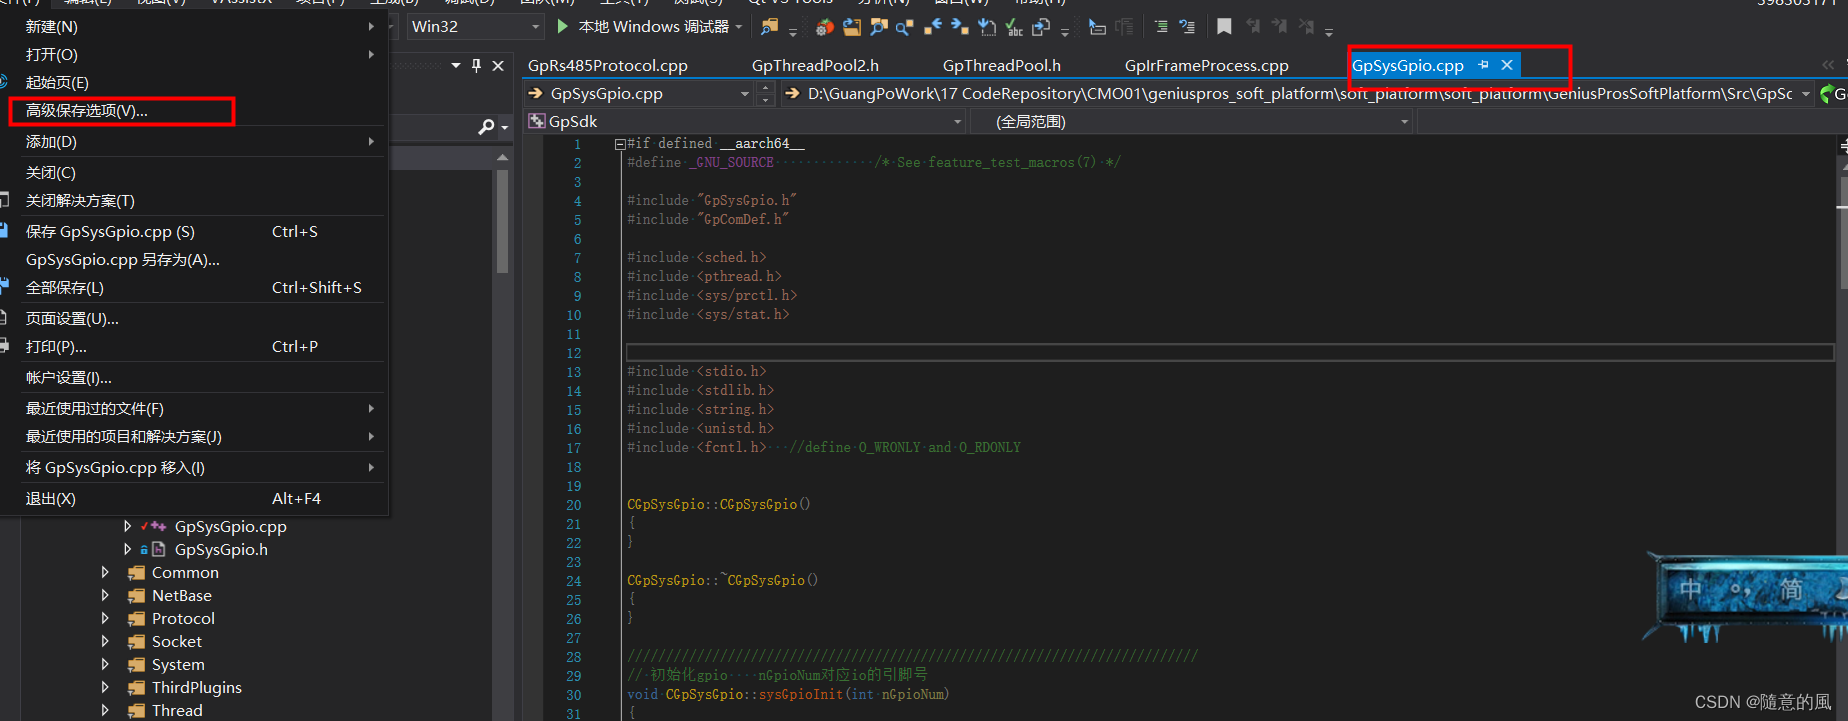
- 如果没有高级保存选项,则可以自行进行设置,默认有些是隐藏了。


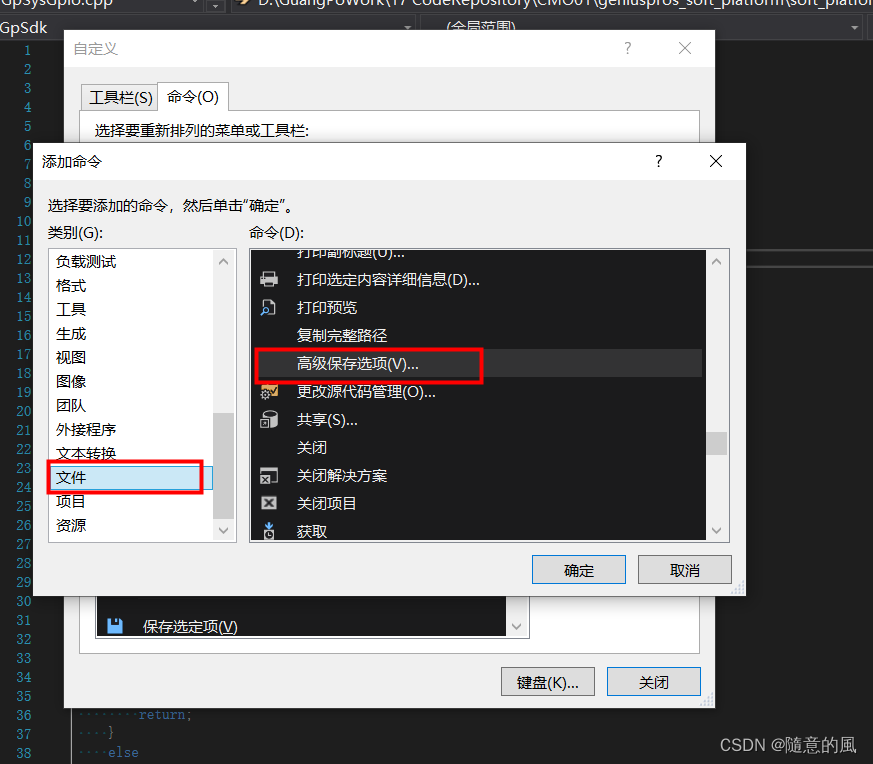
-
然后再打开文件,执行文件高级保存选项
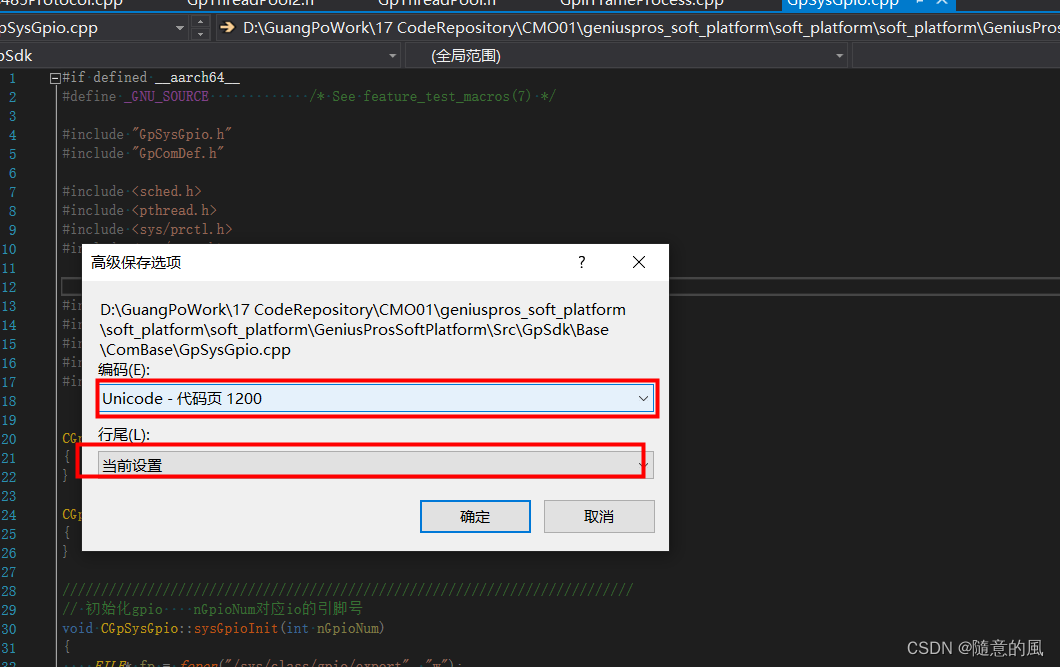
-
确定即可;
-
2. 在Project -> Properties -> Configuration Properties -> C/C++ -> Advance 的 Disable Specific Warnings 中添加相应的警告编号:4819;
-
3. 或找出不符合Unicode格式的文件,然后在该文件的开始处加入下面的语句:
# pragma warning (disable:4819)
- 4.哪个文件出现这个警告错误,打开它, 用VS2010的查找替换功能,打开允许正则表达式选项,选择当前窗口,查找替换 \n 为 \n , 然后,这个世界就清净了。原因: 查找的 \n 是跨平台的回车,替换的 \n 却是当前代码页的回车了。(没有这样试验过)
13. warning: ‘char* strncpy(char*, const char*, size_t)’ specified bound depends on the length of the source argument [-Wstringop-overflow=]

- debug版本不会包警告,但是release版本中就出现该警告
函数源码如下
//
// 安全拷贝字符串
// 当pSrc字符串长度大于nDestSize时会记录异常,然后进行nDestSize字节的拷贝,返回截断标志
int safeStrCopy(char* pDest, size_t unDestSize, const char* pSrc)
{
    CHECKI(pDest);
    CHECKI(pSrc);
    CHECKI(unDestSize > 0);

    DEBUG_TRY
    /*
    * 注意
    *   1. 不能统一使用pDest[unCpySize-1] = 0;因为无法保证前面的数据全部被清空的,有可能是非空数据,这时就会出现255.255.255.0 -> 192.168.100.5
    */
    size_t unSrcSize = strlen(pSrc);
    // 获取最小字符串拷贝长度
    size_t unCpySize = GP_MIN(unDestSize, unSrcSize);
    // 当长度不够时警告发出
    if (unDestSize <= unSrcSize)
    {
        LOGWARNING("safeStrCopy happend truncate overflow cause unDestSize < unSrcSize nDestSize=[%u] unSrcSize=[%u]", unDestSize, unSrcSize);
        strncpy(pDest, pSrc, unCpySize);
        pDest[unCpySize - 1] = 0;
        return ReturnCode_Truncate;
    }
    else // unDestSize > unSrcSize
    {
        /* 注意
        *  1. 出现以下警告,验证了几种方法都不管用,最后 https://gcc.gnu.org/onlinedocs/gcc-9.4.0/gcc/Warning-Options.html#Warning-Options 告知使用memcpy
        *      warning : ‘char * strncpy(char*, const char*, size_t)’ specified bound depends on the length of the source argument[-Wstringop - overflow=]
        *      strncpy(pDest, pSrc, unCpySize);
        *      /home/huyanfeng/geniuspros_emb_platform_huyf/GpSdk/Base/Common/GpCommon.cpp:588 : 30 : note : length computed here
        *      size_t unSrcSize = strlen(pSrc);
        *   2. memcpy效率会高那么一点,strncpy会把dest多余内存清0
        */
#pragma GCC diagnostic push
#pragma GCC diagnostic ignored "-Wstringop-truncation"
        //strncpy(pDest, pSrc, unCpySize);
        memcpy(pDest, pSrc, unCpySize);
#pragma GCC diagnostic pop
        pDest[unCpySize] = 0;
    }

    return ReturnCode_Success;
    DEBUG_CATCHI("CATCH: *** safeStrCopy crash! ***\n");
}
- 增加
-Wno-error=stringop-truncation选项和-Wstringop-overflow=1选项,debug下不报警告,release中还是报该警告

pDest[unCpySize] = 0;修改为pDest[unCpySize] = '\0';也无用,其实'\0'=0- 最终在https://gcc.gnu.org/onlinedocs/gcc-9.4.0/gcc/Warning-Options.html#Warning-Options处查找到应该使用
memcpy执行
-Wstringop-overflow
-Wstringop-overflow=type
Warn for calls to string manipulation functions such as memcpy and strcpy that are determined to overflow the destination buffer. The optional argument is one greater than the type of Object Size Checking to perform to determine the size of the destination. See Object Size Checking. The argument is meaningful only for functions that operate on character arrays but not for raw memory functions like memcpy which always make use of Object Size type-0. The option also warns for calls that specify a size in excess of the largest possible object or at most SIZE_MAX / 2 bytes. The option produces the best results with optimization enabled but can detect a small subset of simple buffer overflows even without optimization in calls to the GCC built-in functions like __builtin_memcpy that correspond to the standard functions. In any case, the option warns about just a subset of buffer overflows detected by the corresponding overflow checking built-ins. For example, the option will issue a warning for the strcpy call below because it copies at least 5 characters (the string "blue" including the terminating NUL) into the buffer of size 4.

enum Color { blue, purple, yellow };
const char* f (enum Color clr)
{
  static char buf [4];
  const char *str;
  switch (clr)
    {
      case blue: str = "blue"; break;
      case purple: str = "purple"; break;
      case yellow: str = "yellow"; break;
    }

  return strcpy (buf, str);   // warning here
}
Option -Wstringop-overflow=2 is enabled by default.

-Wstringop-overflow
-Wstringop-overflow=1
The -Wstringop-overflow=1 option uses type-zero Object Size Checking to determine the sizes of destination objects. This is the default setting of the option. At this setting the option will not warn for writes past the end of subobjects of larger objects accessed by pointers unless the size of the largest surrounding object is known. When the destination may be one of several objects it is assumed to be the largest one of them. On Linux systems, when optimization is enabled at this setting the option warns for the same code as when the _FORTIFY_SOURCE macro is defined to a non-zero value.

-Wstringop-overflow=2
The -Wstringop-overflow=2 option uses type-one Object Size Checking to determine the sizes of destination objects. At this setting the option will warn about overflows when writing to members of the largest complete objects whose exact size is known. It will, however, not warn for excessive writes to the same members of unknown objects referenced by pointers since they may point to arrays containing unknown numbers of elements.

-Wstringop-overflow=3
The -Wstringop-overflow=3 option uses type-two Object Size Checking to determine the sizes of destination objects. At this setting the option warns about overflowing the smallest object or data member. This is the most restrictive setting of the option that may result in warnings for safe code.

-Wstringop-overflow=4
The -Wstringop-overflow=4 option uses type-three Object Size Checking to determine the sizes of destination objects. At this setting the option will warn about overflowing any data members, and when the destination is one of several objects it uses the size of the largest of them to decide whether to issue a warning. Similarly to -Wstringop-overflow=3 this setting of the option may result in warnings for benign code.

-Wstringop-truncation
Warn for calls to bounded string manipulation functions such as strncat, strncpy, and stpncpy that may either truncate the copied string or leave the destination unchanged.

In the following example, the call to strncat specifies a bound that is less than the length of the source string. As a result, the copy of the source will be truncated and so the call is diagnosed. To avoid the warning use bufsize - strlen (buf) - 1) as the bound.

void append (char *buf, size_t bufsize)
{
  strncat (buf, ".txt", 3);
}
As another example, the following call to strncpy results in copying to d just the characters preceding the terminating NUL, without appending the NUL to the end. Assuming the result of strncpy is necessarily a NUL-terminated string is a common mistake, and so the call is diagnosed. To avoid the warning when the result is not expected to be NUL-terminated, call memcpy instead.

void copy (char *d, const char *s)
{
  strncpy (d, s, strlen (s));
}
In the following example, the call to strncpy specifies the size of the destination buffer as the bound. If the length of the source string is equal to or greater than this size the result of the copy will not be NUL-terminated. Therefore, the call is also diagnosed. To avoid the warning, specify sizeof buf - 1 as the bound and set the last element of the buffer to NUL.

void copy (const char *s)
{
  char buf[80];
  strncpy (buf, s, sizeof buf);
  …
}
In situations where a character array is intended to store a sequence of bytes with no terminating NUL such an array may be annotated with attribute nonstring to avoid this warning. Such arrays, however, are not suitable arguments to functions that expect NUL-terminated strings. To help detect accidental misuses of such arrays GCC issues warnings unless it can prove that the use is safe. See Common Variable Attributes.
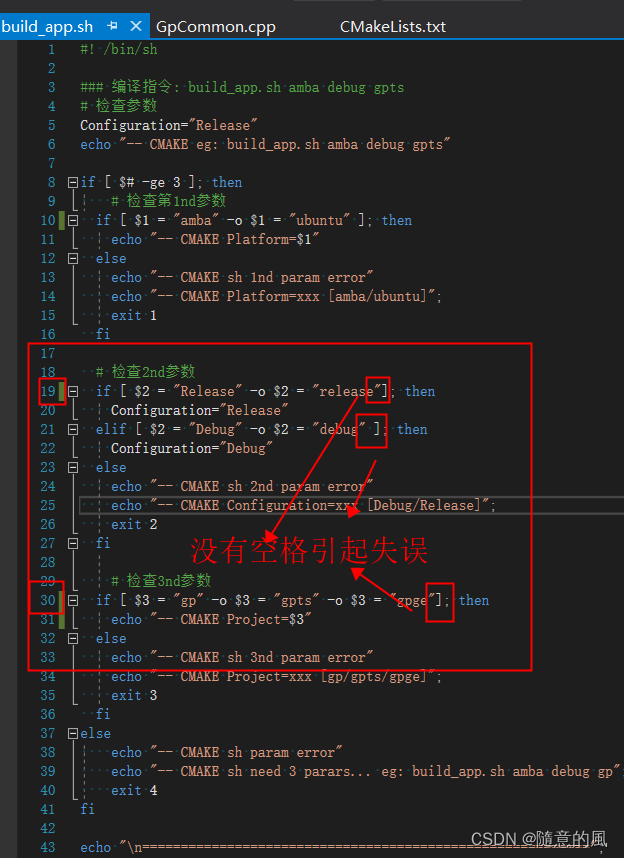
14. shell脚本[ ]首尾未留有空格导致的编译报错
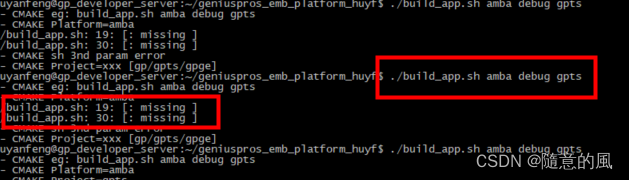
- 没有在[ ]首尾留有空格,引起的编译报错
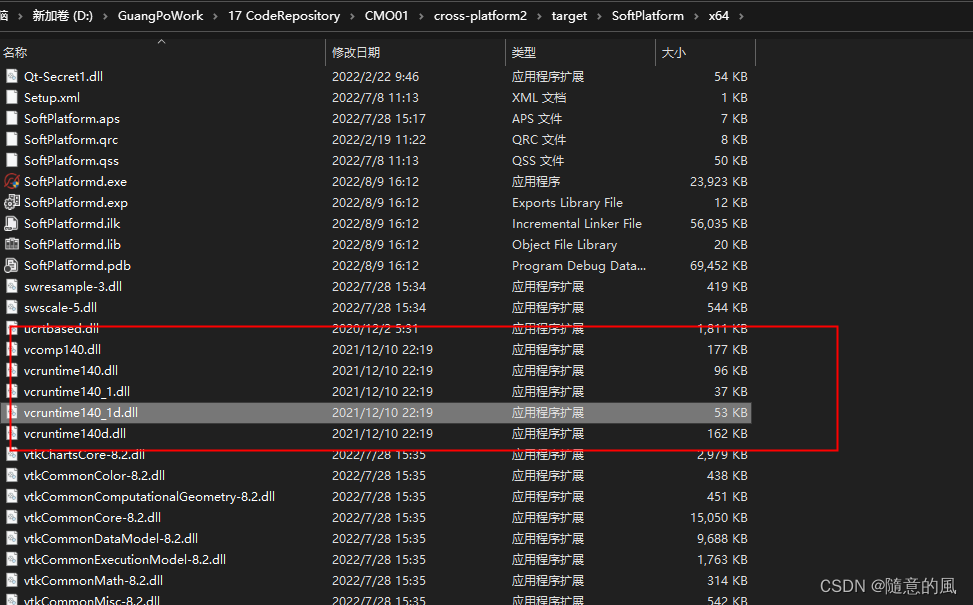
15. 启动电力项目debug调试时,找不到vcruntime140_1d.dll报错
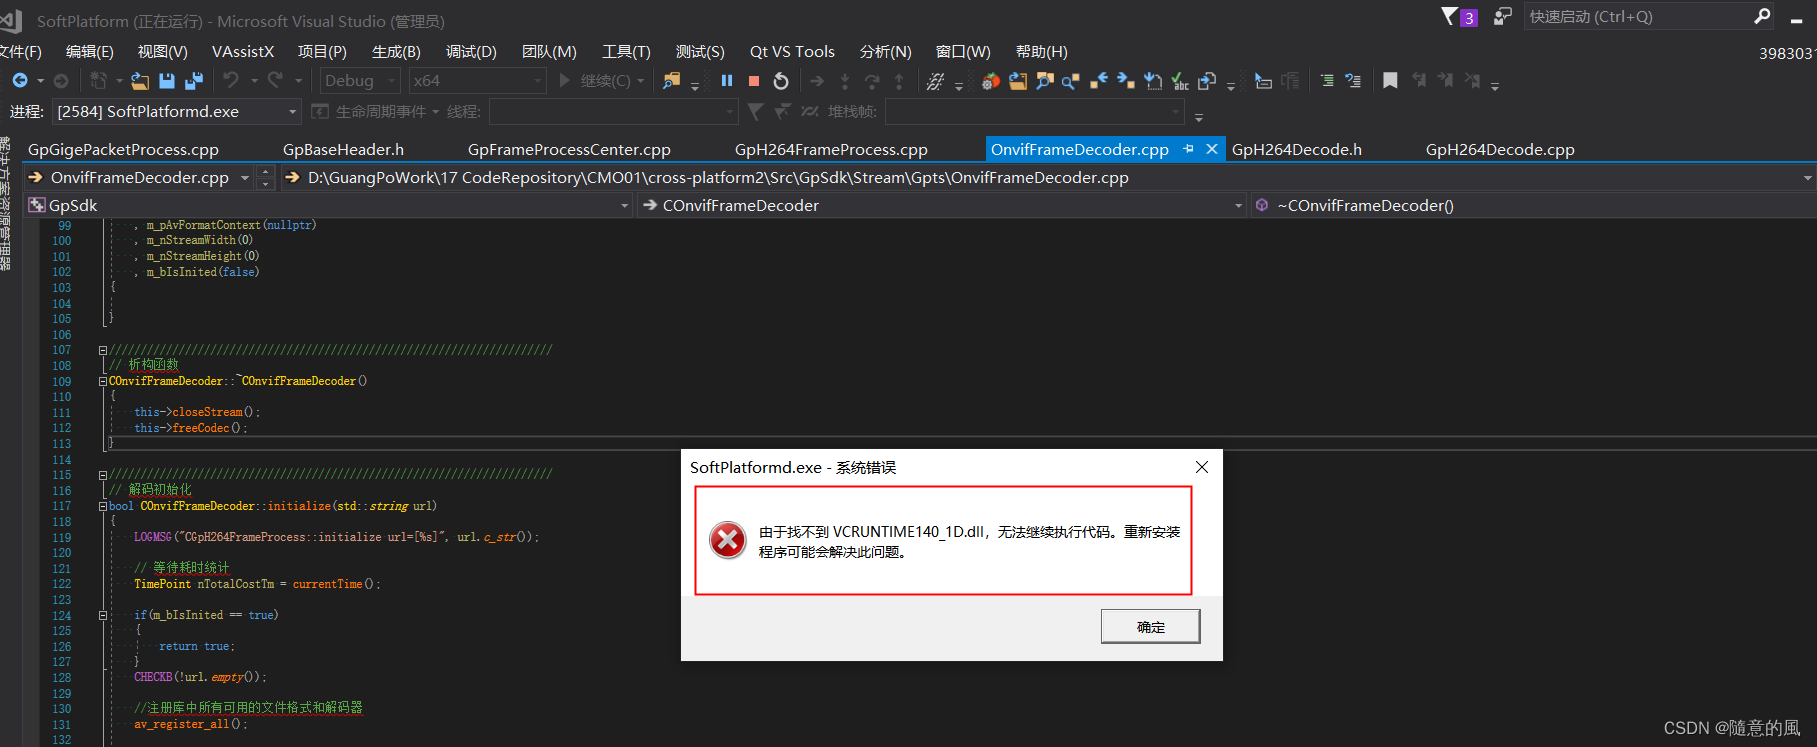
- 经排查是因为该库算法使用,此机器没有该dll,把相关dll拷贝到可执行文件目录即可
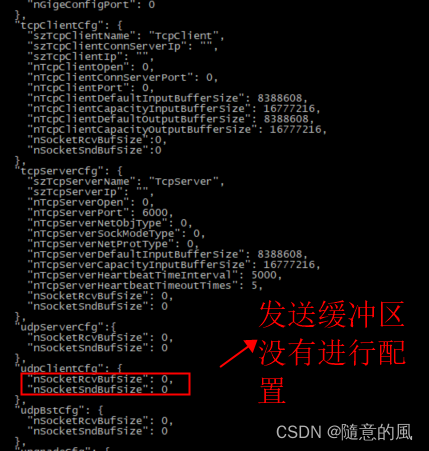
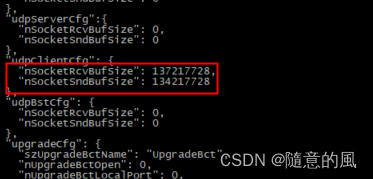
16. 电力项目udp发包报错
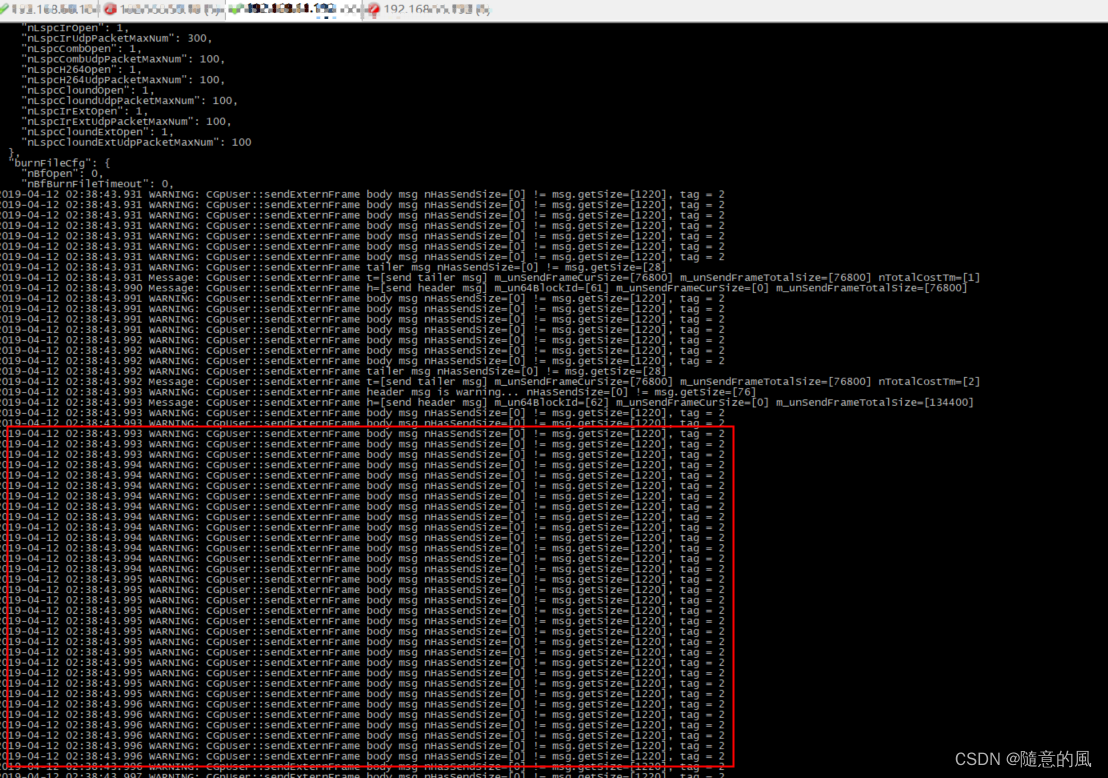
- 问题原因:嵌入式系统中配置文件中udp client的发送和接收缓冲区没有进行配置,进行配置即可
17. vs2017环境编译vtk8.2.0报错 E2512错误
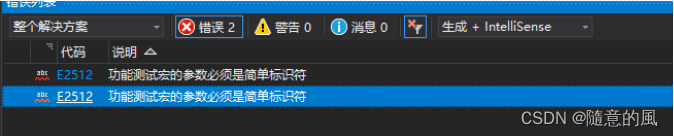
- 解决方案
-
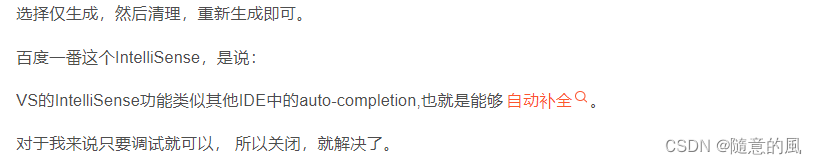
改为一下仅生产选项

18. vs2017环境sdk层面编译和qt gui层面编译会出现耗时翻倍的情况
- sdk代码
//
// 点云数据处理
bool CGpPointCloudSingleObjTrackAlgo::process(char* pPointCloudBuff, int nPointCloudSize, double dOutlineBounds[6])
{
    //LOGMSG("CGpPointCloudSingleObjTrackAlgo::process");

    // 等待耗时统计
    TimePoint nTotalCostTm = currentTime();

    CHECKF(pPointCloudBuff);

    m_pTempPointsA->Reset();
    vtkIdType nTempPointsNumA = m_pTempPointsA->GetNumberOfPoints();
    //LOGMSG("CGpPointCloudSingleObjTrackAlgo::process reset nTempPointsNumA=[%d]", nTempPointsNumA);

    m_pTempPointsB->Reset();
    vtkIdType nTempPointsNumB = m_pTempPointsB->GetNumberOfPoints();
    //LOGMSG("CGpPointCloudSingleObjTrackAlgo::process reset nTempPointsNumB=[%d]", nTempPointsNumB);

    m_pOutlinePoints->Reset();
    vtkIdType nOutlinePointsNum = m_pOutlinePoints->GetNumberOfPoints();
    //LOGMSG("CGpPointCloudSingleObjTrackAlgo::process reset nOutlinePointsNum=[%d]", nOutlinePointsNum);

    m_pPoints->Reset();
    vtkIdType nPointsNum = m_pPoints->GetNumberOfPoints();
    //LOGMSG("CGpPointCloudSingleObjTrackAlgo::process reset nPointsNum=[%d]", nPointsNum);

    // 统计一下x=0 y=0 z=0原点个数
    int nZeroTotalCount = 0;
    // 点和cell的id
    vtkIdType nId = 0;
    // 获取到配置
    int nPointCloudDepthMinValue = 0;
    int nPointCloudDepthMaxValue = 5000000;
    if (g_pConfigIni && g_pConfigIni->nGpbrOpen)
    {
        nPointCloudDepthMinValue = g_pConfigIni->nGpbrPointCloudDepthMinValue;
        nPointCloudDepthMaxValue = g_pConfigIni->nGpbrPointCloudDepthMaxValue;
    }

    int n1 = 0;
    int n2 = 0;
    int n3 = 0;
    int n4 = 0;
    int n5 = 0;
    int n6 = 0;
    int n7 = 0;
    int n8 = 0;
    int n9 = 0;
    int n10 = 0;

    // 中心点坐标
    double dCenterPointX = 0.0;
    double dCenterPointY = 0.0;
    double dCenterPointZ = 0.0;
    double dCenterPointXTotal = 0.0;
    double dCenterPointYTotal = 0.0;
    double dCenterPointZTotal = 0.0;
    // 非背景点的id
    int nTempPointIdx = 0;
    // 统计背景点数
    int nBackgroundPointNumTotal = 0;
    // 背景容器中元素数量
    size_t unMapPolyDataBackgroundsSize = m_mapPolyDataBackgrounds.size();
    // 获取点的个数
    int nPointCloudCount = nPointCloudSize / sizeof(GpPointCloudRgba);
    // 内存上刷新
    GpPointCloudRgba* pPointCloudRgbaBuff = (GpPointCloudRgba*)(pPointCloudBuff);

    nTotalCostTm = currentTime();
    for (int nIdx = 0; nIdx < nPointCloudCount; nIdx++)
    {
        /*
        * 注意
        *   1. 需要在x,y轴上都*(-1)以达到渲染出来的图像和深度图像方位保持一致
        *   2. 如果出现一个点放射状,则可能是相机内参文件不匹配(主点(cx, cy)和焦点(fx, fy)问题)
        *   3. 暂时vtk渲染不做缩放因子处理
        */
        // 点集插入点
        double dPointX = pPointCloudRgbaBuff->x * (-1);
        double dPointY = pPointCloudRgbaBuff->y * (-1);
        double dPointZ = 0.0;
        // 取出深度值把没用的点过滤点
        int depthValue = (int)pPointCloudRgbaBuff->z;
        if ((depthValue == 0 || depthValue == 65300 || depthValue == 65400 || depthValue == 65500 ||
            (dPointX > -0.0001 && dPointX < 0.0001) || (dPointY < 0.0001 && dPointY >-0.0001) && (dPointY < 0.0001 && dPointY > -0.0001) ||
            depthValue < nPointCloudDepthMinValue/*小于0.1米的全部过滤掉*/ ||
            depthValue > nPointCloudDepthMaxValue/*大于3米的全部过滤掉*/))
        {
            dPointX = 0.0;
            dPointY = 0.0;
            dPointZ = 0.0;

            // 统计多少个(0,0,0)点,会引起渲染时有原点
            nZeroTotalCount++;

            n1++;
        }
        else
        {
            dPointZ = pPointCloudRgbaBuff->z;
            n2++;
        }

        // 学习背景中和背景学习完成
        if (m_unBackgroundLeanStatus == GP_BACKGROUND_LEARN_START || m_unBackgroundLeanStatus == GP_BACKGROUND_LEARN_FINISH)
        {
            // 是不是背景点
            bool bBackgroundPoint = false;

            // 过滤背景点
            double dCurPoint[3] = { dPointX, dPointY, dPointZ };
            // 遍历当前点位(640*480=307200)的深度值容器
            size_t unSize = m_mapPolyDataBackgrounds[nIdx].size();
            for (unsigned int i = 0; i < unSize; i++)
            {
                double dBackgroundPoint[3] = { 0.0, 0.0, 0.0 };
                dBackgroundPoint[2] = m_mapPolyDataBackgrounds[nIdx][i];
           }
    }
    LOGMSG("CGpPointCloudSingleObjTrackAlgo::process-1 nTotalCostTm=[%llu] nPointCloudCount=[%d] nPointsNum=[%d] nBackgroundPointNumTotal=[%d] m_nLearnFinishOffsetPointsThreshold=[%d] m_nCurBackgroundLearnFilterFrameNum=[%d] nOffset=[%d] n1=[%d] n2=[%d] n3=[%d] n4=[%d] n5=[%d] n6=[%d] n7=[%d] n8=[%d] n9=[%d] n10=[%d]", (currentTime() - nTotalCostTm).count(), nPointCloudCount, nPointsNum, nBackgroundPointNumTotal, m_nLearnFinishOffsetPointsThreshold, nPointCloudCount - nBackgroundPointNumTotal, m_nCurBackgroundLearnFilterFrameNum, n1, n2, n3, n4, n5, n6, n7, n8, n9, n10);
    }
- qt gui层面源代码
    //
    // 更新点云数据
    bool CPointCloudVtkWidget::updatePointCloudData(std::shared_ptr<char> spPointCloudBuff, int nPointCloudSize)
    {
        //printf("CPointCloudVtkWidget::updatePointCloudData nThreadId=[%d]\n", GetCurrentThreadId());

        // 等待耗时统计
        TimePoint nTotalCostTm = currentTime();

        CHECKB(spPointCloudBuff);

        std::unique_lock<std::mutex> locker(m_updateMtx);

        /*
        * 注意
        *   1. 清空points中数据集合中元素容易造成点云图像闪烁
        *   2. 直接索引数据更新方式
        *   3. 全部reset清理方式,否则会有残留,但是会闪烁
        */
        m_pTempPointsA->Reset();
        vtkIdType nTempPointsNumA = m_pTempPointsA->GetNumberOfPoints();
        //printf("CPointCloudVtkWidget::updatePointCloudData reset nTempPointsNumA=[%d]\n", nTempPointsNumA);

        m_pTempPointsB->Reset();
        vtkIdType nTempPointsNumB = m_pTempPointsB->GetNumberOfPoints();
        //printf("CPointCloudVtkWidget::updatePointCloudData reset nTempPointsNumB=[%d]\n", nTempPointsNumB);

        m_pOutlinePoints->Reset();
        vtkIdType nOutlinePointsNum = m_pOutlinePoints->GetNumberOfPoints();
        //printf("CPointCloudVtkWidget::updatePointCloudData reset nOutlinePointsNum=[%d]\n", nOutlinePointsNum);

        m_pPoints->Reset();
        vtkIdType nPointsNum = m_pPoints->GetNumberOfPoints();
        //printf("CPointCloudVtkWidget::updatePointCloudData reset nPointsNum=[%d]\n", nPointsNum);

        m_pCells->Reset();
        vtkIdType nCellsNum = m_pCells->GetNumberOfCells();
       //printf("CPointCloudVtkWidget::updatePointCloudData reset nCellsNum=[%d]\n", nCellsNum);

        //m_pScalars->Reset();
        //vtkIdType nScalarsNum = m_pScalars->GetNumberOfTuples();
        //printf("CPointCloudVtkWidget::updatePointCloudData reset nScalarsNum=[%d]\n", nScalarsNum);

        // 统计一下x=0 y=0 z=0原点个数
        int nZeroTotalCount = 0;
        // 点和cell的id
        vtkIdType nId = 0;
        // 获取到配置
        int nPointCloudDepthMinValue = 0;
        int nPointCloudDepthMaxValue = 5000000;
        if (m_pPointCloudViewConfig)
        {
            nPointCloudDepthMinValue = m_pPointCloudViewConfig->pointCloudDepthMinValue;
            nPointCloudDepthMaxValue = m_pPointCloudViewConfig->pointCloudDepthMaxValue;
        }

        int n1 = 0;
        int n2 = 0;
        int n3 = 0;
        int n4 = 0;
        int n5 = 0;
        int n6 = 0;
        int n7 = 0;
        int n8 = 0;
        int n9 = 0;
        int n10 = 0;

        // 中心点坐标
        double dCenterPointX = 0.0;
        double dCenterPointY = 0.0;
        double dCenterPointZ = 0.0;
        double dCenterPointXTotal = 0.0;
        double dCenterPointYTotal = 0.0;
        double dCenterPointZTotal = 0.0;
        // 非背景点的id
        int nTempPointIdx = 0;
        // 构建背景过来掉前多少帧
        static int nFilterFrameNum = 0;
        // 统计背景点数
        int nBackgroundPointNumTotal = 0;
        // 背景容器中元素数量
        size_t unMapPolyDataBackgroundsSize = m_mapPolyDataBackgrounds.size();
        // 获取点的个数
        int nPointCloudCount = nPointCloudSize / sizeof(PointCloudRGBA);
        // 内存上刷新
        GpPointCloudRgba* pPointCloudRgbaBuff = (GpPointCloudRgba*)(spPointCloudBuff.get());
        printf("CGpPointCloudSingleObjTrackAlgo::process nPointCloudCount=[%d]\n", nPointCloudCount);
        nTotalCostTm = currentTime();
        for (int nIdx = 0; nIdx < nPointCloudCount; nIdx++)
        {
            /*
            * 注意
            *   1. 需要在x,y轴上都*(-1)以达到渲染出来的图像和深度图像方位保持一致
            *   2. 如果出现一个点放射状,则可能是相机内参文件不匹配(主点(cx, cy)和焦点(fx, fy)问题)
            *   3. 暂时vtk渲染不做缩放因子处理
            */
            // 点集插入点
            double dPointX = static_cast<double>(pPointCloudRgbaBuff->x * (-1));
            double dPointY = static_cast<double>(pPointCloudRgbaBuff->y * (-1));
            double dPointZ = 0.0;
            // 取出深度值把没用的点过滤点
            int depthValue = (int)pPointCloudRgbaBuff->z;
            if ((depthValue == 0 || depthValue == 65300 || depthValue == 65400 || depthValue == 65500 ||
                (dPointX > -0.0001 && dPointX < 0.0001) || (dPointY < 0.0001 && dPointY >-0.0001) && (dPointY < 0.0001 && dPointY > -0.0001) ||
                depthValue < nPointCloudDepthMinValue/*小于0.1米的全部过滤掉*/ ||
                depthValue > nPointCloudDepthMaxValue/*大于3米的全部过滤掉*/))
            {
                dPointX = 0.0;
                dPointY = 0.0;
                dPointZ = 0.0;

                // 点云数据指针偏移
                //pPointCloudRgbaBuff++;

                // 统计多少个(0,0,0)点,会引起渲染时有原点
                nZeroTotalCount++;
                //printf("CPointCloudVtkWidget::updatePointCloudData nZeroTotalCount=[%d] nIdx=[%d] dPointX=[%.12f] dPointY=[%.12f] dPointZ=[%.12f]\n", nZeroTotalCount, nIdx, dPointX, dPointY, dPointZ);
                //continue;

                n1++;
            }
            else
            {
                dPointZ = static_cast<double>(pPointCloudRgbaBuff->z);

                n2++;
            }

            // 背景构建第一帧数据载入已完成
            if (unMapPolyDataBackgroundsSize)
            {
                // 是不是背景点
                bool bBackgroundPoint = false;

                // 过滤背景点
                double dCurPoint[3] = { dPointX, dPointY, dPointZ };
                // 背景构建中
                if (m_bBuildBackgrounding)
                {
                    // 遍历当前点位(640*480=307200)的深度值容器
                    for (unsigned int i = 0; i < m_mapPolyDataBackgrounds[nIdx].size(); i++)
                    {
                        double dBackgroundPoint[3] = { 0.0, 0.0, 0.0 };
                        dBackgroundPoint[2] = m_mapPolyDataBackgrounds[nIdx][i];

                        //printf("CPointCloudVtkWidget::updatePointCloudData nCurPoint=[%f %f %f] dBackgroundPoint=[%f %f %f] dDist[%f]\n", nCurPoint[0], nCurPoint[1], nCurPoint[2], dBackgroundPoint[0], dBackgroundPoint[1], dBackgroundPoint[2], dDist);
                    }
        }
        printf("CPointCloudVtkWidget::updatePointCloudData-1 nTotalCostTm=[%llu] n1=[%d] n2=[%d] n3=[%d] n4=[%d] n5=[%d] n6=[%d] n7=[%d] n8=[%d] n9=[%d] n10=[%d]\n", (currentTime() - nTotalCostTm).count(), n1, n2, n3, n4, n5, n6, n7, n8, n9, n10);
}
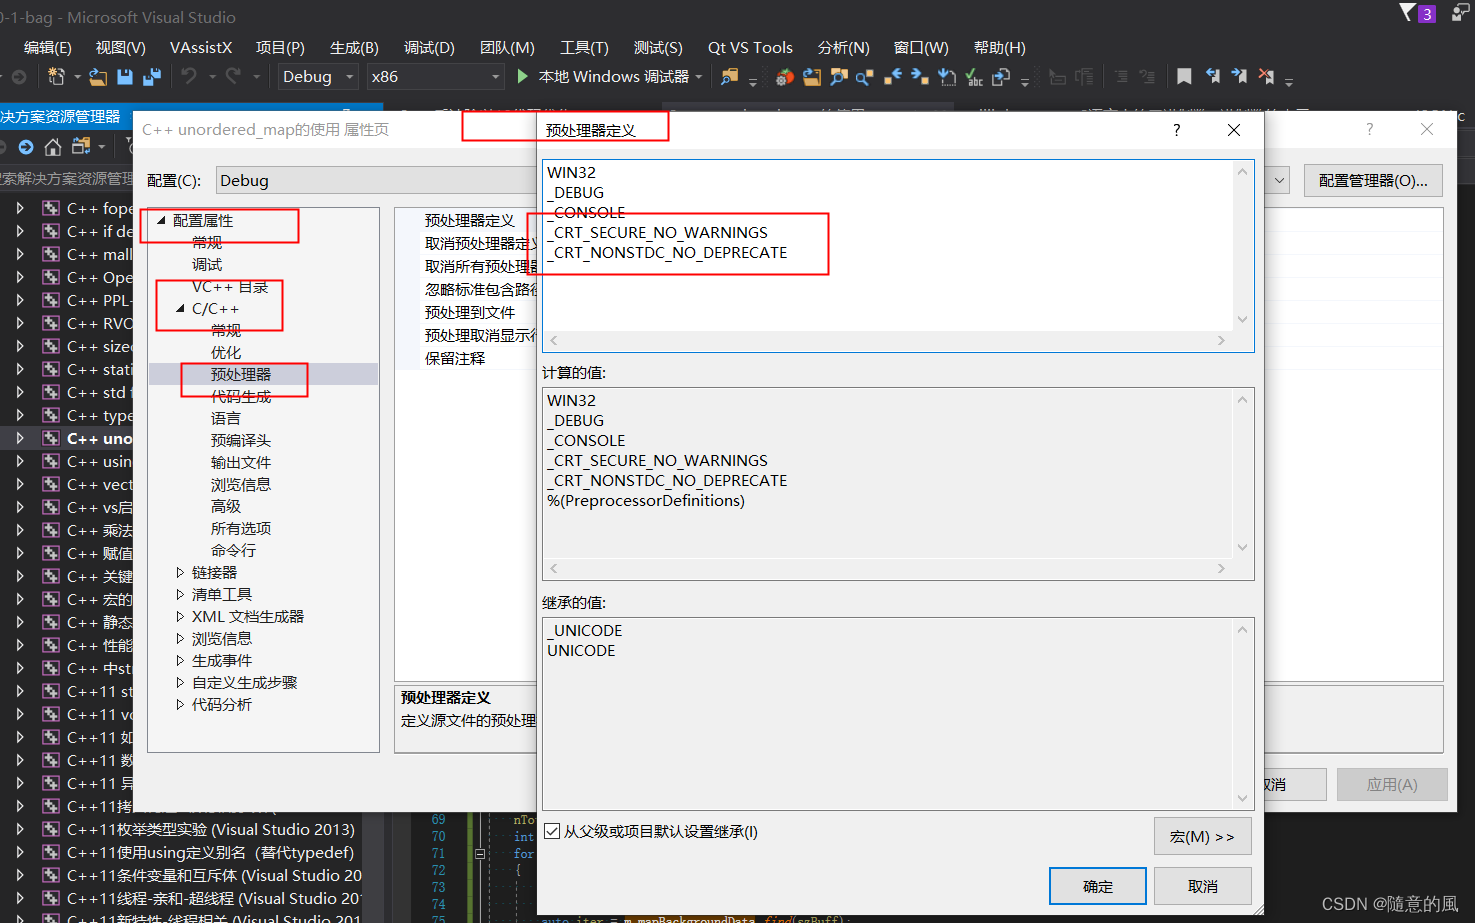
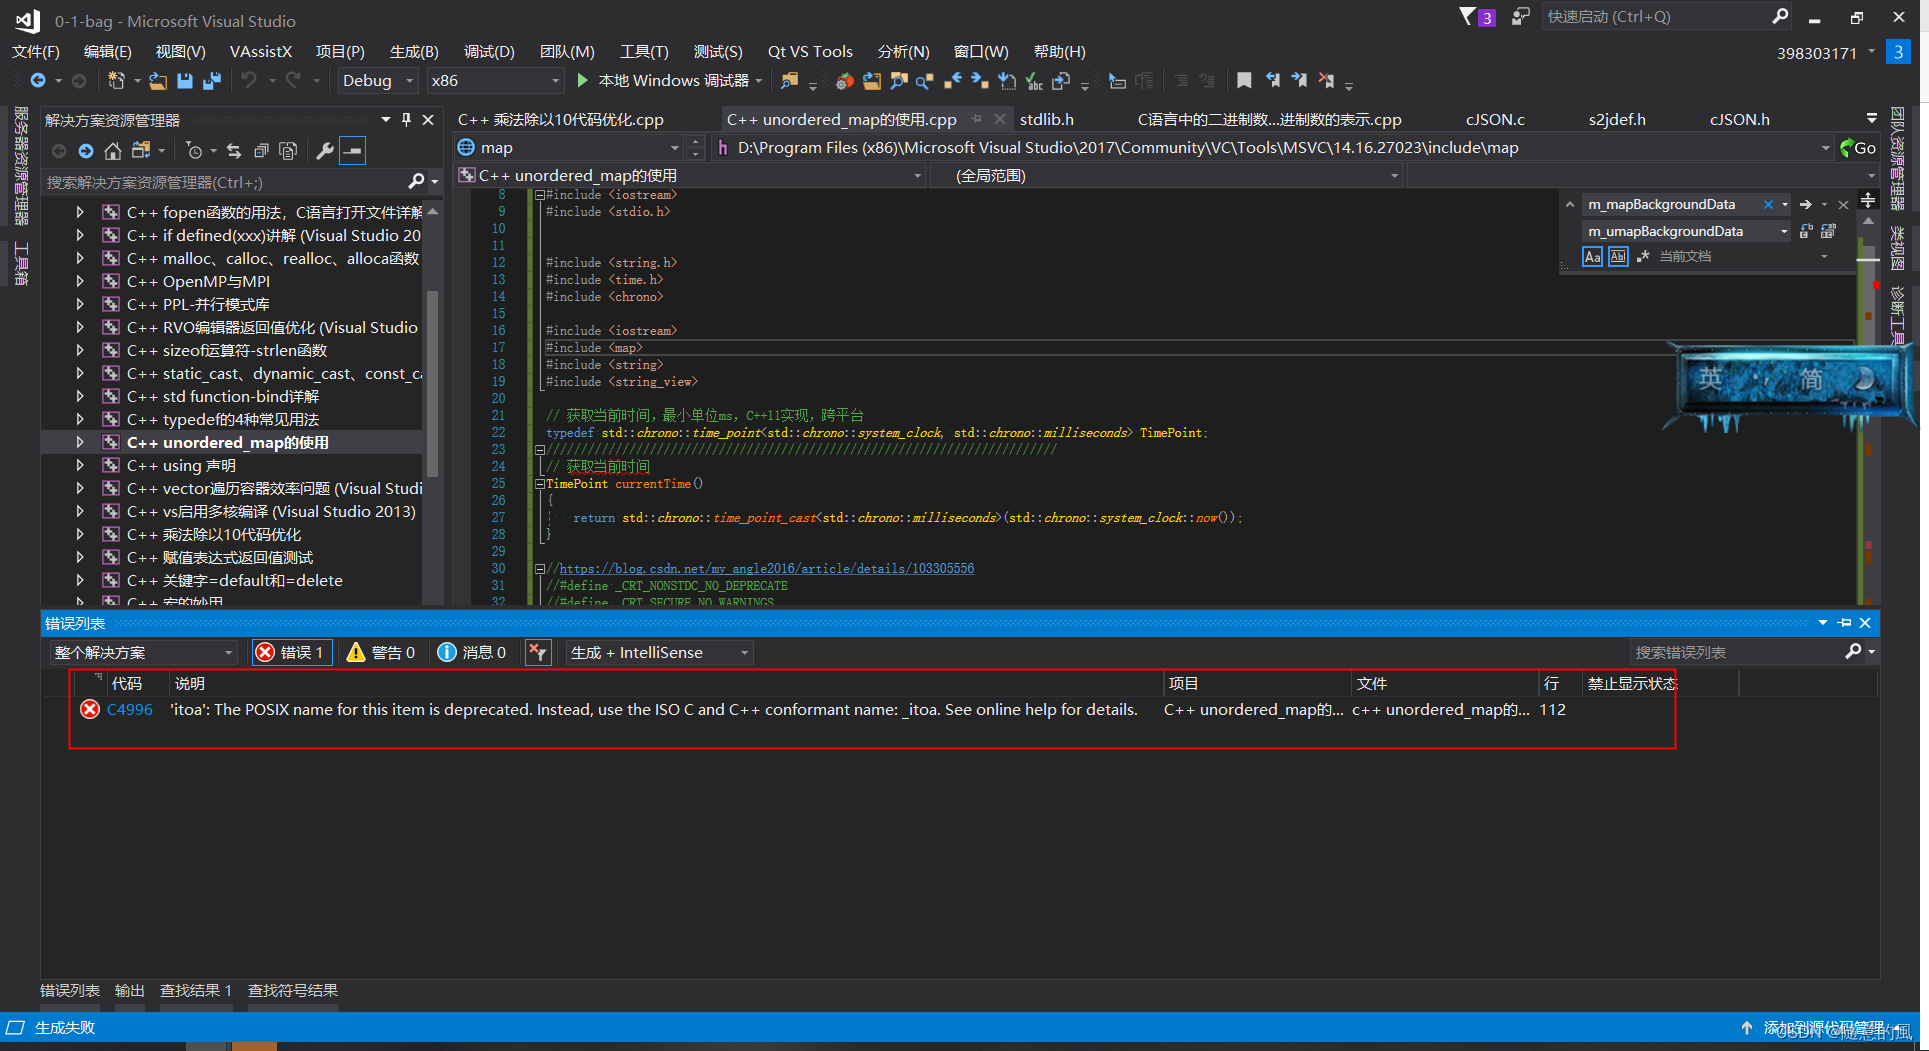
19. error C4996: ‘itoa’: The POSIX name for this item is deprecated. Instead, use the ISO C and C++ conformant name: _itoa. See online help for details.
1>d:\windows kits\10\include\10.0.17763.0\ucrt\stdlib.h(1323): note: 参见“itoa”的声明
解决办法:
- 使用
_itoa_s函数 - 在项目中配置预编译宏
_CRT_SECURE_NO_WARNINGS、_CRT_NONSTDC_NO_DEPRECATE
20. 如何查看.so和可执行文件是debug编译还是release编译的
- 命令
readelf -S libxxx.so |grep debug
- 示例:以查看libgpsdk.so为例

- 执行命令(注意不要偷懒)


- 注意:stripped/not stripped并不是debug/release编译的判断标准. 我对debug和release的.so运行file后,得出几乎相同的输出, 都是not stripped

22. 查看库的搜索路径和可执行文件依赖的库
- 可通过
gcc -print-search-dirs命令来查看库的搜索路径:

- 可以通过
ldd命令查看可执行文件依赖的库:

23. 编译时没有设置可执行文件的库路径,在执行时也没有制定LD_LIBRARY_PATH导致加载so库报错
- 有两种方法可以解决。
- 方法一:将
xxxx.so拷贝到系统/lib/路径下,并执行ldconfig命令(此操作需要root权限才能搞定); - 方法二:将
xxxx.so所在路径,增加到LD_LIBRARY_PATH环境变量中。
23.1 拷贝到lib目录中
$ export LD_LIBRARY_PATH=./
$ ./test
./test: error while loading shared libraries: libprint_func.so: cannot open shared object file: No such file or directory
$ sudo cp lib/libprint_func.so /lib
$ sudo ldconfig
$ ./test
i = 0
i = 1
23.2 执行时制定LD_LIBRARY_PATH库搜索路径
$ export LD_LIBRARY_PATH=./lib
$ ldd ./test
        linux-vdso.so.1 =>  (0x00007ffeb81dd000)
        libprint_func.so => ./lib/libprint_func.so (0x00007f35a3dfc000)
        libc.so.6 => /lib64/libc.so.6 (0x00007f35a3a25000)
        /lib64/ld-linux-x86-64.so.2 (0x00005625bf8b5000)
24. 如果在不同的SO中存在相同的函数名,那么如何处理?
$ gcc -o test main.c -lprint_func -lprint_func00 -Llib -Iinclude -Wall- SO中重名时,优先调用的是先链接的库
lprint_func。
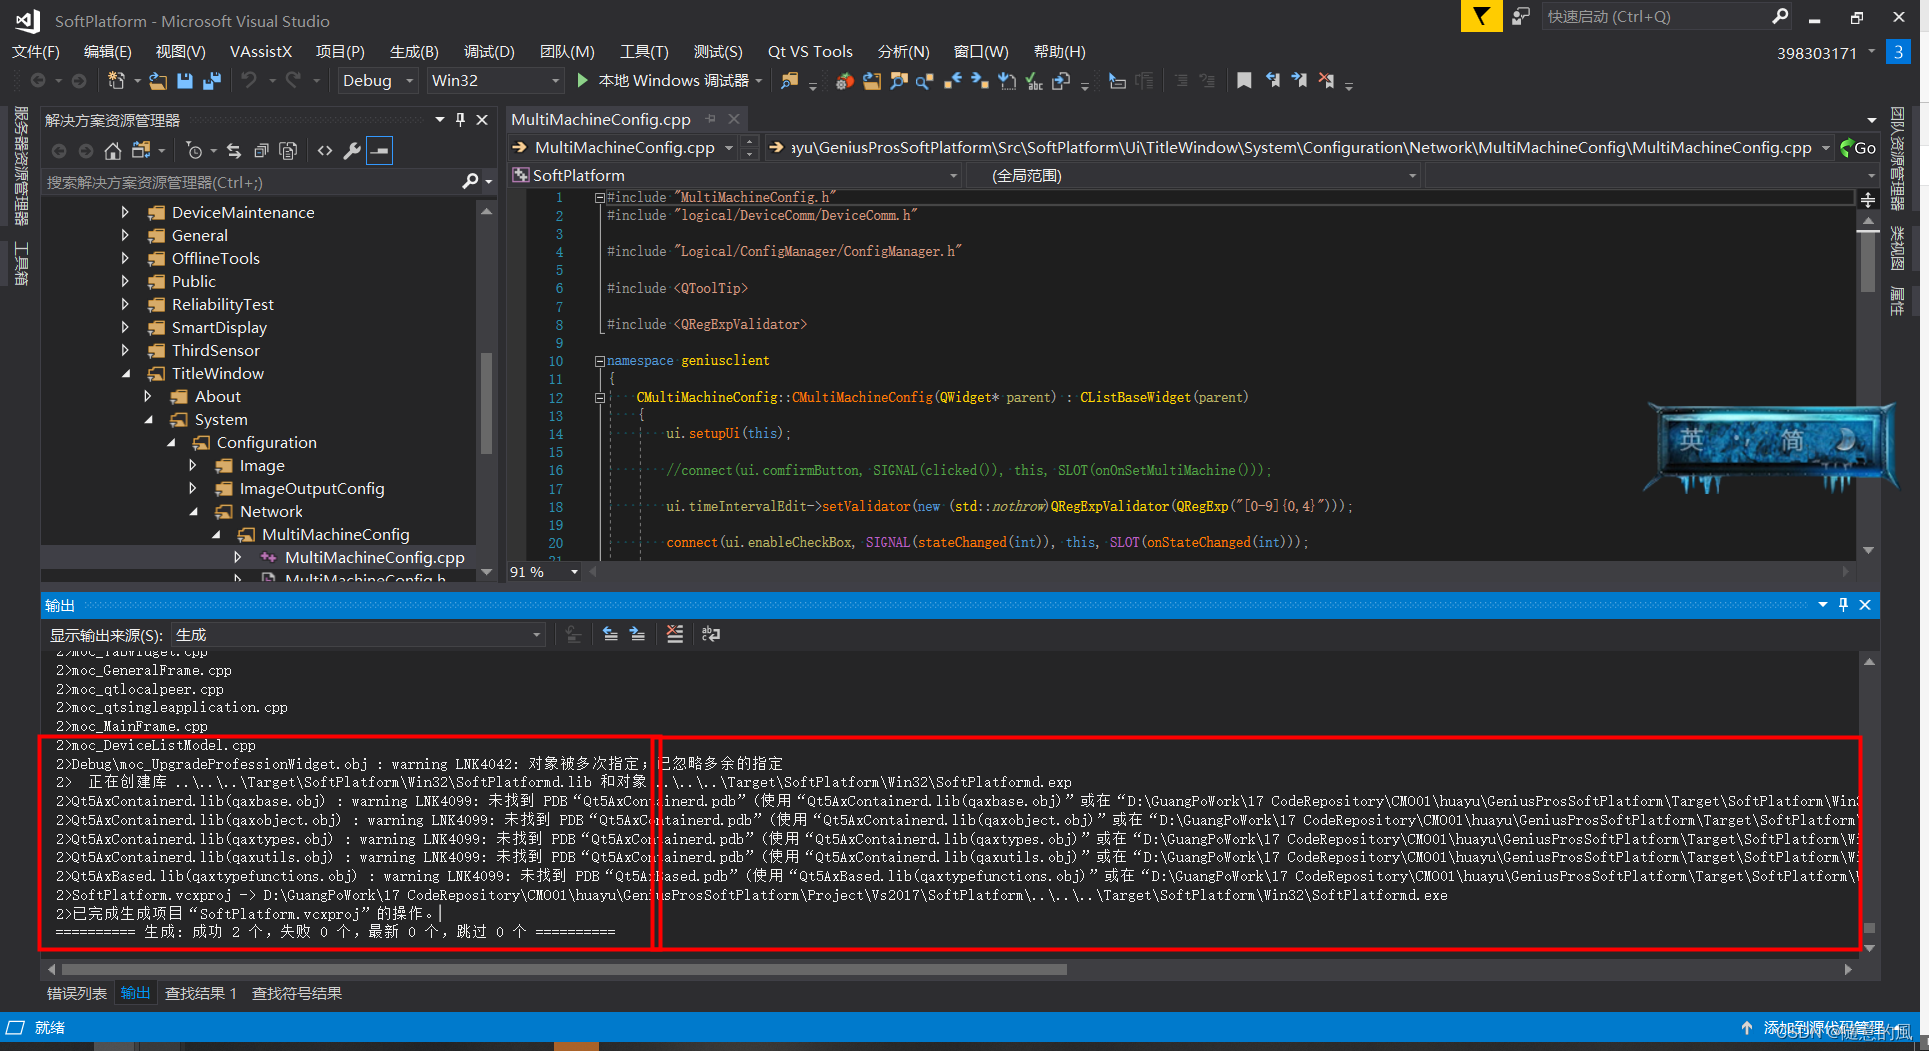
25. c1xx : fatal error C1083: 无法打开源文件: “…\Src\SoftPlatform\Ui\TitleWindow\System\Configuration\Network\MultiMachineConfig\MultiMachineConfig.cpp
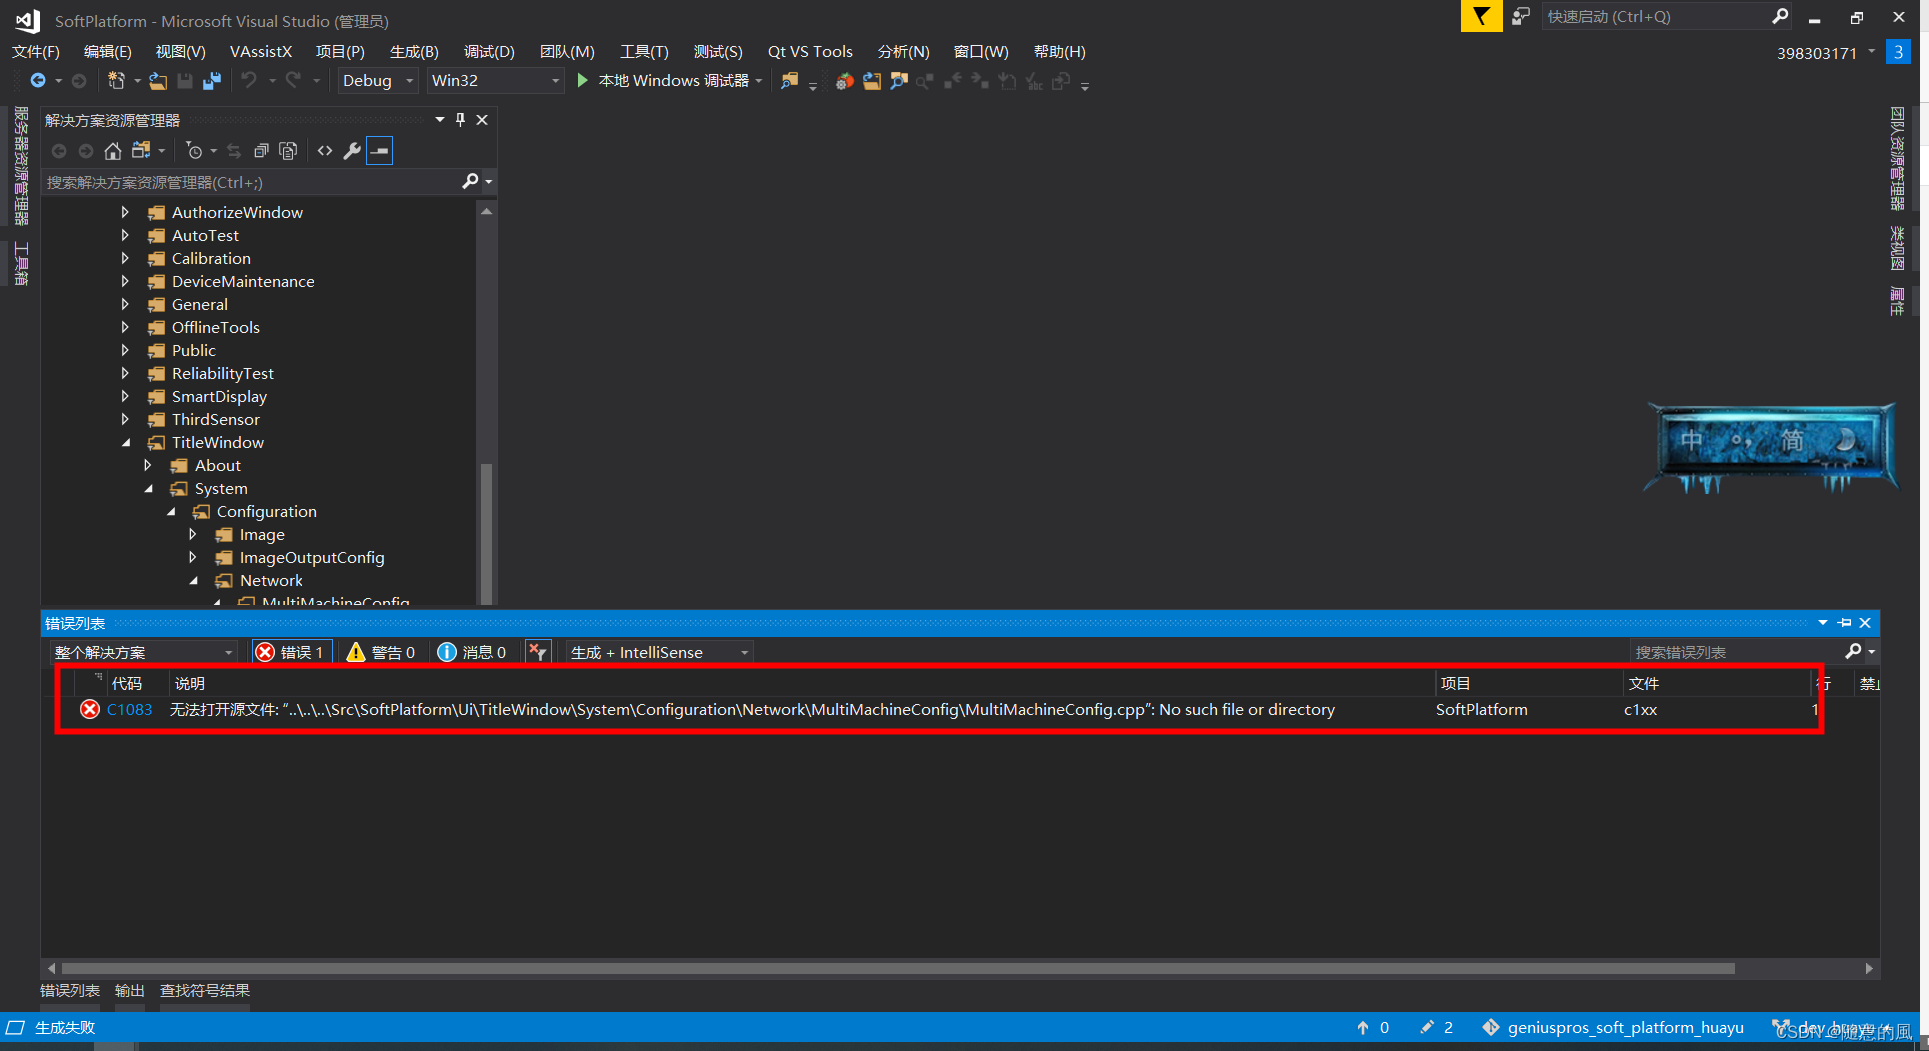
- 问题原因:文件目录超长

- 解决办法:缩短目录文件层级,少数文件路径长度
D:\GuangPoWork\17 CodeRepository\CMO01\huayu\GeniusProsSoftPlatform\Src\SoftPlatform\Ui\TitleWindow\System\Configuration\Network\MultiMachineConfig\MultiMachineConfig.cpp

26. error C4996: This function or variable may be unsafe
26.1 采用_s结尾的安全版本
- 将上面的 fopen 函数改为 fopen_s 函数
26.2 去掉 visual studio “安全开发生命周期(SDL)检查
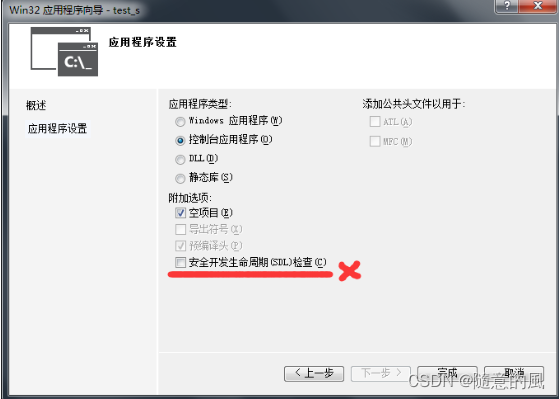
26.3 #pragma warning( disable : 4996)
#pragma warning( disable : 4996)
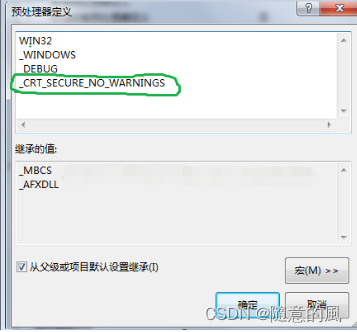
26.4 _CRT_SECURE_NO_WARNINGS
项目 =》属性 =》c/c++ =》预处理器=》点击预处理器定义,编辑,加入_CRT_SECURE_NO_WARNINGS
如下图:
27. /usr/bin/ld: skipping incompatible …/lib/libgpsdk.a when searching for
今天在做项目的时候,用make命令后出现了/usr/bin/ld: skipping incompatible…问题
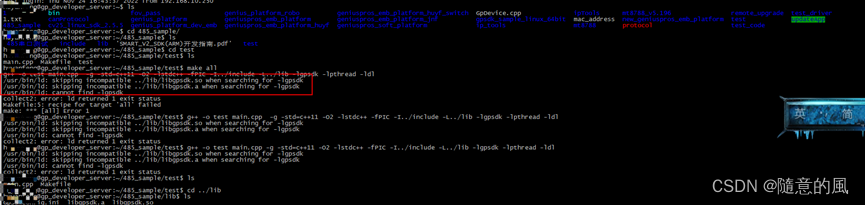
分析:编译器给出的错误信息已经很清楚了:兼容性问题,即产生了不兼容性且找不到libgstaudio-1.0.so共享库,可是libgstaudio-1.0.so在指定的路径下明明是存在的呢。
错误原因排查:
经过排查发现,我链接的共享库是在arm环境下编译产生的,而主程序却是在非arm环境的(此处错误),因此产生了不兼容性。
这个问题实质是链接库文件时,库文件版本与平台版本不对应的问题。
解决方法:objdump -p libgpsdk.so 或者 file ibgpsdk.so 查看文件信息
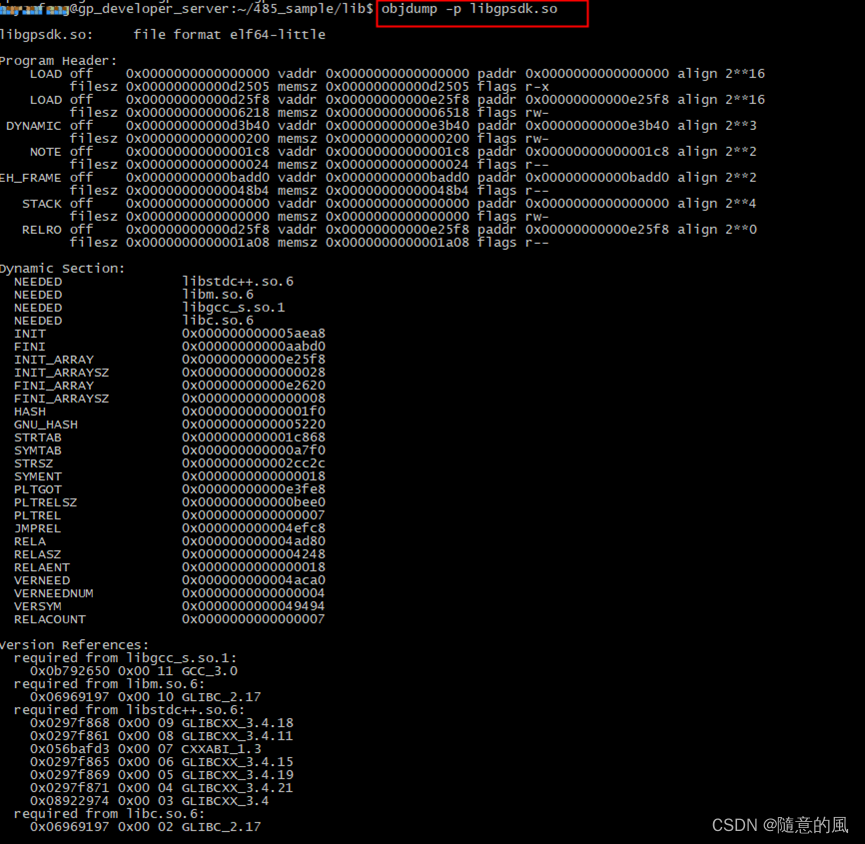

问题很明显是编译工具链配置错误
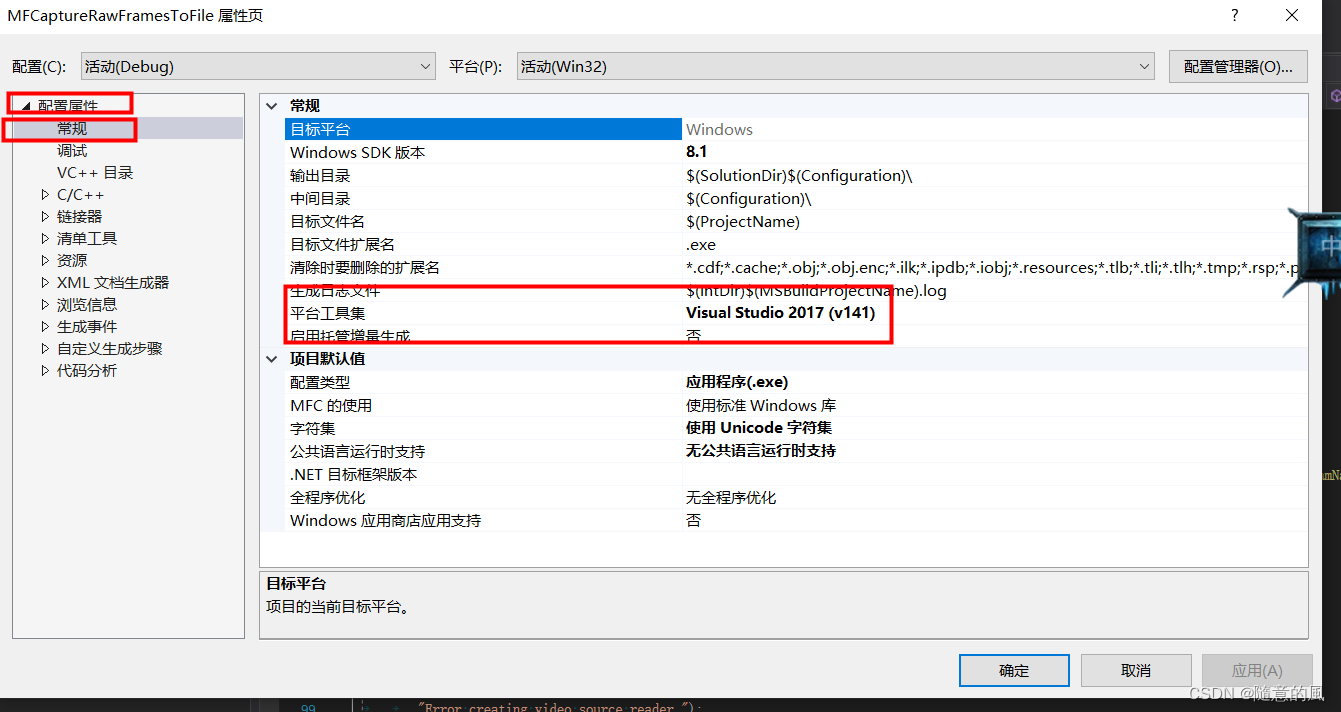
28. error MSB8020: 无法找到 v142 的生成工具(平台工具集 =“v142”)。若要使用 v142 生成工具进行生成,请安装 v142 生成工具。
- 问题的原因:
是由于没有安装v142工具集,其实v142对应的是VS2019,项目从网上下载下来的,之前的编译器VS2019,现在是VS2017,所以报的这个错误。
v142–>VS2019
v141–>VS2017
v140–>VS2015
v120–>VS2013
- 方法一: 修改成现在编译器对应的工具集
项目–>属性—>常规–>平台工具集–>选择对应的

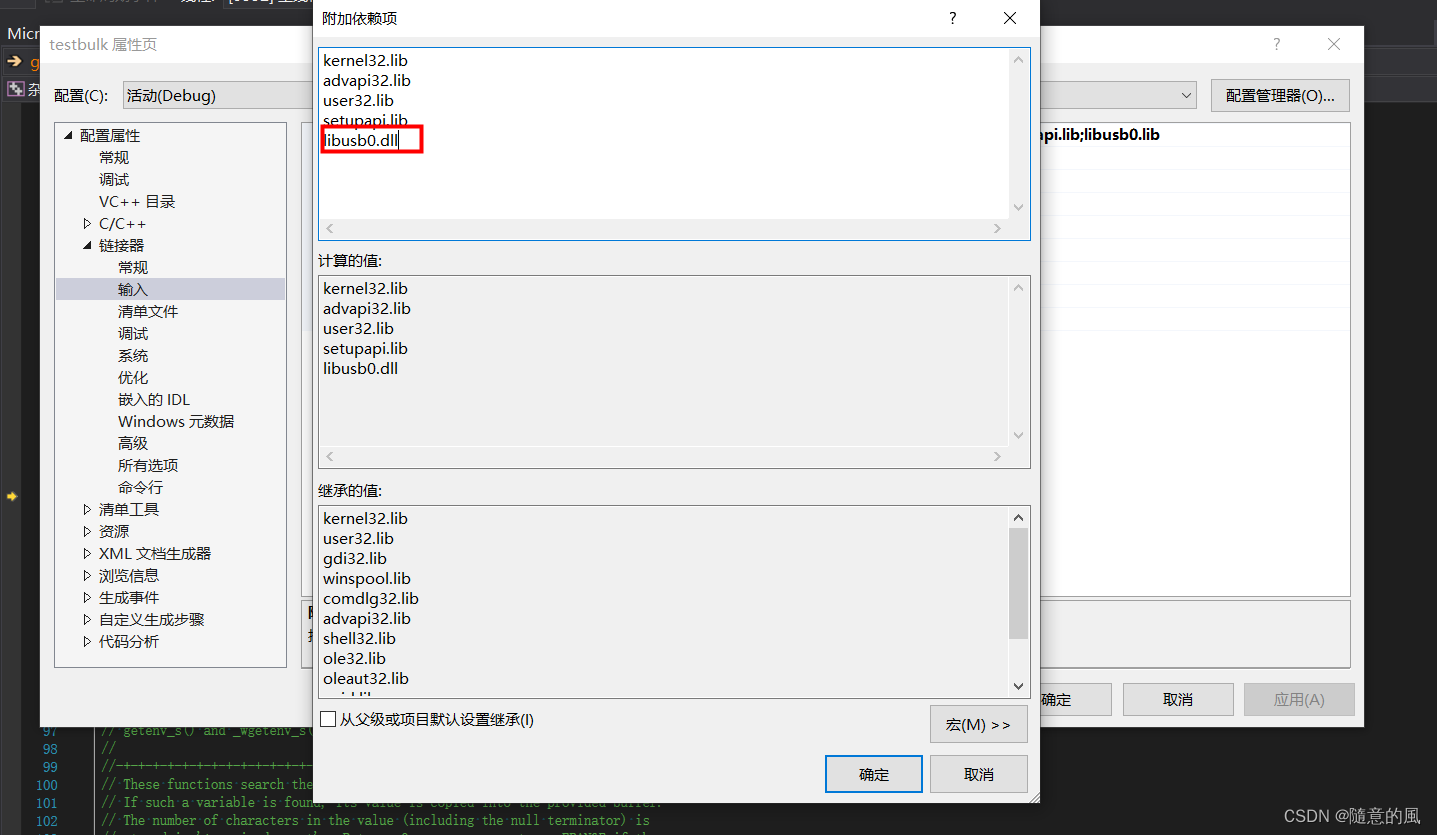
29. fatal error LNK1107: 文件无效或损坏: 无法在 0x320 处读取
- 造成该问题的原因是在设置链接库输入时,把.lib写成了.dll,细节手误问题。
- 解决方案: 注意:项目——属性——链接器——输入——附加依赖项 中,文件后缀名应为“.lib",主要填写/更改正确;如是”.dll“则会出错。
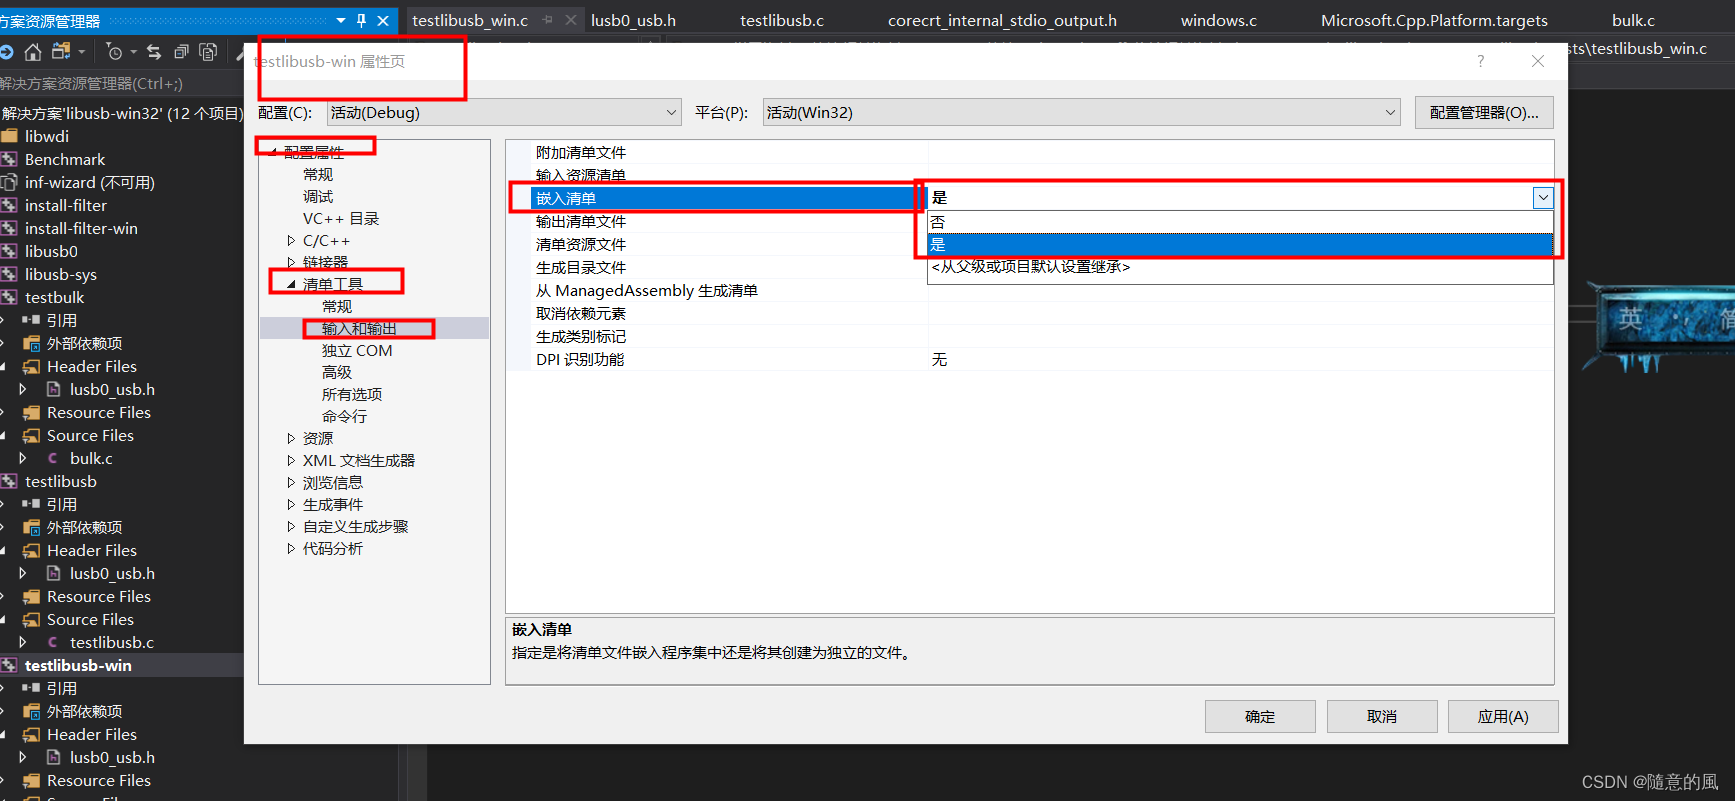
30. 1>CVTRES : fatal error CVT1100: 资源重复。类型: MANIFEST,名称: 1,语言: 0x0409 1>LINK : fatal error LNK1123: 转换到 COFF 期间失败: 文件无效或损坏。
是改成否
30. arm-hisiv500-linux-g++ Common/GpCommon.cpp:37:12: 错误: ‘stoull’不是‘std’的成员 return std::stoull(stid); // arm-hisiv500-linux-g++
经过his平台编译C++11的函数,发生编译报错 std::stoull

31. geniusclient_zh.ts文件tr字符串显示无效问题


32. warning C4819: The file contains a character that cannot be represented in the current code page (936). Save the file in Unicode format to prevent data loss
error C2065: ‘width’ : undeclared identifier
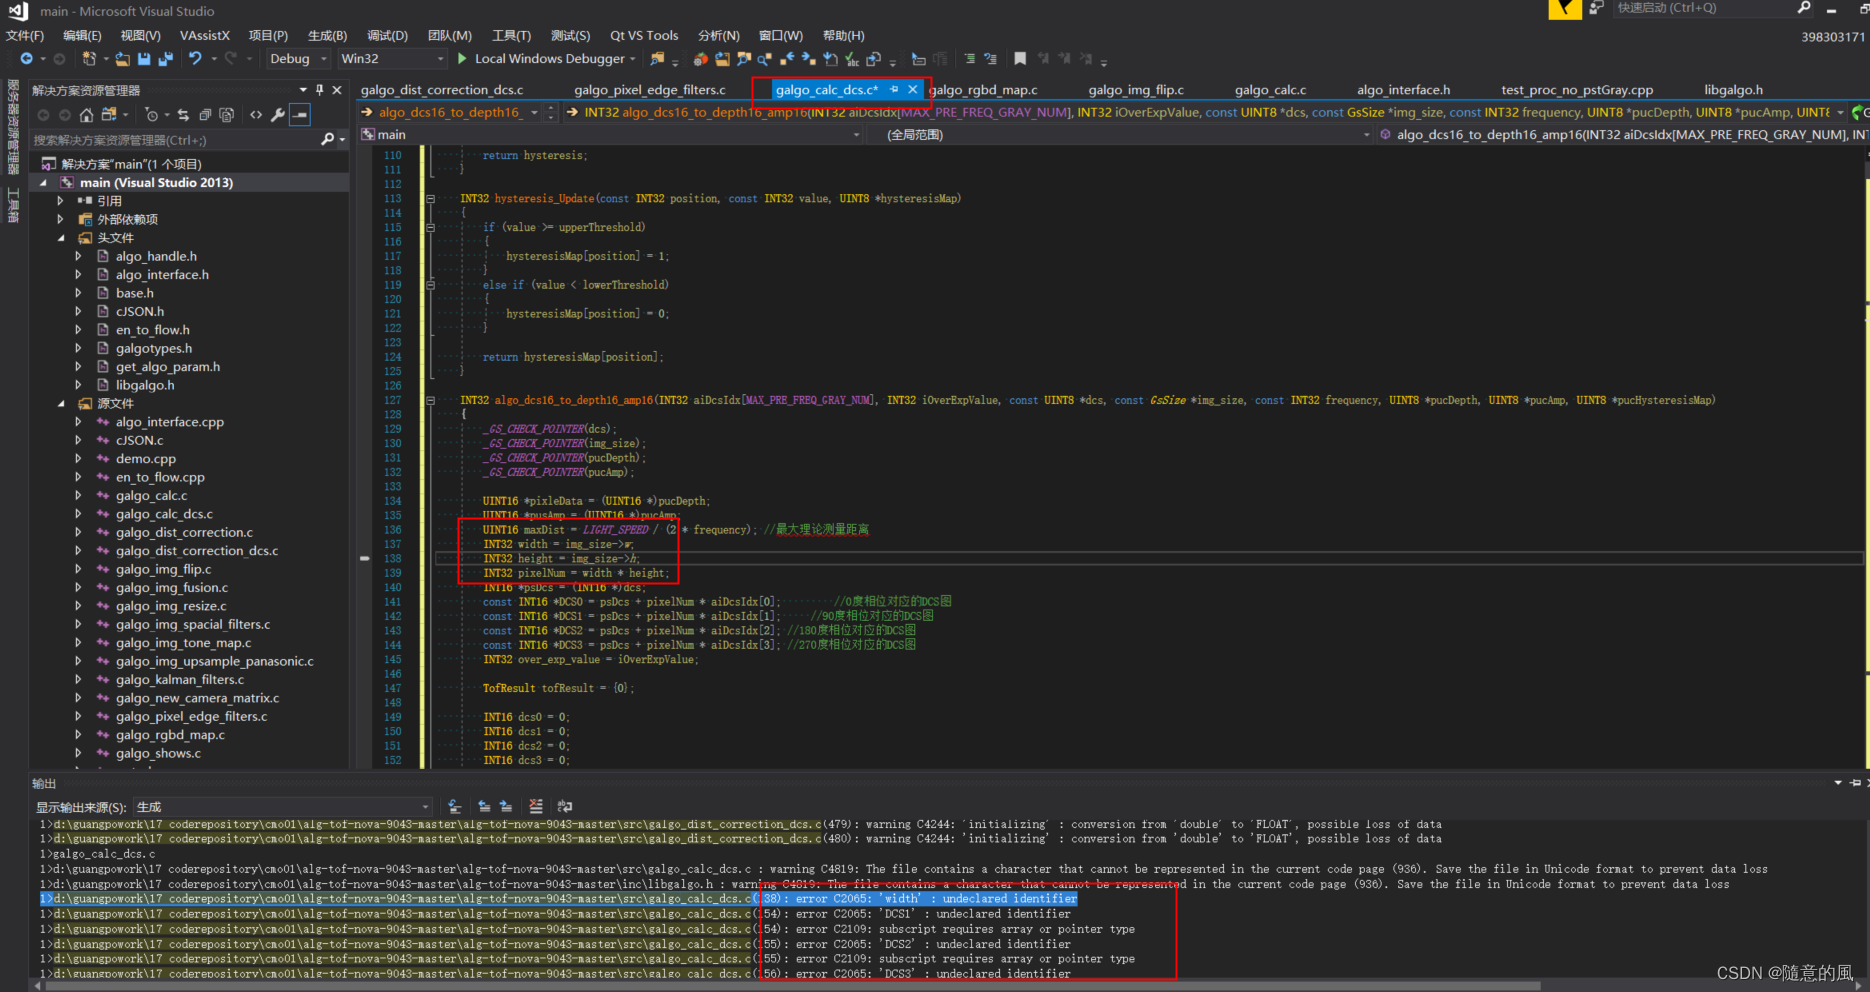
使用vs2017编译算法库时出现一些异常莫名其妙的错误,由于文件保存格式引起的。而罪魁祸首就是这个warning,改正了这个warning就能进行Debug了。下面讲述我是怎么消除这个警告的。这个警告的意思是:在该文件中有一个或多个字符不是Unicode字符!要求把这个字符变成Unicode字符。
难题:在编译信息里并没有提示是哪个字符,或者是在哪一行里出现的该字符。查找起来非常的难,甚至是不可能的任务!
解决方法:打开出现warning的文件,Ctrl+A全选,然后在文件菜单:file->advanced save options ,在弹出的选项中选择新的编码方式为:UNICODE codepage 1200 ,点击确定,问题就解决了。
首先查看file菜单中是否存在advanced save options选项,如果没有则在tool菜单栏进行设置。如下:

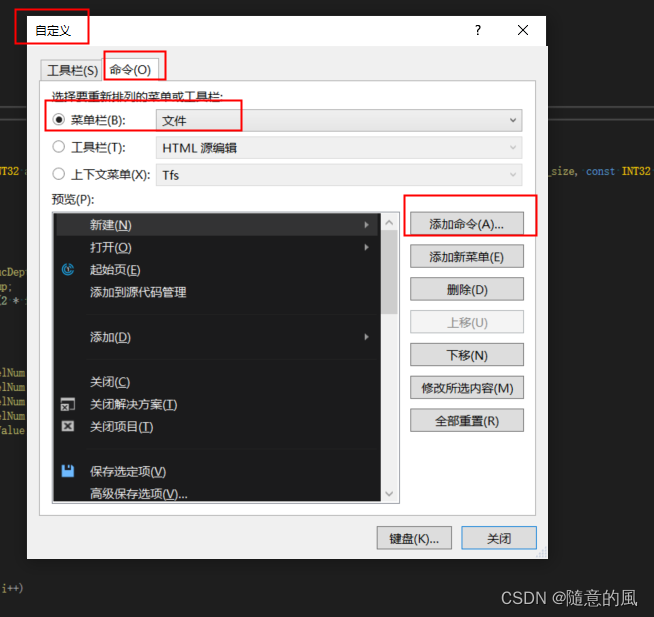
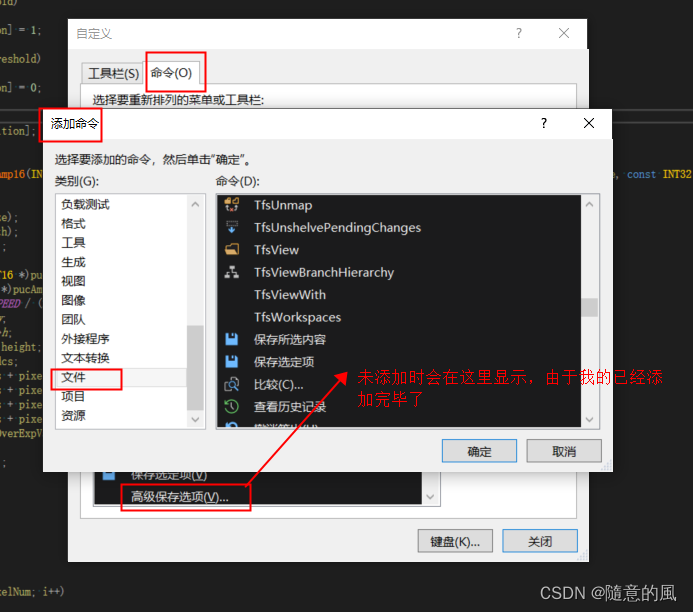
添加好之后就可以关闭了,就会发现在file菜单中出现,这个高级保存选项的。
编译后问题解决。
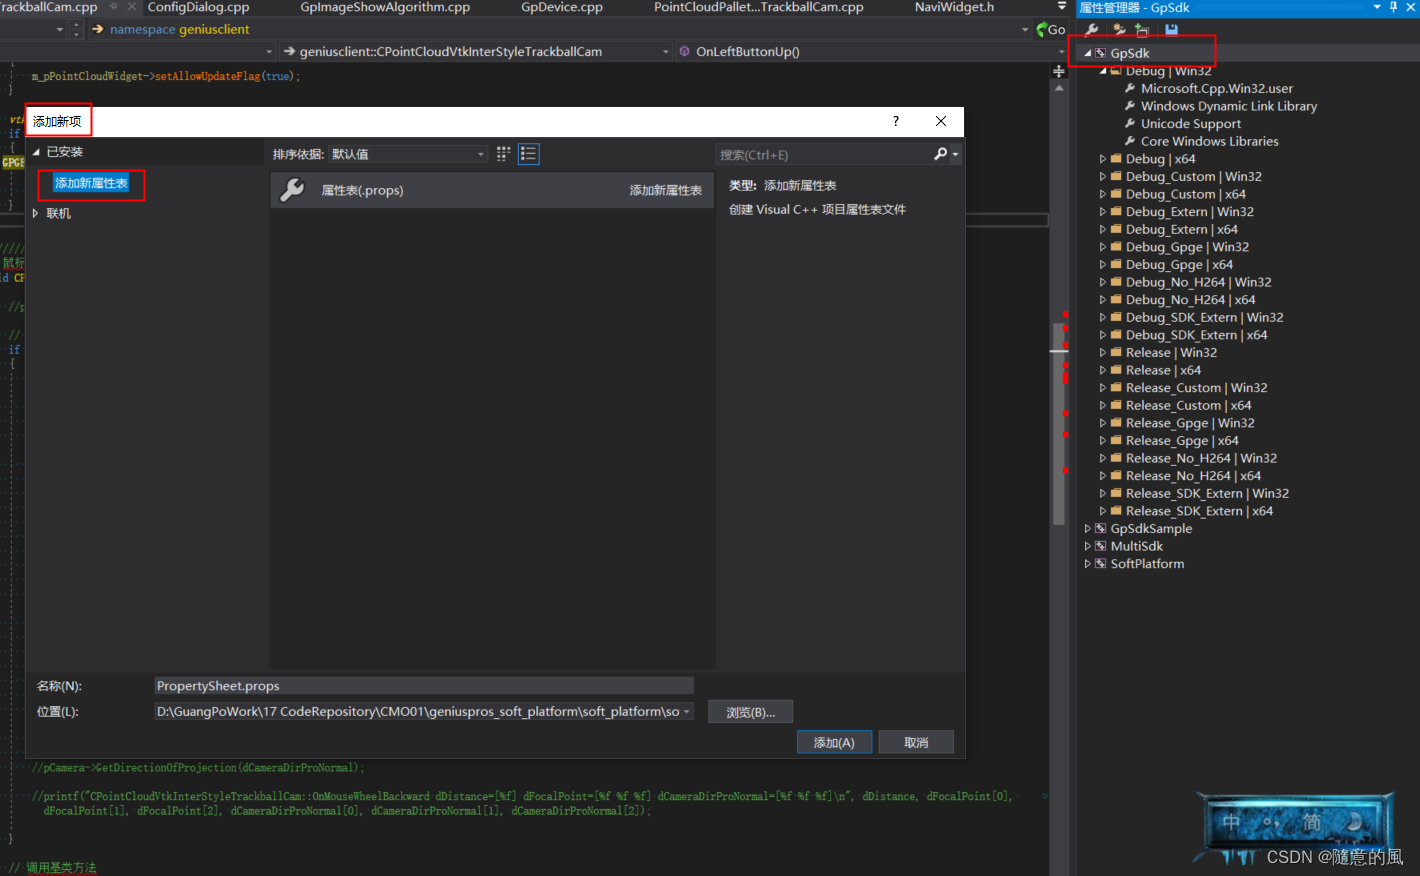
33. vs工程继承配置
如果想要debug xxx的配置都继承debug的配置,则可以通过视图视图-其他窗口-属性管理器,右键工程,添加新项目-然后再下面的所有配置中都会添加该项目的配置。其他所有项目都会继承该配置,后面只需要修改这个即可。(也可以针对某个配置进行添加,然后其他配置进行添加以后项)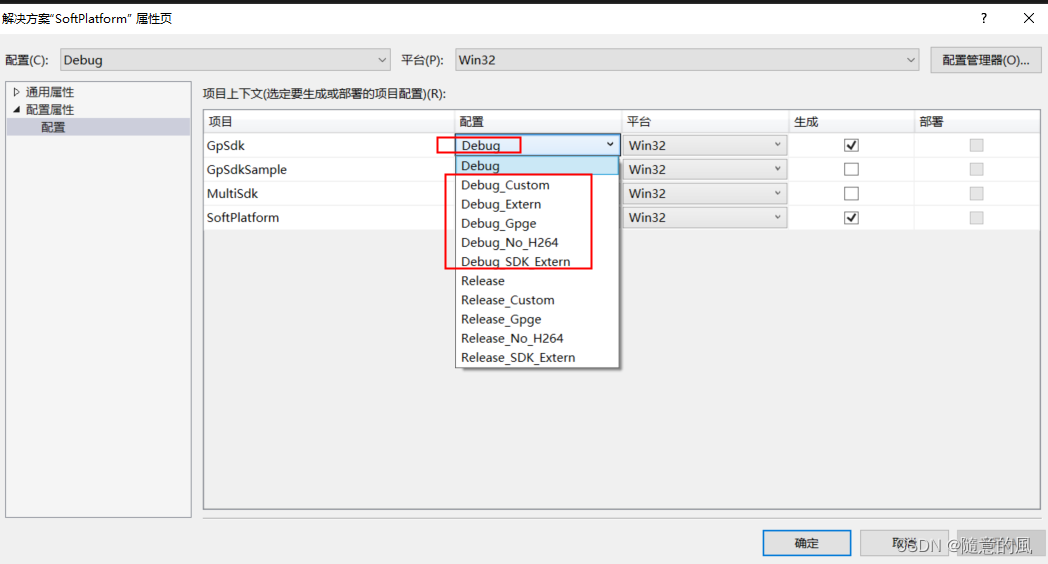

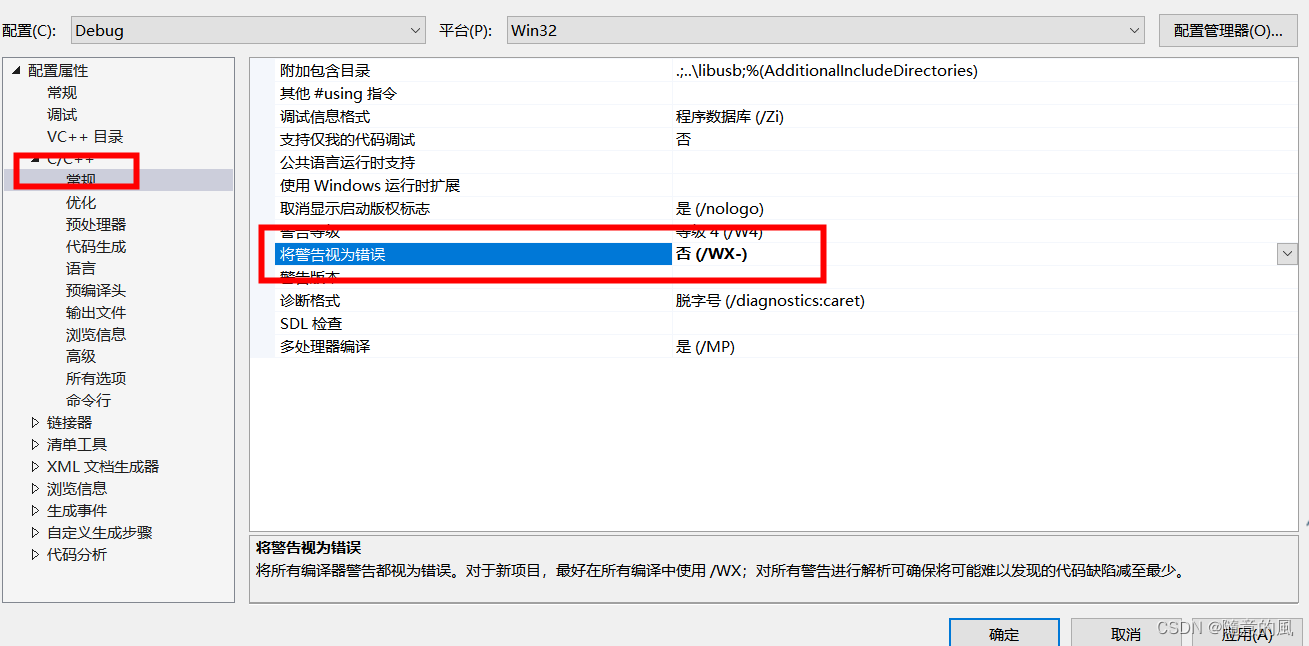
34. error C2220: 警告被视为错误 - 没有生成“object”文件


解决方案:
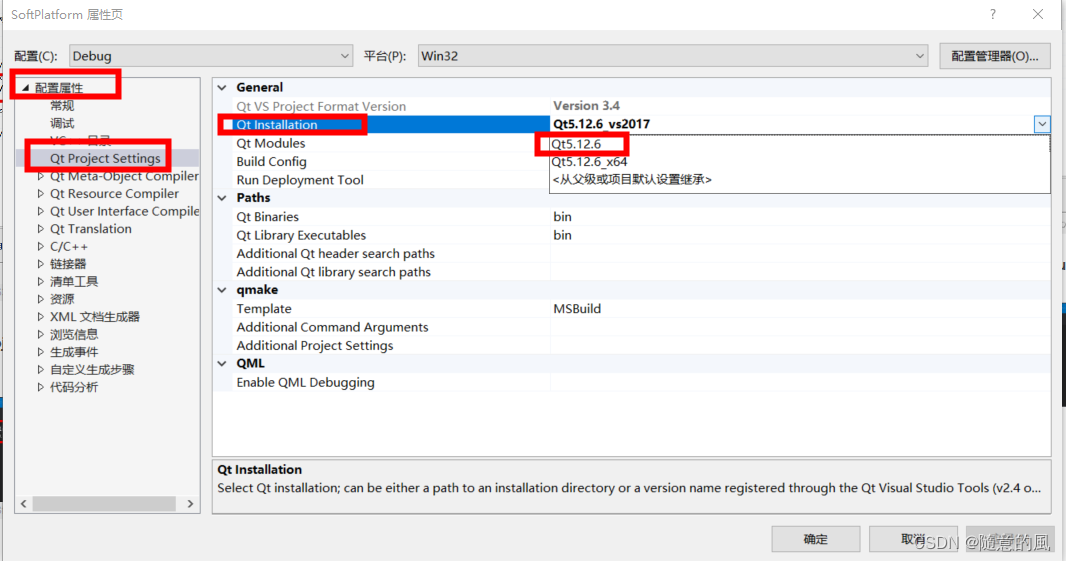
35、error : There’s no Qt version assigned to project SoftPlatform.vcxproj for configuration Debug/Win32

解决方案:

36. ADMode.obj : error LNK2001: 无法解析的外部符号 "public: virtual struct QMetaObject const * __thiscall geniusc
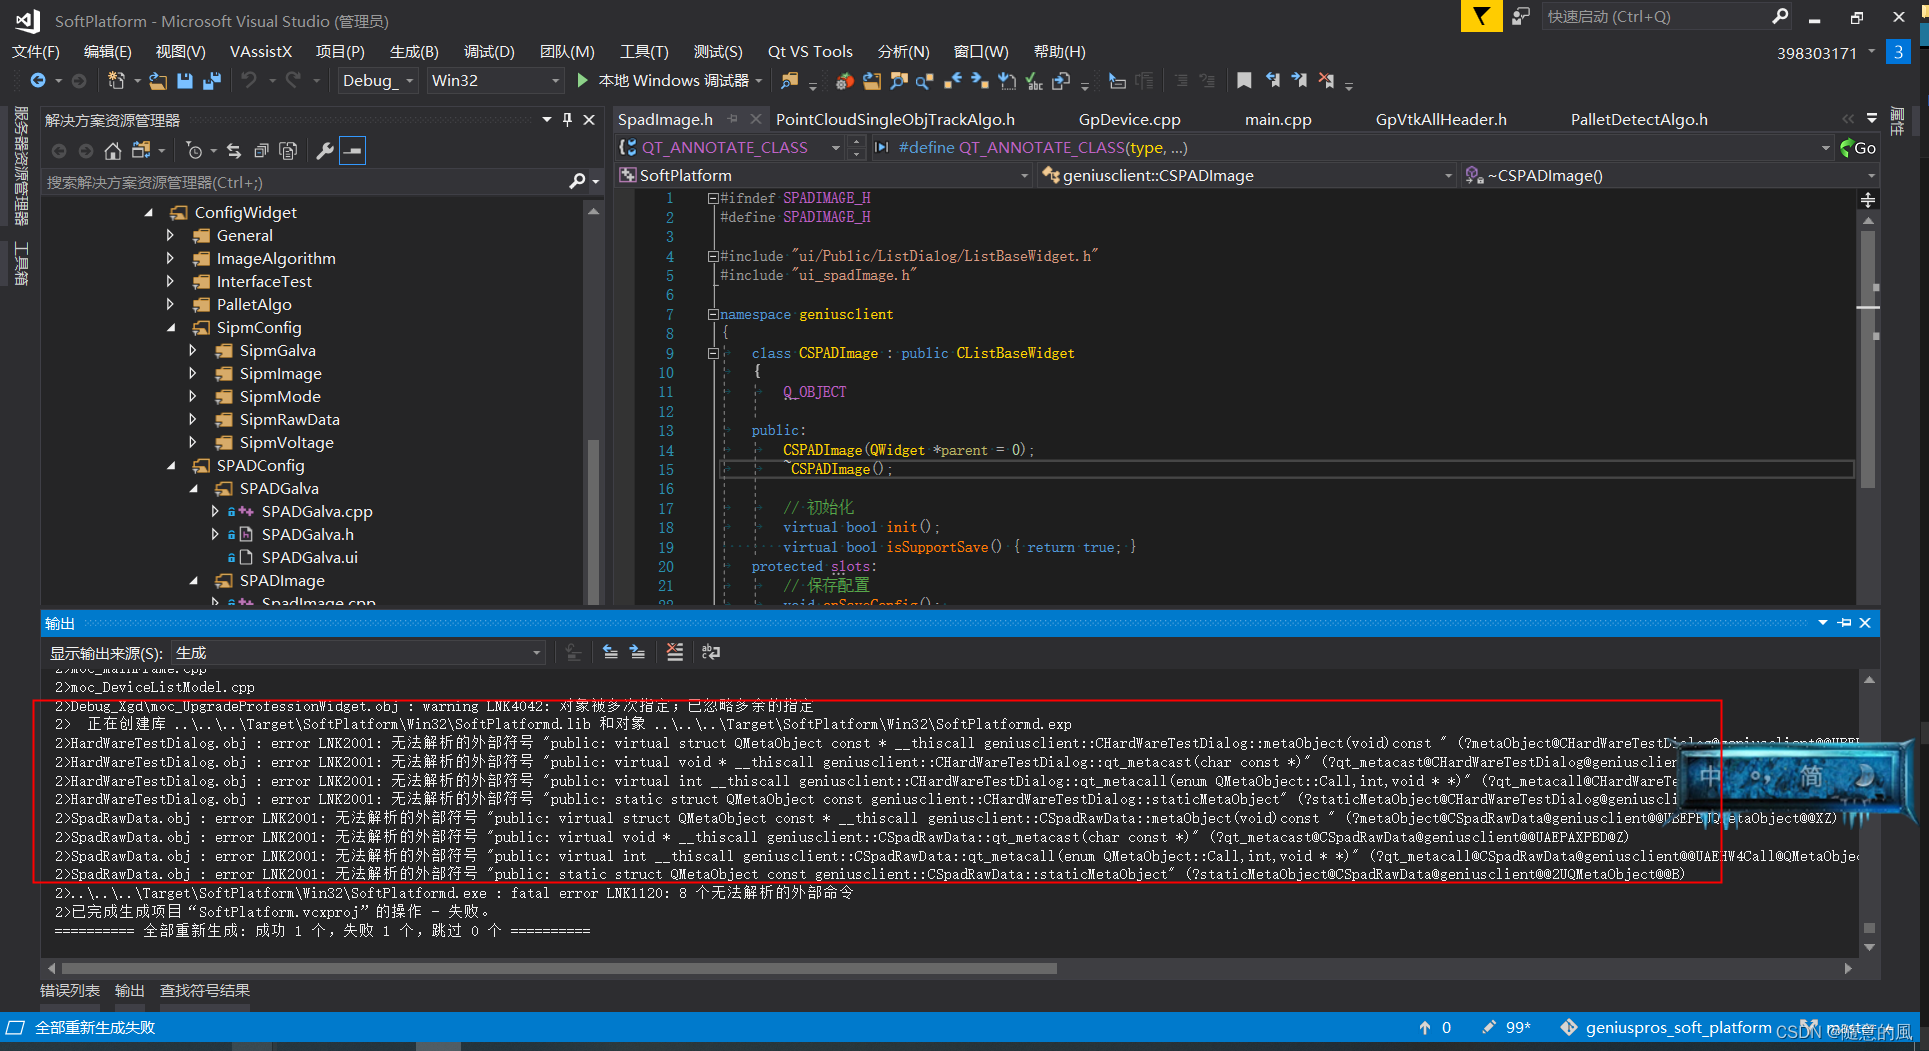
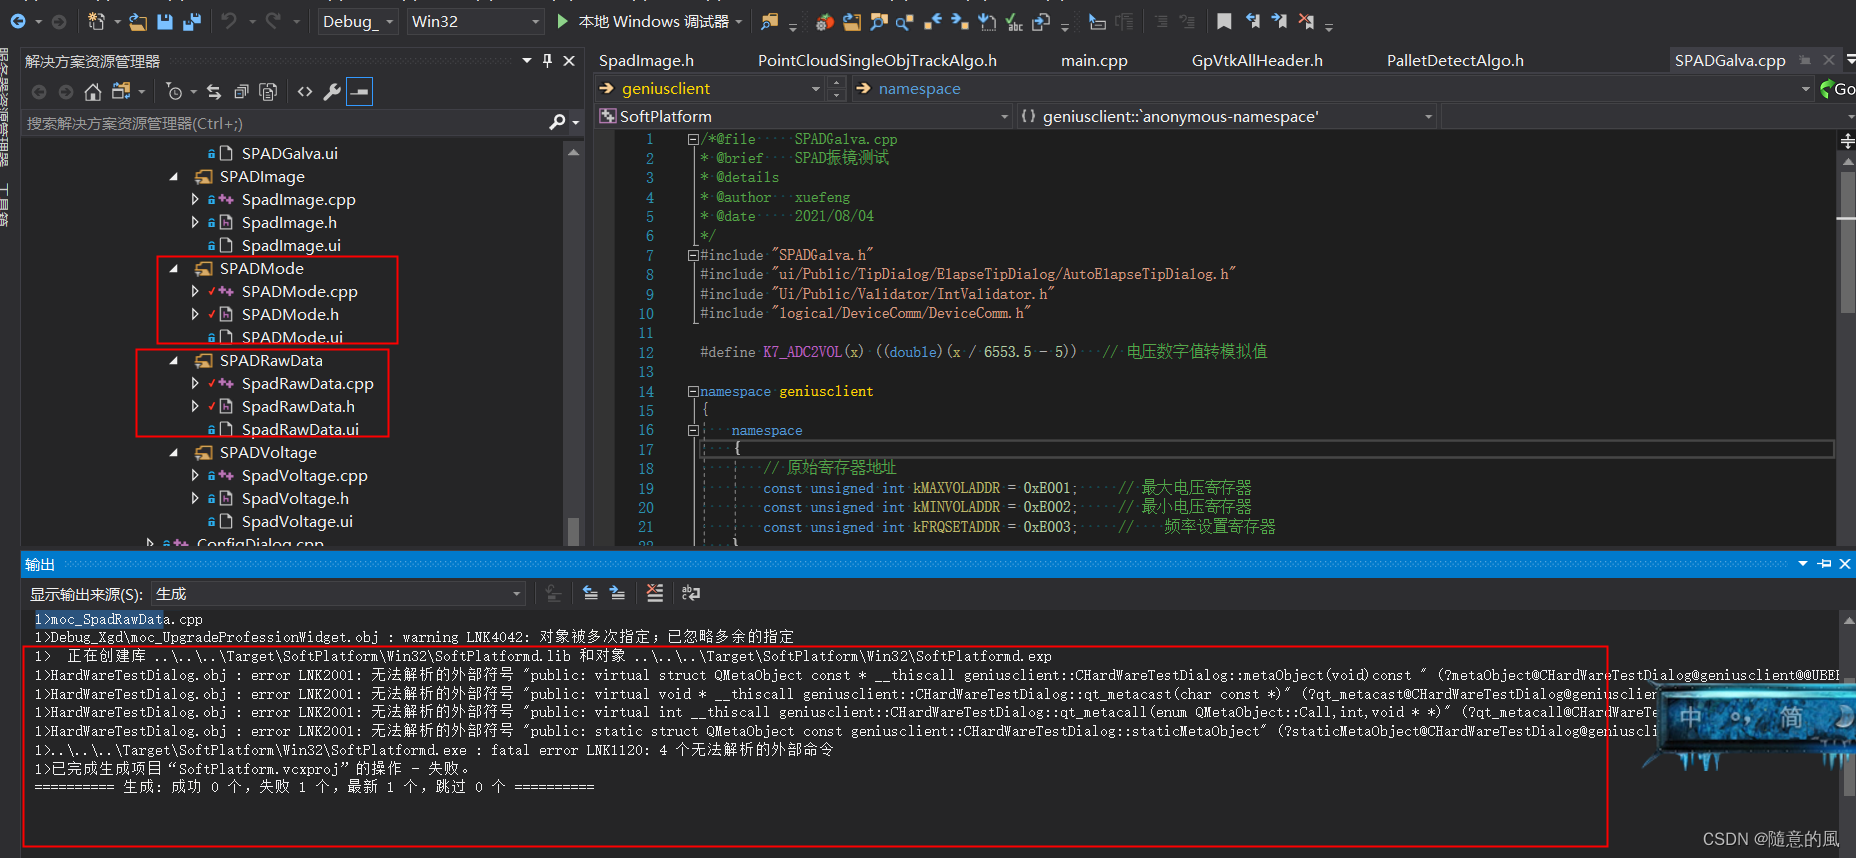
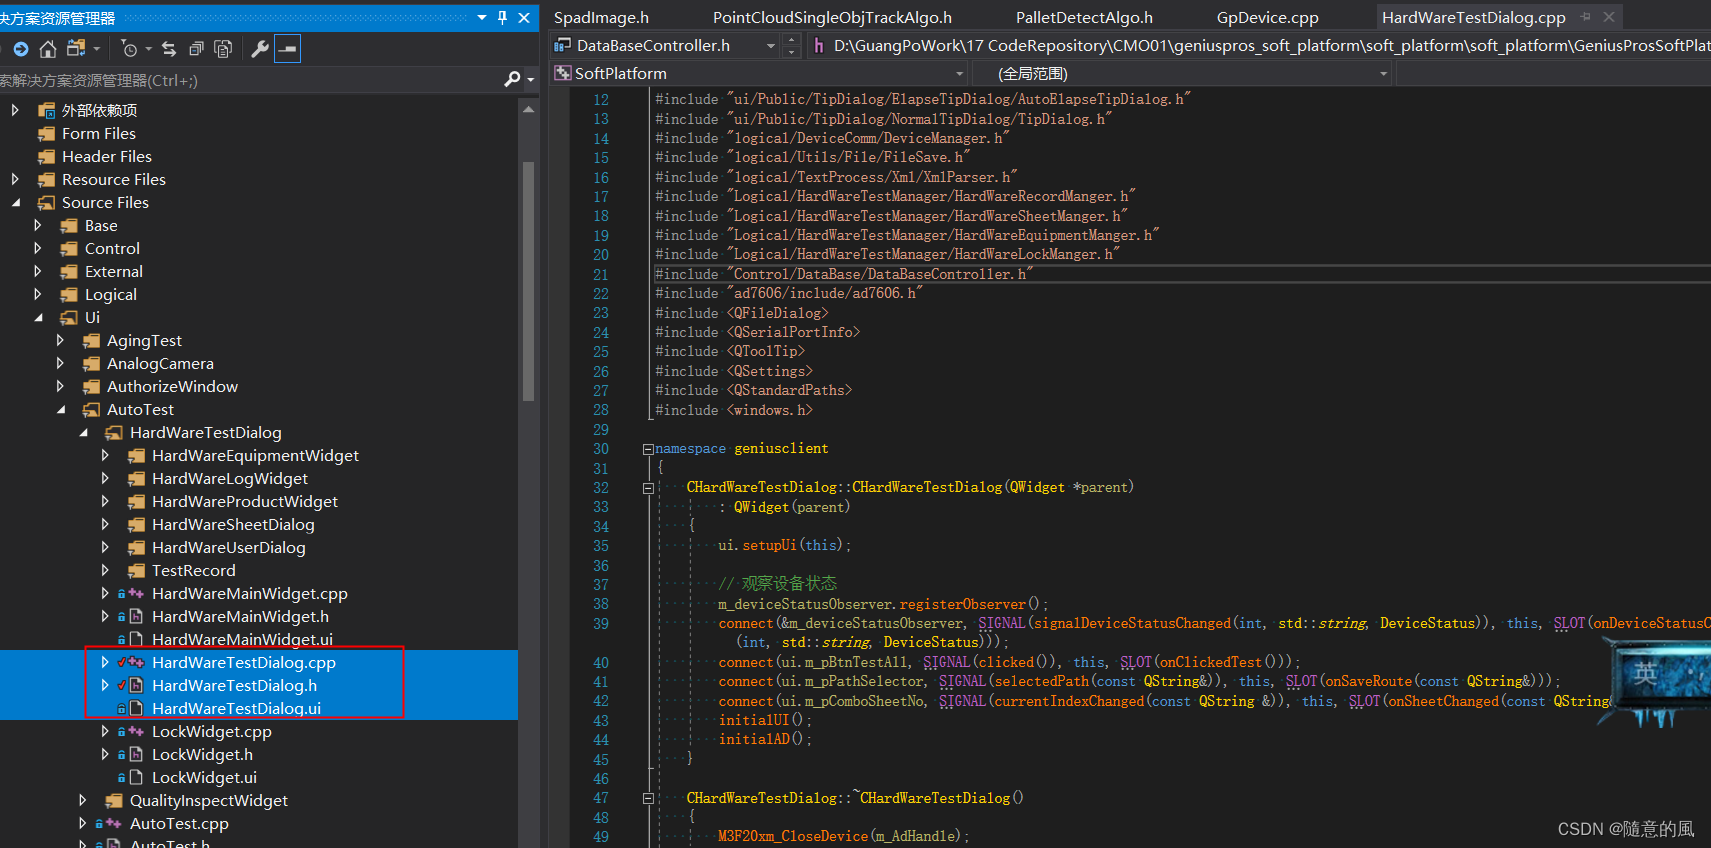
解决方案:项目中操作移除,
37. 编译报错vs fatal error C1083: 无法打开CMultiMachineConfig.cpp源文件,原因“目录太长”
D:\GuangPoWork\17 CodeRepository\CMO01\geniuspros_soft_p_m\soft_platform\soft_platform\GeniusProsSoftPlatform\Src\SoftPlatform\Ui\TitleWindow\System\Configuration\Network\MultiMachineConfig\MultiMachineConfig.cpp

38.vs2017生成过程中提示“c1xx : fatal error C1083: 无法打开源文件: “;”: No such file or directory”
- 最终找到了原因:QT插件问题!是因为vs自动对Qt插件进行了版本升级更新,不知道为什么,升级更新后的Qt插件导致项目无法生成。
直接解决办法:卸载qt vs插件

安装过程中选择VS2017版本。
39 vscode 编译c文件报错,warning: implicit declaration of function ‘PQW2IJK’ [-Wimplicit-function-declaration]

问题原因
一般有两种原因会产出该警告
1 、没有把函数所在的c文件生成.o目标文件;
2、 在函数所在的c文件中定义了,但是没有在与之相关联的.h文件中声明。
**注:**一般主要为第2种原因,要么头文件里没有声明,要么函数所在文件没有包含声明函数的头文件。
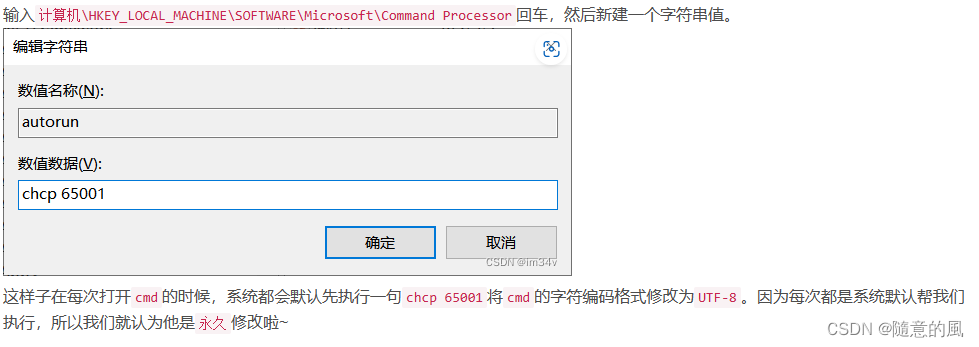
40 vscode 编译console窗口中文乱码
如果需要永久修改cmd的字符编码格式为UTF-8,首先win+r
1、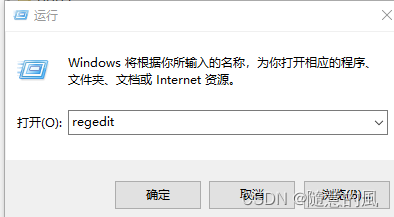
2、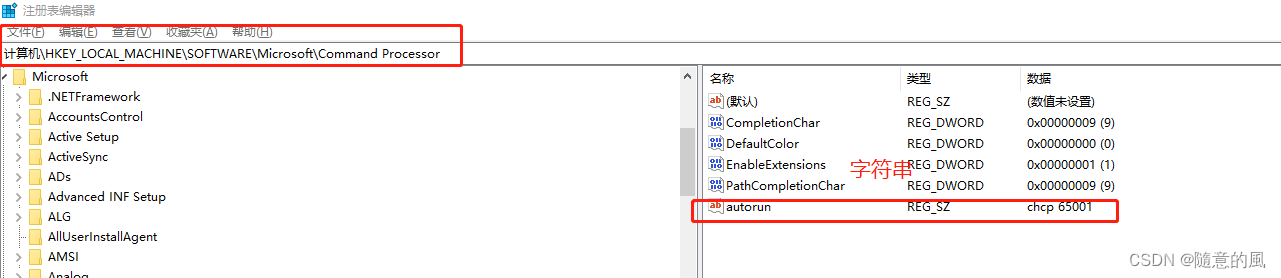
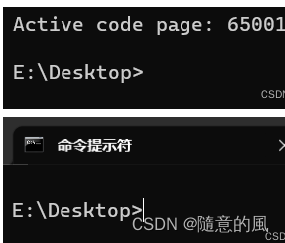
 2023.4.2 补充:
如果是按照上面chcp 65001的方式,那么每次运行终端时都会出现Active code page: 65001这一句话。根据 丛雨16 的补充,chcp 65001 > nul 可以解决这一现象。(实测可以)
41、vscode gcc其他c文件未编译问题
正在启动生成…
E:\ProgramFiles\MinGW\mingw64\bin\gcc.exe -fdiagnostics-color=always -g “E:\17 CodeRepository\geniuspros_emb_platform_pat2\src\main.c” -o “E:\17 CodeRepository\geniuspros_emb_platform_pat2\src\main.exe”
C:\Users\39830\AppData\Local\Temp\ccVNS67N.o: In function main': E:/17 CodeRepository/geniuspros_emb_platform_pat2/src/main.c:17: undefined reference to pointing’
collect2.exe: error: ld returned 1 exit status
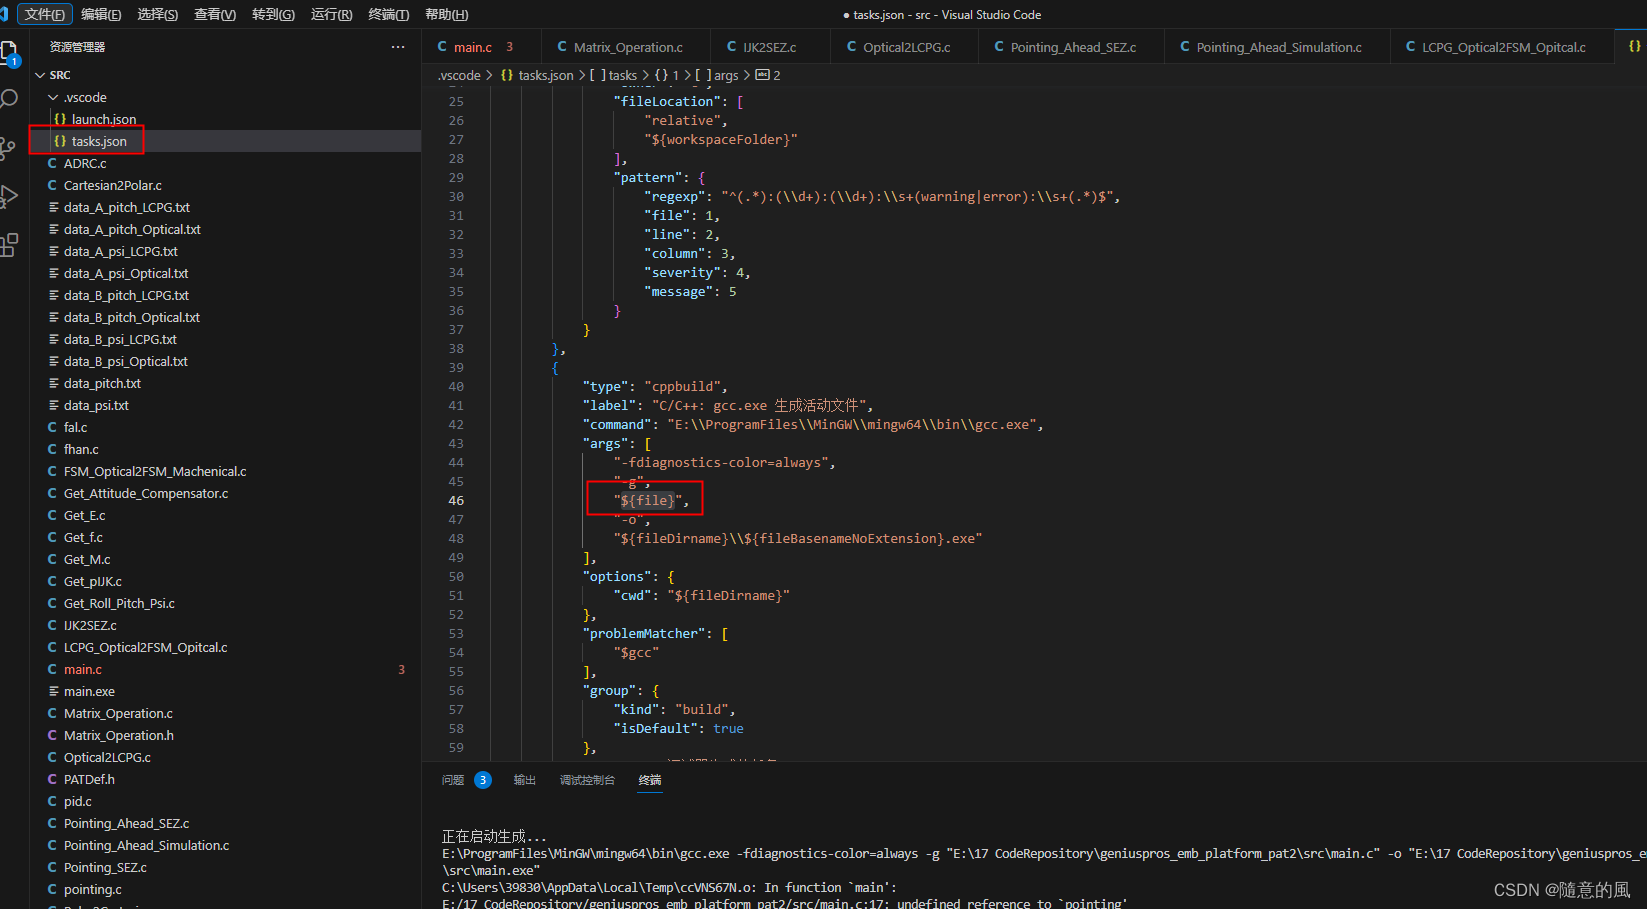
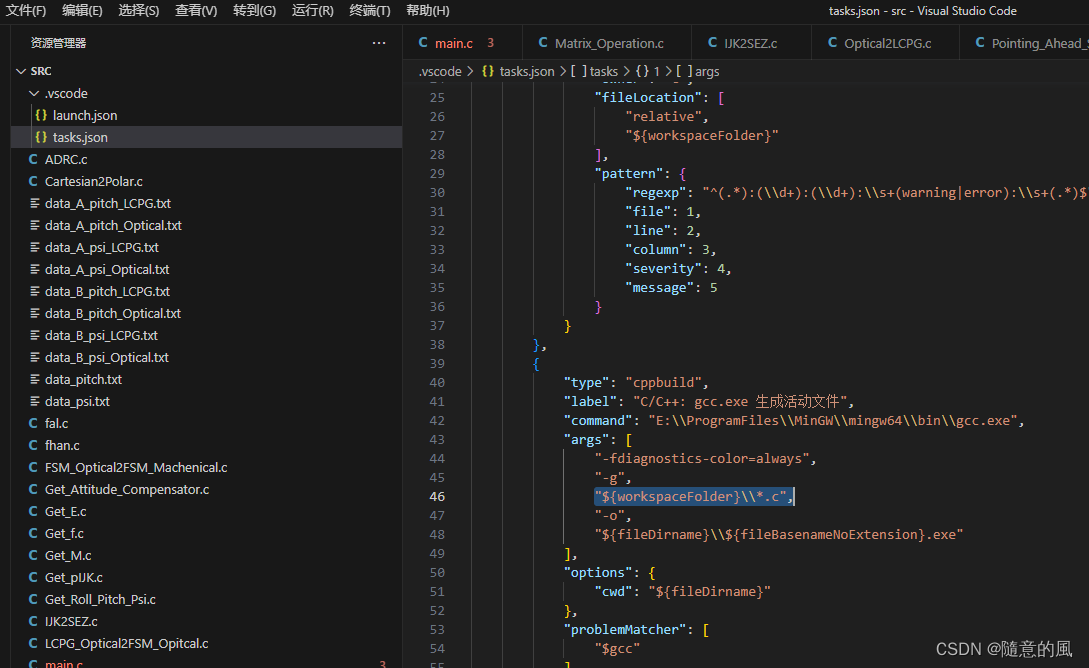
改造tasks.json并构建验证结果
要能够编译一个文件中的多个文件,需要定制tasks.json文件的内容
这里 ${file} 表示编译一个文件,那我们要编译多个文件,应该怎么做呢?
通过把 ${file} 修改为 ${workspaceFolder}\\*.c ,可以构建当前工作工作区中的所有C文件。
通过把 ${file} 修改为 ${workspaceFolder}\\*.cpp ,可以构建当前工作区中的所有C++文件。
修改编译输出的文件名:
通过把${fileDirname}\\$fileBasenameNoExtension}.exe ,修改为:${workspaceFolder}\\myProgram.exe,而不是与C文件同名。
文件名为:myProgram.exe
通过把${fileDirname}\\$fileBasenameNoExtension}.exe,修改为:${workspaceFolder}\\${workspaceRootFolderName}.exe,可以把编译输出的文件名为:打开的工作区文件夹名字.exe。
文件名与打开的工作区文件夹名字相同
修改好之后我们就可以生成这么一个文件了
将图示中的${file}修改为${workspaceFolder}\\*.c
launch.json
{
    // 使用 IntelliSense 了解相关属性。
    // 悬停以查看现有属性的描述。
    // 欲了解更多信息,请访问: https://go.microsoft.com/fwlink/?linkid=830387
    "version": "0.2.0",
    "configurations": [
        {
            "name": "(gdb) Launch", // 配置名称,将会在启动配置的下拉菜单中显示
            "type": "cppdbg",       // 配置类型,这里只能为cppdbg
            "request": "launch",    // 请求配置类型,可以为launch(启动)或attach(附加)
            "program": "${workspaceFolder}\\main.exe",// 将要进行调试的程序的路径
            "args": [],             // 程序调试时传递给程序的命令行参数,一般设为空即可
            "stopAtEntry": false,   // 设为true时程序将暂停在程序入口处,一般设置为false
            "cwd": "${workspaceFolder}", // 调试程序时的工作目录,一般为${workspaceFolder}即代码所在目录
            "environment": [],
            "externalConsole": true, // 调试时是否显示控制台窗口,一般设置为true显示控制台
            "MIMode": "gdb",
            "miDebuggerPath": "E:\\ProgramFiles\\MinGW\\mingw64\\bin\\gdb.exe", // miDebugger的路径,注意这里要与MinGw的路径对应
            "preLaunchTask": "gcc.exe create activer file", // 调试会话开始前执行的任务,一般为编译程序,c++为g++, c为gcc ,注意这里要和tasks.json文件中的label标签保持一致label: C/C++: gcc.exe create activer file,否则debug调试报警告
            "setupCommands": [
                {
            "description": "Enable pretty-printing for gdb",
                    "text": "-enable-pretty-printing",
                    "ignoreFailures": true
                }
            ]
        }
    ]
}
tasks.json文件
{
"version": "2.0.0",
"tasks": [
{
"label": "gcc",
"type": "shell",
"windows": {
"command": "gcc",
"args": [
"-g",
"${workspaceFolder}\\*.c",
"-o",
"\"${fileDirname}\\${fileBasenameNoExtension}.exe\""
]
},
"group": "build",
"presentation": {
"reveal": "silent",
"focus": false,
"echo": false,
"panel": "dedicated"
},
"problemMatcher": {
"owner": "c",
"fileLocation": [
"relative",
"${workspaceFolder}"
],
"pattern": {
"regexp": "^(.*):(\\d+):(\\d+):\\s+(warning|error):\\s+(.*)$",
"file": 1,
"line": 2,
"column": 3,
"severity": 4,
"message": 5
}
}
},
{
"type": "cppbuild",
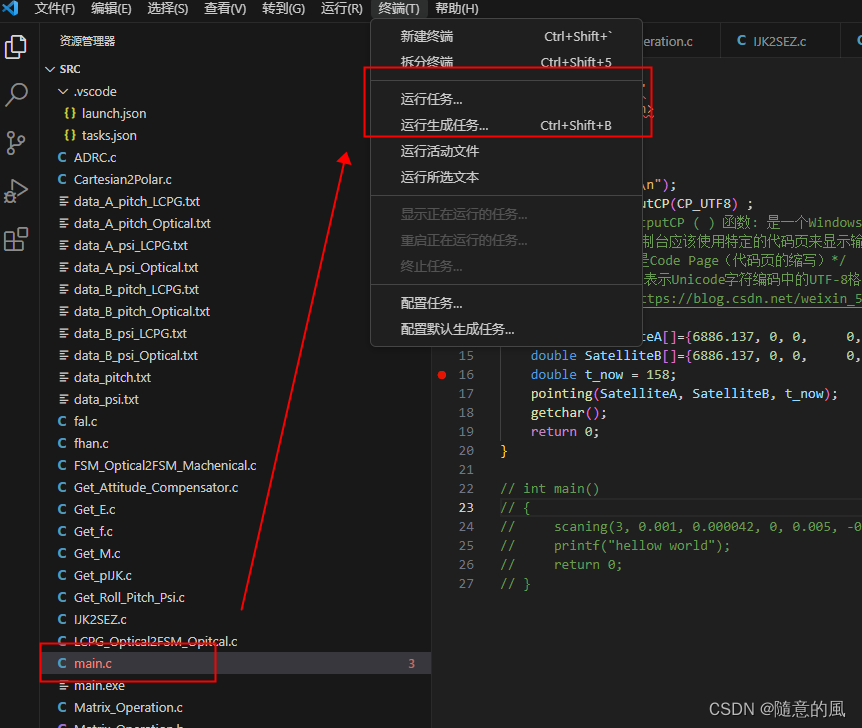
"label": "C/C++: gcc.exe create activer file", // 会在“终端”菜单栏中“运行任务”中子项体现出来,注意这里要和launch.json文件中的preLaunchTask: C/C++: gcc.exe create activer file,项配置已知,否则debug调试会preLaunchTask错误。
"command": "E:\\ProgramFiles\\MinGW\\mingw64\\bin\\gcc.exe",
"args": [
"-fdiagnostics-color=always",
"-g",
"${workspaceFolder}\\*.c", //注意这里要修改,编译工作目录下的所有c文件
"-o",
"${fileDirname}\\${fileBasenameNoExtension}.exe"
],
"options": {
"cwd": "${fileDirname}"
},
"problemMatcher": [
"$gcc"
],
"group": {
"kind": "build",
"isDefault": true
},
"detail": "调试器生成的任务。"
}
]
}
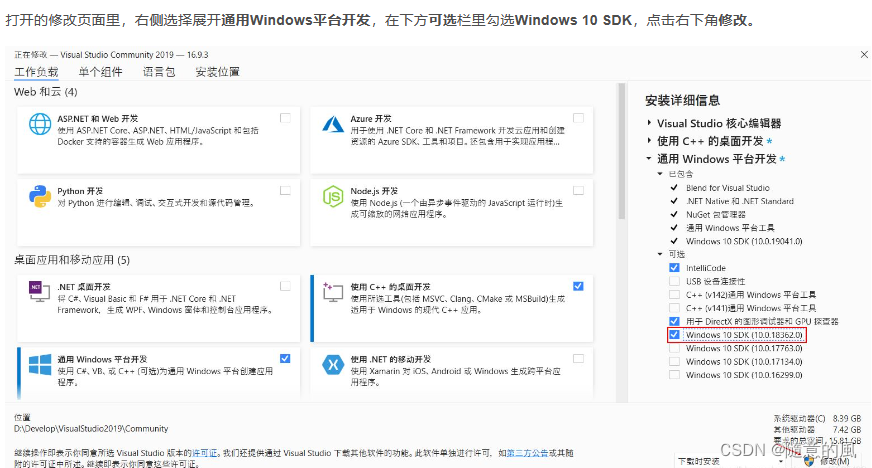
42 、Visual Studio 2017无法打开源文件“stdio.h“问题
出现该问题是因为没有安装对应的Win10 SDK的原因,安装Visual Studio时默认可能不会安装,所以需要手动勾选对应的问题安装。
操作如下:
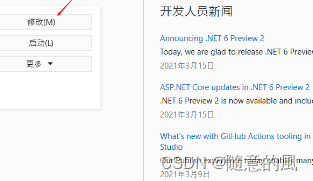
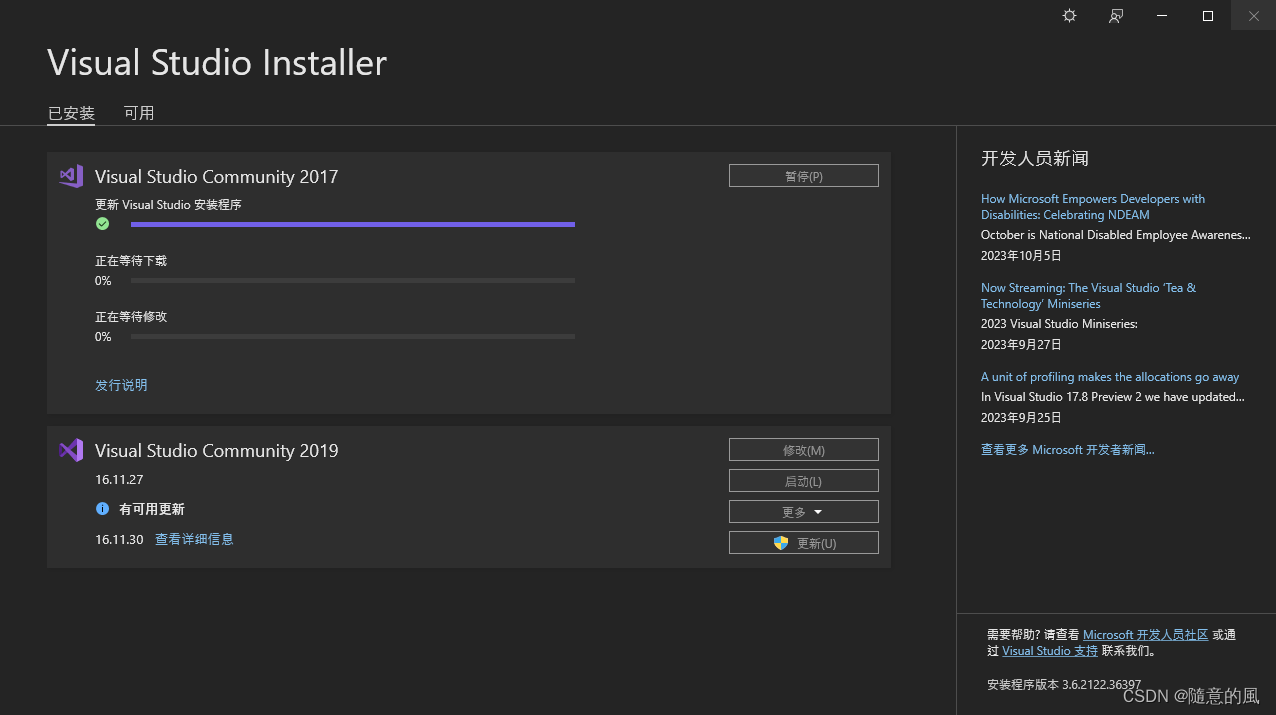
点击Windows的开始菜单,在所有应用里选择Visual Studio Installer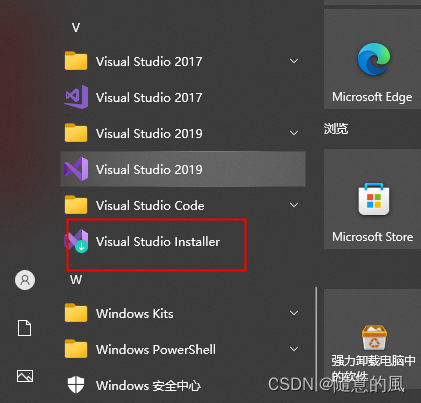


 被折叠的 条评论
为什么被折叠?
被折叠的 条评论
为什么被折叠?
 到【灌水乐园】发言


