


AJAX 综合案例
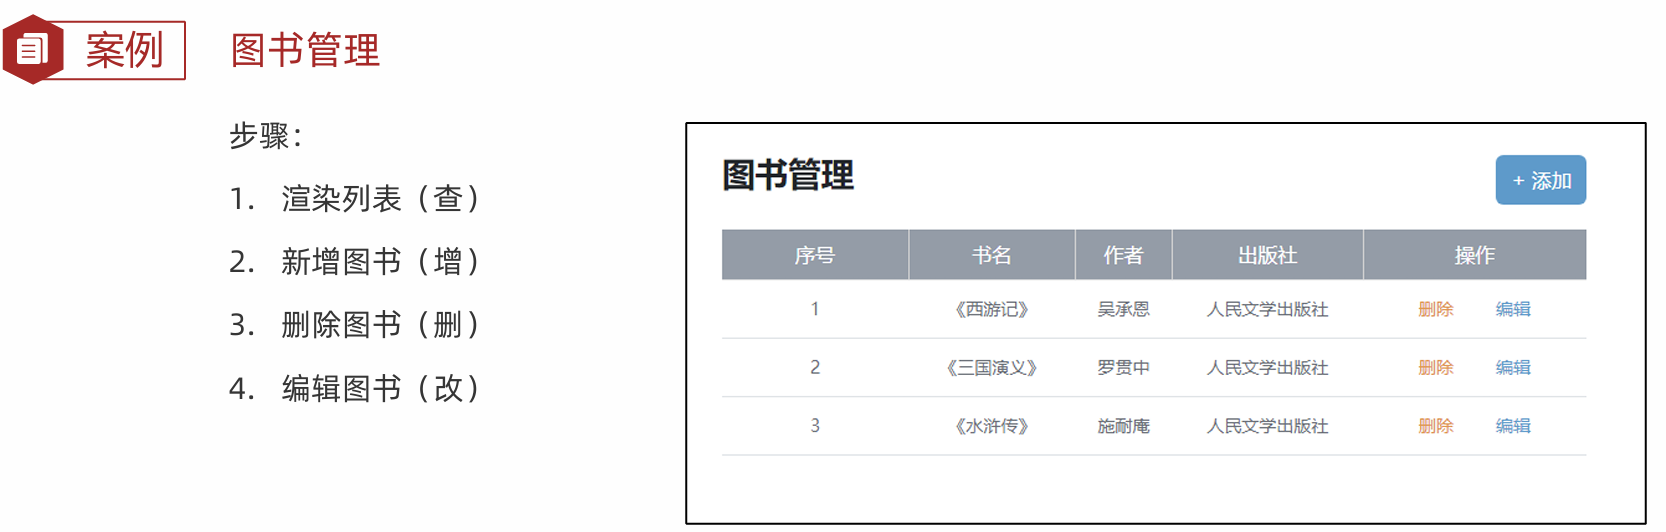
1.案例-图书管理
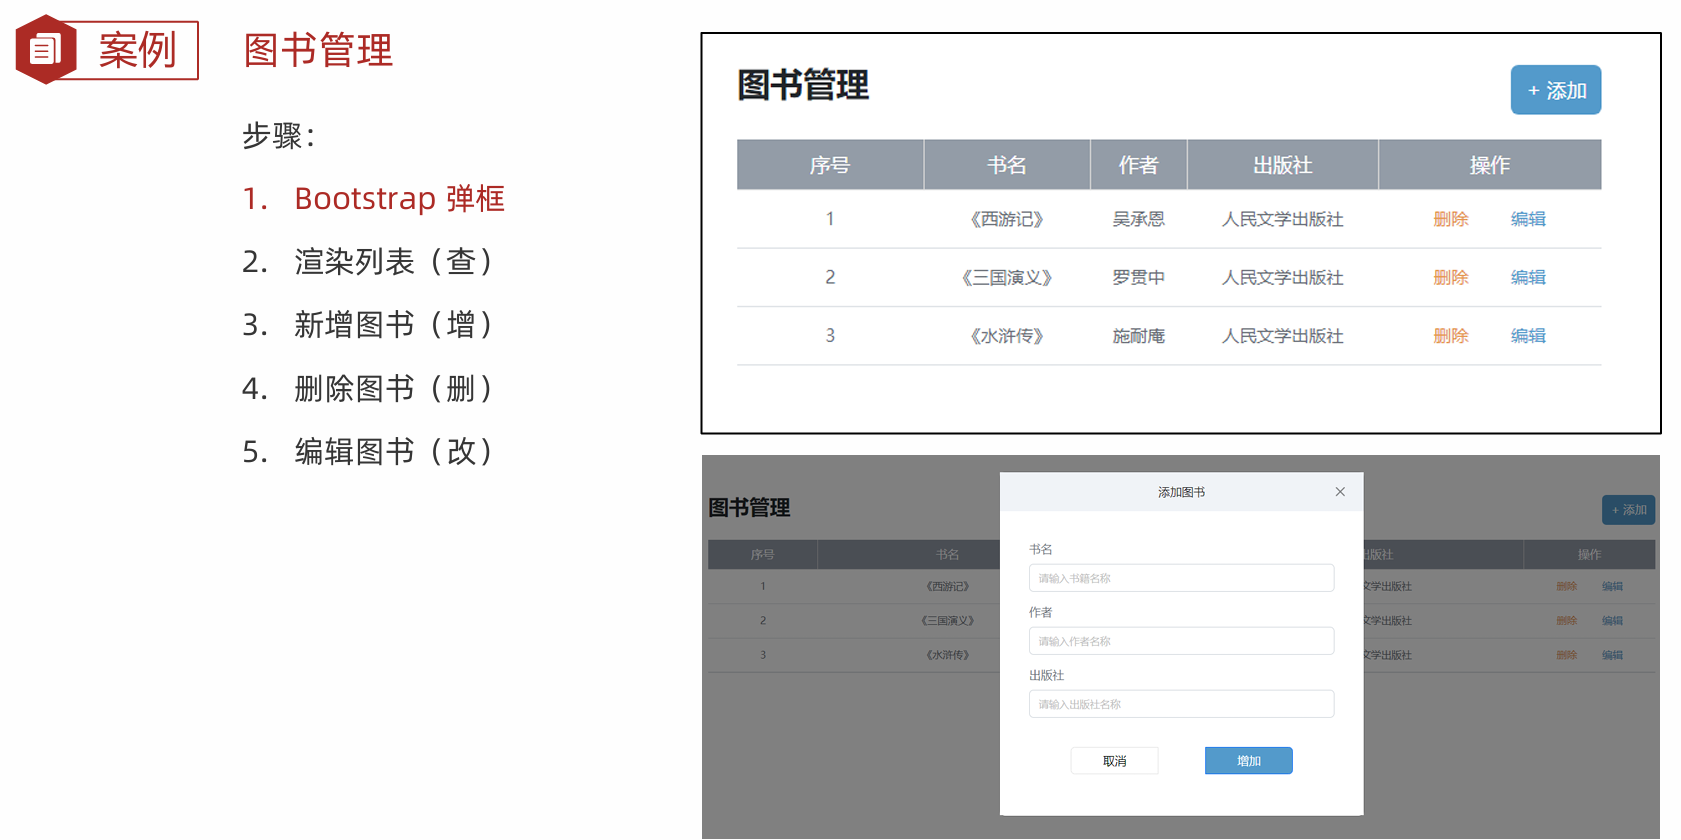
1.1Bootstrap 弹框

<!DOCTYPE html>
<html lang="en">

<head>
  <meta charset="UTF-8">
  <meta http-equiv="X-UA-Compatible" content="IE=edge">
  <meta name="viewport" content="width=device-width, initial-scale=1.0">
  <title>Bootstrap 弹框</title>
  <!-- 引入bootstrap.css -->
  <link href="https://cdn.jsdelivr.net/npm/bootstrap@5.2.2/dist/css/bootstrap.min.css" rel="stylesheet">
</head>

<body>
  <!--
    目标:使用Bootstrap弹框
    1. 引入bootstrap.css 和 bootstrap.js
    2. 准备弹框标签,确认结构
    3. 通过自定义属性,控制弹框的显示和隐藏
   -->
  <button type="button" class="btn btn-primary" data-bs-toggle="modal" data-bs-target=".my-box">
    显示弹框
  </button>

  <!--
    弹框标签
    bootstrap的modal弹框,添加modal类名(默认隐藏)
   -->
  <div class="modal my-box" tabindex="-1">
    <div class="modal-dialog">
      <!-- 弹框-内容 -->
      <div class="modal-content">
        <!-- 弹框-头部 -->
        <div class="modal-header">
          <h5 class="modal-title">Modal title</h5>
          <button type="button" class="btn-close" data-bs-dismiss="modal" aria-label="Close"></button>
        </div>
        <!-- 弹框-身体 -->
        <div class="modal-body">
          <p>Modal body text goes here.</p>
        </div>
        <!-- 弹框-底部 -->
        <div class="modal-footer">
          <button type="button" class="btn btn-secondary" data-bs-dismiss="modal">Close</button>
          <button type="button" class="btn btn-primary">Save changes</button>
        </div>
      </div>
    </div>
  </div>

  <!-- 引入bootstrap.js -->
  <script src="https://cdn.jsdelivr.net/npm/bootstrap@5.2.2/dist/js/bootstrap.min.js"></script>
</body>

</html>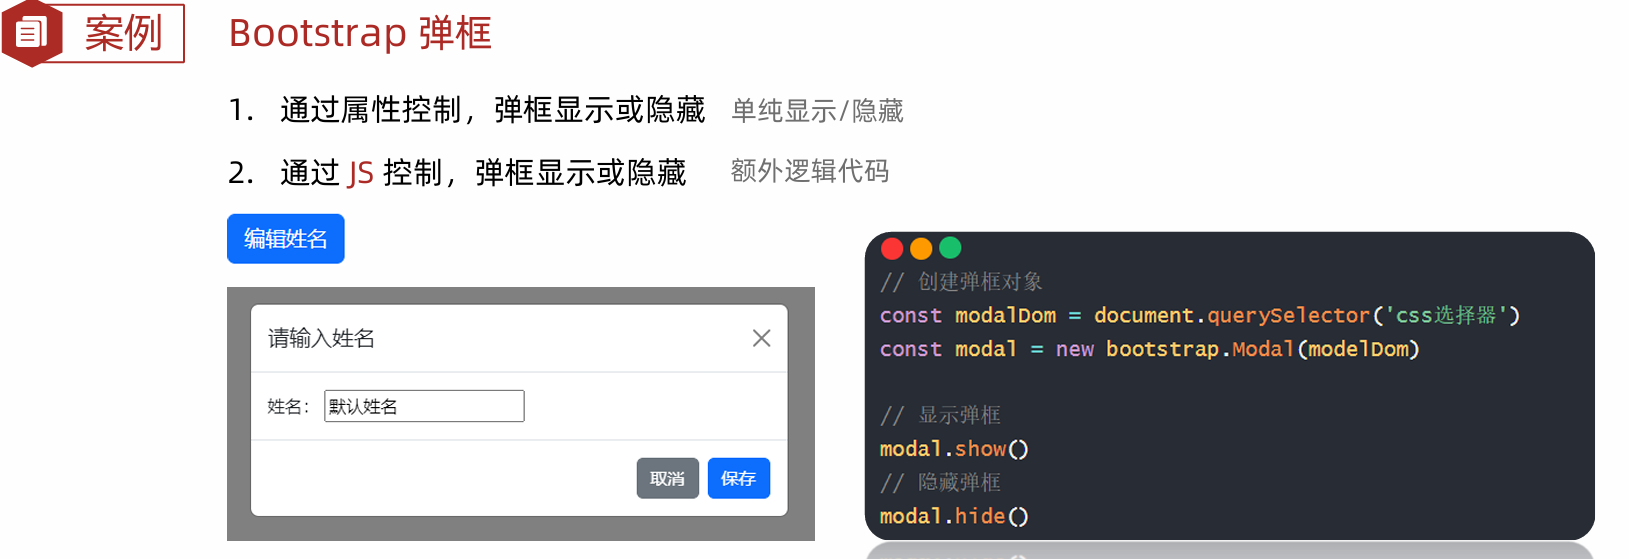
<!DOCTYPE html>
<html lang="en">
<head>
<meta charset="UTF-8">
<meta http-equiv="X-UA-Compatible" content="IE=edge">
<meta name="viewport" content="width=device-width, initial-scale=1.0">
<title>Bootstrap 弹框</title>
<!-- 引入bootstrap.css -->
<link href="https://cdn.jsdelivr.net/npm/bootstrap@5.2.2/dist/css/bootstrap.min.css" rel="stylesheet">
</head>
<body>
<!--
目标:使用JS控制弹框,显示和隐藏
1. 创建弹框对象
2. 调用弹框对象内置方法
.show() 显示
.hide() 隐藏
-->
<button type="button" class="btn btn-primary edit-btn">
编辑姓名
</button>
<div class="modal name-box" tabindex="-1">
<div class="modal-dialog">
<div class="modal-content">
<div class="modal-header">
<h5 class="modal-title">请输入姓名</h5>
<button type="button" class="btn-close" data-bs-dismiss="modal" aria-label="Close"></button>
</div>
<div class="modal-body">
<form action="">
<span>姓名:</span>
<input type="text" class="username">
</form>
</div>
<div class="modal-footer">
<button type="button" class="btn btn-secondary" data-bs-dismiss="modal">取消</button>
<button type="button" class="btn btn-primary save-btn">保存</button>
</div>
</div>
</div>
</div>
<!-- 引入bootstrap.js -->
<script src="https://cdn.jsdelivr.net/npm/bootstrap@5.2.2/dist/js/bootstrap.min.js"></script>
<script>
// 1. 创建弹框对象
const modalDom = document.querySelector('.name-box')
const modal = new bootstrap.Modal(modalDom)
// 编辑姓名->点击->赋予默认姓名->弹框显示
document.querySelector('.edit-btn').addEventListener('click', () => {
document.querySelector('.username').value = '默认姓名'
// 2. 显示弹框
modal.show()
})
// 保存->点击->->获取姓名打印->弹框隐藏
document.querySelector('.save-btn').addEventListener('click', () => {
const username = document.querySelector('.username').value
console.log('模拟把姓名保存到服务器上', username)
// 2. 隐藏弹框
modal.hide()
})
</script>
</body>
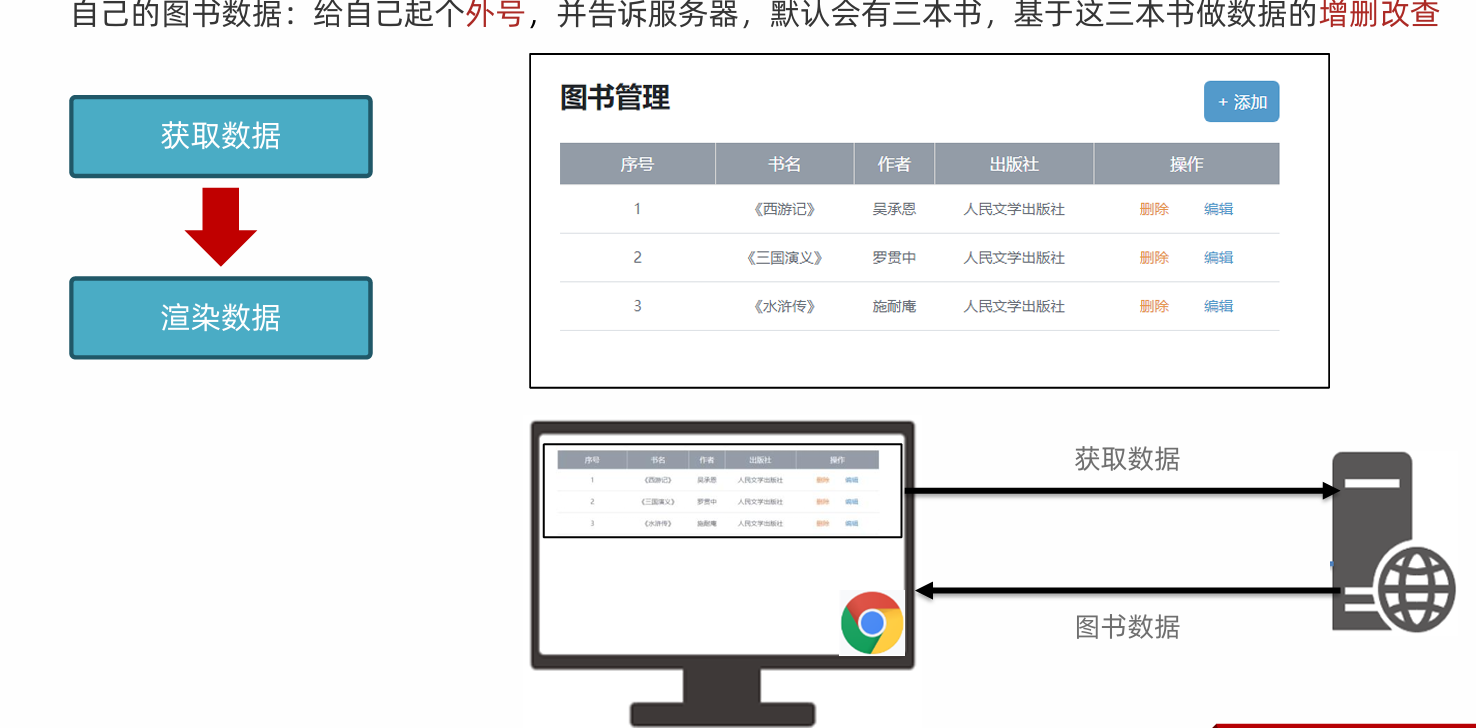
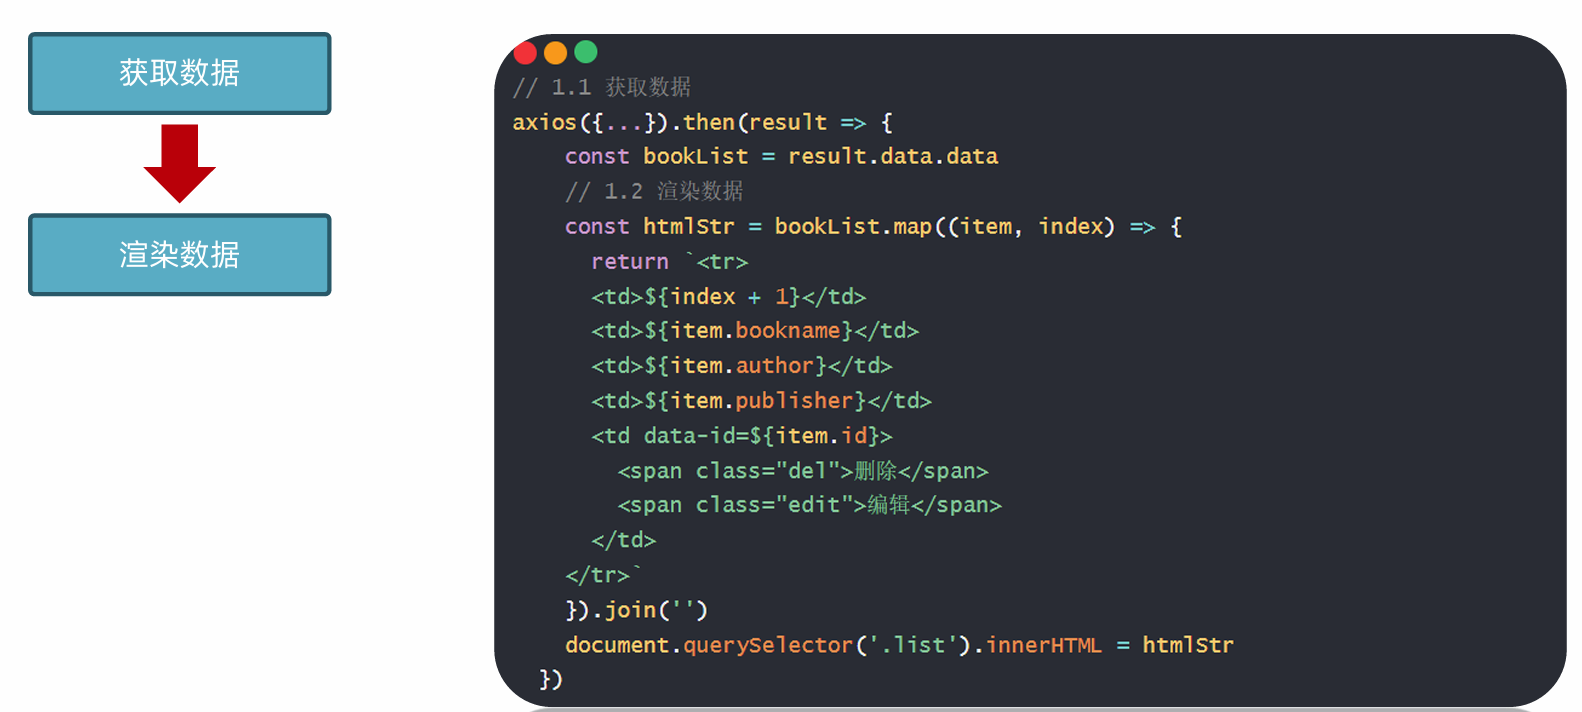
</html>1.2图书管理-渲染列表
/**
 * 目标1:渲染图书列表
 *  1.1 获取数据
 *  1.2 渲染数据
 */
//以后在做添加,删除和编辑,需要告诉服务器我是谁,以后的操作也需要这个外号,所以提到最外面
const creator = '老张'
// 封装-获取并渲染图书列表函数
function getBooksList() {
  // 1.1 获取数据
  axios({
    url: 'http://hmajax.itheima.net/api/books',
    params: {
      // 外号:获取对应数据
      creator
    }
  }).then(result => {
    // console.log(result)
    const bookList = result.data.data
    // console.log(bookList)
    // 1.2 渲染数据
    const htmlStr = bookList.map((item, index) => {
      return `<tr>
      <td>${index + 1}</td>
      <td>${item.bookname}</td>
      <td>${item.author}</td>
      <td>${item.publisher}</td>
      <td data-id=${item.id}>
        <span class="del">删除</span>
        <span class="edit">编辑</span>
      </td>
    </tr>`
    }).join('')
    // console.log(htmlStr)
    document.querySelector('.list').innerHTML = htmlStr
  })
}
// 网页加载运行,获取并渲染列表一次
getBooksList()
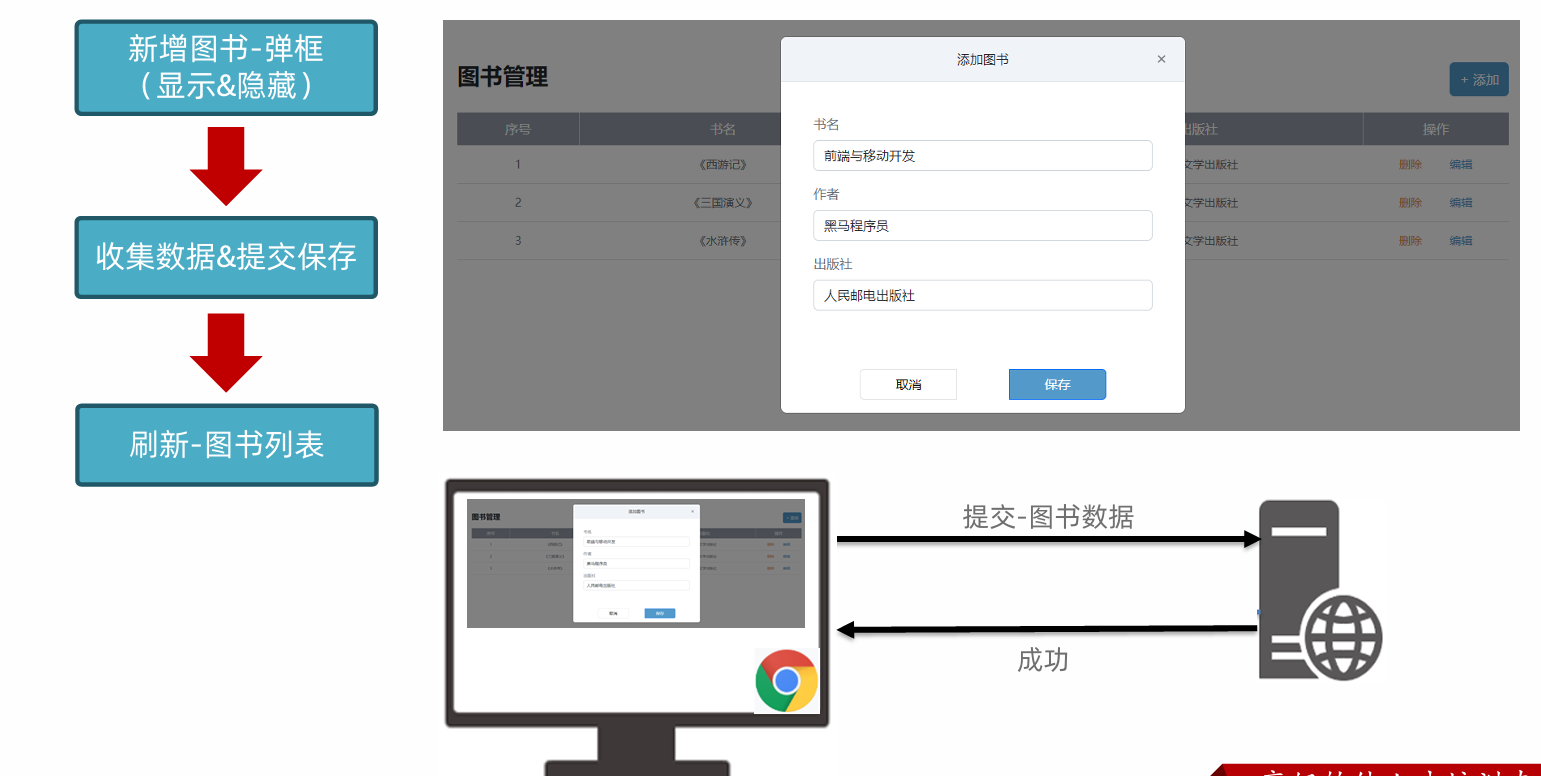
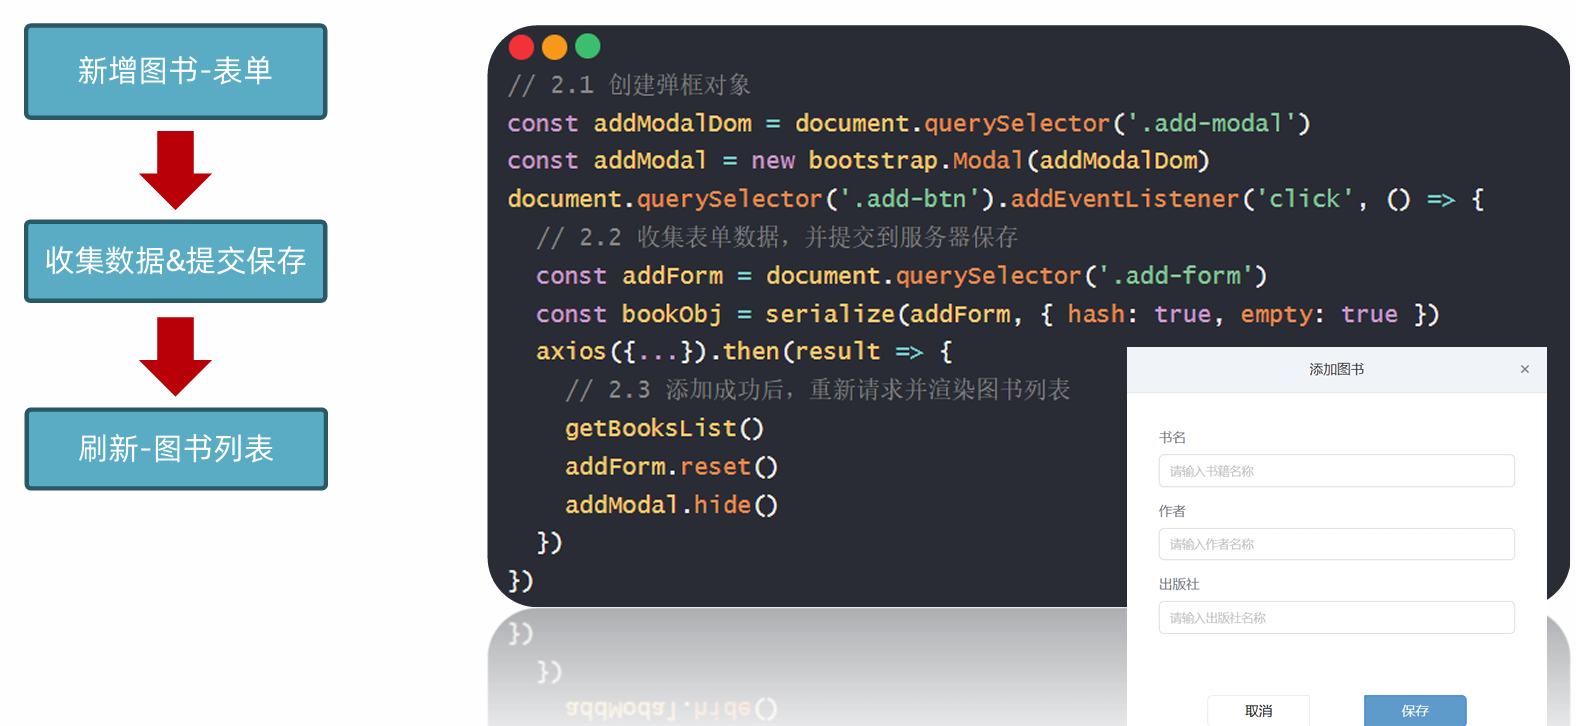
1.3 图书管理-新增图书
**
 * 目标2:新增图书
 *  2.1 新增弹框->显示和隐藏
 *  2.2 收集表单数据,并提交到服务器保存
 *  2.3 刷新图书列表
 */
// 2.1 创建弹框对象
const addModalDom = document.querySelector('.add-modal')
const addModal = new bootstrap.Modal(addModalDom)
// 保存按钮->点击->隐藏弹框
document.querySelector('.add-btn').addEventListener('click', () => {
  // 2.2 收集表单数据,并提交到服务器保存
  const addForm = document.querySelector('.add-form')
  const bookObj = serialize(addForm, { hash: true, empty: true })
  // console.log(bookObj)
  // 提交到服务器
  axios({
    url: 'http://hmajax.itheima.net/api/books',
    method: 'POST',
    data: {
      ...bookObj,
      creator
    }
  }).then(result => {
    // console.log(result)
    // 2.3 添加成功后,重新请求并渲染图书列表
    getBooksList()
    // 重置表单
    addForm.reset()
    // 隐藏弹框
    addModal.hide()
  })
})
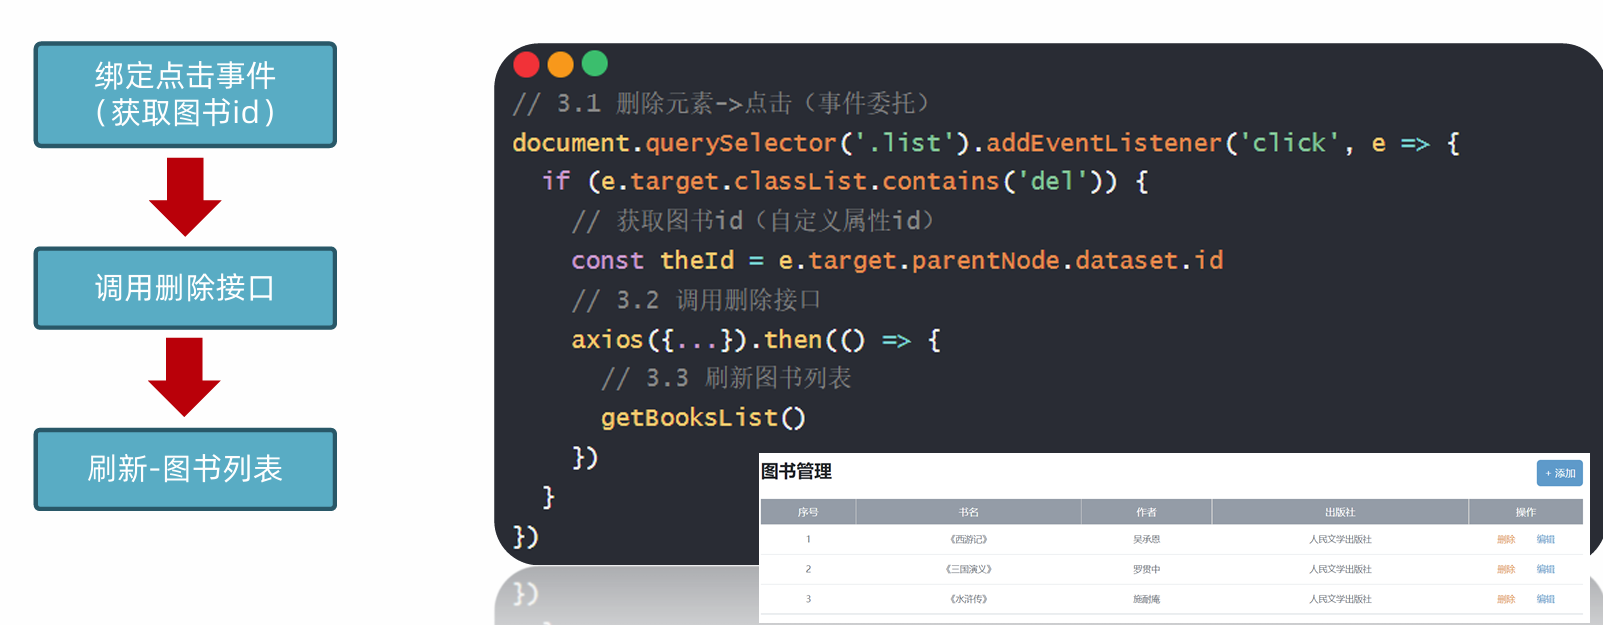
1.4图书管理-删除图书
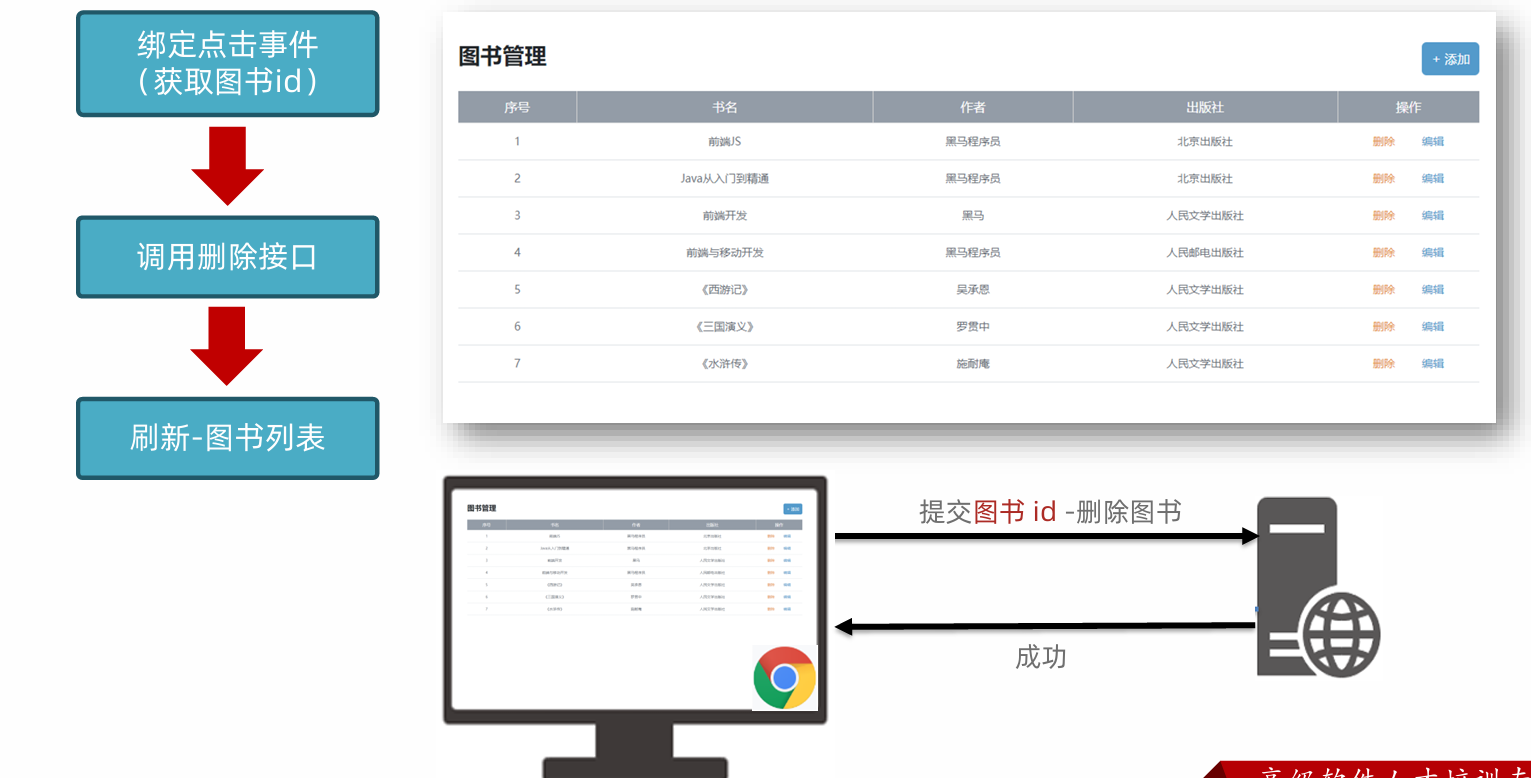
/**
* 目标3:删除图书
* 3.1 删除元素绑定点击事件->获取图书id
* 3.2 调用删除接口
* 3.3 刷新图书列表
*/
// 3.1 删除元素->点击(事件委托)
document.querySelector('.list').addEventListener('click', e => {
// 获取触发事件目标元素
// console.log(e.target)
// 判断点击的是删除元素
if (e.target.classList.contains('del')) {
// console.log('点击删除元素')
// 获取图书id(自定义属性id)
const theId = e.target.parentNode.dataset.id
// console.log(theId)
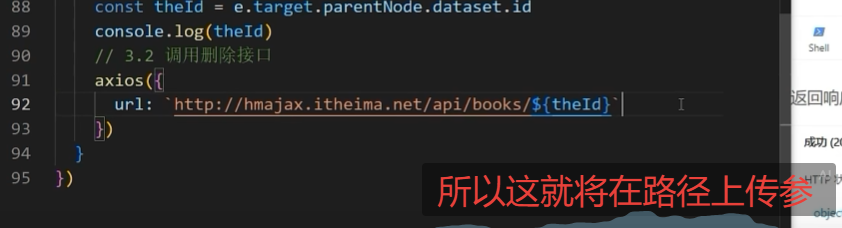
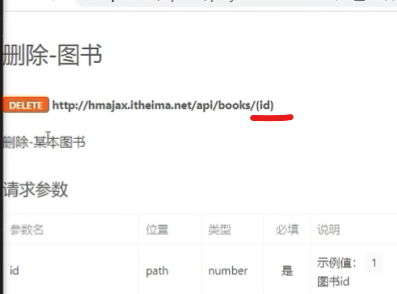
// 3.2 调用删除接口
axios({
url: `http://hmajax.itheima.net/api/books/${theId}`,
method: 'DELETE'
}).then(() => {
// 3.3 刷新图书列表
getBooksList()
})
}
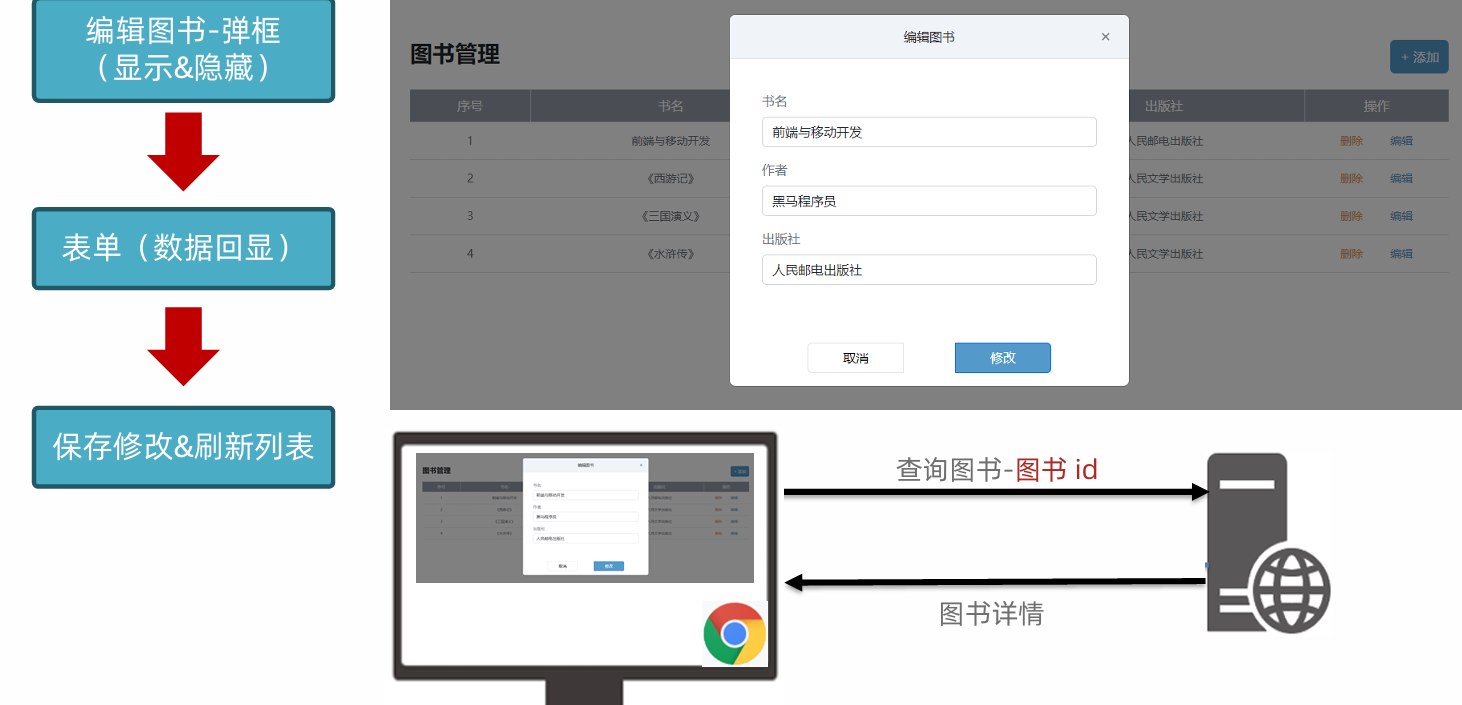
})1.5图书管理-编辑图书

//Object.keys()是js中的一个内置方法,他的作用的接受一个对象作为参数,然后返回一个由该对象自身可列举属性名组成的数组
更清晰明了:这是段JavaScript代码,分两步做了件事:
const keys = Object.keys(bookObj); :假如你有个叫 bookObj 的对象,就像一个装着各种东西(属性)的盒子。 Object.keys() 这个工具可以把这个盒子里能列出来的东西(可枚举属性)的名字都找出来,放到一个清单(数组)里,然后把这个清单存到名叫 keys 的小本本里。
console.log(keys); :就是把刚才那个记录着属性名字的小本本 keys ,展示到浏览器或Node.js的控制台里,让程序员能看到对象 bookObj 都有哪些属性 。
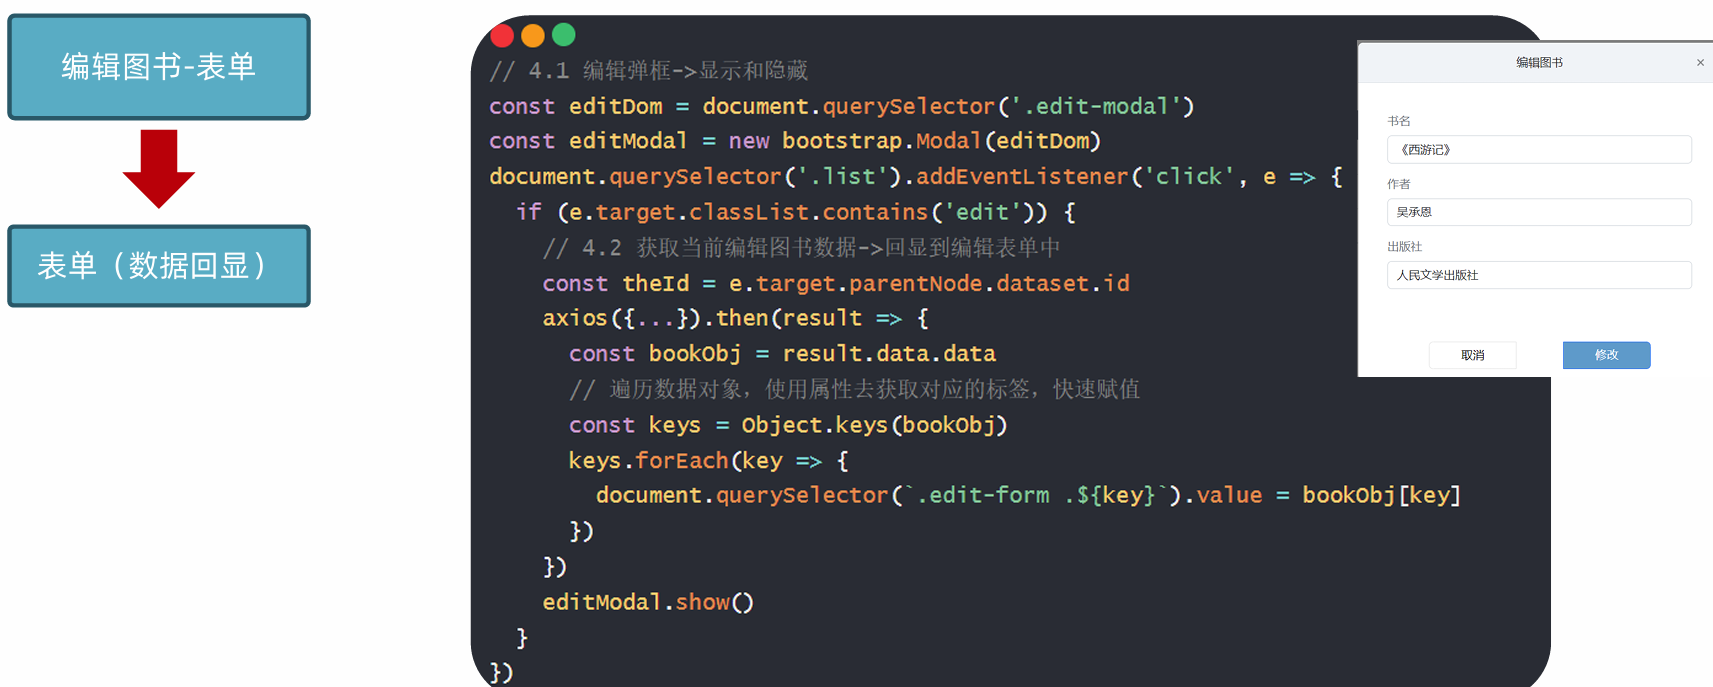
/**
 * 目标4:编辑图书
 *  4.1 编辑弹框->显示和隐藏
 *  4.2 获取当前编辑图书数据->回显到编辑表单中
 *  4.3 提交保存修改,并刷新列表
 */
// 4.1 编辑弹框->显示和隐藏
const editDom = document.querySelector('.edit-modal')
const editModal = new bootstrap.Modal(editDom)
// 编辑元素->点击->弹框显示
document.querySelector('.list').addEventListener('click', e => {
  // 判断点击的是否为编辑元素
  if (e.target.classList.contains('edit')) {
    // 4.2 获取当前编辑图书数据->回显到编辑表单中
    const theId = e.target.parentNode.dataset.id
    axios({
      url: `http://hmajax.itheima.net/api/books/${theId}`
    }).then(result => {
      const bookObj = result.data.data
      // document.querySelector('.edit-form .bookname').value = bookObj.bookname
      // document.querySelector('.edit-form .author').value = bookObj.author
      // 数据对象“属性”和标签“类名”一致
      // 遍历数据对象,使用属性去获取对应的标签,快速赋值
      const keys = Object.keys(bookObj) // ['id', 'bookname', 'author', 'publisher']
     //Object.keys()是js中的一个内置方法,他的作用的接受一个对象作为参数,然后返回一个由该对象自身可列举属性名组成的数组

      keys.forEach(key => {
        document.querySelector(`.edit-form .${key}`).value = bookObj[key]
      })
    })
    editModal.show()
  }
})


// 修改按钮->点击->隐藏弹框
document.querySelector('.edit-btn').addEventListener('click', () => {
  // 4.3 提交保存修改,并刷新列表
  const editForm = document.querySelector('.edit-form')
  const { id, bookname, author, publisher } = serialize(editForm, { hash: true, empty: true})
  //写请求体的时候,不需要一个一个bookObj.属性
  //可以直接把对象里面的值快速映射到这个属性同名的变量中,
  //这样下边直接使用变量,就不用这个对象一个一个.


  // 保存正在编辑的图书id,隐藏起来:无需让用户修改
  // <input type="hidden" class="id" name="id" value="84783">
  axios({
    url: `http://hmajax.itheima.net/api/books/${id}`,
    method: 'PUT',
    data: {
      bookname,
      author,
      publisher,
      creator
    }
  }).then(() => {
    // 修改成功以后,重新获取并刷新列表
    getBooksList()

    // 隐藏弹框
    editModal.hide()
  })
})
2.案例,图书管理
核心步骤-渲染数据
核心步骤-新增数据
核心步骤-删除数据
核心步骤-编辑数据
如果想查询,一定要从服务器上获取最新最准确的数据,因为
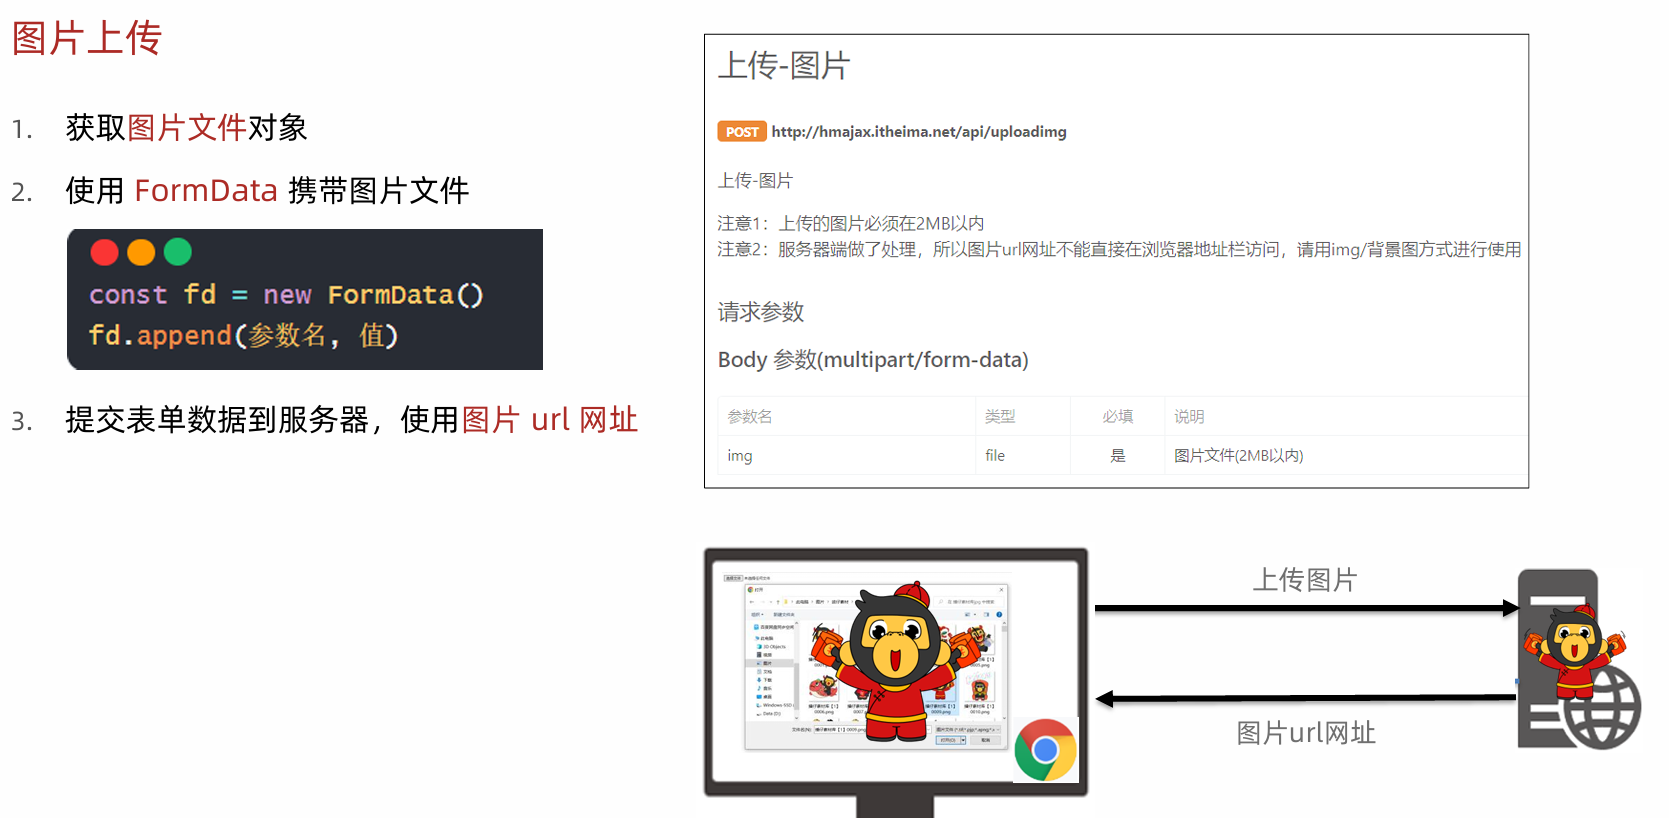
2.图片上传
<!DOCTYPE html>
<html lang="en">

<head>
  <meta charset="UTF-8">
  <meta http-equiv="X-UA-Compatible" content="IE=edge">
  <meta name="viewport" content="width=device-width, initial-scale=1.0">
  <title>图片上传</title>
</head>

<body>
  <!-- 文件选择元素 -->
  <input type="file" class="upload">
  <img src="" alt="" class="my-img">

  <script src="https://cdn.jsdelivr.net/npm/axios/dist/axios.min.js"></script>
  <script>
    /**
     * 目标:图片上传,显示到网页上
     *  1. 获取图片文件
     *  2. 使用 FormData 携带图片文件
     *  3. 提交到服务器,获取图片url网址使用
    */
    // 文件选择元素->change改变事件
    document.querySelector('.upload').addEventListener('change', e => {
      // 1. 获取图片文件
      console.log(e.target.files[0])
      // 2. 使用 FormData 携带图片文件
      const fd = new FormData()
      fd.append('img', e.target.files[0])
      // 3. 提交到服务器,获取图片url网址使用
      axios({
        url: 'http://hmajax.itheima.net/api/uploadimg',
        method: 'POST',
        data: fd
      }).then(result => {
        console.log(result)
        // 取出图片url网址,用img标签加载显示
        const imgUrl = result.data.data.url
        document.querySelector('.my-img').src = imgUrl
      })
    })
  </script>
</body>

</html>
3. 案例-网站换肤
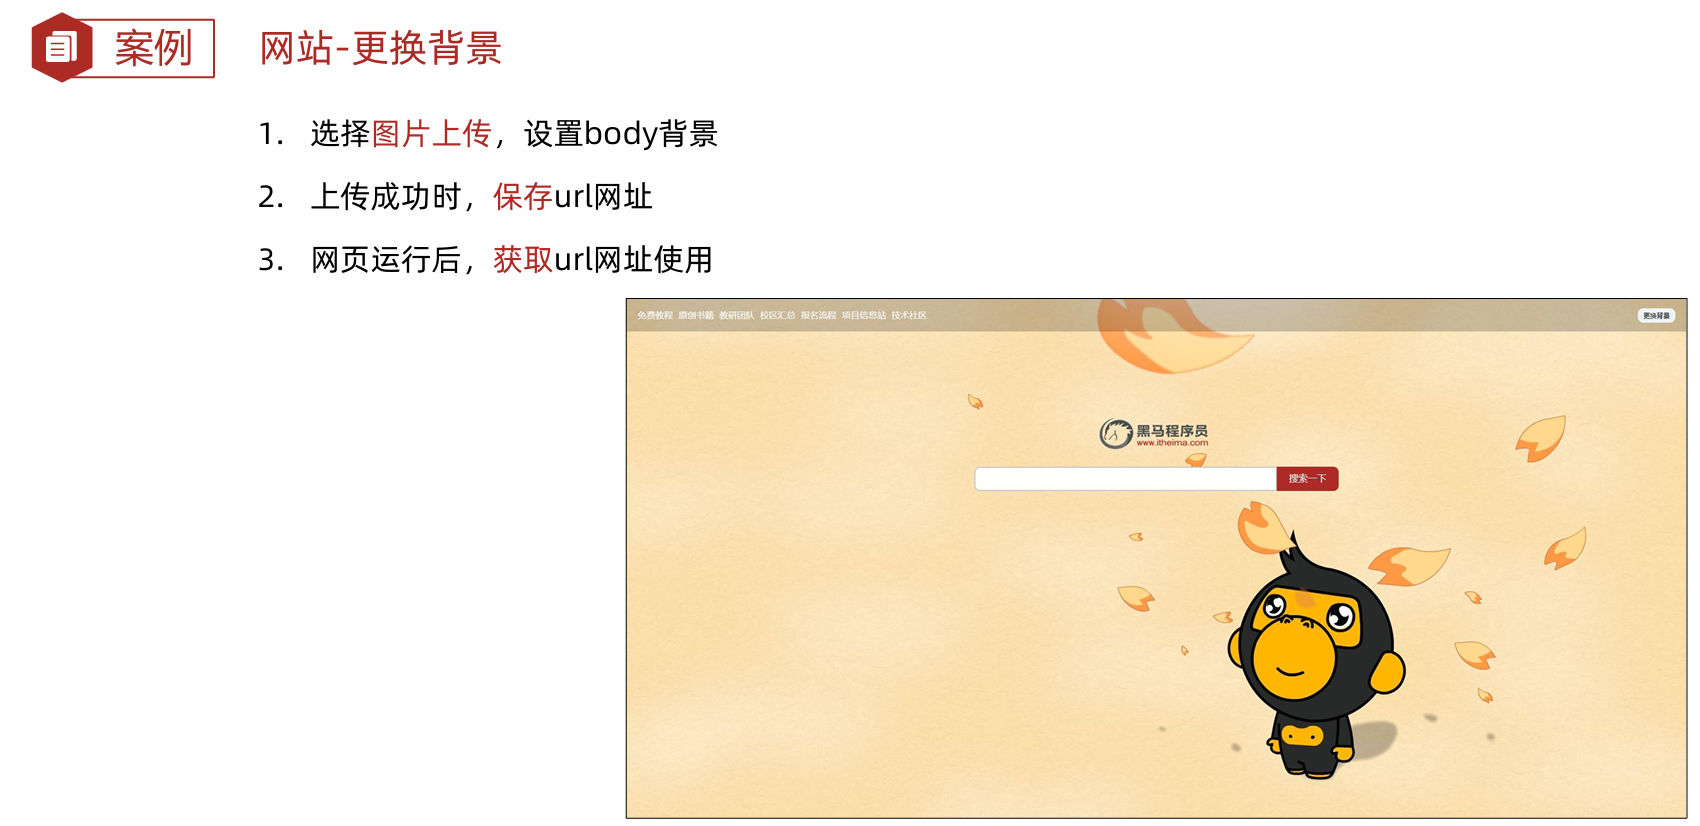
/**
 * 目标:网站-更换背景
 *  1. 选择图片上传,设置body背景
 *  2. 上传成功时,"保存"图片url网址
 *  3. 网页运行后,"获取"url网址使用
 * */
document.querySelector('.bg-ipt').addEventListener('change', e => {
  // 1. 选择图片上传,设置body背景
  console.log(e.target.files[0])
  const fd = new FormData()
  fd.append('img', e.target.files[0])
  axios({
    url: 'http://hmajax.itheima.net/api/uploadimg',
    method: 'POST',
    data: fd
  }).then(result => {
    const imgUrl = result.data.data.url
    document.body.style.backgroundImage = `url(${imgUrl})`

    // 2. 上传成功时,"保存"图片url网址
    localStorage.setItem('bgImg', imgUrl)
  })
})

// 3. 网页运行后,"获取"url网址使用
const bgUrl = localStorage.getItem('bgImg')
console.log(bgUrl)
bgUrl && (document.body.style.backgroundImage = `url(${bgUrl})`)
4. 案例-个人信息设置
4.1 个人信息设置
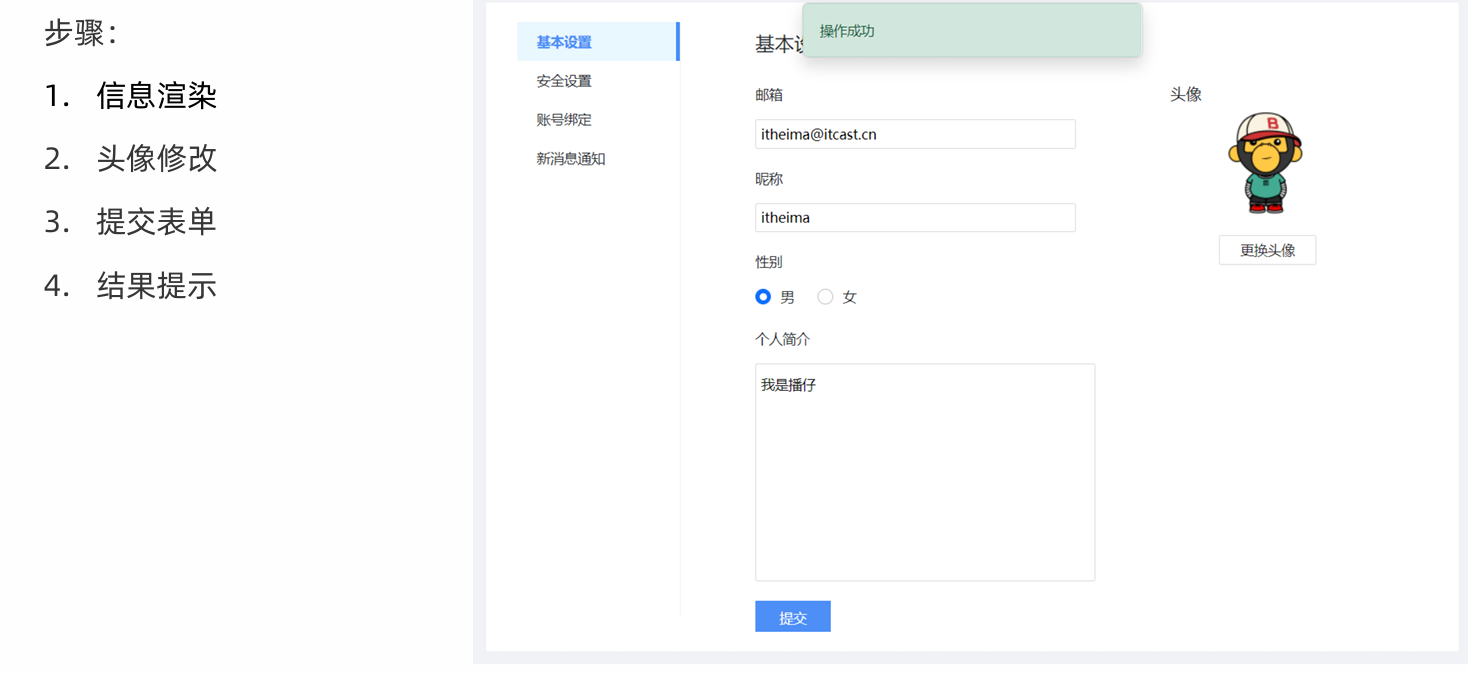
4.2 个人信息设置-信息渲染
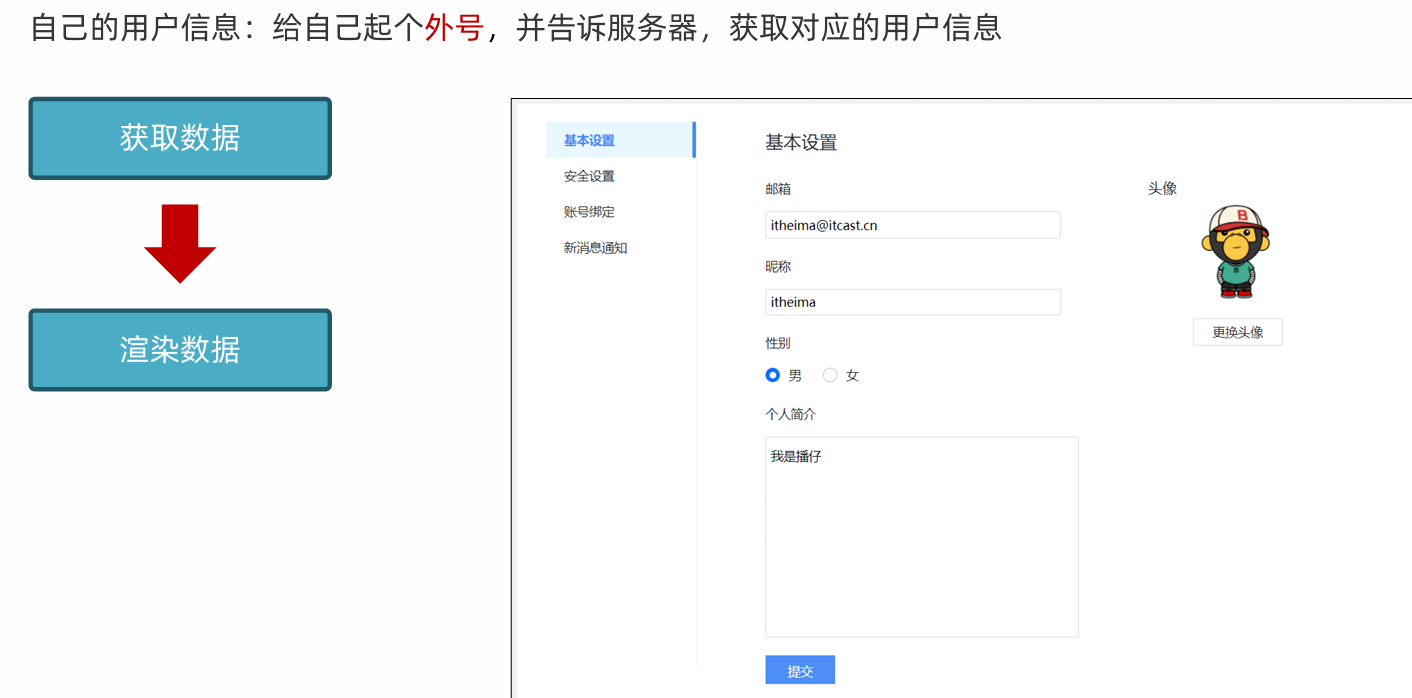
/**
* 目标1:信息渲染
* 1.1 获取用户的数据
* 1.2 回显数据到标签上
* */
const creator = '播仔'
// 1.1 获取用户的数据
axios({
url: 'http://hmajax.itheima.net/api/settings',
params: {
creator
}
}).then(result => {
const userObj = result.data.data
// 1.2 回显数据到标签上
Object.keys(userObj).forEach(key => {
if (key === 'avatar') {
// 赋予默认头像
document.querySelector('.prew').src = userObj[key]
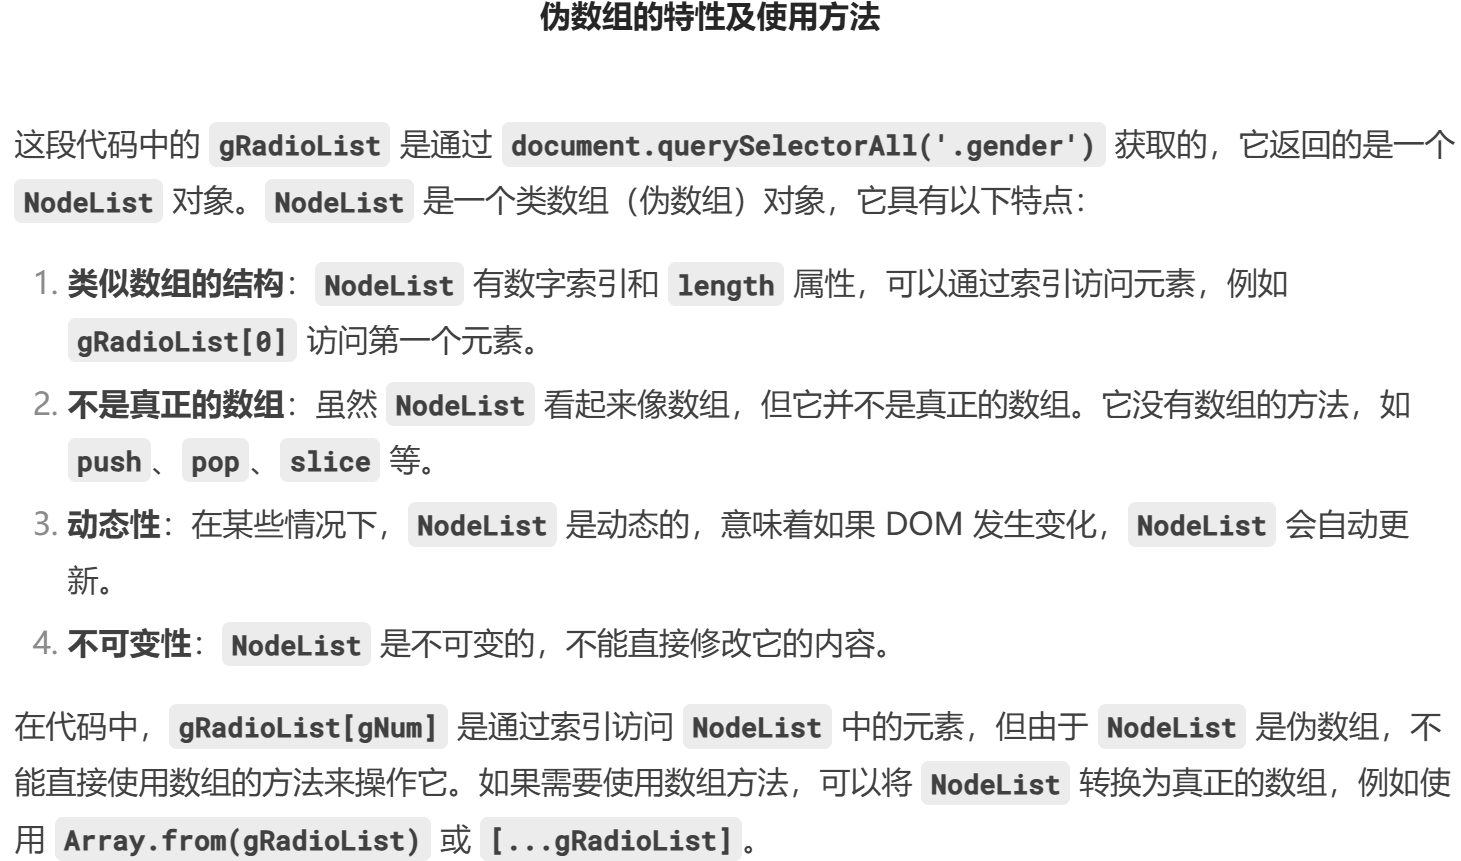
} else if (key === 'gender') {
// 赋予默认性别
// 获取性别单选框:[男radio元素,女radio元素]
const gRadioList = document.querySelectorAll('.gender')
// 获取性别数字:0男,1女
const gNum = userObj[key]
// 通过性别数字,作为下标,找到对应性别单选框,设置选中状态
gRadioList[gNum].checked = true
} else {
// 赋予默认内容
document.querySelector(`.${key}`).value = userObj[key]
}
})
})
4.3 个人信息设置-头像修改
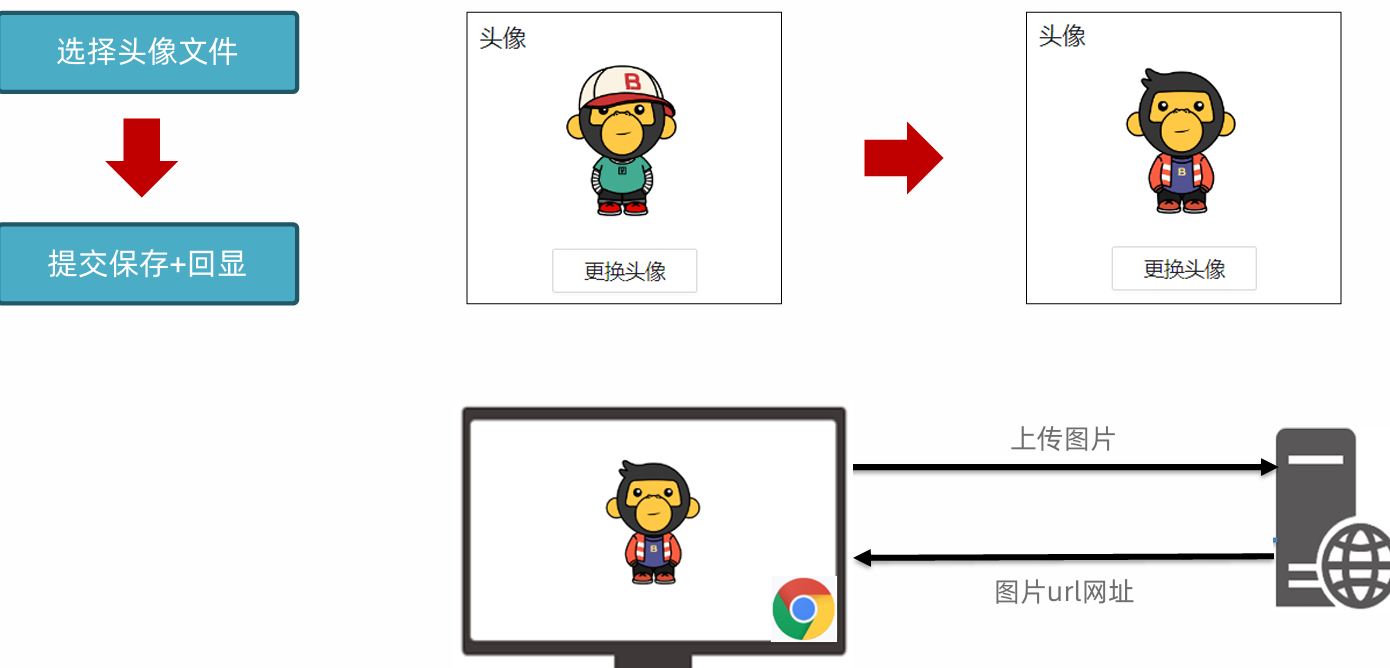
**
 * 目标2:修改头像
 *  2.1 获取头像文件
 *  2.2 提交服务器并更新头像
 * */
// 文件选择元素->change事件
document.querySelector('.upload').addEventListener('change', e => {
  // 2.1 获取头像文件
  console.log(e.target.files[0])
  const fd = new FormData()
  fd.append('avatar', e.target.files[0])
  fd.append('creator', creator)
  // 2.2 提交服务器并更新头像
  axios({
    url: 'http://hmajax.itheima.net/api/avatar',
    method: 'PUT',
    data: fd
  }).then(result => {
    const imgUrl = result.data.data.avatar
    // 把新的头像回显到页面上
    document.querySelector('.prew').src = imgUrl
  })
})
4.4 个人信息设置-信息修改
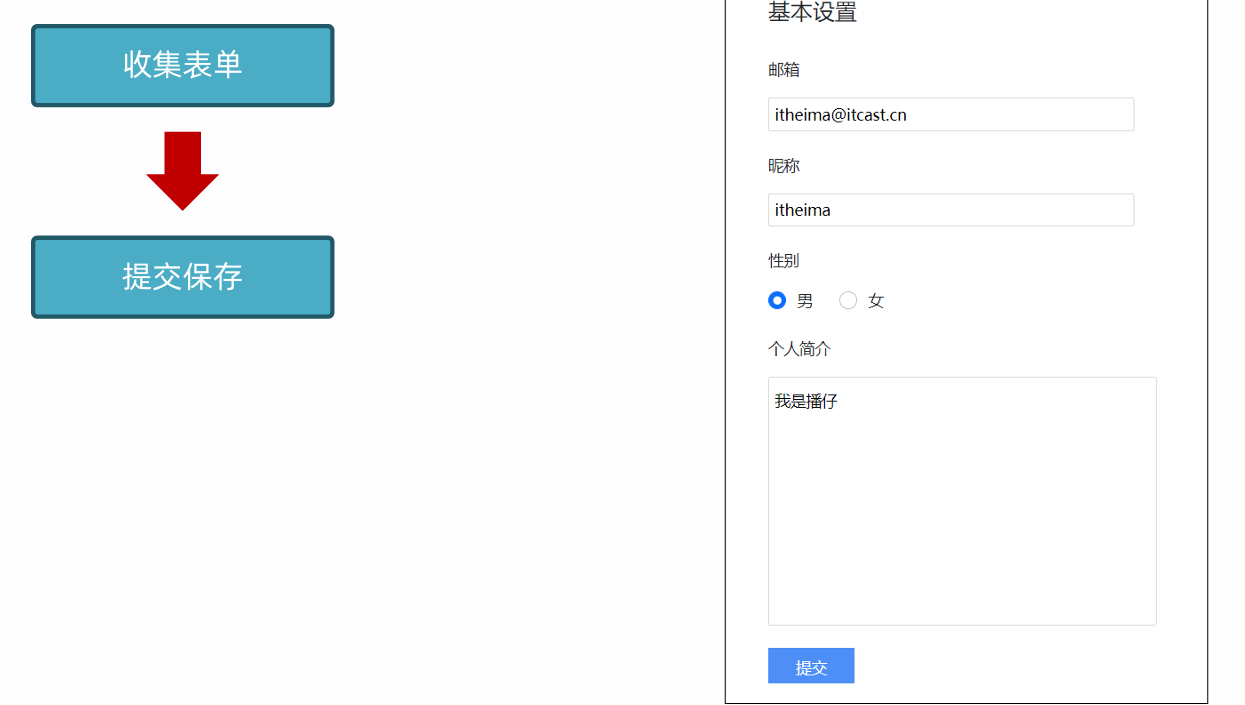
/**
 * 目标3:提交表单
 *  3.1 收集表单信息
 *  3.2 提交到服务器保存
 */
// 保存修改->点击
document.querySelector('.submit').addEventListener('click', () => {
  // 3.1 收集表单信息
  const userForm = document.querySelector('.user-form')
  const userObj = serialize(userForm, { hash: true, empty: true })
  userObj.creator = creator
  // 性别数字字符串,转成数字类型
  userObj.gender = +userObj.gender
  console.log(userObj)
  // 3.2 提交到服务器保存
  axios({
    url: 'http://hmajax.itheima.net/api/settings',
    method: 'PUT',
    data: userObj
  }).then(result => {
    // 4.1 创建toast对象
    const toastDom = document.querySelector('.my-toast')
    const toast = new bootstrap.Toast(toastDom)

    // 4.2 调用show方法->显示提示框
    toast.show()
  })
})
4.5 个人信息设置-提示框
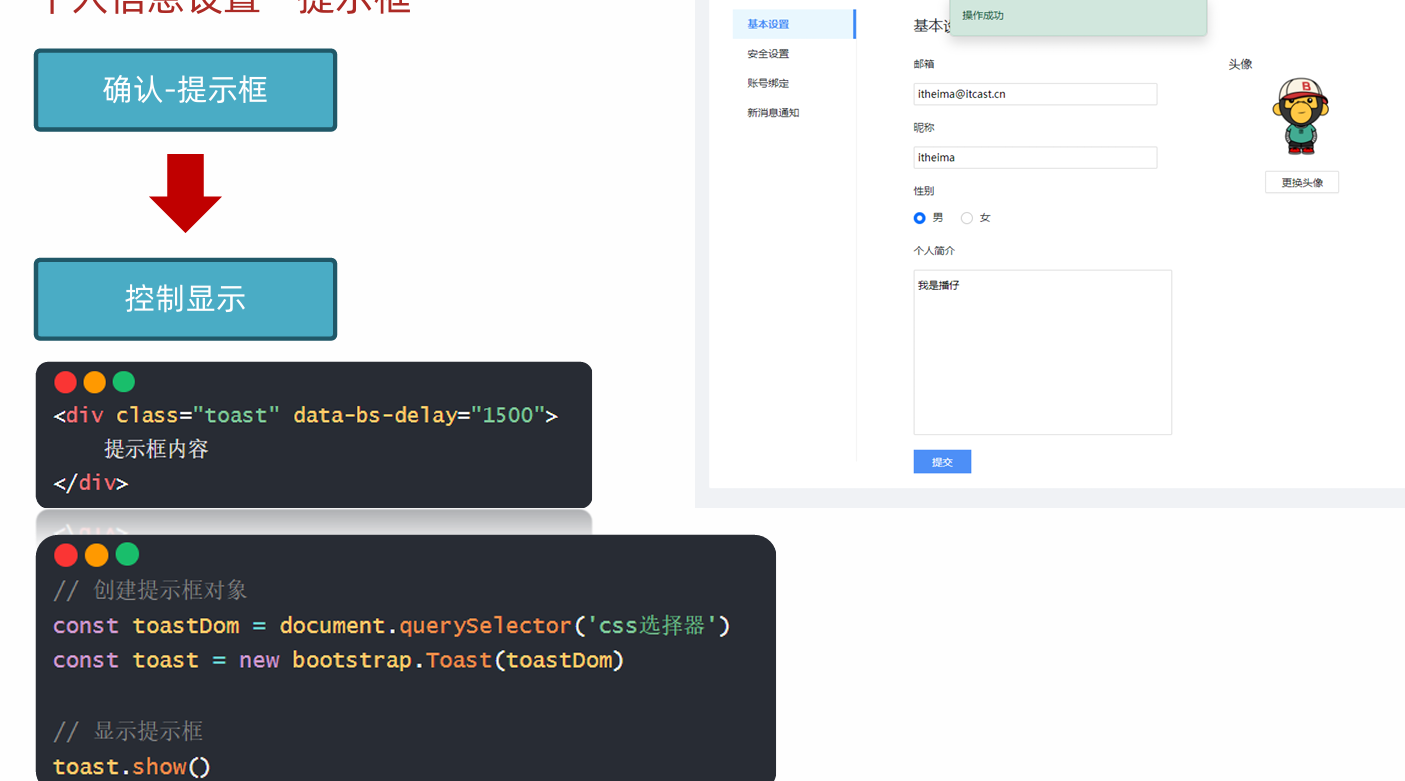
/**
 * 目标4:结果提示
 *  4.1 创建toast对象
 *  4.2 调用show方法->显示提示框
 */
// 保存修改->点击
document.querySelector('.submit').addEventListener('click', () => {
  // 3.1 收集表单信息
  const userForm = document.querySelector('.user-form')
  const userObj = serialize(userForm, { hash: true, empty: true })
  userObj.creator = creator
  // 性别数字字符串,转成数字类型
  userObj.gender = +userObj.gender
  console.log(userObj)
  // 3.2 提交到服务器保存
  axios({
    url: 'http://hmajax.itheima.net/api/settings',
    method: 'PUT',
    data: userObj
  }).then(result => {
    // 4.1 创建toast对象
    const toastDom = document.querySelector('.my-toast')
    const toast = new bootstrap.Toast(toastDom)

    // 4.2 调用show方法->显示提示框
    toast.show()
  })
})


 500
500

 被折叠的 条评论
为什么被折叠?
被折叠的 条评论
为什么被折叠?
 到【灌水乐园】发言


