效果展示


项目简介
- 软件平台:Matlab;
- 软件功能:
- 画出一个,比较逼真的玫瑰花,形状可以调节;
- 修改相关参数,理论上可以画出其他种类的花,以及形状类似的物品;
- 灵感来源:奶油蛋糕的一种裱花手法;
- 项目缘由:送给我爱人的情人节礼物~
- 代码水平:新手水平,非专业向;
- 备注说明:限于篇幅等原因,没有上传全部代码。包括一些新功能,更多可控参数,以及set函数,flower父类等等,不算核心内容;花萼见“局部算法-多花瓣”,花枝只是简单的弯曲圆柱,就不做上传了。
- 完整项目:https://download.csdn.net/download/WoodenHouser/12657865
程序代码
基本思路
- 核心原理——像素图像,空间点阵:
- 求出double points[][][3],然后surf(points)画出。
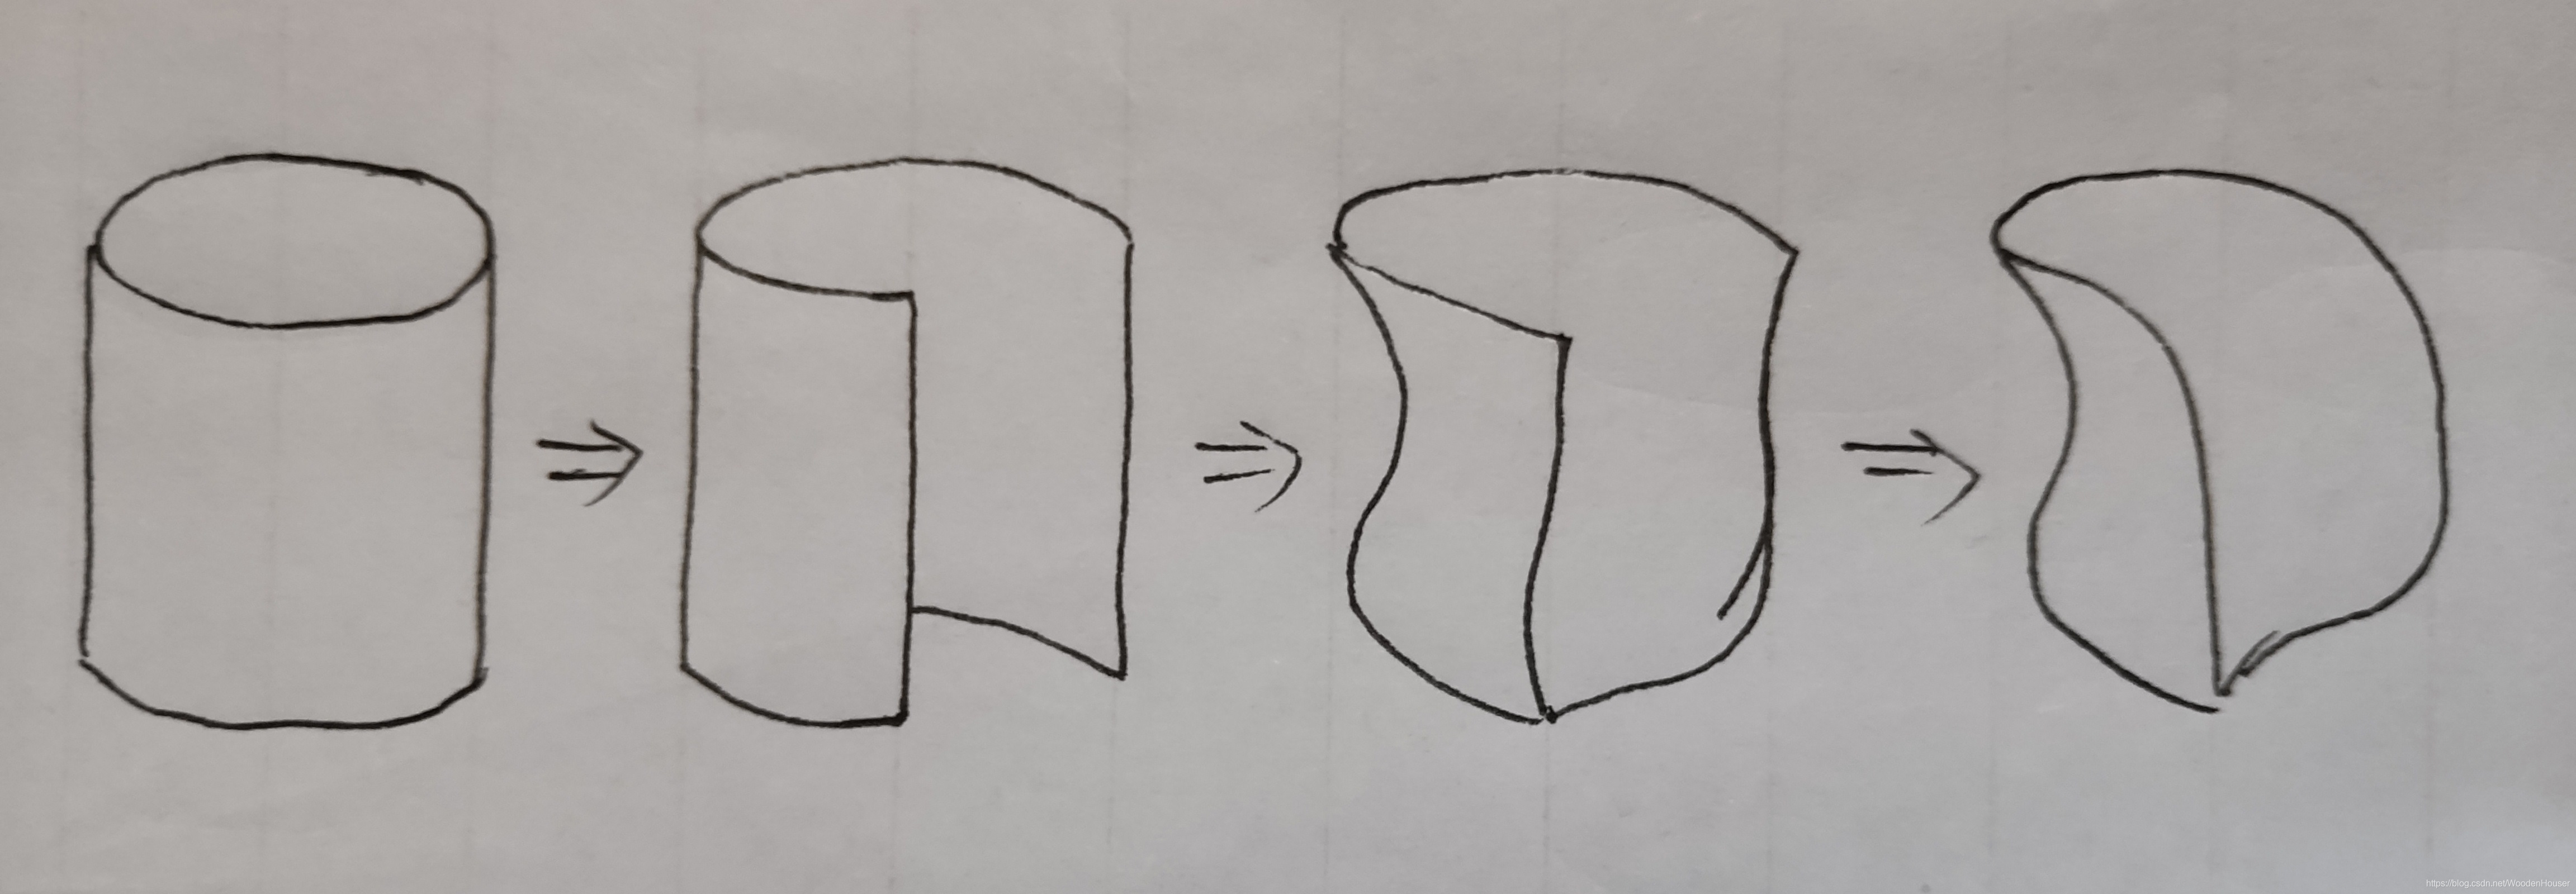
- 生成花瓣——基于一个圆柱侧面:

- 按起止角度纵向切割,横截面从整圆变为圆弧;
- 母线由直线变为曲线,即r(h)由常数变为0-m-n-1(m>n)的变量;
- 上侧边缘剪去两边直角,修成圆滑的曲线,并处理锯齿;
- 生成花朵——多个花瓣组合:
- 按照递增半径i,生成n个同心圆排列的花瓣;
- 其中花瓣的各参数按i做了调节,这样更自然;
- 生成花枝花萼等等。
main(){
	rose=new rose();
	rose.render();
}
class rose{
	render(){
		for(int i=0;i<this.petal_num;i++){
			petal=new petal();
			petal.render();
		}
	}
}
class petal{
	render(){
		points=get_points();
		surf(points);
	}
}
局部算法
抗锯齿算法:
% 核心原理:用三角形填充锯齿的缝隙,使边缘由锯齿状变为多边形状;
% 实现方式:将原本锯齿外应该删掉的点不要删掉,而是修改他们的坐标,将他们平移到锯齿边缘
for(int i=0;i<points.column_num;i++){
	pocessing_column=points[][i];
	longer_column=longer(points[][i-1],points[][i+1]);
	for(int j=pocessing_column.row_num;j<longer_column.row_num;j++){
		pocessing_column[j]=pocessing_column[row_num];
	}
}
母线曲线算法:
% 输入一系列点的坐标;
% 以这些点为拐点,用分段三角函数连接每两个点;
	% 如y=sin(x)连接了[-pi/2,-1],[pi/2,1]...这一系列点;
% 将每段放缩至y=0-1的范围,然后apply幂函数运算,y=y^a,调整曲线凹凸性,运算完了再放缩回原y范围。
% 备注:由于更换此函数即可改变花瓣形状,且此函数具有一定的通用性,所以做成外置独立函数。
对切割圆柱,母线弯曲的优化:
% 实际代码中自始至终都没有,先调用cylinder()函数生成完整的圆柱,再切割变弯。
% 而是首先生成母线和圆弧,之后直接利用矩阵叉乘生成曲面。
随机化算法:
% 将花瓣参数按花瓣序号做一定的处理,使其不完全一样,具有一定的波动,从而使花朵看上去更自然。
% 如花瓣的起始角度,大小,高度,等等。
图像描边算法:
% 刚开始画出来的图像效果不好,后来借用绘画中描边的思想,用较边缘颜色稍浅的颜色描一圈,效果更好。
% 该部分代码较为生硬,未优化,且逻辑上属于主过程之外的附属过程。
多类型花瓣算法:
% 由于花瓣的参数由花朵类负责生成,所以在花朵类中将函数“花瓣参数(花瓣序号)”改为分段函数,即可实现一朵花中有多种花瓣
% 可用于实现花萼,花蕊,复杂的花朵等等。
程序文档
class Rose{
	% 属性:
	Flower_Attribute;	% 花朵通用参数,构造时输入
	Rose_Attribute;		% 玫瑰特征参数,预先指定
	Petals_Attribute;	% 花瓣控制参数,构造时计算
	% 方法:
    Render(){}			% 在画板上画出本玫瑰
	Get_Petal(){}		% 返回第i个花瓣
	Get_Petal_Attribute(){}% 返回所有花瓣的对应属性
}
class Petal{
	% 属性:
	Petal_Attribute; 	% 花瓣参数,构造时输入
	% 方法:
    Render(){}			% 在画板上画出本花瓣
    Get_Matrix(){}		% 返回像素点阵的坐标
    Get_Color(){}		% 返回每个像素点颜色
	Get_Cylinder(){}	% 生成基础花瓣胚
	TrimFillet(){}		% 将花瓣修剪圆角
	ApplySize(){}		% 将花瓣拉伸大小
}
程序源码
"Draw_Rose.m"文件:
% 清空窗口
clf;
clear;
clc;
% 环境准备
axis equal;
hold on;
xlabel('x');
ylabel('y');
zlabel('z');
% 参数准备
fineness=1; % 渲染精细度
flower_position=[1,2,3]; % 花托位置
flower_size=1; % 放大倍数
petal_number=8; % 花瓣数量
% 画出玫瑰
rose=Rose(fineness,flower_position,flower_size,petal_number);
rose.Render();
"Rose.m"文件:
classdef Rose

    properties
         % 花朵控制参数
        fineness=1;% 渲染精细度
        flower_position=[0,0,0];% 花托位置
        flower_size=1;% 放大倍数
        petal_number=8;% 花瓣数量
        % 花瓣控制参数
        petal_size;% [size_x,size_y,size_z;...]
        petal_pixel;% [pixel_xy,pixel_z;...]
        petal_theta;% [theta_start,theta_range;...]
        petal_radius_z;% radius_z[][]
        petal_fillet;% fillet[][]
        petal_color;% [red,green,blue,dark;...]
        petal_line_c;% [red,green,blue;...]
    end

    properties(Hidden)
        petal_ratio=[1,1,1];% 花瓣大小比例
        petal_theta_range=270;% 花瓣角度大小
        petal_inflexion_point=[% 花瓣竖向曲线拐点
            0,0.32,0.6,1;
            0,1,0.85,1.15];
        petal_inflexion_power=[1/4;1;1];% 花瓣径向凹凸程度(凹nan——0凸)
    end

    methods
        % 构造函数
        function this=Rose(fineness,flower_position,flower_size,petal_number)
            % 参数录入
            this.fineness=fineness;
            this.flower_position=flower_position;
            this.flower_size=flower_size;
            this.petal_number=max(0,round(petal_number));
            % 参数计算
            this.petal_size=this.Get_Petal_Size();
            this.petal_pixel=this.Get_Petal_PixelNum();
            this.petal_theta=this.Get_Petal_Theta();
            this.petal_radius_z=this.Get_Petal_Radius_z();
            this.petal_fillet=this.Get_Petal_Fillet();
            this.petal_color=this.Get_Petal_Color();
            this.petal_line_c=this.Get_Petal_Line_C();
        end

        % 渲染图像
        function Render(this)
            % 渲染花朵
            for petal_sequence=1:this.petal_number
                % 生成并渲染花瓣
                petal_rose=this.Get_Petal(petal_sequence);
                petal_rose.Render();
            end
            % 关闭网格
            shading interp;
        end

        % 花瓣生成
        function petal_rose=Get_Petal(this,petal_sequence)
            % 数据准备
            size=this.petal_size(petal_sequence,:);
            pixel=this.petal_pixel(petal_sequence,:);
            theta=this.petal_theta(petal_sequence,:);
            radius_z=this.petal_radius_z(petal_sequence,:);
            fillet=this.petal_fillet(petal_sequence,:);
            color=this.petal_color(petal_sequence,:);
            line_c=this.petal_line_c(petal_sequence,:);
            % 花瓣生成
            petal_rose=Petal(size,pixel,theta,radius_z,fillet,color,line_c);
        end

        % 花瓣大小计算
        function petal_size=Get_Petal_Size(this)
            petal_size=zeros(this.petal_number,3);
            for petal_sequence=1:this.petal_number(1)
                size_x=this.petal_ratio(1)*this.flower_size*sin(petal_sequence/this.petal_number(1))/sin(1);
                size_y=this.petal_ratio(2)*this.flower_size*sin(petal_sequence/this.petal_number(1))/sin(1);
                A=0.15;
                size_z=this.flower_size*(1-A+A*(sin((petal_sequence/this.petal_number(1))*pi)+petal_sequence/this.petal_number(1)));
                % 集成输出
                petal_size(petal_sequence,:)=[size_x,size_y,size_z];
            end
        end

        % 花瓣像素数计算
        function petal_pixel=Get_Petal_PixelNum(this)
            petal_pixel=zeros(this.petal_number,2);
            for petal_sequence=1:this.petal_number(1)
                % 数据运算
                pixel_xy=16*(this.petal_theta_range/180)*this.fineness;
                A=0.2;
                pixel_xy=pixel_xy*(A+(1-A)*petal_sequence/this.petal_number(1))+1;
                pixel_z=16*this.petal_ratio(3)*this.fineness+1;
                % 数据规范
                pixel_xy=max(3,round(pixel_xy));
                pixel_z=max(2,round(pixel_z));
                % 集成输出
                petal_pixel(petal_sequence,:)=[pixel_xy,pixel_z];
            end
        end

        % 花瓣角度计算
        function petal_theta=Get_Petal_Theta(this)
            petal_theta=zeros(this.petal_number,2);
            theta_start_random=32;
            theta_range_random=32;
            for petal_sequence=1:this.petal_number(1)
                theta_start=150*petal_sequence+unifrnd(-theta_start_random,theta_start_random);
                theta_start=rem(theta_start,360);
                theta_range=this.petal_theta_range+unifrnd(-theta_range_random,theta_range_random);
                % 集成输出
                petal_theta(petal_sequence,:)=[theta_start,theta_range];
            end
        end

        % 花瓣半径计算
        function petal_radius_z=Get_Petal_Radius_z(this)
            pixel_z=max(this.petal_pixel(:,2));
            petal_radius_z=zeros(this.petal_number,pixel_z);
            points=this.petal_inflexion_point;
            num=size(points,2);
            start=points(1,1);
            ends=points(1,num);
            points(:,1)=2.*points(:,1)-points(:,2);
            points(:,num)=2.*points(:,num)-points(:,num-1);
            for petal_sequence=1:this.petal_number(1)
                pixel_z=this.petal_pixel(petal_sequence,2);
                r_z=Curve_cos_power(points,this.petal_inflexion_power,start,ends,pixel_z);
                % 集成输出
                petal_radius_z(petal_sequence,1:pixel_z)=r_z;
            end
        end

        % 花瓣圆角计算
        function petal_fillet=Get_Petal_Fillet(this)
            pixel_xy=max(this.petal_pixel(:,1));
            petal_fillet=zeros(this.petal_number,pixel_xy);
            for petal_sequence=1:this.petal_number(1)
                pixel_xy=this.petal_pixel(petal_sequence,1);
                xy=linspace(-1,1,pixel_xy+2);
                fillet_=1-xy.^4;
                fillet_=fillet_(2:pixel_xy+1);
                % 集成输出
                petal_fillet(petal_sequence,1:pixel_xy)=fillet_;
            end
        end

        % 花瓣颜色计算
        function petal_color=Get_Petal_Color(this)
            petal_color=zeros(this.petal_number,4);
            % color_=[0.35,0,0.5,0.36];
            color_=[0.64,0,0,0.36];
            for petal_sequence=1:this.petal_number(1)
                petal_color(petal_sequence,:)=color_;
            end
        end

        % 花瓣边色计算
        function petal_line_color=Get_Petal_Line_C(this)
            petal_line_color=zeros(this.petal_number,3);
            % color_=[245,215,0]./255;
            color_=[0.64,0,0];
            for petal_sequence=1:this.petal_number(1)
                % 集成输出
                petal_line_color(petal_sequence,:)=color_;
            end
        end
    end
end
"Petal.m"文件:
classdef Petal
    properties
        size;% 花瓣大小[size_x,size_y,size_z]
        pixel;% 像素点数[pixel_xy,pixel_z]
        theta;% 角度起止[theta_start,theta_end]
        radius_z;% 母线函数radius_z[]
        fillet;% 圆角函数fillet[]
        color;% 花瓣颜色[color_x,color_y,color_z]
        line_c;% 描边颜色[linec_x,linec_y,linec_z]
    end
    methods
        % 构造函数
        function this=Petal(size,pixel,theta,radius_z,fillet,color,line_c)
            this.size=size;
            this.pixel=pixel;
            this.theta=theta;
            this.radius_z=radius_z;
            this.fillet=fillet;
            this.color=color;
            this.line_c=line_c;
        end
        % 渲染图像
        function Render(this)
            [x,y,z]=this.Get_Matrix();
            c=this.Get_Color(z);
            surf(x,y,z,c);
            % 勾勒边缘
            m=this.pixel(2);
            n=this.pixel(1);
            lx=ones(1,n);
            ly=ones(1,n);
            lz=ones(1,n);
            for j=1:n
                i=2;
                while i<=m&&~isnan(z(i,j))
                    i=i+1;
                end
                lx(j)=x(i-1,j);
                ly(j)=y(i-1,j);
                lz(j)=z(i-1,j);
            end
            plot3(lx,ly,lz,'Color',this.line_c);
            % 描侧边
            % 备注:可优化。
            plot3(x(:,1),y(:,1),z(:,1),'Color',this.line_c);
            plot3(x(:,n),y(:,n),z(:,n),'Color',this.line_c);
        end
        % 矩阵生成
        function [x,y,z]=Get_Matrix(this)
            % 获取基本矩阵
            [x,y,z]=this.Get_Cylinder();
            % 剪裁圆角
            [x,y,z]=this.TrimFillet(x,y,z);
            % 调节比例
            [x,y,z]=this.ApplySize(x,y,z);
        end
        % 颜色生成
        function c=Get_Color(this,z)
            m=this.pixel(1);
            n=this.pixel(2);
            % 颜色矩阵
            color_0=ones(size(z,1),size(z,2));
            % 渐变优化
            for j=1:m
                % 边缘渐变
                hard_xy=0.35;
                hard_xy=hard_xy*this.color(4)*(((j-0.5*(1+m))^2)/((1-0.5*(1+m))^2));
                dark_hard=this.color(4)-hard_xy;
                for i=1:n
                    % 上下渐变
                    color_=z(i,j)/(this.fillet(j)*this.size(3));
                    % 暗度调整
                    color_=dark_hard*color_;
                    % 输出颜色
                    color_0(i,j)=1-color_;
                end
            end
            % RGB上色
            c(:,:,1)=this.color(1)*color_0;
            c(:,:,2)=this.color(2)*color_0;
            c(:,:,3)=this.color(3)*color_0;
        end
        % 基本柱面生成
        function [x,y,z]=Get_Cylinder(this)
            % 曲柱面生成
            r=this.radius_z(1:this.pixel(2));
            theta=linspace(this.theta(1),this.theta(2),this.pixel(1));
            x=r'*cos(theta);
            y=r'*sin(theta);
            z=(0:length(r)-1)'/(length(r)-1)*ones(1,this.pixel(1));
        end
        % 剪裁圆角
        function [x,y,z]=TrimFillet(this,x,y,z)
            m=this.pixel(2);
            n=this.pixel(1);
            % 精准点校准
            lambd=0;
            edge_z=0;
            for j=1:n
                edge_z=this.fillet(j);
                for k=1:m
                    if (z(k,j)==edge_z)
                        break;
                    elseif (z(k,j)>edge_z)
                        lambd=(edge_z-z(k-1,j))/(z(k,j)-z(k-1,j));
                        x(k,j)=x(k-1,j)+lambd*(x(k,j)-x(k-1,j));
                        y(k,j)=y(k-1,j)+lambd*(y(k,j)-y(k-1,j));
                        z(k,j)=edge_z;
                        break;
                    end
                end
            end
            % 逐列镂空
            for j=1:n
                edge_z=this.fillet(j);
                for k=1:m
                    if (z(k,j)>edge_z)
                        x(k,j)=nan;
                        y(k,j)=nan;
                        z(k,j)=nan;
                    end
                end
            end
            % 三角填充
            % 从左侧向中心
            left_begin=1;
            left_end=floor(n/2);
            for j=left_begin:1:left_end
                for k=1:m
                    if (isnan(z(k,j))&&~isnan(z(k,j+1)))
                        x(k,j)=x(k-1,j);
                        y(k,j)=y(k-1,j);
                        z(k,j)=z(k-1,j);
                    end
                end
            end
            % 从右侧向中心
            right_begin=n;
            right_end=left_end+1;
            for j=right_begin:-1:right_end
                for k=1:m
                    if (isnan(z(k,j))&&~isnan(z(k,j-1)))
                        x(k,j)=x(k-1,j);
                        y(k,j)=y(k-1,j);
                        z(k,j)=z(k-1,j);
                    end
                end
            end
        end
        % 调整大小
        function [x,y,z]=ApplySize(this,x,y,z)
            x=0.5*this.size(1)*x;
            y=0.5*this.size(2)*y;
            z=this.size(3)*z;
        end
    end
end
"Curve_cos_power.m"文件:
function line_y=Curve_cos_power(point,power,x_begin,x_end,pixel_num)
% 曲线生成函数
% 算法:
% 1.以三角函数连接所有点
% 2.以幂函数分段调整曲线
% IO:
% 1.输入多个坐标点
% 2.输出曲线列向量
% 3.输入参数的格式说明:
%     point=[% 极值点
%         x1,x2,...;
%         y1,y2,...]
%     power=[% 凹凸性
%         power12;
%         power23;...]
%     曲线定义域=
%         linspace(x_start,x_end,pixel_num)
% 4.输出参数的格式说明:
%     曲线值域:
%         line_y=zeros(1,pixel_num);
% 数据准备
line_x=linspace(x_begin,x_end,pixel_num);
line_y=zeros(1,pixel_num);
point_num=size(point,2);
point_x=point(1,:);
point_y=point(2,:);
% 针对逐点处理的时间优化
flag_start=1;
% 从左到右逐单调区间处理
for i=1:point_num-1
    % 计算三角函数参数
    omega=pi/(point_x(i+1)-point_x(i));
    phi=point_x(i)*pi/(point_x(i)-point_x(i+1));
    A=0.5*(point_y(i)-point_y(i+1));
    y0=point_y(i)-A;
    % 从左到右逐点处理
    for j=flag_start:pixel_num
        % 如果点在定义域内
        if point_x(i)<=line_x(j) && line_x(j)<=point_x(i+1)
            % apply_cos
            if mod(omega*line_x(j)+phi,pi)==pi/2
                % 零点精确值
                line_y(j)=y0;
            else
                line_y(j)=A*cos(omega*line_x(j)+phi)+y0;
            end
        end
        % 定义域外侧点舍弃
        if point_x(i+1)<=line_x(j)
            % 计算0-1放缩参数
            % y=(x-b)/a
            a=line_y(j-1)-line_y(flag_start);
            b=line_y(flag_start);
            for k=flag_start:j-1
                % apply_power
                line_y(k)=(line_y(k)-b)/a;% 放缩to0-1
                % 分正负处理
                if line_y(k)>=0
                    line_y(k)=line_y(k)^power(i);
                else % 避免虚数
                    line_y(k)=-(-line_y(k))^power(i);
                end
                line_y(k)=a*line_y(k)+b;% 放缩from0-1
            end
            flag_start=j;
            break;
        end
    end
end
end
更新日志
2020-07-22:修复了“Curve_cos_power”函数的已知bug,包括0-1放缩以及边界判定。


 1193
1193

 被折叠的 条评论
为什么被折叠?


