


首先,我们看一个示例:
class Obj {
    private int aInt = 0;

    public int getaInt() {
        return aInt;
    }

    public void setaInt(int aInt) {
        this.aInt = aInt;
    }

}

public class TestRef {
    public static void main(String[] args) {
        Obj a = new Obj();
        Obj b = a;
        b.setaInt(5);
        System.out.println("a: " + a.getaInt());
        System.out.println("b: " + b.getaInt());
    }
}
输出结果:a: 5
b: 5
我们发现,对象 b 的改变影响了对象 a 的状态,但是,实际编程中,往往希望从某个已知的对象 A 创建出一个与 A 具有相同状态的对象 B, 并且对 B 的修改不会影响 A 的状态。怎么办呢?
幸运的是,Java 提供了一种简单有效的 clone 方法来满足此需求。
我们都知道,Java 中所有类默认都继承自 Object 类,而 Object类中提供了 clone()方法,作用是返回一个 Object 对象的复制,这个复制函数返回的是一个新的对象而不是一个引用。以下是 clone() 方法的步骤。
1. 实现 clone 的类首先需要继承 Cloneable 接口。
2. 重写 Object 类中的 clone() 方法
3. clone() 方法中调用 super.clone()
4. 把浅复制的引用指向原型对象新的克隆体
class Obj implements Cloneable{
    private int aInt = 0;

    public int getaInt() {
        return aInt;
    }

    public void setaInt(int aInt) {
        this.aInt = aInt;
    }

    @Override
    protected Object clone() throws CloneNotSupportedException {
        return super.clone();
    }

}

public class TestRef {
    public static void main(String[] args) throws CloneNotSupportedException {
        Obj a = new Obj();
        Obj b = (Obj) a.clone();
        b.setaInt(5);
        System.out.println("a: " + a.getaInt());
        System.out.println("b: " + b.getaInt());
    }
}
输出结果:a: 0
b: 5
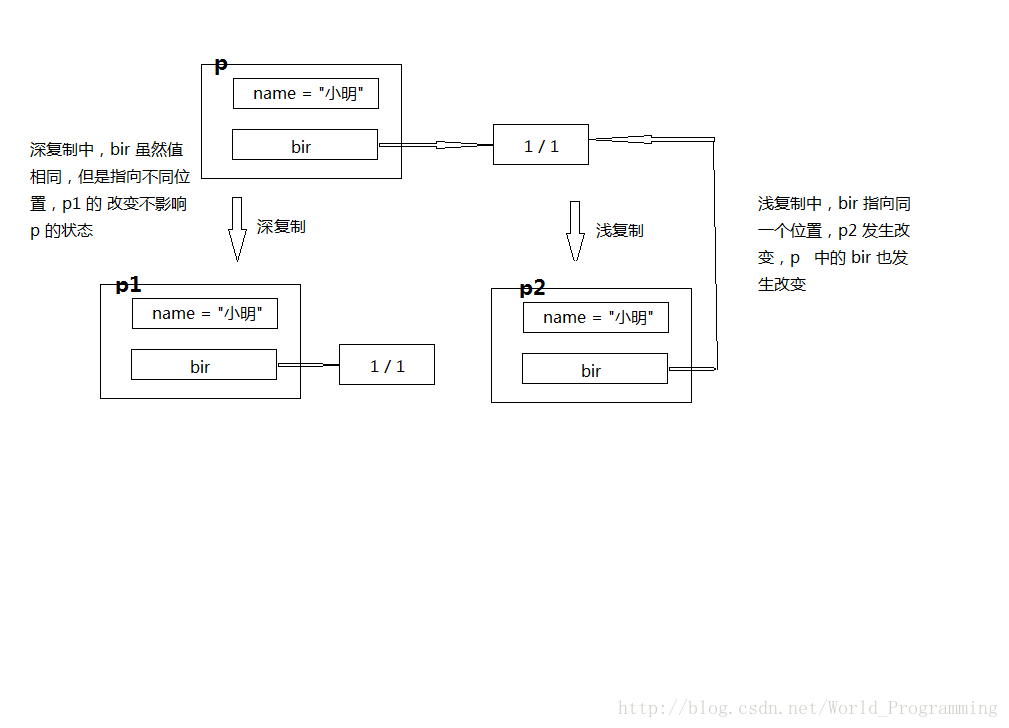
clone() 方法的调用完美的解决了上述问题,但是细心的我们会发现上文步骤 4 中提到了浅复制,那么什么是浅复制?是不是还有深复制?
浅复制:复制对象(如下例中的p2)的所有变量含有与被复制对象(p1)相同的值,而且对象的引用指向同一个地方
深复制:复制对象(如下例中的p2)的所有变量含有与被复制对象(p1)相同的值,但是对象的引用指向不同的地方
下面,我们用示例看一下他们之间的区别:
class Birthday implements Cloneable {
    public int month;
    public int day;

    public Birthday(int month, int day) {
        super();
        this.month = month;
        this.day = day;
    }

    @Override
    public String toString() {
        return month + "/" + day;
    }

    @Override
    protected Object clone() {
        Birthday b = null;
        try {
            b = (Birthday) super.clone();
        } catch (CloneNotSupportedException e) {
            e.printStackTrace();
        }
        return b;
    }


}

class People implements Cloneable {
    public String name;
    public Birthday bir;

    public People(String name, Birthday bir) {
        super();
        this.name = name;
        this.bir = bir;
    }

    @Override
    protected Object clone() {
        People p = null;
        try {
            p =  (People) super.clone();
        } catch (CloneNotSupportedException e) {
            e.printStackTrace();
        }
        return p;
    }

}

public class TestClone {
    public static void main(String[] args) throws CloneNotSupportedException {
        People p1 = new People("小明", new Birthday(1, 1));
        People p2 = (People) p1.clone();
        p2.name = "小红";
        p2.bir.month = 2;
        p2.bir.day = 2;
        System.out.println("p1的姓名:" + p1.name + " ------ p1的生日:" + p1.bir);
        System.out.println("p2的姓名:" + p2.name + " ------ p2的生日:" + p2.bir);
    }
}
输出:p1的姓名:小明 —— p1的生日:2/2
p2的姓名:小红 —— p2的生日:2/2
我们发现,随着对象 p2 的改变,对象 p1 的引用属性(Birthday对象)也发生改变,这不是我们所希望的。而这就是我们所说的浅复制,深复制再看下一个示例:
class Birthday implements Cloneable {
    public int month;
    public int day;

    public Birthday(int month, int day) {
        super();
        this.month = month;
        this.day = day;
    }

    @Override
    public String toString() {
        return month + "/" + day;
    }

    @Override
    protected Object clone() {
        Birthday b = null;
        try {
            b = (Birthday) super.clone();
        } catch (CloneNotSupportedException e) {
            e.printStackTrace();
        }
        return b;
    }


}

class People implements Cloneable {
    public String name;
    public Birthday bir;

    public People(String name, Birthday bir) {
        super();
        this.name = name;
        this.bir = bir;
    }

    @Override
    protected Object clone() {
        People p = null;
        try {
            p =  (People) super.clone();
        } catch (CloneNotSupportedException e) {
            e.printStackTrace();
        }
        //实现深复制
        p.bir = (Birthday) this.bir.clone();
        return p;
    }

}

public class TestClone {
    public static void main(String[] args) throws CloneNotSupportedException {
        People p1 = new People("小明", new Birthday(1, 1));
        People p2 = (People) p1.clone();
        p2.name = "小红";
        p2.bir.month = 2;
        p2.bir.day = 2;
        System.out.println("p1的姓名:" + p1.name + " ------ p1的生日:" + p1.bir);
        System.out.println("p2的姓名:" + p2.name + " ------ p2的生日:" + p2.bir);
    }
}
输出:p1的姓名:小明 —— p1的生日:1/1
p2的姓名:小红 —— p2的生日:2/2
我们再用一个图行来解释其区别


 4186
4186


 被折叠的 条评论
为什么被折叠?
被折叠的 条评论
为什么被折叠?
 到【灌水乐园】发言


